1
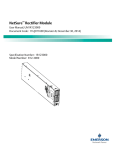
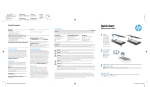
Start Here
Quick Start
Pine_QuickStart_725391-003.book Page 1 Friday, May 17, 2013 5:50 PM
Getting to know your tablet
1
2
3
4
5
6
7
8
9
-
Headphone jack
Internal microphone
Micro SD Card reader
Power button
WLAN antenna
Front camera
Rear camera
Speaker and headphone
volume
Speakers (2)
Micro USB port for charging or
connecting to computer
Locate serial number, product number, and model number
The serial number and product number of your tablet are located on the left edge of the tablet. The
model number of your tablet is located either on the left edge or on the back of the tablet. You may
need the information when you travel internationally or when you contact support.
1
Pine_QuickStart_725391-003.book Page 2 Friday, May 17, 2013 5:50 PM
Setting up your tablet
1.Remove the screen protection film.
2.Connect the micro USB cable to the tablet and to the adapter, and then connect the adapter to a
power outlet. Charge the battery for at least15 minutes.
✎ The HP 5V 2A adapter included with your tablet is recommended for charging the tablet.
3.While the battery image is displayed, turn on the tablet by pressing and holding the power button
about 5 seconds until the HP logo is displayed. If the battery image is not displayed, press the power
button briefly to display the image, and then press and hold the power button until the HP logo is
displayed. The first time you turn on the tablet, you will see a Welcome screen.
4.Follow the on-screen instructions to select a language.
5.Connect to a wireless network:
✎ You must be connected to a wireless network before you can connect to the Internet.
a.
Be sure that Wi-Fi is turned on. Touch the All apps icon, touch Settings, and then touch
Wi-Fi.
b. Select a network from the available networks that are displayed.
c. Type the security key if required, and then touch Connect.
6.On the sign-in screen, enter your Google™ username and password. The email, contacts, calendar,
and data that are associated with that account will be synchronized automatically.
✎ If you do not have a Google account, you can create one now.
Change your tablet’s view
When setup is complete, the Auto-rotate feature allows you to change your tablet’s view. For portrait
view, hold the tablet vertically. For landscape view, hold the tablet horizontally.
✎ Some apps are portrait-only and do not rotate automatically.
To change the Auto-rotate setting, swipe down from the top of the screen to display notifications, and
then touch the Screen rotation icon to lock or unlock the screen rotation.
Indicates that the screen rotation is locked.
Indicates that the screen rotation is unlocked.
2
Pine_QuickStart_725391-003.book Page 3 Friday, May 17, 2013 5:50 PM
Using the Home screen
Unlock
Press the power button, place your finger on the lock icon, and then slide your finger to the unlock
position.
Lock
Press the power button.
Navigate the Home screen
The Home screen provides a central location where you can access information and email, browse the
Web, stream videos, view photos, and access social media websites.
Icon
1 Search
2 Voice search
3 Back
4 Home
5 Recent apps
6 All apps
✎
3
Description
Type one or more keywords to search
with Google.
Speak one or more keywords to
search with Google.
Opens the previous screen.
Opens the Home screen.
Opens a list of apps that you have
used recently.
Displays a list of all the apps installed
on the tablet.
The appearance of the Home screen may vary.
Pine_QuickStart_725391-003.book Page 4 Friday, May 17, 2013 5:50 PM
Use gestures
Use the single tap to make an on-screen selection or to open an app.
Use scrolling to move up, down, left, or right on a page or image.
Use pinching and stretching to zoom in and out on images or text.
Return to the Home screen
To quickly return to the Home screen, touch the Home icon.
Display apps, widgets, and notifications
Apps—Touch the All apps icon, and then touch the Apps tab to see a list of all apps.
Widgets—Touch the All apps icon, and then touch the Widgets tab to see a list of all widgets.
Notifications—Swipe down from the top of the screen to see your notifications.
Configure preferences
Touch the All apps icon, and then tap the Settings icon to configure your preferences.
Organize the Home screen
■
■
■
To add an app or a widget to the Home screen, touch the Apps tab or the Widgets tab, and then
tap and hold an app or widget until it is added to the Home screen.
To move an app or widget, drag it to a different area of the Home screen.
To remove an app or widget from the Home screen, drag it to the X at the top of the screen.
Download apps from the Google Play™ Store
The Play Store provides many apps that you can download to your tablet.
✎ Some applications may not be compatible with this device. Please contact the application
developer for more information
1.On the Home screen, touch All apps, and then touch the Play Store app.
2.To search for an app, touch the Search icon, and then type a keyword, or touch a category to narrow
your search.
3.Scroll down to see the available apps, and then touch an app to select it.
4.Touch Install, and the app begins to download and install. When the installation is finished, the app
appears on the Home screen.
✎ You must be connected to a wireless network and signed into a Google account before you can
access the Play Store. To create a Google account, go to http://www.google.com.
4
Pine_QuickStart_725391-003.book Page 5 Friday, May 17, 2013 5:50 PM
Take photos
1.Touch the All apps icon, and then touch the Camera icon to open the Camera app.
2.To take a photo with the rear camera, focus on the subject, and then touch the blue circle. The photo
is saved in the Gallery.
3.To take a photo with the front camera, touch the rotating camera icon above the blue circle, and
then touch the blue circle to take a photo. The photo is saved in the Gallery.
View photos
To view the photos in your Gallery, touch the All apps icon, and then touch the Gallery app.
Print photos
1.Touch the All apps icon, and then touch the Gallery icon.
2.Touch the photo to select it, touch the Menu icon in the upper-right corner, and then touch Print.
-orActivate HP e-Print, which allows you to print directly to an HP ePrint-enabled printer. For more
information, go to http://www.hp.com/go/2eprint (English only).
Use the on-screen keyboard
Touch a text field to open the on-screen keyboard. Some apps may open the keyboard automatically.
Use Beats Audio
1.Touch the All apps icon, and then touch the Settings icon.
2.To turn on Beat Audio, under DEVICE, touch Beats Audio.
3.Touch Beats On-Ear, Beats In-Ear, or Beats Passive to select the mode that you want to use.
✎
Optional headphones (purchased separately) can be used to obtain maximum benefit from Beats
Audio.
Turn off the tablet
Press and hold the power button, touch Power off, and then touch OK.
If your tablet becomes unresponsive, press and hold the power button for several seconds to turn off
the tablet.
5
Pine_QuickStart_725391-003.book Page 6 Friday, May 17, 2013 5:50 PM
Battery notice
Do not attempt to remove or replace the factory-sealed battery. Removing or replacing the battery
could affect your warranty coverage. If the battery is no longer holding a charge, contact support.
When a battery has reached the end of its useful life, do not dispose of the battery in general
household waste. Follow the local laws and regulations in your area for computer battery disposal.
More HP resources
Resource
Contents
HP support:
For U.S.support, go to http://www.hp.com/go/contact HP.
For worldwide support, go to
http://welcome.hp.com/country/us/en/wwcontact_us.html.
Online chat with an HP technician.
Email support.
Find telephone numbers.
Locate HP service center locations.
Access User Guide.
Access Google online help and
support.
■ Important regulatory notices.
■
■
■
■
■
■
Google
For Google support, go to http://www.google.com/mobile/android.
Regulatory, Safety and Environmental Notices
This document is provided in the box and is available from HP support.
Limited Warranty
■ Warranty information about this
This document is provided in the box. You can also go to
tablet.
http://www.hp.com/go/orderdocuments.
Software terms
By installing, copying, downloading, or otherwise using any software product preinstalled on this
computer, you agree to be bound by the terms of the HP End User License Agreement (EULA). If you do
not accept these license terms, your sole remedy is to return the entire unused product (hardware and
software) within 14 days for a refund subject to the refund policy of your place of purchase.
For any further information or to request a full refund of the tablet, please contact your local point of
sale (the seller).
Specifications
The power information in this section may be helpful if you plan to travel internationally with the
tablet.
The tablet operates on DC power, which can be supplied by an AC or a DC power source. The AC power
source must be rated at 100–240 V, 50–60 Hz.
✎
The tablet can operate on DC power using an industry-standard micro-A or micro-B USB cable.
The HP 5V 2A adapter included with your tablet is recommended for charging the tablet.
Factor
Temperature
Operating
Relative humidity (noncondensing)
Operating
Metric
U.S.
0°C to 40°C
32°F to 104°F
10% to 90%
10% to 90%
Regulatory information
Regulatory markings for your country or region may be located on the back of the tablet or may be
displayed electronically. If the markings for your country are not on the back of the tablet, please
check the electronic labeling. To display the regulatory e-labels:
1.Touch All apps, touch Settings, and then touch About tablet.
2.Touch Regulatory Information, and then the label icons are displayed.
6
European Union regulatory notices
Declaration of Conformity
The telecommunications functionality of this product may be used in the following EU and EFTA countries: Austria, Belgium, Bulgaria,
Cyprus, Czech Republic, Denmark, Estonia, Finland, France, Germany, Greece, Hungary, Iceland, Ireland, Italy, Latvia, Liechtenstein,
Lithuania, Luxembourg, Malta, Netherlands, Norway, Poland, Portugal, Romania, Slovak Republic, Slovenia, Spain, Sweden, Switzerland,
and United Kingdom.
Products bearing the CE marking comply with one or more of the following EU Directives as may be applicable: Low Voltage
Directive 2006/95/EC; EMC Directive 2004/108/EC; Ecodesign Directive 2009/125/EC; R&TTE Directive 1999/5/EC; RoHS
Directive 2011/65/EU
Compliance with these directives is assessed using applicable European Harmonised Standards.
The full Declaration of Conformity can be found at the following web site: http://www.hp.eu/certificates (Search with the product model name or
its Regulatory Model Number (RMN), which may be found on the regulatory label.)
The point of contact for regulatory matters is Hewlett-Packard GmbH, Dept./MS:HQ-TRE, Herrenberger Strasse 140,
71034 Boeblingen, GERMANY.
Products with wireless functionality (EMF)
This product meets international guidelines (ICNIRP) for exposure to radio frequency radiation.
This product incorporates a radio transmitting and receiving device. For notebook computers in normal use, a separation distance of 20 cm
ensures that radio frequency exposure levels comply with EU requirements. Products designed to be operated at closer proximities, such as
tablet computers, comply with applicable EU requirements in typical operating positions, but a minimum distance of 1 cm should be maintained
from the antennas.
Restrictions for product with wireless functionality
This product is designed for use without restrictions in all EU countries, plus Iceland, Liechtenstein, Norway, and Switzerland.
© Copyright 2013 Hewlett-Packard Development Company, L.P.
Google, Android, and Google Play are trademarks of Google Inc.
The information contained herein is subject to change without notice. The only warranties for HP products and services are
set forth in the express warranty statements accompanying such products and services. Nothing herein should be construed
as constituting an additional warranty. HP shall not be liable for technical and editorial errors or omissions contained herein.
Third Edition: May 2013
First Edition: March 2013
Replace this box with PI statement as per spec.
Replace this box with PI statement as per spec.
Replace this box with PI statement as per spec.
Replace this box with PI statement as per spec.
Replace this box with PI statement as per spec.
725391-003