1
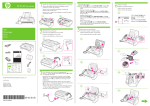
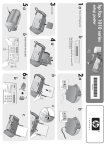
Iniciar aquí Start Here 1 2 If you have problems during setup, see Troubleshooting in the last section. Si tiene problemas durante la instalación, consulte Resolución de problemas en la última sección. Locate components Encontrar componentes HP 640 Fax series User Guide User Guide print cartridge telephone cord Guía del usuario cartucho de impresión cable del teléfono power cord registration card handset cable de alimentación tarjeta de registro auricular document paper support support Soporte para documentos Soporte para papel HP 640 Fax series Setup Guide Fax HP 640 series Guía de instalación 3 Remove all tape Retire toda la cinta Open the control panel and remove the piece of paper and tape. Abra el panel de control y retire el trozo de papel y la cinta. • HP Fax 4 Attach phone line and handset Conecte la línea telefónica y el auricular Turn the device upside down and locate the ports under the side with the handset. De vuelta el dispositivo y ubique los puertos que hay en la parte de abajo con el auricular. • Fax HP 1 1 1.Do not insert anything into the EXT. port at this time. 2.Insert the handset cord into the HANDSET port. 2 3.Insert the phone line cord from the wall into the LINE port. 2 3 4 4.Slip both lines behind the retaining clips. 1.No inserte nada en el puerto EXT. esta vez. 2.Inserte el cable del auricular en el puerto HANDSET. 3.Inserte el cable de la línea telefónica desde la pared al puerto LINE. 4.Deslice ambos cables por debajo de los clips de retención. • HP Fax 5 Plug in the power cord Enchufe el cable de alimentación Plug the power cord into the HP Fax and then into the wall. Enchufe el cable de alimentación al Fax HP y luego a la tomacorriente. • Fax HP 6 Load paper Cargar papel 1. Put in the paper support. 2. Put in the document support. 1 2 1. Ponga el soporte para papel. 2. Ponga el soporte para documentos. 3 3. Set the paper width to LTR or A4. 4. Open the paper tray cover. 4 3. Fije el ancho del papel en LTR o A4. 4. Abra la cubierta de la bandeja para papel. 5 5. Insert a stack of paper (up to 50 sheets). 6. Close the paper tray cover. 6 5. Inserte una pila de papel (hasta 50 hojas). 6. Cierre la cubierta de la bandeja para papel. • HP Fax 1 2 1 Menu 1 Menú 2 OK 2 OK 3 Start/Enter 3 Iniciar 3 4 Keypad 4 Teclado 4 Set the date and time 7 Establecer la fecha y la hora 1. Press Menu. 1. Pulse Menú. 2. Press 3 to choose SET DATE & TIME and press OK. 2. Pulse 3 para seleccionar FIJAR FECHA/ HORA y pulse OK. 3. Press OK when the display shows Date Format. 4. Press 3 to select either Europe (day month year) or USA (month day year) and press OK. 5. Press OK when the display shows Date & Time. 6. Use the keypad to enter the date and time. You can move the cursor by pressing 3 . Enter the hour in 24-hour format. 7. Press OK. • Fax HP 3. Pulse OK cuando aparezca en la pantalla Formato fecha. 4. Pulse 3 para seleccionar Europa (día mes año) o EE.UU. (mes día año) y pulse OK. 5. Pulse OK cuando aparezca en la pantalla Fecha & hora. 6. Utilice el teclado para ingresar la fecha y hora. Puede mover el cursor pulsando 3 . Ingrese la hora en formato de 24 horas. 7. Pulse OK. 8 Open the print cartridge Abrir el cartucho de impresión Open the package and remove the tape from the print cartridge without touching the copper-colored contacts. Abra el embalaje y retire la cinta del cartucho de impresión sin tocar los contactos color cobre. Do not touch the copper-colored contacts on the print cartridge. No toque los contactos color cobre del cartucho de impresión. • HP Fax 9 Press the Access Cartridge button Pulse el botón Acceso al cartucho 1 Access Cartridge 1 Acceso al Cartucho 1 Press the Access Cartridge button to move the cartridge carriage so you can easily insert the print cartridge. • Fax HP Pulse el botón Acceso al Cartucho para mover el carro de los cartuchos de modo que pueda insertar con facilidad el cartucho de impresión. 10 Insert and align the print cartridge Inserte y alinee el cartucho de impresión 2 1.Open the control panel. 2.Lift the cartridge compartment cover. 1 1.Abra el panel de control. 2.Levante la cubierta del compartimiento de cartuchos. 3.Orient the copper-colored area toward the back of the device and lower it into the cartridge carriage. 4.Gently push the print cartridge toward the back of the device until you hear it click into place. 3.Oriente el área color cobre hacia la parte posterior del dispositivo e introdúzcala en el carro de los cartuchos. 4.Empuje cuidadosamente el cartucho de impresión en el aparato hasta que quede asegurado en su posición. 5 5.Lower the cartridge compartment cover. 6.Close the control panel. 5.Baje la cubierta del compartimiento de cartuchos. 6 6.Cierre el panel de control. 10 • HP Fax 1. Press Start/Enter. 1:New 2:Used will display. 2. Press the 1 as this is a new cartridge. 1. Pulse Iniciar. Aparecerá 1:Nuevo 2:Usado. 2. Pulse el 1 ya que este es un cartucho nuevo. An alignment page will print. 06 [01-11] will display 1.Look at the alignment page and select the number under the straightest line. 2.Press that number on the keypad then press OK. Se imprimirá una página de alineación. Aparecerá 06 [01-11] 1.Mire la página de alineación y seleccione el número que aparece bajo la línea más recta. 2.Pulse el número en el teclado y luego pulse OK. 11 • Fax HP 11 Set the Fax Header Establecer la cabecera de fax 1.Press Menu repeatedly until SET FAX HEADER displays. 1.Pulse Menú varias veces hasta que aparezca EST. CABECERA FAX. 2.Press OK. 2.Pulse OK. Fax Number will display. Aparecerá Número de Fax. 3.Press OK again. 3.Pulse OK nuevamente. The cursor will blink for you to enter the number. El cursor destellará para que ingrese el número. To enter punctuation, use these keys: Para ingresar puntuación, use estas teclas: Key Produces # “space” Tecla Produce * + # “espacio” * + 4.Enter the number and press OK. Fax Name will display. 4.Ingrese el número y pulse OK. The cursor will blink for you to enter the name. 5.Pulse OK. 5.Press OK. Press for the cursor to advance. To enter punctuation or other special characters in the name, use these keys. Aparecerá Nombre fax. El cursor destellará para que ingrese el nombre. Pulse para que el cursor avance. Para ingresar puntuación u otro carácter especial en el nombre, utilice estas teclas. Key Produces 1 “space” 1 2 ABC2 Tecla Produce 3 DEF3 1 “espacio” 1 4 GHI4 2 ABC2 5 JKL5 3 DEF3 6 MNO6 4 GHI4 7 PQRS7 5 JKL5 8 TUV8 6 MNO6 9 WXYZ9 7 PQRS7 0 +-,.‘/*#&0 8 TUV8 * nothing 9 WXYZ9 # nothing 0 +-,.‘/*#&0 * nada # nada 6.Enter the name and press OK. 6.Ingrese el nombre y pulse OK. 12 • HP Fax 12 Set the answer mode Establecer el modo de contestación 1 1 Rcv. Mode/Contrast 1 Recibir/Contraste Press the Rcv. Mode/Contrast button until the setting you want displays. Pulse el botón Recibir/Contraste hasta que aparezca la configuración que desea. How are you going to use the Set the answer mode to: HP 640 Fax? ¿Cómo desea utilizar el Fax HP 640? Establecer el modo de contestación en: Fax machine with few or no voice calls FAX mode Aparato de fax con pocas o ninguna llamada de voz Modo FAX Telephone and fax machine without an answering machine AUTO mode Aparato de fax y teléfono sin contestador automático Modo AUTO As a fax machine with an external answering machine plugged into the EXT. port. TAM mode Como un aparato de fax con un contestador automático externo conectado al puerto EXT. Modo TAM As a telephone with few or no fax calls. TEL mode Como un teléfono con pocas o sin llamadas de fax. Modo TEL With distinctive ringing from my phone company Refer to the user guide Con timbres especiales de mi compañía telefónica Consulte la guía del usuario 13 • Fax HP Test your Fax Device 13 Probar el aparato de fax You can test your HP Fax to make sure it is set up properly for faxing. Place a document in the document feeder, dial 1-888 HP FAX ME (1-888-473-2963) and press Start/Enter. Please wait approximately 1 minute and you will receive a “Fax Back System Test” page, confirming your product is working correctly. Puede probar el Fax HP para asegurarse de que está correctamente configurado para enviar y recibir fax. Ponga una hoja de papel en el dispositivo alimentador de documentos. Marque 1-888 HP FAX ME (1-888-473-2963) y pulse Iniciar. Espere approximadamente un minuto y recibirá de vuelta una página titulada “Fax Back System Test”, confirmando que su fax funciona correctamente. The Fax Header must be set up in order to test the fax machine. La Cabecera Fax debe ser definida para iniciar la prueba de fax. 14 • HP Fax Troubleshooting www.hp.com/support Problem: The Install ink cartridge message appears after you insert the print cartridge. Action: Remove the print cartridge. Make sure you remove all tape from the copper contacts. Re-insert the cartridge making sure it snaps firmly into place. Problem: Paper keeps feeding continuously through the device. Action: You have the paper loaded into the document tray. You must load the paper for printing into the paper tray at the back of the device. Refer to the loading paper instructions in this Setup Guide. Problem: Cannot send a fax / no dial tone. Action: Unplug and reconnect the phone cord both to the HP Fax and the wall. You should hear a click when the cord is inserted properly. Make sure the phone line has no dial tone. Refer to the User Guide for more information. Visit www.hp.com/support for assistance. Consulte la Guía del usuario para obtener más información. Para obtener ayuda visite www.hp.com/support. Resolución de problemas *CB782-90004* CB782-90004 Problema: Aparece el mensaje Instalar el cartucho después que insertó el cartucho de impresión. Acción: Retire el cartucho de impresión. Asegúrese de que retiró toda la cinta de los contactos de cobre. Vuelva a insertar el cartucho asegurándose de que encaje firmemente en su lugar. Problema: El papel se alimenta en forma continua en el dispositivo. Acción: Cargó el papel en la bandeja de documentos. Debe cargar el papel para impresión en la bandeja para papel que está en la parte posterior del dispositivo. Consulte las instrucciones de carga de papel en esta Guía de instalación. Problema: No puedo enviar un fax / no hay tono de marcar. Acción: Asegúrese de que la línea telefónica esté funcionando. Desconecte y vuelva a conectar el cable telefónico al Fax HP y en la pared. Asegúrese de que la línea telefónica tenga tono de marcar. © Copyright 2007 Hewlett-Packard Development Company, L.P. Printed in Korea Second edition: 05/2007 Impreso en Corea Segunda edición: 05/2007