1
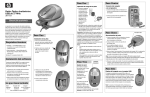
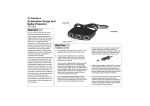
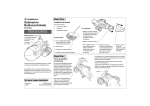
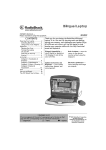
USB 27 MHz
Wireless Optical Mouse
26-753
Owner’s Manual
for installing, setting up and using your new product
Thank you for buying an HP USB 27 MHz Wireless
Optical Mouse. The mouse’s advanced RF (radio
frequency) technology enables 360-degree operation
around your computer - no line-of-sight placement
required. Its ergonomic design lets you hold and use
it comfortably. The mouse’s optical technology
senses mouse movements precisely and smoothly,
with no moving parts to clean or replace.
Step One
Installing the Batteries
System Requirements
• Hardware — IBM PC or compatible with one
available USB port and a CD drive.
• Software — Microsoft Windows 98, Windows
98SE, Windows 2000, Windows ME, or
Windows XP.
Windows NT does not support the USB interface.
1. Open the battery compartment cover
by squeezing the mouse’s sides
where it attaches to the mouse as
shown.
2. While squeezing the sides of the
mouse, pull the battery
compartment cover out with your
other hand.
Installing Software
As Windows 98/98 SE does not support the
mouse’s scroll function, you must install the
supplied software to use the mouse. Follow these
steps ONLY if you have Windows 98/98 SE.
1. Make sure the supplied USB receiver is
connected to the computer.
2. Insert the supplied mouse driver CD into your
computer’s CD ROM drive.
3. Follow the on-screen instructions to finish
installing the mouse driver.
What’s Included
Mouse
USB Receiver
Charger
AC Adapter
Owner’s Manual
Driver CD
AA Ni-MH Rechargeable Batteries (2)
Step Two
Step Four
Charging the Batteries
Connecting the Charger
to the Computer
1. Connect the
supplied AC
adapter to the DC
jack on the back of
the supplied charger.
Then, plug the other
end of the adapter
into a standard
AC outlet.
2. Place the mouse’s
charging contacts on the charger’s contacts to
charge the batteries.
The green charging indicator lights. Charge the
rechargeable batteries at least 8 hours before
you use the mouse for the first time.
Caution: You must use a regulated Class II power
source that supplies 5V DC and delivers at least
450 mA. Its center tip must be set to positive and its
plug must fit the charger’s DC jack. The supplied
AC adapter meets these specifications. Using an
adapter that does not meet these specifications
could damage the charger or the adapter.
Notes:
• The mouse wheel flashes blue when the
battery is low.
• You can also use AA alkaline batteries in the
mouse if the rechargeable batteries are weak.
If you do this, be sure not to place the mouse in
the charger.
• You must reset the channel when you replace
the rechargeable batteries. See “Setting the
Channel” for more information.
Step Five
Step Three
5. Move the mouse around. The cursor on your computer screen should move,
showing that the mouse is ready to use. The blue LED on the USB receiver
lights when you use the mouse.
Connect
1. Plug the supplied USB receiver into the
USB socket on the back of the charger.
2. Plug the charger’s USB connector into a
USB port on your computer.
USB Receiver
Synchronizing the Mouse
1. Plug the supplied USB receiver into the
USB port for the supplied charger, your
computer, or keyboard.
2. Place the mouse within 1 foot of the
USB receiver.
3. Use a pointed object such as a pen to
press Connect on the bottom of the
mouse for less than 1 second.
4. Press Synchronization on the USB receiver. The blue LED on the USB
receiver flashes, showing that the mouse and USB receiver are
synchronized.
Note: If the mouse and USB receiver do not synchronize, remove the batteries
from the mouse and unplug the USB receiver. Then wait about 20 seconds. Next,
reinstall the batteries in the mouse and repeat the steps in this section.
Setting the Channel
3. Insert the two supplied Ni-MH
batteries into the battery
compartment as indicated by the
polarity markings (+ and -)
marked inside.
4. Replace the battery compartment
cover.
Your mouse uses two
RF channels and up to
256 ID codes. Channel
and ID are
automatically selected
when you connect the
mouse to the receiver.
When you change the
batteries in your
mouse or receive
interference from
another wireless mouse,
you must set the RF channel.
To set the channel, use a pointed object to press
Connect on the bottom of the mouse.
Step Six
Using the Charger With the USB Receiver
The supplied charger with USB port and cable and
USB receiver make it easy to connect the mouse to a
notebook computer for traveling or a desktop computer
at home. When traveling, you can detach the USB receiver
from the charger and then attach it to your notebook computer. When at home, you can attach the USB receiver to
the charger and then connect the charger’s USB cable to
the computer.
Note: If you attach the supplied mini USB receiver to your notebook computer,
always carry the charger separately so you can charge the mouse whenever
necessary.
Turning the Mouse On/Off
Customizing the Mouse
To avoid interfering with other devices, we suggest
that you turn off the mouse in public locations when
you are not using it.
Click Start\Programs\Control Panel\Mouse. The Mouse Properties dialog box
appears. From here you can click on any of the tabs and customize your
mouse’s buttons and functions.
Troubleshooting
Problem
Cause
Remedy
The mouse does not work at all.
•
•
•
To turn off the mouse, use a pointed object to press
Connect on the bottom of the mouse for about 2
seconds until the red LED flashes once. The optical
sensor turns off.
Important Note: Do not hold down Connect for more
than 1.5 seconds when turning on the mouse after
it automatically turns itself off.
Operation Notes
Do not use your mouse on a desk made of
glass, a mirror, iron, or black velvet.
•
Use the mouse only on a flat surface.
Otherwise, the optical sensor will not work.
•
If you use the mouse on a metal desk, try using
a mouse pad and reduce the distance between
the mouse and the USB receiver.
•
•
You must set a channel and ID (see “Setting
the Channel”) before it will work in DOS
(disk operating system).
For optimal performance, place the USB
receiver at least 8 inches (20 cm) away from
other electrical devices.
•
If you use your mouse with a notebook
computer with aluminum or magnesium in its
case, it might reduce the mouse’s range.
•
Autoscroll cannot work properly on some
application software, such as MicroSoft Works,
FrontPage, and AdobeAcrobat.
To conserve battery power, the mouse is designed
to gradually reduce power consumption when you
stop moving it.
If you do not move it for about 2 seconds, it enters
its standby mode. Simply move the mouse to
resume. If you do not move it for about 9 minutes, it
enters its sleep mode. Press any button on your
mouse to resume.
Make sure the USB receiver is firmly attached
to the computer’s USB port.
Remove and then reinstall the batteries,
making sure they are inserted with the correct
polarity.
There might be more than one wireless
mouse installed within 10 square meters.
Move one wireless mouse away from the
other.
The USB receiver’s indicator does
not light when moving the mouse.
The mouse connection was not successful.
•
•
Reboot the computer.
Reconnect the mouse to the receiver by
pressing Connect on the bottom of the mouse.
The mouse cursor can be moved
only to the right or left.
The optical sensor might need to be reset.
•
Reconnect the mouse to the receiver by
pressing Connect on the bottom of the mouse.
The mouse does not work after
your computer goes into standby
mode.
Synchronization button not pressed firmly.
•
•
Firmly press Synchronization.
Reconnect the USB connector to the computer.
Press Connect on the mouse, then press Synchronization on the USB receiver.
Reboot the computer.
•
•
Follow the on-screen instructions to customize your mouse.
The FCC Wants You to Know
This equipment has been tested and found to comply with the limits for a Class B digital device, pursuant to Part 15 of the FCC Rules. These
limits are designed to provide reasonable protection against harmful interference in a residential installation. This equipment generates, uses
and can radiate radio frequency energy and, if not installed and used in accordance with the instructions, may cause harmful interference to
radio communications.
However, there is no guarantee that interference will not occur in a particular installation. If this equipment does cause harmful interference to
radio or television reception, which can be determined by turning the equipment off and on, the user is encouraged to try to correct the
interference by one or more of the following measures:
• Reorient or relocate the receiving antenna.
• Increase the separation between the equipment and receiver.
• Consult your local RadioShack store or an experienced radio/TV technician for help.
If you cannot eliminate the interference, the FCC requires that you stop using your mouse. Changes or modifications not expressly approved
by RadioShack may cause interference and void the user’s authority to operate the equipment.
FCC Declaration of Conformity
This device complies with Part 15 of the FCC Rules. Operation is subject to the
following two conditions: (1) this device may not cause harmful interference, and
(2) this device must accept any interference received, including interference that
may cause undesired operation.
Product:
USB 27 MHz Wireless Optical Mouse
Model:
26-753
Responsible Party:
RadioShack
100 Throckmorton
Fort Worth, TX 76102
Phone:
817-415-3200
Limited 90 Day Warranty
Tips for Improving Operation
Reducing Interference with Other Wireless Devices
Power Save
•
•
To turn on the mouse, use a pointed object to hold
down Connect for about 1 second. The red LED
lights.
•
The USB receiver is not firmly attached
to the computer’s USB port.
The batteries were installed incorrectly.
All 27 MHz radio-based devices are subject to interference from other 27 MHz radio-based devices such as cordless telephones, cordless
baby monitors, and cordless toys. Moving the receiver and the base of other wireless devices as far apart as possible helps improve operation. You might need to try several locations to find one that works best. Move the receiver and the mouse closer to each other so the
receiver’s distance to the mouse is shorter than between the mouse and other transmitters. You might even need to reconnect the mouse to
eliminate interference.
Reducing Interference with Another Wireless Mouse
If another wireless mouse is interfering with your mouse, switch to a new RF channel. A new identification code is generated when you switch
channels.
Normally, the effective transmission distance is about 3 feet (1 meter), depending on the environment. If the distance between the mouse and
the receiver is out of range, try to move the receiver closer to the mouse.
This product is warranted by RadioShack against manufacturing defects in material and workmanship under normal use for 90 days from the date of purchase from RadioShack
company-owned stores and authorized RadioShack franchisees and dealers. EXCEPT AS PROVIDED HEREIN, RadioShack MAKES NO EXPRESS WARRANTIES AND ANY
IMPLIED WARRANTIES, INCLUDING THOSE OF MERCHANTABILITY AND FITNESS FOR A PARTICULAR PURPOSE, ARE LIMITED IN DURATION TO THE DURATION OF
THE WRITTEN LIMITED WARRANTIES CONTAINED HEREIN. EXCEPT AS PROVIDED HEREIN, RadioShack SHALL HAVE NO LIABILITY OR RESPONSIBILITY TO CUSTOMER OR ANY OTHER PERSON OR ENTITY WITH RESPECT TO ANY LIABILITY, LOSS OR DAMAGE CAUSED DIRECTLY OR INDIRECTLY BY USE OR PERFORMANCE OF THE PRODUCT OR ARISING OUT OF ANY BREACH OF THIS WARRANTY, INCLUDING, BUT NOT LIMITED TO, ANY DAMAGES RESULTING FROM
INCONVENIENCE, LOSS OF TIME, DATA, PROPERTY, REVENUE, OR PROFIT OR ANY INDIRECT, SPECIAL, INCIDENTAL, OR CONSEQUENTIAL DAMAGES, EVEN IF
RadioShack HAS BEEN ADVISED OF THE POSSIBILITY OF SUCH DAMAGES.
Some states do not allow limitations on how long an implied warranty lasts or the exclusion or limitation of incidental or consequential damages, so the above limitations or exclusions may not apply to you.
In the event of a product defect during the warranty period, take the product and the RadioShack sales receipt as proof of purchase date to any RadioShack store. RadioShack
will, at its option, unless otherwise provided by law: (a) correct the defect by product repair without charge for parts and labor; (b) replace the product with one of the same or similar design; or (c) refund the purchase price. All replaced parts and products, and products on which a refund is made, become the property of RadioShack. New or reconditioned
parts and products may be used in the performance of warranty service. Repaired or replaced parts and products are warranted for the remainder of the original warranty period.
You will be charged for repair or replacement of the product made after the expiration of the warranty period.
This warranty does not cover: (a) damage or failure caused by or attributable to acts of God, abuse, accident, misuse, improper or abnormal usage, failure to follow instructions,
improper installation or maintenance, alteration, lightning or other incidence of excess voltage or current; (b) any repairs other than those provided by a RadioShack Authorized
Service Facility; (c) consumables such as fuses or batteries; (d) cosmetic damage; (e) transportation, shipping or insurance costs; or (f) costs of product removal, installation, setup service adjustment or reinstallation.
This warranty gives you specific legal rights, and you may also have other rights which vary from state to state
RadioShack Customer Relations, 200 Taylor Street, 6th Floor, Fort Worth, TX 76102
12/99
©2003. RadioShack Corporation.
All Rights Reserved.
RadioShack and RadioShack.com are trademarks
used by RadioShack Corporation.
26-753
Printed in China
06A03