1
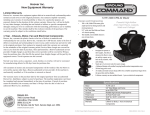
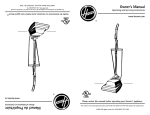
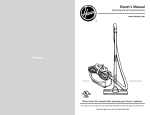
™
Safety, Operation and
Maintenance Manual
with Parts List
20-Gallon Wet/Dry Vac
Important Information and Safety Instructions
PLEASE READ BEFORE USE!
# 961130020
9/10-Rev 1
™
20-Gallon Wet/Dray Vac
TABLE OF CONTENTS
Safety Instructions....................................................................................2
Grounding Instructions.............................................................................3
Operation Wet and Dry Use......................................................................4
Trouble Shooting Guide............................................................................5
Schematic Drawing CH84000-CH84005..................................................6
Schematic Drawing of Optional Squeegee CH08400...............................7
Accessories................................................................................................8
Wiring Diagram.........................................................................................9
Page 1
SAFETY INSTRUCTIONS
THIS WET/DRY VACUUM IS DESIGNED FOR COMMERCIAL USE. ACCIDENTS DUE TO MISUSE CAN
ONLY BE PREVENTED BY THOSE USING THE MACHINE. READ AND FOLLOW ALL SAFETY INSTRUCTIONS.
WARNING!
To reduce the risk of fire, electric shock, or injury, please read and follow all safety instructions and caution
markings before use. This wet/dry vacuum is designed to be safe when used for cleaning functions as specified.
Should damage occur to electrical or mechanical parts, the wet/dry vac and/or accessories should be repaired by
a competent service station or the manufacturer before use in order to avoid further damage to the machine or
physical injury to the user.
• Do not use outdoors.
• Do not leave machine when it is plugged in. Unplug from the socket when not in use and before maintenance.
• Do not use with damaged cord or plug. To unplug, grasp the plug, not the cord. Do not handle plug or
vacuum with wet hands. Turn off all controls before unplugging.
• Do not pull or carry vacuum by cord, use cord as a handle, close door on cord, or pull cord around sharp
edges or corners. Do not run vacuum over cord. Keep cord away from heated surfaces.
• Keep hair, loose clothing, fingers and all parts of the body away from openings and moving parts. Do not
put any objects into openings or use with opening blocked. Keep openings free of dust, lint, hair and anything else that could reduce the flow of air.
• Do not use to pick up flammable or combustible liquids such as gasoline, or use in areas where they may be
present.
• Do not pick up anything that is burning or smoking, such as cigarettes, matches or hot ashes.
• The appliance is not intended for use by young children or infirm persons. Young children should be supervised to ensure that they do not play with the vacuum.
• Use extra care when leaning on stairs.
• Do not use unless filters are fitted.
• If the cleaner is not working properly or has been dropped, damaged, left outdoors, or dropped into water,
return it to a service center or dealer.
• Use only as described in this manual and only with the manufacture’s recommended attachments.
• Do not oil the motor in your vacuum cleaner. It is permanently lubricated and sealed. Do not oil the motor
at any time.
• Do not operate the cleaner without filters installed as damage may result to the motor.
Page 2
For longer service life and safe use of your vacuum, we recommend the following guidelines: Your cleaner is
designed to pick up dirt and dust particles and water. Avoid picking up hard or sharp objects with your cleaner
to avoid bag breakage, clogging or possible motor damage.
Remove the plug from the socket before performing maintenance. Before using the machine make sure that the
frequency and voltage shown on the rating plate correspond with the mains voltage.
CARE OF YOUR VACUUM CLEANER
Treat your vacuum cleaner as you would any other high grade precision made product. Dropping, unreasonable
bumping across thresholds and other misuses may result in a damaged unit which will not be covered under
warranty. When not in use the power cord should be wrapped around the molded-in cord wrap for storage. After
each use, wipe the vacuum body, accessories and power cord with a slightly damp cloth.
GROUNDING INSTRUCTIONS
DANGER: IMPROPER USE OF THE GROUNDING PLUS CAN RESULT IN A RISK OF ELECTRIC SHOCK.
Electrical equipment must be grounded. If it should malfunction or breakdown, grounding provides a path of
least resistance for electrical current to reduce the risk of electric shock. The vacuum is equipped with a cord
containing a grounding conductor and grounding plug. The plug must be inserted into an appropriate outlet that
is properly installed and grounded in accordance with all local codes and ordinances.
If repair or replacement of the cord or plug is necessary. DO NOT connect the grounded wire to a flat bed terminal. The wire with insulation having an outer surface that is green with or without yellow stripes is the grounding wire.
GROUNDING METHODS
This electric equipment is for use on a normal 120 volt circuit. It has a grounded plug that looks like a the plug
illustrated in (Fig A). A temporary adapter that looks like the adapter illustrated in (Fig B & C) may be used to
connect this plug into a 2-pole receptacle as shown in (Fig B) if a properly grounded outlet is not available.
The temporary adapter should be used only until a properly grounded outlet (Fig A) can be installed by a qualified electrician. The green color rigid ear lug or the like extending from the adapter must be connected to a
permanent ground such as a properly grounded outlet box cover. Whenever the adapter is used, it must be held
in place by a metal screw.
WARNING:
Improper connection of the equipment grounding conductor can result in a risk of electric shock. Check with
a qualified electrician or service person if you are in doubt as to whether the outlet is properly grounded. DO
NOT modify the plug provided with the equipment. If it will not fit into the outlet, have a proper outlet installed
by a qualified electrician.
Note: In Canada, the use of a temporary adapter is not permitted by the Canadian Electrical Code.
Page 3
DRY USE
Make sure that the plug is disconnected from the source of electricity. Remove the top of the vacuum and ensure that the cloth filter dust bag is properly installed. This vacuum comes equipped with a cloth dust bag filter.
The dust bag filter should always be used when picking up dry material and can be easily disposed of without
creating a mess. The dust bag should be used for dry cleaning only and must be removed when being used for
wet use.
The dry dust bag is not reusable or washable. Make sure the dust bag is secure inside the tank prior to use.
Check bag frequently, and remove and dispose of debris when bag is about 4/5 full. Overfilling the bag may
make it difficult to remove and increases the risk of the bag breaking and spilling the contents.
Put the top of the vacuum back into its original position and secure it onto the tank snapping down the latches
on both sides. Insert the flexible hose into the tank of the vacuum, assemble the steel wand and connect to the
hose. Connect the plug to the electricity source. Push the switch to the on position and start cleaning.
This vacuum is equipped with multiple tools to help with various applications. Scalloped bristle floor brush for
carpets, tile and other flooring. Dust brush for hard to reach places like base boards and window sills, inside
cars, furniture, etc.
At the end of your work, turn off the machine by pushing the switch to the off position. Disconnect the plug
from the source of electricity. Remove the cloth dust bag and dispose of debris. Wipe down machine with damp
cloth.
WET USE
Make sure that the tank does NOT contain dust and disconnect the plug from the source of electricity. Remove
the Dust filter bag. Replace the top back onto the vacuum ensuring the two latches are securely fastened.
Connect the plug to the source of electricity. Turn the machine on by pushing the switch to the on position. The
squeegee tool included with the vacuum is ideal for wet clean up. At the end of your work, turn off the machine
by pushing the switch to the off position. Disconnect the plug from the source of electricity. Dispose of all liquid from tank by unclipping the disposal hose. Simply remove the end cap from the hose and slowly lower the
drain hose to release the contents into a suitable drain. Replace end cap and clip hose back to machine. Wipe
down machine with damp cloth.
ATTENTION! This vacuum is equipped with a ball float shut off. When the maximum level of fluid has been
reached, there will be a significant change in sound and airflow through the hose will decrease. This feature
provides protection to the vacuum motor by shutting down airflow before motor damage occurs.
Page 4
TROUBLE SHOOTING GUIDE
*Always disconnect power cord before servicing vacuum*
PROBLEM: Loss of Vacuum
SOLUTION:
1. Full Dust Filter Bag. Empty Dust filter bag.
2. Clogged hose or wand. Remove obstructions.
3. Tank rim damaged. May need to replace tank.
4. Loose or broken fan. Contact manufacturer or authorized service center.
5. Motor not working. Contact manufacturer or authorized service center.
6. Float not functioning. Check to see if ball float is moving freely or tank is full.
7. Rubber Seal is worn. Replace.
PROBLEM: Motor is not running/Machine does not work
SOLUTION:
1. Broken switch. Make sure switch is in the correct position. Contact manufacturer or authorized service
center if it needs to be replaced.
2. Power cord defective. Check to make sure plug is connected to the source of electricity. If cord is broken,
contact manufacturer or authorized service center.
3. Motor defective. Contact manufacturer or authorized service center.
4. Blown fuse or tripped circuit breaker. Replace fuse or reset circuit breaker.
5. The tank may be filled with Liquid. If it is, empty the tank following the instructions in this booklet.
PROBLEM: Dust blowing from vacuum when running
SOLUTION:
1. Full Dust Filter Bag. Empty Dust filter bag and replace.
2. Dust Filter Bag may be installed incorrectly. Reinstall properly or replace.
3. Cloth filter bag dirty. Dispose of debris in Dust Filter Bag.
4. Cloth Filter Bag may be torn. If so, replace.
PROBLEM: Water blowing from vacuum when running.
CAUSE: SOLUTION:
1. Tank is full of liquid. Empty tank.
2. Sudsy or foamy liquid is being picked up. Add defoamer to tank.
PROBLEM: Machine does not have suction
SOLUTION:
1. Full Dust Filter Bag. Empty Dust filter bag and replace.
2. The suction hose may be obstructed. lf it is, turn off the vacuum cleaner by pushing the switch to the off
position, and then remove the cause of obstruction.
3. The tank entry may be obstructed. lf it is, turn off the vacuum cleaner by pushing the switch to the off position, and then remove the cause of obstruction.
lf the malfunction is not caused by any of these points, apply to the nearest service centre for an examination of
the vacuum cleaner. The motor is built for maintenance-free operation and does not need any particular service.
The carbon brushes may need to be replaced due to normal wear and tear caused by using the vacuum cleaner
over time, and they can be replaced only by our authorized service centers.
The manufacturer reserves the right to modify the machine and the included attachments without prior notice.
Page 5
™
Schematic Drawing
Page 6
™
Schematic Drawing and Parts Breakdown for
Optional Squeegee
Drawing #
1
2
3
4
5
6
7
8
9
10
11
12
13
14
15
16
17
18
19
20
21
22
Item Description
Rubber Strip
Screw for Well Nut
Fixing Bar
Swivel Caster
Caster Spring
Caster Bracket
Knob Nut
Nozzle Holder
Hand Screw A
Pull-spring
Adjusting pin
Circle Clip
Screw for Well Nut
Nozzle Connector
Hand Screw B
Screw for Well Nut
Joint Plate
Screw
Blocking Nut
Long Hose Connector
Suction Hose
Short Hose Connector
Page 7
™
20-Gallon Wet/Dray Vac
Accessories
Wiring Diagram
Page 8
™
20-Gallon Wet/Dray Vac
Hoover Inc.
7005 Cochran Road
Glenwillow, OH 44139
(888) 321-1134
For Service, Ask for Technical Service Dept. ext 2554
www.hoover.com
Model #_________________________________________________________________
Serial #_________________________________________________________________
Distributor Name:________________________________________________________
Distributor Phone #:______________________________________________________
Date of Purchase:________________________________________________________
NOTES:
Page 9