1
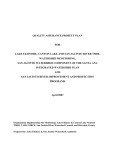
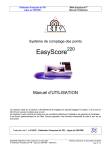
OWNER’S GUIDE
F58F
ELECTRONIC
AIR CLEANER
Copyright © 1998 Honeywell Inc.
All Rights Reserved
69-0764—2
69-0764-2
69-0764—2
CONTENTS
PAGE
THE AIR CLEANER MONITOR
2
OPERATING YOUR ELECTRONIC AIR CLEANER
3
GETTING THE MOST FROM YOUR ELECTRONIC AIR CLEANER
5
CLEANING THE ELECTRONIC CELLS AND PREFILTERS
7
HOW ELECTRONIC AIR CLEANING WORKS
13
BEFORE YOU CALL FOR SERVICE
18
CLEAN COIL GUARANTEE
20
PERFECT CLIMATE® CONTROLS
22
WARRANTY
23
1
69-0764—2
AIR CLEANER MONITOR
The optional W8600F Air Cleaner
Monitor may be added to your air
cleaner system to provide convenient
indication of system performance. The
W8600F must be ordered seperately.
The W8600F is designed to mount next
to your thermostat, or in any convenient
location (such as a utility room) where it
can be seen as it monitors the air
cleaner's performance.
On
Battery
Service
Fault
Air Clea
ner
Monitor
The four Liquid Crystal Display (LCD)
indicators are labeled ON, BATTERY,
SERVICE and FAULT.
• The ON indicator is active during
normal air cleaning operation. The system fan is also on when the air
cleaner is running.
• The BATTERY indicator is active when the W8600F battery is low.
• The SERVICE indicator is active when it is time to wash the air
cleaner prefilters and cells. The time between cleanings is entered
into the W8600F at installation. To turn the SERVICE indicator off,
press the Reset button located at the bottom right of the W8600F.
• The FAULT indicator is active when there is extreme dirt loading,
electronic malfunction, constant arcing or other problems with the
high voltage output of the air cleaner power supply.
69-0764—2
2
OPERATING YOUR ELECTRONIC AIR CLEANER
Set the ON-OFF switch in the power box to ON.
NOTE: Depress 1 for ON, 0 for OFF.
M3584
The air cleaner will now operate whenever your
furnace/air conditioning system fan operates. For
maximum air cleaning benefit and cleaner air
conditioner coils, leave the air cleaner switch ON
at all times and the fan switch on your thermostat
ON. Of course, continuous fan operation will add
to your electric bill each month.
When the fan and air cleaner come on, the neon
indicator lights.
M3586
If your air cleaner is equipped with a wallmounted W8600F Air Cleaner Monitor (see page
2), the ON indicator will be active whenever the
air cleaner is in operation. Of course, the system
fan will also be running.
ON
BATTERY
SERVICE
FAULT
Air Cleaner Monitor
M11980
M 6032
M16001
You may hear a snapping (electrical arcing)
sound occasionally as the air cleaner operates.
This usually is caused by a larger dust particle
causing a high voltage discharge. The snapping
sound means that your air cleaner is working as it
should. To hear the snapping sound, momentarily
press the test button near the bottom of the door.
Use the test button any time you want to prove
air cleaner operation.
When the fan and air cleaner stops, the neon
light goes out, as does the ON indicator on the
W8600F. The air cleaner is off until the heating or
air conditioning and fan start again.
ON
BATTERY
SERVICE
FAULT
Air Cleaner Monitor
M11981
3
69-0764—2
If you don’t want the air cleaner to run, set the
ON-OFF switch to OFF to turn off the air cleaner.
Your furnace and air conditioner will still operate
normally, but without the added benefit of air
cleaning. Normally, this switch should be ON at
all times.
M3583
69-0764—2
4
GETTING THE MOST FROM YOUR ELECTRONIC AIR CLEANER
Run the electronic
air cleaner as
much as possible
For greatest benefit, the air cleaner should run
all the time. To do this, set the fan switch on
your thermostat to ON, and make sure the air
cleaner is switched ON. The fan and air cleaner
will run even when the furnace or air conditioner
is off.
NOTE: A manual fan switch may be built into
the furnace or furnace fan controller.
The air cleaner uses less power than a 40 watt
light bulb (two-cell model—33 watts; single cell
model—22 watts). The cost of running the
system fan will vary with the size of your fan
motor and the cost of electricity where you live.
Most air cleaner owners feel that the added cost
is more than offset by the added benefits of full
time air cleaning and full time air circulation.
You may feel that the room temperature stays
more even when the fan is always on.
Keep the cells
and prefilters
clean
Although the air cleaner is designed to be
efficient over a wide range of cell dirt loading
conditions, regular cleaning is your best
assurance of consistent performance. Also, a
very dirty cell and prefilter reduces air flow and,
in turn, reduces the efficiency of the furnace or
air conditioner. The cell wash reminder schedule or the optional W8600F Air Cleaner Monitor
should be used to maintain a regular wash
schedule.
Replace any
activated carbon
filters in the
ductwork
regularly
An activated carbon (charcoal) filter is sometimes installed downstream of the air cleaner to
help control odors. This filter should be changed
at least annually, or as recommended by the
filter manufacturer. Honeywell does not offer
carbon filters for this application.
5
69-0764—2
If you have a
humidifier
If your system includes an atomizing humidifier,
you may want to install a standard furnace filter
between the humidifier and the air cleaner. This
filter would keep the humidifier spray’s mineral
deposits from collecting on the air cleaner. This
filter should be checked regularly and changed
when it shows signs of mineral or dirt buildup. If
you do not install a filter, you will probably need
to wash the cells and prefilters more often to
remove the mineral buildup.
If an ultrasonic room humidifier is used often,
especially if filled with tap (undistilled) water, the
cells and prefilters will require more frequent
washing. A white residue will accumulate on the
cells from the minerals in the water. This
residue may also contribute to "white dust"
(see p. 17).
All Honeywell whole house humidifiers may be
used in a system with the Honeywell Electronic
Air Cleaner without any additional filters or
system modification.
69-0764—2
6
CLEANING THE CELLS AND PREFILTERS
CAUTION
Sharp edges.
Can cause personal injury.
Carefully handle the cells or wear protective
gloves to avoid cuts from the sharp metal
edges.
To ensure optimum performance from the air
cleaner, the cells and prefilters must be
cleaned regularly—every one to six months.
Washing frequency will vary depending on the
number of family members, pets, activities
(such as cooking or woodshop) and smoking
habits. Use the wash reminder schedule that
came with the air cleaner or the optional
W8600F Air Cleaner Monitor to help establish
and maintain a regular cleaning schedule.
Mount the wash reminder schedule in a
convenient location.
Setting a
regular cleaning
schedule
ELECTRONIC AIR CLEANER WASH REMINDER SCHEDULE
,
INSTALLATION DATE:
YEAR
J
F
M
A
M
J
J
A
S
O
N
D
M982
7
69-0764—2
If your air cleaner has a W8600F Air Cleaner
Monitor, the SERVICE indicator will activate
when it is time to wash the cells and prefilters.
Wash them following the instructions starting on
page 9. To turn the SERVICE indicator off,
press the reset button on the lower right of the
W8600F (see picture below).
You may consider washing your cells and
prefilters before the SERVICE indicator
activates if some activity in your home has
changed. This can include, but is not limited to
the following:
• Have the windows been open more often?
• Has someone been smoking more often?
• Has someone taken up a dust producing
hobby?
If this activity change is permanent, you may
want your installer to change the WASH
schedule that was entered into the W8600F
when it was installed.
LCD
ON
BATTERY
SERVICE
FAULT
Air Cleaner Monitor
FUNCTION
INDICATOR
PANEL
RESET BUTTON
M11965
69-0764—2
8
NOTE: You may let the heating or air conditioning system operate normally while
the cells are being washed. Simply turn
off the air cleaner switch.
Cleaning the
prefilters
Vacuum the prefilter or brush, or soak it in a
tub. Do not wash the prefilter in the dishwasher
or carwash.
Washing
the cells
in your
automatic
dishwasher
CAUTION
Burn hazard.
Can cause personal injury.
Allow the cells to cool completely in the
dishwasher at the end of the wash cycle or
wear protective gloves to avoid burns. Hot
water can accumulate in the tubes supporting
the collector plates. Tip the cells so these tubes
will drain.
IMPORTANT
• Check your dishwasher owner’s manual.
Some manufacturers do not recommend
washing electronic cells in their
dishwashers.
• If the dishwasher has upper and lower
arms, position the cells carefully to allow
good water circulation.
• Be careful to avoid damaging the cells
when placing them in the dishwasher.
Broken ionizer wires or bent collector
plates are not covered under the
warranty.
• Very dirty cells, especially from tobacco or
cooking smoke, can discolor the plastic
parts and the lining of some dishwashers.
This discoloration is not harmful. To
minimize it, wash the cells more frequently or try a different brand
of detergent.
• Do NOT allow the dishwasher to run
through the dry cycle. This will bake
on any contaminants not removed
during the wash cycle and reduce air
cleaner efficiency.
9
69-0764—2
STEP 1
Put the cells on the lower rack of the dishwasher with the airflow arrow pointing up. It may
be necessary to remove the upper rack. Do not
block water flow to the upper arm.
HINT: Lay a few large water glasses between
the spikes on the lower rack, and rest the
cells on them so the spikes do not damage
the aluminum collector blades.
STEP 2
Using your regular dishwashing detergent, allow
the dishwasher to run through the complete
wash and rinse cycle. Do not use the dry
cycle. To avoid burns, let the cells cool
completely before removing, or wear protective
gloves when removing the cells. Remember that
water may be trapped inside the cells plates.
Tip the cells so these tubes can drain.
STEP 3
Wipe the ionizer wires and contact board on the
end of the cell using your thumb and forefinger
with a small, damp cloth.
STEP 4
Inspect the dishwasher. You may wish to rerun
the wash and/or rinse cycle with the dishwasher
empty if you see dirt or residue from washing
the cells. If dirt or residue seems excessive,
wash the cells more often or try a different
detergent.
Washing
the
cells in
a tub
CAUTION
Hazardous chemical.
Can cause personal injury.
• Do not splash the detergent solution in
eyes. Wear rubber gloves to avoid
prolonged detergent contact with your skin.
• Keep detergent and solution out of reach
of children.
NOTE: Always wash the cells first, then the
prefilters, to keep heavy prefilter lint
from getting caught in the cells.
69-0764—2
10
STEP 1
Use a large enough container, such as a
laundry tub or trash container, to hold one or
both cells.
NOTE: Sharp corners on the cells can scratch
the surface of a bathtub.
STEP 2
Dissolve about 3/4 cup of automatic dishwasher
detergent per cell in enough hot water to cover
the cells. If the detergent does not dissolve
readily, or forms a scum on the water, try
another brand, or use softened water.
STEP 3
After the detergent has completely dissolved,
place the cells in the container and let soak for
15 to 20 minutes. Agitate them up and down a
few times, and remove.
STEP 4
Next, wash the prefilters the same way. Empty
and rinse the wash container.
STEP 5
Rinse the cells and prefilters with a hard spray
of very hot water; rinse the tub clean, then fill
the tub with clean hot water and soak for 5 to 15
minutes. Rinse until the water draining from the
cells and prefilters no longer feels slippery.
STEP 6
Soak cells and prefilters in a final clear water
rinse for 10 minutes.
STEP 7
Wipe the ionizer wires and contact board on the
end of the cell using your thumb and forefinger
with a small, damp cloth.
Washing the cells
at a car wash
Use the hand sprayer at a coin-operated do-ityourself car wash to wash the cells. Hold the
nozzle at least two feet away from the unit to
avoid damage (such as broken ionizer wires or
bent collector plates) from the high pressure
stream of water. Follow the same sequence of
wash and rinse as recommended for cars.
However, do not wax the cells. Be sure to rinse
until the water draining from the cells no longer
feels slippery.
11
69-0764—2
Replacing electronic
air cleaner components
STEP 1
Inspect the cells for broken ionizer wires and
bent collector plates. Repair as necessary or
take to a Honeywell Authorized Air Cleaner
Repair Station.
STEP 2
Slide the prefilters into the upstream prefilter
guides.
STEP 3
Slide the air cleaner cells in so the air flow
arrow points downstream and the handles face
outward.
STEP 4
Firmly close the access door.
STEP 5
Turn on the air cleaner. If the cells and prefilters
are wet, the neon light may not come on and
you may hear arcing. If the arcing is annoying,
simply turn the air cleaner off for 2-3 hours or
until the cells are dry.
If your air cleaner has an Air Cleaner Monitor,
the FAULT indicator may activate if you install
wet cells and prefilters. Again, if the neon light
or the FAULT indicator annoys you, simply turn
off the air cleaner for 2-3 hours or until the cells
and prefilters are dry.
M3582
69-0764—2
12
HOW ELECTRONIC AIR CLEANING WORKS
A word about
particle size
The particles removed by the electronic air
cleaner tend to be very small—less than 10
microns. But what is a 10 micron particle? Well,
the eye of an average size sewing needle is
about 750 microns across, and the dot in the i in
the word micron is about 400 microns. Generally, particles smaller than 10 microns can be
seen only with a microscope, except in very
large concentrations, such as a puff of smoke.
Your electronic air cleaner can remove even
smaller particles that can be seen only with an
electron microscope.
Although particles 1 micron and smaller make
up only about 20 percent of the total weight of
particles in unfiltered air, they account for over
99 percent of the numbers of particles.
Because they are so tiny, these particles tend to
remain suspended in the air unless they collide
with a solid surface. Then they attach by
molecular adhesion and stick like glue, staining
walls and furniture and coating your air conditioning coils. And of course, some of these
particles can cause allergic reactions or simply
make the environment less pleasant.
749
25,40
0
Posta
ge
i
397
M 6031
13
69-0764—2
How the electronic
air cleaner works
First, large particles (lint, hair) are caught by the
prefilters. Then, as the dirty air passes through
the intense high voltage electric field surrounding the ionizer wires, all particles, even the
smallest are given an electric charge. The air
then passes into the collector where the
alternate parallel plates are charged positive
and negative, creating a uniform electrostatic
field. Since opposites attract, the charged
particles stick to the collector plates, which have
an opposite electric charge. The air leaving the
air cleaner contains very few particles.
CELL
PREFILTER
CLEANER
AIR
OUT
DIRTY
AIR
IN
IONIZER WIRES
(CHARGING
SECTION)
COLLECTOR PLATES
(COLLECTOR SECTION)
M6030A
Each time the air circulates through the heating/
air conditioning system and air cleaner, more
particles are removed. These particles are
generated by normal household activities, and
also enter the house from outside. That is why
we recommend that you use the air cleaner as
much as possible.
69-0764—2
14
The electronic air
cleaner vs. the
standard
furnace filter
The regular furnace filter collects mainly large,
visible particles that reach the filter. Its main
purpose is to protect the furnace and air
conditioner blower. The electronic air cleaner
collects these large particles, plus many of the
smaller, mostly invisible particles. Its purpose is
to reduce indoor air pollution as well as to
protect the blower, air conditioning coils and
heat exchanger.
15
69-0764—2
Use a carbon
filter to remove
odors
Odors are gases, not particles. They cannot be
removed by the air cleaner or by any other filter
designed to remove particles. However, some
gases can be trapped by an activated carbon
filter or diluted with outdoor air. If odors are a
concern, talk to your heating and air conditioning dealer about installing a carbon filter
downstream of the air cleaner or providing an
outdoor air inlet.
The electronic
air cleaner
versus the air
ionizer
Air ionizers have been marketed with claims
about purifying the air and promising medical
benefits. It should be noted that supporting tests,
if available, are controversial and incomplete.
Air ionizers may generate a bit of ozone, and of
course some ions (air molecules with an electric
charge). This is what your electronic air
cleaner’s ionizer does, but with greater intensity. However, air ionizers do not have good
collectors, if any. With air ionizers, the charged
dirt particles are collected by walls, floor and
furniture, requiring frequent cleaning of the
entire building to remove the effects of collected
contamination. By comparison, an electronic air
cleaner deposits contamination on the cell(s)
and prefilter(s) for easy cleaning.
Ozone and the
electronic
air cleaner
Electronic air cleaners generate a very small
amount of ozone, about 0.005 to 0.010 parts
per million (PPM). The amount is highest when
the air cleaner is new.
The average person can detect the odor of
ozone in concentrations as low as 0.003 to
0.010 PPM. The U.S. Food and Drug Administration, and Health and Welfare Canada
recommend that indoor ozone concentration
should not exceed 0.050 PPM. As a comparison, the outdoor ozone level in major cities is
sometimes higher than 0.100 PPM.
69-0764—2
16
If desired, the ozone generated by the air cleaner
can be reduced by asking your dealer to:
• Install an activated carbon filter downstream
of the air cleaner, or
• Adjust the air cleaner power supply to
reduce ozone production. This adjustment
will reduce ozone production about 20-25
percent, but will also reduce air cleaning
efficiency about 7-10 percent.
About lint or
"white dust"
White dust is made up of particles that settle out
of the air before they get to the return air duct.
You can help prevent this white dust from
settling by running your fan constantly. Also:
• Be sure the return registers are not blocked
with furniture.
• Be sure the discharge ducts are clean (best
done before installing the air cleaner).
• Be sure your clothes dryer is vented to the
outside and is not plugged.
• If you have new rugs or drapes or new
woolen blankets, be aware that the lint from
these items will reduce with age.
• In new or remodeled homes, plaster dust or
paint pigment may contribute to white dust,
but will reduce with time.
• Use of a humidifier may contribute to white
dust, especially if filled with undistilled water.
17
69-0764—2
BEFORE YOU CALL FOR SERVICE
If your air cleaner is equipped with the optional
W8600F Air Cleaner Monitor, the SERVICE and
FAULT indicator on the W8600F will remind you
that a cell and prefilter washing is due and tell
you when the system isn’t operating properly.
Whether or not your air cleaner has an Air
Cleaner Monitor, perform these checks before
you call your heating and air conditioning dealer
for service.
IF…
Electronic air
cleaner doesn't
seem to be
working
THEN…
1. Make sure the furnace or air conditioner
blower is running.
2. Make sure the access door is firmly closed
and latched. If door is not closed properly, an
interlock keeps the air cleaner off.
3. Press the test button. A snapping sound
indicates the air cleaner is operating properly. If
there is no snapping sound, make sure the
appropriate fuse or circuit breaker is OK.
Arcing (snapping)
seems too frequent
1. If the electronic cells are wet from washing,
turn the air cleaner off for 2-3 hours.
2. Check the cells for broken ionizer wires or
bent plates. Repair if necessary.
3. Wash cells and prefilters if dirty.
The neon light
on the air cleaner
does not come on
1. Make sure the furnace or air conditioner fan
is running.
2. Make sure the access door is firmly closed.
3. Make sure the ON-OFF switch is in the ON
position.
4. If the electronic cells are wet, check again in
2 to 3 hours.
69-0764—2
18
5. Press the test button. A snapping sound
indicates the air cleaner is operating properly,
but the neon light is not working. If there is no
snapping sound, make sure the appropriate
fuse or circuit breaker is OK.
The SERVICE
indicator on the
W8600F activates
1. Cell and prefilter washing is due; wash as
soon as possible.
The FAULT
indicator on the
W8600F activates
1. Make sure cells are clean and dry.
BATTERY Indicator
on the W8600F
activates
1. Remove the cover from the W8600F, make
sure the battery is firmly installed in holder.
2. Check cells for visible damage.
2. Replace the disc battery with type BR2032.
You smell ozone
and find it
objectionable
Call your heating and air conditioning dealer.
19
69-0764—2
HONEYWELL 10 YEAR CLEAN COIL GUARANTEE
Guarantee
Honeywell guarantees your indoor heating/
cooling coil will maintain optimum efficiency and
energy savings for a minimum of 10 years if
your new Honeywell Electronic Air Cleaner is
installed and properly maintaineda on either…
• A new heat pump, air conditioner, or high
efficiency furnace, or
• A heat pump, air conditioner, or high
efficiency furnace that is less than one year
old, or
• A heat pump, air conditioner, or high
efficiency furnace more than one year old
that has had the indoor coil professionally
cleaned by a qualified heating/cooling
contractor prior to installing a Honeywell
Electronic Air Cleaner.
If your coil requires cleaning within the next 10
years, Honeywell will pay 50% of the cost to
have the coil professionally cleaned by a
qualified heating/cooling contractor, or $100,
whichever is less.
a
Maintain electronic air cleaner operation by keeping
power switch in the ON position, and periodically
verifying proper operation by using the test button
and checking the neon light. Wash cell(s) regularly,
as specified earlier.
How to register
your guarantee
You can register your guarantee by filling out
the Clean Coil Guarantee Registration Card on
the back cover. If the card has been misplaced,
follow registration instructions below. After
Honeywell receives your registration, it will be
filed; no confirmation will be sent.
To register your guarantee you’ll need a copy of
your dealer invoice showing purchase of a
Honeywell Electronic Air Cleaner. You will also
need dealer invoice(s) verifying the purchase of
new heating/cooling equipment, or coil cleaning
on existing equipment. The registration procedure differs for new and existing equipment.
69-0764—2
20
...on new
equipment or
equipment less
than one year old
For Honeywell Electronic Air Cleaners installed
on a heat pump, air conditioner or high efficiency
furnace that is either new or less than one year
old, send copies of invoices verifying…
• Purchase of a new Honeywell Electronic Air
Cleaner.
• Purchase of a heat pump, air conditioner or
high efficiency furnace that is new or less
than one year old.
...in newly
constructed
homes
Honeywell recognizes that in some newly
constructed homes (those built within the
previous twelve months) a Honeywell Electronic
Air Cleaner may have already been installed,
with no invoice available. In that case, register
your guarantee by sending in the following…
• The name, address and phone number of
the home builder.
• The approximate date home was completed.
• The date you moved in.
...on existing
equipment more
than one year old
For Honeywell Electronic Air Cleaners installed
on a heat pump, air conditioner or high effciency
furnace that is more than one year old, send
copies of invoices verifying…
• Proof of purchase of a new Honeywell
Electronic Air Cleaner.
• Proof of purchase of a professional coil
cleaning by a qualified heating/cooling
contractor.
21
69-0764—2
Perfect Climate® CONTROLS FOR
ADDED COMFORT AND CONVENIENCE
How it works...
®
THE
HONEYWELL
ELECTRONIC AIR CLEANER IS
ONE PART OF A PERFECT CLIMATE®
INDOOR ENVIRONMENT THAT PROVIDES
TOTAL INDOOR COMFORT.
HONEYWELL
HUMIDISTAT
HOME
VENTILATION
SYSTEM
FRESH AIR
CONTROL
CONDITIONED
AIR
OPTIMAL
EFFICIENCY AIR
CONDITIONER
OR HEAT PUMP
HONEYWELL
CHRONOTHERM® lV
PROGRAMMABLE
THERMOSTAT
CONDITIONED
AIR
RETURN AIR
REGISTER
SUPPLY AIR
REGISTER
STALE AIR
EXHAUST
HUMIDIFIER
COLD AIR
RETURN
STALE
AIR FROM
BATHS
OPTIMAL
EFFICIENCY
FORCED AIR
FURNACE
FRESH
AIR TO
HOME
HONEYWELL
ELECTRONIC AIR CLEANER
FRESH AIR
INTAKE
HONEYWELL
HOME
VENTILATION
SYSTEM
M15589
1. Honeywell Perfect Climate® Comfort Center™ controls or
Chronotherm® IV programmable thermostats.
2. Honeywell F50 electronic air cleaner.
3. Honeywell humidistats.
4. Honeywell humidifiers.
5. Honeywell home ventilation systems.
Describing Perfection
The most convenient, most energy efficient, cleanest, healthiest and
most comfortable indoor environment possible today! Perfect climate is
achieved when the five core
components of a home’s climate system work together:
• optimal efficiency heating and cooling equipment,
• precise, programmable temperature control,
• effective indoor air quality control,
• controlled humidity,
• proper ventilation and air distribution.
Contact your local Perfect Climate® dealer for an evaluation of your home.
69-0764—2
22
LIMITED TWO-YEAR WARRANTY
Honeywell warrants this product to be free from defects in the workmanship or materials, under normal use and service, for a period of two (2)
years from the date of purchase by the consumer. If, at any time during
the warranty period, the product is defective or malfunctions, Honeywell
shall repair or replace it (at Honeywell’s option) within a reasonable
period of time.
If the product(s) is defective, please contact:
a) the dealer from whom you purchased it, or
b) the local Honeywell Authorized Repair Station, or
c) the local Honeywell Residential Division Sales Office,
or
d) package the defective cell, power supply or other component with
care, along with a bill of sale, receipt, or other dated proof of purchase, and a short description of the malfunction, and ship it,
prepaid, to the following address:
Honeywell Return Goods
Dock 4 MN10-3860
1885 Douglas Drive
Golden Valley, MN 55422
This warranty does not cover removal or reinstallation costs. This
warranty shall not apply if it is shown by Honeywell that the defect or
malfunction was caused by damage which occurred while the product
was in the possession of a consumer.
Honeywell’s sole responsibility shall be repair or replace the product
within the terms stated above. HONEYWELL SHALL NOT BE LIABLE
FOR ANY LOSS OR DAMAGE OF ANY KIND, INCLUDING ANY
INCIDENTAL OR CONSEQUENTIAL DAMAGES RESULTING, DIRECTLY OR INDIRECTLY, FROM ANY BREACH OF ANY WARRANTY,
EXPRESS OR IMPLIED, OR ANY OTHER FAILURE OF THIS PRODUCT. Some states do not allow the exclusion or limitation of incidental or
consequential damages, so this limitation may not apply to you.
THE WARRANTIES SET FORTH HEREIN ARE EXCLUSIVE, AND
HONEYWELL EXPRESSLY DISCLAIMS ALL OTHER WARRANTIES,
WHETHER WRITTEN, ORAL, IMPLIED OR STATUTORY, INCLUDING
BUT NOT LIMITED TO ANY WARRANTIES OF MERCHANTABILITY,
WORKMANSHIP, OR FITNESS FOR A PARTICULAR PURPOSE.
This warranty gives you specific legal rights, and you may have other
rights which vary from state to state.
If you have any questions concerning this warranty, please write to
Home and Building Control Customer Relations, Honeywell Inc., 1985
Douglas Drive North, Minneapolis, Minnesota 55422.
In Canada, Honeywell Limited/Honeywell Limitée, Dynamic Drive,
Scarborough, Ontario, M1V 4Z9.
23
69-0764—2
69-0764—2
69-0764—2
Home and Building Control
Honeywell Inc.
Honeywell Plaza
P.O. Box 524
Minneapolis, MN 55408-0524
69-0764—2
69-0764—2 J.H. Rev. 7-98
Printed in U.S.A. on recycled
paper containing at least 10%
post-consumer paper fibers.
www.honeywell.com/yourhome