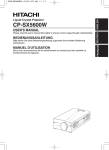
1
Please read this user's manual thoroughly to ensure correct usage through understanding.
BEDIENUNGSANLEITUNG
Bitte lessen Sie diese Bedienungsanleitung zugunsten der korrekten Bedienung
aufmerksam.
MANUEL D'UTILISATION
Nous vous recommandons de lire attentivement ce manuel pour bien assimiler le
fonctionnement de l'appareil.
MANUALE D'ISTRUZIONI
Vi preghiamo voler leggere attentamente il manuale d'sitruzioni in modo tale da poter
comprendere quanto riportato ai fini di un corretto utilizzo del proiettore.
MANUAL DE USUARIO
Lea cuidadosamente este manual del usuario para poder utilizar corretamente el
producto.
GEBRUIKSAANWIJZING
Lees voor het qebruik alstublieft deze handleiding aandachtig door, om volledig profijt te
hebben van de uitgebreide mogelijkheden.
BRUKERHÅNDBOK
Vennligst les denne bruksanvisningen grundig for å være garantert driftssikker bruk.
ENGLISH
USER'S MANUAL
ITALIANO FRANÇAIS DEUTSCH
CP-S225W / CP-X275W
NEDERLANDS ESPAÑOL
Liquid Crystal Projector
TECHNICAL
REGULATORY NOTICES
TECHNICAL PORTGÊS
Para assegurar o uso correto do equipamento, por favor leia atentamente este manual do
usuário.
NORSK
INSTRUÇÕES DO PROPRIETÁRIO
Liquid Crystal Projector
ENGLISH
USER'S MANUAL
Thank you for purchasing this liquid crystal projector.
WARNING • Please read the accompanying manual “SAFETY
INSTRUCTIONS” and this “USER'S MANUAL” thoroughly to ensure correct
usage through understanding. After reading, store this instruction manual in a
safe place for future reference.
NOTE • The information in this manual is subject to change without notice.
• The manufacturer assumes no responsibility for any errors that may appear in this manual
• The reproduction, transmission or use of this document or contents is not permitted without
express written authority.
TRADEMARK ACKNOWLEDGMENT : PS/2, VGA and XGA are registered trademarks of
International Business Machines Corporation. Apple, Mac and ADB are registered trademarks of
Apple Computer, Inc. VESA and SVGA are trademarks of the Video Electronics Standard
Association. Windows is a registered trademark of Microsoft Corporation. Carefully observe the
trademarks and registered trademarks of all companies, even when not mentioned.
CONTENTS
Page
Page
FEATURES .......................................2
BEFORE USE ...................................2
TROUBLESHOOTING ....................19
Contents of Package ..............................2
Part Names.............................................3
Loading the Battery ................................4
INSTALLATION ................................5
Installation of the Projector and Screen........5
Angle Adjustment ...................................5
Cabling ...................................................6
Power Connection ..................................7
Example of System Setup ......................7
Plug & Play .............................................7
OPERATIONS ...................................8
Power ON ..................................................8
Power OFF ..............................................8
Basic Operation ......................................9
Setup Menu ..........................................11
Input Menu............................................12
Image Menu..........................................13
Options Menu .......................................14
No Signal Menu ....................................15
MAINTENANCE ..............................16
Lamp.....................................................16
Air Filter ................................................18
Other Maintenance ...............................18
OSD Message ......................................19
Indicators Message ..............................20
Symptom ..............................................21
SPECIFICATIONS...........................22
WARRANTY AND AFTER-SERVICE ......23
.......................................................................................
TABLES
Table 1. Installation Reference.................5
Table 2. Cabling .......................................6
Table 3. Basic Operations ........................9
Table 4. Setup Menu ..............................11
Table 5. Input Menu................................12
Table 6. Image Menu..............................13
Table 7. Options Menu ...........................14
Table 8. No Signal Menu ........................15
Table 9. OSD Message ..........................19
Table 10. Indicator Message ..................20
Table 11. Symptom ................................21
Table 12. Specifications .........................22
.......................................................................................
For "TECHNICAL" and "REGULATORY
NOTICE", see the end of this manual.
ENGLISH-1
FEATURES
This liquid crystal projector is used to project various computer signals as well as NTSC / PAL /
SECAM video signals onto a screen. Little space is required for installation and large images can
easily be realized.
Outstanding Brightness
The UHB lamp and high-efficiency optical system assure a high level of brightness.
Partial Magnification Function
Interesting parts of images can be magnified for closer viewing.
Distortion Correction Function
Distortion-free images are quickly available.
Extra-low Noise Function
Acoustic noise level from the unit can be reduced.
BEFORE USE
Contents of package
Make sure all of the following items are included in the package. If anything is missing, please
contact your dealer.
NOTE • Keep the original packing material for future reshipment.
Power Cord
(US Type)
Power Cord
(UK Type)
Power Cord
(Europe Type)
Projector
User’s Manual
(this manual)
Component
Video Cable
(with green lead)
RGB Cable
VIDEO
STANDBY/ON
RGB
KEYSTONE
MENU
SELECT
MENU
MAGNIFY
POSITION RESET
FREEZE VOLUME
MUTE
OFF
Safety Instructions
AUTO
BLANK
Remote Controller
containing Battery
ENGLISH-2
Carrying Bag
BEFORE USE (continued)
ENGLISH
Part Names
Zoom Knob
Focus Ring
Remote Control Sensor
Power Switch
Lens
Slide Lens Door
Foot Adjuster
AC Inlet
(to the Power Cord)
Front / Left View
Ventilation Openings
(Intake)
Control Panel (Refer to P.8 "OPERATIONS")
LAMP Indicator
TEMP Indicator
POWER Indicator
MENU Button
RESET Button
KEYSTONE Button
INPUT Button
STANDBY/ON Button
Foot Adjuster Button
Ventilation Openings
(Exhaust)
Air Filter and Intake
(for the Cooling Fan)
Speaker
Rear Foot Adjuster
Rear / Right View
Terminal Panel
(Refer below)
Remote Control Sensor
RGB Terminal
CONTROL Terminal
COMPONENT
Y Terminal
CB/PB Terminal
CR/PR Terminal
AUDIO Terminal
AUDIO
R Terminal
L Terminal
VIDEO Terminal
S-VIDEO Terminal
Terminal Panel
ENGLISH-3
BEFORE USE (continued)
Part Names (continued)
VIDEO Button
STANDBY/ON Button
STANDBY/ON
KEYSTONE Button
KEYSTONE
VIDEO
RGB
RGB Button
MENU SELECT Button
Button
MENU
SELECT
Button
POSITION Button
Button
MENU
Button
POSITION RESET
RESET Button
MENU Button
MAGNIFY
Button
MAGNIFY
Button
MAGNIFY
OFF
MAGNIFY
Button
FREEZE VOLUME
MUTE
VOLUME
Button
MUTE Button
BLANK
AUTO Button
Battery Holder
Button
FREEZE Button
OFF
AUTO
VOLUME
BLANK Button
(Refer to Page.8 "OPERATIONS")
Remote Controller
Loading the Batteries
First Loading:
In original packing, the battery is installed in the battery holder of
the remote controller with protection film(the transparent film some
of which is inside the battery folder). Pull out the protection film to
load the battery.
“+” side
Replacing:
1. See the reverse side of the remote controller.
2. Pinch the groove and pull out battery holder as the drawing right.
3. Remove the worn battery.
4. Install the new battery with “+” side facing.
5. Push in and click the battery holder.
Pull out
Battery Holder
CAUTION • Incorrect handling of the battery could result in fire or personal injury.The
battery may explode if not handled properly. Be careful in handling the battery
according to instructions of accompaning manual "SAFETY INSTRUCTIONS"and this
manual.
• Use the 3V micro lithium battery type no.CR2025 only.
• When loading the battery, make sure the plus and minus terminals are correctly oriented as
indicated in the remote controller.
• When you dispose the battery, you should obey the law in the relative area or country.
• Keep the battery away from children and pets.
• When not to be used for an extended period, remove the battery from the remote controller.
NOTE Replace the batteries when remote control transmitter operation becomes difficult.
ENGLISH-4
Installation of the Projector and Screen
Refer to the drawing and table below for determining the screen size and projection distance.
The projection distances shown in the table below
are for full size (CP-S225W:800 x 600 dots / CPX275W:1024 x 768 dots).
a: Distance from the projector to the screen. (±10%)
b: Distance from the lens center to the bottom of the
screen. (±10%)
Screen
Table 1. Installation Reference
Screen size
[inches (m)]
40
60
80
100
120
150
(1.0)
(1.5)
(2.0)
(2.5)
(3.0)
(3.8)
200 (5.0)
a [inches (m)]
Min.
Max.
37
57
77
96
116
145
(0.9)
(1.5)
(1.9)
(2.4)
(2.9)
(3.7)
194 (4.9)
46
69
93
116
139
174
(1.2)
(1.8)
(2.4)
(2.9)
(3.5)
(4.4)
233 (5.9)
TOP VIEW
b
[inches (cm)]
3
5
7
9
10
13
(8.7)
(13.1)
(17.4)
(21.8)
(26.1)
(32.7)
17 (43.5)
Lens
center
b
a
SIDE VIEW
CAUTION • Install the projector in a suitable environment according to
instructions of the accompanying manual “SAFETY INSTRUCTIONS” and this
manual.
• Please basically use liquid crystal projector at the horizontal position. If you use
liquid crystal projector by the lens up position, the lens down position and the side up
position, this may cause the heat inside to build up and cause damage. Be especially
careful not to install it with ventilation holes blocked.
• Do not install LCD projector in smoke effected environment. Smoke residue may
buildup on critical parts (i.e.LCD panel, Lens Assy etc.).
Angle Adjustment
Use the foot adjusters on the bottom of
the projector to adjust the projection
angle. It is variable within 0˚ to 10˚
Foot Adjuster
approximately.
1. Lift up the front side of the projector,
and pressing the foot adjuster button,
adjust the projection angle.
2. Release the button to lock at the
desired angle.
3. Make the rear foot adjuster screw to
Press the foot adjuster button Rear Foot Adjuster
adjust the left-right slope.
CAUTION • Do not release the foot adjuster button unless the projector is
being held; otherwise, the projector could overturn or fingers could get
caught and cause personal injury.
ENGLISH-5
ENGLISH
INSTALLATION
INSTALLATION (continued)
Cabling
Refer to the table below for connecting each terminal of the projector to a device.
Table 2. Cabling
Function
Terminal
Cable
Analog RGB input
RGB
Accessory RGB cable or optional RGB
cable with D-sub 15-pin shrink jack and
inch thread screws
RS-232C communication
CONTROL
Optional RS-232C cable
Audio input
(from the computer)
AUDIO
Optional audio cable with stereo mini jack
Component video input
COMPONENT VIDEO CB/PB
COMPONENT VIDEO Y
Accessory component video cable
COMPONENT VIDEO CR/PR
S-video input
S-VIDEO
Video input
VIDEO
Audio input
(from video equipment)
AUDIO L
Optional S-video cable with mini DIN 4-pin
jack
Optional video/audio cable with RCA jack
AUDIO R
CAUTION • Incorrect connecting could result in fire or electrical shock.
Please read this manual and the separate “SAFETY INSTRUCTIONS”.
• Before connecting, turn off to all devices to be connected, except for the USB
cable.
• The cables may have to be used with the core set to the projector side. Use the
cables which are included with the projector or specified.
NOTE • Before connecting, read instruction manuals of the devices to be connected, and make sure that the
projector is compatible with the device.
• Secure the screws on the connectors and tighten.
• For some RGB input modes, the optional Mac adapter is necessary.
• To select the digital RGB input, the comuter may need some settings. See the manuals of the computer for
details.
• Some computers may have multiple display screen modes. Use of some of these modes will not be possible
with this projector.
• Refer to the “TECHNICAL” section for the pin assign ment of connectors.
• Refer to manual of the optional RS-232C cable, for the communication data.
• For others, consult your dealer.
ENGLISH-6
Power Connection
Use the correct power cord depending on the power outlet to be used.
Connect the AC inlet of the projector to the power outlet firmly by the power cord.
CAUTION • Be carful in handling the power
cord according to instructions of the
accompanying manual "SAFETY INSTRUCTIONS"
and this manual.
• Connect the power cord firmly. Avoid using a
loose, unsound outlet or failed contact.
Power outlet
Power Cord
AC Inlet
Example of system setup
Computer
(desktop type)
DVD Player
S-Video Tape
Recorder
Computer
(notebook type)
NOTE • When connecting with a notebook computer, set the proper RGB external image output
(setting CRT display or simultaneous display of LCD and CRT). Please read instruction manual of
the notebook for more information.
Plug & Play
This projector is VESA DDC 1/2B compatible. Plug & play is possible by connecting to a computer
that is VESA DDC (Display Data Channel) compatible.
Please use this function by connecting the accessory RGB cable with RGB terminal. Plug & play
may not operate by other connections.
NOTE • Plug & play is a system configured with peripheral equipment including a computer,
display and an operating system.
• This projector is recognized as a plug & play monitor. Use the standard display drivers.
• Plug & play may not operate by the computer to connect.
ENGLISH-7
ENGLISH
INSTALLATION (continued)
OPERATIONS
STANDBY/ON Button
POWER Indicator
STANDBY/
ON Button
VIDEO
STANDBY/ON
RGB
KEYSTONE
MENU
SELECT
Zoom knob
MENU
POSITION RESET
Focus ring
MAGNIFY
Power Switch
FREEZE VOLUME
Slide Lens door
Power ON
1. Check that the power cord is connected correctly.
2. Set the power switch to [ | ]. The standby mode is selected, and the POWER indicator is turned to
orange.
3. Press the STANDBY/ON button
on the control panel or the remote controller. Warm-up
begins and the POWER indicator blinks in green.
4. The POWER indicator ceases blinking and turns to green when power is on. Open the slide lens
door.
5. Adjust picture size using the Zoom knob.
6. Adjust focus using the Focus ring.
Power OFF
1. Press the STANDBY/ON button
on the control panel or the remote controller. Then, the
message "Power off?" will appear on the screen,and the message will disappear by any operation
or no operation for 5 seconds.During this messsage indication,press the STANDBY/ON
button again. The projector lamp is extinguished and lamp cooling begins. The POWER
indicator blinks orange during lamp cooling. Pressing the STANDBY/ON button
has no
effect while the POWER indicator is blinking.
2. The system assumes the Standby mode when cooling is complete, and the POWER indicator
ceases blinking and changes to orange. Check that the indicator is orange and set the Power
switch to [O].
3. The POWER indicator is extinguished when power is off. Do not forget to close the lens door.
WARNING • Please read this manual, and the separate “SAFETY
INSTRUCTIONS” thoroughly before using the equipment. Always ensure that
the equipment is used safely.
NOTE • Except in emergencies, do not turn off unless the POWER indicator is orange as it will
reduce the life of the projector lamp.
• To prevent any troble, turn on/off the projector when the computer or video tape recorder is OFF.
Providing a RS-232C cable is connected, turn on the computer before the projector.
• When a projector continues projecting the same image, the image may remain as an afterimage.
Please do not project the image same for a long time.
ENGLISH-8
Basic Operation
The basic operations shown in Table 3 is performed from the supplied remote controller or the
projector control panel. Items indicated by (*) may be used from the control panel.
Table 3 . Basic Operation
Item
Description
Select Input Signal (*) : Press the INPUT button.
RGB→ VIDEO → S-VIDEO → COMPONENT (→ RGB)
Select RGB Input : Press the RGB button.
INPUT
SELECT
POSITION
VIDEO/S-VIDEO/COMPONENT → RGB
Select Video Input : Press the VIDEO button.
RGB → VIDEO/S-VIDEO/COMPONENT
VIDEO → S-VIDEO → COMPONENT (→ VIDEO)
• The selected signal name is displayed for approximately 3 seconds when the input
signal is changed.
Set/Clear Position Adjustment Mode :
Press the POSITION button. The [ ] icon is displayed in the POSITION mode.
Image Position Adjustment:
Press the , ,
and
buttons in the POSITION mode.
• Valid only in the MAGNIFY mode with a video signal is input.
• After approximately 10 seconds of inactivity the [ ] icon is extinguished and the
POSITION mode is cleared automatically.
RESET (*)
Initialize Each Item : Select an item and press the RESET button.
Initialize Position Adjustment : Press the RESET button and the
POSITION mode. This function is valid only when RGB signal is input.
• Valid except for the VOLUME, LANGUAGE, H PHASE and WIHSPER.
MAGNIFY
Set MAGNIFY Mode : Press the MAGNIFY
button.
Move Magnified Area : Run the POSITION in the MAGNIFY mode.
Adjust Magnification :
Press the MAGNIFY
/
button in MAGNIFY mode.
MAGNIFY
magnifies the image ↔ MAGNIFY
reduces the image
Clear MAGNIFY Mode : Press the MAGNIFY
button.
OFF
• The MAGNIFY mode is cleared by running or setting the AUTO, ASPECT, INPUT
SELECT or VIDEO, or by changing the input signal.
Set/Clear FREEZE Mode : Press the FREEZE button. The [II] icon is
displayed, and the image frozen, in the FREEZE mode.
FREEZE
• The FREEZE mode is cleared by running or setting POSITION, VOLUME, MUTE,
Automatic Adjustment, BLANK ON/OFF, or MENU ON/OFF, or by changing the
input signal.
• Do not forget to clear frozen static images.
button.
KEYSTONE Set/Clear KEYSTONE Mode : Press the KEYSTONE
/
button in the KEYSTONE mode.
(*) Adjust Keystone : Press the
reduces the bottom size of image ↔
reduces the top size of image
NOTE • Use the remote controller at a distance of approximately 3m from the sensor on the front
of the projector, and within a range of 30° left-right. Strong light and obstacles will interfere with
operation of the remote controller.
(It continue the next page.)
ENGLISH-9
ENGLISH
OPERATIONS (continued)
OPERATIONS (continued)
Items indicated by (*) may be used from the control panel.
Table 3. Basic Operation (continued)
Item
Description
VOLUME
Volume Adjustment : Press the VOLUME
/
button.
increases the volume
reduces the volume ↔
MUTE
Set/Clear Mute Mode : Press the MUTE button.
No sound is heard in the MUTE mode.
AUTO
Automatic Adjustment at RGB Input : Press the AUTO button.
Horizontal position(H.POSIT), vertical position (V.POSIT),clock phase
(H.PHASE), and horizontal size(H.SIZE) are automatically adjusted. Use
with the window at maximum size in the application display.
Automatic Adjustment at Video Input : Press the AUTO button.
A signal type appropriate for the input signal is selected automatically. Valid
only when AUTO is set for VIDEO on the menu.
• This operation requires approximately ten seconds. It may not function correctly
with some input signals.
BLANK
ON/OFF
Set/Clear Blank Mode: Press the BLANK button. No image is displayed in
the Blank mode. The screen color is as set in BLANK on the Image menu.
Menu Display Start/Stop: Press the MENU button.
MENU
• The menu display is terminated automatically after approximately ten seconds of
ON/OFF (*)
inactivity.
Select Menu Type: Press the MENU SELECT button.
Allows the user to select the normal menu or the single menu. Only the
selected item is displayed on the single menu, and other items are
displayed with the
and
buttons as with the normal menu.
MENU
SELECT
• Valid only when the Setup menu is used. Push the MENU SELECT button after
selecting items such as "BRIGHTNESS".
Normal menu
Single menu
(MENU SELECT)
SETUP
INPUT
BRIGHT
CONTRAST
V POSIT
H POSIT
H PHASE
H SIZE
COLOR BAL R
COLOR BAL B
ASPECT
ENGLISH-10
IMAGE
OPT.
0
-2
100
100
+1
800
0
0
CONTRAST
-2
Setup Menu
The following adjustments and settings are possible when SETUP is selected at the top of the menu. Part of the
Setup menu differs between RGB input and video input. Select an item with the
and
buttons, and start
operation. Use the Single menu to reduce menu size (see Table 3, MENU SELECT).
SETUP
INPUT
IMAGE
OPT.
0
-2
BRIGHT
CONTRAST
V POSIT
H POSIT
H PHASE
H SIZE
COLOR BAL R
COLOR BAL B
ASPECT
100
100
+1
800
0
0
SETUP
INPUT
IMAGE
SETUP
OPT.
BRIGHT
CONTRAST
SHARPNESS
COLOR
TINT
COLOR BAL R
COLOR BAL B
ASPECT
0
+1
+1
0
0
0
0
IMAGE
OPT.
0
+1
+1
0
0
0
COMPONENT
VIDEO/S-VIDEO
RGB
INPUT
BRIGHT
CONTRAST
COLOR
H PHASE
COLOR BAL R
COLOR BAL B
ASPECT
Table 4. Setup Menu
COMPONENT
Item
BRIGHT
CONTRAST
V POSIT
H POSIT
H PHASE
Description
VIDEO
S-VIDEO
480i
575i
480P
720P
1080i
✔
✔
✔
✔
✔
✔
✔
✔
✔
✔
-
-
-
✔
-
✔
✔
✔
-
-
-
RGB
Dark
↔ Light
Weak
↔ Strong
Down
↔ Up
Left
↔ Right
Left
↔ Right
• Adjust to eliminate flicker.
Small
↔ Large
H SIZE
• The image may not be displayed correctly if the horizontal
size is excessive. In such cases, press the RESET button, and
initialize the horizontal size.
SHARPNESS
COLOR
Soft
Light
↔ Clear
↔ Dark
-
✔
✔
-
-
✔
✔
TINT
Red
↔ Green
-
✔
-
-
✔
✔
✔
✔
✔
✔
✔
✔
✔
-
-
✔
-
✔
✔
-
• Valid only when NTSC or NTSC 4.43 signal is received.
COLOR BAL R Light
COLOR BAL B Light
↔ Dark
↔ Dark
Select Image Aspect Ratio :
4:3[
]
↔
16:9 [
]
Select Position of Image:
] is selected.
Press the
button while 16:9 [
Center →
Down →
Up ( → Center
)
ASPECT
Select Image Aspect Ratio:
4:3[
]
↔
16:9[
]
↔
4:3 small[
Select Position of Image :
Press the
button while 16:9[
] / 4:3
small[
] is selected.
Center →
Down →
Up ( → Center
)
]
• 4:3 small may not be displayed correctly with some input
signals.
ENGLISH-11
ENGLISH
OPERATIONS (continued)
OPERATIONS (continued)
Input Menu
The following functions are available when INPUT is selected on the
menu. Select an item with the
and
buttons, and start operation.
SETUP
AUTO
RGB
VIDEO
HDTV
INPUT
IMAGE
OPT.
EXECUTE
CANCEL
Table 5. Input Menu
Item
AUTO
Description
Operation Start/Stop: Press the
/
button.
Automatic Adjustment at RGB Input: Select the EXECUTE with the
button. Horizontal position (H.POSIT), vertical position (V.POSIT), clock
phase (H.PHASE), and horizontal size (H.SIZE) are automatically adjusted.
Use with the window at maximum size in the application display.
• This operation requires approximately 10 seconds. It may not function correctly with
some input signals. Pressing the AUTO button in this case may correct this problem.
• This function is the same as for the AUTO function in Basic operation.
RGB
Displays RGB Input Frequency:
Displays the horizontal and vertical sync signal frequencies for RGB input.
• Valid only at RGB input.
VIDEO
HDTV
Operation Start/Stop: Press the
/
button.
Select Video Signal Type: Select the signal type with the
and
buttons. Select NTSC, PAL, SECAM, NTSC4.43, M-PAL, or N-PAL as
appropriate for the input signal. The selection of AUTO enables and
executes the function AUTO (Automatic Adjustment at Video Input), except
for the N-PAL input.
• Use this function when the image becomes unstable (eg. the image becomes
irregular, or lacks color) at VIDEO/S-VIDEO input.
• Automatic Adjustment requires approximately ten seconds. It may not function
correctly with some input signals. Pressing the AUTO button in this case may correct
this problem except for the N-PAL input.
• For the COMPONENT VIDEO input, this function is not effective and the signal
type is distinguished automatically.
Operation Start/Stop: Press the
/
button.
Select HDTV Mode: Select the 1080i mode or 1035i mode suitable for the
input signal with the
/
button.
• When the selected HDTV mode is incompatible with the input signal, the image may
be incorrect (eg. the display position or color is incorrect).
ENGLISH-12
Image Menu
SETUP
The following adjustments and settings are available when IMAGE is
selected on the menu. Select an item with the
and
buttons, and
start operation.
INPUT
IMAGE
OPT.
BLANK
MIRROR
START UP
GAMMA
COLOR TEMP
Table 6. Image Menu
Item
Description
Select Blank Screen Color: Select color with the
BLANK
MIRROR
START UP
and
buttons.
•The image is cleared and the entire screen is displayed in the selected color, when
BLANK mode is set with BLANK ON, or when there is no signal for 5 minutes.
Operation Start/Stop: Press the
/
button.
Select Mirror Status: Select mirror status with
and
buttons.
Operation Start/Stop: Press the
/
button.
Setup Initial Screen Display: Select TURN ON with the
button.
Clear Initial Screen Display: Select TURN OFF with the
button.
• Note that if TURN OFF is selected the blank screen is displayed in blue when there
is no signal.
GAMMA
Operation Start/Stop: Press the
/
button.
Select Gamma Mode : Select the gamma mode with the
COLOR
TEMP
Operation Start/Stop: Press the
/
button.
Select Color Temperature:
Select the color temperature mode with the
/
/
button.
button.
ENGLISH-13
ENGLISH
OPERATIONS (continued)
OPERATIONS (continued)
Options Menu
SETUP
The following adjustments and settings are available when OPT. is
selected on the menu. Select an item with the
and
buttons, and
start operation.
INPUT
IMAGE
OPT.
16
VOLUME
MENU COLOR
LANGUAGE
AUTO OFF
SYNC ON G
WHISPER
.
Table 7. Options Menu
Item
Description
↔ Increase VOLUME
VOLUME
Volume Adjustment: Reduce VOLUME
MENU COLOR
Select Menu Background Color: Select with the
and
buttons.
LANGUAGE
Operation Start/Stop: Press the
or
button.
Select Menu Display Language: Select with the
and
buttons.
AUTO OFF
Operation Start/Stop: Press the
or
button.
Set AUTO OFF: Set 1~99 minutes with the
and
buttons. The
system automatically enters the standby mode when a signal is not
received for the set time.
Clear AUTO OFF: Select STOP (0 min.) with the
button. When
STOP is selected the system does not enter the standby mode even if
no signal is received.
SYNC ON G
WHISPER
ENGLISH-14
Operation Start/Stop: Press the
or
button.
SYNC ON G Valid: Select TURN ON with the
button.
SYNC ON G Invalid: Select TURN OFF with the
button.
• May not be displayed correctly with some input signals when SYNC ON G is
valid. In such cases, remove the signal connector so that no signal is received,
set SYNC ON G to invalid, and reconnect the signal.
Operation Start/Stop: Press the
or
button.
Set/Clear Wisper Mode: Press / button. When the WHISPER is
selected, the WHISPER mode is active. In the WHISPER mode,
acoustic noise level from the unit is reduced, brightness level on screen
is a little lower.
No Signal Menu
The same adjustments and settings are available with the Image and
Options menus when the MENU button is pressed during display of the
“NO INPUT IS DETECTED ON ***” or “SYNC IS OUT OF RANGE
ON ***” message while no signal is received.
VOLUME
BLANK
MIRROR
START UP
MENU COLOR
LANGUAGE
AUTO OFF
SYNC ON G
WHISPER
16
Table 8. No Signal Menu
Item
Description
↔ Increase VOLUME
• When this function is used, audio input is automatically switched to video. The
audio input can be switched by moving the DISK PAD left and right during the
display of the volume adjustment bar. The volume adjustment bar is displayed by
pressing VOLUME
or VOLUME
button.
Volume Adjustment: Reduce VOLUME
VOLUME
Select Blank Screen Color: Select the color with the
BLANK
and
buttons.
•The image is cleared and the entire screen is displayed in the selected color,
when BLANK mode is set with BLANK ON, or when there is no signal for 5
minutes.
MIRROR
Operation Start/Stop: Press the
/
button.
Select Mirror Status: Select the mirror status with the
START UP
Operation Start/Stop: Press the
/
button.
Setup Initial Screen Display: Select the TURN ON with the
Clear Initial Screen Display: Select the TURN OFF with the
and
buttons.
button.
button.
• Note that if TURN OFF is selected the blank screen is displayed in blue when there is no signal.
MENU COLOR Select Menu Background Color: Select the color with the
and
buttons.
LANGUAGE
Operation Start/Stop: Press the
/
button.
Select Menu Display Language: Select the language with the
buttons.
AUTO OFF
Operation start/stop: Press the
/
button.
Set AUTO OFF: Set 1~99 minutes with the
and
buttons. The
system automatically enters the standby mode when a signal is not
received for the set time.
Clear AUTO OFF: Select the STOP (0 min.) with the
button. When
the STOP is selected the system does not enter the standby mode even
if no signal is received.
SYNC ON G
WHISPER
and
Operation Start/Stop: Press the
/
button.
SYNC ON G Valid: Select the TURN ON with the
button.
SYNC ON G Invalid: Select the TURN OFF with the
button.
• May not be displayed correctly with some input signals when the SYNC ON G is
valid. In such cases, remove the signal connector so that no signal is received,
set the SYNC ON G to invalid, and reconnect the signal.
Operation Start/Stop: Press the
/
button.
Set/Clear Wisper Mode: Press
/
button. When the WHISPER is
selected, the WHISPER mode is active. In the WHISPER mode,
acoustic noise level from the unit is reduced, brightness level on screen
is a little lower.
ENGLISH-15
ENGLISH
OPERATIONS (continued)
MAINTENANCE
Lamp
HIGH VOLTAGE
HIGH TEMPERATURE
HIGH PRESSURE
Contact your dealer before replacing the lamp.
For the optional lamp, see the item “Optional Parts” of the Table 12.
Before replacing the lamp, switch power OFF, remove the power cord from the power outlet, and
wait approximately 45 minutes until the lamp has cooled. The lamp may explode if handled at high
temperatures.
WARNING • For disposal of used lamp, treat
according to the instruction of community
authorities.
• Since the lamp is made of glass, do not apply shock
to it and do not scratch it.
• Also, do not use old lamp. This could also cause
explosion of the lamp.
• If it is probable that the lamp has exploded (explosive
sound is heard), disconnect the power plug from the
power outlet and ask your dealer to replace lamp. The
lamp is covered by front glass, but in rare cases, the
reflector and the inside of the projector may be
damaged by scattered broken pieces of glass, and
broken pieces could cause injury when being handled.
• Do not use the projector with the lamp cover removed.
Lamp
Reflector
Front
glass
Lamp Life
Projector lamps have a finite life. The image will become darker, and hues will become weaker,
after a lamp has been used for a long period of time.
Replace the lamp if the LAMP indicator is red, or the CHANGE THE LAMP message appears
when the projector is switched ON. See Table 9 of P.19 and Table 10 of P.20.
NOTE • The LAMP indicator is also red when the lamp unit reaches high temperature. Before
replacing the lamp, switch power OFF, wait approximately 20 minutes, and switch power ON again.
If the LAMP indicator is still red, replace the lamp.
ENGLISH-16
MAINTENANCE (continued)
ENGLISH
Replacing the Lamp
1. Switch the projector OFF, remove the power cord from the
power outlet, and wait at least 45 minutes for the unit to cool.
2. Prepare a new lamp.
3. Check that the projector has cooled sufficiently, and gently
turn it upside down.
4. Loosen the two screws as shown in the diagram, and remove
the lamp cover.
5. Loosen the one screw, and gently remove the lamp while
holding the grips. Touching the inside of the lamp case may
result in uneven coloring.
6. Install the new lamp and tighten the one screw firmly. Also
steadily push the opposite side of the screwed lamp into the
unit.
7. Replace the lamp cover in position and tighten the two
screws firmly.
8. Gently turn the projector right-side up.
CAUTION • Ensure that screws are tightened
properly. Screws not tightened fully may result
in injury or accidents.
• Do not use the projector with the lamp cover
removed.
Resetting the Lamp Timer
Reset the lamp timer after replacing the lamp. When the message of “CHANGE THE LAMP …
THE POWER WILL TURN OFF AFTER 0 hr.” is displayed, complete the following operation
within 10 minutes. The power will be turned off automatically in over 10 minutes.
1. Switch power ON, and press the RESET button, for approximately three seconds. The ‘LAMP
xxxx hr’ message will appear on the lamp timer on the bottom of the screen.
2. Press the MENU button on the remote control transmitter, or the RESET button on the control
panel, while the lamp timer is displayed. The ‘LAMP xxxx → 0 ■ CANCEL’ message will
then appear.
3. Press the
and select 0, and wait until the timer display is cleared.
NOTE • Do not reset the lamp timer without replacing the lamp. Reset the lamp timer always
when replacing the lamp. The message functions will not operate properly if the lamp timer is not
reset correctly.
ENGLISH-17
MAINTENANCE (continued)
Air Filter Maintenance
The air filter should be cleaned as described below at intervals of approximately 100 hours.
1. Switch the projector power supply OFF, and remove the power cord from the power outlet.
2. Clean the air filter with a vacuum cleaner.
CAUTION • Switch power OFF and remove the power cord from the power
outlet before beginning maintenance work. Please read the separate “SAFETY
INSTRUCTIONS” thoroughly to ensure that maintenance is performed correctly.
• Replace the air filter if contamination cannot be removed, or if it is damaged.
Contact your dealer in such case. For the optional air filter, see the item “Optional
Parts” of the Table 12.
• Do not use the equipment with the air filter removed.
• When the air filter is clogged with dust etc. the power supply is switched OFF
automatically to prevent the temperature rising inside the projector.
Other Maintenance
Maintenance Inside the Equipment
For safety reasons, ensure that the equipment is cleaned and checked by the dealer once every two
years. Maintaining the equipment by yourself is dangerous.
Cleaning the Lens
Gently wipe the lens with lens cleaning paper. Do not touch the lens with your hands.
Cleaning the Cabinet and Remote control transmitter
Gently wipe with a soft cloth. If dirt and stains etc. are not easily removed, use a soft cloth
dampened with water, or water and a neutral detergent, and wipe dry with a soft, dry cloth.
CAUTION • Switch power OFF and remove the power cord from the power
outlet before beginning maintenance work. Please read the separate “SAFETY
INSTRUCTIONS” thoroughly to ensure that maintenance is performed correctly.
• Do not use detergents or chemicals other than those noted above (e.g. benzene
or thinners).
• Do not use cleaning sprays.
• Do not rub with hard materials, or tap the equipment.
ENGLISH-18
OSD Message
The messages as described below may appear on the screen at power ON. Take the appropriate
measures when such messages appears.
Table 9. OSD Messages
Message
CHANGE THE LAMP
AFTER REPLACING LAMP,
RESET THE LAMP TIME.
(*1)
CHANGE THE LAMP
AFTER REPLACING LAMP,
RESET THE LAMP TIME.
THE POWER WILL TURN OFF
AFTER ** hr.
(*1)
CHANGE THE LAMP
AFTER REPLACING LAMP,
RESET THE LAMP TIME.
THE POWER WILL
TURN OFF
AFTER 0 hr.
Contents
The usage time of lamp will be reaching 2000 hr
shortly.(*2)
It is recommended to replace the lamp soon. Prepare a
new lamp as a replacement.
The usage time of lamp will be reaching 2000 hr shortly.
It is recommended to replace the lamp within * *
hours.(*2)
It might be happened that the lamp is cut off before * * hr
by any chance. Power will be switched OFF
automatically in * * hours. Replace the lamp as shown in
P.17~18 “Lamp”. Always reset the lamp timer after
replacing the lamp.
The usage time of lamp is about to reach. Power will be
switched OFF in a few minutes.(*2)
Switch power OFF immediately and replace the lamp as
shown in P.17 ~18 “Lamp”. Always reset the lamp timer
after replacing the lamp.
NO INPUT IS DETECTED
ON ***
No input signal found.
Check signal input connections and signal sources.
SYNC IS OUT OF RANGE
ON ***
The horizontal or vertical frequency of the input signal is
not within the specified range.
Check the specifications of the equipment and the signal
source.
NOTE (*1) This message is cleared automatically after approximately three minutes, and
appears every time power is switched ON.
(*2) The unit has a function to turn the power off which will be active when the usage time reaches
2000 hr. However the life of lamp might be much different among lamps, so that it might be
happened that a lamp is cut off before the function is active.
ENGLISH-19
ENGLISH
TROUBLESHOOTING
TROUBLESHOOTING (continued)
Indicators Message
The POWER indicator, LAMP indicator, and TEMP indicator are lit and blank as follows. Take the
appropriate measures.
Table 10. Indicators Message
POWER LAMP TEMP
indicator indicator indicator
Contents
Lights
orange
Turns off Turns off The Standby mode has been set.
Blinks
green
Turns off Turns off Warming up. Please wait.
Lights
green
Turns off Turns off ON. Normal operation possible.
Blinks
orange
Turns off Turns off Cooling. Please wait.
Blinks red
-
Blinks
/Lights red
Lights
red
Blinks
/Lights red
Blinks
red
Cooling. Please wait.
The error is found. Take the appropriate measures when the
POWER indicator ceases blinking
Lamp is not lit.
The interior of the equipment may be too hot. Switch power OFF,
wait 20 minutes until the equipment cools, and check whether the
Turns off
ventilation openings are blocked, whether the air filter is dirty, or
whether the ambient temperature exceeds 35 °C. And switch
power ON again. Replace the lamp if the same problem occurs.
-
Lamp or lamp cover is not found, or hasn’t been fitted in correctly.
Switch power OFF, and wait for 45 minutes until the equipment
Turns off
cools. Check fitting of the lamp and lamp cover, and switch power
ON again. Contact your dealer if the same problem occurs again.
The cooling fan is not operating.
Switch power OFF, and wait for 20 minutes until the equipment
cools. Check for foreign matters in the fan, and switch power ON
again. Contact your dealer if the same problem occurs again.
The interior of the equipment is too hot. *2)
Switch power OFF, and wait for 20 minutes until the equipment
Blinks
cools. Check whether the ventilation openings are blocked,
Turns off Lights red
whether the air filter is dirty, or whether the ambient temperature
/Lights red
exceeds 35 °C. Then switch power ON again. Contact your dealer if
the same problem occurs again.
The interior of the equipment is too cool.
Lights
Blinks
Blinks Check whether the ambient temperature is below 0°C. Contact your
dealer if the same problem occurs when the ambient temperature is
green
red
red
0~35°C.
Blinks
Turns off
/Lights red
Blinks
red
NOTE *2) When the internal temperature becomes excessive power is switched OFF
automatically for safety reasons, and the indicator is extinguished. Set the power switch to [O] and
wait for 20 minutes until the equipment has cooled sufficiently.
ENGLISH-20
Symptom
Before requesting repair, check in accordance with the following chart. If the situation cannot be
corrected, then contact your dealer.
Table 11. Symptom
Symptom
The power is not
turned on.
Possible cause
Turn on the main power switch.
The power cord is
disconnected.
Plug the power cord into an AC
power outlet.
The input is not correctly set.
Use the projector or remote control
transmitter to set.
No signal input.
Connect correctly.
6,7
The projector is not correctly
connected.
Connect correctly.
6,7
Video is present but
The volume is set to minimum.
no audio.
Press VOLUME
on the remote
control or display the menu screen
and adjust the volume.
7,8
9
10,14
10
Mute is turned on.
Press the MUTE
The projector is not correctly
connected.
Connect correctly.
6,7
Select BRIGHT with the MENU
button and the press the
button.
11
Audio is present but The brightness is set to
minimum.
no video.
The slide lens door is still
closed.
Colors are pale and Color density and color
color matching is
matching are not correctly
poor.
adjusted.
Images are blurred.
Page
The main power switch is not
turned on.
No video or audio.
Images are dark.
Remedy
button.
8
Open the slide lens door.
Adjust the video.
11
Brightness and contrast are not
correctly adjusted.
Adjust the video.
11
The lamp is nearing the end of
its service life.
Replace with a new lamp.
Focus or H PHASE is out of
adjustment.
Adjust the focus or H PHASE.
16,17
8,11
ENGLISH-21
ENGLISH
TROUBLESHOOTING (continued)
SPECIFICATIONS
Table 12. Specifications
Item
Specification
Product name
Liquid
crystal
panel
Liquid crystal projector
Panel size
1.8 cm (0.7 type)
Drive system
TFT active matrix
CP-S225W : 480,000 pixels (800 horizontal x 600 vertical)
CP-X275W : 786,432 pixels (1024 horizontal x 768 vertical)
Pixels
Lens
Zoom lens F=2.0 ~ 2.3 f=18 ~ 21 mm
Lamp
150 W UHB
Speaker
1.0 W
Power supply
AC100 ~ 120V, 2.7A / AC220 ~ 240V, 1.3A
Power consumption
240 W
Temperature range
0 ~ 35°C (Operating)
Size
289 (W) x 84 (H) x 215 (D) mm
Weight (mass)
CP-S225W : 2.4 kg
CP-X275W : 2.5 kg
RGB
signal
input
Video
signal
input
RGB IN
Video: Analog 0.7Vp-p, 75Ω terminator (positive)
H/V. sync.: TTL level (positive/negative)
Composite sync.: TTL level
D-sub 15-pin shrink jack
AUDIO IN
200mVrms, 47 kΩ (max. 3.0Vp-p)
Stereo mini jack
VIDEO
1.0Vp-p, 75Ω terminator
RCA jack
S-VIDEO
Brightness signal: 1.0Vp-p, 75Ω terminator
Color signal: 0.286Vp-p (NTSC, burst signal), 75Ω terminator
0.3Vp-p (PAL/SECAM, burst signal), 75Ω terminator
Mini DIN 4-pin jack
Y
1.0 Vp-p, 75 Ω Terminator (Positive)
COMPONENT
CB/CR 0.7 Vp-p, 75 Ω Terminator (Positive)
VIDEO
PB/PR 0.7 Vp-p, 75 Ω Terminator (Positive)
AUDIO
Control
functions
CONTROL
Optional Parts
L
R
200mVrms, 47 kΩ (max. 3.0Vp-p)
RCA jack
D-sub 15-pin shrink plug
Lamp: DT00401 (CP-S225W) / DT00461 (CP-X275W)
Air Filter: MU01461
* For others, consult your dealer.
NOTE • This specifications are subject to change without notice.
ENGLISH-22
If a problem occurs with the equipment, first refer to the P.20 “TROUBLESHOOTING” section and
run through the suggested checks. If this does not resolve the problem contact your dealer or service
company. They will tell you what warranty condition is applied.
ENGLISH-23
ENGLISH
WARRANTY AND AFTER-SERVICE
Flüssigkristall-Projektor
BEDIENUNGSANLEITUNG
WARNUNG • Bitte lesen Sie die beiliegende Broschüre
“SICHERHEITSVORSCHRIFTN” und diese “BEDIENUNGSANLEITUNG”
gründlich durch, um korrekte Verwendung durch richtiges Verständnis
sicherzustellen. Bewahren Sie die Bedienungsanleitung nach dem Durchlesen
für spätere Bezugnahme an einem sicheren Ort auf.
HINWEISE • Änderungen der in dieser Bedienungsanleitung gegebenen Informationen bleibt
jederzeit vorbehalten. • Der Hersteller haftet nicht für möglicherweise in dieser Bedienungsanleitung
vorhandene Fehler. • Reproduktion, Übertragung oder Verwendung dieses Dokumentes bzw. seines
Inhalts ist ohne ausdrückliche schriftliche Erlaubnis nicht zulässig.
ANERKENNUNG VON WARENZEICHEN : PS/2, VGA und XGA sind eingetragene Warenzeichen
der International Business Machines Corporation. Apple, Mac und ADB sind eingetragene
Warenzeichen der Apple Computer, Inc. VESA und SVGA sind Warenzeichen der Video
Electronics Standard Association. Windows ist ein eingetragenes Warenzeichen der Microsoft
Corporation. Beachten Sie sorgfältig die Warenzeichen und eingetragenen Warenzeichen aller
Firmen, selbst wenn diese nicht erwähnt sind.
INHAIT
Seite
Seite
EIGENSCHAFTEN ............................2
VOR DER VERWENDUNG ...............2
STÖRUNGSSUCHE........................19
Inhalt der Packung..................................2
Namen der Teile .....................................3
Einlegen der Batterie ..............................4
INSTALLATION ................................5
Installation von Projektor und Bildschirm ......5
Winkeleinstellung....................................5
Kabelanschluß........................................6
Netzanschluß..........................................7
Beispiel für Systemeinrichtung ...............7
Plug & Play .............................................7
BEDIENUNG .....................................8
Einschalten .............................................8
Ausschalten ............................................8
Grundbtrieb.............................................9
Einstellungsmenü .................................11
Eingansmenü........................................12
Abbldmenü ...........................................13
Optionemenü ........................................14
Kein-Signal-Menü .................................15
WARTUNG ......................................16
Lampen.................................................16
Luftfilterwartung ....................................18
Sonstige wartung..................................18
OSD-Meldungen...................................19
Anzeigemeldung...................................20
Symptom ..............................................21
TECHNISCHE DATEN ....................22
GARANTIE UND KUNDENDIENST .....23
....................................................................
TABELLEN
Tabelle 1. Installationsbezug ....................5
Tabelle 2. Kabelanschluß .........................6
Tabelle 3. Grundbtrieb..............................9
Tabelle 4. Einstellungsmenü ..................11
Tabelle 5. Eingansmenü.........................12
Tabelle 6. Abbldmenü.............................13
Tabelle 7. Optionemenü .........................14
Tabelle 8. Kein-Signal-Menü ..................15
Tabelle 9. OSD-Meldungen ....................19
Tabelle 10. Anzeigemeldung ..................20
Tabelle 11. Symptom..............................21
Tabelle 12. Technische Daten................22
....................................................................
Beziehen Sie sich für "TECHNICAL"
(Technisch) und "REGULATORY
NOTICE" (Ausführungshinweis) auf das
Ende dieses Bedienungsanleitung.
DEUTSCH - 1
DEUTSCH
Herzlichen Glückwunsch zum Kauf dieses Flüssigkristall-Projektors von.
EIGENSCHAFTEN
Dieser Flüssigkristallprojektor dient zum Projizieren von Computergrafiken und
NTSC/PAL/SECAM-Videobildern auf eine Leinwand. Großflächige Projektion ist problemlos
möglich, und das Gerät benötigt zur Aufstellung nur wenig Platz.
Hervorragende Helligkeit
Die UHB-Lampe und die Hochleistungsoptik des Geräts sorgen zusammen für optimale
Bildhelligkeit.
Partielle Vergrößerungsfunktion
Interessante Bildteile können für nähere Betrachtung vergrößert werden.
Verzerrungskorrekturfunktion
Verzerrungsfreie Bilder sind schnell verfügbar.
Extra-Leise-Funktion
Der Geräuschpegel des Gerätes kann reduziert werden.
VOR DER VERWENDUNG
Inhalt der Packung
Stellen Sie sicher, daß alle folgenden Teile in der Packung enthalten sind. Wenden Sie sich bitte an
Ihren Händler, wenn Teile fehlen sollten.
HINWEISE
• Bewahren Sie das Originalverpackungsmaterial für späteren Transport auf.
Netzkabel
(US-Typ)
Netzkabel
(UK-Typ)
Netzkabel
(europäischer Typ)
Projektor
KomponentenVideokabel
(mit grünem Streifen)
RGB-Kabel
Bedienungsanleitung
(diese Anleitung)
VIDEO
STANDBY/ON
RGB
KEYSTONE
MENU
SELECT
MENU
MAGNIFY
POSITION RESET
FREEZE VOLUME
MUTE
OFF
AUTO
BLANK
Sicherheitsvorschriften
Fernbedienung mit
Batterie
DEUTSCH - 2
Tragetasche
VOR DER VERWENDUNG (fortsetzung)
Namen der Teile
Fernbedienungssensor
Netzschalter
Netzanschluß
(für Netzkabel)
Objektiv
Gleitende
Objektivabdeckung
Fußeinstellung
Ventilationsöffnungen
(Einlaß)
Ansicht von links vorn
Bedienungsfeld (Vgl.Seite 8 “BEDIENUNG”.)
Anzeige LAMP
Anzeige TEMP
Anzeige POWER
Anzeige MENU
Taste RESET
Taste KEYSTONE
Taste INPUT
Taste STANDBY/ON
Ventilationsöffnungen
(Auslaß)
Fußeinstellknopf
Luftfilter und Einlaß
(für den Kühlventilator)
Lautsprecher
Hintere Fußeinstellung
Ansicht von rechts hinten
Anschlüsse
(siehe unten)
Fernbedienungssensor
Anschluß RGB
Anschluß CONTROL
COMPONENT
Anschluß Y
Anschluß CB/PB
Anschluß CR/PR
Anschluß AUDIO
AUDIO
Anschluß R
Anschluß L
Anschluß VIDEO
Anschluß S-VIDEO
Anschlüsse
DEUTSCH - 3
DEUTSCH
Zoom-Knopf
Fokusring
VOR DER VERWENDUNG (fortsetzung)
Namen der Teile (fortsetzung)
Taste STANDY/ON
STANDBY/ON
Taste KEYSTONE
KEYSTONE
VIDEO
Taste VIDEO
Taste RGB
Taste MENU SELECT
RGB
Taste
MENU
SELECT
Taste
Taste POSITION
Taste
MENU
Taste
POSITION RESET
Taste VOLUME
Taste MENU
MAGNIFY
Taste MAGNIFY
FREEZE VOLUME
Taste MAGNIFY
Taste MAGNIFY
Taste RESET
Taste VOLUME
MUTE
OFF
OFF
BLANK
AUTO
Taste AUTO
Taste FREEZE
Taste MUTE
Taste BLANK
(Vgl. Seite 8 “BEDIENUNG”.)
Batteriehalter
Fernbedienugsteil
Einlegen der Batterien
Erstes Einlegen:
In der Originalverpackung ist die Batterie im Batteriehalter der
Fernbedienung mit einem Schutzfilm (den transparenten Film,
der teilweise im Batteriefach ist) installiert. Ziehen Sie den
Schutzfilm heraus, um die Batterie zu laden.
Seite “+”
Auswechseln:
1. Drehen Sie die Fernbedienung um.
2. Drücken Sie die Nut und ziehen Sie den Batteriehalter wie
rechts gezeigt heraus.
3. Entfernen Sie die verbrauchte Batterie.
4. Legen Sie die neue Batterie mit der Seite “+” nach oben ein.
5. Schieben Sie den Batteriehalter ein, bis er einrastet.
Herausziehen
Batteriehalter
VORSICHT •Falsche Behandlung der Batterie kann einen Brand oder Verletzungen zur
Folge haben. Bei unsachgemäßer Behandlung kann die Batterie explodieren. Die
Batterie vorsichtig entsprechend den Anweisungen in den mitgelieferten
"SICHERHEITSVORSCHRIFTN" und in dieser Anleitung handhaben.
• Verwenden Sie nur eine 3-V-Mikrolithiumbatterie vom Typ Nr. CR2025.
• Achten Sie beim Einlegen der Batterien darauf, dass Plus- und Minuspol gemäß der
Angabe in der Fernbedienung korrekt ausgerichtet sind.
• Die Batterie vorschriftsmäßig entsprechend den lokalen Vorschriften entsorgen.
• Die Batterie außerhalb der Reichweite von Kindern und Haustieren halten.
• Wenn die Fernbedienung längere Zeit nicht benutzt wird, nehmen Sie die Batterien heraus.
HINWEISE Wechseln Sie die Batterien aus, wenn die Wirksamkeit der Fernbedienung nachlässt.
DEUTSCH - 4
INSTALLATION
Beziehen Sie sich für die Bestimmung der Bildschirmgröße und des Projektionsabstands auf die
folgende Zeichnung und Tabelle.
Leinwand
Die Projektionsabstände, die in der Tabelle folgend gezeigt
werden, sind für Größengleich (CP-S225W:800 x 600 Punkte
/ CP-X275W:1024 x 768 Punkte)
a: Entfernung des Projektors zur Leinwand. (±10%)
b: Entfernung von der Objektivmitte bis zum Boden der Leinwand.
(±10%)
Tabelle 1. Installationsbezug
Bildschirmgröße
[m]
1,0
1,5
2,0
2,5
3,0
3,8
5,0
a [m]
Minimal
0,9
1,5
1,9
2,4
2,9
3,7
4,9
Maximal
1,2
1,8
2,4
2,9
3,5
4,4
5,9
AUFSICHT
b
[cm]
8,7
13,1
17,4
21,8
26,1
32,7
43,5
Objektivmitte
b
a
SEITENANSICHT
VORSICHT • Installieren Sie den Projektor in einer angemessenen Umgebung
entsprechend den Anweisungen in der beiliegenden Broschüre
“SICHERHEITSVORSCHRIFTN” und in dieser Bedienungsanleitung.
• Den Flüssigkristallprojektor grundlegend waagerecht aufstellen. Wenn Sie den
Flüssigkristallprojektor mit dem Objektiv nach oben nach unten, oder auf die Seite gestellt
verwenden, kann dies zu Wärmestau im Projektor führen und Beschädigung verursachen.
Achten Sie besonders darauf, die Ventilationsöffnungen bei der Installation nicht zu
blockieren.
• Installieren Sie den LCD-Projektor nicht in einer rauchgefüllten Umgebung. Rauchpartikel
können sich auf wichtigen Teilen (z.B. LCD-Fenster, Linsengruppe usw.) ablagern.
Winkeleinstellung
Verwenden Sie die Fußeinsteller an
der Unterseite des Projektors zum
Einstellen des Projektionswinkels.
Einstellung ist von 0° bis etwa 10°
möglich.
1. Heben Sie die Vorderseite des
Projektors an. Drücken Sie auf den
Fußeinstellknopf und stellen Sie
den Projektionswinkel ein.
2. Lassen Sie den Knopf los, um den
eingestellten Winkel zu fixieren.
3. Drehen Sie den hinteren
Einstellfuß, um seitliche Neigung
zu beseitigen.
Fußeinsteller
Drücken Sie den
Fußeinstellknopf.
Hintere
Fußeinstellung
VORSICHT • Lassen Sie den Fußeinstellknopf nur los, während der Projektor
gehalten wird, da der Projektor sonst umkippen oder die Finger einklemmen
und Körperverletzungen verursachen kann.
DEUTSCH - 5
DEUTSCH
Installation von Projektor und Bildschirm
INSTALLATION (fortsetzung)
Kabelanschluß
Sprechen Sie die Tabelle unten für das Anschließen jedes Terminals des Projektors an jede Einheit an.
Tabelle 2. Kabelanschluß
Funktion
Buchse
Kabel
Analoger RGB-Eingang
RGB
Mitgeliefertes RGB-Kabel oder gesondertes
RGB-Kabel mit 15-polig.em D-SubKompaktstecker und Zollgewindeschrauben
RS-232C-Anschluss
CONTROL
Gesondertes RS-232C-Kabel
Audio-Eingang
(vom Computer)
AUDIO
Gesondertes Audiokabel mit Stereo-MiniStecker
Komponenten-VideoEingang
COMPONENT VIDEO CB/PB
COMPONENT VIDEO Y
Gesondertes Komponenten-Videokabel
COMPONENT VIDEO PR/CB
S-Video-Eingang
S-VIDEO
Video-Eingang
VIDEO
Audio-Eingang
(vom Videogerät)
AUDIO L
Gesondertes S-Video-Kabel mit 4-poligem
Mini-DIN-Stecker
Gesondertes Video/Audio-Kabel mit CinchStecker
AUDIO R
VORSICHT • Falscher Anschluß kann einn Brand oder e elektrischen Schlag
verrursachen. Bitte lessen Sie diese Bedienungsanleitung und die separaten
“SICHERHEITSVORSCHRIFTEN”.
• Schalten Sie vor dem Anschluss alle anzuschließenden Geräte außer dem USB-Kabel aus.
• Die Kabel müssen möglicherweise mit dem Kern auf der Projektorseite angebracht
verwendet werden. Verwenden Sie die mit dem Projektor mitgelieferten Kabel bzw. die
festgelegten Kabel.
HINWEISE • Lesen Sie vor dem Anschluss die Bedienungsanleitungen der zu verbindenden Geräte durch,
um sicherzugehen, dass der Projektor mit dem Gerät kompatibel ist.
• Ziehen Sie zur Sicherheit die Schrauben der Stecker an.
• Bei einigen Modellen wird der gesondert erhältliche Mac-Adapter benötigt.
• Zur Wahl des digitalen RGB-Eingangs sind eventuell Einstellungen am Computer erforderlich. Einzelheiten
entnehmen Sie bitte den Computer-Handbüchern.
• Manche Computer können mehrere Bildschirmmodi haben. Nicht alle dieser Modi können mit diesem
Projektor verwendet werden.
• Angaben zur Stiftbelegung der Anschlüsse entnehmen Sie bitte dem Abschnitt "TECHINICAL".
• Angaben zu den Kommunikationsdaten entnehmen Sie bitte der Gebrauchsanweisung des gesonderten RS232C-Kabels.
• Wenden Sie sich bezüglich anderer Teile an Ihren Händler.
DEUTSCH - 6
INSTALLATION (fortsetzung)
Netzanschluß
Verwenden Sie entsprechend der zu verwendenden Steckdose das angemessene mitgelieferte Netzkabel.
Schließen Sie den Netzanschluß des Projektors mit dem Netzkabel sicher an eine Steckdose an.
Steckdose
Netzkabel
Netzanschluß
Beispid für Systemeinrichtung
Computer
(Desktop)
DVD-Spieler
S-VideoRecorder
Computer
(Notebook)
HINWEISE • Sorgen Sie beim Anschluß an einen Notebook-Computer dafür, daß der externe RGBBildausgang wirksam ist (stellen Sie auf CRT-Anzeige oder auf gleichzeitige LCD- und CRT-Anzeige). Bitte
beziehen Sie sich für weitere Informationen auf die Bedienungsanleitung für das Notebook.
Plug & Play
Dieser Projektor ist mit VESA DDC 1/2B kompatibel. Plug & Play ist durch Anschluß des
Projektors an einen Computer, der mit VESA DC (Display-Datenkanal) kompatibel ist, möglich.
Bitte benutzen Sie diese Funktion, indem Sie das mitgelieferte RGB-Kabel an die Buchse RGB. Plug and
Play funktioniert bei anderem Anschluss eventuell nicht.
HINWEISE • Plug & Play ist ein mit peripherischen Geräten konfiguriertes System, darunter ein
Computer, ein Bildschirmgerät und ein Betriebssystem.
• Dieser Projektor wird als Plug-and-Play-Monitor erkannt. Verwenden Sie die Standard-Bildschirmtreiber.
• Plug and Play funktioniert je nach dem verwendeten Computer eventuell nicht.
DEUTSCH - 7
DEUTSCH
VORSICHT • Das Netzkabel vorsichtig
entsprechend den Anweisungen in den
mitgelieferten "Sicherheitsanweisungen" und in
dieser Anleitung handhaben.
• Das Netzkabel fest anschließen. Vermeiden Sie eine
lockere, unvorschriftsmäßige Steckdose und
Kontaktversagen.
BEDIENUNG
Taste STANDBY/ON
Anzeige POWER
Taste
STANDBY/ON
VIDEO
STANDBY/ON
RGB
KEYSTONE
MENU
SELECT
Zoom knopf
MENU
POSITION RESET
Fokusring
MAGNIFY
Netzschalter
FREEZE VOLUME
Gleitende Objektivabdeckung
Einschalten
1. Stellen Sie sicher, daß das Netzkabel korrekt angeschlossen ist.
2. Stellen Sie den Netzschalter auf [ | ]. Der Bereitschaftsmodus wird gewählt und die Anzeige
POWER leuchtet orange-farbig.
3. Drücken Sie die Taste STANDBY/ON
am Bedienungsfeld oder an der Fernbedienung.
Vorwärmen beginnt und die Anzeige POWER blinkt grün.
4. Wenn die Stromversorgung eingeschaltet ist, hört die Anzeige POWER auf zu blinken und
leuchtet stetig grün. Öffnen Sie dann die Gleitende Objektivabdeckung.
5. Drehen Sie den Zoom-Knopf, um die Bildgröße einzustellen.
6. Drehen Sie den Fokusring, um scharf einzustellen.
Ausschalten
1. Drücken Sie die Taste STANDBY/ON
an der Bedienungskonsole oder der Fernbedienung.
Daraufhin erscheint die Meldung "Power off?" auf dem Bildschirm. Die Meldung verschwindet,
wenn eine beliebige Taste oder 5 Sekunden lang keine Taste gedrückt wird. Drücken Sie die
Taste STANDBY/ON
während dieser Anzeige erneut. Die Projektorlampe geht dann aus und
Kühlen der Lampe beginnt. Während Abkühlen der Lampe blinkt die Anzeige POWER orangefarbig. Drücken der Taste STANDBY/ON
bei blinkender Anzeige POWER ist unwirksam.
2. Das System tritt nach beendigtem Abkühlen in den Bereitschaftsmodus ein, und die Anzeige
POWER hört auf zu blinken und leuchtet orange-farbig. Stellen Sie sicher, daß die Anzeige
POWER orange-farbig leuchtet, und stellen Sie dann den Netzschalter auf [O].
3. Die Anzeige POWER geht aus, wenn die Stromversorgung ausgeschaltet wird. Vergessen Sie
nicht, die Gleitende Objektivabdeckung zu schließen.
WARNUNG • Bitte lesen Sie diese Bedienungsanleitung und die separaten
“SICHERHEITSVORSCHRIFTEN” gründlich durch, bevor Sie die Ausrüstung
verwenden. Bitte stellen Sie immer sicher, daß die Ausrüstung sicher verwendet wird.
HINWEISE • Schalten Sie die Stromversorgung außer in Notfällen nur dann aus, wenn die
Anzeige POWER in Orange leuchtet, weil sonst die Lebensdauer der Projektorlampe verkürzt wird.
• Um Probleme zu vermeiden, schalten Sie den Projektor nur dann ein und aus, wenn der Computer
oder Videorecorder ausgeschaltet ist. Für den Fall, dass ein RS-232C-Kabel angeschlossen ist,
schalten Sie den Computer vor dem Projektor ein.
• Wenn ein Projektor andauernd das gleiche Bild projiziert, kann das Bild als Nachbild
zurückbleiben. Bitte projizieren Sie nicht das gleiche Bild für lange Zeit.
DEUTSCH - 8
BEDIENUNG (fortsetzung)
Grundbetrieb
Der in Tabelle 2 gezeigte Grundbetrieb wird von der mitgelieferten Fernbedienung her durchgeführt
oder vom Bedienungsfeld. Durch (*) angezeigte Punkte können vom Bedienungsfeld her bedient
werden.
Punkt
DEUTSCH
Tabelle 2. Grundbetrieb
Beschreibung
INPUT
SELECT
(Eingangswahl)
Wahl von Eingangssignal (*) : Drücken Sie die Taste INPUT.
RGB → VIDEO → S-VIDEO → COMPONENT (→ RGB )
Wahl von RGB-Eingang : Drücken Sie die Taste RGB.
VIDEO/S-VIDEO/COMPONENT → RGB
Wahl von VIDEO-Eingang : Drücken Sie die Taste VIDEO.
RGB → VIDEO/S-VIDEO/COMPONENT
VIDEO → S-VIDEO → COMPONENT (→ VIDEO)
• Der Name des gewählten Signals wird etwa 3 Sekunden lang angezeigt, wenn das
Eingangssignal umgeschaltet wird.
POSITION
(Position)
Einstellen/Aufheben des Positionseinstellmodus :
Drücken Sie die Taste POSITION. Das Symbol [ ] wird im Positionsmodus angezeigt.
Einstellen der Bildposition :
Drücken Sie die Tasten , , und
im Positionseinstellmodus.
• Nur gültig im Vergrößerungsmodus (MAGNIFY) wenn ein videosignal eingegeben wird.
• Nach einer Inaktivität von etwa 10 Sekunden Dauer erlischt das Symbol [ ], und
der Modus POSITION wird automatisch gelöscht.
Initialisieren Jedes Einzelteil :
RESET (*) Wählen Sie einen Punkt und drücken Sie die Taste RESET.
Initialisieren der Positionseinstellung : Drücken Sie die Taste RESET im
(Rückstellung) Positionsmodus. Diese Funktion ist gültig, nur wenn das RGB-Signal eingegeben wird.
• Gültig ausgenommen für LAUST., SPRACHE, H-PHASE und STILLMODUS.
Einstellen des Vergrößerungsmodus : Drücken Sie die Taste MAGNIFY .
Bewegen des vergrößerten Bereichs :
Führen Sie Positionseinstellung im Vergrößerungsmodus (MAGNIFY) durch.
Einstellen der Vergrößerung: Drücken Sie MAGNIFY
/
im Vergrößerungsmodus.
MAGNIFY
MAGNIFY
vergrößert das Bild ↔ MAGNIFY
verkleinert das Bild
(Vergrößerung)
Annullieren des Vergrößerungsmodus (MAGNIFY) :
Drücken Sie die Taste MAGNIFY .
• Vergrößerung wird durch Laufen oder Einstellen von AUTO, BILDFORMAT, INPUT
SELECT oder VIDEO oder durch Ändern des Eingangssignals annulliert.
OFF
FREEZE
(Standbild)
Einstellen/Aufheben von Standbildmodus : Drücken Sie die Taste FREEZE. Das
Symbol [II] wird angezeigt und das Bild wird im Standbildmodus angestellt.
• Standbildmodus wird durch Laufen oder Einstellen von POSITION, VOLUME,
MUTE, AUTO, BLANK ON/OF oder MENU ON/OF oder durch Ändern des
Eingangssignals annulliert.
• Vergessen Sie nicht, ein Standbild zu annullieren.
Einstellen/Aufheben des KEYSTONE-Modus : Drücken Sie die Taste KEYSTONE
.
Einstellen der Trapezverzeichnung: Drücken Sie die Taste
/
im KEYSTONE(*) Modus.
verkleinert die Unterkante des Bildes ↔
verkleinert die Oberkante des Bildes
KEYSTONE
HINWEISE • Verwenden Sie die Fernbedienung in einem Abstand von etwa 3 m vom Sensor an
der Vorderseite des Projektors und innerhalb eines Winkels von 30° nach rechts bzw. links. Starkes
Licht und Hindernisse stören den Betrieb der Fernbedienung.
(fortgesetzt auf der nächsten Seite)
DEUTSCH - 9
BEDIENUNG (fortsetzung)
Durch (*) angezeigte Punkte können vom Bedienungsfeld her bedient werden.
Tabelle 3. Grundbetrieb (fortsetzung)
Punkt
VOLUME
Beschreibung
(Lautstärke)
Einstellen der Lautstärke : Drücken Sie die Taste VOLUME
Verringern der Lautstärke
↔ Erhöhen der Lautstärke
/
MUTE
Einschalten/Aufheben von Stummschaltung : Drücken Sie die Taste
.
(Stummschaltung) MUTE. Bei eingeschalteter Stummschaltung wird kein Ton gehört.
AUTO
(Automatik)
Automatische Einstellung am RGB-Eingang : Drücken Sie die Taste
AUTO. Horizontale Position (H-POSIT), vertikale Position (V-POSIT),
Taktphase (H-PHASE), und horizontale Größe (H-GR.) werden
automatisch eingestellt. Verwenden Sie das Fenster in der maximalen
Größe des verwendeten Displays.
Automatische Einstellung bei VIDEO-Eingang : Drücken Sie die Taste
AUTO. Ein für das Eingangssignal angemessener Signaltyp wird
automatisch gewählt. Dies ist nur gültig, wenn AUTO im Eingangsmenü
auf VIDEO gestellt ist.
• Dieser Betrieb erfordert etwa 10 Sekunden. Mit einigen Eingangssignalen
funktioniert der Betrieb möglicherweise nicht korrekt.
BLANK
ON/OFF
(Hintergrund
Ein/Aus)
MENU
ON/OFF (*)
(Menü Ein/Aus)
Einschalten/Aufheben von Hintergrundstatus : Drücken Sie die Taste
BLANK. Im Hintergrundstatus wird kein Bild angezeigt. Die
Bildschirmfarbe ist wie in BLANK im Abbld eingestellt.
Menüanzeige Start/Stopp: Drücken Sie die Taste MENU.
• Die Menüanzeige wird automatisch nach etwa 10 Sekunden ohne Tätigkeit
beendet.
Wahl des Menütyps: Drücken Sie die Taste MENU SELECT. Dies
ermöglicht dem Benutzer die Wahl des normalen Menüs oder eines
einzelnen Menüs. Bei einem einzelnen Menü wird nur der gewählte Punkt
angezeigt, und andere Punkte werden mit den Tasten
und
wie beim
normalen Menü angezeigt.
SELECT
(Menüwahl
MENU)
• Nur gültig, wenn das Einstellugsmenü (EISTL) verwendet wird. Drücken Sie die
Taste MENU SELECT nach Wahl von Punkten wie "HELLIE" .
Normales Menü
EISTL
EINGB
HELLE
KONTRAST
V-POSIT
H-POSIT
H-PHASE
H-GR.
FARB BAL R
FARB BAL B
BILDFORMAT
DEUTSCH - 10
ABBLD
(MENU SELECT)
Einzelmenü
OPT.
0
-2
100
100
+1
800
0
0
KONTRAST
-2
BEDIENUNG (fortsetzung)
Einstellungsmenü
EISTL
EINGB
ABBLD
HELLE
KONTRAST
V-POSIT
H-POSIT
H-PHASE
H-GR.
FARB BAL R
FARB BAL B
BILDFORMAT
OPT.
EISTL
0
-2
EINGB
ABBLD
HELLE
KONTRAST
SCH RFE
FARBE
F-TON
FARB BAL R
FARB BAL B
BILDFORMAT
100
100
+1
800
0
0
OPT.
0
+1
+1
0
0
0
0
EISTL
ABBLD
OPT.
0
+1
+1
0
0
0
HELLE
KONTRAST
FARBE
H-PHASE
FARB BAL R
FARB BAL B
BILDFORMAT
COMPONENT
VIDEO/S-VIDEO
RGB
EINGB
DEUTSCH
Die folgenden Einstellungen sind möglich, wenn EISTL am Oberteil des Menüs gewählt wird. Ein
Teil des Einstellungsmenüs unterscheidet zwischen RGB-Eingang VIDEO-Eingang. Wählen Sie
einen Punkt mit den Tasten
und
und Beginnen Sie den Betrieb. Verwenden Sie ein
Einzelmenü, um die Menügröße zu verringern. (siehe Tabelle 3, MENU SELECT).
Tabelle 4. Einstellungsmenü
COMPONENT
Punkt
HELLE
KONTRAST
V-POSIT
H-POSIT
H-PHASE
Beschreibung
Dunkel
↔ Hell
Schwach
↔ Stark
Abwärts
↔ Aufwärts
Links
↔ Rechts
Links
↔ Rechts
• Zur Beseitigung von Flackern einstellen.
Klein
H-GR.
SCHÄRFE
FARBE
F-TON
480i
575i
480P
720P
1080i
✔
✔
✔
✔
✔
✔
✔
✔
✔
✔
-
-
-
✔
-
✔
✔
✔
-
-
-
-
✔
✔
-
-
✔
✔
-
✔
-
-
✔
✔
✔
✔
✔
✔
✔
✔
✔
-
-
✔
-
✔
✔
-
↔ Groß
• Das Bild wird möglicherweise nicht korrekt angezeigt, wenn die
horizontale Größe übermäßig groß ist. Drücken Sie in einem
solchen Fall die Taste RESET und initialisieren Sie die
horizontale Größe.
Weich
↔ Klar
Hell
↔ Dunkel
Rot
↔ Grün
• Nur gültig, wenn NTSC- oder NTSC4.43-Signale empfangen
werden.
FARB BAL R Hell
FARB BAL B Hell
VIDEO
S-VIDEO
RGB
↔ Dunkel
↔ Dunkel
Wählen Sie das Seitenverhältnis:
4:3[
]
↔
16:9[
]
Wählen Sie die Anzeigeposition:
] gewählt ist.
Drücken Sie die Taste
während 16:9[
Mitte →
Abwärts →
Aufwärts (→
Mitte)
Wählen Sie das Seitenverhältnis:
BILDFORMAT 4:3[
]
↔
16:9[
]
↔
4:3 klein[
]
Wählen Sie die Anzeigeposition:
Drücken Sie die Taste
während 16:9[
]/4:3 klein [
gewählt ist.
Mitte →
Abwärts →
Aufwärts (→
Mitte)
• 4:3 klein wird mit einigen Eingangssignalen
möglicherweise nicht korrekt angezeigt.
]
DEUTSCH - 11
BEDIENUNG (fortsetzung)
Eingangsmenü
EISTL
Die folgenden Funktionen stehen zur Verfügung, wenn EINGB im Menü
gewählt wird. Wählen Sie einen Punkt mit den Tasten
und
und
beginnen Sie mit dem Betrieb.
Tabelle 5. Eingangsmenü
Punkt
AUTO
EINGB
AUTO
RGB
VIDEO
HDTV
ABBLD
OPT.
AUSF HREN
L SCHEN
Beschreibung
Start/Stopp des Betriebs: Drücken Sie die Taste
/ .
Automatische Einstellung bei RGB-Eingang: Wählen Sie AUSFÜHREN
mit der Taste . Horizontale Position (H-POSIT), vertikale Position (VPOSIT), Taktphase (H-PHASE), und horizontale Größe (H-GR.) werden
automatisch eingestellt. Verwenden Sie das Fenster in der maximalen
Größe des verwendeten Displays.
• Dieser Betrieb erfordert etwa 10 Sekunden. Mit einigen Eingangssignalen funktioniert er
möglicherweise nicht korrekt. In diesem Fall kann Druck auf die Taste AUTO das Problem
möglicherweise lösen.
• Diese Funktion ist die gleiche wie die Funktion AUTO in der grundlegenden Bedienung.
RGB
Anzeige der RGB-Eingangsfrequenz: Anzeige der horizontalen und der
vertikalen Synchronisationssignalfrequenz für RGB-Eingang.
• Nur gültig bei RGB-Eingang.
VIDEO
Start/Stopp des Betriebs: Drücken Sie die Taste
/ .
Wahl des Videosignaltyps: Wählen Sie den Signaltyp mit den Tasten
und . Wahl von NTSC, PAL, SECAM, NTSC4.43, M-PAL, oder N-PAL wie
angemessen für das Eingangssignal. Die Wahl von AUTO bewirkt die
Aktivierung und Ausführung der Funktion AUTO (Automatische Einstellung
bei Video-Signaleingabe), außer bei Eingabe eines N-PAL-Signals.
HDTV
Start/Stopp des Betriebs: Drücken Sie die Taste
/ .
Wahl des HDTV-Modus: Wählen Sie den für das Eingangssignal
passenden Modus 1080i oder 1035i mit den Tasten
/ .
• Benutzen Sie diese Funktion bei VIDEO/S-VIDEO-Signaleingabe, wenn das Bild instabil wird
(z.B. wenn das Bild unregelmäßig oder farbenblass wird).
• Die automatische Einstellung erfordert etwa zehn Sekunden. Bei bestimmten Eingangssignalen
funktioniert sie eventuell nicht richtig. In diesem Fall kann das Problem durch Drücken der Taste
AUTO, außer für N-PAL-Signaleingabe, beseitigt werden.
• Für den Eingang COMPONENT VIDEO ist diese Funktion unwirksam, da der Signaltyp
automatisch erkannt wird.
• Wenn der gewählte HDTV-Modus mit dem Eingangssignal inkompatibel ist, kann es zu
Bildfehlern (z.B. falsche Anzeigeposition oder Farbe) kommen.
DEUTSCH - 12
BEDIENUNG (fortsetzung)
EISTL
Die folgenden Einstellungen stehen zur Verfügung, wenn ABBLD im
Menü gewählt worden ist. Wählen Sie einen Punkt mit den Tasten
und
und beginnen Sie mit dem Betrieb.
BLANK
SPIEGEL
START
GAMMA
COLOR TEMP
Tabelle 6. Abbldmenü
Item
BLANK
SPIEGEL
START
EINGB
ABBLD
OPT.
Description
Wahl der Farbe für den Bildschirmhintergrund:
Wählen Sie die Farbe mit den Tasten
und .
• Das Bild wird gelöscht und der gesamte Bildschirm wird in der gewählten
Farbe angezeigt, wenn Hintergrundmodus eigeschaltet wird (BLANK ON),
oder wenn es 5 Minuten lang kein Signal anliegt.
Start/Stopp des Betriebs: Drücken Sie die Taste
/ .
Wahl von Spiegelbildstatus:
Wählen Sie den Status mit den Tasten
und .
Start/Stopp des Betriebs: Drücken Sie die Taste
/ .
Anzeige des Anfangsbildschirms für Einstellung:
Wählen Sie EIN mit der Taste .
Löschen der Anfangsbildschirmanzeige: Wählen Sie AUS mit der Taste .
• Bitte beachten Sie, daß bei Wahl von AUS der Bildschirm blau angezeigt wird,
wenn kein Signal anliegt.
GAMMA
Start/Stopp des Betriebs: Drücken Sie die Taste
/
Wahl der Gammamodus:
Wählen Sie die Gammamodus mit der Taste
/ .
.
COLOR
TEMP
Start/Stopp des Betriebs: Drücken Sie die Taste
/ .
Wahl der Farbtemperatur:
Wählen Sie den Farbtemperaturmodus mit der Taste
/ .
DEUTSCH - 13
DEUTSCH
Abbldmenü
BEDIENUNG (fortsetzung)
Optionenmenü
EISTL
Die folgenden Einstellungen stehen zur Verfügung, wenn OPT. im Menü
gewählt worden ist. Wählen Sie einen Punkt mit den Tasten
und
und starten Sie den Betrieb.
EINGB
ABBLD
OPT.
16
LAUTST.
MEN FARBE
SPRACHE
AUTOM-AUS
SYNC ON G
STILLMODUS
Tabelle 7. Optionenmenü
Punkt
Beschreibung
LAUTST.
Einstellen der Lautstärke:
↔ Erhöhen der Lautstärke
Verringern der Lautstärke
MENÜFARBE
Wählen Sie die Menü-Hintergrundfarbe:
Wählen Sie mit den Tasten
und .
SPRACHE
Start/Stopp des Betriebs: Drücken Sie die Taste
oder
Wahl der Menüanzeigesprache: Wählen Sie mit den Tasten
AUTOM-AUS
Start/Stopp des Betriebs: Drücken Sie die Taste
oder .
Einstellen der automatischen Ausschaltzeit:
Stellen Sie 0 bis 99 Minuten mit den Tasten
und
ein. Das System
tritt automatisch in den Bereitschaftsmodus ein, wenn für die
eingestellte Zeit kein Signal empfangen wird.
Löschen der automatischen Ausschaltzeit:
Wählen Sie LOSCHEN (0 min) mit der Taste . Wenn LOSCHEN
gewählt ist, tritt das System selbst wenn kein Signal empfangen wird
nicht in den Bereitschaftsmodus ein.
SYNC ON G
STILLMODUS
DEUTSCH - 14
.
und
Start/Stopp des Betriebs: Drücken Sie die Taste
oder .
Synchronisation an G gültig: Wählen Sie EIN mit der Taste .
Synchronisation an G ungültig: Wählen Sie AUS mit der Taste
.
.
• Wird möglicherweise mit einigen Eingangssignalen nicht korrekt angezeigt,
wenn SYNC ON G gültig ist. Ziehen Sie in einem solchen Fall den
Signalanschluß ab, so daß kein Signal empfangen wird, schalten Sie SYNC ON
G aus, und schließen Sie das Signal wieder an.
Start/Stopp des Betriebs: Drücken Sie die Taste
/ .
AEinstellen/Aufheben des Flüstermodus: Drücken Sie die Taste
/ . Wenn
Sie STILLMODUS wählen, wird der STILLMODUS-Modus aktiviert. Im
STILLMODUS-Modus verringert sich der Geräuschpegel des Gerätes, der
Helligkeitspegel auf dem Bildschirm wird geringfügig abgesenkt.
BEDIENUNG (fortsetzung)
Die gleichen Einstellungen wie mit den Menüs ABBLD und OPT. stehen
zur Verfügung, wenn die Taste MENU während Anzeige der Meldung
“KEIN EINGANGSSIGN. AUF ***” oder “SYNCER. UBERSCHR.
AUF ***” gedrückt wird, während kein Signal empfangen wird.
Tabelle 8. Kein-Signal-Menü
Punkt
LAUTST.
BLANK
SPIEGEL
START
MEN FARBE
SPRACHE
AUTOM-AUS
SYNC ON G
STILLMODUS
16
Beschreibung
LAUTST.
Einstellen der Lautstärke: Verringern der Lautstärke
↔ Erhöhen der Lautstärke
• Bei Verwendung dieser Funktion wird der Audio-Eingang automatisch auf Video
umgeschaltet. Der Audio-Eingang kann umgeschaltet werden, indem das DISK
PAD während der Anzeige des Lautstärke-Einstellbalkens nach links oder rechts
bewegt wird. Der Lautstärke-Einstellbalken wird durch Drücken der Taste
VOLUME
oder VOLUME
angezeigt.
BLANK
Wahl der Farbe für den Bildschirmhintergrund:
Wählen Sie die Farbe mit den Tasten
und .
• Das Bild wird gelöscht und der gesamte Bildschirm wird in der gewählten Farbe
angezeigt, wenn Hintergrundmodus eigeschaltet wird (BLANK ON), oder wenn es
5 Minuten lang kein Signal anliegt.
SPIEGEL
Start/Stopp des Betriebs: Drücken Sie die Taste
/ .
Wahl von Spiegelbildstatus: Wählen Sie den Status mit den Tasten
START
Start/Stopp des Betriebs: Drücken Sie die Taste
/ .
Anzeige des Anfangsbildschirms für Einstellung: Wählen Sie EIN mit der Taste .
Löschen der Anfangsbildschirmanzeige: Wählen Sie AUS mit der Taste .
• Bitte beachten Sie, daß bei Wahl von AUS der Bildschirm blau angezeigt wird,
wenn kein Signal anliegt.
MENÜFARBE
Wählen Sie die Menü-Hintergrundfarbe: Wählen Sie mit den Tasten
SPRACHE
Start/Stopp des Betriebs: Drücken Sie die Taste
/ .
Wahl der Menüanzeigesprache: Wählen Sie mit den Tasten
AUTOM-AUS
Start/Stopp des Betriebs: Drücken Sie die Taste
/ .
Einstellen der automatischen Ausschaltzeit: Stellen Sie 0 bis 99 Minuten mit
den Tasten
und
ein. Das System tritt automatisch in den
Bereitschaftsmodus ein, wenn für die eingestellte Zeit kein Signal empfangen wird.
Löschen der automatischen Ausschaltzeit: Wählen Sie LOSCHEN (0 min) mit
der Taste . Wenn LOSCHEN gewählt ist, tritt das System selbst wenn kein
Signal empfangen wird nicht in den Bereitschaftsmodus ein.
SYNC ON G
STILLMODUS
und
Start/Stopp des Betriebs: Drücken Sie die Taste
/ .
Synchronisation an G gültig: Wählen Sie EIN mit der Taste .
Synchronisation an G ungültig: Wählen Sie AUS mit der Taste
und
und
.
.
.
.
• Wird möglicherweise mit einigen Eingangssignalen nicht korrekt angezeigt, wenn SYNC
ON G gültig ist. Ziehen Sie in einem solchen Fall den Signalanschluß ab, so daß kein Signal
empfangen wird, schalten Sie SYNC ON G aus, und schließen Sie das Signal wieder an.
Start/Stopp des Betriebs: Drücken Sie die Taste
/ .
AEinstellen/Aufheben des Flüstermodus: Drücken Sie die Taste
/ . Wenn
Sie STILLMODUS wählen, wird der STILLMODUS-Modus aktiviert. Im
STILLMODUS-Modus verringert sich der Geräuschpegel des Gerätes, der
Helligkeitspegel auf dem Bildschirm wird geringfügig abgesenkt.
DEUTSCH - 15
DEUTSCH
Kein-Signal-Menü
WARTUNG
Lampen
HOCHSPANNUNG
HOHE TEMPERATUR
HOHER DRUCK
Wenden Sie sich vor dem Auswechseln der Lampe an Ihren Händler.
Angaben zur Ersatzlampe finden Sie unter "Sonderzubehör" in Tabelle 12.
Schalten Sie vor dem Auswechseln der Lampe die Stromversorgung aus, ziehen Sie den Stecker
des Netzkabels aus der Steckdose und warten Sie etwa 45 Minuten, bis sich die Lampe abgekühlt
hat. Die Lampe kann explodieren, wenn sie in heißem Zustand gehandhabt wird.
WARNUNG • Entsorgen Sie verbrauchte Lampen
entsprechend den örtlichen Vorschriften.
• Da Lampen aus Glas sind, sollten sie nicht gekratzt oder
mechanischen Stößen ausgesetzt werden.
• Verwenden Sie alte Lampen nicht erneut - sie können
explodieren.
• Wenn es wahrscheinlich erscheint, daß die Lampe
explodiert ist, so ziehen Sie den Stecker des Netzkabels
aus der Steckdose und bitten Sie Ihren Händler, die
Lampe auszuwechseln. Die Lampe wird durch das
Frontglas, aber in seltenen Fällen könnten der Reflektor
und das Innere des Projektors durch Glassplitter
beschädigt werden, und zerbrochene Teile können bei der
Handhabung Verletzungen verursachen.
• Verwenden Sie den Projektor nicht mit abgenommener
Lampenabdeckung.
Lampe
Reflektor
Frontscheibe
Lampenlebensdauer
Projektorlampen haben eine begrenzte Lebensdauer. Das Bild wird dunkler und die Tönungen
werden schwächer, nachdem eine Lampe eine bestimmte Zeit verwendet worden ist. Wechseln Sie
die Lampe aus, wenn die Anzeige LAMP rot leuchtet oder wenn die Meldung LAMPE
AUSWECHSELN beim Einschalten des Projektors erscheint. Siehe Tabelle 9 auf S. 19 und Tabelle
10 auf S. 20.
HINWEISE • Die Anzeige LAMP leuchtet auch rot, wenn die Lampeneinheit eine hohe
Temperatur hat. Schalten Sie vor dem Auswechseln der Lampe die Stromversorgung aus , warten
Sie etwa 20 Minuten, und schalten Sie dann die Stromversorgung erneut ein. Wenn die Anzeige
LAMP immer noch rot leuchtet, so wechseln Sie die Lampe aus.
DEUTSCH - 16
WARTUNG (fortsetzung)
Auswechseln der Lampe
DEUTSCH
1. Schalten Sie den Projektor aus, ziehen Sie den Stecker des
Netzkabels aus der Steckdose und warten Sie mindestens 45
Minuten zum Abkühlen des Projektors.
2. Bereiten Sie eine neue Lampe vor.
3. Überprüfen Sie, daß sich der Projektor ausreichend abgekühlt hat,
und legen Sie ihn dann vorsichtig mit der Oberseite nach unten hin.
4. Lösen Sie die zwei Schrauben wie in der Abbildung gezeigt und
entfernen Sie die Lampenabdeckung.
5. Lösen Sie die Schraube und entfernen Sie die Lampe vorsichtig,
während Sie die Griffe halten. Berühren der Innenseite des
Lampengehäuses kann ungleichförmige Färbung verursachen.
6. Die neue Lampe installieren und die Stellschraube der Lampe fest
anziehen. Drücken Sie auch das der Schraube gegenüberliegende
Ende der Lampe ganz in das Gerät.
7. Bringen Sie die Lampenabdeckung wieder an ihrem Platz an und
ziehen Sie die zwei Schrauben fest an.
8. Stellen Sie den Projektor vorsichtig wieder richtig herum hin.
VORSICHT • Stellen Sie sicher, daß Schrauben fest
angezogen sind. Nicht fest angezogene schrauben
können Verletzungen oder Unfälle verursachen.
• Verwenden Sie den Projektor nicht mit
abgenommener Lampenabdeckung.
Rückstellung des Lampenzeitschalters
Stellen Sie den Lampenzeitschalter nach Auswechseln der Lampe. Wenn die Meldung “LAMPE
AUSWECHSELN … STROMABSCHALTUNG NACH 0 STUNDEN.” angezeigt worden ist, so
führen Sie die folgenden Tätigkeiten innerhalb von 10 Minuten. Bei Überschreiten von 10 Minuten
wird die Stromversorgung automatisch ausgeschaltet.
1. Schalten Sie die Stromversorgung ein, und halten Sie die Taste RESET etwa drei Sekunden lang
gedrückt. Die Meldung 'LAMP xxxx hr' wird am Lampenzeitschalter an der Unterseite des
Bildschirms angezeigt.
2. Drücken Sie die Taste MENU an der Fernbedienung oder die Taste RESET am Bedienungsfeld
während der Lampenzeitschalter angezeigt wird. Die Meldung 'LAMP xxxx → 0 ■ CANCEL'
wird dann angezeigt.
3. Drücken Sie die Taste , wählen Sie 0, und warten Sie, bis die Zeitschalteranzeige verschwindet.
HINWEISE • Den Lampenzeitschalter nicht zurückstellen, ohne die Lampe auszuwechseln. Den
Lampenzeitschalter immer zurückstellen, wenn die Lampe ausgewechselt wird. Die Meldungen
werden nicht korrekt angezeigt, wenn der Lampenzeitschalter nicht korrekt zurückgestellt wird.
DEUTSCH - 17
WARTUNG (fortsetzung)
Luftfilterwartung
Der Luftfilter sollte wie nachfolgend beschrieben etwa alle 100 Stunden gereinigt werden.
1. Schalten Sie die Stromversorgung des Projektors aus und ziehen Sie den Stecker des Netzkabels
aus der Steckdose.
2. Reinigen Sie den Luftfilter mit einem Staubsauger.
VORSICHT • Schalten Sie die Stromversorgung aus und ziehen Sie den
Stecker des Netzkabels aus der Steckdose, bevor Sie mit der Wartungsarbeit
beginnen. Bitte lesen Sie die separaten “SICHERHEITSVORSCHRIFTN” gründlich
durch, um korrekte Durchführung der Wartung sicherzustellen.
• Wechseln Sie den Luftfilter aus, wenn die Verschmutzung nicht beseitigt werden
kann oder wenn er beschädigt ist. Wenden Sie sich an Ihren Händler. Angaben
zum Ersatzluftfilter finden Sie unter "Sonderzubehör" in Tabelle 12.
• Verwenden Sie den Projektor nicht mit entferntem Luftfilter.
• Wenn der Luftfilter durch Staub usw. verstopft ist, die Stromversorgung wird
automatisch ausgeschaltet, um einen Temperaturanstieg im Projektor zu
verhüten.
Sonstige Wartung
Wartung in der Ausrüstung
lassen Sie das Gerät aus Sicherheitsgründen etwa alle zwei Jahre von Ihrem Händler reinigen und
überprüfen. Wartung durch den Benutzer ist gefährlich.
Reinigen des Objektivs
Das Objektiv vorsichtig mit Linsenreinigungspapier abwischen. Die Linse nicht mit der Hand
berühren.
Reinigen von Gehäuse und Fernbedienung
Wischen Sie vorsichtig mit einem weichen Lappen ab. Wenn Schmutz oder Flecken usw. nicht
einfach entfernt werden können, so verwenden Sie einen mit Wasser oder einem mit Wasser
verdünnten neutralen Reinigungsmittel angefeuchteten weichen Lappen und wischen Sie mit einem
weichen, trockenen Lappen nach.
VORSICHT • Schalten Sie die Stromversorgung aus und ziehen Sie den
Stecker des Netzkabels aus der Steckdose, bevor Sie mit der Wartungsarbeit
beginnen. Bitte lesen Sie die separaten “SICHERHEITSVORSCHRIFTN” gründlich
durch, um korrekte Durchführung der Wartung sicherzustellen.
• Nur die oben angeführten Reinigungsmittel und keine anderen Mittel oder
Chemikalien verwenden (z.B. Benzin oder Verdünnungsmittel).
• Verwenden Sie keinen Reinigungsspray.
• Reiben Sie nicht mit hartem Material und klopfen Sie nicht auf den Projektor.
DEUTSCH - 18
STÖRUNGSSUCHE
OSD-Meldungen
Tabelle 9. OSD-Meldungen
Meldung
Beschreibung
LAMPE AUSWECHSELN
NACH DEM ERSETZEN DER Die Betriebszeit der Lampe erreicht in Kürze 2000 h. (*2)
LAMPE IST DER LAMPEN- Es wird empfohlen, die Lampe bald auszuwechseln. Bereiten Sie
TIMER ZRÜKZUSTELLEN. eine neue Lampe als Ersatz vor.
(*1)
LAMPE AUSWECHSELN
NACH DEM ERSETZEN DER
LAMPE IST DER LAMPENTIMER ZRÜKZUSTELLEN.
STROMABSCHALTUNG
NACH ** STUNDEN.
(*1)
Die Betriebszeit der Lampe erreicht in Kürze 2000 h. Es wird
empfohlen, die Lampe innerhalb von ** Stunden auszuwechseln. (*2)
Es ist möglich, dass die Lampe vor Verstreichen von ** Stunden
erlischt. Die Stromversorgung wird nach ** Stunden automatisch
ausgeschaltet. Wechseln Sie die Lampe wie auf den Seiten 17 und
18 "Lampe" gezeigt aus. Stellen Sie nach dem Auswechseln der
Lampe immer den Lampentimer zurück.
LAMPE AUSWECHSELN
NACH DEM ERSETZEN DER
LAMPE IST DER LAMPENTIMER ZRÜKZUSTELLEN.
STROMABSCHALTUNG
NACH 0 STUNDEN.
Die Lebensdauer der Lampe ist etwa erreicht worden. Die
Stromversorgung wird in einigen Minuten ausgeschaltet. (*2)
Schalten Sie sofort die Stromversorgung aus und wechseln Sie die
Lampe wie auf den Seiten 17 und 18 "Lampe" gezeigt aus.
Stellen Sie nach dem Auswechseln der Lampe immer den
Lampentimer zurück.
KEIN EINGANGSSIGN.
AUF ***
Kein Eingangssignal gefunden.
Die Signaleingangsanschlüsse und die Signalquellen überprüfen.
Die horizontale oder die vertikale Frequenz des Eingangssignals ist
nicht im festgelegten Bereich.
Überprüfen Sie die technischen Daten der Ausrüstung und die
Signalquelle.
Die Innentemperatur ist angestiegen.
Schalten Sie die Stromversorgung aus und warten Sie 20 Minuten,
bis sich das Gerät abgekühlt hat.
Überprüfen Sie die folgenden Punkte und schalten Sie dann die
ANS. LUFTSTROM UBERPR.
Stromversorgung wieder ein.
• Ist der Lufteinlaß oder der Luftauslaß blockiert ?
• Ist der Luftfilter schmutzig ?
• Ist die Umgebungstemperatur über 35°C ?
SYNCER. UBERSCHR.
AUF ***
HINWEISE (*1) Diese Meldung wird automatisch nach etwa drei Minuten gelöscht und
erscheint jeweils beim Einschalten der Stromversorgung.
(*2) Das Gerät hat eine Funktion zum Ausschalten der Stromversorgung, die aktiv wird, wenn die
Betriebszeit der Lampe 2000 h erreicht. Da sich die Lebensdauer jedoch je nach der Lampe
unterscheidet, ist es möglich, dass eine Lampe versagt, bevor diese Funktion aktiv wird.
DEUTSCH - 19
DEUTSCH
Die nachfolgend angeführten Meldungen können nach dem Einschalten der Stromversorgung auf
dem Bildschirm erscheinen. Ergreifen Sie die angemessenen Maßnahmen, wenn eine solche
Meldung erscheint.
STÖRUNGSSUCHE (fortsetzung)
Anzeigemeldung
Die Anzeige POWER, die Anzeige LAMP und die Anzeige TEMP leuchten wie folgt auf oder
nicht. Ergreifen Sie die angemessenen Maßnahmen.
Tabelle 10. Anzeigemeldung
Anzeige
POWER
Anzeige Anzeige
LAMP TEMP
Beschreibung
Blinkt orange- Schaltet Schaltet
Der Bereitschaftsmodus ist eingestellt worden.
farbig
aus
aus
Blinkt grün
Schaltet Schaltet
Anwärmen. Bitte warten.
aus
aus
Leuchtet
grün
Schaltet Schaltet
Eingeschaltet. Normaler Betrieb ist möglich.
aus
aus
Blinkt orange- Schaltet Schaltet
Abkühlen. Bitte warten.
farbig
aus
aus
Abkühlen. Bitte warten.
Der Fehler wird gefunden. Ergreifen Sie die angemessenen
Blinkt rot
Maßnahmen, wenn die Anzeige POWER auf zu blinken.
Die Lampe leuchtet nicht.
Das Innere des Geräts kann zu heiß sein. Schalten Sie die
Stromversorgung aus, warten Sie 20 Minuten, bis sich das Gerät abgekühlt
Blinkt
Leuchte Schaltet
/Leuchtet
hat, und überprüfen Sie, ob der Einlaß oder der Auslaß blockiert ist, ob der
t rot
aus
rot
Luftfilter schmutzig ist, oder ob die Umgebungstemperatur 35°C
überschreitet. Und schalten Sie dann die Stromversorgung wieder ein.
Wechseln Sie die Lampe aus, falls das gleiche Problem wieder auftritt.
Blinkt
/Leuchtet
rot
Blinkt
/Leuchtet
rot
Blinkt
/Leuchtet
rot
Leuchtet
grün
Blinkt
rot
Es ist keine Lampe oder Lampenabdeckung gefunden worden, oder
sie sind nicht korrekt angebracht worden.
Schalten Sie die Stromversorgung aus und warten Sie 45 Minuten,
Schaltet
bis sich das Gerät abgekühlt hat. Überprüfen Sie die Anbringung der
aus
Lampe und der Lampenabdeckung, und schalten Sie dann die
Stromversorgung wieder ein. Wenden Sie sich an Ihren Händler,
wenn das gleiche Problem wieder auftritt.
Der Kühlventilator arbeitet nicht.
Schalten Sie die Stromversorgung aus und warten Sie 20 Minuten, bis sich
das Gerät abgekühlt hat. Überprüfen Sie auf Fremdkörper im Ventilator
und schalten Sie dann die Stromversorgung wieder ein. Wenden Sie sich
an Ihren Händler, wenn das gleiche Problem wieder auftritt.
Das Innere des Geräts ist zu heiß. *2)
Schalten Sie die Stromversorgung aus und warten Sie 20 Minuten,
bis sich das Gerät abgekühlt hat. Überprüfen Sie, ob der Einlaß oder
Schaltet Leuchtet
der Auslaß blockiert ist, ob der Luftfilter schmutzig ist, oder ob die
aus
rot
Umgebungstemperatur 35°C überschreitet. Schalten Sie dann die
Stromversorgung wieder ein. Wenden Sie sich an Ihren Händler,
wenn das gleiche Problem wieder auftritt.
Das Innere des Gerätes ist zu kühl.
Prüfen Sie, ob die Umgebungstemperatur unter 0°C liegt. Wenden
Blinkt rot Blinkt rot
Sie sich an Ihren Händler, falls das gleiche Problem bei einer
Umgebungstemperatur von 0 – 35°C auftritt.
Schaltet Blinkt
aus
rot
HINWEISE *2) Wenn die Temperatur im Inneren zu hoch wird, so wird die Stromversorgung
aus Sicherheitsgründen automatisch ausgeschaltet und die Anzeige geht aus. Stellen Sie den
Netzschalter auf [O] und warten Sie 20 Minuten, bis sich das Gerät ausreichend abgekühlt hat.
DEUTSCH - 20
STÖRUNGSSUCHE (fortsetzung)
Symptom
Die folgenden Erscheinungen sind möglicherweise keine Störungen. Bitte überprüfen Sie
entsprechend der folgenden Tabelle.
Erscheinungen
Die
Stromversorgung
ist nicht
eingeschaltet.
Kein Bild oder
Ton.
Beispiele für keine Störungen
Der Hauptnetzschalter ist nicht
auf ON gestellt.
Den Hauptnetzschalter auf ON
stellen.
Das Netzkabel ist nicht
angeschlossen.
Das Netzkabel an eine
Netzsteckdose anschließen.
Die Eingangsquelle wurde nicht Am Projektor oder am
korrekt gewählt.
Fernbedienungsteil korrekt einstellen.
7,8
9
Korrekt anschließen.
6,7
Der Projektor ist nicht korrekt
angeschlossen.
Korrekt anschließen.
6,7
Die Taste VOLUME
am
Fernbedienungsteil drücken oder
die Lautstärke auf dem Menü
einstellen.
10,14
Der Ton ist stummgeschaltet.
Die Taste MUTE
Der Projektor ist nicht korrekt
angeschlossen.
Korrekt anschließen.
6,7
Wählen Sie HELLE mit der Taste
MENU und drücken Sie die Taste
.
11
Öffnen Sie die gleitende
Objektivabdeckung.
8
Am Videogerät einstellen.
11
HELLE und KONTRAST sind
nicht korrekt eingestellt.
Am Videogerät einstellen.
11
Lampenbirne nähert sich dem
Ende ihrer Betriebslebensdauer.
Die Lampenbirne austauschen.
16,17
Die Fokussierung oder HPHASE ist nicht korrekt
eingestellt.
Die Fokussierung oder H-PHASE
einstellen.
8,11
Die Helligkeit ist auf den
Ton ist vorhanden, Minimalwert eingestellt.
aber kein Bild.
Die gleitende
Objektivabdeckung ist noch
geschlossen.
Die Farben sind
Die Farbsättigung und blaß und die
abstimmung sind nicht korrekt
Farbentsprechung
eingestellt.
ist schlecht.
Die Bilder sind
unscharf.
Seite
Kein Signaleingang.
Bild ist vorhanden, Die Lautstärke ist auf den
aber kein Ton.
niedrigsten Pegel gestellt.
Die Bilder sind
dunkel.
Zu überprüfender Punkt
drücken.
10
DEUTSCH - 21
DEUTSCH
Tabelle 11. Symptom
TECHNISCHE DATEN
Tabelle 12. Technische Daten
Punkt
Einzelheiten
Produktbezeichnung
Flüssigkrist
allfeld
Flüssigkristallprojektor
Größe
1,8 cm (Typ 0,7)
Antriebsystem
TFT-Aktiv-Matrix
Bildpunktezahl
CP-S225W : 480.000 Bildpunkte (800 vertikal × 600 horizontal)
CP-X275W : 786.432 Bildpunkte (1024 vertikal × 768 horizontal)
Objektiv
Zoomobjektiv F=2,0 bis 2,3, f=18 bis21 mm
Lampe
150W UHB
Lautsprecher
1,0W
Stromversorgung
Wechselstrom 100 - 120V, 2,7A / Wechselstrom 220 - 240V, 1,3A.
Stromverbrauch
240W
Temperaturbereich
0°C bis 35°C (Betrieb)
Abmessungen
289 (B) × 84 (H) × 215 (T)mm
Gewicht (Masse)
CP-S225W : 2,4 kg
CP-X275W : 2,5 kg
RGBSignaleingabe
Video: Analog 0,7 Vs-s, 75 Ω Abschlußwiderstand (positive)
Horizontales/Vertikales : TTL-Pegel (positive/negative)
Zusammengesetztes Sync : TTL-Pegel
15-stiftiger D-Sub-Anschluß (vergossen)
RGB IN
AUDIO: 200 mVeff., 47 kΩ (max. 3,0 Vs-s)
Stereominibuchse
1,0 Vs-s, 75 Ω Abschlußstecker RCA-Buchse
AUDIO IN
VIDEO
1,0 Vs-s, 75 Ω Abschlußwiderstand
Farbsignal: 0,286 Vs-s (NTSC, Farbsynchronsignal), 75 Ω Abschlußwiderstand
0,3 Vs-s (PAL/SECAM, Farbsynchronsignal), 75 Ω Abschlußwiderstand
4-stiftige Mini-DIN-Buchse
S-VIDEO
VideoY
1,0 Vs-s, 75 Ω Abschlußwiderstand (positive)
Signaleingabe COMPONENT
CB/CR 0,7 Vs-s, 75 Ω Abschlußwiderstand (positive)
VIDEO
PB/PR 0,7 Vs-s, 75 Ω Abschlußwiderstand (positive)
AUDIO
L
R
AUDIO: 200 mV eff., 50 kΩ (max. 3,0 Vs-s)
RCA-Buchse
Steuerfunktionen CONTROL
15-stiftiger D-Sub-Anschluß (vergossen)
Sonderzubehör
Lampe: DT00401 (CP-S225W) / DT00461 (CP-X275W)
Luftfilter: MU01461
* Wenden Sie sich bezüglich anderer Teile an Ihren Händler.
HINWEISE
vorbehalten.
• Änderungen bei technischen Daten und Design bleiben ohne Vorankündigung
DEUTSCH - 22
GARANTIE UND KUNDENDIENST
DEUTSCH
Wenn ein Problem auftritt, so lesen Sie zuerst den Abschnitt "STÖRUNGSSUCHE" (seite20) und
führen Sie die vorgeschlagenen Überprüfungen durch. Wenn dies das Problem nicht löst, so wenden
Sie sich an Ihren Händler oder an eine Wartungsfirma. Sie erklären Ihnen, was Garantienzustand
angewendet wird.
DEUTSCH - 23
Projecteur à cristaux liquides
MANUEL D'UTILISATION
Nous vous remercions d'avoir choisi un projecteur à cristaux liquides.
REMARQUES • Les informations de ce manuel sont sujettes à modification sans préavis.
• Le fabricant n'assume aucune responsabilité quant aux erreurs qui pourraient figurer dans ce manuel.
• La reproduction, la transmission ou l'utilisation de ces documents ou de leur contenu n'est pas
permise sans autorisation expresse écrite.
RECONNAISSANCE DE MARQUE : PS/2, VGA et XGA sont des marques déposées de
International Business Machines Corporation. Apple, Mac et ADB sont des marques déposées de
Apple Computer, Inc. VESA et SVGA sont des marques déposées de Video Electronics Standard
Association. Windows est une marque déposée de Microsoft Corporation. Observez attentivement les
marques et les marques déposées de toutes les sociétés, même si elles ne sont pas mentionnées.
INDEX
Page
Page
CARACTÉRISTIQUES......................2
AVANT L'UTILISATION....................2
DÉPANNAGE..................................19
Contenu de l'emballage..........................2
Nomenclature des pièces .......................3
Insertion de la piles.................................4
INSTALLATION ................................5
Installation du projecteur et de l'écran.......5
Réglage de l'angle..................................5
Connexions.............................................6
Raccordement de l'alimentation .............7
Exemple de configuration système.........7
Prêt à jouer .............................................7
FONCTIONNEMENT.........................8
Mise sous ...............................................8
Mise hors ................................................8
Opérations de base ................................9
Menu de mise en oeuvre ......................11
Menu d'entrée.......................................12
Menu Image..........................................13
Menu Options .......................................14
Menu No Signal ....................................15
ENTRETIEN ....................................16
Lampe...................................................16
Entretien du filtre à air ..........................18
Autre entretien ......................................18
Messages affichés à l'écran .................19
Témoins................................................20
Symptômes...........................................21
CARACTÉRISTIQUES TECHNIQUES ....22
GARANTIE ET SERVICE APRÈS-VENTE ..23
.......................................................................................
TABLEAUX
Tableau 1. Référence d'installation ..........5
Tableau 2. Connexios...............................6
Tableau 3. Opérations de base ................9
Tableau 4. Menu de mise en oeuvre ......11
Tableau 5. Menu d'entrée.......................12
Tableau 6. Menu Image..........................13
Tableau 7. Menu Options .......................14
Tableau 8. Menu No Signal ....................15
Tableau 9. Messages affichés à l'écran......19
Tableau 10. Témoins..............................20
Tableau 11. Symptômes.........................21
Tableau 12. Caractéristiques techniques.....22
.......................................................................................
Pour la notice technique [TECNICAL] et
réglementaue [REGULATORY NOTICE],
référez-vous à la fin de ce manuel
d'utilisation.
FRANÇAIS - 1
FRANÇAIS
AVERTISSEMENT • Nous vous recommandons de lire attentivement les
“CONSIGNES DE SÉCURITÉ” et ce “MANUEL D'UTILISATION” pour bien
assimiler le fonctionnement de l'appareil. Après les avoir lus, conservez-les en
lieu sûr pour pouvoir vous y référer ultérieurement.
CARACTÉRISTIQUES
Ce projecteur à cristaux liquides sert à projeter sur écran différents signaux d’ordinateurs ainsi que
les signaux vidéo NTSC/PAL/SECAM. Peu encombrant, il permet de projeter des images de grande
taille.
Clarté exceptionnelle
Un niveau de clarté supérieur grâce à la lampe UHB et au système optique à rendement élevé.
Grossissement fragmentaire
Possibilité de grossir les parties intéressantes d’une image pour les visionner en plus gros plan.
Correction de la distorsion
Possibilité d’avoir des images dénuées de toute distorsion.
Fonction de bruits extra faibles
Le niveau de bruit acoustique provenant de l’appareil peut être réduit.
AVANT L'UTILISATION
Contenu de l'emballage
Vérifiez que les éléments suivants se trouvent bien tous dans l'emballage. Contactez votre
distributeur si vous constatez qu'une pièce manque.
REMARQUES • Conservez les matériaux d'emballage d'origine pour le cas où vous devriez
réexpédier l'appareil.
Cordon
d'alimentation
(Type américain)
Cordon
d'alimentation
(Type britannique)
Cordon
d'alimentation
(Type européen)
Projecteur
Câble vidéo à
composantes
séparées
(avec un fil vert)
Câble RVB
Manuel d’utilisation
(document présent)
VIDEO
STANDBY/ON
RGB
KEYSTONE
MENU
SELECT
MENU
MAGNIFY
POSITION RESET
FREEZE VOLUME
MUTE
OFF
AUTO
BLANK
Consignes de sécurité
Télécommande
renfermant une pile
FRANÇAIS - 2
Valise de transport
AVANT I'UTILISATION (suite)
Nomenclature des pièces
Bouton ZOOM
Bague FOCUS
Capteur de
télécommande
Interrupteur d'alimentation
Arrivée secteur
(vers le cordon d'alimentation)
Ouïes de ventilation
(arrivée d'air)
FRANÇAIS
Objectif
Volet d'objectif coulissant
Ajusteur de pied
Vue avant gauche
Panneau de commande (Consultez à P.8 "FONCTIONNEMENT".)
Témoin LAMP
Témoin TEMP
Témoin POWER
Touche MENU
Touche RESET
Touche KEYSTONE
Touche INPUT
Touche STANDBY / ON
Touche d'ajusteur de pied
Ouïes de ventilation
(sortie d'air)
Filtre et arrivée d'air
(pour le ventilateur de
refroidissement)
Haut-parleur
Pied arrière réglable
Vue arrière droite
Panneau des
connecteurs
(Voir ci-dessous.)
Capteur de
télécommande
Prise RGB
Prise CONTROL
COMPONENT
Prise Y
Prise CB/PB
Prise CR/PR
Prise AUDIO
AUDIO
Prise R
Prise L
Prise VIDEO
Prise S-VIDEO
Panneau des connecteurs
FRANÇAIS - 3
AVANT L'UTILISATION (suite)
Nomenclature des pièces (suite)
Touche VIDEO
Touche STANDBY / ON
STANDBY/ON
Touche KEYSTONE
KEYSTONE
VIDEO
RGB
Touche RGB
Touche MENU SELECT
Touche
MENU
SELECT
Touche
Touche POSITION
Touche
MENU
Touche
POSITION RESET
Touche RESET
Touche MENU
Touche MAGNIFY
MAGNIFY
FREEZE VOLUME
Touche MAGNIFY
Touche MAGNIFY
Touche VOLUME
Touche VOLUME
MUTE
OFF
OFF
AUTO
BLANK
Touche AUTO
Touche FREEZE
Touche MUTE
Touche BLANK
Logement de la pile
(Consultez à P.8 "FONCTIONNEMENT".)
Emetteur à télécommande
Insertion de la piles
Première insertion :
Dans l'emballage d'origine, la pile est installée dans le logement de pile de
la télécommande et recouverte d'une pellicule de protection (le film
transparent qui se trouve à l’intérieur du compartiment à pile) . Tirez sur
la pellicule de protection pour insérer la pile.
Côté "+"
Remplacement :
1. Voyez l'envers de la télécommande.
2. Pincez la rainure et sortez le logement de la pile comme indiqué sur le
schéma de droite.
3. Retirez la pile usée.
4. Mettez une pile neuve en place avec son côté "+" dirigé vers le haut.
5. Enfoncez le logement de la pile jusqu'au déclic.
Tirer
Logement de la pile
ATTENTION • Toute manipulation incorrecte de la télécommand risque de provoquer
un incendie ou d'entraîner des dommages corporels. La pile peut exploser si elle n'est
pas manipulée de façon appropriée. Veillez à employer la pile conformément aux
instructions du document "CONSIGNES DE SÉCURITÉ" et de ce mode d'emploi.
• N'utilisez qu'une pile au lithium de 3 V de type CR2025.
• Lorsque vous mettez les piles, vérifiez que les pôles plus et moins sont correctement
alignés d'après les repères indiqués sur le projecteur.
• Débarrassez-vous de la pile conformément à la réglementation en vigueur dans le pays.
• Conservez la pile hors de portée des enfants et des animaux domestiques.
• Si vous envisagez de ne pas vous servir du boîtier de télécommande pendant une longue
période, retirez les piles qu'il contient.
REMARQUES
FRANÇAIS - 4
Remplacez les piles lorsque la commande à distance devient difficile.
INSTALLATION
Installation du projecteur et de l'écran
Déterminez la taille de l'écran et la distance de projection en vous reportant au schéma et au tableau
ci-dessous.
Les distances de projection indiqués dans la table ci-dessous
sont pour iun plein écran (CP-S225W:800 x 600 points /
CP-X275W:1024 x 768 points).
a: Distance entre le projecteur et l’écran. (±10%)
b: Distance entre le center de l’objectif et le bas de l’écran.
(±10%)
Ecran
Taille de l’écran
[m]
1,0
1,5
2,0
2,5
3,0
3,8
5,0
a [m]
Minimum
0,9
1,5
1,9
2,4
2,9
3,7
4,9
Maximum
1,2
1,8
2,4
2,9
3,5
4,4
5,9
b
[cm]
Vue de dessus
8,7
13,1
17,4
21,8
26,1
32,7
43,5
Centre de l’objectif
b
a
Vue de côté
ATTENTION • Installez le projecteur dans un endroit approprié, suivant les
instructions du manuel "CONSIGNES DE SÉCURITÉ" joint et du présent manuel.
• Posez le projecteur à cristaux liquides sur une surface horizontale. Si vous installez le
projecteur à cristaux liquides de telle sorte que l'objectif soit dirigé vers le haut, vers le bas
ou vers le côté, la température intérieure peut s'élever et provoquer une anomalie. Veillez
par ailleurs tout spécialement à ce que les ouïes de ventilation ne soient pas obstruées.
• N’installez pas le projecteur LCD dans un environnement enfumé. Des résidus provenant
de la fumée pourraient se déposer sur les pièces internes importantes du projecteur
(panneau LCD, ensemble d’objectif, etc.).
Réglage de
l'angle
Pour régler l'angle de projection,
utilisez les ajusteurs de pied. Il se
règle entre 0° et 10° environ.
1. Relevez la face avant du projecteur.
Réglez l'angle de projection en
appuyant sur la touche d'ajusteur de
pied.
2. Relâchez la touche pour verrouiller
l'angle ainsi réglé.
3. Tournez le pied arrière réglable
pour ajuster l'inclinaison latérale.
Ajusteur de pied
Appuyez sur la touche
d'ajusteur de pied.
Pied arrière réglable
ATTENTION • Ne relâchez pas la touche d'ajusteur de pied sans tenir le
projecteur ; le projecteur risque de se renverser, ou vous pourriez vous
coincer les doigts ou vous blesser.
FRANÇAIS - 5
FRANÇAIS
Tableau 1. Référence d'installation
INSTALLATION (suite)
Connexions
Référez-vous à la table ci-dessous pour relier chaque terminal du projecteur chaque à dispositif.
Tableau 2. Connexions
Fonction
Prise
Câble
Entrée RGB analogique
RGB
Câble RGB fourni comme accessoire ou câble
RGB en option avec prise rétrécie 15 broches
D-sub et vis de filetage en pouces
Communication RS-232C
CONTROL
Câble RS-232C en option
Entrée audio
(à partir de l'ordinateur)
AUDIO
Câble audio en option, avec mini-prise stéréo
Entrée vidéo à composantes
séparées
COMPONENT VIDEO CB/PB
COMPONENT VIDEO Y
Câble vidéo en composantes fourni comme
accessoire
COMPONENT VIDEO PR/CB
Entrée S-Video
S-VIDEO
Entrée vidéo
VIDEO
Entrée audio (à partir d'un
équipement vidéo)
AUDIO L
Câble S-Video en option, avec mini-prise DIN
4 broches
Câble vidéo/audio en option, avec prise Cinch
AUDIO R
ATTENTION • Tout branchement incorrect risqué de proviquer un incendie ou un choc
électrique. Veuillez lire attentivement ce mode d’emploi et les “CONSIGNES DE
SÉCURITÉ” séparées.
• Avant la connexion, mettez hors tension tous les appareils à connecter sauf pour le câble USB.
• Les câbles peuvent devoir être utilisés avec l'ensemble tore sur le côté projecteur. Utiliser
les câbles fournis avec le projecteur ou spécifiés pour le projecteur.
REMARQUES • Avant d'effectuer les raccordements, lisez le mode d'emploi des appareils concernés et
assurez-vous que le projecteur et les appareils sont compatibles.
• Vissez soigneusement les vis des connecteurs.
• Pour certains modes, l’adaptateur optionnel Mac doit être utilisé.
• Pour choisir l’entrée numérique RGB, l’ordinateur peut nécessiter certains réglages. Reportez-vous au mode
d’emploi de l’ordinateur pour plus d’informations.
• Certains ordinateurs possèdent plusieurs modes d’affichage d’écran. L’utilisation de certains de ces modes peut
ne pas être possible avec ce projecteur.
• Référez-vous à la section "TECHINICAL" pour la disposition des broches des connecteurs.
• Référez-vous au manuel du câble optionnel RS-232C, pour les données de communication.
• Pour le reste, consultez votre revendeur.
FRANÇAIS - 6
INSTALLATION (suite)
Raccordement de l'alimentation
Utilisez celui des cordons d'alimentation joints qui convient pour la prise secteur. Raccordez l'entrée
CA du projecteur à la prise secteur en branchant le cordon d'alimentation à fond.
Prise secteur
Cordon
d'alimentation Entrée secteur
FRANÇAIS
ATTENTION • Veillez à employer le cordon
d'alimentation conformément aux instructions du
document “CONSIGNES DE SÉCURITÉ” et de ce mode
d'emploi.
• Branchez soigneusement la fiche du cordon
d'alimentation. Veillez à ce que la prise secteur soit en
bon état et correctement raccordée.
Exemple de configuration système
Ordinateur
(de bureau)
Lecteur DVD
Magnétophone
S-Video
Ordinateur
(portable)
REMARQUES • Lors de la connexion avec un ordinateur portatif, réglez pour valider la sortie
vidéo RVB extérieure (réglage sur l’écran à tube cathodique ou simultanément sur l’écran LCD et à
tube cathodique).Veuillez vous reportez au mode d’emploi de l’ordinateur portatif pour plus
d’informations.
Prêt à jouer
Ce projecteur est compatible avec les canaux de visualisation VESA B. Il est prêt à fonctionner dès
lors qu’il est connecté à un ordinateur compatible avec les canaux de visualisation VESA.
Veuillez utiliser cette fonction en branchant le câble RGB fourni comme accessoire sur la prise
RGB. Le "Plug and Play" risque de ne pas fonctionner avec d'autres connexions.
REMARQUES • Le prêt à jouer (plug and play) répond à une configuration comprenant un
système d’exploitation et des périphériques tels que l’ordinateur et l’affichage.
• Ce projecteur est reconnu comme moniteur "Plug and Play". Utilisez les pilotes d'affichage standard.
• Le "Plug and Play" risque de ne pas fonctionner avec un ordinateur.
FRANÇAIS - 7
FONCTIONNEMENT
Touche STANDBY/ON
Tèmoin POWER
Touche
STANDBY/ON
VIDEO
STANDBY/ON
RGB
KEYSTONE
MENU
SELECT
Bouton Zoom
MENU
POSITION RESET
Bague Focus
MAGNIFY
Interrupteur d'alimentation
FREEZE VOLUME
Volet d'objectif coulissant
Mise sous
1. Assurez-vous que la fiche du cordon d'alimentation est correctement branchée sur la prise secteur.
2. Placez l'interrupteur d'alimentation sur la position [ | ]. L'appareil passe en veille et le témoin
POWER devient orange.
3. Appuyez sur la touche STANDBY/ON
du panneau de commande, ou du boîtier de télécommande.
Le préchauffage de l'appareil commence et le témoin POWER clignote et devient vert.
4. Le témoin POWER cesse de clignoter mais demeure de couleur verte indiquant ainsi que
l'appareil est sous tension. Ouvrez le volet de l'objectif coulissant.
5. Tournez le bouton du zoom pour régler la taille de l'écran.
6. Tournez la bague de mise au point pour régler la netteté de l'image.
Mise hors
1. Appuyez sur la touche STANDBY/ON
sur le panneau de commande ou sur la télécommande.
Le message "Power off?" apparaît alors sur l’écran, puis disparaît à la première opération ou après
5 secondes sans opération. Pendant que ce message est affiché, appuyez de nouveau sur la touche
STANDBY/ON . La lampe du projecteur s'éteint et commence à refroidir. Le témoin POWER
clignote et devient orange pendant tout le temps que dure le refroidissement de la lampe. La
touche STANDBY/ON
est sans effet lorsque le témoin POWER clignote.
2. Lorsque le refroidissement est terminé, l'appareil passe en veille, et le témoin POWER cesse de
clignoter mais demeure de couleur orange. Assurez-vous que le témoin est de couleur orange puis
placez l'interrupteur d'alimentation sur la position [O].
3. Le témoin POWER s'éteint quand l'appareil est hors tension. N'oubliez pas de fermer le volet de
l'objectif coulissant.
AVERTISSEMENT • Avant d'utiliser cet appareil, veuillez lire attentivement ce
mode d'emploi et les “CONSIGNES DE SÉCURITÉ” séparées. Veillez à utiliser
en permanence l'appareil en toute sécurité.
REMARQUES • Sauf en cas d’urgence, ne mettez pas l’appareil hors tension si le témoin
POWER n’est pas allumé en orange, car cela réduirait la durée de vie de la lampe du projecteur.
• Pour éviter tout problème, mettez le projecteur sous/hors tension quand l’ordinateur ou
magnétoscope est hors tension. Si un câble RS-232C est connecté, mettez l’ordinateur sous tension
avant le projecteur.
• Si le projecteur projette la même image pendant longtemps, il va se former une image rémanente.
Veillez à ne pas projeter la même image pendant longtemps.
FRANÇAIS - 8
FONCTIONNEMENT (suite)
Opérations de base
Les opérations de base qui sont mentionnées dans le tableau 3, sont à réaliser à partir du sont boîtier
de télécommande ou de panneau de commande du projecteur. Les postes repérés par (*) peuvent
être employés à partir du panneau de commande.
Tableau 3. Opérations de base
Poste
Description
Pour choisir signal d'entrée (*): Appuyez sur la touche INPUT.
RGB → VIDEO → S-VIDEO → COMPONENT (→ RGB )
Pour choisir l'entrée RGB: Appuyez sur la touche RGBO.
VIDEO/S-VIDEO/COMPONENT VIDEO → RGB
Pour choisir l'entrée VIDEO/S-VIDEO: Appuyez sur la touche VIDEOO.
RGB → VIDEO/S-VIDEO/COMPONENT
VIDEO → S-VIDEO → COMPONENT (→ VIDEO)
• Le signal d'entrée choisi est affiché pendant environ 3 secondes au moment d'un changement de
signal.
Mise en/hors service du mode permettant le réglage de la position:
Appuyez sur la touche POSITION. En mode POSITION, l'icône [ ] s'affiche.
Réglage de la position de l'image: Utilisez les touches , , et
après avoir
POSITION adopté le mode permettant le réglage de la position.
• Quand un signal vidéo est entré, cette fonction est valide seulement en mode MAGNIFY.
• Au bout d'environ 10 secondes d'inactivité, l'icône [ ] disparaît et le mode
POSITION est annulé automatiquement.
Pour rétablir les conditions par l’élément:
Choisissez un poste et appuyez sur la touche RESET.
RESET(*) Pour rétablir le réglage de position: Appyez sur la touché RESET en mode
POSITION. Cette fonction est valide seulement quand le signal de RVB est entré.
• Valide sauf pour VOLUME, LANGUE, PHASE.H et SILENCIEUX.
Pour utiliser le mode MAGNIFY: Appuyez sur la touche MAGNIFY
.
Pour déplacer la zone agrandie: Effectuez un réglage de position en mode MAGNIFY.
Réglage de l'agrandissement:
Appuyez sur la touche MAGNIFY
/
en mode MAGNIFY.
MAGNIFY
MAGNIFY agrandit l’image. ↔ MAGNIFY réduit l’image.
Pour abandonner le mode MAGNIFY: Appuyez sur la touche MAGNIFY
.
• Le mode MAGNIFY est abandonné lorsque vous adoptez ou utilisez le AUTO, ASPECT ou
VIDEO, INPUT SELECT ou encore lorsque vous changez le signal d'entrée.
OFF
Pour mettre en/hors service le mode FREEZE: Appuyez sur la touche FREEZE.
En mode FREEZE, l'icône [II] s'affiche et l'image est gelée.
FREEZE
• Le mode FREEZE est abandonné lorsque vous adoptez ou utilisez POSITION, VOLUME, MUTE,
AUTO, BLANK ON/OFF ou MENU ON/OFF, ou encore lorsque vous changez le signal d'entrée.
• N'oubliez pas d'effacer les images fixes gelées.
Mise en service/annulation du mode de correction de la distorsion trapézoïdale:
Appuyez sur la touche KEYSTONE
.
Ajustement de la distorsion trapézoïdale:
(*)
Appuyez sur la touche
/
en mode KEYSTON.
réduit la taille du bas de l’image. ↔
réduit la taille du haut de l’image.
KEYSTONE
REMARQUES • Utilisez le boîtier de télécommande lorsque vous êtes à moins de 3 m environ du capteur
placé sur la face avant du projecteur; veillez à ce que le faisceau du boîtier de télécommande ne soit pas incliné
de plus de 30° par rapport à l'axe du capteur. Un éclairage puissant ou des obstacles placés sur trajet du faisceau
peuvent perturber le fonctionnement du boîtier de télécommande.
(à suivre)
FRANÇAIS - 9
FRANÇAIS
INPUT
SELECT
FONCTIONNEMENT (suite)
Les postes repérés par (*) peuvent être employés à partir du panneau de commande.
Tableau 3. Opérations de base (suite)
Postes
Description
VOLUME
Réglage du niveau d'écoute: Appuyez sur la touche VOLUME
/
.
Diminution du niveau d'écoute VOLUME ↔ Augmentation du niveau
d'écoute VOLUME
MUTE
Mise en/hors service du silencieux: Appuyez sur la touche MUTE.
Aucune son ne se fait entendre quand le silencieux est en service.
AUTO
Réglage automatique de l'entrée RGB: Appuyez sur la touche AUTO. La
position horizontale (POSIT.H), la position verticale(POSIT.V), la phase de
l'horloge(PHASE.H) et la taille horizontale (TAIL.H) sont automatiquement
réglées. A utiliser avec la fenêtre de taille maximale sur la page de
l'application.
Réglage automatique au niveau de l'entrée video: Appuyez sur la touche
AUTO.Un type de signal, convenant au signal d'entrée, est
automatiquement sélectionné. Cela n'est valide que si AUTO est réglé sur
VIDEO sur le menu d'entrée.
• Cette opération exige environ dix secondes. Elle peut ne pas fonctionner
correctement avec certains signaux d'entrée.
BLANK
ON/OFF
Mise en/hors service du mode sans image: Appuyez sur la touche
BLANK. En mode sans image, aucune image n'est affichée. La couleur de
l'écran est alors celle définie pour SUPPR. sur le menu Image.
Arrêt/marche de l'affichage du menu: Appuyez sur la touche MENU.
MENU
• L'affichage du menu cesse automatiquement après environ dix secondes
ON/OFF (*)
d'inactivité.
Choix du type de menu: Appuyez sur la touche MENU SELECT. Cela
permet à l'utilisateur de choisir le menu normal ou le menu unique. Sur le
menu unique, seul le poste choisi est affiché, les autres postes s'affichant à
l'aide des touches
et
comme dans le cas du menu normal.
MENU
SELECT
• Valide uniquement si le Menu de mise en oeuve (CONF.) est utilisé. Appuyez sur la
touche MENU SELECT après avoir choisi un poste tel que "LUMIN.".
Menu normal
Menu unique
(MENU SELECT)
CONF.
ENTR.
LUMIN.
CONTRASTE
POSIT. V
POSIT. H
PHASE. H
TAIL. H
COUL BAL R
COUL BAL B
ASPECT
FRANÇAIS - 10
IMAGE
OPT.
0
-2
100
100
+1
800
0
0
CONTRASTE
-2
FONCTIONNEMENT (suite)
Menu de mise en oeuvre
Les ajustements et réglages suivants sont possibles quand CONF. est choisi en haut du menu. Une
partie du menu de mise en oeuvre diffère selon qu'il s'agit de l'entrée RGB ou de l'entrée VIDEO/SVIDEO. Choisissez un poste à l'aide des touches
et , puis lancez l'opération. Utilisez le menu
unique pour réduire la taille du menu (reportez-vous au Tableau 3, MENU SELECT).
ENTR.
IMAGE
CONF.
OPT.
ENTR.
IMAGE
OPT.
100
100
+1
800
0
0
CONF.
0
+1
+1
0
0
0
0
LUMIN.
CONTRASTE
NETTETE
COULEUR
TEINTE
COUL BAL R
COUL BAL B
ASPECT
0
-2
IMAGE
OPT.
0
+1
+1
0
0
0
COMPONENT
VIDEO/S-VIDEO
RGB
ENTR.
LUMIN.
CONTRASTE
COULEUR
PHASE. H
COUL BAL R
COUL BAL B
ASPECT
Tableau 4. Menu de mise en oeuvre
COMPONENT
Postes
Description
RGB
VIDEO
S-VIDEO
480i
575i
480P
720P
1080i
LUMIN.
CONTRASTE
POSIT. V
POSIT. H
Sombre
↔ Clair
Faible
↔ Puissant
Vers le bas
↔ Vers le haut
Vers la gauche
↔ Vers la droite
✔
✔
✔
✔
✔
✔
✔
✔
✔
✔
-
-
-
PHASE. H
Vers la gauche
↔ Vers la droite
• Réglez pour supprimer le scintillement.
✔
-
✔
✔
✔
-
-
-
-
✔
✔
-
-
✔
✔
-
✔
-
-
✔
✔
✔
✔
✔
✔
✔
✔
✔
-
-
✔
-
✔
✔
-
Petit
↔ Grand
TAIL. H
• L'image affichée ne sera peut-être pas correcte si la largeur est
excessive. En ce cas, appuyez sur la touche RESET et initialiser
la largeur.
NETTETE
COULEUR
Doux
Clair
TEINTE
↔ Clair
↔ Sombre
Rouge
↔ Vert
• Valide uniquement lors de la réception de signaux NTSC ou
NTSC 4.43.
COUL BAL R Clair
↔ Sombre
COUL BAL B Clair
↔ Sombre
Choix du format d'image:
4:3[
]
↔
16:9[
]
Choix position d'affichage:
Appuyez sur la touche
16:9[
ASPECT
] est sélectionné.
Centre →
Vers le bas →
Vers le haut (→ Centre )
Choix du format d'image:
4:3[
]
↔
16:9[
]
↔
4:3 petit[
]
Choix position d'affichage:
Appuyez sur la touche
16:9[
]/4:3 petit[
] est
sélectionné.
Centre →
Vers le bas →
Vers le haut (→ Centre
)
• 4:3 petit peut fort bien en pas être correctement affiché pour
certains signaux d'entrée.
FRANÇAIS - 11
FRANÇAIS
CONF.
LUMIN.
CONTRASTE
POSIT. V
POSIT. H
PHASE. H
TAIL. H
COUL BAL R
COUL BAL B
ASPECT
FONCTIONNEMENT (suite)
Menu d'entrée
CONF.
Les fonctions suivantes sont disponibles si ENTR. est choisi sur le menu.
Choisissez un poste à l'aide des touches
et
et lancez l'opération.
AUTO
RGB
VIDEO
HDTV
ENTR.
IMAGE
OPT.
EX CUTION
ANNULER
Tableau 5. Menu d'entrée
Postes
AUTO
Description
Arrêt/marche de l'opération: Appuyez sur les touches
/ .
Réglage automatique pour l'entrée RGB: Choisissez EXÉCUTION à
l'aide de la touche . La position horizontale (POSIT.H), la position
verticale(POSIT.V), la phase de l'horloge(PHASE.H) et la taille horizontale
(TAIL.H) sont automatiquement réglées. A utiliser avec la fenêtre de taille
maximale sur la page de l'application.
• Cette opération exige environ dix secondes. Elle peut ne pas fonctionner correctement avec
certains signaux d'entrée. En ce cas, une pression sur la touche AUTO peut parfois corriger le
problème.
• Cette fonction est la même que la fonction AUTO du fonctionnement de base.
RGB
Affiche la fréquence d'entrée RGB: Affiche la fréquence des signaux de
synchronisation horizontale et verticale pour l'entrée RGB.
• Cela n'est vrai que pour l'entrée RGB.
VIDEO
HDTV
Arrêt/marche de l'opération: Appuyez sur les touches
/ .
Choix du type de signal vidéo: Choisissez le type de signal vidéo à l'aide
des touches
zet . Choisissez NTSC, PAL, SECAM, NTSC4.43, MPAL ou N-PAL comme signal d'entrée convenable. La sélection de l'option
AUTO active et exécute la fonction AUTO (réglage automatique au niveau
de l'entrée vidéo), sauf pour l'entrée N-PAL.
• Utilisez cette fonction lorsque l'image devient instable (par exemple quand elle devient
irrégulière ou qu'elle perd des couleurs) au niveau de l'entrée VIDEO/S-VIDEO.
• Le réglage automatique s'effectue en environ dix secondes. Il risque de ne pas fonctionner
correctement avec certains signaux en entrée. Dans ce cas, une pression sur la touche AUTO
peut résoudre le problème, sauf pour du N-PAL.
• Pour l'entrée COMPONENT VIDEO, cette fonction ne sert à rien et le type de signal est
détecté automatiquement.
Arrêt/marche de l'opération: Appuyez sur les touches
et
.
Choix du mode HDTV : Sélectionnez le mode 1080i ou 1035i qui convient
au signal en entrée à l'aide de la touche
/ .
• Quand le mode HDTV choisi est incompatible avec le signal d’entrée, les
images peuvent être incorrectes (par ex. la position ou la couleur de
l’affichage est incorrecte).
FRANÇAIS - 12
FONCTIONNEMENT (suite)
Menu Image
CONF.
Les ajustements et réglages suivants sont possibles quand IMAGE est
choisi sur le menu. Choisissez un poste à l'aide des touches
et
et
lancez l'opération.
SUPPR.
MIROIR
IMAGE
OPT.
Description
Choix de la couleur de l'écran sans image:
Choisissez la couleur à l'aide des touches
et
.
• L'image est éclaircie et l'écran entier est affiché dans la couleur z choisie, quand la
mode BLANK est mise avec BLANK ON, ou quand il n'y a aucun signal pour 5
minutes.
Arrêt/marche de l'opération: Appuyez sur les touches
Choix de l'état du miroir:
Choisissez l'état du miroir à l'aide des touches
et .
/
.
Arrêt/marche de l'opération: Appuyez sur les touches
/ .
Définition de la page initiale: Choisissez ACTIVE à l'aide de la touche
DEMARRAGE Effacement de la page initiale:
Choisissez DESACTI. à l'aide de la touche .
.
• Sachez que si DESACTI. est sélectionné, l'écran sans image est de couleur bleue
quand il n'y a pas de signal.
GAMMA
Arrêt/marche de l'opération: Appuyez sur les touches
Sélection de la mode de gamma:
Choisissez la mode de gamma avec la touche
/ .
/
.
COLOR
TEMP
Arrêt/marche de l'opération: Appuyez sur les touches
/ .
Sélection de la température de couleur:
Permet de choisir le mode de température de couleur avec la touche
/
.
FRANÇAIS - 13
FRANÇAIS
Tableau 6. Menu Image
Item
ENTR.
SUPPR.
MIROIR
DEMARRAGE
GAMMA
COLOR TEMP
FONCTIONNEMENT (suite)
Menu Options
Les ajustements et réglages suivants sont possibles quand OPT. est choisi
sur le menu. Choisissez un poste à l'aide des touches
et
et lancez
l'opération.
CONF.
ENTR.
IMAGE
OPT.
16
VOLUME
COUL MENU
LANGUE
AUTO OFF
SYNC ON G
SILENCIEUX
Tableau 7. Menu Options
Postes
Description
VOLUME
Réglage du niveau d'écoute: Diminution du niveau d'écoute VOLUME
↔ Augmentation du niveau d'écoute VOLUME
COUL MENU
Choix de la couleur de fond pour le menu:
Choisissez la couleur à l'aide des touches
et
LANGUE
Arrêt/marche de l'opération: Appuyez sur les touches
Choix de la langue de menu:
Choisissez la langue à l'aide des touches
et
.
AUTO OF
Arrêt/marche de l'opération: Appuyez sur les touches
et
.
Avec AUTO OFF: Réglez sur 1~99 minutes à l'aide des touches
et .
Le système adopte automatiquement la veille si aucun signal n'est reçu
pendant le temps précisé.
Sans AUTO OFF: Choisissez ANNUL. (0 mn) à l'aide de la touche
.
Après avoir choisi l'arrêt, le système n'adopte pas la veille si aucun
signal n'est reçu.
SYNC ON G
Arrêt/marche de l'opération: Appuyez sur les touches
et
.
SYNC ON G valide: Choisissez ACTIVE à l'aide de la touche
.
SYNC ON G invalide: Choisissez DESACTI. à l'aide de la touche
.
• Peut fort bien ne pas être correctement affiché pour certains signaux
d'entrée quand SYNC ON G est valide. En ce cas, retirez le connecteur
de signal de manière qu'aucun signal ne soit présent, choisissez SYNC
ON G invalide puis rebranchez le connecteur de signal.
SILENCIEUX
Arrêt/marche de l'opération: Appuyez sur les touches
/
.
Mise en service/annulation du mode Whisper: Appuyez sur la touche
/
Quand SILENCIEUX est choisi, le mode SILENCIEUX est en
service. Dans le mode SILENCIEUX, le niveau de bruit acoustique
provenant de l’appareil est réduit, le niveau de luminosité de l’écran est
un peu plus faible.
FRANÇAIS - 14
.
et
.
FONCTIONNEMENT (suite)
Menu No Signal
Les mêmes ajustements et réglages que ceux proposés par les menus
IMAGE et OPT. sont disponibles quand vous appuyez sur la touche
MENU au cours de l'affichage du message “ENTREE NON DETEC.
SUR ***” ou bien du message “SYNC. HORS PLAGE SUR ***” alors
qu'aucun signal n'est reçu.
VOLUME
SUPPR.
MIROIR
DEMARRAGE
COUL MENU
LANGUE
AUTO OFF
SYNC ON G
SILENCIEUX
16
Tableau 8. Menu No Signal
Description
VOLUME
Réglage du niveau d'écoute: Diminution du niveau d'écoute VOLUME
↔
Augmentation du niveau d'écoute VOLUME
• Lors de l'utilisation de cette fonction, l'entrée audio est automatiquement basculée
sur la vidéo. L'entrée audio peut être basculée en déplaçant le DISK PAD vers la
gauche ou vers la droite lors de l'affichage de la barre de réglage du volume. Pour
afficher cette barre de réglage, appuyez sur la touche VOLUME
ou VOLUME .
SUPPR.
Choix de la couleur de l'écran sans image:
Choisissez la couleur à l'aide des touches
et .
• L'image est éclaircie et l'écran entier est affiché dans la couleur z choisie, quand la
mode BLANK est mise avec BLANK ON, ou quand il n'y a aucun signal pour 5 minutes.
MIROIR
Arrêt/marche de l'opération: Appuyez sur les touches
/ .
Choix de l'état du miroir: Choisissez l'état du miroir à l'aide des touches
et
Arrêt/marche de l'opération: Appuyez sur les touches
/ .
Définition de la page initiale: Choisissez ACTIVE à l'aide de la touche .
DEMARRAGE Effacement de la page initiale: Choisissez DESACTI. à l'aide de la touche
.
.
• Sachez que si DEACTI est sélectionné, l'écran sans image est de couleur bleue quand il n'y a
pas de signal.
COUL MENU
Choix de la couleur de fond pour le menu: Choisissez la couleur à l'aide des
touches
et
.
LANGUE
Arrêt/marche de l'opération: Appuyez sur les touches
/ .
Choix de la langue de menu: Choisissez la langue à l'aide des touches
AUTO OFF
Arrêt/marche de l'opération: Appuyez sur les touches
/
.
Avec AUTO OFF: Réglez sur 1~99 minutes à l'aide des touches
et . Le système
adopte automatiquement la veille si aucun signal n'est reçu pendant le temps
précisé.
Sans AUTO OFF: Choisissez ANNUL. (0 mn) à l'aide de la touche . Après avoir
choisi ANNUL, le système n'adopte pas la veille si aucun signal n'est reçu.
SYNC ON G
Arrêt/marche de l'opération: Appuyez sur les touches
/ .
SYNC ON G valide: Choisissez ACTIVE à l'aide de la touche .
SYNC ON G invalide: Choisissez DESACTI. à l'aide de la touche
et
.
.
• Peut fort bien ne pas être correctement affiché pour certains signaux d'entrée quand SYNC ON G
est valide. En ce cas, retirez le connecteur de signal de manière qu'aucun signal ne soit présent,
choisissez SYNC ON G invalide puis rebranchez le connecteur de signal.
SILENCIEUX
Arrêt/marche de l'opération: Appuyez sur les touches
/
.
Mise en service/annulation du mode Whisper: Appuyez sur la touche
/
Quand SILENCIEUX est choisi, le mode SILENCIEUX est en service. Dans le mode
SILENCIEUX, le niveau de bruit acoustique provenant de l’appareil est réduit, le
niveau de luminosité de l’écran est un peu plus faible.
FRANÇAIS - 15
FRANÇAIS
Postes
ENTRETIEN
Lampe
HAUTE TENSION
TEMPÉRATURE ÉLEVÉE
HAUTE PRESSION
Consultez le revendeur avant de remplacer l'ampoule.
Pour la lampe fournie en option, reportez-vous à la section "Articles vendus séparément" dans le
Tableau 12.
Avant de remplacer la lampe, mettez l'appareil hors service, débranchez la fiche du cordon
d'alimentation au niveau de la prise secteur et attendez environ 45 minutes, le temps nécessaire au
refroidissement de la lampe. La lampe peut exploser si elle est manipulée alors qu'elle est chaude.
AVERTISSEMENT • Mettez au rebut les lampe usagées
conformément aux dispositions réglementaires locales.
• Etant donné que les lampe sont en verre, vous devez
veiller à ne pas les rayer et à éviter de les soumettre à des
chocs mécaniques.
• Ne réutilisez pas une vieille lampe - elle peut exploser.
• S'il est probable que la lampe a explosé (un bruit
d'explosion s'est fait entendre), débranchez la fiche du
cordon d'alimentation au niveau de la prise secteur et
demandez au revendeur de remplacer la lampe. La lampe
est couverte d'un verre avant, dans certains cas rares, le
réflecteur et l'intérieur du projecteur peuvent être
endommagés par les débris de verre, et les morceaux
peuvent provoquer des blessures s'ils sont manipulés.
• N'utilisez pas le projecteur lorsque le couvercle de la
lampe est déposé.
Lampe
Rèflecteur
Plaque de
verre
frontale
Durée de service de la lampe
Les lampe de projecteur ont une durée de service finie. L'image devient plus sombre et les tonalités
moins marquées quand la lampe a été utilisée pendant une longue période.
Remplacez la lampe si le témoin LAMP est rouge, ou encore si le message REMPLACER LA
LAMPE s'affiche au moment où le projecteur est mis sous tension. Voir le tableau 9 de la page 19 et
le tableau 10 de la page 20.
REMARQUES • Le témoin LAMP est également rouge quand la température du bloc ampoule
est élevée. Avant de remplacer la lampe, mettez l'appareil hors service, attendez 20 minutes environ
puis mettez l'appareil sous tension. Si le témoin LAMP est à nouveau rouge, remplacez la lampe.
FRANÇAIS - 16
ENTRETIEN (suite)
Remplacement de la lampe
FRANÇAIS
1. Mettez l'appareil hors service, débranchez la fiche du cordon
d'alimentation au niveau de la prise secteur et attendez environ 45
minutes, le temps nécessaire au refroidissement de l'ampoule.
2. Préparez une ampoule neuve.
3. Assurez-vous que le projecteur est suffisamment froid puis
retournez-le doucement.
4. Désserrez les deux vis comme montré sur l’illustration et retirez le
couvercle de la lampe.
5. Desserrez la vis et retirez délicatement la lampe en la tenant par les
griffes. Le fait de toucher l'intérieur du bloc lampe peut se traduire
par un défaut d'uniformité de coloration.
6. Montez la lampe neuve et serrez soigneusement les deux vis.
Poussez aussi fermement sur le côté opposé de la lampe à
l’intérieur de l’appareil.
7. Replacez le couvercle de la lampe dans sa position initiale et serrez
soigneusement les deux vis.
8. Remettez doucement le projecteur dans sa position de service.
ATTENTION • Assurez-vous que les vis sont
soigneusement serrées. Les vis insuffisamment
serrées peuvent blesser ou provoquer un accident.
• N'utilisez pas le projecteur lorsque le couvercle de la
lampe est déposé.
Remise à zéro du compteur de la lampe
Après avoir replacé la lampe, remettez le compteur à zéro. Quand le message “REMPLACER LA
LAMPE … COUPURE DU COURANT AU BOUT DE 0 HEURES.” était affiché, procédez à
l’opération suivante dans les 10 minutes qui suivent la mise sous tension. L’alimentation est
automatiquement coupée au bout de 10 minutes.
1. Mettez l’appareil sous tension (ON) et appuyez sur la touche RESET pendant environ trois
secondes. Le message 'LAMP xxxx hr' s'affiche sur le compteur de la lampe à la partie inférieure
de l'écran.
2. Appuyez sur la touche MENU du boîtier de télécommande, ou sur la touche RESET du panneau
de commande, tandis que le compteur de la lampe est affiché. Le message ‘LAMP xxxx → 0 ■
CANCEL’ s'affiche alors.
3. Appuyez sur la touche
puis choisissez 0 et attendez que le compteur soit remis à zéro.
REMARQUES • Ne remettez pas à zéro le compteur d'lampe si vous n'avez pas remplacé la
lampe. N'omettez pas de remettre à zéro le compteur après avoir remplacé la lampe. Les messages
ne seront pas conformes si vous remettez le compteur à zéro sans remplacer la lampe.
FRANÇAIS - 17
ENTRETIEN (suite)
Entretien du filtre à air
Le filtre à air doit être nettoyé de la manière décrite ci-dessous après environ chaque 100 heures de
fonctionnement.
1. Mettez le projecteur hors service puis débranchez la fiche du cordon d'alimentation au niveau de
la prise secteur.
2. Nettoyez le filtre à air à l'aide d'un aspirateur.
ATTENTION • Mettez l'appareil hors service et débranchez la fiche du cordon
d'alimentation au niveau de la prise secteur avant d'intervenir sur l'appareil
pour entretien. Veuillez lire attentivement les “CONSIGNES DE SÉCURITÉ”
séparées de manière à vous assurer que l'entretien est effectué convenablement.
• Remplacez le filtre à air s'il ne peut pas être convenablement nettoyé ou s'il est
endommagé. En ce cas, consultez le revendeur. Pour plus de détails sur le filtre à
air vendu séparément, reportez-vous à la section "Articles vendus séparément"
dans le Tableau 12.
• N'utilisez pas l'appareil quand le filtre à air est déposé.
• Si le filtre à air est encrassé par des poussières, l'alimentation est coupée de
manière que la température à l'intérieur du projecteur ne puisse pas augmenter.
Autre entretien
Entretien de l'intérieur de l'appareil
Pour des raisons de sécurité, assurez-vous que l'appareil est propre et faites-le vérifier par le
revendeur une fois tous les deux ans. L'entretien de l'appareil par vous-même est une opération
dangereuse.
Nettoyage de l'objectif
Essuyez doucement l'objectif avec un papier de nettoyage d'optique. Ne touchez pas l'objectif avec
vos mains.
Nettoyage de la carrosserie et du boîtier de télécommande
Essuyez ces pièces à l'aide d'un chiffon doux. Dans le cas des taches tenaces, utilisez un chiffon
humecté d'eau, ou d'eau et d'un détergent neutre, puis séchez soigneusement à l'aide d'un chiffon
doux et propre.
ATTENTION • Mettez l'appareil hors service et débranchez la fiche du cordon
d'alimentation au niveau de la prise secteur avant d'intervenir sur l'appareil
pour entretien. Veuillez lire attentivement les “CONSIGNES DE SÉCURITÉ”
séparées de manière à vous assurer que l'entretien est effectué convenablement.
• N'utilisez ni détergents ni produits chimiques autres que ceux mentionnés cidessus (par exemple, de l'essence ou un diluant pour peinture).
• N'utilisez aucun agent de nettoyage en aérosol.
• Ne frottez pas l'appareil avec des matériaux durs, ne le tapotez pas.
FRANÇAIS - 18
DÉPANNAGE
Messages affichés à l'écran
Les messages mentionnés ci-dessous peuvent apparaître sur l'écran au moment de la mise sous
tension. Lorsqu'un de ces messages s'affichent, prenez les mesures qui conviennent.
Message
Description
REMPLACER LA LAMPE
REMETTRE LA MINUTERIE
À ZÉRO APRÉS AVOIR
REMPLACÉ L’AMPOULE.
(*1)
La durée d'utilisation de la lampe va bientôt atteindre 2 000 heures.
(*2)
Nous vous recommandons de remplacer la lampe bientôt. Préparez
une lampe de rechange neuve.
REMPLACER LA LAMPE
REMETTRE LA MINUTERIE
À ZÉRO APRÉS AVOIR
REMPLACÉ L’AMPOULE.
COUPURE DU COURANT AU BOUT
DE ** HEURES.
(*1)
La durée d'utilisation de la lampe va bientôt atteindre 2 000 heures.
Nous vous recommandons de remplacer la lampe dans les **
heures. (*2)
Il est possible que la lampe tombe en panne avant ces ** heures.
L'appareil se mettra automatiquement hors tension dans les **
heures. Remplacez la lampe comme indiqué aux pages 17-18
"Lampe". Quand vous remplacez la lampe, réinitialisez toujours le
compteur de lampe.
REMPLACER LA LAMPE
REMETTRE LA MINUTERIE
À ZÉRO APRÈS AVOIR
REMPLACÉ L’AMPOULE.
COUPURE DU COURANT
AU BOUT
DE 0 HEURES.
La lampe a atteint sa limite de service. L'appareil va se mettre hors
tension dans quelques minutes. (*2)
Coupez immédiatement l'alimentation et remplacez la lampe comme
indiqué aux pages 17-18 "Lampe".
Quand vous remplacez la lampe, réinitialisez toujours le compteur
de lampe.
ENTREE NON DETEC.
SUR ***
SYNC. HORS PLAGE
SUR ***
VÉR. DÉBIT AIR
Absence de signal à l'entrée.
Vérifiez les raccordements d'entrée et les sources de signaux.
La fréquence de synchronisation horizontale ou verticale du signal
d'entrée est hors des limites prescrites.
Vérifiez les caractéristiques de l'appareil et de la source de signaux.
La température intérieure a augmenté.
Mettez l'appareil hors tension et attendez 20 minutes, le temps
nécessaire à son refroidissement.
Contrôlez ce qui suit puis remettez l'appareil sous tension.
• L'entrée ou la sortie d'air sont-elles obstruées ?
• Le filtre à air est-il sale ?
• La température ambiante est-elle supérieure à 35 °C ?
REMARQUES (*1) Ce message s'efface automatiquement après trois minutes, mais il apparaît à
chaque mise sous tension.
(*2) L'appareil possède une fonction de mise hors tension qui entre en service lorsque la durée
d'utilisation de la lampe a atteint 2 000 heures. Néanmoins, la durée de vie de la lampe variant
considérablement d'une lampe à l'autre, il est possible que la lampe tombe en passe avant que la
fonction n'entre en service.
FRANÇAIS - 19
FRANÇAIS
Tableau 9. Messages affichés à l'écran
DÉPANNAGE (suite)
Témoins
Le témoin POWER, le témoin LAMP et le témoin TEMP sont éclairés ou éteints comme indiqué cidessous. Prenez les mesures correctives qui s'imposent.
Tableau 10. Témoins
Témoin
POWER
Témoin
LAMP
Témoin
TEMP
Description
S’allume en
orange
Eteint
Eteint
L'appareil est en veille
Clignote en
vert
Eteint
Eteint
Préchauffage en cours. Patientez.
S’allume en
vert
Eteint
Eteint
Eclairé. Fonctionnement normal possible.
Clignote en
orange
Eteint
Eteint
Refroidissement en cours. Patientez.
Clignote en
rouge
-
-
Clignote/
s’allume en
rouge
Clignote/
s’allume en
rouge
S’allume
en rouge
Clignote
en rouge
Refroidissement en cours. Patientez.
L'erreur est trouvée. Prenez les mesures correctives qui
s’imposent quand le témoin POWER cesse de clignoter.
Eteint
L'ampoule n'est pas éclairée.
L'intérieur de l'appareil est peut-être trop chaud. Mettez l'appareil hors
tension, attendez 20 minutes, le temps pour que l'appareil refroidisse,
et assurez-vous que les entrées et sorties d'air ne sont pas obstruées,
que le filtre à air n'est pas encrassé et que la température ambiante
n'excède pas 35 °C. Puis mettez à nouveau l'appareil sous tension.
Remplacez l'ampoule si la même anomalie se reproduit.
Eteint
Aucune ampoule ni aucun couvercle d'ampoule peuvent être trouvés,
ni ont été correctement posés.
Mettez l’appareil hors tension et attendez 45 minutes qu’il refroidisse.
Vérifiez la fixation de la lampe et du couvercle de la lampe, puis
remettez l’appareil sous tension. Contactez votre revendeur si le
même problème se produit à nouveau.
Le ventilateur de refroidissement ne fonctionne pas.
Mettez l'appareil hors tension, attendez 20 minutes, le temps pour
que l'appareil refroidisse. Assurez-vous que le ventilateur n'est
pas obstrué par des corps étrangers puis mettez à nouveau
l'appareil sous tension. Si la même anomalie se reproduit,
consultez le revendeur.
L'intérieur de l'appareil est peut-être trop chaud. *2)
Mettez l'appareil hors tension, attendez 20 minutes, le temps pour que
l'appareil refroidisse. Remplacez la lampe si la même anomalie se
reproduit. Assurez-vous que les entrées et sorties d'air ne sont pas
obstruées, que le filtre à air n'est pas encrassé et que la température
ambiante n'excède pas 35 °C. Cela fait, mettez à nouveau l'appareil
sous tension. Si la même anomalie se reproduit, consultez le
revendeur.
Clignote/
s’allume en
rouge
Eteint
Clignote
en rouge
Clignote/
s’allume en
rouge
Eteint
S’allume
en rouge
S’allume en
vert
L’intérieur de l’appareil est trop froid.
Clignote en Clignote en Vérifiez sur la température ambiante est inférieure à 0°C.
rouge
rouge
Contactez votre revendeur si le même problème se produit
quand la température ambiante est comprise entre 0 et 35°C.
REMARQUES *2) Lorsque la température intérieure de l'appareil est excessive, l'alimentation
est coupée pour des raisons de sécurité et le témoin s'éteint. Placez l'interrupteur d'alimentation sur
la position [O] puis attendez 20 minutes, le temps pour que l'appareil refroidisse.
FRANÇAIS - 20
Dépannage (suite)
Symptômes
Les phénomènes suivants sont souvent considérés comme des anomalies.
Ces phénomènes ne sont pas nécessairement des anomalies. Consultez le tableau qui suit.
Tableau 11. Symptômes
L'appareil n'est
pas sous tension.
Absence de
signaux audio et
vidéo.
Exemples qui ne sont pas des anomalies
Le fil électrique est débranché.
Branchez le fil électrique à la prise
murale.
L’entrée n’est pas correctement Configurer à l’aide du projecteur ou
configurée.
de la télécommande.
Aucun signal n’est envoyé.
Les images sont
floues.
7,8
9
Vérifiez la connexion.
6,7
Le projecteur est mal connecté. Rectifiez la connexion
6,7
Appuyez sur la touche VOLUME
de la télécommande ou de
l’affichage pour régler le volume.
10,14
Le silencieux est activé.
Appuyez sur la touche MUTE
Le projecteur n'est pas
correctement raccordé.
Effectuez les raccordements
convenables.
6,7
Choisissez LUMIN. à l'aide de la
touche MENU puis appuyez sur la
touche .
11
Ouvrez le volet coulissant.
8
La densité des couleurs et les
nuances ne sont pas
correctement réglées.
Régler la vidéo.
11
La luminosité et le contraste ne
sont pas correctement réglés
Réglez la vidéo.
11
La durée de vie de la lampe
arrive à expiration
Remplacez par une lampe neuve.
16,17
Mauvaise mise au point ou
mauvais réglage de la PHASE.
H.
Réglez la mise au point ou la phase
horizontale.
8,11
La vidéo est
La luminosité est réglée sur un
présente mais pas minimum.
il n'y a pas de
vidéo.
Le volet coulissant de l'objectif
est encore fermé.
Les images sont
sombres.
Page
Allumez l’interrupteur principal.
L’image est
présente mais pas Le volume est trop bas.
le son
Les couleurs sont
pâles et la palette
de couleurs est
médiocre.
Points à vérifier
l’interrupteur principal n’est pas
allumé.
.
10
FRANÇAIS - 21
FRANÇAIS
Phénomènes
CARACTÉRISTIQUES TECHNIQUES
Tableau 12. Caractéristiques techniques
Poste
Caractéristiques techniques
Nom de produit
Projecteur à cristaux liquides
Dimension du panneau
Panneau à
Système d'excitation
cristaux
liquides
Pixels
1,8 cm (type 0,7)
Matrice active TFT
CP-S225W : 480.000 pixels (800 pixels horizontalement x 600 pixels)
CP-X275W : 786.432 pixels (1024 pixels horizontalement x 768 pixels)
Objectif
Xoom F=2,0 - 2,3 f=18 - 21 mm
Lampe
150 W UHB
Haut-parleur
1,0 W
Alimentation
100 - 120 V CA, 2,7 A / 220 - 240 V CA, 1,3 A
Consommation
240 W
Température ambiante
0 - 35°C (fonctionnement)
Dimensions
288 (L) x 84 (H) x 215 (P) mm
Poids (masse)
CP-S225W : 2,4 kg
CP-X275W : 2,5 kg
Entrée de
signal
RGB
Vidéo: signal analogique 0,7 Vc-c, terminaison 75 Ohms (positive)
Synchronisations H et V: Niveau TTL (positive/négative)
Synchronisation composite: Niveau TTL
Prise raccourcie D-sub 15 broches
RGB IN
200 mV eff., 47 kOhms (maximum 3,0 Vc-c)
Mini-prise stéréo
1,0 Vc-c, terminaison 75 Ohms Prise Cinch (RCA)
AUDIO IN
VIDEO
Signal de luminance: 1,0 Vc-c, terminaison 75 Ohms
Signal de chrominance: 0,286 Vc-c (NTSC, impulsion), terminaison 75 Ohm
0,3 Vc-c (PAL/SECAM, impulsion), terminaison 75 Ohm
Prise 4 broches mini-DIN
S-VIDEO
Entrée de
signal
vidéo
Y
1,0 Vc-c, 75 Ω terminaison 75 Ohms (positive)
COMPONENT
C
B/CR 0,7 Vc-c, 75 Ω terminaison 75 Ohms (positive)
VIDEO
PB/PR 0,7 Vc-c, 75 Ω terminaison 75 Ohms (positive)
L
AUDIO
R
200 mV eff., 47 kOhms (maximum 3,0 Vc-c)
Prise Cinch (RCA)
Fonctions de
CONTROL
commande
Prise raccourcie D-sub 15 broches
Articles vendus séparément
Lampe : DT00401 (CP-S225W) / DT00461 (CP-X275W)
Filtre à air : MU01461
* Pour tout autre article, veuillez contactez votre fournisseur.
REMARQUES
FRANÇAIS - 22
• Les caractéristiques peuvent être modifiées sans avis préalable.
GARANTIE ET SERVICE APRÈS-VENTE
FRANÇAIS
En cas d'anomalie, reportez-vous tout d'abord au page 20 "DÉPANNAGE" et procédez aux
vérifications suggérées. Si cela ne permet de résoudre le problème qui se pose à vous, consultez le
revendeur ou le service d'entretien. Ils vous indiqueront quel état de garantie est appliqué.
FRANÇAIS - 23
Proiettore a cristalli liquidi
MANUALE D'ISTRUZIONI
Vi ringraziamo per aver acquistato il proiettore a cristalli liquidi.
AVVERTENZA • Leggere per intero il manuale allegato “ISTRUZIONI DI
SICUREZZA” e questo “MANUALE D'ISTRUZIONI” per assicurare un uso
corretto del prodotto tramite la comprensione delle istruzioni. Dopo la lettura,
conservare il manuale di istruzioni in un luogo sicuro per riferimento futuro.
RICONOSCIMENTO DEI MARCHI DI FABBRICA : PS/2, VGA e XGA sono marchi
registrati di International Business Machines Corporation. Apple Mac e ADB sono marchi registrati di
Apple Computer, Inc. VESA e SVGA sono marchi registrati di Video Electronics Standard
Association. Windows e un marchio registrato di Microsoft Corporation. Rispettare scrupolosamente i
marchi di fabbrica e ai marchi registrati di tutte le aziende, anche se non sono citati.
SOMMARIO
Pagina
Pagina
CARATTERISTICHE.........................2
PRIMA DELL’USO ............................2
RISOLUZIONE DEI PROBLEMI .....19
Contenuto della confezione ....................2
Nome delle parti .....................................3
Inserimento delle batterie .......................4
INSTALLAZIONE ..............................5
Installazione del proiettore e dello
schermo..................................................5
Regolazione dell’angolazione.................5
Cablatura ................................................6
Collegamento dell’alimentazione............7
Esempio dell’impostazione del sistema ........7
Plug & Play .............................................7
OPERAZION .....................................8
Attivazione ..............................................8
Disattivazione .........................................8
Operazioni base .....................................9
Menu Prep. ...........................................11
Menu Immet..........................................12
Menu Immagine....................................13
Menu Opzione ......................................14
Menu Nessun seghale..........................15
MANUTENZIONE............................16
Lampada...............................................16
Manutenzione del filtro dell'aria ............18
Altri interventi di manutenzione ............18
Messaggio OSD ...................................19
Messaggio degli indicatori ....................20
Sintomo ................................................21
DATI TECNICI .................................22
GARANZIA E ASSISTENZA...........23
.......................................................................................
TABELLE
Tabella 1. Guida di riferimento per
l’installazione ...........................5
Tabella 2. Cablatura .................................6
Tabella 3. Operazioni base.......................9
Tabella 4. Menu Prep. ............................11
Tabella 5. Menu Immet...........................12
Tabella 6. Menu Immagine .....................13
Tabella 7. Menu Opzione .......................14
Tabella 8. Menu Nessun seghale ...........15
Tabella 9. Messaggio OSD.....................19
Tabella 10. Messaggio degli indicatori ...20
Tabella 11. Sintomo................................21
Tabella 12. Dati tecnici ...........................22
.......................................................................................
Per [TECHNICAL] (INFORMAZIONI
TECNICHE) e [REGULATORY NOTICE]
(ARTICOLI DI NORMATIVA), vedere alla fine di
questo manuale.
ITALIANO - 1
ITALIANO
NOTA • Le informazioni contenute in questo manuale sono soggette a modifiche senza
preavviso. • Il produttore non assume nessuna responsabilita per qualsiasi errore possa essere
contenuto in questo manuale. • La riproduzione, la trasmissione o l’uso di questi documenti o del
loro contenuto e proibita senza un’espressa autorizzazione scritta.
CARATTERISTICHE
Il proiettore a cristalli liquidi viene utilizzato per proiettare su schermo vari segnali computerizzati
nonché segnali video NTSC/PAL/SECAM. L’installazione dell’apparecchio richiede uno spazio
minimo a fronte della possibilità di ottenere, in modo semplice, grandi immagini.
Notevole livello di luminosità
Garanzia di immagini luminose, grazie alla lampada UHB ed al sistema ottico ad alta efficienza.
Funzione di ingrandimento parziale
Interesting parts of images can be magnified for closer viewing.
Funzione rettifica distorsione
Disponibilità immediata di immagini senza distorsione.
Funzione di massima riduzione rumore
Il livello di rumore acustico prodotto dall’unità può essere ridotto.
PRIMA DELL’USO
Contenuto della confezione
Accertarsi che nella confezione siano inclusi tutti gli elementi seguenti. Se manca qualcosa,
contattare il rivenditore.
NOTA • Conservare il materiale originale di imballaggio per future spedizioni del prodotto.
Proiettore
Cavo di
alimentazione
(Tipo USA)
Cavo di
alimentazione
(Tipo Regno Unito)
Cavo RGB
Cavo Video Composto
(con terminale verde)
Manuale d'istruzioni
(il presente documento)
VIDEO
STANDBY/ON
Cavo di
alimentazione
(Tipo europeo)
RGB
KEYSTONE
MENU
SELECT
MENU
MAGNIFY
POSITION RESET
FREEZE VOLUME
MUTE
OFF
AUTO
BLANK
Istruzioni di sicurezza
Telecomando con
batteria inclusa
ITALIANO - 2
Borsa per trasporto
PRIMA DELL’USO (continuazione)
Nome delle parti
Manopla diregolazione
ZOOM
Anello di FOCUS
Sensore del telecomando
Interruttore di
alimentazione
Obiettivo
Coperchio scorrevole
dell’obiettivo
Piedino regolabile
Ingresso c.a.
(al cavo di alimentazione)
(ingresso)
Vista del davanti/lato sinistro
Pannello dei comandi (Vedere P.8 “OPERAZIONI”)
Tasto RESET
Tasto KEYSTONE
Tasto INPUT
Tasto STANDBY / ON
Indicatore LAMP
Indicatore TEMP
Indicatore POWER
Tasto MENU
Tasto del piedino
regolabile
Filtro e ingresso d’aria
(per la ventola di
raffreddamento)
Altoparlante
Regolatore piedino
regolabile Vista del retro/lato destro
Aperture di ventilazione
(scarico)
Pannello terminali
(vedere sotto)
Sensore del
telecomando
Terminale RGB
Terminale CONTROL
COMPONENT
Terminale Y
Terminale CB/PB
Terminale CR/PR
Terminale AUDIO
AUDIO
Terminale R
Terminale L
Terminale VIDEO
Terminale S-VIDEO
Pannello dei terminali
ITALIANO - 3
ITALIANO
Aperture di ventilazione
PRIMA DELL’USO (continuazione)
Nome delle parti (continuazione)
Tasto VIDEO
Tasto STANDBY / ON
STANDBY/ON
Tasto KEYSTONE
KEYSTONE
VIDEO
RGB
Tasto RGB
Tasto MENU SELECT
Tasto
MENU
SELECT
Tasto
Tasto POSITION
Tasto
MENU
Tasto
POSITION RESET
Tasto RESET
Tasto MENU
Tasto MAGNIFY
MAGNIFY
FREEZE VOLUME
Tasto MAGNIFY
Tasto MAGNIFY
Tasto VOLUME
Tasto VOLUME
MUTE
OFF
Tasto FREEZE
OFF
AUTO
BLANK
Tasto AUTO
Tasto MUTE
Tasto BLANK
Portabatteria
(Vedere P.8 “OPERAZIONI”)
Trasmettitore del telecomando
Inserimento della batteria
Primo inserimento:
Nell’imballaggio originale, la batteria e installata nel portabatteria del
telecomando avvolta in una pellicola di protezione (Una parte della
pellicola di protezinoe è inserita nello scomparto delle pile) . Per inserire
la batteria, togliere la pellicola di protezione.
lato “+”
Sostituzione:
1. Girare il telecomando sul retro.
2. Afferrare la scanalatura ed estrarre il portabatteria come indicato nel
disegno sulla destra.
3. Rimuovere la batteria scarica.
4. Installare la nuova batteria con il polo “+” di fronte.
5. Spingere all’interno il portabatteria fino a quando si ode uno scatto.
Estrarre
Portabatteria
ATTENZIONE • La manipolazione errata delle pile potrebbe provocare incendi o
lesioni personali. Le pile possono esplodere se non sono maneggiate correttamente.
Maneggiare la pila seguendo le istruzioni fornite nel manuale allegato "ISTRUZIONI DI
SICUREZZA" ed in questo manuale.
• Usare solo il tipo di micropile al litio da 3V n° CR2025.
• Durante l'inserimento delle pile, prestare attenzione a che i poli positivo e negativo siano
correttamente orientati, come indicato nel trasmettitore del telecomando.
• Per lo smaltimento delle pile usate, rispettare i regolamenti locali o nazionali in vigore.
• Tenere le pile fuori dalla portata dei bambini e degli animali domestici.
• Se si prevede di non utilizzarlo per molto tempo, rimuovere le pile dal telecomando.
NOTA Sostituire le pile quando il funzionamento del telecomando diventa difficile.
ITALIANO - 4
INSTALLAZIONE
Installazione del proiettore e dello schermo
Per determinare il formato dello scherno e la distanza di proiezione, consultare la tabella riportata
qui sotto.
Le distanze della proiezione mostrate nello tabella sotto sono
Schermo
distanze per lo schermo (CP-S225W : 800 x 600 punti /
CP-X275W : 1024 x 768 punti).
a: Distanza dal proiettore a cristalli liquidi allo schermo. (±10%)
b: Distanza dal centro dell’ obiettivo alla parte inferiore dello
schermo. (±10%)
Tabella 1. Guida di riferimento per l’installazione
[m]
1,0
1,5
2,0
2,5
3,0
3,8
5,0
Minimo
0,9
1,5
1,9
2,4
2,9
3,7
4,9
Massimo
1,2
1,8
2,4
2,9
3,5
4,4
5,9
VISTA DA SOPRA
b
[cm]
8,7
13,1
17,4
21,8
26,1
32,7
43,5
Centro
obiettivo
b
a
VISTA LATERALE
ATTENZIONE • Installare il proiettore in un ambiente adatto secondo le istruzioni
contenute nel manuale allegato “ISTRUZIONI DI SICUREZZA” e in questo manuale.
• Si prega di utilizzare il proiettore a cristalli liquidi in una posizione orizzontale. Se si utilizza
il proiettore appoggiato su un lato oppure con l'obiettivo in alto o in basso, il calore
all'interno potrebbe aumentare e causare danni. Fare attenzione in particolare a non
installarlo bloccando i fori di ventilazione.
• Non installate il proiettore LCD in ambienti fumosi, in quanto i residui di fumo potrebbero
accumularsi su parti critiche (ad esempio il pannello LCD, il gruppo lenti, ecc.).
Regolazione dell’angolazione
Utilizzare il piedini regolabile che si
trova sul fondo del proiettore per
regolare l’angolazione della proiezione.
Essa puo variare da circa 0° a 10° circa.
1. Sollevare la parte frontale del
proiettore. Premendo il tasto del
piedino regolabile, regolare
l’angolazione di proiezione.
2. Rilasciare il tasto per bloccare il
proiettore all’angolazione desiderata.
3. Ruotare il regolatore posteriore per
regolate la pendenza sinistra-destra.
Piedino regolabile
Premere il tasto del
piedino regolabile
Regolatore piedino
regolabile
ATTENZIONE • Non rilasciare il tasto del piedino regolabile se non si sostiene
il proiettore; altrimenti, il proiettore potrebbe rivoltarsi oppure le dita si
potrebbero incastrare nel proiettore, causando ferite personali.
ITALIANO - 5
ITALIANO
a [m]
Formato schermo
INSTALLAZIONE (continuazione)
Cablatura
Riferiscasi alla tabella qui sotto per il collegamento dell' ogni terminale del proiettore ad ogni
dispositivo.
Tabella 2. Cablatura
Funzione
Terminale
Cavo
Ingresso RGB analogico
RGB
Cavo RGB fornito in dotazione oppure cavo
RGB opzionale dotato di presa jack ridotta Dsub a 15 pin e chiusura graduale a vite.
Comunicazione RS-232C
CONTROL
Cavo RS-232C opzionale
Ingresso Audio
(da un computer)
AUDIO
Cavo audio opzionale dotazione di presa jack
mini stereo
Ingresso video composto
COMPONENT VIDEO CB/PB
COMPONENT VIDEO Y
Cavo video composto fornito in dotazione
COMPONENT VIDEO PR/CB
Ingresso S-video
S-VIDEO
Ingresso Video
VIDEO
AUDIO L
Ingresso audio
(da un’apparecchio video) AUDIO R
Cavo S-video opzionale dotato di presa jack
mini DIN a 4 pin
Cavo audio/video opzionale dotato di presa jack
RCA
ATTENZIONE • Il collegamento errato potrebbe provocare incendi o scosse elettriche.
Leggere attentamente il presente manuale e le “ISTRUZIONI DI SICUREZZA”separate.
• Prima di realizzare il collegamento, spegnere tutti i componenti da collegare, ad eccezione
del cavo USB.
• Potrebbe verificarsi che i cavi debbano essere usati con il conduttore interno rivolto verso
il lato proiettore. Usare i cavi forniti con il proiettore o quelli indicati.
NOTA • Prima di collegare, leggere i manuali di istruzioni delle periferiche da collegare e accertarsi che il
proiettore sia compatibile con l'unità a cui si collega.
• Fissare le viti sui connettori e stringerle.
• Per alcune modalità è necessario l’adattatore Mac, opzionale.
• Per selezionare l’ingresso RGB digitale, il computer potrebbe necessitare di alcune impostazioni. Per ulteriori
dettagli al riguardo, preghiamo di fare riferimento al manuale del computer.
• Alcuni computer possono disporre di modalità Schermo a visualizzazione multipla. L'utilizzo di alcune di
queste modalità non sarà possibile con questo proiettore.
• Fare riferimento alla sezione “TECHINICAL” per l’assegnazione piedini dei connettori.
• Fare riferimento al manuale del cavo RS-232C opzionale per i dati di comunicazione.
• Per altre cose, consultare il proprio rivenditore.
ITALIANO - 6
INSTALLAZIONE (segue)
Collegamento dell’alimentazione
Utilizzare il cavo di alimentazione corretto, tra quelli in dotazione, a seconda del tipo di presa di
rete da utilizzare.
Collegare saldamente l’ingresso c.a. del proiettore alla presa di rete tramite il cavo di alimentazione.
ATTENZIONE • Maneggiare con cautela il cavo
d'alimentazione seguendo le istruzioni del
manuale allegato "ISTRUZIONI DI SICUREZZA" e
quelle contenute in questo manuale.
• Collegare saldamente il cavo d'alimentazione.
Evitare di usare una presa allentata, insicura o con
contatti difettosi.
Uscita alimentazione
Cavo
d'alimentazione
Ingresso a CA
Computer
(di tipo desktop)
Lettore DVD
Videoregistratore
S-Video
Computer
(di tipo Notebook)
NOTA • Per collegare un computer di tipo notebook, abilitare l'uscita immagine esterna RGB (predisporre
la visualizzazione CRT o la visualizzazione simultanea LCD e CRT). Leggere il manuale d'istruzioni del
computer notebook per maggiori informazioni.
Plug & Play
Il proiettore è compatibile con VESA DDC 1/2B. E’ possibile attivare la funzione plug & play collegandolo ad
un computer compatibile con VESA DC (Canale dati di visualizzazione).
Questa funzione va utilizzata collegando il cavo RGB, fornito in dotazione, al terminale RGB. La funzione Plug
& play potrebbe non funzionare con altri collegamenti.
NOTA • La funzione plug & play è un sistema configurato con attrezzature periferiche includenti un
computer ed uno schermo, oltre ad un sistema operativo.
• Questo proiettore viene riconosciuto come monitor plug & play. Utilizzate pertanto i drivers standard di
visualizzazione.
• La funzione plug & play potrebbe non essere disponibile nel computer cui il proiettore va collegato.
ITALIANO - 7
ITALIANO
Esempio di impostazione del sistema
OPERAZIONI
Tasto STANDBY/ON
Indicatore POWER
Tasto
STANDBY/ON
RGB
KEYSTONE
MENU
SELECT
Manopla di
regolazione
Zoom
Anello di Focus
MENU
MAGNIFY
Interruttore di alimentazione
VIDEO
STANDBY/ON
POSITION RESET
FREEZE VOLUME
Coperchio scorrevole dell'obiettivo
Attivazione
1. Controllare che il cavo d'alimentazione sia collegato correttamente.
2. Mettere l'interruttore dell'alimentazione su [ | ]. In questa modalità si seleziona la modalità
standby e l'indicatore POWER diventa arancione.
3. Premere il tasto STANDBY/ON
sul pannello comandi o sul telecomando. Inizia il
riscaldamento e l'indicatore POWER si accende con luce verde lampeggiante.
4. L'indicatore POWER cessa di lampeggiare e la luce verde diventa fissa quando l'alimentazione è
attivata. Controllare che l'indicatore sia verde ed aprire lo sportello dell'obiettivo.
5. Ruotare la manopola di regolazione Zoom per regolare la dimensione dello schermo.
6. Ruotare l'anello di messa a fuoco, per regolare la messa a fuoco.
Disattivazione
1. Premere il tasto STANDBY/ON
sul pannello comandi o sul telecomando. Poi il messaggio
“Power off?” appare sullo schermo e iil messaggio scompare se si esegue qualsiasi operazione o
nessuna operazione entro 5 secondi. Mentre è visualizzato questo messaggio, premere di nuovo il
tasto STANDBY/ON . La lampada del proiettore si spegne ed inizia a raffreddarsi. L'indicatore
POWER si accende con luce arancione e lampeggia durante il raffreddamento. La pressione del
tasto STANDBY/ON
non produce nessun effetto mentre l'indicatore dell'alimentazione
lampeggia.
2. Il sistema passa in modalità Standby al termine del raffreddamento e l'indicatore POWER cessa di
lampeggiare e diventa arancione. Controllare che l'indicatore d'alimentazione sia arancione e
mettere l'interruttore d'accensione su [O].
3. L'indicatore POWER si spegne quando l'alimentazione è disattivata. Non dimenticare di chiudere
lo sportello dell'obiettivo.
AVVERTENZA • Leggere attentamente il presente manuale e le “ISTRUZIONI
DI SICUREZZA” separate prima di usare l'apparecchiatura. Controllare sempre
che l'apparecchiatura sia usata in condizioni di sicurezza.
NOTA • Salvo in casi di emergenza, non spegnere se non quando l'indicatore di POWER è di
colore arancione questo per evitare di accorciare la durata di vita della lampada del proiettore.
• Per evitare eventuali problemi, accendere/spegnere il proiettore quando il computer o il
videoregistratore è OFF. Nel caso che sia collegato un cavo RS-232C, accendere il computer prima
del proiettore.
• Quando un proiettore continua a proiettare la stessa immagine, l’immagine può rimanere come
immagine residua. Non proiettare la stessa immagine per lungo tempo.
ITALIANO - 8
OPERAZIONI (continuazione)
Operazioni base
Le operazioni base indicate nella Tabella 3 sono eseguite sul telecomando o sul pannello comandi
del proiettore. Le opzioni contrassegnate da un (*) possono essere usate agendo sul pannello
comandi.
Tabella 3. Operazioni base
Opzione
Descrizione
Impostazione/Cancellazione della modalità di regolazione posizione:
Premere il tasto POSITION. In modalità POSIZIONE compare l'icona [ ].
Regolazione posizione immagine:
POSITION Premere i tasti , , e in modalità regolazione posizione.
(POSIZIONE) • Quando un video segnale è immesso, questa funzione è valida soltanto in modalità
INGRANDIMENTO (MAGNIFY).
• Dopo circa 10 secondi di inattività, l’icona [ ]scompare ed il modo POSITION
viene automaticamente annullato.
RESET (*)
(RESET)
Inizializzazione delle opni opzione: Selezionare un'opzione e premere il tasto RESET.
Inizializzazione della regolazione posizione: Premere il tasto RESET in modalità
POSIZIONE. Questa funzione è valida soltanto quando il segnale RGB è immesso.
• Abilitato tranne che per VOLUME, LINGUA, FASE H e SILENZIOSO.
Impostazione della modalità INGRANDIMENTO: Premere il tasto MAGNIFY
.
Spostamento dell'area ingrandita:
Usare la regolazione della posizione in modalità INGRANDIMENTO.
Regolazione dell'ingrandimento:
MAGNIFY
/
in modalità INGRANDIMENTO.
(INGRANDIMENTO) Premere i tasti MAGNIFY
MAGNIFY ingrandisce l’immagine ↔ MAGNIFY rimpicciolisce l’immagine.
Annullamento della modalità INGRANDIMENTO: Premere il tasto MAGNIFY
.
• La modalità INGRANDIMENTO si annulla usando o impostando AUTO, LAG./ALT.,
INPUT SELECT o VIDEO, o modificando il segnale d'ingresso.
OFF
Impostazione/Cancellazione della modalità FERMO IMMAGINE: Premere il tasto FREEZE.
Con la modalità FERMO IMMAGINE, sullo schermo appare l'icona [II], e l'immagine si ferma.
FREEZE
• La modalità FERMO IMMAGINE si annulla usando o impostando le modalità POSITION ,
(FERMO
VOLUME, MUTE , AUTO, BLANK ON/OFF , o MENU ON/OFF , oppure ancora modificando il
IMMAGINE) segnale d'ingresso.
• Non dimenticare di annullare le immagini statiche in situazione di fermo.
Impostazione/annullamento del modo KEYSTONE: Premere il tasto KEYSTONE .
KEYSTONE Regolazione della distorsione trapezoidale:
Premere il tasto
/
nel modo KEYSTONE.
(*)
riduce le dimensioni del fondo dell’immagine ↔
riduce le dimensioni della cima
dell’immagine
NOTA • Usare il telecomando ad una distanza approssimativa di 3 m dal sensore situato sulla parte anteriore
del proiettore ed entro una fascia sinistra-destra di 30°. Luci forti e ostacoli interferiscono con l'uso del
telecomando.
(continua alla pagina seguente)
ITALIANO - 9
ITALIANO
Selezione del segnale d'ingresso (*): Premere il tasto INPUT.
RGB → VIDEO → S-VIDEO → COMPONENT (→ RGB )
Selezione dell'ingresso RGB: Premere il tasto RGB.
INPUT
VIDEO/S-VIDEO/COMPONENT → RGB
SELECT
Selezione dell'ingresso VIDEO/S-VIDEO: Premere il tasto VIDEO.
(SELEZIONE
RGB → VIDEO/S-VIDEO/COMPONENT
INGRESSI)
VIDEO → S-VIDEO → COMPONENT (→ VIDEO)
• Il nome del segnale selezionato è visualizzato per circa tre secondi, quando si
cambia il segnale d'ingresso.
OPERAZIONI (continuazione)
Le opzioni contrassegnate da un (*) possono essere usate agendo sul pannello comandi.
Tabella 3. Operazioni base (continuazione)
Opzione
VOLUME
Descrizione
(VOLUME)
Regolazione del volume: Premere il tasto VOLUME
/
Per ridurre il VOLUME
↔ Per aumentare il VOLUME
MUTE
Impostazione/Cancellazione della modalità Mute: Premere il tasto MUTE.
In modalità SILENZIAMENTO non si percepisce nessun suono.
(SILENZIAMENTO)
AUTO
(AUTO)
.
Regolazione automatica sull'ingresso RGB: Premere il tasto AUTO.
La posizione orizzontale (POSIZ H), la posizione verticale (POSIZ V), la
fase di sincronizzazione (FASE H), e la dimensione orizzontale (FORM. H)
sono regolate automaticamente. Usare con la finestra più grande del
display delle applicazioni.
Regolazione automatica sull'ingresso VIDEO: Premere il tasto AUTO.
Il tipo di segnale appropriato per il segnale d'ingresso è selezionato
automaticamente. Questa funzione è valida solo quando nel menu degli
ingressi l'opzione AUTO è stata impostata su VIDEO.
• Quest'operazione richiede circa dieci secondi. Può non funzionare correttamente
con alcuni segnali d'ingresso.
BLANK
ON/OFF
(ATTIVAZIONE/DIS
ATTIVAZIONE
SOPPRESSIONE
IMMAGINE)
Impostazione/Cancellazione della modalità Blank:
Premere il tasto BLANK. Nessun'immagine è visualizzata in modalità Blank.
Il colore dello schermo è quello impostato nel menu SP. VUOTO.
MENU
ON/OFF (*) Avvio/arresto visualizzazione del menu: Premere il tasto MENU.
(ATTIVAZIONE/ • La visualizzazione del menu termina automaticamente dopo circa dieci
DISATTIVAZIO
secondi d'inattività.
NE MENU)
Selezione del tipo di menu: Premere il tasto MENU SELECT. Questa
funzione permette all'utente di selezionare il menu normale o quello
individuale. Il menu individuale visualizza solo l'opzione scelta, mentre le
altre opzioni si possono visualizzare agendo sui tasti
e , come avviene
con i menu normali.
MENU
SELECT
• Utilizzabile solo quando si usa il Menu Prep. Premere il pulsante MENU SELECT
dopo aver selezionato le opzioni, quali "LUMIN." .
(SELEZIONE
MENU)
Menu normale
Menu Individuale
(MENU SELECT)
PREP.
IMMET
LUMIN.
CONTRASTO
POSIZ V
POSIZ H
FASE H
FORM. H
COL EQUIL R
COL EQUIL B
LARG. /ALT.
ITALIANO - 10
IMMAG
OPZ.
0
-2
100
100
+1
800
0
0
CONTRASTO
-2
OPERAZIONI (continuazione)
Menu Prep.
La selezione di PREP. all'inizio del menu permette di eseguire le regolazioni e le impostazioni
elencate nel seguito. Una parte del menu Setup è diversa secondo che si usi l'ingresso RGB o
l'ingresso VIDEO/S-VIDEO. Selezionare un'opzione con i tasti
e , ed iniziare l'operazione.
Usare il Menu individuale per ridurre la dimensione del menu (vedere Tabella 3, MENU SELECT).
PREP.
IMMET
IMMAG
OPZ.
0
-2
LUMIN.
CONTRASTO
POSIZ V
POSIZ H
FASE H
FORM. H
COL EQUIL R
COL EQUIL B
LARG. /ALT.
100
100
+1
800
0
0
RGB
PREP.
IMMET
IMMAG
OPZ.
LUMIN.
CONTRASTO
NITIDEZZA
COLORE
CHIARI
COL EQUIL R
COL EQUIL B
LARG. /ALT.
0
+1
+1
0
0
0
0
VIDEO/S-VIDEO
PREP.
IMMET
IMMAG
OPZ.
0
+1
+1
0
0
0
LUMIN.
CONTRASTO
COLORE
FASE H
COL EQUIL R
COL EQUIL B
LARG. /ALT.
COMPONENT
Tabella 4. Menu Prep.
Opzione
Descrizione
VIDEO
S-VIDEO
480i
575i
480P
720P
1080i
LUMIN.
CONTRASTO
POSIZ V
POSIZ H
Scuro
↔ Chiaro
Debole
↔ Forte
Giù
↔ Su
Sinistra
↔ Destra
✔
✔
✔
✔
✔
✔
✔
✔
✔
✔
-
-
-
FASE H
Sinistra
↔ Destra
• Regolare per eliminare il tremolio d'immagine.
✔
-
✔
✔
✔
-
-
-
-
✔
✔
-
-
✔
✔
-
✔
-
-
✔
✔
✔
✔
✔
✔
✔
✔
✔
-
-
✔
-
✔
✔
-
FORM. H
NITIDEZZA
COLORE
Piccolo
↔ Grande
• La visualizzazione dell'immagine può non essere corretta,
se la dimensione orizzontale è eccessiva. In questo caso,
premere il tasto RESET ed inizializzare la dimensione
orizzontale.
Tenue
↔ Nitido
Chiaro
↔ Scuro
Rosso
↔ Verde
• Utilizzabile solo quando si ricevono i segnali NTSC o
NTSC 4.43.
COL EQUIL R Chiaro
↔ Scuro
COL EQUIL B Chiaro
↔ Scuro
Selezionare il rapporto tra la larghezza e l'altezza
dell'immagine: 4:3[
]
↔
16:9[
]
Selezionare posizione display:
Premere il tasto
mentre si seleziona 16:9[
].
Centro →
Giù →
Su ( →
Centro)
Selezionare il rapporto tra la larghezza e l'altezza
dell'immagine:
LARG. /ALT.
]
]
]
4:3[
↔
16:9[
↔
4:3 piccolo[
Selezionare posizione display:
] / 4:3
Premere il tasto
mentre si seleziona 16:9[
].
piccolo[
Centro →
Giù →
Su ( →
Centro)
• Con alcuni segnali d'ingresso la visualizzazione di 4:3
piccolo può non essere corretta.
CHIARI
ITALIANO - 11
ITALIANO
COMPONENT
RGB
OPERAZIONI (continuazione)
Menu Immet
PREP.
La scelta di IMMET nel menu mette a disposizione le funzioni elencate nel
seguito. Selezionare un'opzione con i tasti
e
, ed iniziare
l'operazione.
AUTO
RGB
VIDEO
HDTV
IMMET
IMMAG
OPZ.
ESEGUI
CANCELLAR
Tabella 5. Menu Immet
Opzione
AUTO
Descrizione
Avvio/arresto dell'operazione: Premere il tasto
/ .
Regolazione automatica sull'ingresso RGB:
Selezionare ESEGUI con il tasto
. La posizione orizzontale (POSIZ H), la
posizione verticale (POSIZ V), la fase di sincronizzazione (FASE H), e la
dimensione orizzontale (FORM. H) sono regolate automaticamente. Usare
con la finestra più grande del display delle applicazioni.
• Quest'operazione richiede circa dieci secondi. Con alcuni segnali d'ingresso può
non funzionare correttamente. In questo caso, la pressione del tasto AUTO può
correggere questo problema.
• Questa funzione è la stessa della funzione AUTO relativa al funzionamento basico.
RGB
Visualizzazione della frequenza dell'ingresso RGB:
Visualizza la frequenza del segnale di sincronizzazione orizzontale e
verticale per l'ingresso RGB.
• Utilizzabile solo con ingresso RGB.
VIDEO
Avvio/arresto dell'operazione: Premere il tasto
/ .
Selezione del tipo di segnale video:
Selezionare il tipo di segnale con i tasti
e
. Selezionare NTSC, PAL,
SECAM, NTSC4.43, M-PAL, o N-PAL in funzione del segnale d'ingresso.
Ad eccezione del formato di ingresso N-PAL, la selezione di AUTO abilita e
rende esecutiva la funzione AUTO (adattamento automatico all’ingresso
video).
HDTV
Avvio/arresto dell'operazione: Premere il tasto
/
.
Selezione del modo HDTV: Con i pulsanti
/
selezionate il modo
1080i oppure il modo 1035i più appropriati al segnale di ingresso.
• l Questa funzione va usata qualora agli ingressi VIDEO/S-VIDEO l’immagine divenga
instabile (ad esempio qualora presenti delle irregolarità oppure sia priva di colori).
• l L’adattamento automatico richiede circa dieci secondi. Tuttavia potrebbe non
funzionare correttamente con alcuni tipi di segnale. In questo caso, ad eccezione del
formato di ingresso N-PAL, premendo il pulsante AUTO si può risovere il problema.
• l Questa funzione non è operativa in caso di ingresso COMPONENT VIDEO ed il
segnale viene automaticamente riconosciuto.
• Quando il modo HDTV selezionato è incompatibile con il segnale in ingresso,
l’immagine può non essere corretta (p.es. la posizione di visualizzazione o il colore
non sono corretti).
ITALIANO - 12
OPERAZIONI (continuazione)
Menu Immagine
PREP.
La selezione di IMAGE nel menu permette di eseguire le regolazioni e le
impostazioni elencate nel seguito. Selezionare un'opzione con i tasti
e
, ed iniziare l'operazione.
IMMET
IMMAG
OPZ.
SP.VUOTO
SPECCHIO
AVVIARE
GAMMA
COLOR TEMP
Tabella 6. Menu Immagine
Opzione
Descrizione
Selezione del colore dello schermo senza immagine:
Selezionare con i tasti
e
.
SP.VUOTO • L'immagine è cancellata e tutto lo schermo intero è esposto nel colore selezionato,
quando il modalità BLANK (MODALITÀ SOPPRESSIONE IMMAGINE) è impostato
con BLANK ON (SOPPRESSIONE ATTIVA), o quando non vi è nessun segnale per
5 minuti.
AVVIARE
.
.
ITALIANO
Avvio/arresto dell'operazione: Premere i tasti
/
SPECCHIO Selezione della condizione di Specchio:
Selezionare la condizione specchio con i tasti
e
Avvio/arresto dell'operazione: Premere i tasti
/ .
Impostazione visualizzazione schermo iniziale: Selezionare ACCEN.RE
con il tasto
.
Cancellazione della visualizzazione dello schermo iniziale: Selezionare
SPEGNERE con il tasto
.
• Notare che se è stato selezionato SPEGNERE quando non si riceve il segnale, lo
schermo vuoto appare blu.
GAMMA
COLOR
TEMP
Avvio/arresto dell'operazione: Premere i tasti
/ .
Selezione della modo gamma: Selezionare la modo gamma con il tasto
Avvio/arresto dell'operazione: Premere i tasti
/ .
Selezioni la Tempratura di colore:
/ .
Selezionare il modo di temperatura del colore con i tasto
/
.
ITALIANO - 13
OPERAZIONI (continuazione)
Menu Opzioni
PREP.
La selezione di OPZ. nel menu permette di eseguire le regolazioni e
le impostazioni elencate nel seguito. Selezionare un'opzione con i
tasti
e , ed iniziare l'operazione.
IMMET
IMMAG
OPZ.
16
VOLUME
COLORE MENU
LINGUA
AUTO OFF
SYNC ON G
SILENZIOSO
Tabella 7. Menu Opzioni
Opzione
Descrizione
VOLUME
Regolazione del volume:
↔ Per aumentare il VOLUME
Per ridurre il VOLUME
COLORE
MENU
Selezione del colore del fondo del menu:
Selezionare con i tasti
e
.
LINGUA
Avvio/arresto dell'operazione: Premere il tasto
o
.
Selezione della lingua del menu: Selezionare con i tasti
AUTO OFF
Avvio/arresto dell'operazione: Premere il tasto
o
.
Impostazione di AUTO OFF: Impostare 1~99 minuti con i tasti
e
.
Il sistema entra automaticamente in modalità standby, quando non
riceve il segnale per il tempo impostato.
Annullamento di AUTO OFF: Selezionare CANCEL (0 min.) con il tasto
. La selezione di CANCEL non permette al sistema di accedere alla
modalità standby anche se non riceve segnali.
SYNC ON G
Avvio/arresto dell'operazione: Premere i tasti
o
.
SYNC ON G valido: Selezionare ACCEN.RE con il tasto
.
SYNC ON G non valido: Selezionare SPEGNERE con il tasto
.
• Con alcuni segnali d'ingresso la visualizzazione può non essere
corretta quando è stata attivata la modalità SYNC ON G . In questo
caso, togliere il connettore dei segnali affinché l'apparecchio riceva il
segnale, impostare SYNC ON G su disattivo e ricollegare il segnale.
SILENZIOSO
Avvio/arresto dell'operazione: Premere i tasti
/
.
Impostazione/annullamento del modo SILENZIOSO:
Premere il tasto
/ .
Quando è selezionato SILEZIOSO, il modo SILEZIOSO è attivo. Nel
modo SILEZIOSO, il livello di rumore acustico prodotto dall’unità viene
ridotto, il livello di luminosità dello schermo è leggermente inferiore.
ITALIANO - 14
e
.
OPERAZIONI (continuazione)
Menu Nessun segnale
VOLUME
SP.VUOTO
SPECCHIO
AVVIARE
COLORE MENU
LINGUA
AUTO OFF
SYNC ON G
SILENZIOSO
È possibile eseguire le stesse regolazioni ed impostazioni dei menu
IMAGE e OPZ. quando si preme il tasto MENU durante la
visualizzazione del messaggio “NESSUN INGRESSO RIV.SU ***”
o “SINCRON. FUPRI GAMMA SU ***”, e non si riceve nessun
segnale.
16
Tabella 8. Menu Nessun segnale
Descrizione
VOLUME
Regolazione del volume: Per ridurre il VOLUME
↔ Per aumentare il VOLUME
• Quando questa funzione viene utilizzata, l’ingresso audio viene
automaticamente commutato su video. L’ingresso audio può essere commutato
muovendo il tasto a disco (DISK PAD) verso destra o sinistra durante la
visualizzazione della barra di regolazione del volume. Quest’ultima viene
visualizzata premendo i pulsanti VOLUME
o VOLUME .
SP.VUOTO
Selezione del colore dello schermo senza immagine: Selezionare con i tasti
e
.
• L'immagine è cancellata e tutto lo schermo intero è esposto nel colore
selezionato, quando il modalità BLANK (MODALITÀ SOPPRESSIONE
IMMAGINE) è impostato con BLANK ON (SOPPRESSIONE ATTIVA), o quando
non vi è nessun segnale per 5 minuti.
SPECCHIO
Avvio/arresto dell'operazione: Premere i tasti
/
Selezione della condizione di Specchio:
Selezionare la condizione specchio con i tasti
e
AVVIARE
ITALIANO
Opzione
.
Avvio/arresto dell'operazione: Premere i tasti
/
.
Impostazione visualizzazione schermo iniziale: Selezionare ACCEN.RE con il tasto
Cancellazione della visualizzazione dello schermo iniziale:
Selezionare SPEGNERE con il tasto
.
.
• Notare che se è stato selezionato SPEGNERE quando non si riceve il segnale, lo schermo
vuoto appare blu.
COLORE MENU
Selezione del colore del fondo del menu: Selezionare con i tasti
LINGUA
Avvio/arresto dell'operazione: Premere il tasto
/
.
Selezione della lingua del menu: Selezionare con i tasti
AUTO OFF
e
.
Avvio/arresto dell'operazione: Premere il tasto
/
.
Impostazione di AUTO OFF: Impostare 1~99 minuti con i tasti
e
e
.
.
Il sistema entra automaticamente in modalità standby, quando non riceve il segnale per il
tempo impostato.
Annullamento di AUTO OFF: Selezionare CANCEL (0 min.) con il tasto
.
La selezione di CANCEL non permette al sistema di accedere alla modalità standby anche
se non riceve segnali.
SYNC ON G
SILENZIOSO
Avvio/arresto dell'operazione: Premere i tasti
/
.
SYNC ON G valido: Selezionare ACCEN.RE con il tasto
.
SYNC ON G non valido: Selezionare SPEGNERE con il tasto
.
• Con alcuni segnali d'ingresso la visualizzazione può non essere corretta quando è stata
attivata la modalità SYNC ON G. In questo caso, togliere il connettore dei segnali affinché
l'apparecchio riceva il segnale, impostare SYNC ON G su disattivo e ricollegare il segnale.
Avvio/arresto dell'operazione: Premere i tasti
/
.
Impostazione/annullamento del modo SILENZIOSO: Premere il tasto
/
.
Quando è selezionato SILEZIOSO, il modo SILEZIOSO è attivo. Nel modo SILEZIOSO, il
livello di rumore acustico prodotto dall’unità viene ridotto, il livello di luminosità dello schermo
è leggermente inferiore.
ITALIANO - 15
MANUTENZIONE
Lampada
ALTA TENSIONE
ALTA TEMPERATURA
ALTA PRESSIONE
Rivolgersi al proprio rivenditore prima di sostituire la lampada.
Per quanto riguarda la lampada opzionale, preghiamo di vedere la voce "Parti Opzionali" della
Tabella 12.
Spegnere l'apparecchiatura, scollegare il cavo d'alimentazione dalla presa e attendere circa 45
minuti per permettere alla lampada di raffreddarsi, prima di sostituirla. La lampada può esplodere
se maneggiata ancora calda.
AVVERTENZA • Smaltire le lampade usate in
conformità alle normative locali in vigore.
• Le lampada sono di vetro, quindi non devono essere
rigate o sottoposte a urti meccanici.
• Non riutilizzare vecchie lampade - potrebbero esplodere.
• Nel caso la lampada esploda (percezione di un suono
d'esplosione), scollegare la spina dalla presa e rivolgersi
al rivenditore per la sostituzione della lampada. La
lampada è coperta da un vetro anteriore, ma in alcuni rari
casi, il riflettore e la parte interna del proiettore possono
essere danneggiati dai pezzi di vetro che si sparpagliano
all'interno e che possono provocare lesioni.
• Non usare il proiettore privo del coperchio della lampada.
Lampada
Reflettore
Vetro
anteriore
Durata della lampada
Le lampade del proiettore hanno una durata determinata. L'immagine diventerà scura e le tonalità
cromatiche si attenueranno progressivamente, dopo un lungo periodo d'uso della lampada.
Sostituire la lampada quando l'indicatore LAMP è rosso o all'accensione del proiettore compare
sullo schermo il messaggio CAMBIARE LA LAMPADA. Fate riferimento alla Tavola 9 di pag. 19
e alla Tavola 10 di pag. 20.
NOTA • L'indicatore LAMP è rosso anche quando la lampada raggiunge temperature elevate.
Spegnere l'apparecchiatura, attendere circa 20 minuti e riaccendere l'apparecchiatura, prima di
sostituire la lampada. Se l'indicatore LAMP è ancora rosso, sostituire la lampada.
ITALIANO - 16
MANUTENZIONE (continuazione)
Sostituzione della lampada
ITALIANO
1. Spegnere il proiettore, scollegare il cavo d'alimentazione dalla
presa ed attendere almeno 45 minuti per permettere all'unità di
raffreddarsi.
2. Preparare una nuova lampada.
3. Controllare che il proiettore sia sufficientemente freddo e
capovolgerlo con attenzione.
4. Svitare le due viti come mostrato in figura e rimuovere il coperchio
della lampada.
5. Svitare l’unica vite e, con cura, rimuovere la lampada afferrando le
impugnature. Toccare l'interno dell'involucro della lampada può
provocare una colorazione non uniforme.
6. Montare la nuova lampada e serrare saldamente la vite di fermo
della stessa. Spingere energicamente nell'unità anche il lato opposto
della lampada avvitata.
7. Rimettere a posto il coperchio della lampada e serrare bene le due
viti.
8. Rigirare il proiettore con cautela.
ATTENZIONE • Controllare che le viti siano ben
serrate. Le viti non correttamente serrate possono
essere causa di lesioni o d'incidenti.
• Non usare il proiettore privo del coperchio della
lampada.
Ripristino del timer della lampada
Ripristinare il timer della lampada dopo aver sostituito quest’ultima. Terminare le operazioni sotto
descritte entro 10 minuti dallo spegnimento dell’apparecchiatura, se sullo schermo è comparso il
messaggio “CAMBIARE LA LAMPADA … L’UNITÀ VIENE SPENTA DOPO 0 ORE.”.
L’alimentazione sarà riattivata automaticamente 10 minuti dopo lo spegnimento.
1. Accendete il proiettore agendo sull’interruttore ON e quindi premete il pulsante RESET per circa
tre secondi. Il messaggio 'LAMP xxxx hr' comparirà sul timer della lampada, nella parte bassa
dello schermo.
2. Premere il tasto MENU sul telecomando, o il tasto RESET sul pannello comandi, mentre il timer
della lampada è visualizzato. Il messaggio ‘LAMP xxxx → 0 ■ CANCEL’ comparirà sullo
schermo.
3. Premere il tasto , selezionare 0 ed attendere quindi fino alla cancellazione del display timer.
NOTA • Non ripristinare il timer della lampada senza aver sostituito quest'ultima. Ripristinare
sempre il timer della lampada dopo aver sostituito la lampada. Le funzioni di messaggio non
funzioneranno correttamente se il timer della lampada non sarà stato ripristinato.
ITALIANO - 17
MANUTENZIONE (continuazione)
Manutenzione del filtro dell'aria
Il filtro dell'aria deve essere pulito come descritto nel seguito all'incirca ogni 100 ore.
1. Spegnere il proiettore e scollegare il cavo d'alimentazione dalla presa.
2. Pulire il filtro dell'aria con un aspirapolvere.
ATTENZIONE • Spegnere l'apparecchiatura e scollegare il cavo
d'alimentazione dalla presa, prima di iniziare un intervento manutentivo.
Leggere attentamente le “ISTRUZIONI DI SICUREZZA” separate per essere certi
che l'intervento manutentivo sia eseguito correttamente.
• Sostituire il filtro dell'aria se gli agenti contaminanti non possono essere
asportati o se il filtro è danneggiato. Rivolgersi al proprio rivenditore. Per quanto
riguarda il filtro aria opzionale, preghiamo di vedere la voce "Parti Opzionali"
della Tabella 12.
• Non usare l'apparecchiatura priva del filtro dell'aria.
• Quando il filtro dell'aria è intasato dalla polvere sullo l'alimentazione si scollega
automaticamente per evitare l'aumento della temperatura all'interno del
proiettore.
Altri interventi di manutenzione
Manutenzione all'interno dell'apparecchiatura
Per motivi di sicurezza, far controllare e pulire l'apparecchiatura dal rivenditore ogni due anni. La
manutenzione eseguita personalmente è pericolosa.
Pulizia dell'obiettivo
Non ripristinare il timer della lampada senza aver sostituito quest'ultima. Ripristinare sempre il
timer della lampada dopo aver sostituito la lampada. Le funzioni di messaggio non funzioneranno
correttamente se il timer della lampada non sarà stato ripristinato.
Pulizia della parte esterna dell'apparecchio e del telecomando
Pulire con delicatezza usando un panno morbido. In caso sia difficile rimuovere lo sporco o le
macchie, etc. usare un panno morbido inumidito con acqua o con detergente neutro diluito in acqua,
quindi asciugare perfettamente con un altro panno morbido.
ATTENZIONE • Spegnere l'apparecchiatura e scollegare il cavo
d'alimentazione dalla presa, prima di iniziare un intervento manutentivo.
Leggere attentamente le “ISTRUZIONI DI SICUREZZA” separate per essere certi
che l'intervento manutentivo sia eseguito correttamente.
• Non usare detergenti o prodotti chimici diversi da quelli sopra indicati (per
esempio: benzene o diluenti).
• Non usare spray detergenti.
• Non sfregare con oggetti duri, né battere l'apparecchiatura.
ITALIANO - 18
RISOLUZIONE DEI PROBLEMI
Messaggio OSD
I messaggi riportati nel seguito possono essere visualizzati sullo schermo al momento
dell'accensione dell'apparecchiatura. Prendere le adeguate misure ogni volta che appaiono detti
messaggi.
Tabella 9. Messaggio OSD
Descrizione
Il tempo di impiego della lampada sta per raggiungere 2000
ore. (*2)
Si consiglia di sostituire presto la lampada. Preparare una
nuova lampada di ricambio.
CAMBIARE LA LAMPADA
SOSTITUITA LA LAMPADA,
AZZERARE IL TIMER
DELLA LAMPADA.
L’UNITÀ VIENE SPENTA
DOPO ** ORE.
(*1)
Il tempo di impiego della lampada sta per raggiungere 2000
ore. Si consiglia di sostituire la lampada entro ** ore. (*2)
Può succedere che la lampada cessi di funzionare prima che
siano trascorse ** ore. L’alimentazione sarà interrotta
automaticamente in ** ore. Sostituire la lampada come
indicato a p.17-18 "Lampada". Azzerare sempre il timer della
lampada dopo aver sostituito la lampada.
CAMBIARE LA LAMPADA
SOSTITUITA LA LAMPADA,
AZZERARE IL TIMER
DELLA LAMPADA.
L’UNITÀ VIENE SPENTA
DOPO 0 ORE.
Il tempo di impiego della lampada sta per raggiungere.
L’alimentazione sarà interrotta tra pochi minuti. (*2)
Spegnere immediatamente e sostituire la lampada come
indicato a p.17-18 "Lampada".
Azzerare sempre il timer della lampada dopo aver sostituito
la lampada.
NESSUN INGRESSO RIV.
SU ***
Non vi è nessun segnale in ingresso.
Controllare i collegamenti d'ingresso e le sorgenti del
segnale.
SINCRON. FUPRI GAMMA
SU ***
CONTROLL FLUSSO AIRA
La frequenza orizzontale o verticale del segnale d'ingresso
non è compresa nella fascia specificata
Controllare i dati tecnici dell'apparecchiatura e le sorgenti del
segnale.
La temperatura interna è aumentata.
Spegnere l'apparecchiatura ed attendere 20 minuti affinché
l'apparecchiatura si raffreddi.
Eseguire le seguenti verifiche e riaccendere
l'apparecchiatura.
• Verificare se l'ingresso o l'uscita dell'aria sono bloccati ?
• Verificare se il filtro dell'aria è sporco ?
• Verificare se la temperatura ambiente supera i 35°C ?
NOTA (*1) Questo messaggio si cancella automaticamente dopo circa tre minuti e ricompare
ogni volta che si accende l'apparecchiatura.
(*2) L’unità dispone di una funzione che disattiva l’alimentazione quando il tempo di impiego
raggiunge 2000 ore. Tuttavia la vita utile della lampada può variare notevolmente da una lampada
all’altra, per cui può succedere che una lampada cessi di funzionare prima che si attivi questa
funzione.
ITALIANO - 19
ITALIANO
Messaggio
CAMBIARE LA LAMPADA
SOSTITUITA LA LAMPADA,
AZZERARE IL TIMER
DELLA LAMPADA.
(*1)
RISOLUZIONE DEI PROBLEMI (continuazione)
Messaggio degli indicator
L'indicatore POWER, quello LAMP e quello TEMP si accendono e si spengono come segue.
Adottare le misure appropriate.
Tabella 10. Messaggio degli indicator
Indicatore
POWER
Indicatore Indicatore
LAMP
TEMP
Descrizione
Si illumina in
Si spegne Si spegne È stata impostata la modalità Standby.
arancione
Lampeggia in
Si spegne Si spegne Riscaldamento. Attendere.
verde
Si illumina in
Si spegne Si spegne ACCESA. È possibile il funzionamento normale.
verde
Lampeggia in
Si spegne Si spegne Raffreddamento. Attendere.
arancione
Raffreddamento. Attendere.
L'errore è trovato. Adottare le misure appropriate quando
l'indicatore POWER cessa di lampeggiare.
La lampada non è accesa.
L'interno dell'apparecchiatura può essere troppo caldo.
Lampeggia/si
Spegnere l'apparecchiatura, attendere 20 minuti affinché si
Si illumina
illumina in
Si spegne raffreddi e verificare se l'ingresso o l'uscita sono bloccati, se il
in rosso
rosso
filtro dell'aria è sporco o se la temperatura ambiente è
superiore a 35°C. Quindi riaccendere l'apparecchiatura.
Sostituire la lampada se il problema si ripresenta.
Lampeggia in
rosso
-
Lampeggia/si
Lampeggi
illumina in
a in rosso
rosso
-
Manca la lampada o il coperchio della stessa, o non è stata
montata correttamente.
Spegnere l'apparecchiatura ed attendere 45 minuti affinché si
Si spegne
raffreddi. Controllare l'installazione della lampada ed il
coperchio della stessa, quindi riaccendere l'apparecchiatura.
Rivolgersi al proprio rivenditore se il problema si ripresenta.
La ventola di raffreddamento non funziona.
Spegnere l'apparecchiatura ed attendere 20 minuti affinché si
raffreddi. Controllare che non vi siano corpi estranei nella
ventola e riaccendere l'apparecchiatura. Rivolgersi al proprio
rivenditore se il problema si ripresenta.
L'interno dell'apparecchiatura è troppo caldo. *2)
Spegnere l'apparecchiatura ed attendere 20 minuti affinché si
Lampeggia/si
Si illumina raffreddi. Verificare se l'ingresso o l'uscita sono bloccati, se il
illumina in
Si spegne
in rosso
filtro dell'aria è sporco o se la temperatura ambiente è
rosso
superiore a 35°C. Riaccendere quindi l'apparecchiatura.
Rivolgersi al proprio rivenditore se il problema si ripresenta.
L’interno dell’unità è troppo freddo.
Si illumina in Lampeggia Lampeggia Controllare se la temperatura ambientale è inferiore a 0°C.
in rosso
in rosso
verde
Contattare il rivenditore se questo problema si verifica quando
la temperatura ambientale è 0-35°C.
Lampeggia/si
Lampeggi
illumina in
Si spegne
a in rosso
rosso
NOTA *2) Per motivi di sicurezza l'alimentazione si disattiva automaticamente e l'indicatore si
spegne, quando la temperatura interna diventa eccessiva . Mettere l'interruttore d'alimentazione su
[O] ed attendere 20 minuti affinché l'apparecchiatura si raffreddi.
ITALIANO - 20
RISOLUZIONE DEI PROBLEMI (continuazione)
Sintomo
Gli eventi sotto elencati spesso appaiono come anomalie.
Questi eventi possono non essere anomalie. Controllare seguendo la tabella sotto riportata.
Tabella 11. Sintomo
L'alimentazione
non è attivata.
Assenza di video
o di audio.
Esempi di non anomalia
Punti da verificare
Attivare l’interruttore
dell’alimentazione elettrica.
Il cavo di alimentazione non è
ben sistemato.
Inserire il cavo di alimentazione
nella presa di corrente a CA.
L’ingresso non è correttamente
impostato.
Effettuare l’impostazione utilizzando il
proiettore o il telecomando.
Non vi è presenza di alcun
ingresso di segnale.
Collegare in modo adeguato.
6,7
Il proiettore non è
adeguatamente collegato.
Collegare in modo adeguato.
6,7
Premere VOLUME
sul
Il video è
funzionante, ma vi Il volume è impostato al minimo. telecomando o visualizzare la
schermata del menu, quindi
è assenza di audio
regolare il volume.
Video è presente
ma non il video.
Le immagini sono
sfocate.
7,8
9
10,14
E’ attivata la funzione di
esclusione audio.
Premere il tasto MUTE
.
10
Il proiettore non è stato
collegato in modo corretto.
Collegare in modo corretto.
6,7
La luminosità è impostata sul
minimo.
Selezionare LUMIN. con il pulsante
MENU e premere il tasto .
11
Lo sportello scorrevole
dell'obiettivo è sempre chiuso.
Aprire lo sportello scorrevole
dell'obiettivo.
8
Regolare il video.
11
La luminosità ed il contrasto non
Regolare il video.
sono regolati in modo adeguato
11
I colori sono pallidi La densità e la simulazione dei
e la corrispondenza colori non sono correttamente
cromatica è scarsa. regolate.
Le immagini sono
scure.
Pagina
L’interruttore dell’alimentazione
elettrica non è stato attivato.
La durata della lampada si sta
esaurendo.
Sostituire con una nuova lampada.
16,17
La messa a fuoco o la FASE H
non rientrano nei valori di
regolazione.
Regolare la messa a fuoco o la
FASE H.
8,11
ITALIANO - 21
ITALIANO
Evento
DATI TECNICI
Tabella 12 Dati tecnici
Articolo
Dati tecnici
Denominazione prodotto
Proiettore a cristalli liquidi
Dimensione pannello 1,8 cm (tipo 0,7)
Pannello a
Sistema di comando matrice attiva TFT
cristalli
CP-S225W : 480.000 pixel (800 orizzontale x 600 verticale)
liquidi
Pixel
CP-X275W : 786.432 pixel (1024 orizzontale x 768 verticale)
Obiettivo
Obiettivo zoom F=2,0 ~ 2,3 f= 18 ~ 21 mm
Lampada
150 W UHB
Altoparlante
1,0 W
Alimentazione
100 ~ 120 V c.a., 2,7 A / 220 ~ 240 V c.a., 1,3 A
Potenza assorbita
Fascia di temperatura
Dimensione
240 W
0 ~ 35°C (Funzionamento)
289 (L) x 84 (A) x 215 (P) mm
CP-S225W : 2,4 kg
CP-X275W : 2,5 kg
Peso (massa)
Ingresso
segnale
RGB
RGB IN
Video: Analogico 0,7 Vp-p, 75 Ω terminale (positivo)
Sincronizzazione O/V: livello TTL (positivo/negativo)
Sincronizzazione composta: livello TTL
Presa a 15 pin D-sub
AUDIO IN
200 mVrms, 47 kΩ (max. 3,0 Vp-p)
Mini presa stereo
VIDEO
1,0 Vp-p, 75 Ω terminale
S-VIDEO
Segnale di luminosità: 1,0 Vp-p 75 Ω terminale
Segnale cromatico: 0,286 Vp-p (NTSC, segnale burst), 75 Ω terminale
0,3 Vp-p (PAL/SECAM, segnale burst), 75 Ω terminale
Presa a 4 pin mini DIN
Ingresso di
segnale
video
COMPONENT
VIDEO
AUDIO
Presa RCA
Y
1,0 Vp-p, 75 Ω terminale (positivo)
CB/CR 0,7 Vp-p, 75 Ω terminale (positivo)
PB/PR 0,7 Vp-p, 75 Ω terminale (positivo)
L
R
200 mVrms, 47 kΩ (max. 3,0 Vp-p)
Presa RCA
Funzioni di
CONTROL
comando
Presa a 15 pin D-sub
Parti Opzionali
Lampada: DT00401 (CP-S225W) / DT00461 (CP-X275W)
Filtro Aria: MU01461
* Per altre parti vi preghiamo di rivolgervi al vostro rivenditore.
NOTA • I presenti dati tecnici sono soggetti a modifiche senza preavviso.
ITALIANO - 22
GARANZIA E ASSISTENZA
ITALIANO
In caso di problemi con l'apparecchiatura, consultare prima la sezione "RISOLUZIONE DEI
PROBLEMI" pagina 20 ed eseguire i controlli suggeriti. Se questo non basta a risolvere il problema,
rivolgersi al proprio rivenditore o a un centro assistenza. Vi diranno che stato della garanzia è
applicato.
ITALIANO - 23
Proyector de Cristal Líquido
MANUAL DE USUARIO
Gracias por adquirir el proyector de cristal líquido.
ADVERTENCIA • Para poder utilizar este producto de manera correcta, por
favor lea completamente las “INSTRUCCIONES DE SEURIDAD” en el manual
adjunto así como este “MANUAL DE USUARIO”. Después de leerlos, guárdelos en
un sitio seguro para futuras consultas.
NOTA • La información de este manual se encuentra sujeta a cambios sin previo aviso. • El
fabricante no asume responsabilidad alguna por los errores que podrían aparecer en este manual. • Se
prohibe la reproducción, la transmisión o el uso de estos documentos o de las informaciones
contenidas sin la autorización previa y por escrito.
RECONOCIMIENTO DE MARCAS COMERCIALES : PS/2, VGA y XGA son marcas
registradas de International Business Machines Corporation. Apple, Mac y ADB son marcas
registradas de Apple Computer, Inc. VESA y SVGA son marcas comerciales de Video Electronics
Standard Association. Windows es una marca registrada de Microsoft Corporation. Respete
cuidadosamente las marcas comerciales y registradas de todas las compañías, aun cuando no estén
explícitamente mencionadas.
Página
Página
CARACTERÍSTICAS ........................2
ANTES DEL USO..............................2
LOCALIZACIÓN Y SOLUCIÓN DE
PROBLEMAS..................................19
Contenido del paquete ...........................2
Nombres de las partes ...........................3
Instalación de las pilas ...........................4
Mensajes en pantalla (OSD) ................19
Mensajes indicadores...........................20
Síntoma ................................................21
INSTALACIÓN ..................................5
ESPECFICACIONES ......................22
GARANTÍA Y SERVICIO ......................23
Instalación del proyector y de la pantalla......5
Ajuste del ángulo ....................................5
Cableado ................................................6
Conexión de la alimentación ..................7
Ejemplo de configuración del sistema .......7
Plug & Play .............................................7
OPERACIONES ................................8
Conexión ..................................................8
Desconexión .............................................8
Operaciones básicas ..............................9
Menú de ajust .......................................11
Menú de entrada ..................................12
Menú de imagen...................................13
Menú de opciones ................................14
Menú sin señal .....................................15
MANTENIMIENTO ..........................16
Lámparas..............................................16
Mantenimiento del filtro de aire ............18
Otras tareas de mantenimiento ............18
.......................................................................................
TABLAS
Tabla 1. Referencia para la instalació ........5
Tabla 2. Cableado .....................................6
Tabla 2. Operaciones básicas ..................9
Tabla 3. Menú de ajust ...........................11
Tabla 4. Menú de entrada ......................12
Tabla 5. Menú de imagen.......................13
Tabla 6. Menú de opciones ....................14
Tabla 7. Menú sin señal .........................15
Tabla 8. Mensajes en pantalla (OSD).......19
Tabla 9. Mensajes indicadores...............20
Tabla 10. Síntomas ................................21
Tabla 11. Especificaciones.....................22
.......................................................................................
Con respecto a [TECNICAL] (Infomación técnia)
y [REGULATORY NOTICE] (Informe
reglamentario), consulte la última parte de este
manual.
ESPAÑOL - 1
ESPAÑOL
CONTENIDO
CARACTERÍSTICAS
Este proyector de cristal líquido se utiliza para proyectar diversas señales de ordenador así como
señales de vídeo NTSC/PAL/SECAM en una pantalla. Aunque su instalación requiere muy poco
espacio, se consiguen imágenes grandes con toda facilidad.
Espectacular brillo
La lámpara UHB y el sistema óptico de alta eficiencia aseguran un alto nivel de brillo.
Función de ampliación parcial
Podrá ampliar las partes más interesantes de las imágenes y visualizarlas sobre la pantalla.
Función de corrección de distorsión
Podrá obtener rápidamente imágenes libres de distorsión.
Función de extra reducción del ruido
El nivel del ruido acústico se podrá reducir desde la unidad.
ANTES DEL USO
Contenido del paquete
Asegúrese de que el paquete contenga todos los elementos siguientes. Si falta algo, póngase en
contacto con su distribuidor.
NOTA
futuro.
• Guarde el material de embalaje original para cuando necesite transportarlo en el
Proyector
Cable de
alimentación
(Tipo US)
Manual de usuario
(este documento)
VIDEO
Cable de
Alimentación
(Tipo Europa)
Cable de vídeo
componente (con
conductor verde)
Cable RGB
STANDBY/ON
Cable de
alimentación
(Tipo UK)
RGB
KEYSTONE
MENU
SELECT
MENU
MAGNIFY
Instrucciones de
seguridad
POSITION RESET
FREEZE VOLUME
MUTE
OFF
AUTO
BLANK
Mando a distancia
(conteniendo la pila)
ESPAÑOL - 2
Estuche para
transporte
ANTES DEL USO (continuación)
Nombres de las partes
Botón ZOOM
Anillo FOCUS
Sensor del mando a
distancia
Interruptor de
alimentación
Objetivo
Puerta deslizante del
objetivo
Pata graduable
Entrada de CA
(al cable de alimentación)
Rendijas de ventilación
(Admisión)
La vista Frontal ⁄ Izquierda
Indicador LAMP
Indicador TEMP
Indicador POWER
Botón MENU
Botón RESET
Botón KEYSTONE
Botón INPUT
Botón STANDBY/ON
Botón de la pata
graduable
Filtro y admisión de aire
(para el ventilador de
enfriamiento)
Altavoz
Ajustador de la pata
trasera
Rendijas de ventilación
(escape)
Panel de terminales
(Refiérase abajo)
La vista Posterior ⁄ Derecha
Sensor del mando a
distancia
Terminal RGB
Terminal CONTROL
COMPONENT
Terminal Y
Terminal CB/PB
Terminal CR/PR
Terminal AUDIO
AUDIO
Terminal R
Terminal L
Terminal VIDEO
Terminal S-VIDEO
Panel de terminals
ESPAÑOL - 3
ESPAÑOL
Panel de control (Página 8 "OPERACIONES")
ANTES DEL USO (continuación)
Nombres de las partes (continuación)
Botón VIDEO
Botón STANDY/ON
STANDBY/ON
Botón KEYSTONE
KEYSTONE
VIDEO
RGB
Botón RGB
Botón MENU SELECT
Botón
MENU
SELECT
Botón
Botón POSITION
Botón
MENU
Botón
POSITION RESET
Botón RESET
Botón MENU
Botón MAGNIFY
MAGNIFY
FREEZE VOLUME
Botón MAGNIFY
Botón MAGNIFY
Botón VOLUME
Botón VOLUME
MUTE
OFF
OFF
AUTO
BLANK
Botón AUTO
Portapila
Botón FREEZE
Botón MUTE
Botón BLANK
(Página 8 "OPERACIONES")
Transmisor del mando a distancia
Instalación de las pilas
Instalación inicial:
Dentro del paquete original, la pila se encuentra instalada en el portapila
del mando a distancia, provista de la película protectora (la película
transparente que esteá dentro del portapila). Para instalar la pila, extraiga la
película protectora.
Lado "+"
Sustitución:
1. Ponga el mando a distancia boca abajo.
2. Oprima la ranura y extraiga el portapila tal como se observa a la derecha.
3. Retire la pila usada.
Extraer
4. Instale la pila nueva con el lado "+" hacia arriba.
5. Introduzca el portapila hasta que encaje con un chasquido.
Portapila
PRECAUCIÓN • Un manejo incorrecto de la pila puede producir incendio o lesiones.
Si no la maneja correctamente, la pila puede explotar. Maneje la pila con cuidado, de
acuerdo con las instrucciones indicadas en el manual adjunto "INSTRUCCIONES DE
SEURIDAD" y este manual.
• Utilice únicamente una pila de litio micro de 3V tipo CR2025.
• Cuando instale las pilas, asegúrese de que las polaridades positiva y negativa estén
correctamente orientadas, tal como se indica en el transmisor del mando a distancia.
• Cuando tenga que desechar la pila, observe los reglamentos vigentes en su localidad o en
su país.
• Mantenga las pilas fuera del alcance de los niños pequeños.
• Saque las pilas del mando a distancia cuando no tenga la intención de usarlo por un
tiempo prolongado.
NOTA
Cambie las pilas cuando la operación del mando a distancia se vuelva irregular.
ESPAÑOL - 4
INSTALACIÓN
Instalación del proyector y de la pantalla
Refiérase al dibujo y a la tabla de abajo para determinar el tamaño de la pantalla y la distancia de
proyección.
Pantalla
Las distancias de la proyección indicadas en el tabla abajo
son distancia para la pantalla del mismo tamaño (CPS225W:800 x 600 puntos / CP-X275W:1024 x 768 puntos).
a: Distancia desde el proyector a la pantalla. (±10%)
b; Distancia desde el centro del objetivo a la parte inferior
de la pantalla. (±10%)
Tabla 1. Referencia para la instalación
Mínimo
Máximo
b
[cm]
1,0
1,5
2,0
2,5
3,0
3,8
5,0
0,9
1,5
1,9
2,4
2,9
3,7
4,9
1,2
1,8
2,4
2,9
3,5
4,4
5,9
8,7
13,1
17,4
21,8
26,1
32,7
43,5
VISTA SUPERIOR
Centro del
objetivo
b
a
VISTA LATERAL
PRECAUCIÓN • Instale el proyector en un sitio apropiado, de conformidad con las
“INSTRUCCIONES DE SEURIDAD” en el manual adjunto y este manual.
• Utilice básicamente el proyector de cristal líquido en la posición horizontal. Si emplea el
proyector de cristal líquido con el objetivo en la posición superior, con el objetivo en la
posición inferior y el lado en posición superior, podría ocasionar la acumulación de calor en
el interior ya causar algún daño. Tenga cuidado especial de no instalarlo con los orificios de
ventilación obstruidos.
• No instale el proyector LCD en entornos cargados de humos. Los residuos de humos
podrían acumularse sobre las partes críticas (por ejemplo, panel LCD, conjunto de lente, etc.).
Ajuste del ángulo
Los paras del ajustador el ángulo de
proyección, utilice la pata graduable de la
parte inferior del proyector. Puede
graduarse entre 0 a 10˚ aproximadamente.
Pata graduable
1. Levante la parte delantera del
proyector. Presionando el botón de la
pata graduable, ajuste el ángulo de
proyección.
2. Suelte el botón para que quede
bloqueado en el ángulo deseado.
Presione el botón de
3. Gire la el ajustador de la pata trasera
la pata graduable
para ajustar la inclinación izquierdaderecha.
Ajustador de la
pata trasera
PRECAUCIÓN • No suelte el botón de la pata graduable sin sostener el
proyector, de lo contrario, podría producirse el vuelco del proyector o
lastimaduras en sus dedos en caso de que quedaran aprisionados.
ESPAÑOL - 5
ESPAÑOL
a [m]
Tamaño de
pantalla [m]
INSTALACIÓN (continuación)
Cableado
Refiera al vector abajo para conectar cada terminal del proyector con cada dispositivo.
Tabla 2. Cableado
Funcion
Terminal
Cable
Entrada RGB analógica
RGB
Cable RGB accesorio o cable RGB opcional
con toma D-sub 15 patillas "shrink" y tornillos
de rosca en pulgada
Comunicación RS-232C
CONTROL
Cable RS-232C opcional
Entrada de audio
(desde el ordenador)
AUDIO
Cable de audio opcional con minijack estéreo
COMPONENT VIDEO Y
Entrada de vídeo componente COMPONENT VIDEO CB/PB
Cable de vídeo componente accesorio
COMPONENT VIDEO PR/CB
Entrada S-vídeo
S-VIDEO
Entrada de vídeo
VIDEO
Entrada de audio
(del equipo de vídeo)
AUDIO L
Cable S-vídeo opcional con minijack DIN de 4
patillas
Cable de vídeo/audio opcional con toma RCA
AUDIO R
PRECAUCIÓN • La conexión incorrecta puede producir incendio o descargas seétricas.
Por favor lea este manual y las “INSTRUCCIONES DE SEURIDAD”.
• Antes de la conexión, apague todos los dispositivos que se van a conectar, excepto el del
cable USB.
• Puede ser que los cables se deban utilizar con el núcleo colocado hacia el lado del
proyector. Utilice los cables incluidos con el proyector o especificados.
NOTA • Antes de la conexión, lea los manuales de instrucciones de los dispositivos que se van a conectar, y
asegúrese de que el proyector sea compatible con el dispositivo.
• Asegure los tornillos en los conectores y apriételos.
• Para algunos modos, se requiere el uso del adaptador Mac.
• Para seleccionar la entrada RGB digital, tal vez sea necesario realizar algunos ajustes en el ordenador. Para
mayor información, consulte los manuales del ordenador.
• Algunos ordenadores podrían tener múltiples modos de visualización en pantalla. El uso de algunos de estos
modos no será posible con este proyector.
• Con respecto a la asignación de las patillas de los conectores, refiérase a la sección TECHNICAL.
• Con respecto de los datos de comunicación, refiérase al manual del cable RS-232C opcional.
• Para los demás puntos, consulte con su distribuidor.
ESPAÑOL - 6
AUFSTELLUNG (continuación)
Conexión de la alimentación
Seleccione el cable de alimentación correcto de entre los cables entregados, según el tomacorriente
que se va a usar. Por medio del cable de alimentación, conecte firmemente la entrada de CA del
proyector al tomacorriente.
PRECAUCIÓN • El cable de alimentación deberá
manipularse de acuerdo con las instrucciones del
manual adjunto “INSTRUCCIONES DE SEURIDAD” y
este manual.
• Conecte firmemente el cable de alimentación. Tenga
cuidado con flojedad, la falla de contacto o el empleo
de un tomacorriente inadecuado.
Tomacorriente
Cable de
alimentación
Entrada de CA
Ejemplo de configuración del sistema
ESPAÑOL
Computer
(Desktop)
Reproductor DVD
Grabador de
videocintas de
S-vídeo
Computer
(Notebook)
NOTA • Cuando conecte con un ordenador notebook, ajuste la salida de la imagen exterior RGB
a válida (ajuste de pantalla CRT o visualización simultánea de LCD y CRT). Para mayor
información, tenga a bien leer el manual de instrucciones del ordenador notebook.
Plug & Play
Este proyecor es compatible con VESA DDC 1/2B. Podrá utilizar Plug & Play conectándolo a un
ordenador compatible con VESA DDC (Canal de datos de visualización).
Tenga a bien utilizar esta función conectando el cable RGB accesorio con terminal RGB. Con otras
conexiones, es posible que Plug & play no funcione.
NOTA • "Plug & Play" es un sistema configurado con el equipo periférico incluyendo
ordenaaador y pantalla y un sistema operativo.
• Este proyector está reconocido como un monitor Plug & play. Utilice los drivers de visualización
estándar.
• Dependiendo del ordenador conectado, puede suceder que Plug & play no funcione.
ESPAÑOL - 7
OPERACIONES
Botón STANDBY/ON
Indicator POWER
Botón
STANDBY/ON
VIDEO
STANDBY/ON
RGB
KEYSTONE
MENU
SELECT
Botón Zoom
MENU
POSITION RESET
Anillo Focus
MAGNIFY
Interruptor de
alimentación
FREEZE VOLUME
Puerta deslizante del objetivo
Conexión
1. Verifique que el cable de alimentación esté correctamente conectado.
2. Ajuste el interruptor de alimentación a [ | ]. Se selecciona el modo de espera, y el color del
indicador POWER cambia a naranja.
3. Oprima el botón STANDBY/ON
en el panel de mando o en el mando a distancia. Se inicia el
calentamiento y el indicador POWER parpadea en verde.
4. Al conectarse la alimentación, el indicador POWER deja de parpadear y cambia a color verde.
Abra la puerta del objetivo.
5. Gire el botón ZOOM para ajustar el tamaño de la pantalla.
6. Gire el anillo FOCUS para ajustar el enfoque.
Desconexión
1. Oprima el botón STANDBY/ON en el panel de control o el mando a distancia. Entonces
aparecerá el mensaje "Power off?" en la pantalla, el cual desaparecerá al realizar alguna operación
o no realizar operación durante 5 segundos. Oprima de nuevo el botón STANDBY/ON
mientras se esté visualizando este mensaje. La lámpara del proyector se apaga y la lámpara
comienza a enfriarse. El indicador POWER parpadeará en naranja durante el enfriamiento de la
lámpara. La pulsación del botón STANDBY/ON
no tendrá ningún efecto mientras está
parpadeando el indicador POWER.
2. El sistema entra en el modo de espera al finalizar el enfriamiento, y el indicador POWER dejará
de parpadear y cambiará a naranja.
Verifique que el indicador esté de color naranja y ajuste el interruptor de alimentación a [O].
3. Al desconectarse la alimentación, el indicador POWER se apaga. No olvide de cerrar la puerta
del objetivo.
ADVERTENCIA • Antes de usar este equipo, por favor lea completamente
este manual y las “INSTRUCCIONES DE SEURIDAD” separadas. Siempre
asegúrese de utilizar este equipo en condiciones de seguridad.
NOTA • Excepto en emergencias, no desconecte la alimentación a menos que el indicador
POWER esté naranja, ya que se reducirá la vida útil de la lámpara del proyector.
• Para evitar cualquier problema, encienda/apague el proyector cuando el ordenador o la grabadora
de videocintas esté en apagado. Siempre que utilice un cable RS-232C, encienda el ordenador antes
que el proyector.
• Cuando un proyector continúa proyectando una misma imagen, ésta podría quedar como imagen
residual. Por favor no proyecte la misma imagen durante un tiempo prolongado.
ESPAÑOL - 8
OPERACIONES (continuación)
Operaciones básicas
Las operaciones básicas indicadas en la Tabla 3 se realizan desde el mando a distancia suministrado
o desde el panel de mando del proyector. Los elementos indicados mediante (*) se pueden utilizar
desde el panel de mando.
Tabla 3. Operaciones básicas
Item
Descripción
Selección de la señal de entrada (*): Oprima el botón INPUT.
RGB → VIDEO → S-VIDEO → COMPONENT (→ RGB )
Selección de entrada RGB: Oprima el botón RGB.
INPUT
VIDEO/S-VIDEO/COMPONENT → RGB
SELECT
(Selector de Selección de entrada de VIDEO/S-VIDEO: Oprima el botón VIDEO.
RGB → VIDEO/S-VIDEO/COMPONENT
entrada)
VIDEO → S-VIDEO → COMPONENT (→ VIDEO)
• El nombre de la señal seleccionada se visualiza durante aproximadamente tres segundos
cuando se cambia la señal de entrada.
AMPLIACION (MAGNIFY).
• Después de aproximadamente 10 segundos de inactividad, el icono [
apaga y el modo POSITION se cancela automáticamente.
] se
ESPAÑOL
POSITION
(Posición)
Ajuste/cancelación del modo de ajuste de posición:
Oprima el botón POSITION. El icono [ ] se visualiza en el modo POSITION.
Ajuste de la posición de la imagen:
Oprima los botones , , y en el modo de ajuste de posición.
• Cuando se entra una señal video, esta función es válida solamente en el modo de
Inicialización del cada opcion:
Seleccione una opción y oprima el botón RESET.
RESET (*)
Inicialización del ajuste de posición:
(Reinicialización) Oprima el botón RESET en el modo de POSICION (POSITION). Esta
función es válida solamente cuando se entra la señal RGB.
• Válido excepto para VOLUMEN, IDIOMA, FASE H y SILENCIOSO.
Ajuste del modo de AMPLIACION: Oprima el botón MAGNIFY
.
Desplazamiento del área ampliada:
Efectúe el ajuste de posición en el modo de AMPLIACION.
Ajuste de la ampliación:
MAGNIFY
/
en el modo de AMPLIACION.
(Ampliación) Oprima MAGNIFY
reduce la imagen
MAGNIFY
amplía la imagen ↔ MAGNIFY
Cancelación del modo de AMPLIACION: Oprima el botón MAGNIFY
OFF
.
• MAGNIFY se cancela mediante la ejecución o el ajuste de AUTO, ASPECTO INPUT SELECT
o VIDEO, o cambiando la señal de entrada.
FREEZE
(Congelamiento)
Ajuste/cancelación del modo FREEZE: Oprima el botón FREEZE.
En el modo de CONGELAMIENTO, se visualiza el icono [II] y la imagen se congela.
• FREEZE se cancela mediante la ejecución o el ajuste de POSITION, VOLUME,
MUTE, AUTO, BLANK ON/OFF, o MENU ON/OFF, o cambiando la señal de entrada.
• No olvide de cancelar las imágenes estáticas congeladas.
Ajuste/cancelación del modo KEYSTONE: Oprima el botón KEYSTONE
.
KEYSTONE Ajuste de Keystone: Oprima el botón / en el modo KEYSTONE.
(*)
reduce el tamaño inferior de la imagen ↔
reduce el tamaño superior de la
imagen.
NOTA • Utilice el mando a distancia a una distancia de aproximadamente 3 metros del sensor de
la parte delantera del proyector, y dentro de un margen de 30˚ a izquierda-derecha. La luz potente y
los obstáculos podrán interferir en la operación del mando a distancia.
(continúa en la página siguiente)
ESPAÑOL - 9
OPERACIONES (continuación)
Los elementos indicados mediante (*) se pueden utilizar desde el panel de mando.
Tabla 3. Operaciones básicas (continuación)
Item
Descripción
VOLUME
(Volumen)
Ajuste de volumen: Oprima el botón VOLUMEN
/
Reduce el VOLUMEN
↔ Aumenta el VOLUMEN
MUTE
Ajuste/cancelación del modo de enmudecimiento: Pulse el botón
MUTE. En el modo de ENMUDECIMIENTO, el sonido no se escucha.
(Enmudecimiento)
AUTO
(Automático)
.
Ajuste automático en entrada RGB : Pulse el botón AUTO. La posición
horizontal (POSI. H), la posición vertical (POSI. V), la fase del reloj (FASE
H), y el tamaño horizontal (AMPLI H) se ajustan automáticamente. Proceda
con la aplicación visualizada al tamaño máximo.
Ajuste automático en entrada de VIDEO Pulse el botón AUTO. Se
selecciona automáticamente el tipo de señal apropiado para la señal de
entrada. Válido solamente cuando AUTO está ajustado a VIDEO en el
menú de entrada.
• Esta operación tarda aproximadamente diez segundos. Puede suceder que no
funcione correctamente con algunas señales de entrada.
BLANK
ON/OFF
(Activación/
desactivación
de pantalla en
blanco)
Ajuste/cancelación del modo en blanco: Pulse el botón BLANK.
En el modo en blanco no se visualiza ninguna imagen. Toda la pantalla
queda en el color definido en EN BLANCO en el menú de imagen.
MENU
Inicio/parada de la visualización del menú: Pulse el botón MENU.
ON/OFF (*)
(Activación/
desactivación
del menú)
MENU
SELECT
(Selección
de menú)
• La visualización del menú finaliza automáticamente tras un período de inactividad
de aproximadamente diez segundos.
Selección del tipo de menú: Pulse el botón MENU SELECT.
Permite al usuario seleccionar entre menú normal o menú individual. En el
menú individual sólo se visualiza la opción que se encuentra seleccionada,
pero las demás opciones se pueden visualizar con los botones
y
como con el menú normal.
• Válido solamente cuando se utiliza Menú de ajust. Oprima el botón MENU SELECT
después de seleccionar los elementos tales como "BRILLO".
Menú normal
Menú individual
(MENU SELECT)
SETUP
INPUT
BRIGHT
CONTRAST
V POSIT
H POSIT
H PHASE
H SIZE
COLOR BAL R
COLOR BAL B
ASPECT
ESPAÑOL - 10
IMAGE
OPT.
0
-2
100
100
+1
800
0
0
CONTRAST
-2
OPERACIONES (continuación)
Menú de ajust
Los siguientes ajustes y reglajes se pueden realizar cuando se ha seleccionado AJUST en la parte
superior del menú. Parte del menú de configuración difiere entre entrada RGB y entrada VIDEO/SVIDEO. Seleccione una opción con los botones
y , e inicie la operación. Utilice el menú
individual para reducir el tamaño del menú (consulte la tabla 3, MENU SELECT).
AJUST
ENTR.
IMAGE
AJUST
OPC.
0
-2
BRILLO
CONTRASTE
POSI. V
POSI. H
FASE H
AMPLI H
COL EQUIL R
COL EQUIL A
ASPECTO
ENTR.
IMAGE
100
100
+1
800
0
0
SETUP
OPC.
BRILLO
CONTRASTE
NITIDEZ
COLOR
MATIZ
COL EQUIL R
COL EQUIL A
ASPECTO
0
+1
+1
0
0
0
0
VIDEO/S-VIDEO
RGB
INPUT
IMAGE
OPT.
0
+1
+1
0
0
0
BRIGHT
CONTRAST
COLOR
H PHASE
COLOR BAL R
COLOR BAL B
ASPECT
COMPONENT
Tabla 4. Menú de ajust
Descripción
RGB
VIDEO
S-VIDEO
480i
575i
480P
720P
1080i
BRILLO
CONTRASTE
POSI. V
POSI. H
Oscuro
↔ Claro
Débil
↔ Fuerte
Abajo
↔ Arriba
Izquierdo
↔ Derecho
✔
✔
✔
✔
✔
✔
✔
✔
✔
✔
-
-
-
FASE H
Izquierdo
↔ Derecho
• Ajústelo para eliminar el parpadeo.
✔
-
✔
✔
✔
-
-
-
-
✔
✔
-
-
✔
✔
-
✔
-
-
✔
✔
✔
✔
✔
✔
✔
✔
✔
-
-
✔
-
✔
✔
-
AMPLI H
NITIDEZ
COLOR
Pequeño
↔ Grande
• Puede suceder que la imagen no se visualice
correctamente si el tamaño horizontal es excesivo. En
tal caso, oprima el botón RESET, e inicialice el tamaño
original.
Suave
↔ Nítido
Claro
↔ Oscuro
Rojo
↔ Verde
• Válido solamente cuando se reciben señales NTSC o NTSC
4.43.
COL EQUIL R Claro
↔ Oscuro
COL EQUIL A Claro
↔ Oscuro
Selección de la relación de aspecto de la imagen:
4:3[
]
↔
16:9[
]
Seleccione la posición de visualización:
Pulse el botón
mientras 16:9[
] está seleccionado.
Centro →
Abajo →
Arriba ( →
Centro)
Selección de la relación de aspecto de la imagen:
ASPECTO 4:3[
]
↔
16:9[
]
↔
4:3 small[
]
Seleccione la posición de visualización:
Pulse el botón
mientras 16:9[
]/4:3 small[
]
está seleccionado.
Centro →
Abajo →
Arriba ( →
Centro)
• Puede suceder que 4:3small no se visualice
correctamente con algunas señales de entrada.
MATIZ
ESPAÑOL - 11
ESPAÑOL
COMPONENT
Opción
OPERACIONES (continuación)
Menú de entrada
Cuando se selecciona ENTR. en el menú, se encuentran disponibles las
funciones siguientes. Seleccione una opción con los botones
y ,e
inicie la operación.
AJUST
AUTO
RGB
VIDEO
HDTV
ENTR.
IMAGE
OPC.
EJECUTAR
CANCELAR
Tabla 5. Menú de entrada
Opción
AUTO
Descripción
Inicio/parada de la operación: Pulse el botón
/ .
Ajuste automático en entrada RGB: Seleccione EJECUTAR con el botón
. La posición horizontal (POSI. H), la posición vertical (POSI. V), la fase
del reloj (FASE H), y el tamaño horizontal (AMPLI H) se ajustan
automáticamente. Proceda con la aplicación visualizada al tamaño máximo.
• Esta operación tarda aproximadamente diez segundos. Puede suceder que no
funcione correctamente con algunas señales de entrada. En este caso, la pulsación
del botón AUTO podría corregir este problema.
• Esta entrada es la misma que para la función AUTO en Operaciones básicas.
RGB
Visualización de la frecuencia de entrada de RGB: Visualiza la frecuencia
de la señal de sincronismo horizontal y vertical para la entrada RGB.
• Válido solamente en entrada RGB.
Inicio/parada de la operación: Pulse el botón
/ .
Selección del tipo de señal de vídeo: Seleccione el tipo de señal con los
botones
y . Seleccione NTSC, PAL SECAM, NTSC4.43, M-PAL, o NPAL según el que sea apropiado para la señal de entrada. La selección de
AUTO le permite ejecutar la función AUTO (Ajuste automático en entrada
de vídeo), excepto para la entrada N-PAL
VIDEO
HDTV
• Utilice esta función cuando la imagen se vuelva inestable (por ejemplo, la imagen
se vuelve irregular, o hay deficiencia de color) en VIDEO/S-VIDEO.
• El ajuste automático tarda alrededor de diez segundos. Con algunas señales de
entrada, puede suceder que no funcione correctamente. En este caso, la pulsación
del botón AUTO podría corregir este problema, excepto para la entrada N-PAL.
• Para la entrada COMPONENT VIDEO, esta función no será efectiva y el tipo de
señal será reconocida automáticamente.
Inicio/parada de la operación: Pulse el botón
/ .
Selecciona el modo HDTV: Con el botón
/
, seleccione el modo
1080i ó 1035i adecuado para la señal de entrada.
• Cuando el modo HDTV seleccionado es incompatible con la señal de entrada, la
imagen se podría mostrar incorrecta (ej. la posición de la visualización o el color es
incorrecto).
ESPAÑOL - 12
OPERACIONES (continuación)
Menú de imagen
AJUST
Los siguientes ajustes y reglajes se encuentran disponibles cuando se ha
seleccionado IMAGE en el menú. Seleccione una opción con los botones
y , e inicie la operación.
EN BLANCO
ESPEJO
ARRANQUE
GAMMA
COLOR TEMP
ENTR.
IMAGE
OPC.
Tabla 6. Menú de imagen
Opción
Descripción
Selección del color de la pantalla en blanco:
Seleccione el color con los botones
y .
EN BLANCO • La imagen se desaparece, y toda la pantalla se visualiza en el color seleccionado,
cuandose ajusta al modo en BLANCO con el BLANCO ACTIVADO, o cuando no
hay señal la imagen desaparece durante 5 minutos.
ESPEJO
Inicio/parada de la operación: Pulse el botón
/ .
Selección del estado del espejo:
Seleccione el estado del espejo con los botones
y .
• Tenga en cuenta que si selecciona APAGADO, la pantalla en blanco se visualiza
en azul en ausencia de señal.
GAMMA
COLOR
TEMP
Inicio/parada de la operación: Pulse el botón
/ .
Seleccione la modo gamma:
Seleccione la modo gamma con el botón / .
Inicio/parada de la operación: Pulse el botón
/ .
Selección de la temperatura del color:
Seleccione el modo de temperatura del color con el botón
/
.
ESPAÑOL - 13
ESPAÑOL
Inicio/parada de la operación: Pulse el botón
/ .
Configuración inicial de la visualización en pantalla:
Seleccione ENCEND. con el botón .
ARRANQUE Cancelación de la visualización inicial en pantalla:
Seleccione APAGADO con el botón .
OPERACIONES (continuación)
Menú de opciones
AJUST
Los siguientes ajustes y reglajes se pueden realizar cuando se ha
seleccionado OPT. en el menú. Seleccione una opción con los botones
y , e inicie la operación.
ENTR.
IMAGE
OPC.
VOLUMEN
COLOR MENU
IDIOMA
AUTO OFF
SYNC ON G
SILENCIOSO
16
Tabla 7. Menú de opciones
Opción
VOLUMEN
Descripción
Ajuste de volumen:
Reduce el VOLUMEN
↔ Aumenta el VOLUMEN
Selección del color de fondo del menú:
COLOR MENU
Seleccione con los botones
y
.
IDIOMA
Inicio/parada de la operación: Pulse el botón
o
Selección del idioma de visualización del menú:
Seleccione con los botones
y
.
AUTO OFF
Inicio/parada de la operación: Pulse el botón
o
.
Ajuste de DESACTIVADO AUTOMATICO:
Ajuste entre 1~99 minutos con los botones
y
.El sistema entra
automáticamente en el modo de espera cuando no se recibe ninguna
señal por un tiempo establecido.
Cancelación de DESACTIVADO AUTOMATICO:
Seleccione CANCEL (0 min.) con el botón . Cuando se selecciona
"CANCEL", el sistema no entrará en el modo de espera aunque no se
reciba la señal.
SYNC ON G
Inicio/parada de la operación: Pulse el botón
o
.
SYNC ON G válido: Seleccione ENCEND. con el botón
.
SYNC ON G inválido: Seleccione APAGADO con el botón
.
• Puede suceder que no se visualice correctamente con algunas
señales de entrada cuando SYNC ON G esté activado. En tales casos,
saque el conector de señal para que se reciban señales conocidas,
ajuste SYNC ON G a inválido, y vuelva a conectar la señal.
SILENCIOSO
Inicio/parada de la operación: Pulse el botón
/ .
Ajuste/cancelación del modo Silencioso: Pulse el botón / .
Cuando se selecciona SILENCIOSO se activará el modo SILENCIOSO.
En el modo SILENCIOSO, el nivel del ruido acústico es reducido desde
la unidad, el nivel del brillo de la pantalla es un poco más bajo.
ESPAÑOL - 14
.
OPERACIONES (continuación)
Menú sin señal
VOLUMEN
EN BLANCO
ESPEJO
ARRANQUE
COLOR MENU
IDIOMA
AUTO OFF
SYNC ON G
SILENCIOSO
Cuando se oprime el botón MENU mientras se está visualizando “ENTRADA NO
DETECTADA EN ***” y “SINCRO FUERA ALCANCEEN ***”estarán disponibles
los mismos ajustes y reglajes que con los menús de imagen y de opciones.
16
Tabla 8. Menú sin señal
Descripción
Ajuste de volumen: Reduce el VOLUMEN
VOLUMEN
BLANK
ESPEJO
ARRANQUE
↔ Aumenta el VOLUMEN
• Cuando se utiliza esta función, la entrada de audio cambia automáticamente a video. La
entrada de audio se puede conmutar moviendo DISK PAD hacia la izquierda y la derecha
durante la visualización de la barra de ajuste de volumen. La barra de ajuste de volumen se
visualiza pulsando el botón VOLUME
o VOLUME
.
Selección del color de la pantalla en blanco:
Seleccione el color con los botones
y .
• La imagen se desaparece, y toda la pantalla se visualiza en el color seleccionado,
cuandose ajusta al modo en BLANCO con el BLANCO ACTIVADO, o cuando no hay señal
la imagen desaparece durante 5 minutos.
Inicio/parada de la operación: Pulse el botón
Selección del estado del espejo:
Seleccione el estado del espejo con los botones
/
.
y
.
Inicio/parada de la operación: Pulse el botón
/ .
Configuración inicial de la visualización en pantalla:
Seleccione ENCEND. con el botón .
Cancelación de la visualización inicial en pantalla:
Seleccione APAGADO con el botón .
ESPAÑOL
Opción
• Tenga en cuenta que si selecciona APAGADO, la pantalla en blanco se visualiza en azul
en ausencia de señal.
COLOR MENU Selección del color de fondo del menú: Seleccione con los botones
y
.
IDIOMA
Inicio/parada de la operación: Pulse el botón
/ .
Selección del idioma de visualización del menú: Seleccione con los botones
AUTO OFF
Inicio/parada de la operación: Pulse el botón
/ .
Ajuste de DESACTIVADO AUTOMATICO:
Ajuste entre 1~99 minutos con los botones
y . El sistema entra
automáticamente en el modo de espera cuando no se recibe ninguna señal por
un tiempo establecido.
Cancelación de DESACTIVADO AUTOMATICO:
Seleccione CANCEL (0 min.) con el botón .Cuando se selecciona "CANCEL",
el sistema no entrará en el modo de espera aunque no se reciba la señal.
SYNC ON G
SILENCIOSO
Inicio/parada de la operación: Pulse el botón
/ .
SYNC ON G válido: Seleccione ENCEND. con el botón .
SYNC ON G inválido: Seleccione APAGADO con el botón
y
.
.
• Puede suceder que no se visualice correctamente con algunas señales de entrada cuando
SYNC ON G esté activado. En tales casos, saque el conector de señal para que se reciban
señales conocidas, ajuste SYNC ON G a inválido, y vuelva a conectar la señal.
Inicio/parada de la operación: Pulse el botón
/ .
Ajuste/cancelación del modo Silencioso: Pulse el botón / . Cuando se
selecciona SILENCIOSO se activará el modo SILENCIOSO. En el modo
SILENCIOSO, el nivel del ruido acústico es reducido desde la unidad, el nivel del
brillo de la pantalla es un poco más bajo.
ESPAÑOL - 15
MANTENIMIENTO
Lámparas
ALTA TENSIÓN
ALTA TEMPERATURA
ALTA PRESIÓN
Antes de reemplazar la lámpara, póngase en contacto con su distribuidor.
Para la lámpara opcional, consulte el punto "Piezas opcionales" en la Tabla 12.
Antes de reemplazar la lámpara, apague el proyector, extraiga el cable del tomacorriente, y espere
aproximadamente 45 minutos hasta que la lámpara se enfríe. La manipulación a altas temperaturas
podrá producir la explosión de la lámpara.
ADVERTENCIA • Descarte las lámparas usadas de
acuerdo con los reglamentos vigentes en su
localidad.
• Debido a que las lámparas están hechas de vidrio, no
deben ser sometidos a golpes mecánicos ni a rayaduras.
• No utilice lámparas usadas - podrían explotar.
• Si sospecha que ha explotado la lámpara (se escucha el
ruido de explosión) extraiga el cable de alimentación del
tomacorriente y solicite a su distribuidor que le reemplace
la lámpara. La lámpara está cubierta por el vidrio
delantero, pero en casos extremos, puede suceder que el
reflector y el interior del proyector resulten dañados por
los trozos de vidrio rotos, los cuales podrían causar a su
vez lesiones durante su manipulación.
• No utilice el proyector con la cubierta de la lámpara
removida.
Lámpara
Reflector
Vidrio
frontal
Vida útil de la lámpara
Las lámparas del proyector tienen una vida útil limitada. Después de usar la lámpara durante un
tiempo prolongado, la imagen podría volverse oscura y los matices débiles.
Reemplace la lámpara si el indicador LAMP está rojo o si aparece el mensaje CAMBIE LA
LÁMPARA al encender el proyector. Véase la tabla 9 en la pág. 19 y la tabla 10 de la pág. 20.
NOTA • El indicador LAMP también se vuelve rojo cuando la lámpara alcanza altas
temperaturas. Antes de reemplazar la lámpara, apague el proyector, espere aproximadamente 20
minutos, y vuélvalo a encender. Si el indicador LAMP sigue estando rojo, reemplace la lámpara.
ESPAÑOL - 16
MANTENIMIENTO (continuación)
Reemplazo de la lámpara
1. Apague el proyector, extraiga el cable de alimentación del
tomacorriente y espere por lo menos 45 minutos hasta que la unidad
se enfríe.
2. Prepare una lámpara nueva.
3. Tras comprobar que el proyector se ha enfriado lo suficiente,
póngalo suavemente boca abajo.
4. Afloje los dos tornillos tal como se indica en la ilustración, y retire
la cubierta de la lámpara.
5. Afloje un tornillo, y retire la lámpara con cuidado mientras sujeta
los retenedores. No toque el interior de la lámpara pues podrán
producirse desigualdades en el color.
6. Instale la lámpara nueva y apriete firmemente el tornillo de ajuste de
la lámpara. También empuje firmemente el lateral opuesto al
tornillo de fijación de la lámpara dentro de la unidad.
7. Vuelva a instalar la cubierta de la lámpara en su lugar y apriete
firmemente los dos tornillos.
8. Vuelva a poner el proyector en su posición original.
ESPAÑOL
PRECAUCIÓN • Asegúrese de apretar los tornillos
firmemente. La flojedad de los tornillos puede ser
causa de lesiones o accidentes.
• No utilice el proyector con la cubierta de la lámpara
removida.un sitio seguro para futuras consultas.
Reinicialización del temporizador de la lámpara
Reinicialice el temporizador de la lámpara después de reemplazarla. Cuando aparezca el mensaje
“CAMBIE LA LÁMPARA … ENERGÍA SE DESCONECT DESPURÉS DE 0 HORAS.”, finalice
la siguiente operación antes que transcurran 10 minutos después de haber conectado la alimentación.
La alimentación se desconectará automáticamente después de los 10 minutos.
1. Conecte la alimentación, y pulse el botón RESET durante aproximadamente tres segundos.. En la
indicación del temporizador de lámpara en la parte inferior de la pantalla aparecerá el mensaje
"LAMP xxx hr".
2. Pulse el botón MENU en el mando a distancia, o el botón RESET en el panel de mando mientras
está visualizado el temporizador de lámpara. Entonces aparecerá el mensaje ‘LAMP xxxx → 0
■ CANCEL’.
3. Pulse el botón
y seleccione 0, y espere hasta que desaparezca la indicación del temporizador.
NOTA • No reinicialice el temporizador de lámpara si no ha reemplazado la lámpara.
Asimismo, asegúrese de reinicializar el temporizador de lámpara cada vez que reemplace la
lámpara. Las funciones de los mensajes no operarán correctamente si no se efectúa correctamente la
reinicialización del temporizador de lámpara.
ESPAÑOL - 17
MANTENIMIENTO (continuación)
Mantenimiento del filtro de aire
El filtro de aire se debe limpiar de la manera descrita abajo a intervalos de aproximadamente 100
horas.
1. Apague el proyector y extraiga el cable de alimentación del tomacorriente.
2. Limpie el filtro de aire con una aspiradora.
PRECAUCIÓN • Desconecte la alimentación y extraiga el cable de
alimentación del tomacorriente. Para poder realizar correctamente el
mantenimiento, por favor lea atentamente las “INSTRUCCIONES DE SEURIDAD”.
• Reemplace el filtro de aire si no consigue eliminar la contaminación o si
presenta daños. Póngase en contacto con su distribuidor. Para el filtro de aire
opcional, consulte el punto "Piezas opcionales" en la Tabla 12.
• No utilice el equipo con el filtro de aire removido.
• Cuando el filtro de aire esté obstruido por el polvo, etc., el proyector se apagará
automáticamente para evitar el aumento de la temperatura interior.
Otras tareas de mantenimiento
Mantenimiento en el interior del equipo
Por motivos de seguridad, asegúrese de solicitar la limpieza y la inspección del equipo a su
distribuidor, una vez cada dos años. El mantenimiento del equipo por sí mismo puede resultar
peligroso.
Limpieza del objetivo
Suavemente, limpie el objetivo con papel para limpiar objetivos. No toque el objetivo con sus
manos.
Limpieza de la carcasa y del mando a distancia
Limpie con cuidado con un paño suave. Si no consigue eliminar la suciedad y las manchas, utilice
un paño suave humedecido con agua, o con una mezcla de agua y detergente neutro, y limpie con un
paño suave y seco.
PRECAUCIÓN • Antes de empezar la tarea de mantenimiento, desconecte la
alimentación y extraiga el cable de alimentación del tomacorriente. Para
poder realizar correctamente el mantenimiento, por favor lea atentamente las
“INSTRUCCIONES DE SEURIDAD”.
• No utilice detergentes ni sustancias químicas distintas de las indicadas arriba
(por ej., bencina o diluyentes).
• No utilice limpiadores en aerosol.
• No frote con materiales duros, ni golpee el equipo.
ESPAÑOL - 18
LOCALIZACIÓN Y SOLUCIÓN DE PROBLEMAS
Mensajes en pantalla (OSD)
Los mensajes descritos abajo pueden aparecer en la pantalla al conectar la alimentación. Cuando
aparezcan tales mensajes, tome las medidas pertinentes.
Tabla 9. Mensajes en pantalla (OSD)
Descripción
El tiempo de uso de la lámpara está por llegar a las 2000
horas. (*2)
Se recomienda reemplazar la lámpara cuanto antes.
Prepare una nueva lámpara de recambio.
CAMBIE LA LÁMPARA
DESPUÉS DE REEMPLAZAR
LÁMPARA, PONGA TEMPOR.
LÁMPARA A CERO.
ENERGÍA SE DESCONECT
DESPURÉS
DE ** HORAS.
(*1)
El tiempo de uso de la lámpara está por llegar a las 2000
horas. Se recomienda reemplazar la lámpara en el lapso
de ** horas. (*2)
Puede suceder que por algún motivo, la lámpara falle
antes de las ** hs. La alimentación se desconectará (OFF)
automáticamente en ** horas. Reemplace la lámpara de la
manera indicada en “Lámpara”, páginas 17-18. Siempre
reinicialice el temporizador de la lámpara después de
reemplazar la lámpara.
CAMBIE LA LÁMPARA
DESPUÉS DE REEMPLAZAR
LÁMPARA, PONGA TEMPOR.
LÁMPARA A CERO.
ENERGÍA SE DESCONECT
DESPURÉS DE 0 HORAS.
El tiempo de uso de la lámpara está por finalizar. La
alimentación se desconectará (OFF) automáticamente en
unos minutos. (*2)
Desconecte (OFF) inmediatamente la alimentación y
reemplace la lámpara de la manera indicada en
“Lámpara”, páginas 17-18.
Siempre reinicialice el temporizador de la lámpara
después de reemplazar la lámpara.
ENTRADA NO DETECTADA
EN ***
No se encontró la señal de entrada.
Verifique las conexiones de entrada de señal y las fuentes
de señal.
SINCRO FUERA ALCANCE
EN ***
CHEQUEAR FLUJO DE AIRE
La frecuencia horizontal o vertical de la señal de entrada
no está dentro del margen especificado.
Verifique las especificaciones del equipo y de la fuente de
señal.
Ha aumentado la temperatura interna.
Desconecte la alimentación y espere 20 minutos hasta que
el equipo se enfríe.
Verifique lo siguiente y vuelva a conectar la alimentación.
• ¿Está la entrada de aire o el escape bloqueado?
• ¿Está el filtro de aire sucio?
• ¿La temperatura ambiente excede de 35˚C?
NOTA (*1) Este mensaje se cancelará automáticamente después de aproximadamente tres
minutos, y aparecerá cada vez que se conecta la alimentación.
(*2) La unidad cuenta con la función de desactivar la alimentación cuando el tiempo de uso llega a
las 2000 horas. Sin embargo, la vida útil de una lámpara podría ser muy diferente entre una y otra, y
por lo tanto, puede suceder que una lámpara falle antes que se active esta función.
ESPAÑOL - 19
ESPAÑOL
Mensaje
CAMBIE LA LÁMPARA
DESPUÉS DE REEMPLAZAR
LÁMPARA, PONGA TEMPOR.
LÁMPARA A CERO.
(*1)
LOCALIZACIÓN Y SOLUCIÓN DE PROBLEMAS (continuación)
Mensajes indicadores
El indicador POWER, el indicador LAMP, y el indicador TEMP se encenderán o parpadearán de la
siguiente manera. Tome las medidas apropiadas.
Tabla 10. Mensajes indicadores
Indicador
POWER
Indicador Indicad
LAMP
or TEMP
Se ilumina
en naranja
Se
apaga
Se
apaga
Se ha ajustado al modo de espera.
Parpadea
en verde
Se
apaga
Se
apaga
Calentando. Por favor espere.
Se ilumina
en verde
Se
apaga
Se
apaga
ON. Posible la operación normal.
Parpadea
en naranja
Se
apaga
Se
apaga
Enfriando. Por favor espere.
Parpadea
en rojo
-
Parpadea / Se
Se ilumina ilumina
en rojo
en rojo
-
Se
apaga
Parpadea /
Parpadea Se
Se ilumina
en rojo
apaga
en rojo
Descripción
Enfriando. Por favor espere.
Se encuentra el error. Tome las medidas apropiadas cuando el
indicador POWER deja de parpadear.
La lámpara no está encendida.
El interior del equipo puede estar muy caliente. Desconecte la
alimentación, espere 20 minutos hasta que el equipo se enfríe, y
revise si está bloqueada la entrada o la salida, si el filtro de aire
está sucio, o si la temperatura ambiente excede de 35˚C. Y
conecte la alimentación otra vez. Reemplace la lámpara si se
produce el mismo problema.
La lámpara o la cubierta de la lámpara no está instalada o no lo
está de manera correcta.
Desconecte la alimentación, y espere 45 minutos hasta que el
equipo se enfríe. Verifique la instalación de la lámpara y de la
cubierta de la lámpara, y vuelva a conectar la alimentación. Si el
problema se repite, póngase en contacto con su distribuidor.
El ventilador de enfriamiento no está funcionando.
Desconecte la alimentación, y espere 20 minutos hasta que el
Parpadea
equipo se enfríe. Revise si hay cuerpos extraños en el ventilador,
en rojo
y vuelva a conectar la alimentación. Si el problema se repite,
póngase en contacto con su distribuidor.
El interior del equipo está muy caliente. *2)
Desconecte la alimentación, y espere 20 minutos hasta que el
Parpadea /
Se
equipo se enfríe. Revise si está bloqueada la entrada o la salida, si
Se ilumina Se apaga ilumina
el filtro de aire está sucio, o si la temperatura ambiente excede de
en rojo
en rojo
35˚C. Vuelva a conectar la alimentación. Si el problema se repite,
póngase en contacto con su distribuidor.
Parpadea /
Se
Se ilumina
apaga
en rojo
El interior del equipo está demasiado frío.
Se ilumina en Parpadea Parpadea Compruebe si la temperatura ambiente está por debajo de 0°C.
verde
en rojo
en rojo
Contacte su agente si ocurre el mismo problema cuando la
temperatura ambiente esté entre 0~35˚C.
NOTA *2) Cuando la temperatura interior sea excesiva, la alimentación se desconectará
automáticamente por motivos de seguridad, y el indicador se apagará. Ajuste el interruptor de
alimentación a [O] y espere 20 minutos hasta que el equipo se haya enfriado suficientemente.
ESPAÑOL - 20
LOCALIZACIÓN Y SOLUCIÓN DE PROBLEMAS (continuación)
Síntoma
Los siguientes fenómenos pueden aparecer frecuentemente como anomalías.
Puede suceder que los siguientes fenómenos no sean anomalías. Verifique de acuerdo con la tabla
de abajo.
Tabla 11. Síntoma
La alimentación no
está conectada.
No hay imagen ni
sonido.
Ejemplos de fenómenos que no son anomalías Punto de comprobación
El interruptor de alimentación
principal no está conectado.
Conecte el interruptor de
alimentación.
El cable de alimentación está
desconectado.
Enchufe el cable de alimentación en
el tomacorriente de CA.
La entrada no está
correctamente ajustada.
Ajuste utilizando el proyector o el
mando a distancia.
No hay entrada de señal.
Conecte correctamente.
6,7
El proyector no está
correctamente conectado.
Conecte correctamente.
6,7
Hay imágenes pero El volumen está ajustado al
mínimo.
no hay sonido.
Las imágenes son
borrosas.
9
10,14
Pulse el botón MUTE
El proyector no está
correctamente conectado.
Conecte correctamente.
6,7
Seleccione BRILLO con el botón
MENU y luego oprima la tecla .
11
No se ha sacado la tapa
deslizante del objetivo.
Las imágenes son
oscuras.
Pulse VOLUME
en el mando a
distancia o visualice la pantalla de
menú para ajustar el volumen.
7,8
Se ha activado el
enmudecimiento.
Hay imagen pero no
El brillo se ajusta al mínimo.
hay sonido.
Los colores son
pálidos y el equilibrio
colorimétrico es
deficiente.
Página
10
.
Abra la tapa deslizante del objetivo.
8
La densidad de color y el
equilibrio colorimétrico no están Ajuste la imagen.
correctamente ajustados.
11
El brillo y el contraste no están
correctamente ajustados.
Ajuste la imagen.
11
La lámpara está por llegar al
final de su vida de servicio.
Reemplace por una lámpara nueva.
El enfoque o FASE H. está
desajustado.
Ajuste el enfoque o la FASE H.
16,17
8,11
ESPAÑOL - 21
ESPAÑOL
Fenómeno
ESPECFICACIONES
Tabla 12. Especificaciones
Item
Especificación
Nombre del producto
Panel de
cristal
líquido
Proyector de cristal líquido
Tamaño del panel
1,8 cm (tipo 0,7)
Sistema de mando
Matriz activa TFT
Pixeles
CP-S225W : 480.000 pixeles (800 horizontal x 600 vertical)
CP-X275W : 786.432 pixeles (1024 horizontal x 768 vertical)
Objetivo
Objetivo zoom F=2,0 – 2,3 f=18 – 21 mm
Lámpara
150 W UHB
Altavoz
1,0 W
Fuente de alimentación
100-120V CA, 2,7A / 220-240V CA, 1,3A
Consumo
240W
Margen de temperaturas
0 – 35˚C (En funcionamiento)
Tamaño
289 (An) x 84 (Al) x 215 (Pr) mm
Peso
CP-S225W : 2,4 kg
CP-X275W : 2,5 kg
Vídeo: Analógico 0,7Vp-p, terminador 75Ω (positivo)
Sincronismo H/V: nivel TTL (positivo/negativo)
Sincronismo compuesto: nivel TTL
Jack D-sub de 15 patillas "shrink"
RGB IN
Entrada de
señal RGB
TMDS, DC: 150~1200 mV / CA: 1,.56 Vp-p
DIGITAL
nivel TTL (positivo/negativo)
200mVrms, 47 kΩ (máx. 3,0V p-p)
Minijack estéreo
1,0Vp-p, terminador 75Ω Jack RCA
AUDIO IN
VIDEO
Señal de brillo: 1,0Vp-p Terminador 75Ω
Señal de color: 0,286Vp-p (NTSC, señal de estallido), terminador 75Ω
0,3Vp-p (PAL/SECAM, señal de estallido), terminador 75Ω
Minijack DIN de 4 patillas
S-VIDEO
Entrada de
señal de
vídeo
COMPONENT
VIDEO
AUDIO
1,0 Vp-p, terminador 75Ω (positivo)
Y
CB/CR 0,7 Vp-p, terminador 75Ω (positivo)
PB/PR 0,7 Vp-p, terminador 75Ω (positivo)
L
R
200mVrms, 47 kΩ (máx. 3,0V p-p)
Jack RCA
Funciones
CONTROL
de control
Jack D-sub de 15 patillas "shrink"
Piezas opcionales
Lámpara: DT00401 (CP-S225W) / DT00461 (CP-X275W)
Filtro de aire: MU01461
* Para otras piezas, consulte con su distribuidor.
NOTA
• Estas especificaciones se encuentran sujetas a cambios sin previo aviso.
ESPAÑOL - 22
GARANTÍA Y SERVICIO
ESPAÑOL
Cuando tenga algún problema con el equipo, primero consulte la sección “LOCALIZACIÓN Y
SOLUCIÓN DE PROBLEMAS” (P.20) y realice las inspecciones recomendadas. Si no consigue
resolver el problema, póngase en contacto con su distribuidor o con el centro de servicio. Le dirán se
aplica qué condición de la garantía.
ESPAÑOL - 23
Vloeibare-kristallen Projector
GEBRUIKSAANWIJZING
Hartelijk dank voor de aanschoop van deze Liquid Crystal Projector.
WAARSCHUWING • Lees de bijgevoegde “VEILIGHEIDSINSTRUCTIES” en
deze "GEBRUIKSAANWIJZING" aandachtig door zodat u het apparaat op de
juiste wijze bedient en behandelt. Bewaar de documentatie op een veilige plaats
voor het geval u deze in de toekomst nogmaals nodig hebt.
OPMERKINGEN • De informatie in deze gebruiksaanwijzing kan zonder voorafgaande
kennisgeving worden gewijzigd. • De fabrikant kan niet aansprakelijk worden gesteld voor eventuele
fouten in deze gebruiksaanwijzing. • Deze documentatie mag niet worden verveelvuldigd, of
elektronisch opgeslagen of overgedragen, zonder voorafgaande schriftelijke toestemming.
HANDELSMERKEN : PS/2, VGA en XGA zijn wettig gedeponeerde handelsmerken van
International Business Machines Corporation. Apple, Mac en ADB zijn wettig gedeponeerde
handelsmerken van Apple Computer, Inc. VESA en SVGA zijn handelsmerken van de Video
Electronics Standard Association. Windows is een wettig gedeponeerd handelsmerk van Microsoft
Corporation. Eventuele andere productnamen zijn de handelsmerken of de wettig gedeponeerde
handelsmerken van de betreffende ondernemingen.
INHOUDSOPGAVE
Pagina
Pagina
KENMERKEN....................................2
ALVORENS GEBRUIK .....................2
VERHELPEN VAN STORINGEN .........19
INSTALLATIE ...................................5
Installatie van de projector en het scherm........5
Afstellen van de projectiehoek................5
Aansluiten van de signaalkabels ............6
Aansluiten van het netsnoern .................6
Voorbeeld van een systeem-setup .........7
Plug & Play .............................................7
BEDIENING.......................................8
Inschakelen ............................................8
Uitschakelen ...........................................8
Basisbediening .......................................9
"Setup" menu........................................11
"Input" menu .........................................12
"Beeld" menu........................................13
"Options" menu.....................................14
"No Signal" men ...................................15
ONDERHOUD .................................16
Lamp.....................................................16
Onderhoud van het luchtfilter ...............18
Overig onderhoud.................................18
OSD melding ........................................19
Indicatormelding ...................................20
Symptoom ............................................21
TECHNISCHE GEGEVENS ............22
GARANTIE EN SERVICE ...............23
.......................................................................................
TABELLEN
Tabel 1. Installatiereferentie .....................5
Tabel 2. Aansluiten van de signaalkabels...6
Tabel 3. Basisbediening ...........................9
Tabel 4. "Setup" menu............................11
Tabel 5. "Input" menu .............................12
Tabel 6. "Beeld" menu............................13
Tabel 7. "Options" menu.........................14
Tabel 8. "No Signal" men .......................15
Tabel 9. OSD melding ............................19
Tabel 10. Indicatormeldin .......................20
Tabel 11. Symptoom ..............................21
Tabel 12. Technische gegevens.............22
.......................................................................................
Voor "TECHNICAL" (TECNISCH) en
"REGULATORY NOTICE" (KENNISGEVING
BETREFFENDE REGELGEVING), zie het eind
van eind van deze gebruiksaanwijzing.
NEDERLANDS - 1
NEDERLANDS
Inhoud van de verpakkingsdoos.............2
Benaming van de onderdelen.................3
Aanbrengen van de batterijen ................4
KENMERKEN
Met deze liquid crystal projector kunt u alle mogelijke beelden van een computer en van
NTSC/PAL/SECAM videosignalen op een beeldscherm projecteren. Het apparaat neemt weinig
plaats in maar levert uitstekende beelden van groot formaat.
Heldere beeldweergaveDe UHB projectielamp en een optisch systeem met hoge lichtopbrengst
garanderen een fraai helder beeld.
Extra uitvergroting voor een deel van het beeld
Interessante delen van het beeld kunnen worden uitvergroot om alle details duidelijk te zien.
Vervormingscorrectie
Snelle correctie voor vervormingsvrije beelden.
Extra lage ruis functie.
Akoestisch ruisniveau van het toestel kan worden gereduceerd.
ALVORENS GEBRUIK
Inhoud van de verpakkingsdoos
Controleer of u de projector en de onderstaande accessoires in de verpakkingsdoos aantreft. Neem
contact op met uw dealer als er iets ontbreekt.
OPMERKINGEN • Bewaar het originele verpakkingsmateriaal voor het geval het apparaat
nogmaals vervoerd moet worden.
Netsnoer (voor de
Verenigde Staten)
Netsnoer (voor
Groot-Brittannië)
RGB kabel
Componentvideokabel (met
groene streep)
Netsnoer
(voor Eurpa)
Projector
Gebruiksaanwijzing
(dit boekje)
VIDEO
STANDBY/ON
RGB
KEYSTONE
MENU
SELECT
MENU
MAGNIFY
POSITION RESET
FREEZE VOLUME
MUTE
OFF
AUTO
BLANK
Veiligheidsinstructies
Afstandsbediening
met batterij
NEDERLANDS - 2
Draagtas
ALVORENS GEBRUIK (vervolg)
Benaming van de onderdelen
Zoomknop
Scherpstelring
Afstandsbedieningssensor
Netschakelaar
Netingang
(voor netsnoer)
Ventilatieopeningen
(inlaat)
Lens
Lens-schuifkapje
Afstelvoetje
Aanzicht voor-/linkerkant
Bedieningspaneel (zie pagina 8 "BEDIENING")
RESET toets
KEYSTONE toets
INPUT toets
STANDBY/ON toets
Knop voor afstelvoetje
Luchtfilter en
inlaatopeningen
(voor de koelventilator)
Ventilatieopeningen
(uitlaat)
Luidspreker
Afsteller voor achterste
voetje
Aanzicht achter/rechterkant
Afstandsbedieningssensor
Aansluitingenpaneel
(zie hieronder)
RGB aansluiting
CONTROL aansluiting
COMPONENT
Y aansluiting
CB/PB aansluiting
CR/PR aansluiting
AUDIO aansluiting
AUDIO
R aansluiting
L aansluiting
VIDEO aansluiting
S-VIDEO aansluiting
Aansluitingenpaneel
NEDERLANDS - 3
NEDERLANDS
LAMP indicator
TEMP indicator
POWER indicator
MENU toets
ALVORENS GEBRUIK (vervolg)
Benaming van de onderdelen (vervolg)
VIDEO toets
STANDBY/ON toets
STANDBY/ON
KEYSTONE toets
KEYSTONE
VIDEO
RGB
RGB toets
MENU SELECT toets
toets
MENU
SELECT
toets
POSITION toets
toets
MENU
toets
POSITION RESET
RESET toets
MENU toets
MAGNIFY
toets
MAGNIFY
toets
MAGNIFY
OFF
toets
MAGNIFY
FREEZE VOLUME
MUTE
OFF
AUTO
BLANK
AUTO toets
Batterijhouder
VOLUME
toets
VOLUME
toets
FREEZE toets
MUTE toets
BLANK toets
(zie pagina 8 "BEDIENING")
Afstandsbediening
Aanbrengen van de batterij
Gebruik van de bijgeleverde batterij:
In de originele verpakking is de batterij reeds in de batterijhouder van
de afstandsbediening geplaatst, voorzien van een dunne beschermfilm
(de doorzichtige film die gedeeltelijk in de batterijhouder is). Trek de
beschermfilm naar buiten om de batterij te gebruiken.
"+" zijde
Vervangen van de batterij:
1. Draai de afstandsbediening om.
2. Druk de groef samen en trek de batterijhouder naar buiten zoals
rechts hiernaast is afgebeeld.
3. Verwijder de oude batterij.
4. Plaats een nieuwe batterij met de "+" zijde naar boven.
5. Druk de batterijhouder naar binnen tot deze vastklikt.
Naar buiten
trekken
Batterijhouder
LET OP • Een verkeerde behandeling van de batterij kan resulteren in brand of letsel.
De batterij kan zelfs ontploffen indien deze niet juist wordt behandeld. Behandel de
batterij overeenkomstig de aanwijzingen in de VEILIGHEIDSINSTRUCTIES en in deze
gebruiksaanwijzing.
• Gebruik uitsluitend een 3V micro-lithiumbatterij type CR2025.
• Zorg dat de batterijen met de plus en min in de juiste richting gekeerd in de batterijhouder
worden geplaatst. Indien de batterijen verkeerd geplaatst zijn, kunnen deze lekken of
barsten met mogelijk letsel of milieuvervuiling tot gevolg.
• Neem bij het weggooien van de lege batterij de plaatselijke voorschriften in acht.
• Houd de batterij buiten het bereik van kinderen en huisdieren.
• Haal de batterijen uit de afstandsbediening wanneer u deze langere tijd niet zult gebruiken.
OPMERKINGEN Vervang de batterijen wanneer u merkt dat het gebruik van de afstandsbediening
problematisch wordt.
NEDERLANDS - 4
INSTALLATIE
Installatie van de projector en het scherm
Zie de onderstaande afbeelding en tabel voor de schermgrootte en de projectieafstand.
De projectie-afstanden in de onderstaande table voor een
Projectiescherm
volledig beeldformaat (CP-S225W:800 x 600 beeldpunten /
CP-X275W:1024 x 768 beeldpunten).
a: Afstand van de projector tot het scherm. (±10%)
b: Hoogte van de hartlijn van de lens tot aan de onderkant
van het projectiescherm. (±10%)
Tabel 1. Installatiereferentie
Minimaal
Maximaal
b
[cm]
1,0
1,5
2,0
2,5
3,0
3,8
5,0
0,9
1,5
1,9
2,4
2,9
3,7
4,9
1,2
1,8
2,4
2,9
3,5
4,4
5,9
8,7
13,1
17,4
21,8
26,1
32,7
43,5
BOVENAANZICHT
Hartlijn van de lens
b
a
ZIJAANZICHT
LET OP • Zet de projector op een geschikte plaats overeenkomstig de aanwijzingen in
de bijgevoegde "VEILIGHEIDSINSTRUCTIES" en deze gebruiksaanwijzing.
• Plaats de vloeibare kristallen projector normaliter horizontaal voor gebruik. Door gebruik
van de projector met de lens omhoog, omlaag of naar de zikant gericht, kan de hitte niet
worden afgevoerd waardoor het toestel te heet wordt met mogelijk beschadiging tot gevolg.
Let vooral op dat door de plaats van het toestel de ventilatie-openingen niet worden
geblokkeerd.
• Plaats de LCD-projector niet in een ruimte met veel rook. De rookneerslag kan zich afzetten
op vitale onderdelen (LCD-paneel, lens enz.) van het apparaat.
Afstellen van de projectiehoek
Gebruik het de afstelvoeten aan de
onderkant van de projector om de
projectiehoek in te stellen. De hoek
kan tussen 0° en 10° worden
ingesteld.
1. Til de voorzijde van de projector
omhoog. Druk op de knop voor
het afstelvoetje en stel de
gewenste projectiehoek in.
2. Laat de knop los om de gemaakte
instelling te vergrendelen.
3. Draai aan de achterste afsteller om
de links-rechts stand in te stellen.
Afstelvoetje
Druk op de knop voor
het afstelvoetje.
Afsteller voor
achterste voetje
LET OP • Zorg dat u de projector met uw handen vasthoudt wanneer u de
knop voor het afstelvoetje indrukt. De projector kan anders omkantelen of uw
vingers kunnen klemgedrukt worden, met mogelijk letsel tot gevolg.
NEDERLANDS - 5
NEDERLANDS
a [m]
Schermafmetingen
[m]
INSTALLATIE (vervolg)
Aansluiten van de signaalkabels
Zie de onderstaande table voor aansluiten elk aansluiting van de projector aan op de elk apparatuur.
Tabel 2. Aansluiten van de signaalkabels
Functie
Aansluiting
Kabel
Analoge RGB ingang
RGB
Bijgeleverde RGB kabel of los verkrijgbare
RGB kabel met D-sub 15-pins
krimpaansluiting en inch-draad schroeven
RS-232C communicatie
CONTROL
Los verkrijgbare RS-232C kabel
Audio-ingang
(vanaf de computer)
AUDIO
Los verkrijgbare audiokabel met stereoministekkers
Component-video-ingang
COMPONENT VIDEO CB/PB
COMPONENT VIDEO Y
Bijgeleverde component-videokabel
COMPONENT VIDEO PR/CB
S-video-ingang
S-VIDEO
Video-ingang
VIDEO
AUDIO L
Audio-ingang
(vanaf de videoapparatuur) AUDIO R
Los verkrijgbare S-videokabel met mini DIN
4-pins stekker
Los verkrijgbare video/audiokabel met
tulpstekkers
LET OP • Een verleerde aansluiting kan resulteren in brand of een elektrische schok.
Lees deze gebruiksaanwijzing en de afzonderlijke “VEILIGHEIDSINSTRUCTIES”.
• Schakel alle apparaten uit alvorens deze aan te sluiten, behalve in geval van de USB kabel.
• De kabels moeten soms gebruikt worden met de ferrietkern aangebracht aan de
projectorzijde. Gebruik de kabels die bij de projector worden geleverd of de
voorgeschreven kabels.
OPMERKINGEN • Voor u de gewenste aansluitingen gaat maken, dient u de handleidingen van de aan te
sluiten apparatuur te lezen en dient u te controleren of de projector geschikt is voor deze apparatuur.
• Zorg ervoor dat de schroeven van de stekkers vast zitten.
• Voor sommige functies hebt u de los verkrijgbare Mac-adapter nodig.
• Om de digitale RGB ingang te kunnen kiezen, is het mogelijk dat er diverse instellingen op de computer nodig
zijn. Zie de handleiding van de computer voor nadere bijzonderheden.
• Sommige computers hebben meerdere weergaveschermfuncties. Het is mogelijk dat niet al deze functies met
deze projector gebruikt kunnen worden.
• Raadpleeg de paragraaf "TECHNICAL" voor de toewijzing van de pennen van de aansluitingen.
• Raadpleeg de gebruiksaanwijzing van de los verkrijgbare RS-232C kabel voor de communicatie-gegevens.
• Voor overige informatie kunt u uw dealer raadplegen.
NEDERLANDS - 6
INSTALLATIE (vervolg)
Aansluiten van het netsnoern
Gebruik het juiste netsnoer van de bijgeleverde snoeren overeenkomstig het land waar u het
apparaat gebruikt. Sluit het netsnoer op de netingang van de projector aan en dan op het stopcontact.
LET OP • Behandel het netsnoer overeenkomstig
de aanwijzingen in de VEILIGHEIDSINSTRUCTIES
en in deze gebruiksaanwijzing.
• Sluit het netsnoer stevig aan. Gebruik een degelijk
stopcontact zodat een goede verbinding wordt
verkregen.
Stopcontact
Netsnoer
AC INLET aansluiting
Voorbeeld van een systeem-Setup
Computer
(bureau-type)
S-videorecorder
Computer
(draagbaar type)
OPMERKINGEN • Bij het aansluiten op een notebook-computer moet de externe RGB
beelduitgang worden ingeschakeld (instelling voor CRT display of gelijktijdig LCD en CRT
display). Zie de gebruiksaanwijzing van de notebook-computer voor verdere informatie.
Plug & Play
Deze projector is VESA DDC 1/2B compatibel. Het Plug & Play aansluiten en direct gebruik is mogelijk met
een computer die ook VESA DDC (Display Data Channel) compatibel is.
Voor gebruik van deze functie moet de bijgeleverde RGB kabel met de RGB aansluiting. Bij een andere
aansluitmethode is het mogelijk dat plug & play niet werkt.
OPMERKINGEN • Plug & Play duidt op de directe bediening die geboden wordt door een
computer, compleet met beeldweergave-apparaat, randapparatuur en een hiervoor geschikt
besturingssysteem.
• Deze projector wordt als een plug & play monitor herkend. Gebruik de standaard displaystuurprogramma's.
• Bij sommige computers is het mogelijk dat plug & play niet werkt.
NEDERLANDS - 7
NEDERLANDS
DVD-speler
BEDIENING
STANDBY/ON toets
POWER Indicator
STANDBY/
ON toets
VIDEO
STANDBY/ON
RGB
KEYSTONE
MENU
SELECT
Zoom knop
MENU
POSITION RESET
Scherpstelring
MAGNIFY
Netshakelaar
FREEZE VOLUME
Lens-schuifkapje
Inschakelen
1. Controleer of het netsnoer juist is aangesloten.
2. Zet de netschakelaar op [ | ]. Het apparaat komt in de ruststand te staan en de POWER indicator
licht oranje op.
3. Druk op de STANDBY/ON
toets op het bedieningspaneel van het apparaat of op de
afstandsbediening. Het opwarmen begint en de POWER indicator knippert groen.
4. De POWER indicator stopt met knipperen en licht continu groen op wanneer het apparaat
bedrijfsklaar is. Maak het lenskapje open.
5. Draai aan de zoomknop om de schermgrootte in te stellen.
6. Draai aan de scherpstelring om de beeldscherpte in te stellen.
Uitschakelen
1. Druk op de STANDBY/ON
op het bedieningspaneel of de afstandsbediening. Vervolgens zal
de melding "Power off?" op het scherm verschijnen, welke zal verdwijnen als er 5 seconden lang
geen handeling wordt uitgevoerd of als er alsnog een handeling uit wordt gevoerd. Terwijl deze
melding getoond wordt dient u nog eens op de STANDBY/ON (_) toets te drukken. De
projectorlamp gaat uit en het afkoelen van de lamp begint. De POWER indicator knippert oranje
tijdens het afkoelen van de lamp. Indrukken van de STANDBY/ON
toets heeft geen effect
wanneer de POWER indicator knippert.
2. De projector komt in de ruststand te staan wanneer het afkoelen is voltooid. De POWER indicator
stopt dan met knipperen en licht oranje op. Controleer of de indicator oranje oplicht en zet dan de
netschakelaar op [O].
3. De POWER indicator is uit wanneer de projector is uitgeschakeld. Vergeet niet om het lenskapje
dicht te maken.
WAARSCHUWING • Lees deze gebruiksaanwijzing en de afzonderlijke
“VEILIGHEIDSINSTRUCTIES” aandachtig door alvorens u het apparaat in
gebruik neemt. Zorg ervoor dat u het apparaat op veilige wijze gebruikt.
OPMERKINGEN • Met uitzondering van noodgevallen mag u het apparaat niet uitschakelen
wanneer de POWER indicator oranje is, want dit kan resulteren in een kortere levensduur van de
projectorlamp.
• Om storingen te voorkomen, mag u de projector alleen in/uitschakelen wanneer de computer of
videorecorder uitgeschakeld is. Wanneer een RS-232C kabel is aangesloten, moet de computer
worden ingeschakeld voordat de projector wordt ingeschakeld.
• Wanneer een projector langere tijd hetzelfde beeld produceert, is het mogelijk dat het weergegeven
beeld blijft na-ijlen. Zorg ervoor dat hetzelfde beeld niet te lang geprojecteerd wordt.
NEDERLANDS - 8
BEDIENING (vervolg)
Basisbediening
De basisbediening die is aangegeven in Tabel 3 wordt uitgevoerd op het met de bijgeleverde
afstandsbediening of bedieningspaneel van de projector. Onderdelen aangegeven met een (*)
kunnen vanaf het bedieningspaneel van de projector bediend worden.
Tabel 3. Basisbediening
Beschrijving
INPUT
SELECT
Kiezen van het ingangssignaal (*): Druk op de INPUT toets.
RGB → VIDEO → S-VIDEO → COMPONENT (→ RGB )
Kiezen van de RGB ingang: Druk op de RGB toets.
VIDEO/S-VIDEO/COMPONENT → RGB
Kiezen van de VIDEO/S-VIDEO ingang: Druk op de VIDEO toets.
RGB → VIDEO/S-VIDEO/COMPONENT
• Bij het wijzigen van het ingangssignaal wordt het gekozen ingangssignaal
ongeveer 3 seconden aangegeven.
POSITION
Inschakelen/uitschakelen van de beeldpositie-instelfunctie:
Druk op de POSITION toets.
Het [ ] pictogram verschijnt wanneer de beeldpositie-instelfunctie wordt ingeschakeld.
Instellen van de beeldpositie:
Druk in de beeldpositie-instelstand op de , , en
toetsen.
• Deze functie is alleen geldig in de MAGNIFY stand, bij ontvangst van een videosignaal.
• Wanneer ongeveer 10 seconden geen bedieningshandeling wordt verricht, zal het
[ ] pictogram doven en komt de POSITION functie automatisch te vervallen.
RESET (*)
Initialiseren van elk onderdeel: Kies een onderdeel en druk dan op de RESET toets.
Initialiseren van de beeldpositie-instelling:
Druk op de RESER toets in de POSITION stand. Deze functie is alleen geldig bij
ontvangst van een RGB ingangssignaal.
• Niet geldig voor VOLUME, TAAl, H FASE en STIL FUNC..
MAGNIFY
Inschakelen van de vergrotingsfunctie: Druk op de MAGNIFY
toets.
Verplaatsen van het vergrote gebied:
Gebruik de beeldpositie-instelfunctie in de MAGNIFY stand.
Uitschakelen van de vergrotingsfunctie:
Druk op de MAGNIFY
/
toets terwijl de vergrotingsfunctie is ingeschakeld.
MAGNIFY
vergroot het beeld ↔ MAGNIFY
verkleint het beeld
Uitschakelen van de vergrotingsfunctie: Druk op de MAGNIFY
toets.
• De vergrotingsfunctie vervalt bij gebruik/instellen van de AUTO, de ASPECT , de
INPUT SELECT of VIDEO, of wanneer het ingangssignaal wordt veranderd.
OFF
Inschakelen/uitschakelen van de stilstaand-beeld functie: Druk op de FREEZE
toets. Het [II] pictogram verschijnt en het beeld wordt stilgezet.
• De stilstaand-beeld functie vervalt bij gebruik/instellen van de POSITION,
VOLUME, MUTE, AUTO, BLANK ON/OFF en MENU ON/OFF functie, of wanneer het
ingangssignaal wordt veranderd.
• Vergeet niet om stilstaand-beeld functie ook weer uit te schakelen.
FREEZE
Instellen/annuleren KEYSTONE functie: Druk op de KEYSTONE
toets.
Bijstellen perspectivische vertekening:
(*) Druk op de / toets in de KEYSTONE functie.
verkleint de onderkant van het beeld ↔
verkleint de bovenkant van het beeld
KESTONE
OPMERKINGEN • Gebruik de afstandsbediening binnen een bereik van ongeveer 3 meter vanaf
de sensor op de voorzijde van de projector en binnen een hoek van 30° naar links en rechts. Sterk
licht of obstakels kunnen de werking van de afstandsbediening storen.
(vervolg op de volgende bladzijde)
NEDERLANDS - 9
NEDERLANDS
Onderdeel
BEDIENING (vervolg)
Onderdelen aangegeven met een (*) kunnen vanaf het bedieningspaneel van de projector bediend worden.
Tabel 3. Basisbediening (vervolg)
Onderdeel
Beschrijving
VOLUME
Volume-instelling: Druk op de VOLUME
Volume verlagen
↔ Volume verhogen
MUTE
Inschakelen/Uitschakelen van de dempingsfunctie: Druk op de MUTE
toets. Er is geen geluid wanneer de dempingsfunctie is ingeschakeld.
AUTO
toets.
/
Automatische instelling bij RGB ingangssignaal: Druk op de AUTO toets.
De horizontale positie (H POSIT), verticale positie (V POSIT), klokfase (H
FASE) en het horizontale (H SIZE) formaat worden automatisch ingesteld.
Gebruik met het venster op maximale grootte in het applicatiedisplay.
Automatische instelling bij VIDEO ingangssignaal: Druk op de AUTO
toets. Het juiste signaaltype overeenkomstig het ingangssignaal wordt
automatisch gekozen. Alleen geldig wanneer in het "Input" menu AUTO is
ingesteld voor VIDEO.
• De instelling vereist ongeveer 10 seconden. Het is mogelijk dat de functie bij
sommige ingangssignalen niet juist werkt.
BLANK
ON/OFF
Inschakelen/uitschakelen van de blancofunctie: Druk op de BLANK toets.
Bij gebruik van de blancofunctie is er geen beeld. De schermkleur is de
kleur die is ingesteld in BLANCO in het "BEELD" menu.
Menu-display start/stop: Druk op de MENU toets.
MENU
• Het menu-display komt automatisch te vervallen wanneer er ongeveer 10 seconden
ON/OFF (*) geen bediening wordt uitgevoerd.
Kiezen van het menutype: Druk op de MENU SELECT toets.
Hiermee kan het normale menu of het enkelvoudige menu worden gekozen.
In het enkelvoudige menu wordt alleen het gekozen onderdeel aangegeven
en de andere onderdelen worden aangegeven met de
en
toetsen
evenals bij het normale menu.
MENU
SELECT
• Alleen geldig wanneer het SETUP menu gebruikt wordt. Druk op de MENU SELECT
toets na het kiezen van onderdelen zoals "BRIGHTNESS".
Normaal menu
SETUP
INPUT
HELDER
CONTRAST
V POSIT
H POSIT
H FASE
H SIZE
KLEUR BAL R
KLEUR BAL B
ASPECT
NEDERLANDS - 10
BEELD
OPT.
0
-2
Enkelvoudig menu
(MENU SELECT)
100
100
+1
800
0
0
CONTRAST
-2
BEDIENING (vervolg)
"Setup" menu
De volgende instellingen zijn mogelijk wanneer SETUP wordt gekozen bovenaan in het menu. Een
gedeelte van het "Setup" menu is verschillend voor de RGB ingang en de VIDEO/S-VIDEO ingang.
Gebruik de
en
toetsen om een onderdeel te kiezen en begin dan met de instelling. Gebruik het
enkelvoudige menu om het menu kleiner te maken (zie Tabel 3, MENU SELECT).
SETUP
INPUT
BEELD
SETUP
OPT.
INPUT
BEELD
HELDER
CONTRAST
SCHERPTE
KLEUR
TINT
KLEUR BAL R
KLEUR BAL B
ASPECT
0
-2
HELDER
CONTRAST
V POSIT
H POSIT
H FASE
H SIZE
KLEUR BAL R
KLEUR BAL B
ASPECT
100
100
+1
800
0
0
OPT.
0
+1
+1
0
0
0
0
VIDEO/S-VIDEO
RGB
SETUP
INPUT
BEELD
OPT.
0
+1
+1
0
0
0
HELDER
CONTRAST
KLEUR
H FASE
KLEUR BAL R
KLEUR BAL B
ASPECT
COMPONENT
Tabel 4. "Setup" menu
Onderdeel
Beschrijving
VIDEO
S-VIDEO
480i
575i
480P
720P
1080i
HELDER
CONTRAST
V POSIT
H POSIT
Donker
↔ Licht
Zwak
↔ Sterk
Omlaag
↔ Omhoog
Links
↔ Rechts
✔
✔
✔
✔
✔
✔
✔
✔
✔
✔
-
-
-
H FASE
Links
↔ Rechts
• Afstellen om flikkering te verminderen.
✔
-
✔
✔
✔
-
-
-
-
✔
✔
-
-
✔
✔
-
✔
-
-
✔
✔
✔
✔
✔
✔
✔
✔
✔
-
-
✔
-
✔
✔
-
H SIZE
SCHERPTE
KLEUR
Klein
↔ Groot
• Het beeld wordt niet juist weergegeven als de
horizontale afmeting te groot is. In dat geval drukt u op
de RESET toets om de horizontale afmeting te
initialiseren.
Zacht
↔ Helder
Licht
↔ Donker
Rood
↔ Groen
• Alleen geldig wanneer NTSC of NTSC 4.43 signalen
worden ontvangen.
KLEUR BAL R Licht
↔ Donker
KLEUR BAL B Licht
↔ Donker
Kiezen van de breedte-hoogteverhouding:
4:3[
]
↔
16:9[
]
Kiezen van de weergave-instelling:
] is geselecteerd.
Druk op de
toets terwijl 16:9[
Midden →
Omlaag →
Omhoog (→
Midden)
Kiezen van de breedte-hoogteverhouding:
ASPECT
]
]
]
4:3[
↔
16:9[
↔
4:3 klein[
Kiezen van de weergave-instelling:
Druk op de
toets terwijl 16:9[
]/4:3 klein[
] is
geselecteerd.
Midden →
Omlaag →
Omhoog (→
Midden)
TINT
• Het is mogelijk dat het "4:3 klein" formaat niet juist wordt
weergegeven bij sommige ingangssignalen.
NEDERLANDS - 11
NEDERLANDS
COMPONENT
RGB
BEDIENING (vervolg)
"Input" menu
De volgende functies beschikbaar wanneer INPUT wordt gekozen in het
menu. Gebruik de
en
toetsen om een onderdeel te kiezen en begin
dan met de instelling.
SETUP
AUTO
RGB
VIDEO
HDTV
INPUT
BEELD
OPT.
UITVOEREN
ANNULEREN
Tabel 5. "Input" menu
Onderdeel
AUTO
Beschrijving
Start/stop bediening: Druk op de
/
toets.
Automatische instelling bij RGB ingang: Kies UITVOEREN met de
toets. De horizontale positie (H POSIT), verticale positie (V POSIT), klokfase (H
FASE) en het horizontale (H SIZE) formaat worden automatisch ingesteld.
Gebruik met het venster op maximale grootte in het applicatiedisplay.
• De instelling vereist ongeveer 10 seconden. Het is mogelijk dat de functie bij
sommige ingangssignalen niet juist werkt. Het probleem kan vaak verholpen worden
door op de AUTO toets te drukken.
• Deze functie is hetzelfde als de AUTO functie bij de basisbediening.
RGB
Weergeven van de RGB ingangsfrequentie: Geeft de frequentie van het
horizontale en verticale synchronisatiesignaal voor de RGB ingang aan.
• Alleen geldig bij RGB ingang.
Start/stop bediening: Druk op de
/
toets.
Kiezen van het videosignaaltype: Kies het videosignaaltype met de
en
toetsen. Kies NTSC, PAL SECAM, NTSC4.43, M-PAL of N-PAL
overeenkomstig het ingangssignaal. Wanneer AUTO is ingesteld, wordt de
AUTO functie (Automatische instellingsfunctie voor video-ingangssignaal)
gebruikt, behalve bij een N-PAL ingangssignaal.
VIDEO
HDTV
• Gebruik deze functie wanneer het beeld onstabiel is (het beeld is onregelmatig of er
zijn geen kleuren) bij een VIDEO/S-VIDEO ingangssignaal.
• De Automatische instellingsfunctie neemt ongeveer tien seconden in beslag. Het is
mogelijk dat deze functie bij sommige ingangssignalen niet juist werkt. Indrukken van
de AUTO toets kan het probleem soms verhelpen, behalve bij een N-PAL
ingangssignaal.
• Bij een COMPONENT VIDEO ingangssignaal zal deze functie niet werken en wordt het
signaaltype automatisch bepaald.
Start/stop bediening: Druk op de
/
toets.
Kiezen van de HDTV functie: Kies met de
/
toetsen de functie, 1080i
of 1035i, die geschikt is voor het ingangssignaal.
• Wanneer de geselecteerde HDTV functie niet geschikt is voor het
ingangssignaal, is het mogelijk dat het beeld niet goed kan worden
weergegeven (bijv. de positie van het beeld of de kleur is incorrect).
NEDERLANDS - 12
BEDIENING (vervolg)
"Beeld" menu
De volgende instellingen zijn mogelijk wanneer BEEID wordt gekozen in
het menu. Gebruik de
en
toetsen om een onderdeel te kiezen en
begin dan met de instelling.
SETUP
INPUT
BEELD
OPT.
BLANCO
SPIEGEL
OPSTARTEN
GAMMA
COLOR TEMP
Tabel 6. "Beeld" menu
Onderdeel
BLANCO
Beschrijving
Kiezen van de kleur van het blanco scherm:
Kies de kleur met de
/
toetsen.
• Het beeld verdwijnt en Het volledige scherm krijgt de gekozen kleur, wanneer de
BLANK mood op BLANK ON wordt gezet of als er 5 minuten lang geen signal is.
Start/stop bediening: Druk op de
/
toets.
Kiezen van de spiegelstatus:
Kies de spiegelstatus met de
en
toetsen.
Start/stop bediening: Druk op de
/
toets.
Instellen van het beginscherm: Kies SCHK.IN met de
OPSTARTEN Wissen van het beginscherm: Kies SCHK.UIT met de
SPIEGEL
toets.
toets.
• Als SCHK.UIT gekozen is, ziet u een leeg blauw scherm wanneer er geen signaal
is.
COLOR
TEMP
Start/stop bediening: Druk op de
/
Selecteer gamma functie:
Selecteer de gamma functie met de /
toets.
toets.
Start/stop bediening: Druk op de
/
toets.
Selecteer de kleurtemperatuur:
Selecteer de kleurtemperatuur-functie met de /
toets.
NEDERLANDS - 13
NEDERLANDS
GAMMA
BEDIENING (vervolg)
"Options" menu
De volgende instellingen zijn mogelijk wanneer OPT. wordt gekozen in
het menu. Gebruik de
en
toetsen om een onderdeel te kiezen en
begin dan met de instelling.
SETUP
INPUT
BEELD
OPT.
VOLUME
MENU KLEUR
TAAL
AUTO UIT
SYNC ON G
STIL FUNC.
16
Tabel 7. "Options" menu
Onderdeel
Beschrijving
↔Volume verhogen
VOLUME
Volume-instelling: Volume verlagen
MENU KLEUR
Kiezen van de menu-achtergrond: Gebruik de
TAAL
Start/stop bediening: Druk op de
of
toets.
Kiezen van de menutaal: Gebruik de
en
toetsen.
AUTO UIT
Start/stop bediening: Druk op de
of toets.
AUTO OFF instellen: Stel 1~99 minuten in met de
en
toetsen.
Het systeem komt automatisch in de ruststand te staan wanneer er
gedurende de ingestelde tijd geen signaal wordt ontvangen.
AUTO OFF annuleren: Kies ANNULE (0 min.) met de
toets.
When "ANNULE" is ingesteld, zal het systeem niet in de ruststand
schakelen, ook wanneer er geen signaal wordt ontvangen.
en
toetsen.
Start/stop bediening: Druk op de
of
toets.
SYNC ON G geldig: Kies SCHK.IN met de
toets.
SYNC ON G ongeldig: Kies SCHK.UIT met de
toets.
SYNC ON G
STIL FUNC.
• Wordt misschien niet juist weergegeven bij sommige ingangssignalen waarvoor
SYNC ON G geldt. In zulke gevallen maakt u de signaalverbinding los zodat
geen signaal wordt ontvangen, schakelt dan SYNC ON G uit en sluit daarna het
signaal weer opnieuw aan.
Start/stop bediening: Druk op de
/
toets.
Instellen/annuleren fluisterfunctie: Druk op de
/
toets. Wanneer STIL.
FUNC. wordt geselecteerd, zal de fluisterfunctie worden ingeschakeld. In de
STIL. FUNC. functie zal het akoestische ruisniveau van het toestel worden
gereduceerd, de helderheid op het scherm zal iets afnemen.
NEDERLANDS - 14
BEDIENING (vervolg)
"No Signal" menu
U kunt dezelfde instellingen maken als bij gebruik van de “BEEID” en
“OPT.” menu's als u de MENU toets indrukt tijdens weergave van het
“GEEN INGANGSSIGNAAL OP ***” of “SYNC IS BUITEN BEREIK OP
***” bericht wanneer er geen signaal wordt ontvangen.
VOLUME
BLANCO
SPIEGEL
OPSTARTEN
MENUKLEUR
TAAL
AUTO UIT
SYNC ON G
STIL FUNC.
16
Tabel 8. "No Signal" menu
Onderdeel
Beschrijving
VOLUME
Volume-instelling: Volume verlagen
↔Volume verhogen
• Wanneer deze functie wordt gebruikt, wordt de audio-ingangsfunctie
automatisch omgeschakeld naar video. De audio-ingangsfunctie kan
omgeschakeld worden door de DISK PAD tijdens de weergave van de volumeinstelbalk naar links en rechts te bewegen. De volume-instelbalk wordt
weergegeven wanneer op de VOLUME
of VOLUME
toets wordt gedrukt.
BLANCO
Kiezen van de kleur van het blanco scherm:
Kies de kleur met de
en
toetsen.
• Het beeld verdwijnt en Het volledige scherm krijgt de gekozen kleur, wanneer de
BLANK mood op BLANK ON wordt gezet of als er 5 minuten lang geen signal is.
SPIEGEL
Start/stop bediening: Druk op de
/
toets.
Kiezen van de spiegelstatus: Kies de spiegelstatus met de
OPSTARTEN
Start/stop bediening: Druk op de
/
toets.
Instellen van het beginscherm: Kies SCHK.IN met de
Wissen van het beginscherm: Kies SCHK.UIT met de
en
toetsen.
toets.
toets.
• Als SCHK.UIT gekozen is, ziet u een leeg blauw scherm wanneer er geen signaal is.
MENUKLEUR
Kiezen van de menu-achtergrond: Gebruik de
TAAL
Start/stop bediening: Druk op de
/
Kiezen van de menutaal: Gebruik de
AUTO UIT
Start/stop bediening: Druk op de
/ toets.
AUTO OFF instellen: Stel 1~99 minuten in met de
en
toetsen.
Het systeem komt automatisch in de ruststand te staan wanneer er gedurende de
ingestelde tijd geen signaal wordt ontvangen.
AUTO OFF annuleren: Kies ANNULE (0 min.) met de
toets.
When "ANNULE" is ingesteld, zal het systeem niet in de ruststand schakelen, ook
wanneer er geen signaal wordt ontvangen.
SYNC ON G
STIL FUNC.
toetsen.
toets.
en
toetsen.
Start/stop bediening: Druk op de
/
toets.
SYNC ON G geldig: Kies SCHK.IN met de
toets.
SYNC ON G ongeldig: Kies SCHK.UIT met de
toets.
• Wordt misschien niet juist weergegeven bij sommige ingangssignalen waarvoor SYNC ON
G geldt. In zulke gevallen maakt u de signaalverbinding los zodat geen signaal wordt
ontvangen, schakelt dan SYNC ON G uit en sluit daarna het signaal weer opnieuw aan.
Start/stop bediening: Druk op de
/
toets.
Instellen/annuleren fluisterfunctie: Druk op de
/
toets. Wanneer STIL.
FUNC. wordt geselecteerd, zal de fluisterfunctie worden ingeschakeld. In de
STIL. FUNC. functie zal het akoestische ruisniveau van het toestel worden
gereduceerd, de helderheid op het scherm zal iets afnemen.
NEDERLANDS - 15
NEDERLANDS
en
ONDERHOUD
Lamp
HOOG SPANNING
HOGE TEMPERATVUR
HOGE DRUK
Neem contact op met uw dealer voor de aanschaf van een nieuwe lamp.
Zie "Los verkrijgbare onderdelen" in tabel 12 voor het modelnummer van de los verkrijgbare lamp.
Schakel de projector uit en trek de stekker uit het stopcontact voordat u de lamp vervangt. Wacht
ongeveer 45 minuten totdat de lamp volledig is afgekoeld. De lamp kan ontploffen indien deze erg
heet is en dan wordt aangeraakt.
WAARSCHUWING • Gooi de gebruikte lamp weg
overeenkomstig de plaatselijke voorschriften.
• Aangezien de lamp van glas is, mag u deze niet
bekrassen of aan sterke schokken blootstellen.
• Gebruik oude lampen niet opnieuw -- de lampen kunnen
ontploffen.
• Als de lamp ontploft is (u hoort het geluid van een
ontploffing), trekt u de stekker uit het stopcontact en neemt
dan contact op met uw dealer om de lamp te laten
vervangen. De lamp is afgedekt door een voorglas, maar
het kan in zeldzame gevallen voorkomen dat de reflector en
de binnenkant van de projector beschadigd worden door
glassplinters, waardoor u letsel kunt oplopen.
• Gebruik de projector niet wanneer het lampdeksel niet is
aangebracht.
Lamp
Reflector
Glas aan
voorkant
Levensduur van de lamp
De lamp van de projector heeft een beperkte levensduur. Het beeld wordt donkerder en de tinten
zwakker wanneer de lamp bijna versleten is.
Vervang de lamp als de LAMP indicator rood oplicht of als het VERVANG LAMP bericht
verschijnt wanneer de projector wordt ingeschakeld. Zie tabel 9 op blz. 19 en tabel 10 op blz. 20.
OPMERKINGEN • De LAMP indicator licht ook rood op als de lampeenheid erg heet is.
Alvorens u de lamp vervangt, moet u de projector uitschakelen, ongeveer 20 minuten wachten en
dan de projector weer inschakelen. Als de LAMP indicator nog steeds rood oplicht, moet u de lamp
vervangen.
NEDERLANDS - 16
ONDERHOUD (vervolg)
Vervangen van de lamp
1. Schakel de projector uit, trek de stekker uit het stopcontact en wacht
minimaal 45 minuten om de lamp te laten afkoelen.
2. Leg een nieuwe lamp gereed.
3. Controleer of de projector voldoende is afgekoeld en draai deze
vervolgens ondersteboven.
4. Draai de twee schroeven aangegeven in de afbeelding los en
verwijder dan het lampdeksel.
5. Draai de enkele schroef los en neem dan voorzichtig de lamp naar
buiten terwijl u deze bij de handgrepen vastpakt. Raak de
binnenkant van het lamphuis niet aan want dit kan resulteren in een
ongelijkmatige kleur.
6. Monteer de nieuwe lamp en draai de bevestigingsschroef van de
lamp stevig vast. Druk tevens de tegenovergestelde kant van de
lamp zorgvuldig in het apparaat.
7. Breng het lampdeksel aan en draai de twee schroeven stevig vast.
8. Draai de projector weer voorzichtig om.
Terugstellen van de lamptimer
Stel de lamptimer terug nadat u de lamp hebt vervangen. Als het “VERYANG LAMP … DE
STROOM WORDT NA 0 UREN UITGESCHAKELD.” bericht is verschenen, moet u de volgende
bedieningsprocedure uivoeren binnen 10 miniten nadat de projector is ingeschakeld. De prijector zal
automatisch worden uitgeschakeld indien meer dan 10 minuten verstrijken.
1. Schakel het apparaat in en druk de RESET toets ongeveer drie seconden in. Het "LAMP xxxx hr"
bericht verschijnt op de lamptimer onder aan het scherm.
2. Druk op de MENU toets van de afstandsbediening of op de RESET toets op het bedieningspaneel
van de projector terwijl de lamptimer wordt getoond. Het ‘LAMP xxxx → 0 ■ CANCEL’
bericht zal dan verschijnen.
3. Druk op de
toets en kies 0, en wacht dan tot de timer-aanduiding is verdwenen.
OPMERKINGEN • Stel de lamptimer niet terug zonder dat u de lamp vervangt. Stel de
lamptimer altijd terug wanneer u de lamp vervangt. De berichtenfunctie van de projector zal niet
juist werken als de lamptimer niet op het juiste tijdstip is teruggesteld.
NEDERLANDS - 17
NEDERLANDS
LET OP • Zorg dat de schroeven weer stevig worden
vastgedraaid. Schroeven die niet stevig zijn
vastgedraaid kunnen letsel veroorzaken.
• Gebruik de projector niet wanneer het lampdeksel niet
is aangebracht.
ONDERHOUD (vervolg)
Onderhoud van het luchtfilter
Het luchtfilter moet na ongeveer iedere 100 gebruiksuren worden schoongemaakt zoals hieronder
wordt beschreven.
1. Schakel de projector uit en trek de stekker uit het stopcontact.
2. Maak het luchtfilter met een stofzuiger schoon.
LET OP • Schakel de projector uit en trek de stekker uit het stopcontact
alvorens u met het onderhoud begint. Lees de afzonderlijke
“VEILIGHEIDSINSTRUCTIES” aandachtig door zodat het onderhoud correct wordt
uitgevoerd.
• Vervang het luchtfilter indien de verontreinigingen niet verwijderd kunnen
worden of als het filter beschadigd is. Neem in dat geval contact op met uw
dealer. Zie "Los verkrijgbare onderdelen" in tabel 12 voor het modelnummer van
het los verkrijgbare luchtfilter.
• Gebruik het apparaat niet wanneer het luchtfilter niet is aangebracht.
• Wanneer het luchtfilter verstopt is wordt de projector automatisch uitgeschakeld
om te voorkomen dat de temperatuur in het inwendige te hoog oploopt.
Overig onderhoud
Onderhoud in het inwendige van het apparaat
Om veiligheidsredenen moet u het inwendige van het apparaat iedere 2 jaar door uw dealer laten
controleren en schoonmaken. U mag dit onderhoud niet zelf uitvoeren.
Schoonmaken van de lens
Maak de lens voorzichtig met een lensreinigingsdoekje schoon. Raak de lens niet met uw vingers
aan.
Schoonmaken van de behuizing en de afstandsbediening
Gebruik een zachte doek. Voor het verwijderen van hardnekkig vuil kunt u de doek met water
bevochtigen, of met een mild zeepsopje. Wrijf na het schoonmaken met een zachte, droge doek na.
LET OP • Schakel de projector uit en trek de stekker uit het stopcontact
alvorens u met het onderhoud begint. Lees de afzonderlijke
"VEILIGHEIDSINSTRUCTIES" aandachtig door zodat het onderhoud correct wordt
uitgevoerd.
• Gebruik geen reinigingsmiddelen of chemicaliën (bijv. benzeen of
verfverdunner), anders dan de hierboven vermelde middelen.
• Gebruik geen reinigingssprays.
• Klop niet tegen de apparatuur en wees voorzichtig dat deze ook niet op andere
wijze wordt beschadigd.
NEDERLANDS - 18
VERHELPEN VAN STORINGEN
OSD melding
De onderstaande meldingen kunnen bij het inschakelen van het apparaat op het scherm verschijnen.
Neem in dat geval de vereiste maatregelen.
Tabel 9. OSD melding
Melding
Beschrijving
VERVANG LAMP
STEL DE LAMPTIMER
TERUG NA HET
VERVANGEN
VAN DE LAMP.
De gebruiksduur van de lamp bereikt binnenkort de 2000
bedrijfsuren. (*2)
Het verdient aanbeveling de lamp binnenkort te vervangen.
Zorg voor een nieuwe lamp ter vervanging.
(*1)
De gebruiksduur van de lamp bereikt binnenkort de 2000
bedrijfsuren. Het verdient aanbeveling de lamp binnen **
bedrijfsuren (*2) te vervangen.
Het is mogelijk dat de lamp uitvalt voor er ** bedrijfsuren
verstreken zijn. De stroom zal automatisch worden
uitgeschakeld na ** bedrijfsuren. Vervang de lamp zoals
aangegeven op blz. 17-18 "Lamp". Vergeet niet altijd na het
(*1) vervangen van de lamp de lamptimer terug te zetten.
VERVANG LAMP
STEL DE LAMPTIMER
TERUG NA HET VERVANGEN
VAN DE LAMP.
DE STROOM WORDT
NA 0 UREN UITGESCHAKELD.
GEEN INGANGSSIGNAAL
OP ***
De lamp is aan het eind van zijn gebruiksduur. De stroom zal
automatisch worden uitgeschakeld na een paar minuten. (*2)
Schakel onmiddellijk de stroom uit en vervang de lamp zoals
aangegeven op blz. 17-18 "Lamp". Vergeet niet altijd na het
vervangen van de lamp de lamptimer terug te zetten.
Er is geen ingangssignaal gevonden.
Controleer de ingangsaansluitingen en de signaalbronnen.
De horizontale of verticale frequentie van het ingangssignaal
is niet binnen het voorgeschreven bereik.
Controleer de technische gegevens van de apparatuur en de
signaalbron.
De interne temperatuur is zeer hoog.
Schakel de projector uit en laat het apparaat 20 minuten
afkoelen.
Controleer de volgende punten en schakel het apparaat dan
CONTROLEER LUCHTSTROOM
weer in.
• Is de luchtinlaat of -uitlaat geblokkeerd ?
• Is het luchtfilter vuil ?
• Is de omgevingstemperatuur hoger dan 35°C ?
SYNC IS BUITEN BEREIK
OP ***
OPMERKINGEN (*1) Deze melding zal automatisch na ongeveer 3 minuten verdwijnen. De
melding verschijnt telkens wanneer het apparaat wordt ingeschakeld.
(*2) Dit toestel beschikt over een functie die de stroom zal uitschakelen wanneer de gebruiksduur
van de lamp 2000 bedrijfsuren bereikt. Niet alle lampen hebben echter dezelfde gebruiksduur, dus
het kan voorkomen dat sommige lampen zullen uitvallen voor deze functie in werking kan treden.
NEDERLANDS - 19
NEDERLANDS
VERVANG LAMP
STEL DE LAMPTIMER
TERUG NA HET
VERVANGEN
VAN DE LAMP.
DE STROOM WORDT
NA ** UREN
UITGESCHAKELD.
VERHELPEN VAN STORINGEN (vervolg)
Indicatormelding
De POWER indicator, LAMP indicator en TEMP indicator branden of knipperen zoals hieronder is
aangegeven. Neem de vereiste maatregelen.
Tabel 10. Indicatormelding
POWER
LAMP
TEMP
indicator indicator indicator
Beschrijving
Licht
Brandt
oranje op niet
Brandt
niet
De ruststand is ingesteld.
Knippert
groen
Brandt
niet
Brandt
niet
Opwarmen. Even wachten a.u.b.
Licht
Brandt
groen op niet
Brandt
niet
Aan. Het apparaat is bedrijfsklaar.
Knippert
oranje
Brandt
niet
Afkoelen. Even wachten a.u.b.
Knippert
rood
Brandt
niet
-
-
Knippert/l
Licht
icht rood
rood op
op
Brandt
niet
Knippert/l
Knippert
icht rood
rood
op
Brandt
niet
Knippert/l
Brandt
icht rood
niet
op
Knippert/li
Brandt
cht rood
niet
op
Knippert
groen
Knippert
rood
Afkoelen. Even wachten a.u.b.
Er is fouten gevonden. Neem de vereiste maatregelen wanneer
de POWER indicator stopt met knipperen.
De lamp brandt niet.
De temperatuur in het inwendige van het apparaat is misschien
te hoog. Schakel het apparaat uit, wacht 20 minuten om het
apparaat te laten afkoelen en controleer of de inlaat of uitlaat
geblokkeerd is, het luchtfilter vuil is of de omgevingstemperatuur
hoger dan 35°C is. En schakel dan weer in. Vervang de lamp
als hetzelfde probleem opnieuw optreedt.
Er is geen lamp of lampdeksel aanwezig, of de onderdelen zijn
niet juist aangebracht. Schakel het apparaat uit en laat het 45
minuten afkoelen. Controleer of de lamp en het lampdeksel juist
bevestigd zijn en schakel het apparaat weer in. Neem contact
op met uw dealer als hetzelfde probleem opnieuw optreedt.
De koelventilator werkt niet.
Knippert Schakel het apparaat uit en laat het 20 minuten afkoelen.
Controleer de ventilator op vreemde bestanddelen en schakel
rood
het apparaat daarna weer in. Neem contact op met uw dealer
als hetzelfde probleem opnieuw optreedt.
De temperatuur in het inwendige van het apparaat is te hoog. *2)
Schakel het apparaat uit en laat het 20 minuten afkoelen.
Licht rood Controleer of de inlaat of uitlaat geblokkeerd is, het luchtfilter vuil
is of de omgevingstemperatuur hoger dan 35°C is. Verhelp de
op
storing en schakel het apparaat daarna weer in. Neem contact
op met uw dealer als hetzelfde probleem opnieuw optreedt.
Het binnenwerk van het toestel is te koud.
Knippert Controleer of de omgevingstemperatuur lager is dan 0°C. Neem
contact op met uw dealer wanneer dit probleem zich voordoet bij
rood
een omgevingstemperatuur tussen 0-35°C.
OPMERKINGEN *2) Wanneer de temperatuur in het inwendige te hoog oploopt, zal de
projector om veiligheidsredenen automatisch worden uitgeschakeld en gaat de indicator uit. Zet de
netschakelaar op [O] en wacht dan 20 minuten om het apparaat te laten afkoelen.
NEDERLANDS - 20
VERHELPEN VAN STORINGEN (vervolg)
Symptoom
In veel gevallen zijn het echter geen storingen. Raadpleeg de onderstaande tabel voor nadere
bijzonderheden.
Tabel 11. Symptoom
De projector kan
niet worden
ingeschakeld.
Geen video of
audio.
Voorbeelden van storingen
Te controleren punten
Pagina
De hoofdschakelaar staat in de
uit-stand.
Schakel de projector in met de
hoofdschakelaar.
Het netsnoer is niet
aangesloten.
Steek de stekker in een gewoon
wandstopcontact.
De ingangsbron is niet juist
gekozen.
Kies de juiste ingangsbron op de
projector of de afstandsbediening.
Er komen geen signalen binnen.
Zorg dat de ingangsaansluitingen in
orde zijn.
6,7
De projector is niet juist
aangesloten.
Zorg dat de ingangsaansluitingen in
orde zijn.
6,7
Druk op de VOLUME
toets van
de afstandsbediening of breng het
menu op het scherm en stel de
geluidssterkte hoger in.
10,14
Het volume staat in de
Er is wel beeld,
maar geen geluid. minimumstand
7,8
9
De geluiddemping is
ingeschakeld.
Schakel de demping uit met een
druk op de MUTE
toets.
10
De projector is niet juist
aangesloten.
Corrigeer de aansluitingen.
6,7
De helderheid wordt op het
minimum ingesteld.
Kies HELDER met de MENU toets
en druk dan op de
toets.
11
Het lens-schuifkapje is dicht.
Maak het lens-schuifkapje open.
8
De kleurkwaliteit is
De kleurverzadiging en de tint
niet goed; fletse
zijn niet goed ingesteld.
kleuren.
Stel via het menu de
beeldweergave bij.
11
De helderheid en het contrast
zijn niet goed ingesteld.
Stel via het menu de
beeldweergave bij.
11
De projectielamp is bijna
versleten.
Vervang de projectielamp door een
nieuwe.
16,17
De scherpte of de zijn niet goed Stel via het menu de scherpte of de
ingesteld.
bij.
8,11
Wel video maar
geen audio.
Het beeld is te
donker.
De beelden zijn
niet scherp.
NEDERLANDS - 21
NEDERLANDS
Symptomen
TECHNISCHE GEGEVENS
Tabel 12. Technische gegevens
Onderwerp
Technische gegevens
Productnaam
LCDpaneel
LCD (vloeibare kristallen)
Paneelgrootte
1,8 cm (0,7 type)
Aandrijfsysteem
TFT actieve matrix
Aantalbeeldpunten
CP-S225W : 480.000 beeldpunten (800 horizontaal x 600 verticaal)
CP-X275W : 786.432 beeldpunten (1024 horizontaal x 768 verticaal)
Lens
Zoomlens F = 2,0-2,3 f = 18-21 mm
Lamp
150 W UHB
Luidspreker
1,0 W
Stroomvoorziening
100 - 120 V wisselstroom, 2,7 A / 220 -240 V wisselstroom, 1,3 A
Stroomverbruik
240 W
Temperatuurbereik
0-35°C (bedrijfstemperatuur)
Afmetingen
289(B) x 84(H) x 215(D) mm
Gewicht (massa)
CP-S225W : 2,4 kg
CP-X275W : 2,5 kg
RGB
signaalingang
Video: Analoog 0,7 Vp-p, 75 Ω afgesloten (positief)
H/V sync.: TTL niveau (positief/negatief)
Samengestelde sync.: TTL niveau
D-sub 15-pin krimp-aansluiting
RGB IN
200 mVrms, 47 kΩ (max. 3,0 Vp-p)
Stereo ministekkerbus
1,0 Vp-p, 75 Ω afgesloten Cinch-aansluiting
AUDIO IN
VIDEO
Helderheidssignaal: 1,0 Vp-p, 75 Ω afgesloten
Kleursignaal: 0,286 Vp-p (NTSC, burst-signaal), 75 Ω afgesloten
0,3 Vp-p (PAL/SECAM, burst-signaal), 75 Ω afgesloten
Mini DIN 4-pins aansluiting
S-VIDEO
Videosignaalingang
Y
1,0 Vp-p, 75 Ω afgesloten (positief)
COMPONENT
CB/CR 0,7 Vp-p, 75 Ω afgesloten (positief)
VIDEO
PB/PR 0,7 Vp-p, 75 Ω afgesloten (positief)
L
AUDIO
Besturingsfuncties
R
CONTROL
Los verkrijgbare onderdelen
OPMERKINGEN
voorbehouden.
200 mVrms, 47 kΩ of (max. 3,0 Vp-p)
Cinch-aansluiting
D-sub 15-pins krimp-aansluiting
Lamp: DT00401 (CP-S225W) / DT00461 (CP-X275W)
Luchtfilter: MU01461
* Raadpleeg uw dealer voor andere onderdelen.
• Wijzigingen in de technische gegevens, zonder voorafgaande kennisgeving,
NEDERLANDS - 22
GARANTIE EN SERVICE
NEDERLANDS
Als er een storing in het apparaat optreedt, dient u eerst het hoofdstuk "VERHELPEN VAN
STORINGEN" (P.20) te raadplegen en de aanbevolen controles uit te voeren. Indien dit het
probleem niet verhelpt, moet u contact opnemen met uw dealer of servicecentrum. Zij zullen u
vertellen welke garantievoorwaarde van toepassing is.
NEDERLANDS - 23
Flytende krystall-prosjektør
BRUKERHÅNDBOK
Takk for at du kjøpte denne flytende krystall-prosjektøren fra.
ADVARSEL • Vennligst les den vedlagte “SIKKERHETSINSTRUKSJONER”
denne “BRUKERHÅNDBOK” nøye for å sikre at du forstår hvordan utstyret skal
brukes korrekt. Oppbevar deretter anvisningen på et sted hvor du lett finner den
igjen for senere referanse.
NB • Vi forbeholder oss retten til å foreta endringer i denne bruksanvisningen uten varsel.
• Produsenten påtar seg ikke ansvar for eventuelle feil i denne bruksanvisningen. • Reproduksjon,
overføring eller bruk av dette dokumentet eller eventuelt innhold er ikke tillatt uten skriftlig
godkjennelse.
VAREMERKEOPPLYSNINGER : PS/2, VGA og XGA er registrerte varemerker for
International Business Machines Corporation. Apple, Mac og ADB er registrerte varmerker for
Apple Computer, Inc. VESA og SVGA er varemerker for Video Electronics Standard Association.
Windows er et registrert varemerke for Microsoft Corporation. Vi ber om at det tas hensyn til alle
firmaenes varemerker og registrerte varemerker også når dette ikke er nevnt.
INNHOLD
Side
Side
EGENSKAPER..................................2
FØR BRUK........................................2
FEILSØKING...................................19
INSTALLERING ................................5
Installering av projektør og skjerm ............5
Vinkeljustering ........................................5
Kabeltilkopling ........................................6
Strømtilkopling........................................6
Eksempel på systemoppsett...................7
Plug & Play .............................................7
BETJENING ......................................8
PÅ...........................................................8
AV...........................................................8
Grunnleggende bruk...............................9
Oppsettmeny ........................................11
Kildemeny.............................................12
Bildemeny.............................................13
Valgmeny..............................................14
Ikke noe-Meny ......................................15
VEDLIKEHOLD ...............................16
Lamper .................................................16
Vedlikehold av luftfilter..........................18
Annet vedlikehold .................................18
Skjermmeldinger...................................19
Indikatormelding ...................................20
Symptom ..............................................21
SPESIFIKASJONER .......................22
GARANTI OG SERVICE .................23
.......................................................................................
TABELLER
Tabell 1. Installeringsreferense ................5
Tabell 2. Kabeltilkopling............................6
Tabell 3. Grunnleggende bruk ..................9
Tabell 4. Oppsettmeny ...........................11
Tabell 5. Kildemeny ................................12
Tabell 7. Bildemeny ................................13
Tabell 8. Valgmeny.................................14
Tabell 9. Ikke noe-Meny .........................15
Tabell 10. Skjermmeldinger....................19
Tabell 11. Indikatormelding ....................20
Tabell 12. Symptom................................21
Tabell 13. Spesifikasjoner ......................22
.......................................................................................
For [TECHNICAL] (TEKNISK) og
[REGULATORY NOTICE] (REGUÆRE
UTTRYKK], se helt bakrst i denne
håndboken.
NORSK - 1
NORSK
Pakkens innhold .....................................2
Delenes navn..........................................3
Sette inn batteriene ................................4
EGENSKAPER
Denne flytende krystallprosjektøren (LCD) benyttes for fremvisning av forskjellige data-signaler i
tillegg til videosignalene NTSC/PAL/SECAM, på en fremviserskjerm. Prosjektøren er plassvennlig
og fremvisning på større flater kan utføres på enkleste vis.
Uovertruffen lysstyrke
UHB-lampen og det høy-effektive optiske systemet sikrer meget høy lysstyrke.
Utsnittsvis forstørringsfunksjon
Interresante deler av bildet kan forstørres for nærmere inspeksjon.
Funksjon for distorsjonskorrigering
Bildet kan vises fortløpende uten distorsjon.
Ekstra lav støyfunksjon
Det akustiske støynivået fra enheten kan reduseres.
FØR BRUK
Pakkens innhold
Kontroller at pakken inneholder følgende deler. Kontakt forhandleren hvis noe mangler.
NB
• Ta vare på originalemballasjen for senere transport.
Nettkabel,
(US-type)
Nettkabel,
(UK-type)
Nettkabel,
(Europeisk type)
Prosjektør
RGB-kabel
Del til
videokabel
(med grønt bly)
Brukerhåndbok
(dette dokumentet)
VIDEO
STANDBY/ON
RGB
KEYSTONE
MENU
SELECT
MENU
MAGNIFY
POSITION RESET
FREEZE VOLUME
MUTE
OFF
AUTO
BLANK
Sikkerhetsanvisninger
Fjernkontroll med
batteri
NORSK - 2
Bærekoffert
FØR BRUK (forts.)
Delenes navn
Zoomknott
Fokusring
Fjernkontrollsensor
På/Av-bryter
Vekselstrømsinngang
(til nettkabel)
Linse
Skyveluke for linse
Fotjustering
Ventilasjonsåpninger
(inntak)
Sett forfra fra
venstre
Kontrollpanel (Se Side 8 "BETJENING")
LAMP indikator
TEMP indikator
POWER indikator
MENU knapp
RESET knapp
KEYSTONE knapp
NPUT knapp
STANDBY/ON knapp
Fotjusteringsknapp
Ventilasjonsåpninger
(avløp)
Sett bakfra fra høyre
Koplingstavle
(Se under)
Fjernkontrollsenso
(Se under)
RGB-terminal
CONTROL-terminal
COMPONENT
Y-terminal
CB/PB-terminal
CR/PR-terminal
AUDIO-terminal
AUDIO
R-terminal
L-terminal
VIDEO-terminal
S-VIDEO-terminal
Koplingstavle
NORSK - 3
NORSK
Luftfilter og inntak
(for kjølevifte)
Høyttaler
Justeringanordning for
bakre fot
FØR BRUK (forts.)
Delenes navn (forts.)
VIDEO Knapp
STANDBY/ON Knapp
STANDBY/ON
KEYSTONE Knapp
KEYSTONE
VIDEO
RGB
RGB Knapp
MENU SELECT Knapp
Knapp
MENU
SELECT
Knapp
POSITION Knapp
Knapp
MENU
Knapp
POSITION RESET
RESET Knapp
MENU Knapp
MAGNIFY
Knapp
MAGNIFY
Knapp
MAGNIFY
OFF
MAGNIFY
Knapp
FREEZE VOLUME
MUTE
VOLUME
Knapp
MUTE Knapp
BLANK
AUTO Knapp
Batteriholder
Knapp
FREEZE Knapp
OFF
AUTO
VOLUME
BLANK Knapp
(Se Side 8 "BETJENING")
Fjernkontrollenhet
Sette inn batteriene
Første gangs innsetting:
I originalpakken finner du batteriet montert i batteriholderen på
fjernkontrollen ved hjelp av en beskyttende film (den gjennomsiktige
hinnen som er inne i batterimappen).
Trekk ut den beskyttende filmen for å sette inn batteriet.
"+"-side
Utskifting:
1. Se baksiden på fjernkontrollen.
2. Knip sammen sporet og trekk ut batteriholderen som vist i
illustrasjonen til høyre.
3. Fjern det utgåtte batteriet.
4. Sett inn det nye batteriet med "+"-siden opp.
5. Skyv batteriholderen inn til det klikker på plass.
Trekk ut
Batteriholder
FORSKING • Feilaktig behandling av batteriet kan resultere i branntilløp eller elektrisk
støt. Batteriet kan eksplodere hvis det ikke behandles korrekt.Utvis forsiktighet og
håndter batteriet i samsvar med anvisningene i "SIKKERHETSINSTRUKSJONER" som følger
med denne brukerhåndboken.
• Bruk bare 3V mikro litiumbatteri type nr.CR2025.
• Ved plassering av batteriene, sørg for at pluss og minus polene peker i riktig retning som
indikert i fjernkontroll senderen. Uriktig retning kan forårsake lekkasje eller at batteriene
ødelegges, noe som kan resultere i personskade eller forurensing av det omliggende miljø.
• Batteriet må kasseres i henhold til de regionale eller nasjonale lover og bestemmelser.
• Hold batteriet utenfor barns og kjæledyrs rekkevidde.
• Når fjernkontrollen ikke skal brukes på en god stund, må batteriene tas ut.
NB Skift ut batteriene når fjernkontrollen blir vanskelig å betjene.
NORSK - 4
INSTALLERING
Installering av projektør og skjerm
Se tegningen og tabellen under for å bestemme skjermstørrelse og projektøravstand.
Projeksjonsavstanden vist i tabellen under er gyldige for
full størrelse (CP-S225W : 800 x 600 bildeelementer /
CP-X275W : 1024 x 768 bildeelementer).
a: Avstand fra prosjektøren til fremviserskjermen. (±10%)
b: Avstand fra linsens senter til nederste del av skjermen.
(±10%)
Fremviserskjerm
Tabell 1. Installasjonsreferanse
a [m]
Skjermstørrelse
[m]
Minimum
Maksimum
b
[cm]
1,0
1,5
2,0
2,5
3,0
3,8
5,0
0,9
1,5
2,0
2,4
2,9
3,7
4,9
1,2
1,8
2,4
2,9
3,5
4,4
5,9
7,6
12,7
17,8
22,9
25,4
33,0
43,2
SETT OVENIFRA
Linsens senter
b
a
SETT FRA SIDEN
FORSKING • Installer projektøren et egnet sted i samsvar med anvisningene i
“SIKKERHETSINSTRUKSJONER” og denne bruksanvisningen.
• Flytende krystall-prosjektøren bør grunnleggende alltide brukes ihorisontal stilling. Hvis du
brukerflytende krystall-prosjektøren i stillingen med linsen oppe, stillingen med linsen nede
eller stillingen med siden opp, kan detføre til overoppheting innvendig som kan gi varige
skader. Vær spesielt oppmerksom på at den ikke installeres på en slik måte at
ventilasjonshullene blokkeres.
• Ikke installer LCD prosjektor i et lokale utsatt for røyk. Røykrester kan samle seg på
kritiske deler. (f.eks LCD panelet, Assy linse osv.)
Bruk de fotjusterings på undersiden
av projektøren for å justere
projeksjonsvinkelen. Den er
variabel innenfor ca. 0˚ - 10˚.
Fotjustering
1. Løft opp fremsiden av
projektøren. Trykk på
fotjusteringsknappen og juster
projeksjonsvinkelen.
2. Slipp knappen for låse foten i
den justerte vinkelen.
3. Drei justeringsanordningen for Trykk på fotjusteringsknappen
Justeringanordning for
bakre fot ved justering av
bakre fot
høyre/venstre balanse.
FORSKING • Slipp ikke fotjusterings knappen med mindre du holder
projektøren; ellers kan projektøren velte eller du kan få fingrene i klemme og
komme til skade.
NORSK - 5
NORSK
Vinkeljustering
INSTALLERING (forts.)
Kabeltilkopling
Se tabellen under for tilkopling etter terminalen på projektøren til etter equipamento.
Tabell 2. Kabeltilkopling
Funksjon
Terminal
Kabel
Analog fargeterminal (RGB)
inntak
RGB
RGB kabel tilbehør eller valgfri RGB kabel
med D-sub 15-bolt krympejekk og
tommelang gjengeskrue.
RS-232C kommunikasjon
CONTROL
Valgfri RS-232C kabel
Audioinntak (fra datamaskin)
AUDIO
Valgfri audiokabel med stereo minijekk
Del til videoinntak
COMPONENT VIDEO CB/PB
COMPONENT VIDEO Y
Tilbehør del til videokabel
COMPONENT VIDEO PR/CB
S-video inntak
S-VIDEO
Videoinntak
VIDEO
AUDIO L
Audioinntak (fra videoutstyr)
Valgfri S-video kabel med mini DIN 4-bolt
jekk
Valgfri video/audio kabel med RCA jekk
AUDIO R
FORSKING • Feilaktig tilkopling kan resultere I branntilløp eller elektrisk støt.
Vennligst les denne brukerhåndboken og den separate
“SIKKERHETSINSTRUKSJONER”.
• Før tilkopling må alle enheter som skal koples til, med unntak av USB-kabelen,
slås av.
• Det kan hende at kablene må brukes sammen med kjernen festet i siden på
fremviseren. Bruk kablene som følger med fremviseren eller som er spesifisert.
NB • Før tilkoplingen utføres må instruksjonsheftene for enhetene som skal koples til leses og det må
sjekkes at projektøren kan brukes sammen med enheten det gjelder.
• Fest skruene på kontaktene og stram forsvarlig.
• For enkelte modi kreves den ekstra tilgjelige Mac-adapteren.
• Ved valg av RGB digitalinntak trenger datamaskinen noen innstillinger. Sjekk manualen for datamaskinen for
detaljer.
• Noen datamaskiner har flere modi for skjermvisning. Det er ikke alle som kan brukes med denne projektøren.
• Referer til "TECHNICAL" seksjon angående tilkoplingselementets stifttilordning.
• Referer til håndboken for RS-232C-kabelen til bruk for kommunikasjonsdata. Denne kabelen leveres etter
ønske.
• Når det gjelder andre ting, konsulter din leverandør.
NORSK - 6
INSTALLERING (forts.)
Strømtilkopling
Se til at korrekt nettleding brukes avhengig av stikkontakten som skal brukes. Kople
vekselstrømsinntaket på projektøren forsvarlig til stikkontakten med nettledningen.
FORSKING • Nettledningen må behandles
forsiktig og i samsvar med anvisningene i
“SIKKERHETSINSTRUKSJONER” og denne
brukerhåndboken.
• Kople nettledningen skikkelig til og unngå å
bruke en løs eller defekt stikkontakt.
Stikkontakt
Nettledning
Vekselstrømsinngang (AC)
Eksempel på systemoppsett
Datamaskin
(Skrivebord-type)
DVD spiller
Datamaskin
(bærbar type)
NB • Når det koples til med notisblokk datamaskin, still inn for å gjøre RGB eksternt bilde uttak
gyldig (innstilling av CRT (bilderør) display, eller display til LCD (vindu av flytende krystall) og
CRT samtidig. Vennligst les instruksjonsheftet til notisblokken for mer informasjon.
Plug & Play
Denne prosjektøren er kompatibel med standarden VESA DDC 1/2B. Plug & Play er mulig når
enheten tilkoples en datamaskin som er kompatibel med VESA DDC (display-data-kanal).
Vær vennlig å benytte denne funksjonen ved å kople tilbehøret RGB kabel med RGB terminal.
Plugg & play fungerer muligvis ikke med annen type kopling.
NB • Plug & Play er en system-oppsettstype hvor komponenter koples til en PC, skjerm og
operativsystem.
• Denne prosjektøren er omorganisert til en plug & play monitor. Bruk standard drivenhet for
skjermbilde.
• Plug & play vil muligvis ikke fungere på datamaskinen for å tilkople.
NORSK - 7
NORSK
S - Videokassettspiller
BETJENING
STANDBY/ON knapp
POWER Indikator
STANDBY/
ON knapp
VIDEO
STANDBY/ON
RGB
KEYSTONE
MENU
SELECT
Zoomknott
MENU
POSITION RESET
Fokusring
MAGNIFY
På/Av-bryter
FREEZE VOLUME
Skyveluke for linse
PÅ
1. Sjekk at nettledningen er skikkelig tilkoplet.
2. Still strømbryteren på [ I ]. Beredskapsmodus velges og POWER-indikatoren skifter til oransje.
3. Trykk på STANDBY/ON
-knappen på kontrollpanelet eller på fjernkontrollen. Oppvarmingen
begynner og POWER-indikatoren blinker grønt.
4. POWER-indikatoren slutter å blinke og skifter til grønt nå strømmen er på. Åpne linsedøren.
5. Drei zomknotten for å justere skjermstørrelsen.
6. Drei fokusringen for å justere fokus.
AV
1. Trykk på STANDBY/ON -knappen på kontrollpanelet eller fjernkontrolløren. Deretter vil "slått
av?" komme på skjermen, og denne meldingen vil forsvinne etter en hvilken som helst betjening,
eller etter 5 sekunder uten betjening. Mens meldingen er indikert på skjermen, trykk igjen på
STANDBY/ON -knappen. Prosjektørlampen slukker og lampen begynner å kjøles av.
POWER-indikatoren blinker oransje under avkjølingsprosessen. Det har ingen effekt å trykke på
STANDBY/ON
-knappen sålenge POWER-indikatoren blinker.
2. Systemet går over i beredskapsmodus når avkjølingen er tilstrekkelig og POWER-indiaktoren
slutter å blinke og skifter til oransje. Sjekk at indikatoren lyser oransje og still strømbryteren på
[O].
3. POWER-indikatoren slukker når apparatet slås av. Glem ikke å lukke linsedøren.
ADVARSEL • Vennligst les denne brukerhåndboken og den separate
“SIKKERHETSINSTRUKSJONER” nøye gjennom før dette utstyret tas i bruk.
Se alltid til at utstyret brukes på en sikkerhetsmessig forsvarlig måte.
NB • Med unntak av nødstilfeller, må strømmen ikke slås av med mindre POWER-indiaktoren
lyser oransje. Det kan kraftig redusere projaktørlampens levetid.
• For å forhindre problemer må projektøren slås på/av når datamaskinen eller videospilleren er
avslått. Hvis en RS-232C-kabel er tilkoplet, slås datamaskinen på før projektøren.
• Når projetoren viser det samme bildet over lengre tid, vil bildet bli hengende igjen. Unngå derfor å
vise det samme bildet for lenge om gangen.
NORSK - 8
BETJENING (forts.)
Grunnleggende bruk
Grunnleggende bruk som vist i Tabell 3, utføres den vedlagte fjernkontrollen eller via prosjektørens
kontrollpanel. Punkter indikert med (*), kan brukes via kontrollpanelet.
Tabell 3. Grunnleggende bruk
Post
Beskrivelse
Velge inngangssignalets (*): Trykk på INPUT-knappen.
RGB → VIDEO → S-VIDEO → COMPONENT (→ RGB )
Velge RGB-inngang: Trykk på RGB-knappen.
VIDEO/S-VIDEO/COMPONENT → RGB
INPUT
SELECT
Velge VIDEO/S-VIDEO-inngang: Trykk på VIDEO-knappen.
RGB → VIDEO/S-VIDEO/COMPONENT
VIDEO → S-VIDEO → COMPONENT (→ VIDEO )
• Det inngangssignalet som er valgt, vises i ca. tre sekunder når signalet endres.
Stille inn/slette modus for posisjonjustering:
Trykk på POSITION-knappen. [ ]-ikonet vises i POSISITON-modus.
Justering av bildeposisjon:
Trykk på , , og -knappene i modus for posisjonsjustering.
POSITION
• Denne funksjonen kun gyldig i MAGNIFY-modus når video signal er inndata.
• Etter omtrent 10 sekunders inaktivitet vil [ ] ikonet slokkes og POSISJON
modus dannes automatisk.
Formatere menyposter: Velg en post og trykk på RESET-knappen.
Formatere posisjonsjustering:Trykk på RESET-knappen i POSITIONmodus. Denne funksjonen kun gyldig når RGB signal er inndata.
RESET (*)
• Gyldig unntatt for VOLUM, SPRÅK, H FASE og STILLE.
Stille inn forstørrelsesmodus: Trykk på MAGNIFY-knappen -knappen.
Flytte det forstørrede feltet: Kjør posisjonsjustering i MAGNIFY-modus.
Justere forstørrelsen: Trykk på MAGNIFY / i forstørrelsesmodus.
MAGNIFY forstørrer bildet ↔ MAGNIFY forminsker bildet.
Slette forstørrelsesmodus: Trykk på MAGNIFY -knappen.
MAGNIFY
OFF
Stille inn/slette frysemodus: Trykk på FREEZE-knappen.
I denne modusen vil [II]-ikonet vises og bildet fryse.
FREEZE
• FREEZE slettes ved å kjøre eller stille inn POSITION, VOLUME, MUTE, AUTO,
BLANK ON/OFF eller MENU ON/OFF, eller ved å endre inngangssignalet.
• Glem ikke å slette statiske bilder som fryses.
Stille inn/slette TRAPES-modus: Trykk på KESTONE
-knappen.
Fininnstill TRAPES: Trykk på knappen
/ i TRAPES-modus.
(*) reduserer trapesforstyrrelser nederst på skjermen. reduserer
trapesforstyrrelser øverst på skjermen.
KESTONE
NB • Bruk fjernkontrollen fra en avstand på ca. 3 m fra sensoren som er på prosjektørens front,
og innen en vinkel på 30° til venstre/høyre. Sterkt lys og gjenstander som står i veien vil hindre
fjernkontrollens funksjon.
(forts. neste side)
NORSK - 9
NORSK
• MAGNIFY slettes ved å kjøre eller stille inn AUTO, ASPEKT, INPUT SELECT eller
VIDEO, eller ved å endre inngangssignalet.
BETJENING (forts.)
Punkter indikert med (*), kan brukes via kontrollpanelet.
Tabell 3. Grunnelggende bruk (forts.)
Post
Beskrivelse
VOLUME
Volumjustering: Trykk på VOLUM
/
↔ Øke VOLUME
Redusere VOLUM
MUTE
Stille inn/slette DEMPE-funksjonen : Trykk på MUTE-knappen.
Lyden høres ikke i DEMPE-funksjonen.
AUTO
-knappen.
Automatisk justering ved RGB inngang: Trykk på AUTO-knappen.
Horisontal posisjon (H POS.), vertikal posisjon (V POS.), klokkefase (H
FASE) (H STR.), and horisontal størrelse justeres automatisk. Brukes med
vinduet i maksimal størrelse i applikasjonsdisplayet.
Automatisk justering av VIDEO inngang: Trykk på AUTO-knappen.
En signaltype som passer til inngangssignalet velges automatisk. Gjelder
bare når AUTO er satt til VIDEO i inngangsmenyen.
• Denne prosedyren tar cirka ti sekunder. Den virker ikke med alle typer
inngangssignaler.
BLANK
ON/OFF
Stille inn/slette Blank modus: Trykk på BLANK-button. Det vises ikke noe
bilde i Blank-modus. Skjermfargen er som innstilt i BLANK i Bildemenyen.
MENU
Menydisplay start/stop: Trykk på MENU-knappen.
ON/OFF (*) • Menydisplayet slukker automatisk etter ti sekunder hvis ingen taster betjenes.
Velge menytype: Trykk på MENU SELECT-knappen.
Tillater brukeren å velge normalmenyen eller enkeltmenyen. Det er bare
den valgte posten som vises i enkeltmenyen, og andre poster angis med
and
knappene på samme måte som i normalmenyen.
MENU
SELECT
• Virker bare når Oppsettmeny brukes. Trykk på MENU SELECT-knappen etter at
punkter som "LYS" er valgt.
Normalmeny
OPPS.
KILDE
LYS
KONTRAST
V POS.
H POS.
H FASE
H STR.
FARGE BAL R
FARGE BAL B
ASPEKT
NORSK - 10
BILDE
VALG
Enkeltmeny
(MENU SELECT)
0
-2
100
100
+1
800
0
0
KONTRAST
-2
BETJENING (forts.)
Oppsettmeny
Følgende justeringer og innstillinger kan gjøres når du velger OPPS øverst på menyen. Deler av
oppsettmenyen er forskjellig for RGB inngang og VIDEO/S-VIDEO inngang. Velg en post med
og
knappene og start prosedyren. Bruk enkeltmenyen til å redusere menystørrelsen (se Tabell 3,
MENU SELECT).
OPPS.
KILDE
BILDE
VALG
0
-2
LYS
KONTRAST
V POS.
H POS.
H FASE
H STR.
FARGE BAL R
FARGE BAL B
ASPEKT
100
100
+1
800
0
0
RGB
OPPS.
KILDE
BILDE
VALG
LYS
KONTRAST
SKARPHET
FARGE
NYANSE
FARGE BAL R
FARGE BAL B
ASPEKT
0
+1
+1
0
0
0
0
VIDEO/S-VIDEO
OPPS.
KILDE
BILDE
VALG
0
+1
+1
0
0
0
LYS
KONTRAST
FARGE
H FASE
FARGE BAL R
FARGE BAL B
ASPEKT
COMPONENT
Tabell 4. Oppsettmeny
LYS
KONTRAST
V POS.
H POS.
H FASE
Beskrivelse
480i
575i
480P
720P
1080i
✔
✔
✔
✔
✔
✔
✔
✔
✔
✔
-
-
-
Venstre
↔ Høyre
• Juster for å eliminere flimring.
✔
-
✔
✔
✔
-
-
-
-
✔
✔
-
-
✔
✔
-
✔
-
-
✔
✔
✔
✔
✔
✔
✔
✔
✔
-
-
✔
-
✔
✔
-
Liten
↔ Store
• Det kan forekomme at bildet ikke vises korrekt dersom
horisontalstørrelsen er for stor. I dette tilfellet trykker du
på RESET -knappen og formaterer horisontalstørrelsen.
SKARPHET Myk
↔ Skarp
FARGE
Lys
↔ Mørk
Rød
↔ Grønn
• Virker bare ved mottak av NTSC eller NTSC 4.43
signaler.
FARGE BAL R Lys
FARGE BAL B Lys
ASPEKT
VIDEO
S-VIDEO
↔ Lys
↔ Sterk
↔ Opp
Ned
Venstre
↔ Høyre
Mørk
Svak
H STR.
NYANSE
RGB
↔ Mørk
↔ Mørk
Velg bildeverdi:4:3[
]
↔
16:9[
]
Velg displayposisjon:
Trykk på -knappen samtidig som du velger 16:9[
].
Senter →
Ned →
Opp ( →
Senter)
Velg bildeverdi:
4:3[
]
↔
16:9[
]
↔
4:3 liten[
]
Velg displayposisjon:
Trykk på -knappen samtidig som du velger 16:9[
]/4:3
liten [
].
Senter →
Ned →
Opp ( →
Senter)
• 4:3 vil muligens ikke vises korrekt med enkelte
inngangssignaler.
NORSK - 11
NORSK
COMPONENT
Punkt
BETJENING (forts.)
Kildemeny
OPPS.
Følgende funksjoner er tilgjengelige når KILDE velges fra menyen.
Velg en post med
og -knappene og start prosedyren.
AUTO
RGB
VIDEO
HDTV
KILDE
BILDE
VALG
UTFflR
ANNUL.
Tabell 5. Kildemeny
Post
AUTO
Beskrivelse
Betjening start/stopp: Trykk på
/
-knappen.
Automatisk justering ved RGB inngang: Velg UTFØR med
-knappen.
Horisontal posisjon (H POS.), vertikal posisjon (V POS.), klokkefase (H
FASE) (H STR.), and horisontal størrelse justeres automatisk. Brukes med
vinduet i maksimal størrelse i applikasjonsdisplayet.
• Denne prosedyren tar cirka ti sekunder. Den virker muligens ikke korrekt med alle
typer inngangssignaler. Problemet kan korrigeres ved å trykke på AUTO-knappen.
• Denne funksjonen er den samme som for AUTO funksjon i Basic drift.
RGB
Viser RGB-inngangsfrekvensen:
Viser det horisontale og vertikale sync-signalfrekvensen for RGB-inngang.
• Gjelder bare RGB-inngang.
Betjening start/stopp: Trykk på
/
-knappen.
Velg video-signaltype: Velg signaltypen med
og
-knappene.
Velg NTSC, PAL SECAM, NTSC4.43, M-PAL, eller N-PAL i samsvar med
inngangssignalet. Valg av AUTO muliggjør og setter i gang AUTO
funksjonen (Automatisk Justering på Video Inntak), unntagen N-PAL inntak.
VIDEO
HDTV
NORSK - 12
• Bruk denne funksjonen når bildet blir ustabilt (i.e bildet blir uregelmessig eller
mangler farge) på VIDEO/S-VIDEO inntak.
• Automatisk Justering trenger omtrent ti sekunder. Med noen inntakssignaler kan det
forekomme å ikke fungere korrekt. I et slikt tilfelle kan det hjelpe å trykke på AUTO
knappen, unntagen ved N-PAL inntak.
• For DEL VIDEO inntak vil denne funksjonen ikke være effektiv og signaltypen vil
skilles ut automatisk.
Betjening start/stopp: Trykk på
/
-knappen.
Velg HDTV modus: Velg 1080i modus eller 1035i modus tilpasset
signalinntaket med
/
knappen.
• Når den valgte HDTV-funksjonen ikke er kompatibel med
inngangssignalet, kan bildet bli feil (dvs. displayposisjon eller farge blir feil).
BETJENING (forts.)
Bildemeny
OPPS.
Følgende justeringer og innstillinger er tilgjengelige når du velger BILDE
i menyen. Velg en post med
og -knappene og start prosedyren.
KILDE
BILDE
VALG
BLANK
SPEIL
OPPSTRT.
GAMMA
COLOR TEMP
Tabell 6. Bildemeny
Post
Beskrivelse
Velg ensfarget skjerm: Velg farge med
BLANK
SPEIL
OPPSTRT.
og
-knappene.
• Bildet forsvinner og hele skjermen vises med fargen som er valgt, når BLANK
modus stilles inn på BLANK ON, eller når det ikke er noe signal etter 5 minutter.
Betjening start/stopp: Trykk på
/ -knappen.
Velg Speilvendt status: Velg speilvendt status med
og -knappene.
Betjening start/stopp: Trykk på
/ -knappen.
Innledende skjermdisplay: Velg SKRU PÅ med -knappen.
Slett innledende skjermdisplay: Velg SKRU AV med -knappen.
• Hvis du velger SKRU AV, vises den blanke skjermen i blått når der ikke er noe
signal.
COLOR
TEMP
Betjening start/stopp: Trykk på
/ -knappen.
Velg gamma modus: Velg gamma modus med
/ -knappen.
Betjening start/stopp: Trykk på
/ -knappen.
Velg fargetemperatur: Velg fargetemperaturen med
/ -knappen.
NORSK
GAMMA
NORSK - 13
BETJENING (forts.)
Valgmeny
OPPS.
Følgende justeringer og innstillinger er tilgjengelige når du velger VALG
fra menyen. Velg en post med
og
- knappene og start prosedyren.
KILDE
VOLUM
FARGEMENY
SPR K
AUTO AV
SYNC ON G
STILLE
BILDE
VALG
16
Tabell 7. Valgmeny
Post
Beskrivelse
↔ Øke VOLUM
VOLUM
Volumjustering: Redusere VOLUM
FARGEMENY
Velg menyens bakgrunnsfarge: Velge farge med
SPRÅK
Betjening start/stopp: Trykk på
eller
Velget språket menyen skal vises på:
Velg ved hjelp av
og -knappene.
AUTO AV
Betjening start/stopp: Trykk på
eller -knappen.
Stille inn AUTOMATISK SLUKKING :
Still inn 1~99 minutter med
og -knappene. Systemet går
automatisk over i beredskapsmodus når det ikke mottas et signal for det
innstilte klokkeslettet.
Slette AUTOMATISK SLUKKING :
Velg ANNUL. (0 min.) med -knappen. Når ANNUL. velges, går ikke
systemet over i beredkapsmodus selv om det ikke mottar noe signal.
SYNC ON G
STILLE
NORSK - 14
og
-knappene.
-knappen.
Betjening start/stopp: Trykk på
eller -knappen.
SYNC ON G innkoplet: Velg SKRU PÅ med -knappen.
SYNC ON G utkoplet: Velg SKRU AV med -knappen.
• Vil muligens ikke vises korrekt med enkelte inngangssignaler når SYNC ON G
er aktivert. I dette tilfellet kopler du signalkontakten slik at det ikke mottas noen
signaler, kopler ut SYNC ON G og kopler signalkontakten tilbake på plass igjen.
Betjening start/stopp: Trykk på
/ -knappen.
Innstill/Nullstill Viske-modus: Trykk på
/ -knappen.
Når STILLE blir valgt, aktiveres STILLE-modus. I STILLE-modus vil det
akustiske støynivået fra enheten reduseres, lysstyrkenivået på skjermen
bli noe lavere.
BETJENING (forts.)
Ikke noe-Meny
VOLUM
BLANK
SPEIL
OPPSTRT.
FARGEMENY
SPR K
AUTO AV
SYNC ON G
STILLE
De samme justeringene og innstillingene som for BILDE og VALG
menyene er tilgjengelige når du trykker på MENU-knappen når “INGEN
INNGANG PÅ ***” eller “SYNC UTE ÅV OMRADE PÅ ***” meldingen
vises mens det ikke mottas noe signal.
16
Tabell 8. kke noe-Meny
Beskrivelse
VOLUM
Volumjustering: Redusere VOLUM
↔ Øke VOLUM
• Når denne funksjonen velges vil lydinntaket automatisk bytte til video.
Lydinntaket kan byttes ved å bevege på DISK PUTE til venstre og til høyre under
visningen av streken for volumjustering. Streken for volumjustering vises bed å
trykke på VOLUM
eller VOLUM
knappen.
BLANK
Velg ensfarget skjerm: Velg farge med
og -knappene.
• Bildet forsvinner og hele skjermen vises med fargen som er valgt, når BLANK
modus stilles inn på BLANK ON, eller når det ikke er noe signal etter 5 minutter.
SPEIL
Betjening start/stopp: Trykk på
/ -knappen.
Velg Speilvendt status: Velg speilvendt status med
OPPSTRT.
Betjening start/stopp: Trykk på
/ -knappen.
Innledende skjermdisplay: Velg SKRU PÅ med -knappen.
Slett innledende skjermdisplay: Velg SKRU AV med -knappen.
• Hvis du velger SKRU AV , vises den blanke skjermen i blått når der ikke er noe
signal.
FARGEMENY
Velg menyens bakgrunnsfarge: Velge farge med
SPRÅK
Betjening start/stopp: Trykk på
/ -knappen.
Velget språket menyen skal vises på: Velg ved hjelp av
AUTO AV
Betjening start/stopp: Trykk på
/ -knappen.
Stille inn AUTOMATISK SLUKKING :
Still inn 1~99 minutter med
og -knappene. Systemet går automatisk over i
beredskapsmodus når det ikke mottas et signal for det innstilte klokkeslettet.
Slette AUTOMATISK SLUKKING :
Velg ANNUL. (0 min.) med -knappen. Når ANNUL. velges, går ikke systemet
over i beredkapsmodus selv om det ikke mottar noe signal.
SYNC ON G
Betjening start/stopp: Trykk på
/ -knappen.
SYNC ON G innkoplet: Velg SKRU PÅ med -knappen.
SYNC ON G utkoplet: Velg SKRU AV med -knappen.
• Vil muligens ikke vises korrekt med enkelte inngangssignaler når SYNC ON G er
aktivert. I dette tilfellet kopler du signalkontakten slik at det ikke mottas noen signaler,
kopler ut SYNC ON G og kopler signalkontakten tilbake på plass igjen.
STILLE
Betjening start/stopp: Trykk på
/ -knappen.
Innstill/Nullstill Viske-modus: Trykk på
/ -knappen.
Når STILLE blir valgt, aktiveres STILLE-modus. I STILLE-modus vil det akustiske
støynivået fra enheten reduseres, lysstyrkenivået på skjermen bli noe lavere.
og
og
-knappene.
-knappene.
og
-knappene.
NORSK - 15
NORSK
Post
VEDLIKEHOLD
Lamper
HØY SPENNING
HØY TEMPERATUR
HØY TRYKK
Kontakt forhandleren når lampen skal skiftes ut.
For valgfri lys, se artikkel "Valgfrie Deler" på tabell 12.
Før lampen skiftes ut, må strømmen slås av , støplset trekkes ut av stikkontakten. Vent deretter i
cirka 45 minutter til lampen er avkjølt. Lampen kan eksplodere hvis den fjernes mens den stadig er
varm.
ADVARSEL • Brukte lamper må kasseres i henhold til
de lokale bestemmelsene.
• Siden lampene er av glass, vær forsiktig så de ikke ripes
opp eller utsettes for slag og støt.
• En brukt lampe må ikke brukes på nytt – den kan
eksplodere.
• Hvis det grunn til å tro at lampen har eksplodert (det
høres et pang), må støpslet koples fra stikkontakten og
forhandleren kontaktes for utskifting av lampen. Lampen
er dekket av solid glass i, men det kan en sjelden gang
forekomme at reflektoren inni prosjektøren ødelegges av
glassbiter. Knust glass kan også forårsake personskader
og lampen må derfor behandles med forsiktighet.
• Prosjektøren må ikke brukes uten at lampedekslet er på
montert.
Lampen
Reflektor Frontglass
Lampens levetid
Prosjektørlampen har en viss levetid. Bildet blir mørkere og fargetonene blir svakere når lampen har
vært brukt i lengre tid.
Lampen må skiftes ut når LAMP-indikatoren lyser rødt eller når "SKIFT LAMPEN" (skift ut
lampen)-meldingen vises når prosjektøren er i bruk. Se tabell 9 til P.19 og tabell 10 av P. 20.
NB • LAMP-indikatoren lyser rødt også når apparatet når en høy temperatur. Før lampen skiftes
ut, må strømmen slås av , og deretter må du vente i cirka 20 minutter og så slå strømmen på igjen.
Hvis LAMP-indiaktoren stadig lyser rødt, må lampen skiftes ut.
NORSK - 16
VEDLIKEHOLD (forts.)
Utskifting av lampen
1. Slå strømmen av , trekk støpslet ut av stikkontakten og vent i minst
45 minutter til apparatet er tilstrekkelig avkjølt.
2. Gjør klar en ny lampe.
3. Sjekk at prosjektøren er tilstrekkelig avkjølt og snu den deretter
oppned.
4. Løsne de to skruene som vist i diagrammet, og fjern lampedekselet.
5. Løsne den ene skruen, og hold i håndtakene når lampen fjernes. Hvis
lampen berøres innvendig kan det forårsake ujevn farging.
6. Installer den nye lampen og stram stilleskruen forsvarlig. Skyv i
tillegg motsatt side av lampen som er skrudd fast forsiktig inn i
enheten.
7. Sett lampedekslet tilbake på plass og trekk de to skruene forsvarlig
til.
8. Snu prosjektøren forsiktig tilbake med riktig side opp.
FORSKING • Se til at skruene trekkes forsvarlig til.
Hvis dette ikke gjøres, kan det resultere i skader
eller en ulykke.
• Prosjektøren må ikke brukes uten at lampedekslet er
på montert.
Gjeninnstilling av lampens timer
1. Skru PÅ innstilling og trykk på RESET knappen og hold inne i omtrent 3 sekunder. 'LAMP xxxx
hr'-meldingen vises på LAMP-timeren nederst på skjermen.
2. Trykk på MENU-knappen på fjernkontrollen eller RESET-knappen på kontrollpanelet mens
lampens timer vises. ‘LAMP xxxx → 0 ■ CANCEL’-meldingen vises.
3. Trykk på
, velg 0 og vent til timerdisplayet slettes.
NB • Lampens timer må ikke nullstilles uten at lampen skiftes ut. Timeren må alltid nullstilles
ved utskifting av lampen. Meldingsfunksjonen vil ikke fungere korrekt med mindre lampentimeren
nullstilles skikkelig.
NORSK - 17
NORSK
Still lampens timer inn på nytt etter at lampen er skiftes ut. Når “SKIFT LAMPEN …
STROMUTKØPLING ETTER 0 TIMER.”-meldingen vistes, må følgende gjøres innen 10 minutter
etter at strømmen slås på igjen. Strømmen slås automatisk av når det går over 10 minutter.
VEDLIKEHOLD (forts.)
Vedlikehold av luftfilter
Luftfilteret må rengjøres som beskrevet under ca. hver 100. timer.
1. Slår prosjektøren av , og trekk nettledingen ut av stikkontakten.
2. Rengjør luftfilteret med en støvsuger.
FORSKING • Slå strømmen av og trekk nettledningen ut av stikkontakten før
vedlikeholdsarbeidet starter. Vennligst les den separate
“SIKKERHETSINSTRUKSJONER” nøye gjennom for å sikre at vedlikeholdet
utføres på forsvarlig måte.
• Ut luftfilteret hvis det er vanskelig å rengjøre eller hvis det er ødelagt. Kontakt
forhandleren. For valgfri luftfilter, se artikkel "Valgfrie Deler" på tabell 12.
• Utstyret må ikke brukes uten at luftfilteret er påmontert.
• Når luftfilteret er tilstoppet med støv, strømmen slås automatisk av for å
forhindre overoppheting inni prosjektøren.
Annet vedlikehold
Innvendig vedlikehold
Av sikkerhetsmessige grunner, må det ses til at utstyret rengjøres og sjekkes av forhandleren en
gang hvert annet år. Vedlikehold av utstyret på egenhånd er farlig.
Rengjøre linsene
Tørk linsen forsiktig med linsepapir. Ta ikke på linsen med fingrene.
Rengjøring av kabinett og fjernkontroll
Tørk med en ren, myk klut. Hvis det er vanskelig å fjerne skitt og flekker, brukes en fuktig klut eller
en klut som er godt oppvridd i mildt såpevann. Tørk deretter med en tørr, myk klut.
FORSKING • Slå strømmen av og trekk nettledningen ut av stikkontakten før
vedlikeholdsarbeidet starter. Vennligst les den separate
“SIKKERHETSINSTRUKSJONER” nøye gjennom for å sikre at
vedlikeholdsarbeidet utføres på forsvarlig måte.
• Bruk ikke andre rengjøringsmidler eller kjemikalier enn de som er nevnt over
(bruk f.eks. ikke bensin eller tynnere).
• Bruk ikke rengjøringspray.
• Gni ikke med harde materialer og bank ikke på utstyret.
NORSK - 18
FEILSØKING
Skjermmeldinger
Meldingene er beskrevet under og kan vises på skjermen når utstyret er påslått. Følg anvisningen
når en melding vises.
Tabell 9. Skjermmeldinger
Melding
Beskrivelse
SKIFT LAMPEN
Lampens levetid vil snart nå 2000 timer. (*2)
ETTER AT LAMPEN ER
SKIFTET UT, NULLSTILLES Lampen bør derfor skiftes ut snarest mulig.
LAMPE-TIMEREN.
Sørg for å ha en reservelampe klar.
(*1)
SKIFT LAMPEN
ETTER AT LAMPEN ER
SKIFTET UT, NULLSTILLES
LAMPE-TIMEREN.
STROMUTKØPLING
ETTER ** TIMER.
(*1)
Lampens levetid vil snart nå 2000 timer. Lampen bør skiftes
ut innen **timer. (*2)
Det kan skje at lampen slukker før **timer. Strømmen slås
AV automatisk innen **timer. Skift lampen ut som beskrevet
på s. 17 – 18 "Lampe". Lampetimeren må alltid stilles inn på
nytt etter at lampen er skiftet ut.
SKIFT LAMPEN
ETTER AT LAMPEN ER
SKIFTET UT, NULLSTILLES
LAMPE-TIMEREN.
STROMUTKØPLING
ETTER 0 TIMER.
Lampens levetid er snart utgått. Strømmen vil slås AV om få
minutter. (*2)
Slå strømmen AV øyeblikkelig og skift ut lampen som
beskrevet på s. 17 – 18 "Lampe".
Lampetimeren må alltid stilles inn på nytt etter at lampen er
skiftet ut.
SYNC UTE ÅV OMRADET
PÅ ***
SJEKK LUFTSTRØMMEN
Ingen inngangssignal å finne.
Sjekk signalinngangens kopling og signalkilden.
Den horisontale og vertikale frekvensen i inngangssignalet
er ikke innenfor det spesifiserte området. Sjekk
spesifikasjonene for utstyret og signalkilden.
Den innvendige temperaturen er for høy.
Slå strømmen av og vent i 20 minutter til utstyret er avkjølt.
Sjekk følgende og slå strømmen på igjen.
• Er luftinntaket eller –avløpet tilstoppet ?
• Er luftfilteret skittent ?
• Er den omgivende temperaturen over 35°C ?
NB (*1) Denne meldingen forsvinner automatisk etter ca. tre minutter og vises hver gang
strømmen slås på.
(*2) Enheten er utstyrt med en funksjon som slår strømmen av og denne funksjonen aktiveres når
lampens brukstid nærmer seg 2000 timer. Men lampens levetid kan variere sterkt, så det kan
forekomme at lampen slukker før denne funksjonen aktiveres.
NORSK - 19
NORSK
INGEN INNGANG
PÅ ***
FEILSØKING (forts.)
Indikatormelding
POWER in, LAMP-indikatoren og TEMP-indikatoren lyser og slukker som følger. Følg
anvisningene.
Tabell 10. Indikatormelding
POWER- LAMPTEMPindikator indikator indikator
Beskrivelse
Lyser
oransje
Slukker
Slukker
Beredskapsmodus er innstilt.
Blinker
grønt
Slukker
Slukker
Oppvarming. Vennligst vent.
Lyser
grønt
Slukker
Slukker
PÅ. Kan brukes normalt.
Blinker
oransje
Slukker
Slukker
Avkjøling. Vennligst vent.
Blinker
rødt
-
Blinker/ly Lyser
ser rødt rødt
Blinker/ly Blinker
ser rødt rødt
Blinker/ly
Slukker
ser rødt
Blinker/lys
Slukker
er rødt
Lyser
grønt
Blinker
rødt
-
Slukker
Avkjøling. Vennligst vent.
Feil å finne. Følg anvisningene når POWER-indikator
slutter å blinke
Lampen lyser ikke.
Prosjektøren kan være overopphetet. Slå strømmen av ,
vent 20 minutter til utstyret er sjekk om luftinntaket eller
avløpet er tilstoppet, om filteret er skittent eller om den
omgivende temperaturen er over 35°C. er avkjølt og slå
strømmen på igjen. Skift lampen ut hvis det samme skjer
en gang til.
Det er ikke installert en lampe eller lampedeksel, eller
disse er ikke riktig installert. Slå strømmen av og vent i
Slukker 45 minutter til utstyret er avkjølt. Sjekk lampens og
dekslets installasjon og slå strømmen på igjen. Kontakt
forhandleren hvis det samme skjer en gang til.
Slå strømmen av og vent 20 minutter til utstyret er
Blinker
avkjølt og slå strømmen på igjen. Kontakt forhandleren
rødt
hvis det samme skjer en gang til.
Prosjektøren er overopphetet. *2)
Slå strømmen av og vent 20 minutter til utstyret er
avkjølt. Sjekk om luftinntaket eller avløpet er tilstoppet,
Lyser rødt
om filteret er skittent eller om den omgivende
temperaturen er over 35°C. Slå strømmen på igjen.
Kontakt forhandleren hvis det samme skjer en gang til.
Blinker
rødt
Innsiden av utstyret er for kaldt.
Sjekk om den omgivende temperaturen er under 0°C. Kontakt
forhandleren hvis det samme problemet oppstår når den
omgivende temperaturen er på mellom 0 ~ 35°C.
NB *2) Når prosjektøren blir overopphetet, vil den av sikkerhetsmessige årsaker slå seg av
automatisk og indikatoren vil slukke. Still strømbryteren på [O] og vent 20 minutter til utstyret er
tilstrekkelig avkjølt.
NORSK - 20
FEILSØKING (forts.)
Symptom
Følgende symptomer er ikke nødvendigvis tegn på noe galt. Sjekk i samsvar med tabellen under.
Tabell 11. Symptom
Strømmen er
ikke påslått.
Symptom som ikke er feil
Punkt som skal sjekkes
Hovedstrømbryteren er ikke
Slå på hovedstrømbryteren.
slått på.
Strømledningen er ikke
Plugg strømledningen inn i
tilkoplet.
stikkontakten.
7,8
Bruk knappene på prosjektøren
Ingen video eller Feil inngangen har blitt valgt. eller fjernkontrollen til å velge
signalinngang.
audio.
Ingen signalinngang.
Utfør korrekt tilkopling.
Prosjektøren er tilkoplet feil. Kople prosjektøren riktig.
Video er
virksom, men
ingen lyd.
Lyd utgår men
ingen video.
Side
9
6,7
6,7
Volumet er stilt til minimum.
Trykk VOLUME
på
fjernkontrollen eller fremvis
menyen og juster volumet.
Lyddemping er påslått.
Trykk MUTE
Prosjektøren er ikke korrekt
tilkoplet.
Utfør koplingen korrekt.
6,7
Lysstyrken er stilt inn på et
minimum
Velg LYS med MENU-knappene
og trykk på
-knappen.
11
Linsedøren er stading
lukket.
Åpne linsedøren.
8
Juster videosignalet.
11
Fargetettheten og
Fargene er
blasse og glir inn fargetilpasningen er ikke
i hverandre.
riktig innstilt.
10,14
10
-knappen.
Bildene er
mørke.
Lysstyrke og kontrast er ikke
Juster videosignalet.
riktig innstilt.
Lampens levetid nærmer
Skift ut lampen med en ny.
seg slutten.
Bildene er
uklare.
Fokusering eller H FASE er
feil justert.
Juster fokuseringen eller H
FASE.
11
16,17
8,11
NORSK - 21
NORSK
Symptom
SPESIFIKASJONER
Tabell 12. Spesifikasjoner
Punkt
Spesifikasjon
Produktnavn
Flytende
krystallpanel
Flytende krystallprosjektør
Panelstørrelse
1,8 cm (0,7 type)
Drivsystem
TFT aktiv matriks
Pixel
CP-S225W : 480.000 pixel (800 horisontale x 600 vertikale)
CP-X275W : 786.432 pixel (1024 horisontale x 768 vertikale)
Linse
Zoomlinse F=2,0-2,3 f=18-21mm
Lampe
150W UHB
Høyttaler
1,0W
Strømforsyning
100–120V vekselstrøm, 2,7A/220-240 vekselstrøm, 1,3A
Strømforbruk
240W
Driftstemperatur
0 – 35°C
Størrelse
289(B) x 84(H) x 215(D) mm
Total vekt
CP-S225W : 2,4 kg
CP-X275W : 2,5 kg
RGBsignalinngang
Video: Analog 0,7Vp-p, 75 Ω, terminator (posistiv)
H/V.sync: TTL nivå (posistiv/negativ)
Sammensatt sync.: TTL nivå
D-sub 15-pins krympeuttak
RGB IN
AUDIO IN
RGB1
RGB2
VIDEO
1,0 DVp-p 75Ω terminator RCA-uttak
S-VIDEO
Lysstyrkesignal : 1,0Vp-p, 75Ω terminator
Fargesignal : 0,286Vp-p (NTSC, bristsignal), 75Ω terminator
0,3Vp-p (PAL/SECAM, bristsignal), 75Ω terminator
Mini DIN 4-pins uttak
Videosignalinngang
Y
COMPONENT
VIDEO
AUDIO
CONTROL
Valgfrie Deler
NB
1,0 Vp-p, 75 Ω terminator (posistiv)
CB/CR 0,7 Vp-p, 75 Ω terminator (posistiv)
PB/PR
Kontrollfunksjoner
200Vrms, 47kΩ (maks. 3,0Vp-p)
Stereo miniuttak
L
R
0,7 Vp-p, 75 Ω terminator (posistiv)
200Vrms, 47kΩ (maks. 3,0Vp-p)
RCA-uttak
D-sub 15-pins krympeuttak
Lampe:DT00401 (CP-S225W) / DT00461 (CP-X275W)
Luftfilter: MU01461
* For annet, søk råd hos Deres forhandler.
• Vi forbeholder oss retten til å foreta endringer uten forvarsel.
NORSK - 22
GARANTI OG SERVICE
NORSK
Hvis det oppstår problemer med utstyret, ser du først under "FEILSØKING" (S.20) og går igjennom
rådene som er oppgitt. Hvis dette ikke ordner problemet, bør du kontakte forhandleren eller et
serviceverksted. De vil fortelle hvilke garantiforhold som gjelder.
NORSK - 23
Projetor de Cristal Líquido
INSTRUÇÕES DO PROPRIETÁRIO
Gratos pela aquisição deste projetor de cristal líquido.
ADVERTÊNCIA • Para assegurar o uso correto do equipamento, por favor leia
atentamente o folheto “INSTRUÇUÕES DE SEGURANÇA”, fornecido com o
aparelho, e este “INSTRUÇÕES DO PROPRIETÁRIO.” Após a leitura, guarde este
manual de instruções em local seguro para consulta futura.
NOTA • As informações deste manual estão sujeitas a alterações sem aviso prévio. • O fabricante
não assume nenhuma responsabilidade por quaisquer erros que eventualmente estejam impressos
deste manual. • Não é permitida a reprodução, transmissão ou uso destes documentos ou conteúdos
sem expressa autorização por escrito.
RECONHECIMENTO DAS MARCAS REGISTRADAS : PS/2, VGA e XGA são marcas
registradas de International Business Machines Corporation. Apple, Mac e ADB são marcas
registradas de Apple Computer, Inc. VESA e SVGA são marcas registradas da Video Electronics
Standard Association. Windows é marca registrada da Microsoft Corporation. Observe
cuidadosamente as marcas registradas e marcas comerciais registradas de todas as empresas, mesmo
das não mencionadas.
ÍNDICE
Página
Página
CARACTERÍSTICAS ........................2
ANTES DE USAR .............................2
RESOLUÇÃO DE PROBLEMAS ......19
INSTALAÇÃO ...................................5
Instalação do projetor e da tela ..............5
Ajuste do ângulo.....................................5
Conexão dos cabos................................6
Conexão à tomada elétrica.....................6
Exemplo de instalação de sistema .........7
Plug & Play .............................................7
OPERAÇÕES....................................8
Ligar........................................................8
Desligar ..................................................8
Operação básica ....................................9
Menu Ajust............................................11
Menu Entrada .......................................12
Menu Imagem.......................................13
Menu Opções .......................................14
Menu nenhum sinal ..............................15
MANUTENÇÃO...............................16
Lâmpadas.............................................16
Manutenção do filtro de ar....................18
Outras observações sobre manutenção ......18
Mensagem de OSD ..............................19
Mensagem dos indicadores..................20
Situações..............................................21
ESPECIFICAÇÕES .........................22
GARANTIA E ASSISTÊNCIA
TÉCNICA..........................................23
.......................................................................................
TABELAS
Tabela 1. Referência para instalação.......5
Tabela 2. Conexão dos cabos..................6
Tabela 3. Operações básicas...................9
Tabela 4. Menu Ajust..............................11
Tabela 5. Menu Entrada .........................12
Tabela 6. Menu Imagem.........................13
Tabela 7. Menu Opções .........................14
Tabela 8. Menu nenhum sinal ................15
Tabela 9. Mensagem de OSD ................19
Tabela 10. Mensagem dos indicadores ....20
Tabela 11. Situações..............................21
Tabela 12. Especificações......................22
.......................................................................................
Para "TECHNICAL" (DETALHES TÉCNICOS) e
"REGULATORY NOTICE" (AVISO
REGULAMENTAR) consulte a parte final deste
instruções doproprietário.
PORTGÊS - 1
PORTGÊS
Conteúdo da embalagem .......................2
Denominação das partes........................3
Colocação das pilhas .............................4
CARACTERÍSTICAS
Este projetor de cristal líquido é usado para projetar em tela vários sinais de computador, bem como
sinais de vídeo NTSC/PAL/SECAM. O espaço exigido para instalação é pequeno, e grandes
imagens podem ser facilmente obtidas.
Brilho excepcional
A lâmpada UHB e o sistema óptico de alta eficiência asseguram brilho de grande intensidade.
Função de ampliação parcial
Partes interessantes das imagens podem ser ampliadas para visualização mais detalhada.
Função de correção de distorções
Imagens livres de distorções estão rapidamente disponíveis.
Função de Ruído Superbaixo.
O nível de ruído acústico do aparelho pode ser reduzido.
ANTES DE USAR
Conteúdo da embalagem
Certifique-se de que todos os itens seguintes estejam incluídos na embalagem. Se quaisquer deles
não estiver na embalagem, entre em contato com o revendedor.
NOTA
• Guarde a embalagem original para reenvio futuro.
Cabo de
Cabo de
Cabo de
alimentação (para alimentação (para alimentação (para
uso nos EUA)
uso no Reino Unido) uso na Europa)
Projetor
Cabo de vídeo
componente
(com fio verde)
Cabo de RGB
Instruçes do
proprietário
(este manual)
VIDEO
STANDBY/ON
RGB
KEYSTONE
MENU
SELECT
MENU
MAGNIFY
POSITION RESET
FREEZE VOLUME
MUTE
OFF
AUTO
Instruções de
Segurança
PORTGÊS - 2
BLANK
Controle remoto com
pilha
Bolsa de transporte
ANTES DE USAR (continuação)
Denominação das partes
Botão ZOOM
Anel FOCUS
Sensor do controle
remoto
Chave liga-desliga
Soquete AC (para o
cabo de alimentação)
Aberturas de
ventilação (entrada)
Lente
Porta deslizante
Pé ajustador
Vista da esquerda/ frontal
Painel de Controle (veja a página 8 "OPERAÇÕES")
Indicador LAMP
Indicador TEMP
Botão RESET
Botão KEYSTONE
Botão INPUT
Botão STANDBY/ON
Indicador POWER
Botão MENU
Botão do pé ajustador
Aberturas de
ventilação (exaustão)
Filtro de ar e entrada
(para o ventilador de
resfriamento)
Alto-falante
Pé ajustador traseiro
Vista da direita/frontal
Sensor do controle
remoto
Entrada RGB
Entrada CONTROL
COMPONENT
Entrada Y
Entrada CB/PB
Entrada CR/PR
Entrada AUDIO
AUDIO
Entrada R
Entrada L
Entrada VIDEO
Entrada S-VIDEO
Painel de terminais
PORTGÊS - 3
PORTGÊS
Painel de terminais
(veja abaixo)
ANTES DE USAR (continuação)
Denominação das partes (continuação)
Botão VIDEO
Botão STANDBY/ON
Botão KEYSTON
VIDEO
STANDBY/ON
RGB
Botão RGB
Botão MENU SELECT
KEYSTONE
Botão
MENU
SELECT
Botão
Botão POSITION
Botão
Botão
MENU
POSITION RESET
Botão RESET
Botão MENU
Botão MAGNIFY
MAGNIFY
FREEZE VOLUME
Botão VOLUME
Botão MAGNIFY
MUTE
OFF
Botão MAGNIFY
Botão VOLUME
Botão FREEZE
OFF
AUTO
BLANK
Botão MUTE
Botão AUTO
Botão BLANK
Suporte da pilha
(veja a página 8 "OPERAÇÕES")
CONTROLE REMOTO
Colocação da pilha
Utilização inicial da pilha:
Na embalagem original, a pilha está instalada no suporte da pilha do
controle remoto com uma película protetora (a película transparente,
parte da qual está no interior do compartimento das pilhas). Remova
a película protetora para utilizar a pilha.
Lado "+"
Troca da pilha:
1. Observe o lado de trás do controle remoto.
2. Comprima a ranhura e retire o suporte da pilha, como indica o
desenho à direita.
3. Remova a pilha usada.
4. Instale a pilha nova com o lado "+" voltado para cima.
5. Empurre o suporte da pilha para dentro até ouvir um clique.
Puxe para
fora
Suporte da pilha
PERECAUÇÃO • Um manuseio inadequado da pilha poderá resultar em incêndio ou
ferimentos. A pilha poderá explodir se não for manuseada adequadamente. Manuseie
com cuidado a bateria, observando as recomendações do folheto INSTRUÇÕES DE
SEGURANÇA, fornecido com o aparelho , e deste manual.
• Use somente a microbateria de lítio modelo CR2025, de 3V.
• Ao instalar as pilhas, certifique-se de que os pólos positivo e negativo estejam orientados
corretamente, conforme a indicação no transmissor de controle remoto.
• Ao descartar a bateria, deve-se obedecer à legislação da respectiva região ou país.
• Mantenha a bateria afastada de crianças e animais de estimação.
• Remova as pilhas do controle remoto se não for usá-lo por um longo período.
NOTA Substituta as pilhas quando se tornar difícil a operação do controle remoto.
PORTGÊS - 4
INSTALAÇÃO
Instalação do projetor e da tela
Consulte o desenho e a tabela abaixo para determinar o tamanho da tela e a distância de projeção.
As distâncias da projeção mostradas na tabela abaixo
estão a uma distância para a tela sem reduão (CP-S225W
: 800 x 600 pontos / CP-X275W : 1024 x 768 pontos).
a: Distância entre o projetor e a tela. (±10%)
b: Distância do centro da lente ao fundo da tela. (±10%)
Tela
Tabela 1. Referência para instalação
a [m]
Tamanho da
tela [m]
Mín.
Máx.
b
[cm]
1,0
1,5
2,0
2,5
3,0
3,8
5,0
0,9
1,5
1,9
2,4
2,9
3,7
4,9
1,2
1,8
2,4
2,9
3,5
4,4
5,9
8,7
13,1
17,4
21,8
26,1
32,7
43,5
VISTA SUPERIOR
Centro da lente
b
a
VISTA LATERAL
PERECAUÇÃO • Instale o projetor em um ambiente apropriado, seguindo as instruções
do folheto “INSTRUÇÕES DE SEGURANÇA”, fornecido com o aparelho, e deste manual.
• Utilize basicamente o projetor de cristal líquido na posição horizontal. Se utilizar o projetor
de cristal líquido posicionado com a lente para cima, com a lente para baixo ou com uma
das laterais do aparelho voltada para cima, haverá risco de sobreaquecimento interno e
danos subseqüentes. Tome especial cuidado para não instalar o aparelho com as aberturas
de ventilação bloqueadas.
• Não instale o projetor de LCD em ambiente impregnado com fumaça. Resíduos de fumaça
poderão acumular-se em partes críticas (por ex., painel LCD, lentes, etc.).
Ajuste do ângulo
Pé ajustador
Pressione botão
do pé ajustador
Pé ajustador traseiro
PERECAUÇÃO • Não solte o botão do pé ajustador a menos que esteja
segurando o projetor; caso contrário, o projetor poderá virar ou seus dedos
poderão ficar presos, com risco de ferimentos.
PORTGÊS - 5
PORTGÊS
Use os pé ajustadores na base do
projetor para ajustar o ângulo de
projeção. É possível mudar o ângulo
aproximadamente de 0° a 10°.
1. Levante o lado dianteiro do projetor.
Pressionando o botão do pé
ajustador, ajuste o ângulo de
projeção.
2. Solte o botão para fixar o pé no
ângulo pretendido.
3. Gire o ajustador traseiro para
regular a inclinação esquerdadireita.
INSTALAÇÃO (continuação)
Conexão dos cabos
Consulte à tabela abaixo conectando cada terminal do projetor a cada dispositivo.
Tabela 2. Conexão dos cabos
Função
Entrada RGB analógica
Terminal
RGB
Cabo
Cabo de RGB acessório ou cabo de RGB
opcional com conector contrátil D-sub de 15 pinos
e parafusos de rosca de polegada
Comunicação por RS-232C CONTROL
Cabo para RS-232C opcional
Entrada de áudio
(do computador)
AUDIO
Cabo de áudio opcional com miniplugue estéreo
Entrada de vídeo
componente
COMPONENT VIDEO CB/PB
COMPONENT VIDEO Y
Cabo de vídeo componente acessório
COMPONENT VIDEO PR/CB
Entrada de S-video
S-VIDEO
Entrada de vídeo
VIDEO
Entrada de áudio
(de equipamento de vídeo)
AUDIO L
Cabo de S-video opcional com miniplugue DIN de
4 pinos
Cabo de vídeo/áudio opcional com plugue RCA
AUDIO R
PERECAUÇÃO • Uma conexão incorreta poderá resultar em incêndio ou choque
elétrico. Leia atentamente este manual e o folheto à parte “INSTRUÇU’ES DE
SEGURANÇA”.
• Antes de efetuar as conexões, desligue todos os aparelhos a serem conectados, com
exceção do cabo de USB.
• Os cabos podem ter de ser conectados de modo tal que o núcleo fique próximo da
extremidade ligada ao projetor. Utilize os cabos que acompanham o projetor ou cabos
especificados.
NOTA • Antes de conectar os cabos, leia os manuais de instruções dos aparelhos a conectar e certifique-se
de que o projetor seja compatível com o equipamento.
• Aperte firmemente os parafusos dos conectores.
• Para algum modos, é necessário usar o adaptador para Mac opcional.
• Para a seleção da entrada digital RGB, o computador poderá exigir uma determinada configuração. Veja
detalhes nos manuais do computador.
• Alguns computadores podem ter múltiplos modos de tela de exibição. Não é possível a utilização de alguns
destes modos com este projetor.
• Para a atribuição de pinos dos conectores, consulte a seção "TECHNICAL".
• Em relação ao cabo opcional RS-232C, para comunicação de dados, consulte o manual
• Para outros assuntos, consulte o seu revendedor.
PORTGÊS - 6
INSTALAÇÃO (continuação)
Conexão à tomada elétrica
Use o cabo correto dentre um dos fornecidos, dependendo da tomada elétrica que utilizar.
Conecte firmemente o soquete AC do projetor à tomada elétrica com o cabo de alimentação.
PERECAUÇÃO • Manuseie com cuidado o cabo
de alimentação, observando as recomendações
do folheto Instruções de Segurança, fornecido com
o aparelho, e deste manual.
• Conecte o cabo de alimentação firmemente. Evite
usar uma tomada frouxa ou que esteja em mau
estado, pois poderá haver falha de contato.
Tomada elétrica
Cabo de
alimentação
Soquete AC
Exemplo de instalação de sistema
Computador
(tipo "de mesa")
DVD player
Gravador de
videocassete S-Video
Computador
(tipo "notebook")
Plug & Play
Este projetor é compatível com o padrão VESA DDC 1/2B. Plug & Play é possível mediante a
conexão a um computador compatível com o padrão VESA DDC (Display Data Channel).
Use esta função através da ligação do cabo de RGB acessório à entrada RGB. O plug & play poderá
não funcionar por meio de outras conexões.
NOTA • Plug & Play é um sistema configurado com equipamentos periféricos que incluem um
computador e monitor, e um sistema operacional.
• Este projetor é detectável como monitor plug & play. Utilize os drivers de monitor padrão.
• O plug & play poderá não funcionar, dependendo do computador com qual seja feita a conexão.
PORTGÊS - 7
PORTGÊS
NOTA • Ao conectar com computador tipo “notebook”, configure para válida a saída de imagem
externa RGB (selecionando monitor CRT ou monitores simultâneos de LCD e CRT).
Leia maiores detalhes no manual de instruções do computador tipo “notebook”.
OPERAÇÕES
Botão STANDBY/ON
Indicador POWER
Botão
STANDBY/ON
VIDEO
STANDBY/ON
RGB
KEYSTONE
MENU
SELECT
Botão Zoom
MENU
POSITION RESET
Anel Focus
MAGNIFY
Chave liga-desliga
FREEZE VOLUME
Porta deslizante
Ligar
1. Certifique-se de que o cabo de alimentação esteja corretamente conectado.
2. Coloque a chave liga-desliga em [ | ]. O modo auxiliar é selecionado e o indicador POWER muda
para a cor laranja.
3. Pressione o botão STANDBY/ON
no painel de controle ou no controle remoto. Inicia-se o
aquecimento e o indicador POWER começa a piscar em verde.
4. O indicador POWER pára de piscar e muda para a cor verde quando o aparelho está ligado.
Abra a porta deslizante.
5. Gire o botão do zoom para ajustar o tamanho da tela.
6. Gire o anel de focagem para ajustar o foco.
Desligar
1. Pressione o botão STANDBY/ON
no painel do controle remoto. Aparecerá na tela, então, a
mensagem "Power off?" (Desligar?), que vai desaparecer ao ser selecionada alguma operação, ou
se não houver operação dentro de 5 segundos. Durante a permanência da mensagem, pressione
novamente o botão STANDBY/ON . A lâmpada de projeção apaga-se e tem início o
resfriamento da lâmpada. O indicador POWER passa a piscar na cor laranja durante o
resfriamento da lâmpada. Pressionar o botão STANDBY/ON
não produz nenhum efeito
enquanto o indicador POWER está piscando.
2. O sistema entra no modo de espera quando o resfriamento se completa, e o indicador POWER
pára de piscar e muda para a cor laranja. Certifique-se de que o indicador esteja na cor laranja e
coloque a chave liga-desliga em [O].
3. O indicador POWER apaga-se quando o aparelho é desligado. Não esqueça de fechar a porta
deslizante.
ADVERTÊNCIA • Antes de usar o equipamento, leia atentamente este manual
e o folheto à parte “INSTRUÇUÕES DE SEGURANÇA”. Certifique-se sempre
de que o equipamento seja usado com segurança.
NOTA • Afora situações de emergência, não desligue, a menos que o indicador de energia esteja
laranja, visto que reduzirá a duração da lâmpada do projetor.
• De modo a evitar problemas, ligue/desligue o projetor quando o computador ou o gravador de
videocassete estiver desligado. Desde que um cabo de RS-232C esteja conectado, ligue o
computador antes do projetor.
• Quando o projetor continua a mostrar a mesma imagem, ela pode persistir na retina ou na tela. Não
se deve, portanto, projetar a mesma imagem por um período prolongado.
PORTGÊS - 8
OPERAÇÕES (continuação)
Operação básica
A operação básica mostrada na tabela 3 é executável através do controle remoto fornecido ou do
painel de controle do projetor. O asterisco (*) indica funções controláveis através do painel de
controle.
Tabela 3. Operação básica
Item
Descrição
Seleção do sinal de entrada (*): Pressionar o botão INPUT.
INPUT
SELECT
(seleção de
entrada)
POSITION
(posição)
RGB → VIDEO → S-VIDEO → COMPONENT (→ RGB )
Seleção da entrada RGB: Pressionar o botão RGB.
VIDEO/S-VIDEO/COMPONENT → RGB
Seleção da entrada VIDEO/S-VIDEO: Pressionar o botão VIDEO.
RGB → VIDEO/S-VIDEO/COMPONENT
• O nome do sinal selecionado é exibido por cerca de três segundos quando se
muda o sinal de entrada.
Ativar/desativar o modo de ajuste de posição: Pressionar o botão
POSITION. O ícone [ ] é exibido no modo de POSITION.
Ajuste da posição de imagem:
Pressionar os botões , , e no modo de ajuste de posição.
• Quando um sinal video input, esta função é válida somente no modo MAGNIFY.
• Depois de aproximadamente dez segundos de inatividade o ícone [ ]
desaparece e o modo POSITION é desativado automaticamente.
Inicializar cada itens: Selecionar um item e pressionar o botão RESET.
Inicializar o ajuste de posição: Pressionar o botão RESET no modo de
(inicialização) POSITION. Válido somente quando o sinal RGB é recebido.
RESET (*)
• Váido com exceção de VOLUME, LANGUAGE, FASE HORIZON e SILENCIAME.
MAGNIFY
(ampliar)
Ativar o modo MAGNIFY: Pressionar o botão MAGNIFY .
Mover a área de ampliação:
Executar o ajuste de posição no modo MAGNIFY.
Ajuste da ampliação: Pressionar MAGNIFY / no modo MAGNIFY.
MAGNIFY amplia a imagem ↔ MAGNIFY reduz a imagem.
Desativar o modo MAGNIFY: Pressionar o botão MAGNIFY .
OFF
• Desativa-se MAGNIFY por meio da execução ou configuração de AUTO, ASPECTO,
INPUT SELECT ou VIDEO, ou mediante mudança do sinal de entrada.
Ativar/desativar o modo FREEZE: Pressionar o botão FREEZE. O ícone
[II] é exibido e a imagem é congelada no modo FREEZE.
• Desativa-se FREEZE por meio da execução ou configuração de POSITION,
(congelamento) VOLUME, MUTE, AUTO, BLANK ON/OFF ou MENU ON/OFF, ou mediante
mudança do sinal de entrada.
• Não se esqueça de desativar imagens estáticas congeladas.
Ativar/desativar o KEYSTONE: Pressione o botão KEYSTONE .
/ no modo KEYSTONE.
(*) reduz o tamanho da parte inferior da imagem ↔ reduz a parte superior da
imagem.
KEYSTONE Ajustar Keystone: Pressione o botão
NOTA • Use o controle remoto a uma distância aproximada de 3 metros do sensor existente na
frente do projetor e dentro de uma amplitude de 30 graus à esquerda e à direita. Luz intensa e
obstáculos interferem na operação do controle remoto.
(continua na próxima página)
PORTGÊS - 9
PORTGÊS
FREEZE
OPERAÇÕES (continuação)
O asterisco (*) indica funções controláveis através do painel de controle.
Tabela 3. Operação básica (continuação)
Descrição
Item
VOLUME
(volume)
Ajuste do volume: Pressionar o botão VOLUME
baixar VOLUME
↔ levantar VOLUME
MUTE
Ativar/desativar o modo de silenciamento: Pressionar o botão MUTE.
Não se ouve som nenhum no modo MUTE.
(silenciamento)
AUTO
(automático)
/
.
Ajuste automático da entrada RGB: Pressione o botão AUTO.
Posição horizontal (POSICAO HORI), posição vertical (POSICAO VERT),
fase do relógio (POSICAO HORI) e tamanho horizontal (FASE HORIZON)
são ajustados automaticamente. Use com a janela de exibição do aplicativo
no tamanho máximo.
Ajuste automático da entrada VIDEO/S-VIDEO: Pressionar o botão
AUTO. Um tipo de sinal apropriado para o sinal de entrada é selecionado
automaticamente. Válido somente quando AUTO está configurado para
VIDEO no menu entrada.
• Esta operação exige aproximadamente dez segundos. Pode não funcionar
corretamente com alguns sinais de entrada.
BLANK
ON/OFF
(ativar/desativar
a supressão da
imagem)
MENU
ON/OFF (*)
Ativar/desativar o modo de supressão da imagem:
Pressionar o botão BLANK. Nenhuma imagem é exibida no modo de
supressão da imagem. A cor da tela é aquela ajustada em SUPRESS.IMA
no menu Image.
Ativar/desativar a exibição do menu: Pressionar o botão MENU.
• A exibição do menu é desativada automaticamente depois de cerca de dez
(ativar/desativar
segundos de inatividade.
o menu)
Seleção do tipo de menu: Pressionar o botão MENU SELECT.
Permite ao usuário selecionar o menu normal ou o menu individual.
Somente o item selecionado é exibido no menu individual, e outros itens
são exibidos com os botões
e
, como com o menu normal.
MENU
• Válido somente quando Menu Ajust é utilizado. Pressione o botão MENU SELECT
SELECT
depois de selecionar itens como "BRILHO".
(seleção de
Menu normal
Menu individual
menu)
(MENU SELECT)
AJUST
ENTRD
BRILHO
CONTRASTE
POSICAO VERT
POSICAO HORI
FASE HORIZON
TAMANHO HORI
EQ. COR VERM
EQ. COR AZUL
ASPECTO
PORTGÊS - 10
IMAGE
OPCAO
0
-2
100
100
+1
800
0
0
CONTRASTE
-2
OPERAÇÕES (continuação)
Menu Ajust
Os seguintes ajustes e configurações são possíveis quando se seleciona AJUST na parte superior do
menu. O menu Setup difere parcialmente em relação à entrada RGB e à entrada VIDEO/S-VIDEO.
Selecione um item com os botões
e , e inicie a operação. Use o menu individual para reduzir o
tamanho do menu (veja a tabela 3, MENU SELECT).
AJUST
ENTRD
IMAGE
AJUST
OPCAO
0
-2
BRILHO
CONTRASTE
POSICAO V
POSICAO H
FASE H
TAMANHO H
EQ. COR V
EQ. COR A
ASPECTO
ENTRD
IMAGE
OPCAO
BRILHO
CONTRASTE
NITIDEZ
COR
MATIZ
EQ. COR V
EQ. COR A
ASPECTO
100
100
+1
800
0
0
AJUST
0
+1
+1
0
0
0
0
IMAGE
OPCAO
0
+1
+1
0
0
0
COMPONENT
VIDEO/S-VIDEO
RGB
ENTRD
BRILHO
CONTRASTE
COR
FASE H
EQ. COR V
EQ. COR A
ASPECTO
Tabela 4. Menu Ajust
COMPONENT
Item
Descrição
RGB
VIDEO
S-VIDEO
480i
575i
480P
720P
1080i
Escuro
↔ Claro
Fraco
↔ Forte
Para baixo
↔ Para cima
Esquerda
↔ Direita
✔
✔
✔
✔
✔
✔
✔
✔
✔
✔
-
-
-
FASE
HORIZON
Esquerda
↔ Direita
• Ajustar para eliminar tremulação da imagem.
✔
-
✔
✔
✔
-
-
-
-
✔
✔
-
-
✔
✔
-
✔
-
-
✔
✔
✔
✔
✔
✔
✔
✔
✔
-
-
✔
-
✔
✔
-
TAMANHO
HORI
NITIDEZ
COR
Pequena
↔ Grande
• A imagem poderá não ser exibida corretamente se o tamanho
horizontal (largura) for excessivo. Neste caso, aperte o botão
RESET para restaurar o tamanho horizontal padrão.
Suave
Claro
↔ Brilhante
↔ Escuro
Vermelho
↔ Verde
• Válido somente quando são recebidos sinais de NTSC ou
NTSC 4.43.
EQ. COR VERM Claro
↔ Escuro
MATIZ
EQ. COR AZUL Claro
↔ Escuro
Seleção da relação de aspecto da imagem:
4:3[
]
↔
16:9[
]
Seleção da posição de exibição:
Pressionar o botão
enquanto 16:9[
] estiver
selecionado.
Centro →
Para baixo →
Para cima (→
Centro)
Seleção
da
relação
de
aspecto
da
imagem:
ASPECTO
4:3[
]
↔
16:9[
]
↔
4:3 pequena[
Seleção da posição de exibição:
Pressionar o botão
enquanto 16:9[
]/4:3 pequena [
estiver selecionado.
Centro → Para baixo → Para cima (→ Centro)
PORTGÊS
BRILHO
CONTRASTE
POSICAO VERT
POSICAO HORI
]
]
• 4:3 pequena pode não ser exibido corretamente com alguns
sinais de entrada.
PORTGÊS - 11
OPERAÇÕES (continuação)
Menu Entrada
As seguintes funções tornam-se disponíveis quando se seleciona ENTRD
no menu. Selecione um item com os botões
e , e a operação.
AJUST
AUTO
RGB
VIDEO
HDTV
ENTRD
IMAGE
OPCAO
EXECUTAR
CANCELAR
Tabela 5. Menu Entrada
Item
AUTO
Descrição
Ativar/desativar a função: pressionar o botão
/ .
Ajuste automático da entrada RGB: selecionar EXECUTAR com o botão .
Posição horizontal (POSICAO HORI), posição vertical (POSICAO VERT),
fase do relógio (POSICAO HORI) e tamanho horizontal (FASE HORIZON)
são ajustados automaticamente. Use com a janela de exibição do aplicativo
no tamanho máximo.
• Esta operação exige aproximadamente dez segundos. Pode não funcionar
corretamente com alguns sinais de entrada. Nestes casos, o problema poderá ser
corrigido pressionando-se o botão AUTO.
• Esta função é idêntica à função AUTO de Operação básica.
RGB
Exibe a freqüência da entrada RGB: exibe a freqüência dos sinais de
sincronização horizontal e vertical para a entrada RGB.
• Válido somente na entrada RGB.
VIDEO
HDTV
Ativar/desativar a função: pressionar o botão
/ .
Seleção do tipo de sinal de vídeo: selecionar o tipo de sinal com os
botões
e
. Selecione NTSC, PAL SECAM, NTSC4.43, PAL M, ou PAL
N, conforme for apropriado para o sinal de entrada. A seleção de AUTO
habilita e executa a função AUTO (ajuste automático à entrada de vídeo),
com exceção da entrada N-PAL.
• Use esta função quando a imagem se tornar instável (por ex., se a imagem torna-se
irregular ou com falta de cor) à entrada VIDEO/S-VIDEO..
• AO ajuste automático leva aproximadamente dez segundos. Poderá não funcionar
corretamente com alguns sinais de entrada. Nesses casos, pressionar o botão AUTO
poderá corrigir o problema, com exceção da entrada N-PAL.
• Para a entrada COMPONENT VIDEO, esta função não tem efeito e o tipo de sinal é
detectado automaticamente.
Ativar/desativar a função: pressionar o botão
/ .
Selecionar o modo HDTV: selecionar o modo 1080i ou o modo 1035i
adequado para a entrada de sinal com o botão
/ .
• Quando o modo HDTV selecionado for incompatível com o sinal de
entrada, a imagem pode ser incorreta (p. ex. a exibição da posição ou da
cor são incorretas).
PORTGÊS - 12
OPERAÇÕES (continuação)
Menu Imagem
Os seguintes ajustes e configurações estão disponíveis quando se
seleciona IMAGE no menu. Selecione um item com os botões
e
inicie a operação.
AJUST
,e
ENTRD
IMAGE
OPCAO
SUPRESS.IMA
IMAG.ESPELH
INICIAR
GAMMA
COLOR TEMP
Tabela 6. Menu Imagem
Item
SUPRESS.
IMA
IMAG.
ESPELH
INICIAR
Descrição
Seleção da cor para supressão da imagem da tela:
selecionar a cor com os botões
e .
• A imagem ? clareada e a tela inteira ? exibida na cor selecionada, quando modo
EM BRANCO ? fixo com ESPA ? O EM BRANCO EM, ou quando h? nenhum
not?vel durante 5 atas.
Ativar/desativar a função: pressionar o botão
/ .
Seleção da condição do espelho:
selecionar a condição do espelho com os botões
e
.
Ativar/desativar a função: pressionar o botão
e .
Configurar a exibição da tela inicial: selecionar LIGAR com o botão .
Desativar a exibição da tela inicial: selecionar DESLIGAR com o botão .
• Note que, se DESLIGAR for selecionado, a tela será exibida em azul quando não
houver nenhum sinal.
GAMMA
Ativar/desativar a função: pressionar o botão
/ .
Selecionar modo Gama: Selecione a modo gama com o botão
COLOR
TEMP
Ativar/desativar a função: pressionar o botão
/ .
Selecionar Temperatura da Cor:
Selecione o modo de temperatura da cor com o botão
.
.
PORTGÊS
/
/
PORTGÊS - 13
OPERAÇÕES (continuação)
Menu Opções
AJUST
Os seguintes ajustes e configurações tornam-se disponíveis quando se
seleciona OPCAO no menu. Selecione um item com os botões
e ,e
inicie a operação.
ENTRD
IMAGE
OPCAO
16
VOLUME
COR DO MENU
IDIOMA
DESLIG.AUTO
SYNC ON G
SILENCIAME
Tabela 7. Menu Opções
Item
VOLUME
Descrição
Ajuste do volume: baixar VOLUME
↔ levantar VOLUME
COR DO MENU Seleção da cor de fundo do menu: selecionar com os botões
ou
e
.
IDIOMA
Ativar/desativar a função: pressionar o botão
Seleção do idioma de exibição do menu:
selecionar com os botões
e .
.
DESLIG. AUTO
Ativar/desativar a função: pressionar o botão
ou .
Ajustar desligamento automático: ajustar de 1 a 99 minutos com os
botões
e . O sistema entra automaticamente no modo de espera
quando não recebe sinal durante no período ajustado.
Desativar desligamento automático: selecionar CANCELAR (0 min)
com o botão . Quando se seleciona CANCELAR, o sistema não entra
no modo de espera ainda que não receba nenhum sinal.
Ativar/desativar a função: pressionar o botão
ou .
SYNC ON G válido: selecionar LIGAR com o botão .
SYNC ON G inválido: selecionar DESLIGAR com o botão
SYNC ON G
SILENCIAME
PORTGÊS - 14
.
• Pode não ser exibido corretamente com alguns sinais de entrada quando
SYNC ON G for válido. Nestes casos, remova o conector de sinal para que
nenhum sinal seja recebido, ajuste SYNC ON G para inválido e reconecte o
sinal.
Operação Iniciar/Parar: Pressione o botão
/ .
Definir/Apagar modo SILENCIAME: Pressione o botão / . Quando
se seleciona SILENCIAME, o modo SILENCIAME fica ativado. No
modo SILENCIAME, o nível de ruído acústico do aparelho se reduz, o
nível de brilho na tela é um pouco menor.
OPERAÇÕES (continuação)
Menu nenhum sinal
Os mesmos ajustes e configurações que estão disponíveis com os menus
IMAGE e OPCAO quando o botão MENU é pressionado durante a
exibição da mensagem “NENHUMA ENTRADA É DETECTADA EM
***” ou “SINCRONIZACAO FORA DE ALCANCE EM ***”, enquanto
nenhum sinal é recebido.
VOLUME
SUPRESS.IMA
IMAG.ESPELH
INICIAR
COR DO MENU
IDIOMA
DESLIG.AUTO
SYNC ON G
SILENCIAME
16
Tabela 8. Menu nenhum sinal
Item
Descrição
Ajuste do volume: Baixar VOLUME
VOLUME
SUPRESS.IMA
IMAG.ESPELH
INICIAR
↔ levantar VOLUME
• Quando se utiliza esta função, a entrada de áudio é comutada automaticamente para
vídeo. A entrada de áudio pode ser comutada movendo-se DISK PAD para a esquerda e
para direita durante a exibição da barra de ajuste de volume. A barra de ajuste de volume
é exibível pressionando-se o botão VOLUME
ou VOLUME
.
Seleção da cor para supressão da imagem da tela:
Selecionar a cor com os botões
e .
• A imagem ? clareada e a tela inteira ? exibida na cor selecionada, quando modo EM
BRANCO ? fixo com ESPA ? O EM BRANCO EM, ou quando h? nenhum not?vel durante
5 atas.
Ativar/desativar a função: Pressionar o botão
/ .
Seleção da condição do espelho:
Selecionar a condição do espelho com os botões
e
.
Ativar/desativar a função: Pressionar o botão
/ .
Configurar a exibição da tela inicial: Selecionar LIGAR com o botão .
Desativar a exibição da tela inicial: Selecionar DESLIGAR com o botão
.
• Note que, se DESLIGAR for selecionado, a tela será exibida em azul quando não houver
nenhum sinal.
e
.
IDIOMA
Ativar/desativar a função: Pressionar o botão
/ .
Seleção do idioma de exibição do menu: Selecionar com os botões
DESLIG.AUTO
Ativar/desativar a função: Pressionar o botão
/ .
Ajustar desligamento automático: Ajustar de 1 a 99 minutos com os botões
e . O sistema entra automaticamente no modo de espera quando não
recebe sinal durante no período ajustado.
Desativar desligamento automático: Selecionar CANCELAR (0 min) com o botão .
Quando se seleciona CANCELAR, o sistema não entra no modo de espera
ainda que não receba nenhum sinal.
SYNC ON G
Ativar/desativar a função: Pressionar o botão
/ .
SYNC ON G válido: Selecionar LIGAR com o botão .
SYNC ON G inválido: Selecionar DESLIGAR com o botão
e
.
.
• Pode não ser exibido corretamente com alguns sinais de entrada quando SYNC ON G for
válido. Nestes casos, remova o conector de sinal para que nenhum sinal seja recebido,
ajuste SYNC ON G para inválido e reconecte o sinal.
SILENCIAME
Operação Iniciar/Parar: Pressione o botão
/ .
Definir/Apagar modo SILENCIAME: Pressione o botão / . Quando se
seleciona SILENCIAME, o modo SILENCIAME fica ativado. No modo
SILENCIAME, o nível de ruído acústico do aparelho se reduz, o nível de brilho
na tela é um pouco menor.
PORTGÊS - 15
PORTGÊS
COR DO MENU Seleção da cor de fundo do menu: Selecionar com os botões
MANUTENÇÃO
Lâmpadas
CHOQUE ELÉTRICO
ALTA TEMPERATURA
CHOQUE MECÂNICO
Entre em contato com o revendedor do aparelho antes de substituir a lâmpada.
Veja lâmpada opcional no item Peças opcionais da tabela 12.
Antes de substituir a lâmpada, desligue a alimentação, remova o cabo de alimentação da tomada
elétrica e aguarde aproximadamente 45 minutos até que a lâmpada resfrie. A lâmpada pode
explodir se for manuseada a altas temperaturas.
ADVERTÊNCIA • Descarte lâmpadas usadas em
conformidade com as determinações das autoridade
locais.
• Como as lâmpadas são de vidro, elas não devem ser
arranhadas nem sujeitas a choques mecânicos.
• Não reutilize lâmpadas velhas, que podem explodir.
• Se for provável que a lâmpada tenha explodido (ouve-se
um som de explosão), desconecte o plugue de
alimentação da tomada elétrica e solicite a substituição da
lâmpada ao revendedor do aparelho. A lâmpada é
protegida por um vidro dianteiro, mas, em casos raros, o
refletor e o interior do projetor podem ser danificados por
estilhaços de vidro e partículas podem causar ferimentos
durante seu manuseio.
• Não use o projetor com a cobertura da lâmpada
removida.
lâmpada
Refletor
Vidro
dianteiro
Durabilidade da lâmpada
As lâmpadas de projeção têm duração limitada. A imagem ficará mais escura e os matizes ficarão
mais fracos depois que uma lâmpada for utilizada por um longo período de tempo.
Substitua a lâmpada se o indicador LAMP ficar vermelho, ou se a mensagem TROCAR A
LAMPADA aparecer ao se ligar o projetor. Veja a tabela 9, na pág. 19, e a tabela 10, na pág. 20.
NOTA • O indicador LAMP também ficará vermelho quando a unidade da lâmpada atingir
temperatura elevada. Antes de substituir a lâmpada, desligue o aparelho, aguarde aproximadamente
20 minutos e volte a ligar o aparelho. Se o indicador LAMP ainda estiver vermelho, substitua a
lâmpada.
PORTGÊS - 16
MANUTENÇÃO (continuação)
Substituição da lâmpada
1. Desligue o projetor, remova o cabo de alimentação da tomada
elétrica e aguarde pelo menos 45 minutos para que a unidade resfrie.
2. Providencie uma lâmpada nova.
3. Certifique-se de que o projetor tenha resfriado suficientemente e
coloque-o cuidadosamente em posição invertida.
4. Solte os dois parafusos, como mostra a ilustração, e retire a
cobertura da lâmpada.
5. Solte um parafuso e cuidadosamente remova a lâmpada, segurando
nos pegadores. Tocar no interior do invólucro da lâmpada pode dar
origem a uma coloração irregular.
6. Instale a lâmpada nova e aperte firmemente o parafuso de fixação da
lâmpada. Pressione firmemente também o lado oposto da lâmpada
enroscada para dentro da unidade.
7. Recoloque a cobertura da lâmpada no lugar e aperte os dois
parafusos firmemente.
8. Vire o projetor cuidadosamente, de modo que seu lado direito fique
voltado para cima.
PERECAUÇÃO • Certifique-se de que os parafusos
estejam apertados adequadamente. Se não estiverem
completamente apertados, os parafusos poderão causar
ferimentos ou acidentes.
• Não use o projetor com a cobertura da lâmpada
removida.
Rearme do temporizador da lâmpada
1. Ligue o aparelho (ON) e pressione o botão RESET por aproximadamente três segundos. A
mensagem "LAMP xxxx hr" aparecerá no temporizador da lâmpada, na parte inferior da tela.
2. Pressione o botão MENU no controle remoto, ou o botão RESET no painel de controle, enquanto
estiver em exibição o temporizador da lâmpada. Aparecerá então a mensagem ‘LAMP xxxx →
0 ■ CANCEL’.
3. Pressione
e selecione 0, e aguarde até que desapareça a exibição do temporizador.
NOTA • Não rearme o temporizador da lâmpada sem substituir a lâmpada. Rearme o
temporizador da lâmpada sempre que substituir a lâmpada. As funções de mensagem não terão um
desempenho correto se o temporizador da lâmpada não for rearmado corretamente.
PORTGÊS - 17
PORTGÊS
Rearme o temporizador da lâmpada depois de substituir a lâmpada. Quando a mensagem “TROCAR
A LAMPADA … O APARELHO SERA DESLIGADO DEPOIS DE 0 H.” tiver sido exibida,
execute a operação seguinte dentro de 10 minutos após ligar o aparelho. O aparelho sera desligado
automaticamente quando transcorrerem mais de dez minutos.
MANUTENÇÃO (continuação)
Manutenção do filtro de ar
O filtro de ar deve ser limpo como se descreve abaixo em intervalos de aproximadamente cem
horas.
1. Desligue a alimentação de energia do projetor e remova o cabo de alimentação da tomada elétrica.
2. Limpe o filtro de ar com um aspirador de pó.
PERECAUÇÃO • Desligue o aparelho e remova o cabo de alimentação da
tomada elétrica antes de iniciar o trabalho de manutenção. Leia atentamente o
folheto à parte “INSTRUÇÕES DE SEGURANÇA” para assegurar que a
manutenção seja executada de forma adequada.
• Substitua o filtro de ar se não puder remover as impurezas, ou se o filtro estiver
danificado. Entre em contato com o revendedor do aparelho. Veja filtro de ar
opcional no item Peças opcionais da tabela 12.
• Não use o equipamento com o filtro de ar removido.
• Se o filtro de ar ficar entupido com pó, etc., a alimentação de energia será
desligada automaticamente para evitar elevação da temperatura no interior do
projetor.
Outras observações sobre manutenção
Manutenção do interior do equipamento
Por razões de segurança, certifique-se de que o equipamento seja limpo e inspecionado pelo
revendedor uma vez a cada dois anos. Fazer a manutenção do equipamento por conta própria é
perigoso.
Limpeza da lente
Limpe cuidadosamente a lente com lenços de limpeza de lente. Não toque com as mãos na lente.
Limpeza do gabinete e do controle remoto
Esfregue suavemente com um pano macio. Se não for fácil remover sujeira, manchas, etc., use um
pano macio umedecido com água, ou água e um detergente neutro, e seque com um pano macio e
seco.
PERECAUÇÃO • Desligue o aparelho e remova o cabo de alimentação da
tomada elétrica antes de iniciar o trabalho de manutenção. Leia atentamente
o folheto à parte “INSTRUÇÕES DE SEGURANÇA” para assegurar que a
manutenção seja executada de forma adequada.
• Não utilize detergentes ou substâncias químicas cujo uso não tenha sido
recomendado acima (por exemplo, benzina ou dissolventes).
• Não use sprays de limpeza.
• Não esfregue o equipamento com materiais duros nem o perfure.
PORTGÊS - 18
RESOLUÇÃO DE PROBLEMAS
Mensagem de OSD
As mensagens descritas abaixo podem aparecer na tela quando se liga o aparelho. Tome as medidas
apropriadas quando as mensagens aparecerem.
Tabela 9. Mensagem de OSD
TROCAR A LAMPADA
APOS A TROCA DA LAMPADA,
REAJUSTE
O TIMER DA LAMPADA.
(*1)
Descrição
O tempo de uso da lâmpada vai atingir 2.000 horas em
breve. (*2)
Recomenda-se substitui-la logo. Prepare uma nova
lâmpada para a troca.
TROCAR A LAMPADA
APOS A TROCA DA LAMPADA,
REAJUSTE
O TIMER DA LAMPADA.
O APARELHO SERA DESLIGADO
DEPOIS DE ** H.
(*1)
O tempo de uso da lâmpada vai atingir 2.000 horas em
breve. Recomenda-se substituir a lâmpada por uma nova
dentro de ** horas. (*2)
É possível que a lâmpada se queime antes de ** horas. O
aparelho se desliga automaticamente em ** horas. Troque a
lâmpada como explicado na seção "Lâmpada", páginas 1718. Depois da troca, reinicie sempre o timer da lâmpada.
TROCAR A LAMPADA
APOS A TROCA DA LAMPADA,
REAJUSTE
O TIMER DA LAMPADA.
O APARELHO SERA DESLIGADO
DEPOIS DE 0 H.
O tempo de uso da lâmpada está para ser atingido. O
aparelho vai desligar em poucos minutos. (*2)
Desligue o aparelho imediatamente e substitua a lâmpada
como explicado na seção "Lâmpada", páginas 17-18.
Depois da troca, reinicie sempre o timer da lâmpada.
NENHUMA ENTRADA É
DETECTADA
EM ***
SINCRONIZACAO FORA DE
ALCANCE
EM ***
VERIFIQUE O FLUXO DE AR
Nenhum sinal de entrada detectado.
Verifique as conexões de sinal de entrada e fontes de sinal.
A freqüência horizontal ou vertical do sinal de entrada não
está dentro dos limites especificados.
Verifique as especificações do equipamento e a fonte de
sinal.
A temperatura interna aumentou.
Desligue o aparelho e aguarde 20 minutos até que o
equipamento resfrie.
Verifique os seguintes pontos e ligue o aparelho novamente.
• A entrada ou a exaustão de ar está bloqueada ?
• O filtro de ar está sujo ?
• A temperatura ambiente está acima de 35°C ?
NOTA (*1) Esta mensagem desaparece automaticamente depois de aproximadamente três
minutos e aparece toda vez que se liga o aparelho.
(*2) O aparelho possui uma função de desligamento que se ativa quando o tempo de uso atinge
2.000 horas. Entretanto, a vida útil de uma determinada lâmpada pode diferir da de outras, de forma
que pode ocorrer que ela se queime antes que esta função seja ativada.
PORTGÊS - 19
PORTGÊS
Mensagem
RESOLUÇÃO DE PROBLEMAS (continuação)
Mensagem dos indicadores
Os indicadores POWER, LAMP e TEMP iluminam-se e apagam-se como se descreve a seguir.
Tome as medidas apropriadas.
Tabela 10. Mensagem dos indicadores
Indicador Indicador Indicador
POWER
LAMP
TEMP
Descrição
Acende o
laranja
Apaga-se Apaga-se O modo de espera foi ativado.
Pisca o
verde
Apaga-se Apaga-se Em aquecimento. Por favor aguarde.
Acende o
verde
Apaga-se Apaga-se Aceso. É possível o funcionamento normal.
Pisca o
laranja
Apaga-se Apaga-se Resfriando-se. Por favor aguarde.
Pisca o
vermelho
-
-
Pisca/Ac
Acende o
ende o
Apaga-se
vermelho
vermelho
Resfriando-se. Por favor aguarde.
O erro é encontrado. Tome as medidas apropriadas quando o
indicador POWER pára de piscar.
A lâmpada não está iluminada.
O interior do equipamento pode estar muito aquecido. Desligue o
aparelho, aguarde 20 minutos até que o equipamento resfrie e
certifique-se de que a entrada ou saída de ar não esteja bloqueada,
de que o filtro de ar não esteja sujo, ou de que a temperatura
ambiente não exceda 35°C. E ligue o aparelho novamente. Substitua
a lâmpada se o mesmo problema voltar a acontecer.
Nenhuma lâmpada ou cobertura da lâmpada é detectada, ou sua
colocação não foi feita de maneira correta.
Pisca/Ac
Pisca o
Desligue o aparelho e aguarde 45 minutos até que o equipamento
ende o
Apaga-se resfrie. Verifique a colocação adequada da lâmpada e da cobertura
vermelho
vermelho
da lâmpada, e ligue o aparelho novamente. Contate o revendedor do
aparelho se o mesmo problema voltar a acontecer.
O ventilador de resfriamento não está funcionando.
Pisca/Ac
Desligue o aparelho e aguarde 20 minutos até que o equipamento
Pisca o
resfrie. Certifique-se da inexistência de objetos estranhos no ventilador
ende o
Apaga-se
vermelho e ligue o aparelho novamente. Contate o revendedor do aparelho se o
vermelho
Pisca/Ace
Acende o
nde o
Apaga-se
vermelho
vermelho
mesmo problema voltar a acontecer.
O interior do equipamento está muito aquecido. *2)
Desligue o aparelho e aguarde 20 minutos até que o equipamento
resfrie. Certifique-se de que a entrada ou saída de ar não esteja
bloqueada, de que o filtro de ar não esteja sujo, ou de que a
temperatura ambiente não exceda 35°C. Então ligue o aparelho
novamente. Contate o revendedor do aparelho se o mesmo problema
voltar a acontecer.
O interior do equipamento está frio demais.
Acende o
verde
Pisca em Pisca em Verifique se a temperatura ambiente está abaixo de 0°C.
vermelho vermelho Contate seu revendedor se o mesmo problema ocorrer quando a
temperatura ambiente estiver entre 0° e 35°C.
NOTA *2) Quando a temperatura interna se torna excessiva, o aparelho é desligado
automaticamente por razões de segurança e apaga-se o indicador. Coloque a chave liga-desliga em
[O] e aguarde 20 minutos até que o equipamento resfrie suficientemente.
PORTGÊS - 20
RESOLUÇÃO DE PROBLEMAS (continuação)
Situações
Os seguintes fenômenos freqüentemente parecem falhas.
Os fenômenos seguintes podem não ser falhas. Faça a averiguação de acordo com a tabela abaixo.
Tabela 11. Situações
O aparelho não
está ligado.
Não há vídeo
nem áudio.
Exemplos de situações
que não constituem falhas
A chave liga-desliga não
está ligada.
Ponto a verificar
Página
Ligue a chave liga-desliga.
Ligue o cabo de alimentação a
O cabo de alimentação está
uma tomada de corrente
desconectado.
alternada (AC).
A entrada não está
configurada corretamente.
Não há entrada de nenhum
sinal.
O projetor não está
conectado corretamente.
Use o projetor ou o controle
remoto para configurar.
Faça a conexão
adequadamente.
Faça a conexão
adequadamente.
9
6,7
6,7
Aparece o vídeo
no
O volume está em seu nível Pressione VOLUME
mas se ouve o
controle remoto ou exiba a tela
mínimo.
de menu e ajuste o volume.
áudio.
O silenciamento está
ativado.
O projetor não está
conectado corretamente.
As imagens
aparecem
escuras.
As imagens
estão
desfocadas.
.
10,14
10
Faça a conexão
adequadamente.
6,7
•Selecione BRILHO com o
botão MENU e pressione a
tecla .
11
A porta deslizante da lente
ainda está fechada.
Abra a porta deslizante da
lente.
8
A densidade e a
combinação das cores não
estão ajustadas
adequadamente.
Ajuste o vídeo.
11
O brilho e o contraste não
estão ajustados
adequadamente.
Ajuste o vídeo.
11
A lâmpada está chegando
ao fim de seu período de
duração.
Substitua a lâmpada por uma
nova.
16,17
•O foco ou a FASE H está
fora de ajuste.
Ajuste o foco ou a FASE H.
8,11
Vídeo presente O brilho está ajustado para o
mas sem vídeo. mínimo.
As cores estão
pálidas e a
combinação de
cores é precária.
Pressione o botão MUTE
7,8
PORTGÊS - 21
PORTGÊS
Fenômenos
ESPECIFICAÇÕES
Tabela 12 Especificações
Item
Especificação
Nome do produto
Painel de
cristal
líquido
Projetor de cristal líquido
Tamanho do painel
1,8 cm (tipo 0,7)
Sistema de acionamento
Matriz ativa TFT
Pixels
CP-S225W : 480.000 pixels (800 horizontais x 600 verticais)
CP-X275W : 786.432 pixels (1024 horizontais x 768 verticais)
Lente
Lente zoom F=2,0 ~ 2,3
Lâmpada
UHB de 150 W
Alto-falante
1,0 W
Alimentação
CA de 100 V ~ 120 V, 2,7 A / CA de 220 V ~ 240 V, 1,3 A
Consumo
240 W
Temperaturas-limite
0°C ~ 35°C (funcionamento)
Dimensões
289 (larg.) x 84 (alt.) x 215 (prof.) mm
Peso
CP-S225W : 2,4 kg
CP-X275W : 2,5 kg
Entrada de
sinal RGB
Vídeo: analógico 0,7 Vp-p, terminação (positiva) de 75 Ω
Sincronização H/V: nível TTL (positivo/negativo)
Sincronização de vídeo composto: nível TTL
Entrada contrátil D-sub de 15 pinos
RGB IN
200 mVrms, 47 kΩ (máx. de 3,0 Vp-p)
Minientrada estéreo
1,0 Vp-p, terminação de 75 Ω, Entrada de RCA
AUDIO IN
VIDEO
S-VIDEO
Entrada de
sinal de
vídeo
COMPONENT
VIDEO
AUDIO
Funções de
controle
CONTROL
Peças opcionais
f=18 ~ 21 mm
Y
CB/CR
PB/PR
L
R
Sinal de brilho: 1,0 Vp-p, terminação de 75 Ω
Sinal de cor:
0,286 Vp-p (NTSC,sinal de sincronização), terminação de 75 Ω
0,3 Vp-p (PAL/SECAM,sinal de sincronização), terminação de 75 Ω
Minientrada DIN de 4 pinos
1,0 Vp-p, terminação (positiva) de 75 Ω
0,7 Vp-p, terminação (positiva) de 75 Ω
0,7 Vp-p, terminação (positiva) de 75 Ω
200 mVrms, 47 kΩ (máx. de 3,0 Vp-p)
Entrada de RCA
Saída contrátil de D-sub de 15 pinos
Lâmpada: DT00401 (CP-S225W) / DT00461 (CP-X275W)
Filtro de ar: MU01461
* Consulte o revendedor de sua região sobre outros itens.
NOTA Estas especificações estão sujeitas a alterações sem notificação.
PORTGÊS - 22
GARANTIA E ASSISTÊNCIA TÉCNICA
PORTGÊS
Se algum problema ocorrer com o equipamento, primeiramente consulte a seção “RESOLUÇÃO
DE PROBLEMAS” P.20 e realize as averiguações recomendadas. Se o problema não for
solucionado, entre em contato com o revendedor do aparelho ou com o serviço de assistência
técnica. Dir-lhe-ão que condição da garantia é aplicada.
PORTGÊS - 23
TECHNICAL
215
Dimension Diagram
289
60
84
52.5
Unit : mm
74.5
Signal Connector Pin Assignment
1. D-sub 15-pin Shrink Connector (RGB IN)
Pin No
Signal
1
2
3
4
5
6
7
Video input Red
Video input Green
Video input Blue
Ground
Ground Red
Ground Green
8
Ground Blue
Pin No
9
10
11
12
13
14
15
Signal
Ground
SDA(DDC)
H. sync./ Composite sync.
Vertical sync
SCL(DDC)
# " !
' & % $
# " ! 2. Mini Din 4-pin Connector (S-VIDEO)
Signal
1
Color:0.286Vp-p (NTSC, burst signal),75Ω terminator
0.3Vp-p (PAL/SECAM, burst signal),75Ω terminator
2
Brightness:1.0Vp-p, 75Ω terminator
3
Ground
4
Ground
TECHNICAL
Pin No
TECHNICAL - 1
TECHNICAL (continued)
Example of computer signal
Resolution
H×V
fH (kHz)
fV (Hz)
Rating
720 × 400
37.9
85.0
VESA
640 × 480
31.5
59.9
VESA
640 × 480
35.0
66.7
640 × 480
37.9
72.8
VESA
640 × 480
37.5
75.0
VESA
640 × 480
43.3
85.0
800 × 600
35.2
56.3
800 × 600
37.9
800 × 600
48.1
800 × 600
Signal mode
Display mode
CP-S225W
CP-X275W
TEXT
Zoom in
Zoom in
VGA (60Hz)
Zoom in
Zoom in
Mac13"mode
Zoom in
Zoom in
VGA (72Hz)
Zoom in
Zoom in
VGA (75Hz)
Zoom in
Zoom in
VESA
VGA (85Hz)
Zoom in
Zoom in
VESA
SVGA (56Hz)
Zoom in
60.3
VESA
SVGA (60Hz)
Zoom in
72.2
VESA
SVGA (72Hz)
Zoom in
46.9
75.0
VESA
SVGA (75Hz)
Zoom in
800 × 600
53.7
85.1
VESA
SVGA (85Hz)
832 × 624
49.7
74.5
1024 × 768
48.4
60.0
1024 × 768
56.5
1024 × 768
60.0
1024 × 768
1152 × 864
Zoom in
Mac16"mode
Zoom out
VESA
XGA (60Hz)
Zoom out
Zoom in
70.1
VESA
XGA (70Hz)
Zoom out
75.0
VESA
XGA (75Hz)
Zoom out
68.7
85.0
VESA
XGA (85Hz)
Zoom out
67.5
75.0
VESA
SXGA (75Hz)
Zoom out
Zoom out
1280 × 960
60.0
60.0
VESA
SXGA (60Hz)
Zoom out
Zoom out
1280 × 1024
64.0
60.0
VESA
SXGA (60Hz)
Zoom out
Zoom out
NOTE • Some computers may have multiple display screen modes. Use of some of these modes
will not be possible with this projector.
• Be sure to check jack type, signal level, timing and resolution before connecting this projector to a
computer.
• Depending on the input signal, full-size display may not be possible in some cases. Refer to the
number of display pixels above.
• The image might be something wrong with computer by computer on the digital RGB mode. In
this case, it is recommended to reduce the resolution and / or reflesh rate.
TECHNICAL - 2
TECHNICAL (continued)
Initial set signals
The following signals are used for the initial settings.
The signal timing of some computer models may be different. In such case, refer to adjust the
V.POSIT and H.POSIT of the menu.
Back porch b
Front porch d
Display interval c
Back porch b
Front porch d
Display interval c
DATA
DATA
HSYNC
VSYNC
Sync a
Computer /
Signal
Sync a
Horizontal signal timing (µs)
TEXT
a
2.0
b
3.0
c
20.3
d
1.0
Computer /
Signal
Vertical signal timimg (lines)
TEXT
a
3
b
42
c
400
d
1
3.8
1.9
25.4
0.6
VGA (60Hz)
2
33
480
10
2.1
3.2
21.2
2.1
Mac 13"mode
3
39
480
3
VGA (72Hz)
1.3
3.8
20.3
1.0
VGA (72Hz)
3
28
480
9
VGA (75Hz)
2.0
3.8
20.3
0.5
VGA (75Hz)
3
16
480
1
VGA (85Hz)
1.6
2.2
17.8
1.6
VGA (85Hz)
3
25
480
1
SVGA (56Hz)
2.0
3.6
22.2
0.7
SVGA (56Hz)
2
22
600
1
SVGA (60Hz)
3.2
2.2
20.0
1.0
SVGA (60Hz)
4
23
600
1
SVGA (72Hz)
2.4
1.3
16.0
1.1
SVGA (72Hz)
6
23
600
37
SVGA (75Hz)
1.6
3.2
16.2
0.3
SVGA (75Hz)
3
21
600
1
SVGA (85Hz)
1.1
2.7
14.2
0.6
SVGA (85Hz)
3
27
600
1
Mac 16"mode
1.1
3.9
14.5
0.6
Mac 16"mode
3
39
624
1
XGA (60Hz)
2.1
2.5
15.8
0.4
XGA (60Hz)
6
29
768
3
XGA (70Hz)
1.8
1.9
13.7
0.3
XGA (70Hz)
6
29
768
3
XGA (75Hz)
1.2
2.2
13.0
0.2
XGA (75Hz)
3
28
768
1
XGA (85Hz)
1.0
2.2
10.8
0.5
XGA (85Hz)
3
36
768
1
1152×864 (75Hz)
1.2
2.4
10.7
0.6
1152×864 (75Hz)
3
32
864
1
1280×960 (60Hz)
1.0
2.9
11.9
0.9
1280×960 (60Hz)
3
36
960
1
1280×1024 (60Hz)
1.0
2.3
11.9
0.4
1280×1024 (60Hz)
3
38
1024
1
TECHNICAL
VGA (60Hz)
Mac 13"mode
TECHNICAL - 3
TECHNICAL (continued)
Connection to the Mouse Control
This function needs the optional "RMU Accessory kit".
If you need, ask your dealer.
For how to use the kit, please read the manual of the kit.
NOTE • Before connecting, read the instruction manuals of the devices to be connected.
• In the case of notebook type computers with an internal pointing device, the mouse control
function will not work unless the internal pointing device is disabled. In such case, disable the
internal pointing device and change the BIOS setting to select an external mouse.
Also, some computers may not have a utility program to operate a mouse.
Refer to the computer hardware manual for detail.
TECHNICAL - 4
TECHNICAL (continued)
RS-232C communication
(1) Turn off the projector and computer power supplies and connect with the RS-232C cable.
(2) Turn on the computer power supply and after the computer has started up, turn on the projector
power supply.
Projector
Control jack
D-sub 15-pin shrink jack
# " !
' & % $
# " ! Computer
1
2
3
4
5
SELO 6
RTS 7
8
9
GND 10
11
12
RD 13
TD 14
15
1
2
3
4
5
6
7
8
9
CD
RD
TD
DTR
GND
DSR
RTS
DTS
RI
RS-232C jack
D-sub 9-pin
2
1
6
3
7
4
8
5
9
Communications setting
19200bps, 8N1
1 Protocol
Consist of header (7 bytes) + command data (6 bytes).
2 Header
BE + EF + 03 + 06 + 00 + CRC_low + CRC_high
CRC_low : Lower byte of CRC flag for command data.
CRC_high : Upper byte of CRC flag for command data.
3 Command data
Command data chart
byte_0
byte_1
byte_2
Action
low
byte_3
byte_4
high
low
Type
high
low
byte_5
Setting code
high
Action (byte_0 - 1)
Classification
Content
1
SET
Change setting to desired value.
2
GET
Read projector internal setup value.
4
INCREMENT
Increment setup value by 1.
5
DECREMENT
Decrement setup value by 1.
6
EXECUTE
Run a command.
TECHNICAL - 5
TECHNICAL
Action
TECHNICAL (continued)
Requesting projector status (Get command)
(1) Send the request code Header + Command data (‘02H’+‘00H’+ type (2 bytes) +‘00H’+‘00H’)
from the computer to the projector.
(2) The projector returns the response code ‘1DH’+ data (2 bytes) to the computer.
Changing the projector settings (Set command)
(1) Send the setting code Header + Command data (‘01H’+‘00H’+ type (2 bytes) + setting code (2
bytes)) from the computer to the projector.
(2) The projector changes the setting based on the above setting code.
(3) The projector returns the response code ‘06H’ to the computer.
Using the projector default settings (Reset Command)
(1) The computer sends the default setting code Header + Command data (‘06H’+‘00H’+ type (2
bytes) +‘00H’+‘00H’) to the projector.
(2) The projector changes the specified setting to the default value.
(3) The projector returns the response code ‘06H’ to the computer.
Increasing the projector setting value (Increment command)
(1) The computer sends the increment code Header + Command data (‘04H’+‘00H’+ type (2 bytes)
+‘00H’+‘00H’) to the projector.
(2) The projector in creases the setting value on the above setting code.
(3) The projector returns the response code ‘06H’ to the computer.
Decreasing the projector setting value (Decrement command)
(1) The computer sends the decrement code Header + Command data (‘05H’+‘00H’+ type (2 bytes)
+‘00H’ + ‘00H’) to the projector.
(2) The projector decreases the setting value on the above setting code.
(3) The projector returns the response code ‘06H’ to the computer.
When a command sent by the projector cannot be understood by the computer
When the command sent by the projector cannot be understood, the error command ‘15H’ is
returned by the computer. Some times, the projector ignores RS-232C commands during other
works. If the error command ‘15H’ is returned, please send the same command again.
When data sent by the projector cannot be practice
When the command sent by the projector cannot be practiced, the the error code ‘1cH’ +‘xxxxH’ is
returned.
When the data length is greater than indicated by the data length code, the projector will ignore the
excess data code.
Conversely, when the data length is shorter than indicated by the data length code, an error code
will be returned to the projector.
NOTE • Operation cannot be guaranteed when the projector receives an undefined command or
data.
• Provide an interval of at least 40ms between the response code and any other code.
• The projector outputs test data when the power supply is switched ON, and when the lamp is lit.
Ignore this data.
• Commands are not accepted during warm-up.
TECHNICAL - 6
TECHNICAL (continued)
Command data chart
Blank Color
Operation type
Set
Type
Setting code
Red
BE EF
03
06 00
3B D3
01 00
00 30
00 00
Orange
BE EF
03
06 00
AB D2
01 00
00 30
01 00
Green
BE EF
03
06 00
5B D2
01 00
00 30
02 00
Blue
BE EF
03
06 00
CB D3
01 00
00 30
03 00
Purple
BE EF
03
06 00
FB D1
01 00
00 30
04 00
White
BE EF
03
06 00
6B D0
01 00
00 30
05 00
Black
BE EF
03
06 00
9B D0
01 00
00 30
06 00
BE EF
03
06 00
08 D3
02 00
00 30
00 00
Normal
BE EF
03
06 00
C7 D2
01 00
01 30
00 00
H Inverse
BE EF
03
06 00
57 D3
01 00
01 30
01 00
V lnverse
BE EF
03
06 00
A7 D3
01 00
01 30
02 00
H&V Inverse
BE EF
03
06 00
37 D2
01 00
01 30
03 00
BE EF
03
06 00
F4 D2
02 00
01 30
00 00
Normal
BE EF
03
06 00
83 D2
01 00
02 30
00 00
Freeze
BE EF
03
06 00
13 D3
01 00
02 30
01 00
BE EF
03
06 00
B0 D2
02 00
02 30
00 00
Red
BE EF
03
06 00
7F D3
01 00
03 30
00 00
Orange
BE EF
03
06 00
EF D2
01 00
03 30
01 00
Green
BE EF
03
06 00
1F D2
01 00
03 30
02 00
Blub
BE EF
03
06 00
8F D3
01 00
03 30
03 00
Purple
BE EF
03
06 00
BF D1
01 00
03 30
04 00
Transparent
BE EF
03
06 00
2F D0
01 00
03 30
05 00
Gray
BE EF
03
06 00
DF D0
01 00
03 30
06 00
Get
BE EF
03
06 00
4C D3
02 00
03 30
00 00
Turn ON
BE EF
03
06 00
0B D2
01 00
04 30
00 00
Turn OFF
BE EF
03
06 00
9B D3
01 00
04 30
01 00
Get
BE EF
03
06 00
38 D2
02 00
04 30
00 00
English
BE EF
03
06 00
F7 D3
01 00
05 30
00 00
Français
BE EF
03
06 00
67 D2
01 00
05 30
01 00
Deutsch
BE EF
03
06 00
97 D2
01 00
05 30
02 00
Español
BE EF
03
06 00
07 D3
01 00
05 30
03 00
Italiano
BE EF
03
06 00
37 D1
01 00
05 30
04 00
Norsk
BE EF
03
06 00
A7 D0
01 00
05 30
05 00
Nederlands
BE EF
03
06 00
57 D0
01 00
05 30
06 00
Português
BE EF
03
06 00
C7 D1
01 00
05 30
07 00
Japanese
BE EF
03
06 00
37 D4
01 00
05 30
08 00
Get
BE EF
03
06 00
C4 D3
02 00
05 30
00 00
Get
Mirror
Set
Get
Freeze
Set
Get
Menu Color
Startup
Language
Set
Set
Set
Command data
Header
CRC
Action
TECHNICAL - 7
TECHNICAL
Names
TECHNICAL (continued)
Command data chart
Names
Operation type
Command data
Header
Type
Setting code
Get
BE EF
03
06 00
7C D2
02 00
07 30
00 00
Increment
BE EF
03
06 00
1A D2
04 00
07 30
00 00
Decrement
BE EF
03
06 00
CB D3
05 00
07 30
00 00
Get
BE EF
03
06 00
08 86
02 00
10 31
00 00
Increment
BE EF
03
06 00
6E 86
04 00
10 31
00 00
Decrement
BE EF
03
06 00
BF 87
05 00
10 31
00 00
Brightness Reset
Execute
BE EF
03
06 00
58 D3
06 00
00 70
00 00
Contrast Reset
Execute
BE EF
03
06 00
A4 D2
06 00
01 70
00 00
V.Position Reset
Execute
BE EF
03
06 00
E0 D2
06 00
02 70
00 00
H.Position Reset
Execute
BE EF
03
06 00
IC D3
06 00
03 70
00 00
H.Size Reset
Execute
BE EF
03
06 00
68 D2
06 00
04 70
00 00
Color Balance R Reset
Execute
BE EF
03
06 00
94 D3
06 00
05 70
00 00
Color Balance B Reset
Execute
BE EF
03
06 00
D0 D3
06 00
06 70
00 00
Sharpness Reset
Execute
BE EF
03
06 00
C4 D0
06 00
09 70
00 00
Color Reset
Execute
BE EF
03
06 00
80 D0
06 00
0A 70
00 00
Tint Reset
Execute
BE EF
03
06 00
7C D1
06 00
0B 70
00 00
Keystone_V Reset
Execute
BE EF
03
06 00
08 D0
06 00
0C 70
00 00
Auto
Execute
BE EF
03
06 00
91 D0
06 00
0A 20
00 00
off
BE EF
03
06 00
FB D8
01 00
20 30
00 00
on
BE EF
03
06 00
6B D9
01 00
20 30
01 00
BE EF
03
06 00
C8 D8
02 00
20 30
00 00
BE EF
03
06 00
D9 D8
02 00
20 60
00 00
Magnify
Auto off
Blank on/off
Set
Get
Error Status
Get
(Example of Return)
00 00
01 00
(Normal) (Cover-error)
04 00
(reserved)
Power
Volume
TECHNICAL - 8
Action
02 00
(Fan-error)
03 00
(Lamp-error)
06 00
(Lamp-Time-over)
BE EF
BE EF
BE EF
03
03
03
06 00
06 00
06 00
2A D3
BA D2
19 D3
01 00
01 00
02 00
00 60
00 60
00 60
00 00
01 00
00 00
RGB1
BE EF
03
06 00
FE D2
01 00
00 20
00 00
Video
BE EF
03
06 00
6E D3
01 00
00 20
01 00
SVideo
BE EF
03
06 00
9E D3
01 00
00 20
02 00
Component
BE EF
03
06 00
AE D1
01 00
00 20
05 00
Get
BE EF
03
06 00
CD D2
02 00
00 20
00 00
Get
BE EF
03
06 00
31 D3
02 00
01 20
00 00
Increment
BE EF
03
06 00
57 D3
04 00
01 20
00 00
Decrement
BE EF
03
06 00
86 D2
05 00
01 20
00 00
Set
OFF
ON
Get
Input Source
05 00
(reserved)
CRC
Set
TECHNICAL (continued)
Command data chart
Operation type
Command data
Header
CRC
Mute
Set
Brightness
Contrast
Color
Balance R
Color
Balance B
Keystone_V
Aspect
Set
Type
Setting code
Normal
BE EF
03
06 00
46 D3
01 00
02 20
00 00
Mute
BE EF
03
06 00
D6 D2
01 00
02 20
01 00
Get
BE EF
03
06 00
75 D3
02 00
02 20
00 00
Get
BE EF
03
06 00
89 D2
02 00
03 20
00 00
Increment
BE EF
03
06 00
EF D2
04 00
03 20
00 00
Decrement
BE EF
03
06 00
3E D3
05 00
03 20
00 00
Get
BE EF
03
06 00
FD D3
02 00
04 20
00 00
Increment
BE EF
03
06 00
9B D3
04 00
04 20
00 00
Decrement
BE EF
03
06 00
4A D2
05 00
04 20
00 00
Get
BE EF
03
06 00
01 D2
02 00
05 20
00 00
Increment
BE EF
03
06 00
67 D2
04 00
05 20
00 00
Decrement
BE EF
03
06 00
B6 D3
05 00
05 20
00 00
Get
BE EF
03
06 00
45 D2
02 00
06 20
00 00
Increment
BE EF
03
06 00
23 D2
04 00
06 20
00 00
Decrement
BE EF
03
06 00
F2 D3
05 00
06 20
00 00
Get
BE EF
03
06 00
B9 D3
02 00
07 20
00 00
Increment
BE EF
03
06 00
DF D3
04 00
07 20
00 00
Decrement
BE EF
03
06 00
0E D2
05 00
07 20
00 00
4:3, Full
BE EF
03
06 00
9E D0
01 00
08 20
00 00
16:9
BE EF
03
06 00
0E D1
01 00
08 20
01 00
Small
BE EF
03
06 00
FE D1
01 00
08 20
02 00
BE EF
03
06 00
AD D0
02 00
08 20
00 00
Default
BE EF
03
06 00
62 D1
01 00
09 20
00 00
Bottom
BE EF
03
06 00
F2 D0
01 00
09 20
01 00
Top
BE EF
03
06 00
02 D0
01 00
09 20
02 00
Get
BE EF
03
06 00
51 D1
02 00
09 20
00 00
Get
BE EF
03
06 00
0D 83
02 00
00 21
00 00
Increment
BE EF
03
06 00
6B 83
04 00
00 21
00 00
Decrement
BE EF
03
06 00
BA 82
05 00
00 21
00 00
Get
BE EF
03
06 00
F1 82
02 00
01 21
00 00
Increment
BE EF
03
06 00
97 82
04 00
01 21
00 00
Decrement
BE EF
03
06 00
46 83
05 00
01 21
00 00
Get
BE EF
03
06 00
B5 82
02 00
02 21
00 00
Increment
BE EF
03
06 00
D3 82
04 00
02 21
00 00
Decrement
BE EF
03
06 00
02 83
05 00
02 21
00 00
Get
BE EF
03
06 00
49 83
02 00
03 21
00 00
Increment
BE EF
03
06 00
2F 83
04 00
03 21
00 00
Decrement
BE EF
03
06 00
FE 82
05 00
03 21
00 00
Get
BE EF
03
06 00
F1 72
02 00
01 22
00 00
Increment
BE EF
03
06 00
97 72
04 00
01 22
00 00
Decrement
BE EF
03
06 00
46 73
05 00
01 22
00 00
Get
Display
Position at
16 : 9 or Small
V.Position
H.Position
H.Size
H.Phase
Sharpness
Set
Action
TECHNICAL - 9
TECHNICAL
Names
TECHNICAL (continued)
Command data chart
Names
Operation type
Color
Tint
Type
Setting code
Get
BE EF
03
06 00
B5 72
02 00
02 22
00 00
Increment
BE EF
03
06 00
D3 72
04 00
02 22
00 00
Decrement
BE EF
03
06 00
02 73
05 00
02 22
00 00
Get
BE EF
03
06 00
49 73
02 00
03 22
00 00
Increment
BE EF
03
06 00
2F 73
04 00
03 22
00 00
Decrement
BE EF
03
06 00
FE 72
05 00
03 22
00 00
Set
Video Format
WHISPER
GAMMA
Action
Auto
BE EF
03
06 00
9E 75
01 00
00 22
0A 00
BE EF
03
06 00
FE 71
01 00
00 22
04 00
PAL
BE EF
03
06 00
6E 70
01 00
00 22
05 00
SECAM
BE EF
03
06 00
6E 75
01 00
00 22
09 00
NTSC 4.43
BE EF
03
06 00
5E 72
01 00
00 22
02 00
M-PAL
BE EF
03
06 00
FE 74
01 00
00 22
08 00
N-PAL
BE EF
03
06 00
0E 71
01 00
00 22
07 00
BE EF
03
06 00
0D 73
02 00
00 22
00 00
1080i
BE EF
03
06 00
F2 73
01 00
05 22
00 00
1035i
BE EF
03
06 00
62 72
01 00
05 22
01 00
BE EF
03
06 00
C1 73
02 00
05 22
00 00
off
BE EF
03
06 00
CB D0
01 00
08 30
01 00
on
BE EF
03
06 00
5B D1
01 00
08 30
00 00
Get
BE EF
03
06 00
68 D1
02 00
08 30
00 00
NORMAL
BE EF
03
06 00
3B 23
01 00
00 33
00 00
WHISPER
BE EF
03
06 00
AB 22
01 00
00 33
01 00
Get
BE EF
03
06 00
08 23
02 00
00 33
00 00
NORMAL
BE EF
03
06 00
C7 F0
01 00
A1 30
00 00
CINEMA
BE EF
03
06 00
57 F1
01 00
A1 30
01 00
DYNAMIC
BE EF
03
06 00
A7 F1
01 00
A1 30
02 00
Get
BE EF
03
06 00
F4 F0
02 00
A1 30
00 00
NORMAL
BE EF
03
06 00
FB F5
01 00
B0 30
00 00
LOW
BE EF
03
06 00
6B F4
01 00
B0 30
01 00
BE EF
03
06 00
C8 F5
02 00
B0 30
00 00
Set
Get
Sync on G
CRC
NTSC
Get
HDTV
Command data
Header
Set
Set
Set
Set
COLOR TEMP.
Get
TECHNICAL - 10
REGULATORY NOTICES
FCC Statement Warning
WARNING: This equipment has been tested and found to comply with the
limits for a Class B digital device, pursuant to Part 15 of the FCC Rules. These
limits are designed to provide reasonable protection against harmful
interference in a residential installation. This equipment generates, uses, and
can radiate radio frequency energy and, if not installed and used in accordance
with the instructions, may cause harmful interference to radio communications.
However, there is no guarantee that interference will not occur in a particular
installation. If this equipment does cause harmful interference to radio or
television reception, which can be determined by turning the equipment off and
on, the user is encouraged to try to correct the interference by one or more of
the following measures:
- Reorient or relocate the receiving antenna.
- Increase the separation between the equipment and receiver.
- Connect the equipment into an outlet on a circuit different from that to which
the receiver is connected.
- Consult the dealer or an experienced radio/TV technician for help.
INSTRUCTIONS TO USERS: This equipment complies with the requirements
of FCC (Federal Communication Commission) equipment provided that the
following conditions are met.
The cables may have to be used with the core set to the projector side. Use
the cables which are included with the projector or specified.
Core
CAUTION: Changes or modifications not expressly approved by the party
responsible for compliance could void the user’s authority to operate the
equipment.
For the Customers in CANADA
NOTICE: This Class B digital apparatus complies with Canadian ICES-003.
Pour les utilisateurs au Canada
AVIS: Cet appareil numérique de la Classe B est conforme à la norme NMB-003 du
Canada.
REGULATORY NOTICES - 1
Hitachi America, Ltd.
Hitachi France
Computer Division 2000 Sierra Point Parkway,
MS760 Brisbane, CA 94005-1835
Tel: +1-800-225-1741 Fax: +1-650-244-7776
www.hitachi.com/lcd.
Immeuble, 'Ariane', 18 Rue Grange Dame Rose,
B.P. 134, 78148 Velizy, Cedex, France
Tel: +33-1-34630542 Fax: +33-1-34650761
Hitachi Canada, Ltd.
Gran Via Carlos 111, 101, 1-1, 08028 Barcelona,
Spain
Tel: +34-3-330-8652 Fax: +34-3-339-7839
6740 Campobello Road, Mississauga, Ontario
L5N2L8, Canada
Tel: +1-905-821-4545 Fax: +1-905-821-1101
Hitachi Home Electronics (Europe), Ltd.
Dukes Meadow, Millboard Road, Bourne End ,
Buckinghamshire SL8 5XF UK
Tel: +44-162-864-3000 Fax: +44-162-864-3400
Hitachi Home Electronics Europe Ltd
426 Bergensesteenweg, 1500 Halle, Belgium
Tel: +32-2-363-9901 Fax: +34-2-363-9900
Hitachi Home Electronics Europe Ltd
Gewerbepark, Hintermattlistr, Postfach, 5506
Magenwil, Switzerland
Tel: +41-62-889-8011 Fax: +41-62-896-4771
Hitachi Europe GmbH
Business Systems Division
Via T. Gulli. 39, 20147 Milano, Italy
Tel: +39-2-487861 Fax: +39-2-48786322
Hitachi Sales Europe GmbH
Business Systems Division
Am Seestern 18, 40547 Dusseldorf, Germany
Tel: +49-211-529-1551 Fax: +49-211-529-1594
Hitachi Business Systems (Nordic)
Brugata 14, N-0184 Oslo, Norway
Tel: +47-2205-9060 Fax: +47-2205-9061
Hitachi Business Systems (Nordic)
Domnarvsgatan 29, Lunda, Box 62, S-163 91
Spanga, Sweden
Tel: +46-8-621-8260 Fax: +46-8-761-6250
Hitachi Business Systems (Nordic)
Kuldyssen 13, DK-2630 Tåstrup, Denmark
Tel: +45-43-99-9200 Fax: +45-43-99-9392
Hitachi Sales Iberica S A
Hitachi Home Electronics Asia, (S) Pte Ltd.
16 Collyer Quay #20-00 Hitachi Tower Singapore
049318, Singapore
Tel: +65-536-2520 Fax: +65-536-2521
Hitachi Sales (Malaysia) Sdn. Bhd.
Wisma Hitachi, No.2, Lorong 13/6A, 46200
Petaling
Jaya, Selangor Darul Ehsan, Malaysia
Tel: +60-3-7573455 Fax: +60-3-7556090
Hitachi Sales (Thailand), Ltd.
994,996 Soi Thonglor, Sukhumvit 55 Road,
Klongton,
Klongtoey, Bangkok 10110, Thailand
Tel: +66-2-381-8381 Fax: +66-2-381-9520
Hitachi (Hong Kong), Ltd.
8th Floor Park-in Commercial Centre, No.56,
Dundas
Street, Kowloon Bay, Kowloon, Hong Kong
Tel: +852-2-7804351 Fax: +852-2-7804915
Hitachi Sales Corp. of Taiwan.
2nd Floor, No.65, Nanking East Road, Section 3,
Taipei, Taiwan
Tel: +886-2-516-0500 Fax: +886-2-516-1501
Hitachi Australia Ltd.
13-15 Lyonpark Road, North Ryde NSW 2113,
Australia
Tel: +61-2-9888-4100 Fax: +61-2-9888-4144
Hitachi, Ltd.
15-12, Nishi Simbashi 2-chome, Minato-ku, Tokyo,
105 Japan
Tel: +81-3-3502-2111 Fax: +81-3-3506-1440
Hitachi Business Systems (Nordic)
Tapiolan Keskustorni 11 Krs. Fin-02100 Espoo,
Finland
Tel: +358-9-3487-1188 Fax: +358-9-455-2152
*QR51381*
Printed in Japan