1
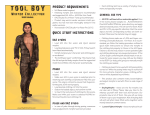
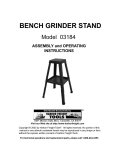
Metal Punch Kit
91201
Safety Precautions and Instructions
®
TO PREVENT SERIOUS INJURY,
READ AND UNDERSTAND ALL WARNINGS AND INSTRUCTIONS BEFORE USE.
3491 Mission Oaks Blvd./Camarillo, CA 93011
Copyright© 2004 by Harbor Freight Tools®. All rights reserved. No portion
of this instruction sheet or any artwork contained herein may be reproduced in any
shape or form without the express written consent of Harbor Freight Tools.
For technical questions, please call 1-800-444-3353.
1.
2.
3.
This kit has sharp edges that can cut and injure you.
• Keep fingers away from the blade, especially during use.
•
Keep this kit away from children.
•
Do not hold the workpiece while using this kit on it. The blade may suddenly break through
causing personal injury.
Flying pieces, debris, smoke, or dust caused during use can injure you.
• Always wear ANSI approved safety goggles, full face shield, and dust mask/respirator
during use. If this set is used on fiberglass or similar materials, additional protective
equipment (such as a disposable painter’s jumpsuit) should also be used.
• Use this kit only on the following recommended materials:
Mild Steel-10 gauge thick or less
Fiberglass-less than .08” (about 5/64”) thick
Aluminum-15 gauge thick or less
Plastic-less than .08” (about 5/64”) thick
Use on other materials may result in chipping, breakage, personal injury, and damage
to this kit, the workpiece, and/or the tool that this kit is used with. Do not attempt to force this
kit to do the cutting work of a larger one. There are certain applications for which this kit was
designed. Do not modify this kit and do not use this kit for a purpose for which it was not intended.
Pieces of the tool can break off and cause injury to the eyes, injury to the face, or other injury.
• Before every use, check for any broken parts or mounting fixtures, and any other condition that may
affect proper operation. Any part that appears damaged should be carefully checked to determine that
it will operate properly and perform its intended function.
• Do not use if any blade is worn, cracked, or chipped.
• Keep this set clean and in a dry location to prevent rust, prolong the life of the tool, and help prevent
breakage.
4.
Replacement parts and accessories. When servicing, use only identical replacement parts. Use of any other
parts is dangerous and will void the warranty. Only use accessories intended for use with this kit.
5.
Do not use this kit if under the influence of alcohol or drugs. Read warning labels if taking prescription
medicine to determine if your judgment or reflexes are impaired while taking drugs. If there is any doubt, do not
use this tool.
6.
Stay alert. Watch what you are doing, use common sense. Do not use this kit if you are tired.
7.
Read and adhere to all safety warnings and precautions in the manual for any tool used with this Kit.
SAVE THIS INSTRUCTION SHEET.
(Operation Instructions on Back.)
The warnings, cautions, and instructions discussed in this instruction sheet cannot cover all
possible conditions and situations that may occur. It must be understood by the operator that common
sense and caution are factors which cannot be built into this set, but must be supplied by the operator.
Operation Instructions
1.
Using a drill, drill a pilot hole through the center of the
location that you want the larger hole to be. Note:
Pilot hole should be 1/2” diameter for Part Number
(1) bolt and 3/4” diameter for Part Number (2) bolt.
2.
Place the 1/2” Die (4) over the Small Drive Bolt (1),
with the flat side against the bearing. Insert the Small
Drive Bolt through the hole.
Risk of electric shock or death.
Before drilling pilot holes or using this kit,
ensure that the area of the material the kit is
used on is free from any wires, cables, and utility lines.
The punches are very sharp. Always keep
hands and fingers away from the blades.
Figure A
3.
On some materials it may be helpful to apply light oil
to the Punch to help it move freely. If this is done
caution must be exercised to avoid being cut by the
blade.
(Using Large
Hardware)
Die
Punch
Large
Drive
Bolt (2)
4.
Thread the 1/2” Punch (3) onto the Bolt on the other
side of the material, with the blade side facing the
material to be cut. Finger-tighten until the Punch is
snug against the material -positioning is similar to
Figure A, right, except with the smaller hardware.
5.
Use a wrench, ratchet, or drill (not included) to
turn the Drive Bolt, driving the Punch into the material
-similar to Figure A. Use caution so that, once the Punch breaks through, the tool doesn’t slip and injure you.
6.
Carefully unthread the Punch to remove the material. If a larger hole is desired, after the hole is opened up using
the smaller Punch and Die, the above steps can be repeated using the Large Drive Screw (2) with a larger Punch
and Die pair to get the desired size.
7.
After use, clean the Punch, Die, and Bolt by oiling them lightly and carefully wiping them with a dry cloth. Store
them in the case in a dry, cool area, out of children’s reach.
Parts List
PLEASE READ THE FOLLOWING CAREFULLY
Par t
Description
Par t
1
Small Drive Bolt
6
3/ "
4
2
Large Drive Bolt
7
1" Punch
3
1/
2"
Punch
8
1" Die
4
1/
2"
Die
9
1-1/4" Punch
5
3/
Punch
10 1-1/4" Die
3
4"
5
7
Description
THE MANUFACTURER AND/OR DISTRIBUTOR HAS
PROVIDED THE PARTS DIAGRAM IN THIS MANUAL AS A
REFERENCE TOOL ONLY.
NEITHER THE
MANUFACTURER NOR DISTRIBUTOR MAKES ANY
REPRESENTATION OR WARRANTY OF ANY KIND TO THE
BUYER THAT HE OR SHE IS QUALIFIED TO MAKE ANY
REPAIRS TO THE PRODUCT OR THAT HE OR SHE IS
QUALIFIED TO REPLACE ANY PARTS OF THE PRODUCT.
IN FACT, THE MANUFACTURER AND/OR DISTRIBUTOR
EXPRESSLY STATES THAT ALL REPAIRS AND PARTS
REPLACEMENTS SHOULD BE UNDERTAKEN BY
CERTIFIED AND LICENSED TECHNICIANS AND NOT BY
THE BUYER. THE BUYER ASSUMES ALL RISK AND
LIABILITY ARISING OUT OF HIS OR HER REPAIRS TO
THE ORIGINAL PRODUCT OR REPLACEMENT PARTS
THERETO, OR ARISING OUT OF HIS OR HER
INSTALLATION OF REPLACEMENT PARTS THERETO.
Die
9
2
1
4
6
8
10
NOTE: Some parts are listed and shown for
illustration purposes only and are not available
individually as replacement parts.
REV 09/06
ITEM 91201