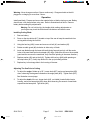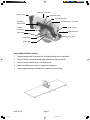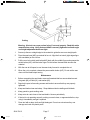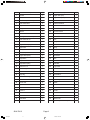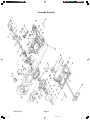
1
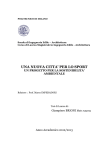
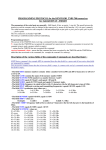
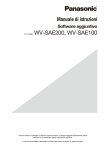
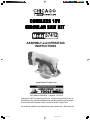
CORDLESS 18V
CIRCULAR SAW KIT
37412
ASSEMBLY and OPERATING
INSTRUCTIONS
www.HarborFreight.com
3491 Mission Oaks Blvd., Camarillo, CA 93011
Copyright © 1997 by Harbor Freight Tools. All rights reserved. No portion of
this manual or any artwork contained herein may be reproduced in any shape
or form without the express written consent of Harbor Freight Tools.
For technical questions and replacement parts, please call 1-800-444-3353
37412.p65
1
10/7/03, 11:55 AM
Specifications
ITEM
Motor
DESCRIPTION
3000 RPM, 200 watts
5-3/8 inches; hex key included for blade
removal
At 90° 1-1/2 inches; at 45° 1-1/4 inches
Cutting Depths and
Angle settings: 0 to 50° in 10° degree
Angles
increments; spindle: 3/8 inch
18 volts, 1.3 amps; one hour, 500 MA quick
Battery
charger with adapter. Note: As battery is
recharged many times it will maximize strength
Blade Diameter
Switch
Off, On, and safety lock
Weight
7.5 Lbs.
Save This Manual
You will need the manual for the safety warnings and precautions, assembly instructions,
operating and maintenance procedures, parts list and diagram. Keep your invoice with this
manual. Write the invoice number on the inside of the front cover. Keep the manual and
invoice in a safe and dry place for future reference.
Safety Warnings and Precautions
WARNING: When using tool, basic safety precautions should always be followed to reduce
the risk of personal injury and damage to equipment.
Read all instructions before using this tool!
1.
Keep work area clean. Cluttered areas invite injuries.
2.
Observe work area conditions. Do not use machines or power tools in damp or wet
locations. Don’t expose to rain. Keep work area well lighted. Do not use electrically
powered tools in the presence of flammable gases or liquids.
3.
Keep children away. Children must never be allowed in the work area. Do not let
them handle machines, tools, or extensions cords.
4.
Store idle equipment. When not in use, tools must be stored in a dry location to
inhibit rust. Always lock up tools and keep out of reach of children.
5.
Do not force tool. It will do the job better and more safely at the rate for which it was
intended. Do not use inappropriate attachments in an attempt to exceed the tool
capacity.
6.
Use the right tool for the job. Do not attempt to force a small tool or attachment to
do the work of a larger industrial tool. Do not use a tool for a purpose for which it was
not intended.
7.
Disconnect power. Unplug charger when not in use.
SKU 37412
37412.p65
Page 2
2
10/7/03, 11:56 AM
8.
Dress properly. Do not wear loose clothing or jewelry as they can be caught in
moving parts. Protective, electrically nonconductive clothes and nonskid footwear are
recommended when working. Wear restrictive hair covering to contain long hair.
9.
Use eye and ear protection. Always wear ANSI approved impact safety goggles.
Wear a full face shield if you are producing metal filings or wood chips. Wear an ANSI
approved dust mask or respirator when working around metal, wood, and chemical
dusts and mists.
10. Do not overreach. Keep proper footing and balance at all times. Do not reach over or
across running machines.
11. Maintain tools with care. Keep tools sharp and clean for better and safer
performance. Follow instructions for lubricating and changing accessories. Inspect tool
cords periodically and, if damaged, have them repaired by an authorized technician.
The handles must be kept clean, dry, and free from oil and grease at all times.
12. Remove adjusting keys and wrenches. Check that keys and adjusting wrenches
are removed from the tool or machine work surface before plugging it in.
13. Avoid unintentional starting. Be sure the switch is in the Off position when not in
use and before plugging in. Do not carry any tool with your finger on the trigger,
whether it is plugged in or not.
14. Stay alert. Watch what you are doing, use common sense. Do not operate any tool
when you are tired.
15. Check for damaged parts. Before using any tool, any part that appears damaged
should be carefully checked to determine that it will operate properly and perform its
intended function. Check for alignment and binding of moving parts; any broken parts
or mounting fixtures; and any other condition that may affect proper operation. Any
part that is damaged should be properly repaired or replaced by a qualified technician.
Do not use the tool if any switch does not turn On and Off properly.
16. Replacement parts and accessories. When servicing, use only identical
replacement parts. Use of any other parts will void the warranty. Only use accessories
intended for use with this tool. Approved accessories are available from Harbor Freight
Tools.
17. Do not operate tool if under the influence of alcohol or drugs. Read warning
labels on prescriptions to determine if your judgment or reflexes are impaired while
taking drugs. If there is any doubt, do not operate the tool.
18. Secure work. Use clamps or a vise to hold work. Do not use hands to secure.
19. Never touch moving parts. Never place your hands, fingers or other body parts near
the tool’s moving parts.
20. Never operate without all guards in place. Do not disable blade guard when cutting.
21. Guard against kickback. Kickback occurs when the saw stalls and is driven
backwards toward the operator. When this happens, release switch immediately.
SKU 37412
37412.p65
Page 3
3
10/7/03, 11:56 AM
Note: Always switch to a fresh battery when tool performance begins to diminish. Severe heat is most destructive to
a battery; the more heat generated, the faster the battery loses power. A battery that gets too hot can be permanently
damaged. Never over-discharge a battery by using the tool even after tool performance is decreasing. Never attempt to
discharge a tool’s battery by continuing to pull the tool trigger. When tool performance begins to diminish, stop the tool,
re-charge the battery and use the fresh battery for optimal performance.
Battery Precautions
1.
Read all instructions and warnings on the battery before charging the battery.
2.
To avoid accidents, charge the supplied battery only. Do not use a different charger with this battery.
3.
Do not expose the battery to rain or wet conditions.
4.
To avoid damage of cable and plug, never pull the cable to disconnect the charger.
5.
Do not use the charger if the cable or plug are damaged.
6.
Repairs should be carried out by experts only.
7.
Do not touch the battery poles with any conductive source.
8.
Do not store the battery in a box with other metal objects.
9.
Ni-Cd Battery must be recycled or disposed of properly. Do not throw the battery in a fire.
Unpacking
When unpacking, check to make sure the following parts are included. If any parts are missing or broken,
please call Harbor Freight Tools at the number on the cover of this manual. If any part of the machine is
missing or broken, please call Harbor Freight Tools at the number on the front cover as soon as possible.
Note: Cutting blade and rip fence sold separately.
Charging Battery
The Battery does not come charged from the factory. Charge before using. Part numbers below refer to Parts
List on page 8. Charging room temperature: 500 F - 1040 F.
1. Insert the Battery (#14) into the black Charger Base. The Battery will only insert one way.
2. Plug the Charger Base into a wall socket. Note: The Charger Base has an ON red light, an OFF green light,
and a SET button.
3. When the Charger Base is plugged into a wall socket, the GREEN light will go on. This shows that all
circuitry is working properly and the Charger Base is ready to charge.
4. Press the SET button to start the charge. The red light will go on and will continue to be on while the Battery
is charging. The Battery will charge in approximately 1-1/2 hours. When the RED light goes off, the Battery
charge is complete.
5. After charging, unplug the Charger Base from the wall socket.
6. Remove the Battery from the Charger Base and insert the Battery into the base of the tool.
Note: The operation time of a new battery will ramp up as it is properly used and recharged. It will take
about 5 cycles before the battery is at maximum efficiency.
Warning: If two or more batteries are to be charged, allow the Charging Base time to cool down between
charges.
SKU 37412
37412.p65
Page 4
4
Rev 09/98
10/7/03, 11:56 AM
REV 10/03
Warning: Never charge more than 2 hours continuously. Chargers should not be left
plugged in or charging for more than 2 hours.
Operation
Install saw blade. Prepare and secure the material to be cut before turning on saw. Battery
should have a full charge before using saw. Refer to illustrations that follow. Remove
battery before making any adjustments.
Warning: Do not hold tool by the handle while making adjustments as
your fingers may touch the Switch and Safe buttons and start the saw.
Installing Cutting Blade
1.
Remove battery.
2.
Press on the stop button (#17) located on top of the saw to keep the saw blade from
moving while turning the nut bolt.
3.
Using the hex key (#48), loosen and remove nut bolt (#1) and washer (#2).
4.
Rotate movable guard (#8) clockwise to allow entry of blade.
5.
Insert saw blade through the base with teeth facing forward (and up) until the center
holes of the saw blade and motor adapter (#5) align. (Notice the arrow on the movable
guard and the arrow on the saw blade, they should be pointing in the same direction.)
6.
Replace washer (#2) and nut bolt (#1). Tighten with hex key (#48) while pressing on
the stop button (#17). Verify stop button is in the up (unlocked) position.
7.
Replace key to its storage hole in the housing of the saw.
Adjusting The Saw Prior to Cutting
1.
To adjust the angle of blade up to 50°, loosen knob (#57) and move base plate (#50)
down, observing the degrees indicated on the angle plate (#53). Tighten knob (#57).
See illustration on next page.
2.
To adjust the depth of the cut, loosen knob (#43, not visible) located behind motor
housing, and move base plate (#50) down while observing the amount of saw blade
exposed under base plate. Tight knob (#43).
SKU 37412
37412.p65
Page 5
5
Rev 09/98
10/7/03, 11:56 AM
REV 05/02
Knob (#43, not visible)
Battery (#14)
Safe Button (#45)
Switch Button (#47)
Guard (#9)
Exhaust Hole
Stop Button (#17, not visible)
Hex Key (#48)
Movable
Guard (#8)
Angle Plate (#53)
Base (#50)
Knob (#57)
Nut Bold (#1)
Washer (#2)
Prepare Material Before Cutting
1.
Support large panels to minimize risk of blade pinching and saw kickback.
2.
Use a rip fence or secured straight edge guide when ripping material.
3.
Securely clamp material to be cut to work bench.
4.
Make sure saw does not cut into supports or workbench.
5.
Use the appropriate type of blade for the material you are cutting.
SKU 37412
37412.p65
Page 6
6
10/7/03, 11:56 AM
Cutting
Warning: this tool can cause serious injury if not used properly. Read this entire
manual before using. Verify that saw blade is securely tightened and both angle
and height adjustment knobs are tight.
1.
Secure rip fence or straight edge to the material to guide the saw on a straight path.
2.
Place the saw base (#50) on material to be cut. Align the front notch (right edge aligns
with saw blade) on the cut line.
3.
Pull the rear lock switch (safe button #45) back with the middle finger and squeeze the
switch button (#47) with the index finger. Do this before the saw blade touches the
material.
4.
With the saw at full speed, move the saw slowly forward to complete the cut.
5.
When the cut in complete, release the power switch button (#47). Do not set the saw
down until the blade stops turning.
Maintenance
1.
Before remounting the saw blade, remove all sawdust that has accumulated around
the guard (#9), nut bolt (#1), and washer (#2).
2.
Regularly inspect all mounting screws and knobs to ensure that they are properly
tightened.
3.
Keep saw blades clean and sharp. Sharp blades minimize stalling and kickback.
4.
Keep guards in good working order.
5.
Keep motor air vent clean of dust and debris. Vacuum periodically.
6.
If the tool is not operating normally, making unusual noises, or appears defective, stop
using it immediately and get it repaired.
7.
Clean tool with a damp cloth and light detergent. Do not use solvents as they can
damage and crack the plastic parts.
SKU 37412
37412.p65
Page 7
7
10/7/03, 11:56 AM
Item #
Description
Item #
Description
Qty
1
Nut Bolt
1
34
Copper Wire (red)
1
2
Washer
1
35
Copper Wire (black)
1
3
Saw Blade (not included)
1
36
Left Case
1
4
Stud Screw M3*8
3
37
Stud Screw M4*50
4
5
Adapter
1
38
Motor Base
1
6
Flange
1
39
Screw ST2.9*25
2
7
Washer
1
40
Screw ST2.9*20
3
8
Movable Guard
1
41
Back Case
1
9
Guard (protection cover)
1
42
Screw ST2.9*12
2
10
Stud Screw M4*10
1
43
Knob
1
11
Collar
1
44
Spring
1
12
Torgue Force Spring
1
45
Safe Button
1
13
Right Case
1
46
Spring
1
14
Battery TYD-B114
1
47
Switch Button
1
15
Battery Clip
1
48
Hex Key 1/8 inch
1
16
Copper Wire (blue)
1
49
Bolt M6*80
1
17
Stop Button
1
50
Base
1
18
Stop Button Pillar
1
51
Rivel 5
1
19
Stop Button Spring
1
52
Guide Bar
1
20
Switch kw-v15
1
53
Angle Plate
1
21
Ball Bearing 180100
1
54
Rivel 5
1
22
Gearbox Case
1
55
Screw M4*8
2
23
Stop Dag
1
56
Screw M6*12
1
24
Gear and Bearing Box
1
57
Knob
1
25
Main Shaft and Planet Wheel Axle
1
58
Connecting Bar
1
26
Planet Gear
3
59
Needle
1
27
Spacer
1
60
Screw M3*5
1
28
Stud Screw M4*8
2
61
Axle
1
29
Spacer 4
2
62
Nut M5
1
30
Gear Box
1
63
Screw M4*10
1
31
Stud Screw M4*8
2
64
Nut M4
1
32
Motor Gear
1
65
Rubber Post
1
33
Motor
1
66
Rip Fence (not included)
1
SKU 37412
37412.p65
Qty
Page 8
8
10/7/03, 11:56 AM
Assembly Drawing
SKU 37412
37412.p65
Page 9
9
10/7/03, 11:56 AM