1
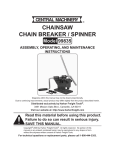
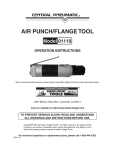
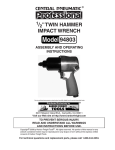
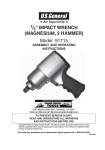
Specifications
Torque Range
20-200 in-lb
Drive
1/4"
Length
11"
Accuracy
±4%
Important Safety Information
WARNING Read all safety warnings and instructions.
Failure to follow the warnings and instructions may result in injury.
Save all warnings and instructions for future reference.
1. The warnings, cautions, and instructions
discussed in this instruction manual cannot
cover all possible conditions and situations
that may occur. It must be understood by the
operator that common sense and caution
are factors which cannot be built into this
product, but must be supplied by the operator.
4. Use as intended only. Do not use as
hammer or pry bar. Do not use handle
extension to increase force. Do not drop.
2. Wear ANSI-approved safety goggles and
heavy-duty work gloves during use.
7. For your safety, service, calibration,
and maintenance should be performed
regularly by a qualified technician.
3. Use only within rated torque range.
Do not use for loosening.
5. Inspect before every use; do not use
if damaged or if parts are loose.
6. Keep away from children.
8. Use only sockets with the correct
drive and rated to at least the
torque that will be applied to it.
Operating Instructions
Knurled Handle
Drive Anvil
Torque Settings
2. Clean and/or repair the threads that will be
tightened. Damaged or dirty threads will
result in a misleading torque reading.
3. Select the desired socket and verify it fits
properly on the nut or bolt being tightened.
Lock
Knob
1. Wear ANSI-approved safety goggles
and heavy-duty work gloves.
Page 2
For technical questions, please call 1-888-866-5797.
Item 61277
80
70
60
50
76543
4. Press the socket firmly onto the drive anvil.
(B)
The 50 line is shown in grey because
it will likely be hidden at this point.
b. Continue turning the knurled handle about
a half turn clockwise until the “5” graduation
mark lines up with the centerline. It is now
set for 55. See illustration (B), above.
5. Turn the Lock Knob at bottom of the
Handle counterclockwise until it stops.
6. Turn the handle to set the torque.
To set to 55, for example:
80
70
60
50
21098
7. Retighten the Lock Knob by turning
it all the way clockwise.
Direction
Switch
(A)
a. Turn the knurled handle (CW or CCW) until
the “0” graduation on the bevel edge lines
up with 50. See illustration (A), above.
8. Set the Direction Switch for clockwise
or counterclockwise operation.
The Switch shown above is in
position for clockwise operation.
9. Place socket onto the nut or bolt and pull
the handle gradually in the desired direction
until a click is heard or felt. Do not pull
beyond that point; the click indicates that
the torque setting has been reached.
10. Stop pulling and the Torque Wrench
will automatically reset.
11. When finished, loosen the lock knob and set
the Torque to the lowest torque setting (not
lower than the lowest setting) before storing
inside case indoors out of reach of children.
Item 61277
For technical questions, please call 1-888-866-5797.
Page 3
Maintenance and Servicing
Procedures not specifically explained in this manual
must be performed only by a qualified technician.
TO PREVENT INJURY FROM TOOL FAILURE:
Do not use damaged equipment. If abnormal noise or vibration occurs,
have the problem corrected before further use.
1. BEFORE EACH USE, inspect the general
condition of the tool. Check for loose
hardware, misalignment or binding of moving
parts, cracked or broken parts, and any other
condition that may affect its safe operation.
2. If the Torque Wrench has not been used
for some time, turn the knurled handle
(clockwise and counterclockwise) several
times to re-lubricate the internal workings.
Then, operate at a low torque setting
several times. This ensures proper operation.
Do not turn knurled handle below
the lowest torque setting.
3. Wipe Torque Wrench with a cloth to clean.
Do not immerse in any cleaning solution.
This would damage the internal lubrication.
4. Every 6 months, have the Wrench calibrated
and serviced by a qualified technician.
Note: Replacement parts are not
available for this item.
3491 Mission Oaks Blvd. • PO Box 6009 • Camarillo, CA 93011 • 1-888-866-5797