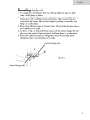
1
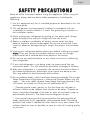
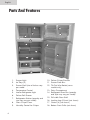
Top Mount No Frost Refrigerators
Réfrigérateur á Congélateur Anti Givre
Refrigeradores con Congelador Superior
sin Escarcha
(Features and Size May Vary per Model)
(Les caractéristiques et la taille Peuvent Varier par le Modèle)
(Las características y el tamaño Pueden Variar por el Modelo)
User
Manual
U
Model # Series PRTS, RRTG, RRTW, HTA, HRTS
Guide de l’Utilisateur
Modéle # Series PRTS, RRTG, RRTW, HTA, HRTS
Manual del Usuario
Para Modelo de # Series PRTS, RRTG, RRTW, HTA, HRTS
Quality • Innovation • Style
English
English
SAFETY PRECAUTIONS
Read all of the instructions before using this appliance. When using this
appliance, always exercise basic safety precautions, including the
following:
1) Use this appliance only for its intended purpose as described in this use
and care guide.
2) This refrigerator must be properly installed in accordance with the
installation instructions before it is used. See grounding instructions in
the installation section.
3) Never unplug your refrigerator by pulling on the power cord. Always
grasp the plug firmly and pull straight out from the outlet.
4) Repair or replace immediately, all electric service cords that have
become frayed or otherwise damaged. Do not use a cord that shows
cracks or abrasion damage along its length, the plug or the connector
end.
5) Unplug your refrigerator before cleaning or before making any repairs.
N o t e : If for any reason this product requires service, we strongly
recommend that a certified technician performs the service.
6) Do not use any electrical device or any sharp instrument in defrosting
your refrigerator.
7) If your old refrigerator is not being used, we recommend that you
remove the doors. This will reduce the possibility of danger to children.
8) After your refrigerator is in operation, do not touch the cold surfaces in
the freezer compartment, particularly when hands are damp or wet.
Skin may adhere to these extremely cold surfaces.
9) Do not refreeze foods, which have been thawed completely. The United
States Department of Agriculture in Home and Garden Bulletin No. 69
reads: "…You may safely refreeze frozen foods that have thawed if they
still contain ice crystals or if they are still cold-below 40˚F".
"…Thawed ground meats, poultry, or fish that have any off-odor or
off-color should not be refrozen and should not be eaten. Thawed ice
cream should be discarded. If the odor or color of any food is poor or
questionable, discard it. The food may be dangerous to eat."
"…Even partial thawing and re-freezing reduce the eating quality of
foods, particularly fruits, vegetables, and prepared foods. The eating
quality of red meats is affected less than that of many other foods. Use
refrozen foods as soon as possible, to save as much of its eating quality
as you can."
1
English
10) This refrigerator should not be recessed or built-in an enclosed
cabinet. It is designed for freestanding installation only.
11) Do not operate your refrigerator in the presence of explosive fumes.
12) Do not use electrical power tools for handle installations, instead use regular
screwdrivers.
SAVE THESE INSTRUCTIONS
DANGER
Risk of child entrapment. Before you throw away your old
refrigerator or freezer, take off the doors. Leave the shelves in
place so that children may not easily climb inside.
Thank you for using our Haier
product. This easy-to-use manual
will guide you in getting the best
use of your refrigerator.
Remember to record the model and
serial number. They are on a label
inside of the refrigerator.
Model number
Serial number
Date of purchase
Staple your receipt to your manual.
You will need it to obtain warranty service.
2
English
Table Of Contents
PAGE
Safety Precautions ..........................................................................1
Parts And Features ..........................................................................4
Installing Your Refrigerator............................................................5
Unpacking Your Refrigerator ................................................................5
Adjusting Your Refrigerator ..................................................................5
Proper Air Circulation ..........................................................................5
Electrical Requirements ........................................................................6
Door Handle Installation ......................................................................7
Door Alignment ..................................................................................8
Reversing the Door Swing ....................................................................8
Reversing the Door Handles ..............................................................11
Installing Front Grill ..........................................................................11
Refrigerator Features And Use ....................................................12
General Features ..............................................................................12
Refrigerator Interior Shelves................................................................12
Utility Drawer And Cover ..................................................................13
Crisper And Crisper Cover ................................................................14
Refrigerator Door Shelves ..................................................................16
Light Bulb Replacement......................................................................17
Food Storage Information ..................................................................18
Normal Operating Sounds ................................................................20
Proper Refrigerator Care and Cleaning......................................21
Cleaning and Maintenance ................................................................21
Power Interruptions ............................................................................22
Vacation and Moving Care ................................................................22
Troubleshooting ............................................................................23
Warranty Information ..................................................................25
3
English
Parts And Features
1
11
3
12
2
4
5
13
6
7
14
8
9
10
15
18
4
1.
Freezer Light
10. Deluxe Crisper Drawers
2.
Ice Trays (2)
11. Freezer Door Bins
3.
Freezer Shelf (size of shelves vary
per model
12. Tilt-Out Wire Basket (some
models only)
4.
Temperature Control
13. Dairy Compartment
5.
Interior Refrigerator Light
6.
Deluxe Deli Drawer
14. Refrigerator Door Bins (quantity
and style may vary per model)
7.
Refrigerator Shelves (quantity and
size may vary per model)
16. Leveling Legs (2 front) (not shown)
15. Full-width Door Shelf
8.
Glass Crisper Cover
17. Casters (4) (not shown)
9.
Humidity Control for Crisper
18. Bottom Front Grille (not shown)
English
Installing Your Refrigerator
Unpacking Your Refrigerator
1. Remove all packaging material. This includes the corrugated base
and all adhesive tape holding the refrigerator accessories inside and
outside.
2. Inspect and remove any remains of packing, tape or printed
materials before powering on the refrigerator.
Adjusting Your Refrigerator
Leveling Your Refrigerator:
• Your refrigerator has two leveling legs which are located in the
front corners of your refrigerator. After properly placing your
refrigerator in its final position, you can level your refrigerator.
• Leveling legs can be adjusted by turning them clockwise to raise your
refrigerator or by turning them counterclockwise to lower
your refrigerator. The refrigerator door will close easier when the
leveling legs are raised.
Proper Air Circulation
• To assure your refrigerator works at the maximum efficiency it
was designed for, you should install it in a location where there
is proper air circulation, plumbing and electrical connections.
• The following are recommended clearances around the refrigerator:
Sides……………3/4 "(19mm)
Top....................1" (25mm)
Back..................2" (51mm)
5
English
Electrical Requirement
• Make sure there is a suitable power outlet (115 volts, 15 amps
outlet) with proper grounding to power the refrigerator.
• Avoid the use of three plug adapters or cutting off the third grounding
pin order to accommodate a two plug outlet. This is a dangerous
practice since it provides no effective grounding for the refrigerator
and may result in shock hazard.
Use of Extension Cords
• Avoid the use of an extension cord because of potential safety
hazards under certain conditions. If it is necessary to use an extension
cord, use only a 3-wire extension cord that has a 3-blade grounding
plug and a 3-slot outlet that will accept the plug. The marked rating
of the extension cord must be equal to or greater than the electrical
rating of the appliance.
Install Limitations
• Do not install your refrigerator in any location not properly insulated
or heated e.g. garage etc. Your refrigerator was not designed to
operate in temperature settings below 55˚ Fahrenheit.
• Select a suitable location for the refrigerator on a hard even
surface away from direct sunlight or heat source e.g. radiators,
baseboard heaters, cooking appliances etc. Any floor unevenness
should be corrected with the leveling legs located on the front bottom
corners of the refrigerator.
6
English
77
English
8
English
9
English
1. As shown in fig.5, dismantle the bottom hinge and bottom hinge
pad and secure them to the left side. It is also necessary to move
the bottom hinge axle from the right side of the hinge to the left
side. NOTE: If the door fit is too tight between the bottom and
center hinges after moving them to the left side, we advise to use
only one plastic pad and remove the extra stud under the bot
tom hinge axle for proper fit and sealing.
10
English
1
11
English
Refrigerator Features And Use
4
encapsulated
(see fig. #8)
12
1
English
(see fig. #8)
fig. #8
(see fig. #9)
fig. #9
(see fig. #10)
13
English
(see fig. #10)
fig. #10
(see fig. #11)
fig. #11
1
14
English
(see fig. #12)
fig. #12
(see fig. #12)
(see fig. #13)
15
1
English
• LOW setting allows moist air to exit the crisper for optimum storage
of fruits and/or vegetables, which have skins.
• HIGH setting retains moist air in the crisper for optimum storage of
fresh, leafy vegetables.
Low
High
fig.
#13
fig. #
14
High/Low
Settings
Refrigerator Door Shelves
fig.
fig.#14
# 15
Gallon door storage:
Your refrigerator may be equipped with gallon
door storage shelves. This feature will allow
for the storage of gallon size containers.
To remove refrigerator door shelves:
(see fig. #14)
# 15)
1. Remove all items stored on the shelf.
2. Gently push up each side until the shelf is
clear of the door shelf slots and then
remove.
3. Carefully push down on each end of the door shelf until it is locked
in place in the refrigerator door slots.
16
1
English
(see fig. #15)
fig. #15
Light Bulb Replacement
fig. #16
Refrigerator
1.
2.
3.
4.
Unplug power to the refrigerator.
Remove the highest shelf.
Allow light bulb to cool before removing.
Remove the bulb by turning it counter
clockwise.
5. Replace with a 40
25 watt appliance bulb.
6. Replace the bulb cover.
7. Replug refrigerator to power outlet.
Freezer
fig. #17
1. Unplug power to refrigerator.
2. Place finger in the bulb cover slot and gently
press outward to remove.
3. Wait for bulb to cool before removing.
4. Remove bulb by turning it counter clockwise.
5. Replace the bulb with a 40
25 watt appliance bulb.
6. Replace the bulb cover.
7. Replug refrigerator to the power outlet.
1
17
English
18
English
Plastic containers with air tight lids
Heavy duty aluminum foil
•
•
Plastic wrap made from plastic film wrap
Self-sealing plastic bags
Do not refreeze defrosted/thawed foods.
It is recommended that the freezing date be marked on the packaging.
1
19
English
20
English
Proper Refrigerator Care and Cleaning
21
English
“General cleaning” section pg. 21.
222
English
TroubleShooting
in “defrost” mode and must complete this cycle before compressor starts
to operate.
23
English
• Check front to back slope is approx. 1/4”.
2 24
English
25
Francais
1
Francais
12) Ne pas utiliser les outils électriques de pouvoir pour les installations de
poignée, plutôt utiliser des tournevis réguliers.
2
Francais
3
Francais
Table des Matiéres
PAGE
Mesures de sécurité ..............................................................................1
Pièces et Caractéristiques de I’Appareil ............................................5
Installation du Réfrigérateur................................................................6
Désemballage du Réfrigérateur ..................................................................6
Réglages du Réfrigérateur ..........................................................................6
Circulation d’Air Adéquate ........................................................................6
Caractéristiques Electriques ........................................................................7
Installation de la Poignée de Porte ..............................................................8
Inverser I’Ouverture de la Porte ..................................................................9
Inverser les Poignées de Porte ..................................................................12
Le Gril installant de Devant ......................................................................12
Caractéristiques et Utilisation du Réfrigérateur ..............................13
Caractéristiques Générales ......................................................................13
Etagéres Intérieures du Réfrigérateur ........................................................13
Tiroir de Ranagement et Couvercle ..........................................................15
Bac à Légumes et Couvercle du Bac ........................................................16
Etagères de la Porte du Réfrigérateur ........................................................18
Pour changer les Ampoules ......................................................................19
Infomations Concernant le Stockage des Aliments ....................................20
Témoins Habituels de Bon Fonctionnement ..............................................22
Entetien et Nettoyage Adéquats du Réfrigérateur ..........................23
Nettoyage et Entretien ..............................................................................23
Pannes d’Alimentation ..............................................................................24
Vacances et Démenagement ....................................................................24
Dépannage ..........................................................................................25
Informations Concernant la Garantie ..............................................27
4
Francais
Pièces et Caractéristiques de l’appareil
1
11
3
12
2
4
5
13
6
7
14
8
9
10
15
18
1. Ampoule de Congélateur.
2. Plateau de glace.
3. Étagères du congélateur (Le type
et la quantité varient en fonction
du modèle).
4. Régulation de la température.
5. Ampoule du Réfrigérateur.
6. Tiroir pour viande.
7. Étagerons du réfrigérateur (Le
type et la quantité varient enfonction du modèle).
8. Convers de en verre du bac à
Légumes.
9. Contrôleur d'humidité pour
bacs à Légumes.
10. De Lexe couver de du tiroirs á
Légumes
11. Huche du congélateur de la
porte
12. Inclinaisons pour panier (sur
certains du modèle du Bac á glace)
13. Compartiment á produits
laitiers.
14. Huche du Réfrigérateur de la
porte du (Le type et la quantité
varient en fonction du modèle).
15. Plein – largeur de l’étagée de
la porte
16. 2 pieds de mise á niveau (non
illustrés)
17. Roulettes (4) (non illustrés)
18. Le gril inférieur de devant (non
illustrés)
5
Francais
( )
6
Francais
7
Francais
8
Francais
9
Francais
10
Francais
1. Comme montré dans la figue 5, démontez la charnière de fond et
le bloc de charnière de fond et protégez-les au côté gauche. Il
est aussi nécessaire de déplacer l'axe de charnière de fond du
côté juste de la charnière au côté gauche. NOTEZ : si la porte
appropriée est trop serrée entre le fond et les charnières de cen
tre après le fait de les déplacer au côté gauche, nous conseillons
pour utiliser seulement un bloc de plastique et enlever le clou
supplémentaire sous l'axe de charnière de fond pour nécessaire
approprié et cachetant.
11
Francais
12
12
Francais
4
encapsulé. Le modèle en votre possession comporte soit
13
Francais
(consulter le schéma nº8)
schéma 8
14
Francais
(consulter le schéma nº9)
schéma
schéma 99
(consulter le schéma nº10)
15
Francais
(consulter le schéma nº10)
schéma 10
(consulter le schéma nº11)
schéma 11
16
Francais
(consulter le schéma nº12)
schéma 12
(consulter le schéma nº12)
17
Francais
(consulter le schéma nº13)
schéma 13
(consulter le schéma nº14)
schéma 14
(consulter le schéma nº14)
3. Abaisser chaque côté de l’étagere de la porte avec précaution, ce qu’elle se
trouve bien en place á l’intérieur des supports de la porte du réfrigérateur.
18
Francais
(consulter le schéma nº15)
schéma 15
Pour Changer les Ampoules du
Réfrigérateur
1. Débranchez votre réfrigérateur ou déconnectez.
2. Retirer I’ensemble des articles stockés sur
I’étageré.
3. Laisser I’ampoule refroidir avant de la refirer.
4. Retirer I’ampoule en la dévissant dans le sens
inverse des aiguilles d’une montre.
5. Remplacer á l’aide d’une ampoule pour
appareil de 40 watts.
6. Replacez le Couvercle de l'ampoule.
7. Branchez vorte réfrigérateur ou reconnectez la
source de courant élecrique.
Schéma 16
Schéma 17
Congélateur
1. Débranchez vorte réfrigérateur ou déconnectez la
source de courant élecrique.
2. Agripper de l’ampoule avec précaution el le sortir
en le faisant glisser.
3. Laisser l’ampoule refroidir avant de la retirer.
4. Retirer l’ampoule en la dévissant dans le sens inverse des aiguilles
d’une montre.
5. Remplacer á l’aide d’une ampoule pour appareil de 40 watts.
6. Replacez le Couvercle de l'ampoule.
7. Branchez vorte réfrigérateur ou reconnectez la source de courant
élecrique.
19
Francais
20
Francais
21
Francais
22
Francais
23
Francais
24
Francais
25
Francais
•Fron de contrôle pour soutenir la pente est approximativement 1/4".
26
Francais
27
Español
1
Español
12) No utiliza herramientas eléctricas eléctricas para instalaciones de asidero,
en lugar el uso desatornilladores regulares.
2
Español
3
Español
Indice
PÁGINA
Instrucciones Precautions .................................................................... 1
Indice ......................................................................................................4
Partes y Funciones ................................................................................5
Instalación su refrigerador ..................................................................6
Desempaquetado de su refrigerador ..........................................................6
Ajustamiento de su Refrigerador ................................................................6
Circulación Adecuada del Aire....................................................................6
Requerimientos Eléctricos............................................................................7
Instalación de la Manija de la Puerta ..........................................................8
Alineación de la Puerta ..............................................................................9
Cómo Invertir la Oscilación de la Puerta ....................................................9
Cómo Invertir las Manijas de la Puerta......................................................12
Intalar Parrilla Frente ................................................................................12
Uso y Funciones del Refrigerador ......................................................13
Funciones Generales ................................................................................13
Entrepaños Interiores del Refrigerador ......................................................13
Cajón de Uso General y Cubierta ............................................................14
Cajón para Frutas y Verduras y Cubierta ..................................................15
Entrepaños de la Puerta del Refrigerador ..................................................17
Reemplazo de la bombilla de luz..............................................................18
Información sobre el Almacenamiento de los Alimentos ............................19
Ruidos de Operación Normales................................................................21
Cuidados y Limpieza Adecuada del Refrigerador............................22
Limpieza y Mantenimiento ........................................................................22
Interrupciones de Energía ........................................................................23
Vacaciones y Mudanza ............................................................................23
Verificación de Problemas ..................................................................24
Información de la Garantía................................................................26
4
Español
Partes Y Funciones
1
11
3
12
2
4
5
13
6
7
14
8
9
10
15
18
1. Luz del freezer
2. Cubiteras
3. Estante del fresar (el tipo y la
cantidad varían con el modelo).
4. Control de temperatura
5. Luz del Refrigerador
6. Cajón para almacén.
7. Entrepaños del Refrigerador (el
tipo y la cantidad varían con el
mod elo).
8. Cubierta de vidrio del cajón
para frutas y verduras.
9. Control de humedad para
cajones para frutas y verduras.
10. De lujo cobertor de compartimiento.
11. Compartimiento del fresar de
la puerta.
12. Repisa para canasto de alambre (No en todas los modelos).
13. Compartimiento de lácteos
14. Compartimiento del
Refrigerador de la puerta del (el
tipo y la cantidad varían con el
modelo).
15. Repleto – anchura de la puerta
16. 2 patas Niveladoras (ne se
muestran)
17. Ruedecillas (4) (ne se muestran)
18. Grillo base (ne se muestran)
5
Español
6
Español
7
Español
8
Español
9
Español
10
Español
1. Como mostrado en el higo 5, desmonte el gozne de fondo y la almo
hadilla de gozne de fondo y asegúrelos al lado izquierdo. Es también
necesario mover el árbol de gozne de fondo de la derecha del gozne
al lado izquierdo. NOTE: Si la puerta adecuada es demasiado apreta
da entre el fondo y goznes de centro después de moverlos al lado
izquierdo, aconsejamos para usar sólo una almohadilla plástica y
quitar el clavo suplementario bajo el árbol de gozne de fondo para
apropiado adecuado y sellar.
11
Español
12
Español
4
encapsulé. Su modelo puede incluir entrepaños de ancho
(vea la figura #8)
13
Español
(vea la figura #8)
fig. #8
(vea la figura #9)
fig. #9
(vea la figura #10)
14
Español
(vea la figura #10)
fig. #10
(vea la figura #11)
fig. #11
15
Español
(vea la figura #12)
fig. #12
(vea la figura #12)
(vea la figura #13)
16
Español
Entrepaños en la Puerta del Refrigerador
Almacenamiento de galones en la puerta:
(ver la figura #14)
Su refrigerador puede estar equipado con
entrepaños de almacenamiento de galón en la
puerta. Esta función le permitira almacenar contenedores tamaño galón.
Para quitar los entrepaños de la puerta del
refrigerador: (ver figura #14)
1. Saque todos los artículos almacenados en el entrepaño.
2. Empuje cuidadosamente cada lado hasta que el entrepaño se desenganche de los sopories de entrepaño en la puerta y sáquelo.
3. Presione cuidadosamente cada extremo del entrepaño de la puerta
hasta que se enganche en los sopories de entrepaño de la puerta.
17
Español
(vea la figura #15)
fig. #15
Reemplazo de la bombilla de luz
El
1.
2.
3.
4.
5.
6.
7.
Refrigerador
Desconectar la refrigeradora.
Quitar el estante más alto.
Deje que la bombilla enfríe antes de removerlo.
Quitar la bombilla girándolo hacia la derecha.
Reemplazer la bombilla por otra de 40 watts.
Colocar la tapa de la bombilla.
Conecte la refrigeradora.
Congelador
1. Desconectar la refrigeradora.
2. Para sacar tapa de la bombilla, coloque el dedo
en la ranura de la tapa y suavemente presione hacia
fuera.
3. Espere que el bombilla este fría.
4. Quitar la bombilla girándolo hacia la derecha.
5. Reemplazer la bombilla por otra de 40 watts.
6. Colocar la tapa de la bombilla.
7. Conecte la refrigeradora.
18
fig. #16
fig. #17
Español
19
Español
20
Español
21
Español
22
Español
23
Español
24
Español
• La espalda de fron de cheque para inclinar es
aproximadamente 1/4".
25
Español
26
Issued: October-07
Printed in USA
Imprimé en USA
Impreso en USA
0060513454