1
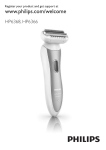
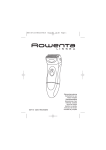
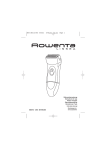
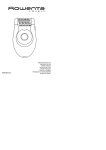
LADY SHAVER
LS 4940
------------------------------------------------------------------------------------------------------------------------------------------------------------------
A
G
B
C
D
F
E
H
2
SAFETY -----------------------------------------------------------------------------------------------------------------------------------Please note the following instructions when using the appliance:
7
Do not immerse the appliance in
water.
7
This appliance is designed for
domestic use only.
7
7
This appliance is designed
solely for shaving human hair.
Any other use is expressly
prohibited.
The appliance may only come
into contact with water once it is
disconnected from the power
supply unit and the power supply unit is no longer in the
socket.
7
When the appliance is being
charged, on no account should
it come into contact with water
or any other liquid.
7
Do not drop the appliance.
7
The appliance may not be used
by the following people, including children: those with limited
physical, sensory or mental capabilities and also those with a
lack of experience and knowledge. This does not apply to the
latter if they were instructed in
the use of the appliance or if
they use it under the supervision
of a person responsible for
safety. Children should always
be supervised to ensure that
they do not play with the
appliance.
7
Do not open the appliance under any circumstances. No warranty claims are accepted for
damage caused by improper
handling.
7
Never use the appliance if it, the
blade foil or the shaving head
are visibly damaged.
7
Only use the SW-030100 EUL
power supply unit provided.
7
Caution! Always keep the
power adapter dry.
ENGLISH
3
OVERVIEW ---------------------------------------------------------------------------------------------------------------------Dear customer,
Controls
Congratulations on the purchase
of your LS 4940 lady shaver.
See the illustrations on page 2.
A
Protective cap.
Read the following user notes carefully to ensure you can enjoy your
quality product from Grundig for
many years to come.
B
Blade foil.
C
Switch for turning on and
off.
Special features
– Blade foil with two long-hair side
trimmers for thorough removal of
all hair.
– The cutting system can be
cleaned in water as it is when
removed.
Replace it when it is dry.
– The lady shaver is designed to
remove unwanted hair on the
arms, legs and also for especially sensitive areas such as the
bikini line, underarms or the
face.
D
Charging display.
E
Power cord socket.
Accessories
F
Power supply unit.
G
Cleaning brush.
H
Storage case.
A responsible approach!
GRUNDIG focuses on
contractually agreed
social working conditions with fair wages
for both internal employees and
suppliers, as well as on the efficient use of raw materials with continual waste reduction of several
tonnes of plastic each year – and
availability of at least 5 years for
all accessories.
For a future worth living.
For a good reason. Grundig.
4
ENGLISH
POWER SUPPLY ---------------------------------------------------------------------------------------------------Rechargeable battery
operation
When operating the appliance
with the built-in nickel metal hydride battery, only use the power
unit supplied for charging.
Check if the type plate on the
power supply unit corresponds to
your local mains supply.
1 Press the button
the appliance.
C
Notes
7 Charge up the batteries completely (for at least 12 hours) before you first use them or if you
have not used them for a long
time.
7
Never charge the appliance for
longer than 24 hours.
7
The ambient temperature should
be between 5 °C and 40 °C.
7
Once you have used the appliance, charging time is approx.
8 hours.
7
In its fully charged state, the appliance can run for approx. 60
minutes. It is not advisable to
charge the batteries after each
use. Only charge the batteries
when they are completely discharged. This increases their
service life. Do not charge them
every day.
to switch off
2 Plug the power cord into the appliance socket E and the power
supply unit F into the wall
socket.
– During the charging process,
the display D lights up red.
– Once the appliance is fully
charged, the charging display
does not switch off or change
its colour.
3 Pull the power cord out of the
the appliance socket E and the
power supply unit out of the wall
socket.
ENGLISH
5
POWER SUPPLY ---------------------------------------------------------------------------------------------------Mains operation
Only operate the appliance with
the power supply unit provided.
Check that the voltage indicated
on the type plate of the power
supply unit corresponds to your
local power supply.
The only way to disconnect the
appliance from the power supply
is to unplug the power supply unit.
1 Insert the power cord into the
socket E on the appliance.
2 Plug the power supply unit
into the power socket.
F
Caution
7 Only use the appliance in battery mode when in the bathroom or beside a water
connection; never run it from the
mains.
6
ENGLISH
USE -------------------------------------------------------------------------------------------------------------------------------------------------Shaving
Trimming
1 Remove the plastic protective
cap A .
Use the extended trimmer for
longer hair.
Caution
7 The blade foils and side trimmers for long hair must not be
damaged. Replace any damaged parts before shaving.
1 Press the button
the appliance.
2 Press the button
the appliance.
C
to switch on
3 Shave with slow, gentle movements against the direction of
hair growth. Hold the appliance
at a 90° angle to your skin.
C
to switch on
2 Shave with slow, gentle movements against the direction of
hair growth.
Useful tips
7
Always pull the skin taut when
shaving difficult areas, such as
your underarms.
7
Always shave against the natural direction of hair growth.
7
In the case of thick or copious
hair growth which cannot be removed by just one shave, do
one quick shave and then a
more thorough second one.
Caution
7 Do not press too hard as you
may damage the blade foils.
4 After use, switch off the appliance with the switch C and put
the plastic cap A back on.
ENGLISH
7
CLEANING AND CARE ---------------------------------------------------------------------------General information
The device must be cleaned regularly so that you can continue to
enjoy its top performance and
optimum results. Clean the housing
with a soft, damp cloth and a mild
detergent. Do not use household
cleaning agents.
Caution
7 Never hold the appliance in
water or any other liquid.
Cleaning the shaving
head
1 Turn the appliance off and unplug the cable. Pull the power
supply unit out of the mains
socket.
2 Pull up the shaving head
of the attachment.
B
out
3 Knock the bottom of the shaving
head B gently against a flat
surface.
Note
7 Alternatively, you can rinse the
shaving head under running
water.
Caution
7 Never clean the blade foil of the
shaving head with the cleaning
brush supplied.
4 Clean the bottom of the shaving
head with the cleaning brush G
supplied.
5 Insert the blade foil in the shaving head again.
8
ENGLISH
CLEANING AND CARE ---------------------------------------------------------------------------Storage
If you do not want to use the appliance for a long period of time,
please store it carefully.
7
Ensure that it is switched off and
is dry.
7
Store the appliance and the
power supply unit in the storage
case provided in a cool, dry
place.
7
Make sure the appliance is kept
out of reach of children.
ENGLISH
9
INFORMATION -----------------------------------------------------------------------------------------------------Environmental note
Technical data
This product is manufactured from
high-quality parts and materiais
which can be reused and
recycled. Therefore, do not
dispose of the device and the builtin rechargeable battery along with
normal household waste at the
end of its service life.
Take it to a collection point for the
recycling of electrical and
electronic equipment where the
battery is taken out of the device
and disposed separately. This is
indicated by this symbol on the
product, in the operating manual
and on the packaging.
This product conforms to the European directives
2004/108/EC,
2006/95/EC and 2009/125/EC.
Power supply
Power supply unit SW-030100 EUL
100 – 240 V ~, 50–60 Hz
Batteries: Nickel metal hydride
Ni-MH
Technical and design modifications reserved.
Please find out about collection
points operated by your local authority.
Help protect the environment by
recycling used products.
10 ENGLISH