1
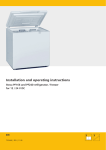
FOOD PROCESSOR Multitalent Compact UM 8050 de en tr fr it sv ________________________________________________________ A B C D E J I K O N R 2 F G H L M P Q S ________________________________________________________ DEUTSCH 04-17 ENGLISH 18-29 TÜRKÇE 30-41 FRANÇAIS 42-53 ITALIANO 54-65 SVENSKA 66-77 3 SAFETY AND SET-UP_______________________ Please read this instruction manual thoroughly before using this appliance! Follow all the safety instructions to avoid damage caused by improper use. Keep the instruction manual for future reference. Should this appliance be given to a third party, then this instruction manual must also be handed over. ■ The blades, slicers and shredders are very sharp! To avoid injury, handle with the utmost care, especially when removing and cleaning them. ■ Never clean the appliance with your bare hands. Always use a brush. ■ Do not touch any moving parts of the appliance. Do not attach or remove the parts until the unit has come to a complete stop. ■ Always keep hair, clothing and utensils away from the appliance during operation to prevent injury and damage. ■ The appliance is intended for domestic use only. ■ Check if the mains voltage on the rating label corresponds to your local mains supply. The only way to disconnect the appliance from the mains is to pull out the plug. ■ Do not wrap the power cord around the appliance. ■ For additional protection, this appliance should be connected to a household residual current device with a rating of no more than 30 mA. Consult your electrician for advice. ■ Do not immerse the appliance, power cord or power plug in water or in other liquids. ■ Always pull out the power plug before assembling, after using, before disassembling or before cleaning the appliance, before leaving the room or if a fault occurs. Do not disconnect the plug by pulling on the cord. ■ Prevent damage to the power cord by not squeezing, bending or rubbing it on sharp edges. Keep the cord away from hot surfaces and open flames. ■ Do not use an extension cord with the appliance. 18 ENGLISH ■ Never use the appliance if the power cord or the appliance is damaged. ■ Our GRUNDIG Household Appliances meet all the applicable safety standards; thus if the appliance or power cord is damaged, it must be repaired or replaced by the dealer, a service centre or a similarly qualified and authorized service person to avoid any danger. Faulty or unqualified repair work may cause danger and risks to the user. ■ Do not dismantle the appliance under any circumstances. No warranty claims are accepted for damage caused by improper handling. ■ Always keep the appliance out of the reach of children. ■ The appliance should not be used by the following persons, including children: those with limited physical, sensory or mental capabilities and also those with a lack of experience and knowledge. This does not apply to the latter if they were instructed in the use of the appliance or if they use it under the supervision of a person responsible for their safety. Children should always be supervised to ensure that they do not play with the appliance. ■ Do not leave the appliance unattended when it is in use. Extreme caution is advised when the appliance is being used near children and people with limited physical, sensory or mental capabilities. ■ Before using of the appliance for first time, clean all parts which come into contact with food carefully. Please see details in the “Cleaning and Care” section. ■ Dry the appliance and all parts before connecting it to the mains supply and before attaching the accessories. ■ Do not operate the appliance when the glass bowl is empty ■ Never place the appliance, attachments, power cord or plug on hot surfaces such as gas or electric burners or hot oven surfaces and never use with hot liquids or food. Let hot food and liquids cool down to 80 °C or less before placing them in the applicance. ■ Only the glass bowl is suitable for use in a microwave oven. SAFETY AND SET-UP_______________________ ■ Do not use the appliance for anything other than its intended use. The appliance is designed to process food only. ■ Never switch on the appliance for longer than necessary for processing the food. ■ Never use the appliance with damp or wet hands. ■ Operate the appliance only with the supplied parts. ■ The appliance is designed to process only common household quantities. ■ Do not use the appliance if the blades are damaged or show signs of wear. ■ Always use the appliance on a stable, flat, clean and dry surface. ■ Always place the glass bowl on the anti-slip plastic pad. If the anti-slip plastic pad is damaged or torn apart, please get a new one from the dealer or a service centre. ■ Make sure that there is no danger that the power cord could be accidentally pulled or that someone could trip over it when the appliance is in use. ■ Position the appliance in such a way that the plug is always accessible. ■ The spatula may be used to remove the food from the glass bowl. Make sure the appliance is switched off before doing this. ■ This appliance is not suitable for crushing ice or for dry or hard foods as the blades will become dull quickly. ■ Remove any bones and stones from food to prevent the blades or the appliance from being damaged. ■ To reduce the risk of injury, never set the blade of the appliance onto the base if the appliance is not positioned properly. ■ Make sure that the base unit of the appliance is positioned properly before you switch on the appliance. ■ Do not use the appliance continuously for more than 10 seconds in order to prevent overheating. ENGLISH 19 AT A GLANCE_____________________________ Dear Customer, Congratulations on the purchase of your new GRUNDIG Multitalent Compact UM 8050. Please read the following user notes carefully to ensure you can enjoy your quality GRUNDIG product for many years to come. A responsible approach! GRUNDIG focusses on contractually agreed social working conditions with fair wages for both internal employees and suppliers. We also attach great importance to the efficient use of raw materials with continuous waste reduction of several tonnes of plastic every year. Furthermore, all our accessories are available for at least 5 years. For a future worth living. For a good reason. Grundig. Special features The appliance is perfectly suitable for chopping of vegetables, culinary herbs, meat, fruits, nuts and cheese, as well as for preparing of dips, whipped cream, sauces, crèmes, soups and baby food. The GRUNDIG Multitalent Compact UM 8050 is equipped with: ■ Powerful 450 Watt motor ■ 2.2 litre glass bowl for long lasting hygienic food preparation ■ High-quality stainless steel blades, shredding and slicing attachments ■ Robust whisk for the quick and easy preparation of dough and crèmes ■ Anti-slip plastic pad for a safe working basis ■ Dishwasher-proof parts ■ Microwave-proof glass bowl 20 ENGLISH Controls, parts and accessories See the figure on page 2. Controls and parts A B C D E F G H I J K Base unit Speed control and locking / unlocking button Pulse button Locking handles Filler spout Intermediate lid Intermediate lid ring Pusher Glass bowl Fixed shaft Accessory support Accessories L M N O P Q R S Chopping blade Whisk Attachment holder Slicing attachment Shredding attachment – thin Shredding attachment – thick Anti-slip plastic pad Spatula AT A GLANCE_____________________________ Recipe ideas Pesto Ingredients 2 bunches of fresh basil 3 medium-sized garlic cloves 3 tablespoons pine nuts or walnuts 50 g grated parmesan cheese 5 tablespoons olive oil Salt and freshly ground black pepper to taste Preparation Put the basil leaves, peeled garlic and pine nuts or walnuts into the glass bowl of the appliance and pulse until the ingredients are coarsely chopped. Add the parmesan cheese and the olive oil and pulse a few times until the ingredients are thoroughly mixed and smooth. Season with salt and pepper. Tartlets Ingredients (makes 10–12) 125 g butter 100 g sugar 1 pinch of salt 2 egg yolks 200 g flour 1 teaspoon baking powder 2 tablespoons lukewarm water Preparation Put the butter, sugar and salt into the glass bowl of the appliance and pulse until the ingredients are mixed. Gradually add in the egg yolks, flour, baking powder and water and pulse until the ingredients are thoroughly mixed and the dough is smooth. Cover and allow to rest in a cool place for at least 1 hour. Roll out the dough, cut in 10–12 circles and place into the tartlet cutters. Place the cutters on the oven rack and bake in a pre-heated oven at 180 ºC for 15–20 minutes. Leave the tartlets to cool, fill with cream and garnish with seasonal fruits. ENGLISH 21 AT A GLANCE_____________________________ Maximum quantities and processing time Refer to the tables below for processing times and maximum quantities. Chopping Ingredients Maximum quantities Processing time Meat / fish (diced) 500 g Max / Pulse Onions, garlic (peeled & cut into 8 pieces) 600 g Max / Pulse Nuts (without shells) 350 g Max / Pulse Fruits / vegetables (cleaned & cut into 8 pieces) 800 g Max / Pulse Tomato (cut into 6 pieces) 800 g Max / Pulse Culinary herbs 100 g Max / Pulse Cheese (cut into small cubes) 400 g Max / Pulse Milk & liquids 700 ml Max / Pulse Soup 700 ml Max / Pulse Baby food 400 g Max / Pulse Carrots 500 g Max / Pulse Mixing and blending Ingredients Maximum quantities Processing time Eggs 4 Max / Pulse Cake dough 800 g Max Cream 400 g Max Maximum quantities Processing time Carrots 500 g Min – Max Radish 500 g 6 – Max Potato 500 g 6 – Max Squash 1000 g 6 – Max Cucumber 1000 g Min – Max Shredding and slicing Ingredients 22 ENGLISH OPERATION_________________________________ Notes ■ Do not chop extremely hard items such as coffee beans, ice cubes, nutmeg, grains and bones. Remove stalks from herbs, shells from nuts, and bones, tendons and gristle from meat. ■ The appliance should be unplugged. 2 Place the chopping blade support K . L on the accessory Preparation 1 Remove all packaging and stickers materials and dispose of them according to the applicable legal regulation. 2 Before using of the appliance for first time, clean parts which come into contact with food (see the “Cleaning and care” section). 3 Cut the food into small pieces before using the appliance. 4 Always place the glass bowl on the anti-slip plastic pad R . Chopping Caution ■ The chopping blade is very sharp, be careful while removing the plastic cover. ■ Do not touch the chopping blade with your bare hands. 1 Place accessory support K onto the fixed shaft J in the glass bowl I . 3 Put the food that you would like to prepare into glass bowl I . 4 Fit the intermediate lid F into position on the glass bowl I . ENGLISH 23 OPERATION_________________________________ 5 Put the base unit A onto the intermediate lid F that is fitted onto the glass bowl I . Make sure that the indicator of the speed control and locking / unlocking button B is at unlock position F. Turn the indicator of button B to the locked position D. Make sure that the locking handles D of the base unit are clipped properly onto the handles of the glass bowl I . E LS PU 6 Insert the plug into the wall socket. 7 Turn the speed control and locking / unlocking button B clockwise and select the desired speed. – The appliance starts. Note ■ You can press and hold down pulse button C continuously or intermittently. If you want to use only the pulse function, turn the speed control and locking / unlocking button B to the pulse position and press and hold down pulse button C . You can obtain a better quality of chopping with the pulse function. PULSE 8 Turn the speed control and locking / unlocking button B to the Off position when you want to finish the operation. 24 ENGLISH 9 Disconnect the power plug from the wall socket. Remove the base unit A and then the intermediate lid F . Carefully take out the chopping blade L carefully. Remove the food from the glass bowl I . Caution ■ Do not touch the chopping blade with your bare hands. The chopping blade is very sharp. Notes ■ Do not operate the appliance continuously for more than 10 seconds, in order to prevent overheating. ■ If the chopping blade L does not work or only turns slowly, first pull out the power plug. Then take the base unit A and the intermediate lid F off. Check the glass bowl to see if there is something blocking the chopping blade. Maybe you put too much food and/or hard food in the glass bowl. ■ If the ingredients stick to the side of the glass bowl, use the spatula S to remove the food from the glass bowl. The appliance must be switched off when you do this. ■ Make sure that all rotating parts are stopped before removing the intermediate lid. ■ Do not operate the appliance when the glass bowl is empty ■ After use, clean the chopping blade (see the “Cleaning and Care” section) and store it in the chopping blade plastic cover. OPERATION_________________________________ Whisking Notes ■ You can use the whisk for whipping cream and beating eggs. ■ Never use more than 4 egg whites or 400g cream. 3 Put the food into the glass bowl 4 Fit the intermediate lid glass bowl I . F I . into position on the 1 Put the whisk M onto the accessory support K so that the claws on the whisk fit the accessory support until you hear a click. 5 Put the base unit A on the intermediate lid F that is fitted onto glass bowl I . Make sure that the indicator of speed control and locking / unlocking button B is in the unlock position F. Turn the indicator of the button B to the locked position D. Clip the locking handles D of the base unit properly onto the handles of the glass bowl I . E LS PU 2 Place the accessory support K with the whisk M onto the fixed shaft J in the glass bowl I . 6 Insert the plug into the wall socket. 7 Turn the speed control and locking / unlocking button B clockwise and select the desired speed. – The appliance starts. 8 Turn the speed control and locking / unlocking button B to the Off position when you want to finish the operation. 9 Disconnect the power plug from the wall socket. Remove the base unit A and then the intermediate lid F . Take out the accessory support K with the whisk M . Remove the food from the glass bowl I . ENGLISH 25 OPERATION_________________________________ Notes ■ Do not operate the appliance continuously for more than 10 seconds in order to prevent overheating. ■ If the ingredients stick to the side of the glass bowl, use the spatula S to remove the food from the glass bowl. The appliance must be switched off when you do this. ■ Make sure that all rotating parts have stopped before removing the intermediate lid. ■ Do not operate the appliance without the food in the glass bowl. Shredding and slicing Caution ■ The shredding and slicing attachments are very sharp, do not touch the sharp parts with your bare hands Note ■ You can use the slicing attachment O for cucumber, potato, squash etc. Use shredding attachment P for carrots and radishes. Use shredding attachment Q for garnishing cabbage, carrots, etc. 3 Place the attachment holder N with the attachment on the accessory support K in the glass bowl I . 1 Place the accessory support K onto the fixed shaft J in the glass bowl I . 4 Fit the intermediate lid glass bowl I . 2 Put the shredding attachment P , shredding attachment Q or slicing attachment O on attachment holder N and make sure that it clicks into place. 26 ENGLISH F into position on the OPERATION_________________________________ PULSE 5 Put the base unit A onto the intermediate lid F that is fitted onto the glass bowl I . Make sure that the indicator of speed control and locking / unlocking button B is in the unlock position F. Turn the indicator of button B to the locked position D. Make sure that the locking handles D of the base unit are clipped properly onto the handles of the glass bowl I . 6 Insert the plug into the wall socket. 7 Insert the food that you want to slice or shred through the filler spout E . Make sure that the food is not larger than the filler spout. Use the pusher H to push the food to the attachment holder. 8 Turn the speed control and locking / unlocking button B clockwise and select the desired speed. – The appliance starts. 9 Turn the speed control and locking / unlocking button B to the Off position when you want to finish the operation. Disconnect the power plug from the wall socket. Remove the base unit A and then the intermediate lid F . Take out the attachment holder N with the attachment and the accessory support K from the glass bowl I . Remove the food from the glass bowl I . Notes ■ Do not operate the appliance continuously for more than 10 seconds in order to prevent overheating. ■ If the ingredients stick to the side of the glass bowl, use the spatula S to remove the food from the glass bowl. The appliance must be switched off when you do this. ■ Be sure that all rotating parts are stopped before removing the intermediate lid. ■ Do not operate the appliance when the glass bowl is empty ENGLISH 27 INFORMATION_____________________________ Cleaning and care Storage Caution ■ Never use petrol, solvents or abrasive cleaners, metal objects or hard brushes to clean the appliance. ■ Do not touch the chopping blades, shredders and slicers with your bare hands as they are very sharp. Use a brush instead. If you do not plan to use the appliance for a long period of time, please store it carefully. Make sure that the appliance is unplugged and completely dry. Do not wrap the power cord around the appliance. Store it in a cool and dry place. Make sure the appliance is always kept out of the reach of children. 1 Turn off the appliance and disconnect it from the wall socket. 2 Let the appliance cool down completely. 3 Use a damp soft cloth to clean the exterior of the base unit A and then wipe it dry. 4 You can put the glass bowl I , chopping blade L , shredding attachment P , shredding attachment Q , the slicing attachment O , the attachment holder N , whisk M , and spatula S on the upper shelf of the dishwasher. Do not clean the intermediate lid F or accessory support K in the dishwasher. Instead, clean them with a damp soft cloth. 5 Immediately after use, clean the chopping blade L , shredding attachment P , shredding attachment Q and the slicing attachment O and then dry them. Store the chopping blade in its plastic cover after you have cleaned and dried it. Caution ■ Never put the base unit or power cord in water or any other liquids and never hold them under running water. Note ■ Before using the appliance again, dry all parts carefully after cleaning, using a soft towel. 28 ENGLISH INFORMATION_____________________________ Environmental note This product has been manufactured with highquality parts and materials which can be reused and are suitable for recycling. Therefore, do not dispose of the product with normal domestic waste at the end of its service life. Take it to a collection point for the recycling of electrical and electronic equipment. This is indicated by this symbol on the product, in the operating manual and on the packaging. Please consult your local authorities to learn the nearest collection point. Help protect the environment by recycling used products. Technical data This product conforms to the European directives 2004/108/EC, 2006/95/EC and 2009/125/EC. Power supply: 220 - 240V~, 50/60 Hz Power: 450 W Technical and design modifications reserved. ENGLISH 29 www.grundig.com 72011 907 1000