1
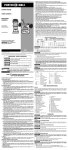
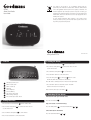
The symbol on the product or on its packaging indicates that this
product may not be treated as household waste. Instead it shall be handed
over to the applicable collection point for the recycling of electrical and
electronic equipment. By ensuring this product is disposed of correctly, you
will help prevent potential negative consequences for the environment and
human health, which could otherwise be caused by inappropriate waste
handling of this product.
For more detailed information about recycling of this product, please
contact your local city office, your household waste disposal service or the
shop where you purchased the product.
GCR02
Alarm Clock Radio
User Guide
www.goodmans.co.uk
3. Setting the Alarm
1. Controls
1. Press and hold the Alarm 1 button ( 3 ) until the numbers flash.
2. Press the Hour setting button ( 7 ) to set the hours. Note: This unit
uses the 24-hour clock.
3. Press the Minute setting button ( 8 ) to set the minutes.
4. Press the Alarm 1 button to set the selected time.
1
1
2
3
4
5
6
7
8
9
2
3
4
5
6
7
Standby/stop; Radio on/off
Alarm 2; Volume down
Alarm 1; Volume up
Nap/Sleep
Snooze; Brightness
Set clock; Memory
Hour setting; Setting down
Minute setting; Setting up
Auto scan and preset radio stations
2. Setting the Clock
8
9
5. Press the Setting down ( 7 ) or Setting up ( 8 ) button to select
whether the alarm will use the buzzer or the FM radio.
Note: ‘bb’ means to wake by buzzer and ‘F’ means to wake by FM radio.
6. Press the Alarm 1 button to confirm the selection. The Alarm
indicator on the face of the unit lights up.
Note: Follow the same steps to set Alarm 2 ( 2 ).
4. Switching Off the Alarm
Snooze (alarm sounds again 9 minutes later)
Press the Snooze button ( 5 ).
1. Press and hold the Set clock button ( 6 ) until the numbers flash.
Stop (alarm sounds at same time next day)
2. Press the Hour setting button ( 7 ) to set the hours. Note: This unit
uses the 24-hour clock.
Press the Standby button ( 1 ) or the relevant Alarm button ( 3 or 2 ).
Cancel Alarm (alarm switched off)
3. Press the Minute setting button ( 8 ) to set the minutes.
Press the relevant Alarm button ( 3 or 2 ).
4. Press the Set clock button to set the selected time.
FEB14-GCR02-REV3
5. Nap Function
9. Changing the Batteries
While the unit is in standby mode you can use it as a nap timer by setting it to sound the buzzer
after a fixed period of time.
1. Press the Nap button ( 4 ). Each press of the Nap button cycles
through the available nap times (in minutes):
120 - 90 - 60 - 30 - 15 - 10 - 5 - OFF
2. When the buzzer sounds, press the Nap button or the Standby ( 1 )
button to silence it.
To cancel the Nap function, press the Nap button until OFF is displayed.
6. Tuning the Radio
Press the Radio on/off button ( 1 ) to switch on the radio. For best results, extend the FM wire
antenna.
This unit is powered from the mains using the the AC power cord supplied. Backup time keeping
can be powered by two 1.5V AAA/R03/UM4 batteries (not included). For optimal performance, we
recommend Alkaline batteries.
Note: The unit will not work on batteries alone. They are only used for backup time keeping.
Manual Search
Press the Setting down ( 7 ) or Setting up ( 8 ) button to search for a radio station.
10. Technical Specifications
Automatic Search
Power Supply: AC 230V~50Hz, 4W consumption
DC 3V 2x 1.5V AAA/R03/UM4 backup batteries (not supplied)
Press and hold the Setting down ( 7 ) or Setting up ( 8 ) button until the automatic search
starts. The search will stop when a station is found. Press the button again to continue the search.
Radio:
87.5 - 108Mhz FM
Dimensions: 120(L) x 64(W) x 77(H) mm
Storing a Station in the Presets List
The unit can store up to 20 radio stations in the presets list. To do so:
11. Safety
1. Search for a radio station.
Do not block the ventilation slots with items such as newspapers, tablecloths, curtains, etc. Leave
a minimum of 5cm clear around the unit for sufficient ventilation.
2. Press the Memory button ( 6 ). P01 will flash on the display.
Do not place naked flame sources, such as candles, on top of the unit.
3. Press the Setting down or Setting up button to select the required preset location.
Do not place objects filled with liquid, such as vases, on the unit.
4. Press the Memory button to save the station to the selected preset location.
Do not expose the unit to dripping or splashing.
Alternatively, press and hold the Auto scan button ( 9 ) to store the first 20 FM stations in the
presets.
Do not dispose of batteries in the fire. Do not expose batteries to excessive heat, such as direct
sunlight or fire.
To Select a Preset Station From the List
The mains plug is used to disconnect the device. To completely disconnect the unit, remove the
plug completely from the mains.
Press the Auto scan button to select the required preset. Each press of the button cycles through
the list of presets.
The mains plug should not be obstructed and should be easily accessible during intended use.
7. Sleep Function
The marking plate is on the bottom of the unit.
You can set the unit to switch the radio off after a set period of time. This enables you to fall
asleep to the radio.
Press the Sleep button ( 4 ). Each press of the Sleep button cycles through the available sleep
times (in minutes):
120 - 90 - 60 - 30 - 15 - 10 - 5 - OFF
If the unit is affected by electrical fast transient and/or electrostatic phenomenon, the unit may
malfunction and require the user to power reset it.
Use the unit in moderate climates.
Caution: To reduce the risk of electric shock, do not remove the cover or back.
There are no user serviceable parts inside the unit. Refer all servicing to qualified personnel.
To cancel the Sleep function, press the Sleep button until OFF is displayed.
8. Dimmer
To adjust the brightness of the display, press the Brightness button ( 5 ). Each press of the
Brightness button cycles through the available brightness settings:
HIGH - LOW - OFF
Caution: Danger of explosion if the batteries are incorrectly replaced. Replace only with the same
or equivalent type.
The lightning with arrow symbol in the triangle is a warning sign alerting the user to
‘dangerous voltage’ inside the unit.
The exclamation mark in the triangle is a warning sign alerting the user to important
instructions accompanying the product.