1
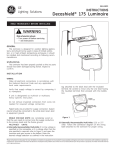
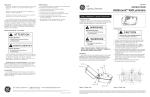
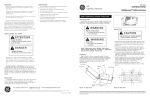
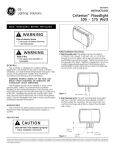
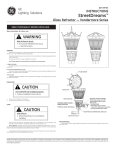
ÉTAPE 3
• Enlevez l'ancien étrier de douille sur la douille et jetez-le.
ÉTAPE 6
• Fixez le module optique avec les fermetures à arceau, puis
réinstallez la lampe.
Utilisez un tournevis à
empreinte hexagonale
ou un embout
hexagonal de 5/16 po.
Passer sur le crochet et tirer
vers le bas
g
GEH-5918
INSTRUCTIONS
GE
Lighting Solutions
SKYGARDTM POWR/BRACKET®
Retrofit Optical
Fermetures
à arceau
READ THOROUGHLY BEFORE INSTALLING
Jetez le
vieil
étrier
WARNING
New
Socket
Bracket
Risk of electric shock
• Turn power off before servicing
– see instructions
Figure 3
SKYGARD™
Optical
Figure 6
CAUTION
ÉTAPE 4
• Fixez le nouvel étrier en l'orientant conformément au
schéma de la figure 4.
Risk of burn
• Allow lamp/fixture to cool before
handling
Vue du dessus
de la douille
Release
Latches
GENERAL
This luminaire optical is designed for outdoor lighting
service, and should not be used in areas of limited ventilation, or in high ambient temperature enclosures. Best results
will be obtained if installed and maintained according to
following recommendations.
Nouvel étrier
coins coupés
UNPACKING
Lower
Optical
Figure 1
This luminaire optical has been properly packed so that
no part should have been damaged during transit. Inspect to
confirm.
Figure 4
TOOLS
ÉTAPE 5
• Réinstallez l'étrier avec la douille sur le boîtier du luminaire, conformément à la figure 5.
Installation will require either a slotted screw driver or
5/16 hex drivers.
INSTALLATION
STEP 2
If this is a 400 watt mercury Powr/Bracket go to STEP 6.
• Remove the socket bracket screws and lower the socket
and bracket from the casting shown in Figure 2.
• Retain the screws.
After the luminaire optical has been unpacked and
inspected, it may be installed according to the following
instructions.
Figure 5
g
STEP 1
• Remove the lamp and retain.
• Remove the existing refractor optical by releasing the
bail latches as shown in Figure 1 and lowering the
optical to remove.
Vue du dessous
de la douille
GE Lighting Solutions • 1-888-MY-GE-LED • www.gelightingsolutions.com
Figure 2
Use Slotted
or 5/16
inch Hex
Driver
1-88 8 - 6 9 - 4 3-5 3 3
GE Lighting Solutions is a subsidiary of the General Electric Company. Evolve and other trademarks belong to GE Lighting Solutions. The GE brand and logo are trademarks of the General Electric Company.
© 2011 GE Lighting Solutions. Information provided is subject to change without notice. All values are design or typical values when measured under laboratory conditions.
35-201578-111 (3/04)
These instructions do not purport to cover all details or variations in equipment nor to provide for every possible contingency to be met in connection with installation, operation or
maintenance. Should further information be desired or should particular problems arise which are not covered sufficiently for the purchaser’s purposes, the matter should be referred
to GE Lighting Solutions.
STEP 3
• Remove the old socket bracket from the socket and
discard.
STEP 6
• Attach the optical using the bail latches and reinstall
the lamp.
Use Slotted or
5/16 inch Hex
Driver
Clip on Hook and Pull Down
g
GEH-5918
GE
Lighting Solutions
INSTRUCTIONS
Module optique de conversion
SKYGARDTM POWR/BRACKET®
Bail
Latches
LIRE ATTENTIVEMENT AVANT D'INSTALLER
Discard
old
bracket
AV E RT I S S E M E N T
Nouvel
étrier
de douille
Risque d'électrocution
• Mettre hors tension avant d'intervenir
– Suivez les instructions
Figure 3
Module optique
SKYGARD™
Figure 6
AV E RT I S S E M E N T
STEP 4
• Attach the new bracket in the orientation shown in
Figure 4.
View from
top of socket
New Bracket
Trimmed Corners
Risque de brûlure
• Ne touchez pas le luminaire en
fonctionnement
GÉNÉRALITÉS
Ce luminaire a été conçu pour une utilisation à l'extérieur et
ne doit pas être utilisé dans les endroits mal ventilés ni dans un
endroit clos où la température ambiante peut être élevée. Son
efficacité sera meilleure s'il est installé et entretenu conformément
aux recommandations ci-dessous.
DÉBALLAGE
Ce module optique de luminaire a été soigneusement emballé
pour qu'aucune pièce ne subisse de dommages durant le transport. Procédez à une inspection pour vous en assurer.
Figure 4
OUTILS
Pour réaliser l'installation vous devrez utiliser un tournevis à
empreinte hexagonale ou un embout hexagonal de 5/16 po.
STEP5
• Reattach the bracket with socket to the luminaire
casting as shown in Figure 5.
Ouvrez les
fermetures
INSTALLATION
Après le déballage et l'inspection du module optique de
luminaire, l'installation peut être faite en exécutant les opérations
suivantes.
Module
optique
inférieur
Figure 1
ÉTAPE 2
Si le luminaire est de type Powr/Bracket au mercure 400 watts,
passez à l'étape 6.
• Enlevez les vis de l'étrier de douille, puis abaissez la douille
et l'étrier de la pièce coulée, comme dans la figure 2.
• Conservez les vis.
ÉTAPE 1
• Enlevez la lampe et mettez-la de côté.
• Enlevez l'ancien module optique du réfracteur en ouvrant
les fermetures à arceau (voir la figure 1), puis en abaissant
le module optique pour le sortir.
Figure 5
View from
bottom of socket
Figure 2
Utilisez un tournevis
empreinte hexagonale
ou un embout
hexagonal de 5/16 po.
Ces instructions n'ont pas pour destination de couvrir tous les détails ou variantes de l'équipement, ni de répondre à toutes les éventualités que vous pourriez rencontrer pendant l'installation,
le fonctionnement ou l'entretien. Si vous souhaitez des informations complémentaires, ou si vous rencontrez un problème particulier qui ne soit pas adressé de votre point de vue d'acheteur,
le sujet doit être remonté jusqu'à la société GE Lighting Solutions
ÉTAPE 3
• Enlevez l'ancien étrier de douille sur la douille et jetez-le.
ÉTAPE 6
• Fixez le module optique avec les fermetures à arceau, puis
réinstallez la lampe.
Utilisez un tournevis à
empreinte hexagonale
ou un embout
hexagonal de 5/16 po.
Passer sur le crochet et tirer
vers le bas
g
GEH-5918
INSTRUCTIONS
GE
Lighting Solutions
SKYGARDTM POWR/BRACKET®
Retrofit Optical
Fermetures
à arceau
READ THOROUGHLY BEFORE INSTALLING
Jetez le
vieil
étrier
WARNING
New
Socket
Bracket
Risk of electric shock
• Turn power off before servicing
– see instructions
Figure 3
SKYGARD™
Optical
Figure 6
CAUTION
ÉTAPE 4
• Fixez le nouvel étrier en l'orientant conformément au
schéma de la figure 4.
Risk of burn
• Allow lamp/fixture to cool before
handling
Vue du dessus
de la douille
Release
Latches
GENERAL
This luminaire optical is designed for outdoor lighting
service, and should not be used in areas of limited ventilation, or in high ambient temperature enclosures. Best results
will be obtained if installed and maintained according to
following recommendations.
Nouvel étrier
coins coupés
UNPACKING
Lower
Optical
Figure 1
This luminaire optical has been properly packed so that
no part should have been damaged during transit. Inspect to
confirm.
Figure 4
TOOLS
ÉTAPE 5
• Réinstallez l'étrier avec la douille sur le boîtier du luminaire, conformément à la figure 5.
Installation will require either a slotted screw driver or
5/16 hex drivers.
INSTALLATION
STEP 2
If this is a 400 watt mercury Powr/Bracket go to STEP 6.
• Remove the socket bracket screws and lower the socket
and bracket from the casting shown in Figure 2.
• Retain the screws.
After the luminaire optical has been unpacked and
inspected, it may be installed according to the following
instructions.
Figure 5
g
STEP 1
• Remove the lamp and retain.
• Remove the existing refractor optical by releasing the
bail latches as shown in Figure 1 and lowering the
optical to remove.
Vue du dessous
de la douille
GE Lighting Solutions • 1-888-MY-GE-LED • www.gelightingsolutions.com
Figure 2
Use Slotted
or 5/16
inch Hex
Driver
1-88 8 - 6 9 - 4 3-5 3 3
GE Lighting Solutions is a subsidiary of the General Electric Company. Evolve and other trademarks belong to GE Lighting Solutions. The GE brand and logo are trademarks of the General Electric Company.
© 2011 GE Lighting Solutions. Information provided is subject to change without notice. All values are design or typical values when measured under laboratory conditions.
35-201578-111 (3/04)
These instructions do not purport to cover all details or variations in equipment nor to provide for every possible contingency to be met in connection with installation, operation or
maintenance. Should further information be desired or should particular problems arise which are not covered sufficiently for the purchaser’s purposes, the matter should be referred
to GE Lighting Solutions.