1
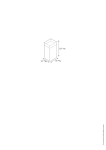
Installation Instructions
JXCHBB, JXCHWW,
JXCHCC, JXCHSS
JXCHBB, Black
JXCHWW, White
JXCHCC, Bisque
JXCHSS, Stainless Steel
Decorative Duct Cover
Ceiling Bracket
4 Torx Head
Screws
KIT CONTENTS
2 Washers
2 Phillips Head
Decorative Screws
2 Wall
Fasteners
2 Wood
Screws
DUCT COVER REQUIREMENTS
These decorative duct covers are designed to conceal
the ductwork running from the top of the hood to the
ceiling. The duct cover can be used to fill a 12" space by
using the outer piece alone, or using both pieces it will
expand from 24" to 34" heights. Read this page to be
sure the duct cover accessory fits your installation
situation.
Duct Cover Accessory:
• Use the decorative duct
cover to conceal ductwork
running from the top of
the hood to the ceiling.
• The duct cover accessory
consists of 2 pieces. The
outside piece is 12″ high,
the inside piece is 22″.
22"
Nested together they are
24″ min., expanding to
a total maximum height
of 34″.
• The outside piece can be
used alone to fill a 12″
11"
height.
• For heights over 12″, the
ceiling bracket must be
installed to secure the cover at the top.
2-Piece
Duct Cover With
Ceiling Bracket
Review the following examples to ensure a trouble free
installation using the duct cover accessory.
8 ft. Ceilings: The hood must
be installed at 30″ above the
cooking surface (or 66″ above
the floor). The duct cover will
not fit if the hood is installed at
a lower or higher height. Use
the outside 12″ section, discard
the inside section.
8 ft. Ceiling
12"
30"
9 ft. Ceiling
12"
24"
30"
12"
30"
24"
12"
To avoid unsightly gaps, plan the hood installation height
for duct cover use.
• The cover will fit a 12″ min. height from the top of the
hood to the ceiling,
– or 24″ min. and expanding up to 34″ from the top of
the hood to the ceiling.
THE DUCT COVER CANNOT BE USED WHEN THE
DISTANCE ABOVE THE TOP OF THE HOOD IS
BETWEEN 12″ AND 24″.
9 ft. Ceilings: Install the hood 24″ min. and up to a maximum of 30″
above the cooking surface. The duct cover will expand to reach
ceiling height.
10 ft. Ceiling
30"
34"
32"
36" Max.
10 ft. Ceilings: Install the hood 32″ min. to 36″ max. above the cooking
surface. The duct cover will expand to a maximum of 34″ above the
top of the hood to meet the ceiling.
Installation Instructions
STEP 1 INSTALL CEILING BRACKET
The ceiling bracket must be installed when the duct
cover is used to span 24″ or more height above the
hood. The bracket will hold the decorative duct cover
in place at the top.
Note: The ceiling bracket is not required when using
only the 12″ section of the duct cover.
• Install the 2 small screws into the sides of the duct
bracket. Remove the screws. Pre-tapping the holes will
insure ease of final installation.
• Match center notch on the bracket to the centerline
on the wall and flush against the ceiling.
• Mark the 2 screw hole locations.
• Drill 1/8″ pilot holes in marked bracket location.
• If pilot holes do not enter studs, enlarge the holes to
3/8″ and install wall fastener anchors.
• Secure the bracket to the rear wall with wood screws
and washers. Use wall anchors if needed.
STEP 2 INSTALL DUCT COVERS
To install the 12″ duct cover alone:
• Place the 12″ section of the decorative duct cover on
top of the hood.
• Secure the cover to the top of the hood with 4 screws
provided.
To install the 2-piece duct cover:
• Place the 2-piece duct cover on top of the hood.
• Secure the bottom cover to the top of the hood with
4 screws provided.
• Extend the inside section upwards to meet the
ceiling and ceiling bracket.
• Secure the duct cover to the bracket with the 2 small
Phillips screws provided.
Note: Bracket has 2 sets of holes. Use larger holes for wall
fasteners or wood screws with washers. Use smaller holes for
wood screws with washers.
Install
Ceiling Bracket
When Duct
Cover is
Used to Span
24" or More
See Step 2
to Install
Duct Cover
Pub. No. 49-80107
Dwg. No. 164D4290P065
(N.D. 245) 6/01