1
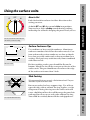
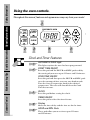
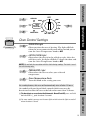
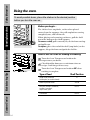
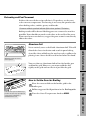
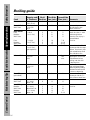
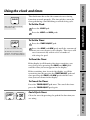
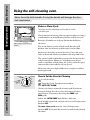
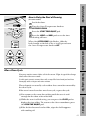
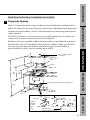
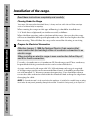
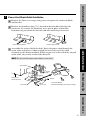
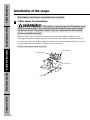
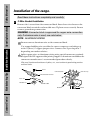
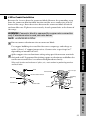
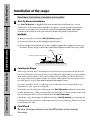
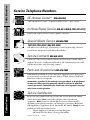
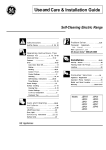
Self-Cleaning Electric
Ranges
GE Appliances
Owner’s Manual
JBP19
JBP21
JBP24
JBP25
JBP26
JBP30
JBP45
JBP46
JBP47
3
GE Answer Center ® 800.626.2000
Part No. 164D3333P035
Pub. No. 49-8781
Congratulations!
You Are Now Part of the GE Family.
Welcome to the GE family.
We’re proud of our quality
products and we are
committed to providing
dependable service.
You’ll see it in this easy-touse Owner’s Manual and
you’ll hear it in the friendly
voices of our customer
service department.
Best of all, you’ll experience
these values each time you
use your range. That’s
important, because your
new range will be part of
your family for many years.
And we hope you will be
part of ours for a long time
to come.
We thank you for buying
GE. We appreciate your
purchase and hope you
will continue to rely on us
whenever you need quality
appliances for your home.
Important!
Staple sales slip or cancelled
check here.
Proof of the original purchase date
is needed to obtain service under
the warranty.
Write the model and serial
numbers here.
#
#
You can find them on a label behind
the range door or behind the storage
drawer.
2
Read this Manual
Inside you will find many
helpful hints on how to use and
maintain your range properly.
Just a little preventive care on
your part can save you a great
deal of time and money over the
life of your range.
Review the Section on
Troubleshooting Tips
Using the Surface Units . . .10, 11
Using the Oven . . . . . . . . .12–15
Using the Clock and Timer . . . .17
Timed Baking and Roasting . . .18
Oven Thermostat . . . . . . . . . . .19
Care and Cleaning . . . . . . .20–27
Installation Instructions
Before You Begin . . . . . . . . . . .28
Prepare the Opening . . . . . . . .29
Flooring . . . . . . . . . . . . . . . . . .30
Electrical Connection . . . . .30–35
Anti-Tip Bracket . . . . . . . . . . . .36
Leveling . . . . . . . . . . . . . . . . . .36
Troubleshooting Tips
Before You
Call For Service . . . . . . . . .37–42
If You Need Service
Customer Service
Warranty . . . . . . . . . . . . . . . . .43
Service Telephone
Numbers . . . . . . . . . .Back Cover
3
Customer Service
If you do need service, you can
relax knowing help is only a
phone call away. A list of toll-free
customer service numbers is
included in the back section.
Or you can always call the
GE Answer Center® at
800.626.2000, 24 hours a day,
7 days a week.
Troubleshooting Tips
You’ll find many answers to
common problems here.
If you review our chart of
Troubleshooting Tips first,
you may not need to call for
service at all.
Operating Instructions
Operating Instructions Installation Instructions
Ask any GE appliance owner and they will
tell you we stand behind our products with
unmatched quality service. However, did
you know that most questions result from
simple problems that you can easily fix
yourself in just a few minutes? This
Owner’s Manual can tell you how.
Safety Information
GE & You,
A Service Partnership.
Safety Information
Anti-Tip Device . . . . . . . . . . . . . .4
Safety Precautions . . . . . . . . .5–7
Oven . . . . . . . . . . . . . . . . . . . .7, 8
Surface Cooking Units . . . . .9, 10
Safety Information
IMPORTANT SAFETY INFORMATION.
READ ALL INSTRUCTIONS BEFORE USING.
WARNING!
Installation Instructions Operating Instructions
For your safety, the information in this manual must be
followed to minimize the risk of fire or explosion, electric
shock, or to prevent property damage, personal injury, or
loss of life.
WARNING ANTI-TIP DEVICE
All ranges can tip and injury could result.
To prevent accidental tipping of the range, attach it to the
wall and floor by installing the Anti-Tip device supplied.
To check if the device is installed and engaged properly,
remove the kick panel or storage drawer and inspect the
rear leveling leg. Make sure it fits securely into the slot.
If you pull the range out from the wall for any
reason, make sure the device is properly engaged
when you push the range back against the wall. If it is
not, there is a possible risk of the range tipping over
and causing injury if you or a child stand, sit or lean
on an open door.
Troubleshooting Tips
Please refer to the Anti-Tip device information in this
manual. Failure to take this precaution could result in
tipping of the range and injury.
IMPORTANT SAFETY NOTICE
Customer Service
The California Safe Drinking Water and Toxic Enforcement
Act requires the Governor of California to publish a list of
substances known to the state to cause birth defects or
other reproductive harm, and requires businesses to warn
customers of potential exposure to such substances.
The fiberglass insulation in self-clean ovens gives off a very
small amount of carbon monoxide during the cleaning cycle.
Exposure can be minimized by venting with an open window
or using a ventilation fan or hood.
4
Fluorescent light bulbs contain mercury. If your model has a
surface light, you must recycle the fluorescent light bulb
according to local, state and federal codes.
Safety Information
Use this appliance only for its intended purpose as
described in this Owner’s Manual.
Operating Instructions Installation Instructions
SAFETY PRECAUTIONS
When using electrical appliances, basic safety precautions
should be followed, including the following:
■ Do not allow anyone to
climb, stand or hang on
the door, storage
drawer or cooktop.
They could damage the
range and even tip it
over, causing severe
personal injury.
■ Do not store flammable
materials in an oven or
near the cooktop.
■ CAUTION: Items of
interest to children
should not be stored in
cabinets above a range
or on the backsplash of
a range—children
climbing on the range
to reach items could be
seriously injured.
■ Never wear loose-fitting
or hanging garments
while using the
appliance. Be careful
when reaching for
items stored over the
range. Flammable
material could be
ignited if brought in
contact with hot surface
units or heating
elements and may
cause severe burns.
Troubleshooting Tips
Customer Service
■ Be sure your appliance
is properly installed and
grounded by a qualified
technician in
accordance with the
provided installation
instructions.
■ Do not attempt to
repair or replace any
part of your range
unless it is specifically
recommended in this
manual. All other
servicing should be
referred to a qualified
technician.
■ Before performing any
service, disconnect the
range power supply at
the household
distribution panel by
removing the fuse or
switching off the circuit
breaker.
■ Do not leave children
alone—children should
not be left alone or
unattended in an area
where an appliance is
in use. They should
never be allowed to sit
or stand on any part of
the appliance.
5
Safety Information
IMPORTANT SAFETY INFORMATION.
READ ALL INSTRUCTIONS BEFORE USING.
WARNING!
Customer Service
Troubleshooting Tips
Installation Instructions Operating Instructions
SAFETY PRECAUTIONS
6
■ Use only dry pot
holders—moist or
damp pot holders on
hot surfaces may result
in burns from steam.
Do not let pot holders
touch hot surface units
or heating elements.
Do not use a towel or
other bulky cloth.
■ For your safety, never
use your appliance for
warming or heating the
room.
■ Do not let cooking
grease or other
flammable materials
accumulate in or near
the range.
■ Do not use water on
grease fires. Never pick
up a flaming pan. Turn
the controls off.
Smother a flaming pan
on a surface unit by
covering the pan
completely with a wellfitting lid, cookie sheet
or flat tray. Use a multipurpose dry chemical
or foam-type fire
extinguisher.
■ Flaming grease outside
a pan can be put out by
covering it with baking
soda or, if available, by
using a multi-purpose
dry chemical or foamtype fire extinguisher.
■ Flame in the oven can
be smothered
completely by closing
the oven door and
turning the oven off or
by using a multipurpose dry chemical
or foam-type fire
extinguisher.
■ Do not touch the
surface units, the
heating elements or the
interior surface of the
oven. These surfaces
may be hot enough to
burn even though they
are dark in color.
During and after use,
do not touch, or let
clothing or other
flammable materials
contact, the surface
units, areas nearby the
surface units or any
interior area of the
oven; allow sufficient
time for cooling first.
■ Potentially hot surfaces
include the cooktop,
areas facing the
cooktop, oven vent
opening, surfaces near
the opening, crevices
around the oven door
and metal trim parts
above the door.
■ REMEMBER: The inside
surface of the oven may
be hot when the door is
opened.
WHEN COOKING PORK…
When cooking pork, follow the directions exactly and always cook
the meat to an internal temperature of at least 170°F. This assures
that, in the remote possibility that trichina may be present in the
meat, it will be killed and the meat will be safe to eat.
OVEN
Customer Service
■ Pulling out the shelf to
the stop-lock is a
convenience in lifting
heavy foods. It is also a
precaution against
burns from touching
hot surfaces of the door
or oven walls.
■ When using cooking or
roasting bags in the
oven, follow the
manufacturer’s
directions.
■ Do not use the oven to
dry newspapers. If
overheated, they can
catch on fire.
■ Do not use the oven for
a storage area. Items
stored in an oven can
ignite.
■ Do not leave paper
products, cooking
utensils or food in the
7
oven when not in use.
Troubleshooting Tips
■ Stand away from the
range when opening
the oven door. Hot air
or steam which escapes
can cause burns to
hands, face and/or
eyes.
■ Do not heat unopened
food containers.
Pressure could build up
and the container could
burst, causing an injury.
■ Keep the oven vent
unobstructed.
■ Keep the oven free
from grease buildup.
■ Place the oven shelf in
the desired position
while the oven is cool. If
shelves must be
handled when hot, do
not let pot holder
contact the heating
elements.
Operating Instructions Installation Instructions
■ Keep the hood and
grease filters clean to
maintain good venting
and to avoid grease
fires.
Safety Information
■ Do not store or use
combustible materials,
gasoline or other
flammable vapors and
liquids in the vicinity of
this or any other
appliance.
Safety Information
IMPORTANT SAFETY INFORMATION.
READ ALL INSTRUCTIONS BEFORE USING.
WARNING!
SELF-CLEANING OVEN
Customer Service
Troubleshooting Tips
Installation Instructions Operating Instructions
■ Do not clean the door ■ Before self-cleaning the
oven, remove the
gasket. The door gasket
broiler pan, grid and
is essential for a good
other cookware.
seal. Care should be
taken not to rub,
■ Be sure to wipe up
damage or move the
excess spillage before
gasket.
starting the selfcleaning operation.
■ Clean only parts listed
in this Owner’s Manual. ■ If the self-cleaning
mode malfunctions,
■ Do not use oven
turn the oven off and
cleaners. No
disconnect the power
commercial oven
supply. Have it serviced
cleaner or oven liner
by a qualified
protective coating of
technician.
any kind should be
used in or around any
part of the oven.
Residue from oven
cleaners will damage
the inside of the oven
when the self-clean
cycle is used.
8
Customer Service
■ To minimize the
possibility of burns,
ignition of flammable
materials and spillage,
the handle of a
container should be
turned toward the
center of the range
without extending over
nearby surface units.
■ Always turn the surface
units off before
removing cookware.
■ Do not immerse or soak
the removable surface
units. Do not put them
in a dishwasher. Do not
self-clean the surface
units in the oven.
■ When flaming foods
are under the hood,
turn the fan off. The
fan, if operating, may
spread the flame.
■ To avoid the possibility
of a burn or electric
shock, always be certain
that the controls for all
surface units are at the
OFF position and all
coils are cool before
attempting to lift or
remove a unit.
9
Troubleshooting Tips
■ Never leave the surface
units unattended at
high heat settings.
Boilovers cause
smoking and greasy
spillovers that may
catch on fire.
■ Do not use aluminum
foil to line the drip pans
or anywhere in the oven
except as described in
this manual. Misuse
could result in a shock,
fire hazard or damage
to the range.
■ Be sure the drip pans
and the vent duct are
not covered and are in
place. Their absence
during cooking could
damage range parts
and wiring.
■ Only certain types of
glass, glass ⁄ceramic,
earthenware or other
glazed containers are
suitable for cooktop
service; others may
break because of the
sudden change in
temperature.
Operating Instructions Installation Instructions
Use proper pan size—select cookware having flat bottoms
large enough to cover the surface unit heating element. The
use of undersized cookware will expose a portion of the
surface unit to direct contact and may result in ignition of
clothing. Proper relationship of cookware to surface unit will
also improve efficiency.
Safety Information
SURFACE COOKING UNITS
Safety Information
IMPORTANT SAFETY INFORMATION.
READ ALL INSTRUCTIONS BEFORE USING.
WARNING!
SURFACE COOKING UNITS
Troubleshooting Tips
Installation Instructions Operating Instructions
■ Clean the cooktop with
caution. If a wet sponge
is used to wipe spills on
a hot cooktop, be
careful to avoid steam
burns.
■ Keep an eye on foods
being fried at high or
medium high heat
settings.
■ Foods for frying should
be as dry as possible.
Frost on frozen foods or
moisture on fresh foods
can cause hot fat to
bubble up and over the
sides of the pan.
■ Use little fat for
effective shallow or
deep fat frying. Filling
the pan too full of fat
can cause spillovers
when food is added.
■ If a combination of oils
or fats will be used in
frying, stir together
before heating, or as
fats melt slowly.
■ Always heat fat slowly,
and watch as it heats.
■ Use a deep fat
thermometer whenever
possible to prevent
overheating fat beyond
the smoking point.
REMEMBER…
Your continued health and safety are important to us.
Please read and follow this Safety Information carefully.
We want you to remain a happy and healthy part of our
GE family.
Customer Service
SAVE THESE INSTRUCTIONS
10
Safety Information
Using the surface units.
LO
OFF
How to Set
HI
Push the knob in and turn in either direction to the
setting you want.
Operating Instructions Installation Instructions
At both OFF and HI the control clicks into position.
You may hear slight clicking sounds during cooking,
indicating the control is keeping the power level you set.
MED
Be sure you turn the control knob to
OFF when you finish cooking.
Surface Cookware Tips
1″
Not over 1 inch
Use medium- or heavy-weight cookware. Aluminum
cookware conducts heat faster than other metals. Castiron and coated cast-iron cookware are slow to absorb
heat, but generally cook evenly at low to medium heat
settings. Steel pans may cook unevenly if not combined
with other metals.
For best cooking results, pans should be flat on the
bottom. Match the size of the saucepan to the size of the
surface unit. The pan should not extend over the edge
of the surface unit more than 1 inch.
Troubleshooting Tips
Wok Cooking
We recommend that you use only a flat-bottomed wok. They are
available at your local retail store.
Customer Service
Use only flat-bottomed woks.
Do not use woks that have support rings. Use of these
types of woks, with or without the ring in place, can be
dangerous. Placing the ring over the surface unit will
cause a build-up of heat that will damage the porcelain
cooktop. Do not try to use such woks without the ring.
You could be seriously burned if the wok tipped over.
11
Safety Information
Using the oven controls.
Throughout this manual, features and appearance may vary from your model.
Installation Instructions Operating Instructions
1
AUTOMATIC OVEN
COOK
TIME
ON/OFF
START
TIME
TIMER
ON/OFF
L
D
CLOCK
ON/OFF
2
HR
3
MIN
4
5
Clock and Timer Features
Troubleshooting Tips
1
2
AUTOMATIC OVEN Light
This lights anytime the oven has been programmed.
START TIME ON/OFF
Press this pad and the HOUR and MIN. pads to delay
the starting of your oven up to 11 hours and 59 minutes.
COOK TIME ON/OFF
Press this pad and then press the HOUR and MIN. pads
to set the amount of time you want your food to cook.
Turn the Oven Temperature knob to the desired
temperature. The oven will shut off when the Cook
Time has run out.
3
CLOCK
Press this pad before setting the clock.
Customer Service
TIMER ON/OFF
Press this pad to select the timer feature.
4
5
12
Display
Shows the time of day and the time set for the timer.
HOUR and MIN. Pads
These pads allow you to set times up to 11 hours
and 59 minutes.
OVEN ON
Safety Information
6
OFF
WM
BROIL
200
AUTO
SELF
CLEAN
250
9
Operating Instructions Installation Instructions
7
8
LATCH
DOOR
300
PREHEATED
350
550
500
450
400
Oven Control Settings
6
OVEN ON Light
7
LATCH DOOR Light
Glows anytime the oven is heating. The light will flash
when the oven automatically turns off to remind you to
turn the Oven Temperature knob to OFF.
Glows when the oven is in the self-clean cycle. After the
self-clean cycle, the light will flash. Unlatch the door and
turn the Oven Temperature knob to OFF.
NOTE: Do not lock the oven door with the latch during cooking. The latch is used
for self-cleaning only.
8
PREHEATED Light
9
Oven Temperature Knob
Troubleshooting Tips
Glows when the oven reaches your selected
temperature.
Turn this knob to the setting you want.
As a safety feature, this oven will automatically shut off after 12 hours.
On models with touch pad clock controls this feature may be
deactivated to allow the oven to be left on for more than 12 hours.
Customer Service
■ To deactivate or reactivate the Automatic Oven Shut-Off, press and hold
both the MIN. +/– pads for about 4 seconds.
■ On some models you may use the oven light switch to turn the light on and off
when the door is closed.
13
Safety Information
Using the oven.
To avoid possible burns, place the shelves in the desired position
before you turn the oven on.
Installation Instructions Operating Instructions
Before you begin…
D
C
B
A
The shelves have stop-locks, so that when placed
correctly on the supports, they will stop before coming
completely out, and will not tilt.
When placing and removing cookware, pull the shelf
out to the bump on the shelf support.
To remove a shelf, pull it toward you, tilt the front end up
and pull it out.
The oven has 4 shelf positions.
To replace, place the end of the shelf (stop-locks) on the
support, tilt up the front and push the shelf in.
How to Set the Oven for Baking or Roasting
Troubleshooting Tips
C
B
A
Turn the Oven Temperature knob to the
1 temperature
you desire.
Check food for doneness at minimum time on
2 recipe.
Cook longer if necessary.
Turn the Oven Temperature knob to OFF when
3 cooking is complete.
Type of Food
Customer Service
Angel food cake and
frozen pies (on cookie sheet)
14
Shelf Position
A
Bundt or pound cakes
A or B
Biscuits, muffins, brownies,
cookies, cupcakes,
layer cakes, pies
B or C
Casseroles
B or C
Safety Information
Preheating and Pan Placement
Preheat the oven if the recipe calls for it. To preheat, set the oven
at the correct temperature. Preheating is necessary for good results
when baking cakes, cookies, pastry and breads.
Operating Instructions Installation Instructions
For ovens without a preheat indicator light or tone, preheat 10 minutes.
Baking results will be better if baking pans are centered as much as
possible. Pans should not touch each other or the walls of the oven.
If you need to use two shelves, stagger the pans so one is not directly
above the other.
Aluminum Foil
Never entirely cover a shelf with aluminum foil. This will
disturb the heat circulation and result in poor baking.
A smaller sheet of foil may be used to catch a spillover by
placing it on a lower shelf several inches below the food.
Aluminum foil may be used to
catch a spillover.
You can also use aluminum foil to line the broiler pan
and broiler grid. However, you must mold the foil
tightly to the grid and cut slits in it just like the grid.
Troubleshooting Tips
How to Set the Oven for Broiling
1
2 Follow suggested shelf positions in the Broiling guide.
3 Turn the Oven Temperature knob to BROIL.
Customer Service
Leave the door open to the broil stop
position. The door stays open by itself,
yet the proper temperature is
maintained in the oven.
Place the meat or fish on the broiler grid in the
broiler pan.
15
Safety Information
Broiling guide
Food
Bacon
Installation Instructions Operating Instructions
Ground Beef
Well Done
Beef Steaks
Rare
Medium
Well Done
Troubleshooting Tips
Rare
Medium
Well Done
Chicken
Customer Service
1/2 lb. (about
8 thin slices)
1 lb. (4 patties)
1/2 to 3/4″
thick
C
41⁄2
41⁄2
C
10
7
Space evenly.
Up to 8 patties take
about same time.
1″ thick
(1 to 11⁄2 lbs.)
C
C
C
6
8
12
5
6
11
11⁄2″ thick
(2 to 21⁄2 lbs.)
C
C
C
A
10
15
25
35
7–8
14–16
20–25
10–15
Steaks less than 1″ thick
cook through before
browning. Pan frying is
recommended.
Slash fat.
1 whole
(2 to 21⁄2 lbs.),
split lengthwise
Lobster Tails
2–4
(6 to 8 oz.
each)
B
13–16
Do not
turn
over.
Fish
1-lb. fillets
1/4 to 1/2″
thick
C
5
5
Ham Slices
(precooked)
1″ thick
B
8
8
Pork Chops
Well Done
2 (1/2″ thick)
2 (1″ thick),
about 1 lb.
C
B
10
13
10
13
2 (1″ thick),
about 10 to 12 oz.
2 (11⁄2″ thick),
about 1 lb.
C
C
C
B
10
12
14
17
9
10
12
12–14
Lamb Chops
Medium
Well Done
Medium
Well Done
16
Quantity and/ Shelf
First Side Second Side
or Thickness Position Time (min.) Time (min.) Comments
Arrange in single layer.
Reduce time about 5 to 10
minutes per side for cut-up
chicken. Brush each side
with melted butter. Broil
skin-side-down first.
Cut through back of shell.
Spread open. Brush with
melted butter before
broiling and after half
of broiling time.
Handle and turn very carefully.
Brush with lemon butter
before and during cooking,
if desired. Preheat broiler
to increase browning.
Increase time 5 to 10
minutes per side for 11⁄2″
thick or home cured ham.
Slash fat.
Slash fat.
Safety Information
Using the clock and timer.
The clock must be set for the automatic oven timing
functions to work properly. The time of day cannot be
changed during a timed baking or self-cleaning cycle.
CLOCK
To Set the Clock:
Operating Instructions Installation Instructions
Make sure the clock is set to the
correct time of day.
1 Press the CLOCK pad.
2 Press the HOUR and MIN. pads.
To Set the Timer:
TIMER
ON/OFF
The timer is a minute timer only.
The timer does not control oven
operations. The maximum setting on
the timer is 11 hours and 59 minutes.
1 Press the TIMER ON/OFF pad.
Press the HOUR and MIN. pads until the amount of
2 time
you want shows in the display. The timer will
start automatically within a few seconds of
releasing the pad.
To Reset the Timer:
If the display is still showing the time remaining, you
may change it by pressing the HOUR and MIN. pads
until the time you want appears in the display.
Troubleshooting Tips
If the remaining time is not in the display, recall the
remaining time by pressing the TIMER ON/OFF pad and
then pressing the HOUR and MIN. pads until the new
time you want shows in the display.
To Cancel the Timer:
Press the TIMER ON/OFF pad once. To cancel the timer
press the TIMER ON/OFF pad again.
TIMER
or
ON/OFF
End of Cycle Tones
Clear the tones by pressing the pad of the function you
are using.
Customer Service
ON/OFF
COOK
TIME
17
Safety Information
Using the timed baking and roasting features.
Do not latch the oven door during timed cooking. The latch is used
for self-cleaning only.
Installation Instructions Operating Instructions
NOTE: Foods that spoil easily, such as milk, eggs, fish, stuffings, poultry and pork, should not be
allowed to sit for more than 1 hour before or after cooking. Room temperature promotes the growth
of harmful bacteria. Be sure that the oven light is off because heat from the bulb will speed harmful
bacteria growth.
COOK
TIME
How to Set an Immediate Start and
Automatic Stop
ON/OFF
Make sure the oven clock shows the correct time of day.
START
TIME
ON/OFF
1 Press COOK TIME ON/OFF.
the HOUR and MIN. pads, enter the length of
2 Using
cooking time.
the Oven Temperature knob to the desired
3 Turn
temperature.
The display will show the cooking time remaining. When
the oven reaches the set temperature, a tone sounds.
Troubleshooting Tips
When the oven automatically turns off the AUTOMATIC
OVEN light will flash and the oven will signal. Turn the
oven control to OFF to stop the flashes and signal.
COOK
TIME
ON/OFF
How to Set a Delay Start and Automatic Stop
Make sure the oven clock shows the correct time of day.
1 Press COOK TIME ON/OFF.
the HOUR and MIN. pads, enter the length of
2 Using
cooking time.
START
TIME
3 Press START TIME ON/OFF.
the HOUR and MIN. pads, enter the time you
4 Using
want cooking to start.
START
TIME
the Oven Temperature knob to the desired
5 Turn
temperature.
Customer Service
ON/OFF
ON/OFF
When the oven automatically turns off the AUTOMATIC
OVEN light will flash and the oven will signal. Turn the
oven control to OFF to stop the flashes and signal.
18
You may find that your new oven cooks differently than the one it replaced.
Use your new oven for a few weeks to become more familiar with it. If you
still think your new oven is too hot or too cold, you can adjust the thermostat
yourself.
NOTE: This adjustment will not affect the broiling or the self-cleaning temperatures.
The adjustment will be retained in memory after a power failure.
For Models with Only an Oven Temperature Knob
OFF
OVEN ON
BROIL
PREHEATED
WM
200
LATCH
DOOR
AUTO
SELF
CLEAN
250
300
350
550
500
450
OFF
OVEN ON
PREHEATED
BROIL
WM
TTER
HO VEN
O
E
T MP
HE O N .
S
+20°
A
T O RES E
P S
(5
AUTO
SELF
CLEAN
COOLE
OVEN R
-20°
LATCH
DOOR
400
550
D
S JU T VEN T T
O
U
C. A N S
) U D H O L D B LAS
N ITL IG H T F
L
500 450
400
(appearance may vary)
200
250
300
350
1 Put the knob in the OFF position.
2 Pull the knob off by pulling straight out.
and hold the HOTTER or COOLER button
3 Press
for 5 seconds to make the oven 20°F. hotter or
4
20°F. cooler.
Replace the knob.
When you are adjusting the thermostat, the following
lights will flash indicating where the thermostat will be
set when you release the adjustment button:
For Models with Pads and an Oven Temperature Knob
5 degree increments.
The oven temperature can be increased up to 35°F.
hotter or can be decreased down to 35°F. cooler.
If the oven adjustment is set cooler than the factory
setting a minus sign (–) and the offset temperature will
appear in the display.
several seconds for the control to automatically
4 Wait
19
set and return to its previous setting.
Customer Service
1 Put the Oven Temperature knob in the OFF position.
Press and hold the HOUR +/– pads for 5 seconds
2 until
the display changes.
Before display changes back, press the HOUR +/–
3 pads to increase or decrease the temperature in
Troubleshooting Tips
■ OVEN ON: Indicates the thermostat will be set at the factory
setting.
■ PREHEATED: Indicates the thermostat will be set 20°F. hotter.
■ LATCH DOOR: Indicates the thermostat will be set 20°F. cooler.
Operating Instructions Installation Instructions
Do not use inexpensive thermometers, such as those found in grocery stores, to check the temperature
setting of your oven. These thermometers may vary 20–40 degrees.
Safety Information
Adjust the oven thermostat—Do it yourself!
Safety Information
Using the self-cleaning oven.
Never force the latch handle. Forcing the handle will damage the door
lock mechanism.
Installation Instructions Operating Instructions
Before a Clean Cycle
The range must be completely cool in order to set the
self-clean cycle.
We recommend venting with an open window or using a
ventilation fan or hood during the first self-clean cycle.
Remove all cookware and any aluminum foil from
the oven.
Wipe up heavy soil on the oven
bottom.
The oven shelves can be self-cleaned, but they will
darken, lose their luster and become hard to slide.
Do not use abrasives or oven cleaners. Clean the top,
sides and outside of the oven door with soap and water.
The enamel grid and broiler pan may be cleaned in the
self-cleaning oven. However, to help prevent heavy
smoke caused by self-cleaning the greasy soil in the pan,
you must first clean off the excess grease.
Troubleshooting Tips
Make sure the oven light bulb cover is in place and the
oven light is off.
OFF
OVEN ON
BROIL
PREHEATED
200
LATCH
DOOR
How to Set the Oven for Cleaning
WM
AUTO
SELF
CLEAN
250
300
350
550
500
450
400
1 Latch the door.
the Oven Temperature knob to
2 Turn
AUTO SELF CLEAN.
Customer Service
Clean cycle time is normally 4 hours and 20 minutes.
You can change the clean time to between 3 hours
and 5 hours, 59 minutes by using the HOUR and
MIN. pads.
When the LATCH DOOR light flashes, slide the
latch handle to the left, and turn the Oven Temperature
knob to OFF.
To stop a clean cycle, turn the Oven Temperature
knob to OFF. Wait until the oven has cooled and unlatch
the door.
20
Safety Information
How to Delay the Start of Cleaning
(on some models)
PREHEATED
WM
200
LATCH
DOOR
Operating Instructions Installation Instructions
OFF
OVEN ON
BROIL
1 Latch the door.
the Oven Temperature knob to
2 Turn
AUTO SELF CLEAN.
AUTO
SELF
CLEAN
250
300
350
550
500
450
400
3 Press the START TIME ON/OFF pad.
the HOUR and MIN. pads to set the time
4 Press
cleaning will start.
When the LATCH DOOR light flashes, slide the
latch handle to the left as far as it will go and turn
the Oven Temperature knob to OFF.
START
TIME
ON/OFF
After a Clean Cycle
Troubleshooting Tips
You may notice some white ash in the oven. Wipe it up with a damp
cloth after the oven cools.
If white spots remain, remove them with a soap-filled steel wool pad and rinse
thoroughly with a vinegar and water mixture.
These deposits are usually a salt residue that cannot be removed by
the clean cycle.
If the oven is not clean after one clean cycle, repeat the cycle.
Customer Service
■ You cannot set the oven for cooking until the oven is cool
enough for the door to be unlatched.
■ While the oven is self-cleaning, you can press the CLOCK pad to
display the time of day. To return to the clean countdown, press
the COOK TIME ON/OFF pad.
■ If the shelves become hard to slide, wipe the shelf supports
with cooking oil.
21
Safety Information
Care and cleaning of the range.
Installation Instructions Operating Instructions
If your range is removed for cleaning, servicing
or any reason, be sure the anti-tip device is
re-engaged properly when the range is replaced.
Failure to take this precaution could result in
tipping of the range and cause injury.
Control Panel and Knobs
Clean up spatters with a damp cloth. Remove heavier
soil with warm, soapy water.
Do not use abrasives of any kind on the control panel.
Pull the knob straight off the stem.
The control knobs may be removed for easier cleaning.
To remove a knob, pull it straight off the stem. Wash the
knobs in soap and water but do not soak.
Oven Vent
The oven is vented through an opening under the right
rear surface unit.
Troubleshooting Tips
Never cover the opening with aluminum foil or any other material.
Oven vent location
Painted Surfaces
Painted surfaces include the sides and the drawer front.
Clean these with soap and water or a vinegar and water solution.
Customer Service
Do not use commercial oven cleaners, cleaning powders, steel wool
or harsh abrasives on any painted surface.
22
Safety Information
Lift-Off Oven Door
The oven door is removable for cleaning.
Do not lift the door by the handle.
Operating Instructions Installation Instructions
To remove the door, open it to the special stop position.
Grasp firmly on each side and lift the door straight up
and off the hinges.
Do not place hands between the hinge and the oven door frame.
Lift the door straight up and off the
hinges.
To replace the door, make sure the hinges are in the
special stop position. Position the slots in the bottom of
the door squarely over the hinges and slowly lower it
over both hinges.
To clean the inside of the door:
■ Because the area inside the gasket is cleaned
during the self-clean cycle, you do not need to
clean this by hand.
The gasket is designed with a gap at
the bottom to allow for proper air
circulation.
■ The area outside the gasket and the front frame can
be cleaned with a soap-filled scouring pad, hot water
and detergent. Rinse well with a vinegar and water
solution.
Do not rub or clean the door gasket—it has an extremely low
resistance to abrasion.
Troubleshooting Tips
■ If you notice the gasket becoming worn, frayed or
damaged in any way or if it has become displaced
on the door, you should have it replaced.
To clean the outside of the door:
■ Use soap and water to thoroughly clean the top, sides
and front of the oven door. Rinse well. You may also
use a glass cleaner to clean the glass on the outside of
the door. Do not let water drip into the vent openings.
Customer Service
■ Spillage of marinades, fruit juices, tomato sauces and
basting materials containing acids may cause
discoloration and should be wiped up immediately.
When surface is cool, clean and rinse.
■ Do not use oven cleaners, cleaning powders or harsh
abrasives on the outside of the door.
23
Safety Information
Care and cleaning of the range.
Oven Heating Elements
Do not clean the bake element or the broil element.
Any soil will burn off when the elements are heated.
Installation Instructions Operating Instructions
To clean the oven floor, gently lift the bake element.
Clean with warm soapy water.
Oven Shelves
Clean the shelves with an abrasive cleanser or steel wool.
Oven Light Replacement (on some models)
CAUTION: Before replacing your oven light bulb,
disconnect the electrical power to the range at
the main fuse or circuit breaker panel.
Be sure to let the light cover and bulb cool completely.
Wire Cover Holder
To remove the cover:
a hand under the cover so it doesn’t fall when
1 Hold
released. With fingers of the same hand, firmly push
back the wire cover holder. Lift off the cover.
Troubleshooting Tips
Do not remove any screws to remove the cover.
bulb with a 40-watt household appliance
2 Replace
bulb.
To replace the cover:
it into groove of the light receptacle. Pull wire
1 Place
forward to the center of the cover until it snaps into
place.
Customer Service
2 Connect electrical power to the range.
24
Safety Information
Broiler Pan & Grid
Operating Instructions Installation Instructions
After broiling remove the broiler pan
from the oven.
After broiling, remove the broiler pan from the oven.
Remove the grid from the pan. Carefully pour out the
grease from the pan into a proper container.
Wash and rinse the broiler pan and grid in hot water
with a soap-filled or plastic scouring pad.
If food has burned on, sprinkle the grid with detergent
while hot and cover with wet paper towels or a dishcloth.
Soaking the pan will remove burned-on foods.
The broiler pan may be cleaned with a commercial oven
cleaner. If the grid is grey enamel, it can also be cleaned
with an oven cleaner. If the grid is chrome, do not use
an oven cleaner to clean it.
Both the broiler pan and grid can also be cleaned in the
dishwasher.
Do not store a soiled broiler pan and grid anywhere in the range.
How to Remove the Storage Drawer or Kick
Panel to Clean Under the Range
To remove the storage drawer:
Troubleshooting Tips
1 Pull the drawer out all the way.
2 Tilt up the front and remove it.
Clean under the range.
To replace the storage drawer:
glides at the back of the drawer beyond the
1 Insert
stop on range glides.
Customer Service
2 Lift the drawer if necessary to insert easily.
the front of the drawer down, then push
3 Let
in to close.
To remove the kick panel, pull it straight out at the bottom.
To replace the panel, first hook the top tabs on and
then the bottom tabs.
25
Safety Information
Care and cleaning of the range.
Porcelain Enamel Cooktop
Installation Instructions Operating Instructions
The porcelain enamel finish is sturdy but breakable if misused.
This finish is acid-resistant. However, any acidic foods spilled
(such as fruit juices, tomato or vinegar) should not be permitted
to remain on the finish.
If acids spill on the cooktop while it is hot, use a dry paper towel or
cloth to wipe it up right away. When the surface has cooled, wash
with soap and water. Rinse well.
For other spills such as fat spatterings, wash with soap and water or
cleansing powders after the surface has cooled. Rinse well. Polish
with a dry cloth.
Lift-Up Cooktop (on some models)
Some models have a cooktop that can be lifted up
for easier cleaning. The entire cooktop may be lifted up
and supported in the up position.
Be sure all surface units are turned off
before raising the cooktop.
The surface units do not need to be removed; however,
you may remove one to make raising the cooktop easier.
There are two side supports that lock into position when
the cooktop is lifted up.
Troubleshooting Tips
After cleaning under the cooktop with hot, mild soapy
water and a clean cloth, lower the cooktop. Be careful
not to pinch your fingers.
Customer Service
To lower the cooktop, push the rods back and gently
lower the cooktop until it rests in place.
26
Safety Information
Be sure all the controls are turned to OFF and the surface units are cool
before attempting to remove them.
Surface Units
Surface unit
Receptacle
Drip pan
Operating Instructions Installation Instructions
To clean the surface units, turn the control to the highest
setting for a minute. The coils will burn off any soil.
To remove a surface unit:
To remove the drip pans for cleaning, the surface units
must be removed first.
Lift the surface unit about 1 inch above the drip pan and
pull it out.
Do not lift the surface unit more than 1 inch. If you do, it may not lie
flat on the drip pan when you plug it back in.
Repeated lifting of the surface unit more than 1 inch above
the drip pan can permanently damage the receptacle.
To replace a surface unit:
Replace the drip pan into the recess in the cooktop. Make
sure the opening in the pan lines up with the receptacle.
Insert the terminals of the surface unit through the
opening in the drip pan and into the receptacle.
Guide the surface unit into place so it rests evenly.
Troubleshooting Tips
Do not immerse the surface units in liquids of any kind.
Do not clean the surface units in a dishwasher.
Do not bend the surface unit plug terminals.
Do not attempt to clean, adjust or in any way repair the plug-in
receptacle.
Drip Pans
Remove the surface units. Then lift out the drip pans.
Customer Service
For best results, clean the drip pans by hand. Place them in a
covered container (or a plastic bag) with 1/4 cup ammonia to
loosen the soil. Then scrub with a soap-filled scouring pad if
necessary. Rinse with clean water and polish with a clean soft cloth.
The drip pans may also be cleaned in the dishwasher.
Clean the area under the drip pans often. Built-up soil, especially
grease, may catch fire.
Do not cover the drip pans with foil. Using foil so close to the receptacle could
cause shock, fire or damage to the range.
27
Safety Information
Installation of the range.
Read these instructions completely and carefully.
Installation Instructions Operating Instructions
Before You Begin
IMPORTANT: Save these instructions for the local electrical
inspector’s use.
IMPORTANT: OBSERVE ALL GOVERNING CODES AND
ORDINANCES.
NOTE TO INSTALLER: Leave these instructions with the
appliance after installation is completed.
NOTE TO CONSUMER: Keep this Owner’s Manual and
Installation Instructions for future use.
NOTE: This appliance must be properly grounded.
Tools You Will Need
■ Large blade screwdriver
■ 1/4″ hex head nutdriver
Troubleshooting Tips
■ Channel lock pliers or small ratchet wrench with 3/16″ socket
(for leveling range)
Electrical Requirements
CAUTION, FOR PERSONAL SAFETY: DO NOT USE AN
EXTENSION CORD WITH THIS APPLIANCE.
REMOVE HOUSE FUSE OR OPEN CIRCUIT BREAKER
BEFORE BEGINNING INSTALLATION.
Customer Service
This appliance must be supplied with the proper voltage and
frequency, and connected to an individual, properly grounded
branch circuit, protected by a circuit breaker or time delay fuse,
as noted on the rating plate.
Wiring must conform to National Electric Codes.
If the electric service provided does not meet the above
specifications, have a licensed electrician install an approved outlet.
Because range terminals are not accessible after range is in position,
flexible service conduit or cord must be used.
28
Safety Information
Read these instructions completely and carefully.
1
Prepare the Opening
Allow 11⁄2″ spacing from the range to adjacent vertical walls above cooktop surface.
Operating Instructions Installation Instructions
Allow 30″ minimum clearance between surface units and bottom of unprotected
wood or metal top cabinet, and 15″ minimum between countertop and adjacent
cabinet bottom.
EXCEPTION: Installation of a listed microwave oven or cooking appliance over the cooktop shall
conform to the installation instructions packed with that appliance.
If cabinet storage is installed, reduce risk by installing a range hood that projects
horizontally a min. of 5″ beyond the bottom of the cabinets. Make sure the wall
covering, countertops and cabinets around the range can withstand heat
generated by the range, oven or cooktop up to 200°F.
Not less than the width
of the range
Hood
5″ Min.
15″
Min.
Troubleshooting Tips
30″
Min.
Locate the outlet box within either shaded area.
Wall
11⁄2″
Min.
Outlet box
Install the
outlet box
on either
Cord
side of
the CL
71⁄2″
CLof range
7″
145⁄8″
71⁄2″
3⁄″
1
2
Floor
Customer Service
Wall
5″
21⁄4″
Anti-Tip Bracket
(install in either rear corner)
29
Safety Information
Installation of the range.
Read these instructions completely and carefully.
Flooring Under the Range
Installation Instructions Operating Instructions
Your range, like many other household items, is heavy and can settle into soft floor coverings
such as cushioned vinyl or carpeting.
When moving the range on this type of flooring, it should be installed on a
1/4″ thick sheet of plywood (or similar material) as follows:
When the floor covering ends at the front of the range, the area that the range
will rest on should be built up with plywood to the same level or higher than the
floor covering. This will allow the range to be moved for cleaning or servicing.
2
Prepare for Electrical Connection
Effective January 1, 1996 the National Electric Code requires that
new construction (not existing) utilize a 4-conductor connection to an
electric range.
When installing an electric range in new construction follow Steps 3
and 5 for 4-wire connection.
Use only a 3-conductor or a 4-conductor UL-listed range cord. These cords may
be provided with ring terminals on wire and a strain relief device.
Troubleshooting Tips
A range cord rated at 40 amps with 125/250 minimum volt range is required.
A 50 amp range cord is not recommended but if used, it should be marked for
use with nominal 13⁄8″ diameter connection openings. Care should be taken to
center the cable and strain relief within the knockout hole to keep the edge from
damaging the cable.
Customer Service
NOTE: A 4-conductor cord is to be used when the appliance is installed in a mobile home or when
local codes do not permit grounding through the neutral. If conduit is being used, go to Step 6 or 7.
30
Safety Information
3
Power Cord Strain Relief Installation
the lower rear range wiring cover to expose the connector block
a Remove
and bracket.
the knockout ring (1 ⁄ ″) located on bracket directly below the
b Remove
connector. To remove the knockout, use a pair of pliers to bend the
3
Operating Instructions Installation Instructions
8
knockout ring away from the bracket and twist until ring is removed.
Knockout ring in bracket.
Knockout ring removed.
Assemble the strain relief in the hole. Insert the power cord through the
c strain
relief and tighten. Allow enough slack to easily attach the cord
terminals to the connector block. If tabs are present at the end of the winged
strain relief, they can be removed for better fit.
NOTE: Do not install the power cord without a strain relief.
Connector box
Wiring cover
(shown removed)
Strain relief
Troubleshooting Tips
Ground
strap
Bracket
Power cord
Strain relief bracket
(Provided with range cord. Not part of range.)
Customer Service
31
Safety Information
Installation of the range.
Read these instructions completely and carefully.
4
3-Wire Power Cord Installation
WARNING:
Installation Instructions Operating Instructions
The neutral or ground wire of the power cord
must be connected to the neutral terminal located in the center of the
connector block. The power leads must be connected to the outside
(brass colored) terminals.
Remove the 3 wire terminal screws from the connector block. Insert screws
through each power cord terminal ring and into the connector block until the
screws engage the nuts. Be certain that the center wire is connected to the center
screw of the connector block. Tighten screws securely.
Do NOT remove ground strap connection.
Connector block
Neutral terminal
Troubleshooting Tips
Ground strap
Customer Service
Power cord
32
Safety Information
5
4-Wire Power Cord Installation
WARNING:
Operating Instructions Installation Instructions
The neutral wire of the supply circuit
is connected to the neutral terminal located in the center of the
connector block. The power leads must be connected to the outside
(brass colored) terminals. The 4th grounding lead must be connected
to the frame of the range with the grounding plate and grounding screw.
a Remove the 3 screws from the connector block.
the grounding screw and strap from the connector block middle
b Remove
location and the screw connection to the frame of the range.
screws through each power cord terminal ring and into connector
c Insert
block until screw engages nut. Be certain that the center wire is connected
to the center screw of the connector block. Tighten screws securely.
d Attach ground wire to the frame of the range.
Before
Neutral terminal
Neutral terminal
Grounding
plate
Troubleshooting Tips
Ground Strap
(grounding to range)
After
Grounding to range
Customer Service
33
Safety Information
Installation of the range.
Read these instructions completely and carefully.
6
3-Wire Conduit Installation
Installation Instructions Operating Instructions
Remove the 3 screws from the connector block. Insert bare wires between the
connector block terminals and movable nuts. Tighten screws securely. Do not
remove ground strap connection.
WARNING: Connector block is approved for copper wire connection
only. If aluminum wire is used, see note below.
NOTE: ALUMINUM WIRING
a Do not connect aluminum wire to the connector block.
Use copper building wire rated for the correct amperage and voltage to
make 3 (three) 3″ copper jumper wires. Connect wire as per Step 6 or 7
depending on number of wires.
copper wires to aluminum wiring using special connector terminals
b Splice
designed and UL-approved for joining copper to aluminum and follow the
connector manufacturer’s recommended procedure closely.
Wire used, location and enclosure of splices, etc., must conform to good wiring practices
and local codes.
Screw
Troubleshooting Tips
Connector block
Bare wire tips
Connector block terminal
Bare wire
Movable nut
Flexible cable
Customer Service
Bracket
34
Conduit
Safety Information
7
4-Wire Conduit Installation
Operating Instructions Installation Instructions
Remove the 3 screws from the connector block. Remove the grounding strap
from the connector block middle location and the screw connecting it to the
frame of the range. Insert bare wires between the connector block terminals
and movable nuts. Tighten screws securely. Attach ground wire to the frame of
the range.
WARNING: Connector block is approved for copper wire connection
only. If aluminum wire is used, see note below.
NOTE: ALUMINUM WIRING
a Do not connect aluminum wire to connector block.
Use copper building wire rated for the correct amperage and voltage to
make 3 (three) 3″ copper jumper wires. Connect wire as per Step 6 or 7
depending on number of wires.
copper wires to aluminum wiring using special connector terminals
b Splice
designed and UL-approved for joining copper to aluminum and follow the
connector manufacturer’s recommended procedure closely.
Wire used, location and enclosure of splices, etc., must conform to good wiring practices
and local codes.
Screw
Bare wire tips
Connector block
Troubleshooting Tips
Connector block terminal
Grounding
plate
Bare wire
Movable nut
Flexible cable
Bracket
Conduit
Customer Service
35
Safety Information
Installation of the range.
Read these instructions completely and carefully.
8
Anti-Tip Bracket Installation
Installation Instructions Operating Instructions
An Anti-Tip bracket is supplied with instructions for installation in a variety
of locations. The instructions include a template, a parts list and a list of tools
necessary to complete the installation. Read the Important Safety Information
and the instructions that fit your situation before beginning installation.
WARNING
■ Range must be secured by Anti-Tip bracket supplied.
■ See instructions to install (supplied with bracket).
■ Unless properly installed, the range could be tipped by stepping or sitting on
the door. Injury might result from spilled hot liquids or from the range itself.
Bracket
Wall plate
Screw must enter wood or metal
Typical installation of anti-tip bracket attachment to wall.
9
Leveling the Range
Troubleshooting Tips
The range must be level. Leveling feet are located at each corner of the base of
the range. Remove the storage drawer or kick panel (depending on your model)
and using channel locks, rotate the leveling feet in and out as required to level
the range. (For instructions on how to remove and replace the storage drawer or
the kick panel, see the Care and cleaning of the range section.)
On some models, there are plastic covers which may be removed for easy
adjustment (just squeeze and pull).
Customer Service
One of the rear leveling feet will engage the Anti-Tip bracket (allow for some side
to side adjustment). Allow a minimum clearance of 1/8″ between the range and
the leveling foot that is to be installed into the Anti-Tip bracket.
Check the range for proper installation into the Anti-Tip bracket by removing the
kick panel or storage drawer and inspecting the rear leveling leg. Make sure it fits
securely into the slot.
10
36
Final Check
Be sure all range controls are in the OFF position before leaving
the range.
Safety Information
Before you call for service…
Troubleshooting Tips
Save time and money! Review the charts on the following pages
first and you may not need to call for service.
Surface units
not functioning
properly
The surface units are
not plugged in solidly.
• With the controls off, check
to make sure the surface
unit is plugged completely
into the receptacle.
The surface
unit controls
improperly set.
• Check to see the correct
control is set for the surface
unit you are using.
The drip pans are
not set securely in
the cooktop.
• With the controls off, check
to make sure the drip pan is
in the recess in the cooktop
and that the opening in the
pan lines up with the
receptacle.
The display goes
blank or indicator
lights come on
when range is
not in use
Power surge.
• Disconnect power at the
fuse box or circuit breaker
for at least 10 seconds.
Turn power on and power
up your range. If the
indicator lights are still on,
call for service.
Oven light does
not work
Light bulb is loose
or defective.
• Tighten or replace
the bulb.
Switch operating light
is broken.
• Call for service.
Plug on range is not
completely inserted in
the electrical outlet.
• Make sure electrical plug is
plugged into a live, properly
grounded outlet.
A fuse in your home
may be blown or the
circuit breaker tripped.
• Replace fuse or reset
circuit breaker.
Oven controls
improperly set.
• See the Using the
oven section.
Door left in the
locked position.
• If necessary, allow the
oven to cool then unlock
the door.
Oven will
not work
Customer Service
What To Do
Troubleshooting Tips
Possible Causes
Operating Instructions Installation Instructions
Problem
37
Safety Information
Before you call for service…
Installation Instructions Operating Instructions
Troubleshooting Tips
Problem
Possible Causes
What To Do
Food does not bake
or roast properly
Oven controls
improperly set.
• See the Using the
oven section.
Shelf position is
incorrect or the
shelf is not level.
• See the Using the
oven section.
Incorrect cookware
or cookware of
improper size
being used.
• See the Using the
oven section.
Oven thermostat
needs adjustment.
• See the Adjust the oven
thermostat—Do it yourself!
section.
Oven is not set
at BROIL.
• Make sure you turn the
knob all the way to the
BROIL position.
Door not open to the
broil stop position as
recommended.
• See the Using the
oven section.
Improper shelf position
being used.
• See the Broiling guide.
Food being cooked
in a hot pan.
• Use the broiling pan and
grid that came with your
range. Make sure it is cool.
Cookware not suited
for broiling.
• Use the broiling pan and
grid that came with your
range.
Aluminum foil used on
the broiling pan and
grid has not been fitted
properly and slit as
recommended.
• See the Using the
oven section.
In some areas the
power (voltage)
may be low.
• Preheat the broil element
for 10 minutes.
Customer Service
Troubleshooting Tips
Food does not
broil properly
38
• Broil for the longest period
of time recommended in
the Broiling guide.
Safety Information
Oven temperature
too hot or too cold
Oven thermostat
needs adjustment.
• See the Adjust the oven
thermostat—Do it yourself!
section.
Clock and timer
do not work
Plug on range is
not completely
inserted in the
electrical outlet.
• Make sure electrical plug is
plugged into a live, properly
grounded outlet.
A fuse in your home
may be blown or the
circuit breaker tripped.
• Replace fuse or reset
circuit breaker.
Oven controls
improperly set.
• See the Using the clock
and timer section.
The oven temperature
is too high to set a
self-clean operation.
• Allow the range to cool to
room temperature and
reset the controls.
Oven controls
improperly set.
• Make sure you turn the
control knob all the way
to the AUTO SELF
CLEAN position.
Oven door is not in
the locked position.
• Make sure you move the
door latch handle all the
way to the right.
Oven starts a
self-clean cycle
when you wanted
to bake, roast
or broil
Oven door locked
during cooking.
• Turn the Oven
Temperature knob to OFF.
Allow the oven to cool.
Never force the door
latch handle.
“Crackling” or
“popping” sound
This is the sound of
the metal heating and
cooling during both
the cooking and
cleaning functions.
• This is normal.
Oven will not
self-clean
Customer Service
What To Do
Troubleshooting Tips
Possible Causes
Operating Instructions Installation Instructions
Problem
39
Safety Information
Before you call for service…
Customer Service
Troubleshooting Tips
Installation Instructions Operating Instructions
Troubleshooting Tips
40
Problem
Possible Causes
What To Do
Excessive smoking
Excessive soil.
• Turn the Oven
Temperature knob to OFF.
Open the windows to rid
the room of smoke. Wait
until the LATCH DOOR
light goes off. Wipe up the
excess soil and reset the
clean cycle.
Oven door will
not unlock
Oven too hot.
• Allow the oven to cool
below locking temperature.
Oven not clean
after a clean cycle
Oven controls not
properly set.
• See Using the self-cleaning
oven section.
Oven was heavily soiled.
• Clean up heavy spillovers
before starting the clean
cycle. Heavily soiled ovens
may need to self-clean
again or for a longer
period of time.
LATCH DOOR light
flashes
Oven controls not
properly set.
• Move the door latch
handle to the right before
setting the Oven
Temperature knob to
AUTO SELF CLEAN.
Oven door is
crooked
The door is out
of position.
• Because the oven door is
removable, it sometimes
gets out of position during
installation. To straighten
the door, push down on
the high corner.
Safety Information
Possible Causes
What To Do
LATCH DOOR light
is on when you
want to cook
The oven door was
accidentally locked.
• Turn the Oven
Temperature knob to OFF.
Allow the oven to cool.
Never force the door
latch handle.
“F—and a number”
flash in the display
You have a function
error code.
• If a function error code
appears during the selfcleaning cycle, check the
oven door latch. The latch
may have been moved, even
if only slightly, from the
locked position. Make sure
the latch is moved to the
right as far as it will go. Turn
the Oven Temperature
knob to OFF. Allow the
oven to cool for one hour.
Put the oven back into
operation.
Operating Instructions Installation Instructions
Problem
Troubleshooting Tips
• Disconnect all power to
the range for 5 minutes
and then reconnect power.
If the function error code
repeats, call for service.
Power outage
Power outage or surge.
Customer Service
• Some models will
automatically resume their
setting once the power is
restored. On models with a
clock, you must reset the
clock. If the oven was in
use, you must reset it by
turning the Oven
Temperature knob back to
OFF, setting the clock and
resetting any cooking
function.
41
Customer Service
Troubleshooting Tips
Installation Instructions Operating Instructions
Safety Information
Notes
42
Safety Information
GE Electric Range Warranty
All warranty service provided by our Factory Service Centers,
or an authorized Customer Care® technician. For service,
call 800-GE-CARES.
We Will Replace, At No Charge To You:
One Year
From the date of the
original purchase
Any part of the range which fails due to a defect
in materials or workmanship. During this full one-year
warranty, we will also provide, free of charge, all labor
and in-home service to replace the defective part.
Operating Instructions Installation Instructions
For The Period Of:
What Is Not Covered:
■ Service trips to your home to teach you
how to use the product.
■ Replacement of house fuses or
resetting of circuit breakers.
■ Improper installation.
■ Damage to the product caused by
accident, fire, floods or acts of God.
■ Failure of the product if it is
abused, misused, or used for other
than the intended purpose or used
commercially.
■ Incidental or consequential damage to
personal property caused by possible
defects with this appliance.
Troubleshooting Tips
This warranty is extended to the original purchaser and any succeeding owner for products purchased
for home use within the USA. In Alaska, the warranty excludes the cost of shipping or service calls to
your home.
Some states do not allow the exclusion or limitation of incidental or consequential damages. This
warranty gives you specific legal rights, and you may also have other rights which vary from state to
state. To know what your legal rights are, consult your local or state consumer affairs office or your
state’s Attorney General.
Customer Service
43
Safety Information
Installation Instructions Operating Instructions
Troubleshooting Tips
Service Telephone Numbers.
GE Answer Center ®
800.626.2000
The GE Answer Center® is open 24 hours a day, 7 days a week.
In-Home Repair Service 800-GE-CARES (800-432-2737)
Expert GE repair service is only a phone call away.
Special Needs Service 800.626.2000
TDD 800-TDD-GEAC (800-833-4322)
GE offers, free of charge, a brochure to assist in planning a barrierfree kitchen for persons with limited mobility.
Service Contracts 800-626-2224
Purchase a GE service contract while your warranty is still in effect
and you’ll receive a substantial discount. GE Consumer Service will
still be there after your warranty expires.
Parts and Accessories 800-626-2002
Individuals qualified to service their own appliances can have parts
or accessories sent directly to their homes (VISA, MasterCard and
Discover cards are accepted).
Instructions contained in this manual cover procedures to be performed
by any user. Other servicing generally should be referred to qualified
service personnel. Caution must be exercised, since improper servicing
may cause unsafe operation.
Customer Service
Service Satisfaction
If you are not satisfied with the service you receive from GE, follow
these three steps. First, contact the people who serviced your
appliance. Next, if you are still not pleased, write all the details—
including your phone number—to: Manager, Consumer Relations,
GE Appliances, Appliance Park, Louisville, KY 40225. Finally, if your
problem is still not resolved, write:
Major Appliance Consumer Action Program
20 North Wacker Drive, Chicago, IL 60606.
Printed in Louisville, KY
10-96 CG