1
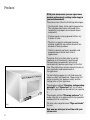
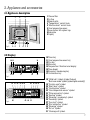
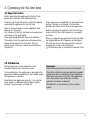
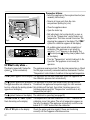
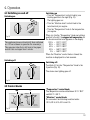
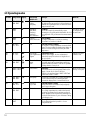
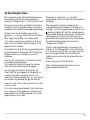
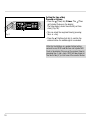
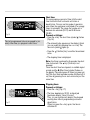
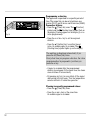
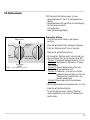
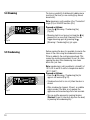
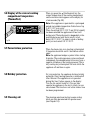
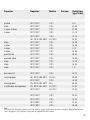
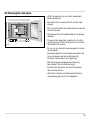
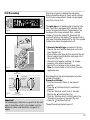
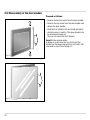
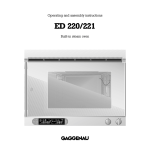
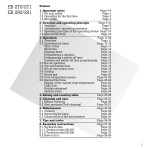
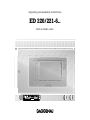
Operating and assembly instructions
ED 220/221-6..
Built-in steam oven
ED 220/221-6..
Preface
Important safeguards
Important instructions
1. Important notes
1.1 For your safety
1.2 About use
2. Appliance and accessories
2.1 Appliance description
2.2 Display
2.3 Accessories / special accessories
3. Operating for the first time
3.1 Important notes
3.2 Calibration
3.3 What to do, when ...
3.4 Determining water hardness
3.5 Entering the water hardness
4. Operation
4.1 Switching on and off
4.2 Control knobs
4.3 Operating modes
4.4 Operating the timer
5. Special functions
5.1 Child lock
5.2 Options menu
5.3 Core temperature sensor
5.4 Steaming
5.5 Condensing
5.6 Display of the current cooking compartment
temperature
5.7 Power failure protection
5.8 Holiday protection
5.9 Cleaning aid
6. Further uses
7. Cooking table, Baking table
8. Tips and tricks
9. Cleaning and care
9.1 Manual cleaning
9.2 Cleaning the side plate
9.3 Cleaning aid
10. Maintenance
10.1 General
10.2 Lamp replacement
10.3 Descaling
10.4 Disassembly of the front window
10.5 Remedying small malfunctions yourself
Page 3
Page 4
Page 5-6
Page 5
Page 6
Page 7-8
Page 7
Page 7
Page 8
Page 9-12
Page 9
Page 9-10
Page 10
Page 11
Page 12
Page 13-19
Page 13
Page 13
Page 14
Page 15-19
Page 20-25
Page 20
Page 21
Page 22-23
Page 24
Page 24
Page 25
Page 25
Page 25
Page 25
Page 26-27
Page 28-32
Page 33
Page 34-37
Page 34
Page 35
Page 36-37
Page 38-41
Page 38
Page 38
Page 39
Page 40
Page 41
1
Preface
With your steam oven you can experience
modern professional cooking technology in
your own household.
The steam oven offers the following advantages:
– Cooking with steam allows gentle preparation.
The valuable substances contained in the
foodstuffs you prepare are retained almost
completely.
– Diverse meals can be prepared without any
transfer of taste.
– Thanks to a special combined steaming
method, foodstuffs are neither dried out nor
drained of their goodness.
– Gently re-heating up food is possible, and
prepared meals retain their natural
appearance.
To ensure that you will be able to use this
appliance in all its diversity, read through
the operating and assembly instructions
conscientiously before operating it for the first
time. The instructions contain important notes on
use, installation and maintenance of
the appliance.
On the following pages you will find important
notes on safety and operation. These notes will
serve to ensure your personal safety and the
lasting value of your appliance.
The chapters entitled “Structure and operating
principle” and “Operation” tell you all about
what your appliance can do and how you operate
it.
The chapter entitled “Cleaning and care” will
make sure that your appliance will stay operable
and beautiful for a long time.
Fig. 1
We have also compiled some “Tips and tricks”
for your.
And now we wish you lots of fun with your
steam oven.
2
Important safeguards
1.
2.
3.
4.
5.
6.
7.
8.
9.
10.
11.
12.
13.
Read all instructions.
Do not touch hot surfaces. Use handles or
knobs.
To protect against electrical shock do not
immerse cord or plug in water or liquid.
Close supervision is necessary when any
appliance is used by or near children.
Unplug from outlet when not in use and before
cleaning. Allow to cool before putting on or
taking off parts.
Do not operate any appliance with a damaged
cord or plug or after the appliance malfunctions
or has been damaged in any manner. Return
appliance to the nearest authorized service
facility for examination, repair, or adjustment.
The use of accessory attachments not
recommended by the appliance manufacturer
may cause injuries.
Do not use outdoors.
Do not let cord hang over edge of table or
counter, or touch hot surfaces.
Do not place on or near a hot gas or electric
burner, or in a heated oven.
Extreme caution must be used when moving an
appliance containing hot oil or other hot liquids.
Do not use appliance for other than intended
use.
To reduce the risk of fire, do not place any
heating or cooking appliance beneath the
appliance.
14. To reduce the risk of fire, do not mount unit over
or near any portion of a heating or cooking
appliance.
15.
Save these instructions.
3
Important instructions
1. a) Proper installation - Be sure your appliance
is properly installed and grounded by a
qualified electrician.
b) Never use your appliance for warming or
heating the room.
c) Do not leave children alone - Children
should not be left alone or unattended in areas
where the appliance is in use. They should
never be allowed to sit or stand on any part of
the appliance.
d) Wear proper apparel - Loose-fitting or
hanging garments should never be worn while
using the appliance.
e) User servicing - Do not repair or replace any
part of the appliance unless specifically
recommended in the manual. All other
servicing should be referred to a qualified
technician.
f) Storage in appliance - Flammable materials
should not be stored in an oven or near surface
units.
g) Do not use water on grease fires - Smother
fire or flame or use dry chemical or foam type
extinguisher.
h) Use only dry pot holders - Moist or damp pot
holders on hot surfaces may result in burns
from steam. Do not let pot holders touch hot
heating elements. Do not use a towel or other
bulky cloth.
2. a) Use care when opening door - Let hot air or
steam escape before removing or replacing
food.
b) Do not heat unopened food containers Build-up of pressure may cause container to
burst and result in injury.
c) Keep oven vent ducts unobstructed.
4
d) Use care when using meat probe,
that it does not contact any heating elements.
e) Placement of oven racks - Always place
oven racks in desired location while oven is
cool. If rack must be moved while oven is hot,
do not let pot holder contact hot heating
element in oven.
f) Accessories supplied with this oven are
intended only for use in this oven.
3. DO NOT TOUCH HEATING ELEMENTS OR
INTERIOR SURFACES OF OVEN Heating elements may be hot even though they
are dark in color. Interior surfaces of an oven
become hot enough to cause burns.
During and after use, do not touch, or let clothing
or other flammable materials contact heating
elements or interior surfaces of oven until they
have had sufficient time to cool. Other surfaces of
the appliance may become hot enough to cause
burns.
4. a) Do not clean door gasket - The door gasket
is essential for a good seal. Care should be
taken not to rub, damage, or move the gasket.
b) Do not use oven cleaners - No commercial
oven cleaner or oven liner protective coating of
any kind should be used in or around any part
of the oven.
c) Clean only parts listed in manual.
d) Oven must be in the OFF position before
attempting to attach or install any accessory.
1. Important notes
1.1 For your safety
You must not operate the appliance if it is damaged.
The appliance must only be connected by an
authorised specialist, paying attention to
the relevant regulations of the power supply
companies and the regional construction
regulations.
Observe the assembly instructions!
Caution: Fire risk! Do not store any combustible
objects in your appliance. When operating the
appliance, only ever leave the inner parts inside the
cooking compartment that you actually need.
As the user, you yourself are responsible for
maintenance and proper use in the household.
Only ever operate the appliance under supervision.
Disconnect the unit from the water mains when it is
not in operation.
Caution! The appliance gets hot during operation.
Keep children away!
Do not clean the appliance with a steam cleaning
apparatus or with water pressure – risk of shortcircuits!
Disconnect the appliance from the water and
electricity mains. Switch off the corresponding fuse
and turn off the tap.
Caution! For technical reasons the lamp cover
cannot be removed. Lamp must only be replaced
by Gaggenau after-sales service.
Repairs may only be carried out by authorised
electricians.
Note: the appliance must not be connected to the
hot water supply.
No warranty claims can be lodged for any
damage resulting from failure to observe these
instructions.
Technical modifications reserved.
Caution! There is a risk of injuries if the door is not
closed properly. You could jam and crush your
fingers and hands.
Caution! Steam may billow out when you open the
door. If there is steam in the oven, do not reach in
with your hands! Risk of burns!
Caution! When removing the cooking insert hot
water may drip from the oven top. Risk of
scalding! Be careful when removing the cooking
insert as hot liquid might spill. Use heat resistant
oven gloves.
Leads of other electrical appliances that are used
in the proximity of the cooker must not be jammed
in by the hot oven door.
5
1.2 About use
The appliance is intended solely for use in the
household and must not be put to any other uses.
The door window may fog up at all moisture levels
(above all at the 100 % moisture level).
Use the appliance to prepare meals only. It must not
be used to heat up the room in which it is installed.
Operating noise may occur in all operating modes.
Opening and closing of the air flap causes clicking
noise.
Only ever use the included cooking inserts or
order the special accessories.
Do not place any items in the oven compartment
that might rust. Rusty accessories will lead to further
rusting in the oven compartment!
Do not use any silver tableware in the cooking
compartment.
The cooking compartment may become
discoloured during prolonged operation. This does
not have a detrimental influence on operability of
the appliance.
Operation is only possible when the door is closed,
otherwise there is a risk that water will spray out of
the appliance or that hot steam will come out.
The steam oven uses unpressurized steam,
therefore the door can be opened at any time
during cooking. To prevent extreme steam from
escaping when you open the door, you can
condense beforehand. Water may drip when
opening the door.
Steam may escape during operation and when
opening the door.
The
(Heating) symbol in the control panel goes
off as soon as the required temperature has been
reached.
Turn the “Temperature” control knob (right control
knob) to the 0 position after use.
In the event of malfunctions, first of all check
the household fuses. If the problem has nothing to
do with the power or water supply, please contact
your specialist dealer or your local Gaggenau aftersales service.
6
The appliance rinses automatically when switched
on if it has not been in operation for a prolonged
period of time or after a prolonged power failure
(several hours). This removes water that is left over
in the pipes.
The food being cooked must not come into contact
with the sides or the grease filter.
At set temperatures below 65 °C / 150 °F , the light is
switched off after a few seconds to ensure that the
halogen lamp will not additionally heat up the oven
compartment. This ensures more precise
temperature coordination. The light in the oven
compartment is switched on again for a few
seconds if you turn one of the two control knobs or
if you press a key.
Calibration
(automatic boiling point-adjustment):
the boiling point of water depends on the barometric pressure. The barometric pressure changes
with the altitude of the place where the appliance is
installed. During self-adjustment, the appliance
adapts itself to the pressure conditions prevailing at
the appliance’s location.
The appliance cannot be operated if it has not
been calibrated!
The appliance features a descaling display.
When it flashes, this is an indication that the
appliance must be descaled. Before commencing
operation, you must enter the water hardness in
your household on the appliance.
2. Appliance and accessories
2.1 Appliance description
1
Fig. 2
9
8
2
7
1
2
3
4
5
6
7
8
9
3
6
Grease filter
Air flap
Slide-in grills
“Temperature” control knob
“Moisture level” control knob
Core temperature sensor
Base strainer with siphon trap
Side plate
Display
5 4
2.2 Display
10 11
17 16
12
15
14
13
10
11
12
13
14
15
16
17
Timer key
Core temperature sensor key
Plus key
Minus key
Temperature / Moisture level display
Time display
Steaming / condensing key
Confirmation key
Fig. 3
18 19 20
Fig. 4
28
21 22 23
24
29 30 31
25 26 27
18 “Child lock" symbol (symbol flashes)
“Show room mode" symbol (symbol lights constantly)
19 “Duration, end" symbol
20 “Short timer" symbol
21 “Cooking time" symbol
22 “Core temperature sensor" symbol
23 “Water connection" symbol
24 “Heating" symbol
25 “Steaming / condensing" symbol
26 “Descaling" symbol
27 “Door lock" symbol
28 “Start calibration" symbol
29 “Steaming" symbol
30 “Hot air" symbol
31 “Cleaning aid" symbol
7
2.3 Accessories / special accessories
As standard, the appliance comes with the
following accessories:
Fig. 5
– Stainless steel cooking insert GN 2/3,
unperforated, 40 mm / 11/2 ´ ´ deep (Fig. 5)
– Stainless steel cooking insert GN 2/3,
perforated, 40 mm / 11/2 ´ ´ deep (Fig. 6)
– Wire grill (Fig. 7)
Fig. 6
– Water connection pipe (10 ft)
– Waste water pipe (10 ft)
Fig. 7
You can order the following special accessories:
– DR 220-010: Pressure reducer, connection
accessory for water pressure
6-10 bar
– GZ 010-011: Extension pipes for water
connections
– WF 040-020: Brita descaling system (filter head
and filter cartridge). If the hardness
of the water exceeds 7 ° (American
water hardness), you must install a
descaling system before the
appliance.
– WF 040-021: Set of 3 filter cartridges
– KB 220-114: Stainless steel cooking insert
GN 1/3, unperforated,
40 mm / 11/2 ´ ´ deep
– KB 220-124: Stainless steel cooking insert
GN 1/3, perforated,
40 mm / 11/2 ´ ´ deep
8
3. Operating for the first time
3.1 Important notes
Before operating the appliance for the first time,
please pay attention to the following notes:
Read through these instructions attentively before
operating the appliance for the first time.
Remove the packaging from the appliance and
dispose of it properly.
Pay attention to the fact that there are accessories
in the base of the packaging.
Keep packaging elements away from children.
Thoroughly clean the appliance and accessories
before using them for the first time. This will
eliminate any “newness” smells and soiling (see
Chapter 9).
Every appliance is subjected to a thorough check
before it arrives in your home. It is therefore
possible that there is still water in the appliance.
Before operating the appliance for the first time,
make sure that the water connection is properly
secured.
When you operate the appliance for the first time,
the suggested time 8:00 appears on the display.
You can now choose the required time of day by
pressing the + and – keys. Press the
(Confirmation) key to confirm the entered value.
3.2 Calibration
The boiling point of water depends on the
barometric pressure at mean sea level.
Important:
the calibration process cannot be interrupted.
During calibration, the appliance is adjusted to the
pressure conditions prevailing at the altitude where
the appliance is installed.
Should the calibration process be interrupted by
opening the door or switching off the appliance,
the steam oven will not function. The appliance
will automatically start calibration until the
operation has been completed.
Recalibrate the appliance manually if you should
move home to a different altitude (see chapter
entitled “Options menu” on Page 21).
Recalibration is not necessary after a power
failure.
9
Proceed as follows:
– Install the appliance at the required location (see
assembly instructions).
– Remove all loose parts from the oven
compartment (baking tray etc.).
– Close the appliance door.
– Open the water tap.
– Self-adjustment starts automatically as soon as
you turn the “Temperature” control knob to any
temperature. This takes around 15 minutes. The
elapsing time appears in the display. The “CAL”
symbol for calibration appears in the display.
Fig. 8
– An audible signal sounds after completion of
calibration. The appliance is now ready for
operation. “--:--” appears on the display. The
(Duration) and (Cooking time) symbols flash
on the display.
Fig. 9
3.3 What to do, when ...
The display repeatedly flashes the
symbol
(water connection).
– Turn the “Temperature” control knob back to the
0 position. The appliance is now ready for
operation.
The appliance receives no water. Turn the water connection on. Check
that the pipe is correctly connected and free from bends. Turn the
“Temperature” control knob to 0 and then to the required temperature.
The R symbol appears on the display. The appliance has not been calibrated. Switch the appliance on,
the calibration process starts automatically.
The symbol appears on the display.
The appliance does not calibrate or
heat up, although the heating symbol
appears on the display.
The
The appliance is in show room mode without heating function.
Disconnect the appliance from power supply for a few seconds
(by switching off the fuse), then within 3 minutes press + key
and keep pressed and turn “Temperature” control knob to any
temperature (not light!).
symbol flashes on the display. The child lock is operating (see page 20).
The CAL and 40 °C / 104 °F symbol
flash alternating on the display.
The temperature in the oven is above 40 °C / 104 °F . Therefore the
calibration cannot take place. The actual temperature appears on
the left of the display. The appliance automatically cools the oven
below 40 °C / 104 °F and re-starts the calibration.
F 61 or F 62 lights on the display.
Check the power and water supply. If these are functioning
correctly call the Gaggenau after-sales service.
10
3.4 Determining water hardness
Water hardness range 4 has been pre-entered on
the appliance. If the hardness of the water in your
household should deviate from this value, the
correct water hardness range (between 1
and 4) must be entered before commencing
operation of the appliance. You can find out
the hardness of the water in your household either
by consulting your waterworks or by using the
included test strip.
– Run water from the tap for about 20 seconds to
drain off stale water.
Please also note that different designations are
used outside Germany to describe the hardness of
water.
Water hardness range
1
2
3
4
American hardness
French hardness
British hardness
Russian hardness
1-7°
1-12°
1-9°
1-50°
7-14°
12-25°
9-18°
50-100°
14-21°
25-37°
18-26°
100-150°
>21°
>37°
>26°
>150°
– Fill a glass with tap water and briefly (no more
than 1 second) dip the test strip into the water,
making sure that all test points are wetted.
– Remove the strip from the water and shake off any
surplus water drops.
– You can read off the result after one minute.
– If your water contains lime, one or more of the test
areas is/are of a reddish colour and the others
stay light or greenish. The number of light (green)
areas defines the right water hardness range
setting on the appliance.
The test set must be used even if a water descaling
system is already installed in your household
because, depending on the descaling method, not
all scale-forming ions are removed.
Number of light
(green) areas on
the test strip
3 or more
2
1
None
Water hardness
Water
(German hardness) hardness
range
1-7°
1
7-14°
2
14-21°
3
>21°
4
11
3.5 Entering the water hardness
End
Options menu
Temperature
display in
°C / °F
Descaling
Start
Calibration
Time display
24h / 12h (AM/PM)
0
If the hardness of the water in your household
deviates from the value that is set at the works
(water hardness range 4), you must enter the
right water hardness in the options menu for
commencing operation of the appliance.
Proceed as follows:
– Turn the two control knobs to the topmost
position.
– Press the
pressed.
(Confirmation) key and keep it
– Turn the “Moisture level” knob to the right.
Fig. 10
Time display
ON/OFF
(only if appliance is switched off)
– Release the
(Confirmation) key.
– The various options appear on the display. Turn
the “Moisture level” control knob to the right to
the descaling position.
– With the + and – keys, set the water hardness
(between 1 and 4) (Fig. 11).
– Press the
(Confirmation) key.
– To quit the options menu, turn the “Moisture”
control knob back up or turn the “Temperature”
control knob.
Fig. 11
12
4. Operation
Switching on
– Turn the “Temperature” control knob by one
latching position to the right (Fig. 12).
The lighting goes on:
4.1 Switching on and off
Switching on
– Turn the “Moisture level” control knob to the
moisture level you require.
– Turn the “Temperature” knob to the temperature
you require.
Fig. 12
The appliance rinses automatically when switched
on, if it has not been in operation for some days.
This removes water that is left over in the pipes
and will take no longer than 1 minute.
When you turn the “Temperature” knob one latching
position to the left, the suggested temperature for
the chosen moisture level appears on the display.
100 % – 100 °C / 210 °F
80 % – 120 °C / 250 °F
60 % – 120 °C / 250 °F
30 % – 165 °C / 330 °F
0 % – 165 °C / 330 °F
When the “Moisture” control knob is turned, the
moisture is displayed for a few seconds.
Switching off
Switching off:
To switch off, turn the “Temperature” knob to the
0 position (Fig. 13).
The steam oven lighting goes off.
Fig. 13
4.2 Control knobs
“Temperature” control knob:
The temperature can be set between 30 °C / 85 °F
and 230 °C / 450 °F .
Off
Suggested
temperature
Cleaning assistance
“Moisture” control knob:
You can select the following moisture levels:
100 %, 80 %, 60 %, 30 % und 0 %
Moisture
control knob
Temperature
control knob
Fig. 14
13
4.3 Operating modes
Moisture
Temperature Display
Particularly
suitable for...
Principle
100%
150 - 230 °C
300 - 450 °F
Bread
poultry,
puff pastry
Steam baking:
The high moisture prevents the food from drying out.
Thanks to the high temperature, the surface become
crispy brown all-round.
100%
100 °C
210 °F
Vegetables,
side dishes,
blanching,
sterilising,
juice extraction
Steaming:
The food is completely surrounded by steam.
Steaming is a very gently method with which the food
is not deprived of its goodness and retains its natural
colour.
100%
120 °C
250 °F
Potatoes,
pulses and beans
Fast steaming:
The higher temperature accelerates steaming.
Not suitable for sensitive foodstuffs.
100%
80 - 90 °C
175 - 195 °F
Fish
Low-temperature steaming:
The air in the cooking compartment is saturated with
steam. The heat is transferred without any drying out
whatever. Protein leaking is avoided by the lower
temperature.
80%
60%
30 - 45 °C
85 - 115 °F
Yeast dough,
Fermenting, rising:
sour dough mixture, Thanks to the moisture, the heat is distributed
Yoghurt
particularly evenly. The surfaces of doughs do not
dry out so much.
80%
60%
150 - 230 °C
300 - 450 °F
Casserole dishes,
gratin,
roast
Combined steaming:
the middle way between steam baking and hot air
operation makes it possible to achieve the optimum
cooking climate for every food.
60%
120 °C / 250 °F
160 °C / 320 °F
Plated dishes
Reheating:
cooked food can be reheated gently. Thanks to the
supply of steam, the food is not dried out.
Reheat food served on plates at 120 °C / 250 °F and
baked items at 160 °C / 320 °F .
30%
150 - 230 °C
300 - 450 °F
Yeast pastry
In this mode of operation, the cooking compartment
is sealed hermetically. The remaining moisture
prevents the drying effect of conventional hot air.
30%
70 - 80 °C
160 - 175 °F
Roast beef,
leg of lamb
Low-temperature cooking:
briefly seared meat can mature slowly and gently
over a long cooking time.
0%
150 - 230 °C
300 - 450 °F
Fruit cake
Convection:
the cooking compartment is ventilated and vented
through an opening so that the moisture produced
can be dissipated. This is particularly advantageous
for baked items that have to give off moisture during
the baking process.
100%
60 °C
140 °F
14
Cleaning aid
The cleaning aid makes it possible to loosen
soiling with steam.
Remarks
You can use several
cooking inserts at
the same time.
Light goes off after
a few seconds.
Meals can be heated
directly on the plate.
4.4 Operating the timer
The required moisture level and temperature can
be set before and after time programming by
turning the “Temperature” or “moisture level” knob.
The longer you press the + or – key when
programming a time, the faster the time elapses on
the display.
As long as one or several symbol(s) in the display
flash(es), no input is possible and no value is programmed or an invalid value has been programmed.
After completion of time programming, the
corresponding symbol flashes on the display. For
example, if you have programmed an end time, the
(end time) symbol will flash. An audible signal is
also sounded. Heating is deactivated and the oven
lighting goes off. You can restart the previously
selected mode by pressing any key on the display.
You end the baking process by turning the
“Temperature" knob to 0.
All time values are entered by means of the
(timer), +, – and
(confirmation) keys. Every
input triggers an audible and a visible signal.
If you select a program (e.g. end), but you do not
enter a value, the current time will appear on the
display after 20 seconds.
An entered value (e.g. duration programming) must
be confirmed within 20 seconds
(Confirm) key.
Entered values are not stored if they are not
confirmed.
Press the
(Confirm) key if you wish to confirm
a value during programming.
If you press any other key instead, the entered
value will not be stored and will disappear.
During a time programming it is possible at any
time to turn the “Temperature” control knob back
to 0. The steam oven will then no longer heat. The
previously programmed value is retained. An
audible signal sounds after the entered time has
elapsed.
Every alarm goes off after 3 minutes.
Note: all time programming functions can be
programmed simultaneously.
You can query set values by pressing the
(timer) key. The value appears on the display for
around 10 seconds. During this time, you can
modify the value by pressing the + or – key and you
can confirm it by pressing the
(Confirm) key.
Press the + and – keys at the same time if you wish
to clear a value.
If you have already programmed a time value once
(e.g. a duration) on the appliance, this previously
programmed value will be proposed to you when
programming a value again.
15
Setting the time of day
Proceed as follows:
– Press the (Timer) key 3 times. The (Time
unit) symbol flashes on the display.
The time display shows the currently set time
of day (Fig. 15).
Fig. 15
– You can select the required time by pressing
the + or – key.
– Press the (Confirmation) key to confirm the
entered value. An audible signal is sounded.
After first installation or a power failure lasting
several hours, 08:00 and the time unit symbol will
flash in the display. You can set the current time by
pressing the + and – keys. 08:00 will be stored as
the time of day if you turn one of the control knobs.
16
Fig. 16
The last programmed value is proposed to you
every other time you program a short time.
Short time
You can program a period of time with the short
time function without automatic activation or
deactivation. You can use this mode of operation
even when the appliance is switched off as an egg
timer, for example. The range that can be set is
between ten seconds (00:10) and 23.59 hours
(23:59)
Proceed as follows:
– Press the + key. The short time symbol flashes
(Fig. 16).
– The entered value appears on the display, which
you can modify by pressing the + or – key. The
time unit symbol lights up.
– Press the
value.
(Confirm) key to confirm the entered
– The elapsing time is displayed.
Note: if nothing is entered for 5 seconds, the short
time starts even if the key (Confirm) is not
pressed.
Once the short time has elapsed, an audible signal
sounds and the (Short time) symbol flashes on
the display. The signal goes off when you press any
key. The short time reminder can be switched off at
any time by pressing the + and – minus keys at the
same time.
Elapsing timer
Proceed as follows:
– Press the – key (Fig. 17).
Fig. 17
– The time, beginning at 00:00, is displayed
(maximum display: value 12 hours).
Thus, you can continuously display the elapsed
cooking time without programming automatic
deactivation.
When you press the – key again, the time is
switched off.
17
Fig. 18
Programming a duration
The appliance is operated for a specific period of
time. The range that can be set is between one
minute (00:01) and 23 hours and 59 minutes (23:59).
Proceed as follows:
– Press the (Timer) key once. The (Duration)
symbol and the (Cooking time) symbol flash on
the display. Dashes appear on the display (i.e. no
value programmed).
– Press the + or the – key to set the required
duration.
– Press the (Confirm) key to confirm the set
value. An audible signal is sounded. The
(Cooking time) symbol lights up on the display.
The end time is displayed automatically if you
press the (Timer) key twice.
Every other time you program a duration, the value
programmed last is proposed to you when you
press the + key.
– A signal is sounded after the programmed
duration has elapsed. At the same time, the steam
oven switches off automatically.
– By pressing any key, you can switch off the signal
and heating will start again. Turn the temperature
selector switch to 0 to end the operation.
Clearing incorrectly programmed values:
– Press the (Timer) key once.
– Press the + and – keys at the same time.
An audible signal is sounded.
18
Programming a switch-off time
The appliance switches off automatically at a time
that you have chosen. The starting point is the time
of day set on the appliance.
Proceed as follows:
– Press the (Timer) key twice. The (End) and
(Cooking time) symbols flash.
Fig. 19
– Press the + or – key to set the required time. You
can choose any switch-off time within a period of
24 hours.
– Press the (Confirm) key to confirm the entered
value. An audible signal is sounded. The
(Cooking time) symbol lights up on the display.
Note: the time of day that is set on the appliance
is the starting point for programming the switch-off
time.
You can query the entered value by pressing the
(Timer) key twice.
After the set time has elapsed, the (Cooking
time) symbol flashes and an audible signal is
sounded.
By pressing any key, you can switch off the signal
and heating will start again. Turn the temperature
selector switch to 0 to end the operation.
Programming a duration and an off time
This mode enables you to start and end baking and
cooking in your absence.
Proceed as follows:
– Enter a required duration (see page 18).
– Press the
(Confirmation) key.
– Enter the required switch-off time (see above).
– Press the
(Confirmation) key.
The automatic mode becomes active as soon as
the switch-off time is programmed and you have
pressed the (Confirm) key.
19
5. Special functions
5.1 Child lock
The child lock prevents inadvertent activation of the
steam oven.
Proceed as follows:
Switching on:
– Turn the “Temperature” control knob to the right
to any temperature position (not light).
– Press the
(Confirm) key and keep it pressed.
– Turn the “Temperature” control knob to the 0
position (Fig. 20).
The
(Child lock) symbol on the display flashes.
Fig. 20
Switching off:
– Press the (Confirm) key and keep it pressed.
– Turn the “Temperature” control knob to the right
to any temperature position (not light).
– Release the
(Confirmation) key.
– Turn the “Temperature” control knob to the 0
position (Fig. 21).
The
Fig. 21
20
(Child lock) symbol on the display goes off.
5.2 Options menu
With the aid of the Options menu, you can
– choose between °C and °F on the temperature
display.
– choose between 12h and 24h on the time display.
– turn the timer on and off.
– start calibration.
– reset the descaling display.
Proceed as follows:
– Turn the two control knobs to the topmost
position.
End
Options menu
Temperature
display in
°C / °F
Descaling
– Press the
– Turn the “Moisture level” knob to the right.
– Release the
Start
Calibration
Fig. 22
Time display
24h / 12h (AM/PM)
Time display
ON/OFF
(only if appliance is switched off)
(Confirm) key and keep it pressed.
(Confirmation) key.
– By turning the “Moisture level” control knob, you
can now choose the various functions (Fig. 22):
Position 1: temperature display either in °C or °F.
Position 2: time display in 24 hours or 12 hours
(am and pm)
Position 3: optional deactivation of the time
display when the appliance is off
Position 4: calibration – you can now start the
calibration process when you turn the
“Temperature” control knob to any
position except light.
Position 5: descaling, enter water hardness
– Set the required option by pressing the + or – key.
– Press the
(Confirmation) key
– To quit the options menu, turn the “Moisture”
control knob back up or turn the “Temperature”
control knob.
21
5.3 Core temperature sensor
Using the core temperature sensor, during the
cooking process you can measure the core
temperature of the food you are preparing exactly
between 1 °C / 5 °F and 99 °C / 210 °F . The sensor
measures the temperature in the interior of the
meat. It indicates when the set core temperature
has been reached and the meat has been cooked
to satisfaction.
Fig. 23
The core temperature sensor
– enables exact cooking to the spot.
– prevents overcooking of roasts.
– provides you with a display of the actual
temperature for total control of the cooking
process.
Proceed as follows:
– Preheat the oven.
– Insert the cooking insert with the food.
Fig. 24
– Insert the tip of the core temperature sensor in
the middle of the food, at its thickest point; not in
the middle in the case of poultry (hollow), but
between the belly and the thigh.
The measuring tip must not touch any bones and
should not be inserted into fatty tissue.
Caution: the core temperature sensor and the
sides are hot. Use a glove.
– Close the oven door.
Fig. 25
– Press the (Core temperature sensor) key twice.
The (Core temperature sensor) symbol flashes
and the suggested value of 60 °C / 140 °F can be
seen on the display (Fig. 24).
– You can enter a value between 1 °C / 5 °F and
99 °C / 210 °F (see table) by pressing the + and –
keys (Fig. 25).
– Press the (Confirmation) key to confirm the
entered value. An audible signal is sounded.
22
An audible signal sounds as soon as the
programmed core temperature has been reached.
The oven switches off automatically. The (Core
temperature sensor) and (End) symbols flash on
the display.
Caution: pull out the core temperature sensor
before removing the food. Use a glove to do this
because the core temperature sensor gets very hot
during operation.
Note:
when you press the (Core temperature sensor)
key once, the temperature on the core temperature
sensor is displayed for a few seconds.
Clearing the core temperature:
– Press the (Core temperature sensor) key
twice. The (Core temperature sensor) symbol
flashes on the display.
– Press the + and – keys at the same time.
– An audible signal sounds and the (Core
temperature sensor) symbol goes off.
To clean it, simply rub the core temperature sensor
with a moist cloth.
Note:
you cannot set a temperature on the core
temperature sensor that is lower than the core
temperature of the food you are preparing.
If you set programming with the core temperature
sensor and the timer at the same time, the
programming that reaches the entered value first
will switch off the oven.
Recommended core temperature values
Beef
Roast beef / fillet of beef
rare
medium-rare
well-done
Beef roast
Boiled fillet of beef
45-50 °C/115-120 °F
55-65 °C/130-150 °F
70-80 °C/160-175 °F
80-85 °C/175-185 °F
90 °C/195 °F
Pork
Roast pork
Back of pork
Meat loaf
75-80 °C/165-175 °F
65-70 °C/150-160 °F
85 °C/185 °F
Veal
Roast veal
75-80 °C/165-175 °F
Breast of veal, stuffed
75-80 °C/165-175 °F
Back of veal medium-rare 65-70 °C/150-160 °F
Venison
Leg of venison
Back of hare / venison
75-80 °C/165-175 °F
65-70 °C/150-160 °F
Poultry
Chicken
Goose
Turkey, duck
Duck breast
85 °C/185 °F
85-90 °C/185-195 °F
80-85 °C/175-185 °F
70 °C/160 °F
Lamb
Leg of lamb
Lamb
medium-rare 55-65 °C/130-150 °F
well-done
75-80 °C/165-175 °F
Mutton
Leg of mutton medium-rare 75-80 °C/165-175 °F
Back of lamb well-done
80 °C/175 °F
Bread
90 °C/195 °F
23
5.4 Steaming
You have a possibility of deliberately adding more
moisture to the food you are cooking (e.g. bread,
bread rolls).
Note: steaming is only possible at the “Convection”
stage (0 %) or with 30% moisture (0 %).
Proceed as follows:
– Press the (Steaming / Condensing) key
(Fig. 26).
Fig. 26
5.5 Condensing
– Steaming lasts for as long as you keep the key
pressed, but no more than 8 seconds. You can
trigger steaming again by pressing the
(Steaming / Condensing) key yet again.
Before opening the door it is possible to remove the
steam in the oven using the condensation mode.
Water is added to the cooking compartment. This
causes the cooking compartment to cool. So, when
opening the door after condensing, less steam
blows into your face.
Note: condensing is only possible by a humidity of
100 %, 80 % and 60 % and at a temperature below
130 °C / 265 °F .
Proceed as follows:
– Press the (Steaming / Condensing) key for
approx. one second (Fig. 27).
– Condensation starts to run only when the door is
closed.
Fig. 27
– After condensation (approx. 20 sec.), an audible
signal sounds. If the door is not opened, the
appliance continues heating after a few seconds.
– You can end the process by opening the door
(Caution! Drops of water may drip from the door)
or pressing the condensing key.
24
5.6 Display of the current cooking
compartment temperature
(ThermoTest)
Fig. 28
When you press the (Confirmation) key, the
current temperature in the cooking compartment
and the moisture level appears on the display for
a few seconds (Fig. 28).
Note: if the appliance is operated for a prolonged
period unavoidable temperature fluctuations of up
to 5 °C / 10 °F may occur.
When the setting 100 °C / 210 °F and 100 % humidity
has been selected the appliance will heat until
boiling point. The boiling point is dependent on the
position above sea level and is usually, in fact,
below 100 °C / 210 °F . In order to steam at boiling
point you must select 100 °C / 210 °F .
5.7 Power failure protection
When the steam oven is on, heating is interrupted
if the power should fail and if it should then return
again.
Note: the appliance bridges a power failure lasting
5 minutes. The cooking process can be continued
unhindered. A prolonged power failure may have a
negative influence on the cooking process. This is
why cooking stays interrupted. You must switch the
appliance off and then on again.
5.8 Holiday protection
For your protection, the appliance features holiday
protection. Every heating operation is switched off
after 15 hours if the appliance is not operated
during this time. Dashes appear on the display.
Turn the two control knobs to 0. You can then
operate the appliance in the way to which you are
accustomed. This function is not active when a time
has been programmed.
5.9 Cleaning aid
The cleaning assistance feature loosens soiling,
which can then be removed with greater ease
(see Chapter 9.3).
25
6. Further uses
Low-temperature cooking
Vigorously browned meat matures over a longer
time at a lower temperature.
Fermenting
Raising yeast dough, self-raising flour and sour
dough mixtures
– Preheat the appliance to 70 - 80 °C / 160 - 175 °F
(depending on the size of the food). To do this,
turn the “Moisture content” control knob to the
30 % position.
– Place the bowl containing the dough on the wire
grill.
– Briefly roast the meat on all sides in a pan.
Note: the longer you roast the meat in the pan, the
shorter the roasting time in the oven.
– Place the meat on a preheated plate in the oven.
– Larger pieces of meat (e.g. entrecote, roast beef
or leg of lamb) need 2 - 4 hours).
Smaller pieces of meat (steak or diced chicken)
take 30 - 60 minutes.
– You can reduce the temperature to 60 °C / 140 °F
towards the end of the cooking time. For larger
pieces of meat, you can extend the cooking time
by 2 - 4 hours or for smaller pieces you can
extend it by 30 - 45 minutes.
– Turn the “Temperature” knob to 30 - 40 °C /
85 - 105 °F and the “Moisture content” knob to
60 %.
Extracting juice
The steam oven allows you to extract juices even
without a special juice extraction pot.
– Place the fruit or berries in the perforated
cooking insert.
– Insert the perforated cooking insert with the fruit
in the 3rd level from below.
– Place the deep unperforated cooking insert one
level lower to collect the juice.
– Turn the “Temperature” knob to 100 °C / 210 °F
and the “Moisture content” knob to 100 %.
Reheating
Warming up ready-cooked meals without quality
losses.
Leave the fruit in the appliance until juice no longer
appears (1 - 2 hours depending on the type of fruit).
– Heat up the appliance to 120 °C / 250 °F . To do
this, turn the “Moisture” control knob to the 60 %
position.
Sterilising
Preserving fruit, vegetables and meats in
preserving jars.
– Portion cooked but cold meals on plates.
– Place the filled preserving jars on the gridiron or
the perforated cooking insert. Important: the jars
must not touch each other.
– Place the plates on the wire grill.
– Cooking time: 7 - 15 minutes.
Note: to reheat vegetables or pastas choose a
temperature of 100 °C / 210 °F and a moisture of
100 %.
– Turn the “Temperature” knob to 100 °C / 210 °F
and the “Moisture content” knob to 100 %.
– Turn the “Temperature” knob to 0 as soon as the
contents of the jars begin to bubble.
Do not remove the preserving jars from the oven
until they have cooled down completely.
26
Thawing
Thawing deep frozen products gently and in a short
time.
– After 1-2 minutes, remove the cooking receptacle
from the oven again and place the vegetables in
iced water to cool them.
– Place the frozen foodstuff in the perforated
cooking receptacle.
– Allow the food to drip off well.
– Insert the perforated cooking insert with the
frozen food in the 2nd level from below.
– Insert the unperforated cooking insert one level
lower to collect the thawing liquid.
– Turn the “Temperature” knob to 45 - 50 °C /
115 - 120 °F and the “Moisture content” knob to
80 %.
Preparing yoghurt
Preparing yoghurt the do-it-yourself way.
– Heat milk (except long-life milk) on the hob to
90 °C / 195 °F to avoid disturbing the bacteria in
the lactic acid.
– Cool the milk to 40 °C / 104 °F in a water bath.
The time it takes to thaw depends on the size and
weight of the frozen food.
– Stir natural yoghurt (without fruit) into the milk
(1-2 teaspoons for every 100 ml).
Application examples:
Chicken (1000 g)
Chicken legs (400 g)
Vegetable frozen in a block
(e.g. spinach) (400 g)
Berries (300 g)
Fish fillet (400 g)
– Pour the yoghurt into clean jars.
55 - 65 minutes
30 - 35 minutes
– In the case of yoghurt ferment, pay attention to
the notes on the packet.
20 - 30 minutes
8 - 10 minutes
15 - 20 minutes
– Turn the “Temperature” knob to 45 °C / 115 °F and
the “Moisture content” knob to 80 %. Allow the
yoghurt to mature for 4 - 6 hours.
After the thawing time has elapsed, leave thawed
food for another 10-15 minutes in the appliance
after switching off to ensure that the food is able
to thaw right down to its interior.
Blanching
By blanching, vegetables that are to be frozen,
for example, retain their natural colour.
– Place the food in a perforated cooking
receptacle.
– Turn the “Temperature” knob to 100 °C / 210 °F
and the “Moisture content” knob to 100 %.
– As soon as the temperature has been reached,
place the cooking receptacle in the second level
from below and place the unperforated cooking
receptacle one level lower.
Note: the time needed for maturity will be
lengthened if you use cold milk to produce the
yoghurt.
On completion, place the yoghourt in the fridge!
Tip: before heating the milk, add skimmed milk
powder (1 - 2 tablespoons for every litre) to obtain
yoghurt that will not go off.
To kill off undesirable germs, before preparing
the yoghurt place the yoghurt jars in the oven
compartment for a few minutes at 100 °C / 210 °F
and 100 % moisture. Caution! The yoghurt jars are
hot. Allow them to cool down before taking them
out of the oven.
27
7. Cooking table
Dish
VEGETABLES **
Leaf spinach
Cauliflower
Cauliflower and carrots
Broccoli
Peas
Stuffed vegetables (courgette, aubergine, peppers)
Green beans
Kohlrabi
Leek
Carrots
Jacket potatoes
Boiled potatoes
Asparagus, green
Asparagus, purple
Skinned tomatoes
MISCELLANEOUS
Vegetable pudding / vegetable flan
Potato gratin
Dumplings
Lasagne
Soufflé
Soup ingredients (cooked-egg-garnish, semolina dumpling)
PULSES / RICE ***
Long grain rice
Parboiled rice
Lentils
Pre-soaked white beans
Cooking insert selection * Quantity (end weight)
perforated / unperforated
perforated
perforated
perforated
perforated / unperforated
unperforated
perforated
perforated
perforated / unperforated
perforated
perforated
unperforated
perforated
perforated
perforated
500 g
1 head
together approx. 1 kg
1 kg
1 kg
1 kg
1 kg
1 kg
1 kg
1 kg (average size)
1 kg
1 kg
1 kg
perforated, wire grill
unperforated
perforated / unperforated
unperforated
shelf, perforated
unperforated
unperforated
unperforated
unperforated
unperforated
250 g + 600 ml water
250 g + 600 ml water
250 g + 750 ml water
250 g + 1 l water
* Place the cooking insert on the second shelf from bottom. When steaming you can use two cooking inserts simultaneously.
Use the second and third shelves from bottom.
** Some types of vegetables can be “quick steamed” at 100 % and temperatures between 102 - 120 °C / 215 - 250 °F . The higher temperature
shortens the cooking time. Not recommended for sensitive foods!
*** Follow packaging instructions.
28
Preparation
Temperature
Moisture
plucked
whole
in roses / in slices
in roses
100 °C / 210 °F
100 °C / 210 °F
100 °C / 210 °F
100 °C / 210 °F
100 °C / 210 °F
160 - 180 °C / 320 - 355 °F
100 °C / 210 °F
100 °C / 210 °F
100 °C / 210 °F
100 °C / 210 °F
100 °C / 210 °F
100 °C / 210 °F
100 °C / 210 °F
100 °C / 210 °F
100 °C / 210 °F
100 %
100 %
100 %
100 %
100 %
80 - 100 %
100 %
100 %
100 %
100 %
100 %
100 %
100 %
100 %
100 %
2-5
20 - 30
20 - 25
10 - 15
12 - 18
20 - 30
20 - 35
15 - 25
9 - 12
15 - 25
35 - 50
15 - 25
10 - 15
15 - 20
1-2
100 °C / 210 °F
180 - 200 °C / 355 - 390 °F
100 °C / 210 °F
175 - 200 °C / 350 - 390 °F
175 - 200 °C / 350 - 390 °F
100 °C / 210 °F
100 %
30 - 60 %
100 %
80 %
60 - 100 %
80 - 100 %
60 - 70
30 - 45
15 - 25
35 - 45
10 - 20
10 - 20
100 °C / 210 °F
100 °C / 210 °F
120 °C / 250 °F
120 °C / 250 °F
100 %
100 %
100 %
100 %
20 - 30
15 - 20
30 - 40
55 - 65
whole
in slices
in slices
in slices
prick with fork
quartered, salted
whole
whole
whole
bain marie, 1,5 l
see recipe book
see recipe book
in soufflé dish, see recipe book
Core temp.
Cooking times
(approx. in min.)
Note:
the cooking times and quantities given here are rough values for 4 people. Smaller quantities shorten cooking time. Always preheat the steam
oven. If the appliance is not preheated, cooking times are lengthened by about 5 minutes.
29
Cooking table
*
Dish
Cooking insert selection * Quantity (end weight)
MEAT
Fillet in puff pastry
perforated with baking paper 1 - 1,5 kg
Roast pork with rind
wire grill, unperforated
1,5 kg
Leg of lamb (Low-temperature cooking)
Roast beef (Low-temperature cooking)
Roast pork (collar / shoulder)
Boiled fillet of beef
POULTRY
Duck (whole)
Duck breast
Chicken (whole)
Leg of chicken
FISH
Bream
Fish tureen
Trout (whole)
Salmon fillet
Mussels
Rolled sole, stuffed
DESSERTS
Crème Brûlée
Yeast dumplings
Sweet soufflé
REHEATING
Food served on plates
Vegetables, starch side dishes (potatoes, rice, pasta)
perforated
perforated
wire grill, unperforated
unperforated
1,5 - 2,5 kg
1,5 - 2,5 kg
1,5 kg
1 kg
wire grill, unperforated
unperforated
wire grill
wire grill
2 - 3 kg
perforated
wire grill
perforated / unperforated
perforated / unperforated
perforated/unperforated
perforated / unperforated
1 - 1,5 kg
4 - 6 pieces
2 à 300 g
800 g
1,5 kg
wire grill / perforated
unperforated
wire grill
wire grill
unperforated
0,5 - 1 kg
Place the cooking insert on the second shelf from bottom. When steaming you can use two cooking inserts simultaneously.
Use the second and third shelves from bottom.
**** Change to the second moisture or temperature value15 - 20 min. before the end of the cooking.
30
Preparation
Temperature
Moisture
see recipe book
cut the rind between
step 1 and 2 and season
180 - 200 °C / 355 - 390 °F
1) 100 °C / 210 °F
2) 160 - 170 °C / 320 - 340 °F
3) 210 °C / 410 °F
75 - 80 °C / 165 - 175 °F
75 - 80 °C / 165 - 175 °F
200 - 220 °C / 390 - 430 °F
100 °C / 210 °F
80 - 100 %
100 %
60 - 80 %
0%
0 - 30 %
0 - 30 %
60 %
100 %
160/200 °C - 320/390 °F ****
160 °C / 320 °F
200 °C / 390 °F
180 °C / 355 °F
60 - 80 %
80-85 °C/175-185 °F
0 - 30 %
70 °C/160 °F
100 / 0 % **** 85 °C/185 °F
100 / 0 % ****
70 - 100
15 - 20
45 - 55
20 - 35
80° - 90 °C / 175 - 195 °F
75 °C / 165 °F
80 - 90 °C / 175 - 195 °F
80 - 90 °C / 175 - 195 °F
100 - 120 °C / 210 - 250 °F
150 °C / 300 °F
100 %
80 %
100 %
100 %
100 %
80 %
15 - 25
40 - 50
12 - 15
12 - 18
12 - 15
8 - 10
160 °C / 320 °F
100 °C / 210 °F
150 °C / 300 °F
60 %
100 %
60 %
10 - 15
15 - 25
8 - 10
120 °C / 250 °F
90 - 100 °C / 195 - 210 °F
60 %
80 - 100 %
7 - 15
7 - 15
first brown vigorously on hob
first brown vigorously on hob
0,5 l liquid and vegetables
see recipe book
first brown on hotplate
tureen
see recipe book
see recipe book
in oven proof dish, see recipe book
Core temp.
80-85 °C/175-185 °F
80-85 °C/175-185 °F
90 °C/195 °F
Cooking times
(approx. in min.)
50 - 60
5
50 - 60
KT
180 - 240
180 - 240
(60 - 70)
100 - 120
Note:
the cooking times and quantities given here are rough values for 4 people. Smaller quantities shorten cooking time. Always preheat the steam
oven. If the appliance is not preheated, cooking times are lengthened by about 5 minutes.
31
Baking table
Cakes and biscuits
Temperature
Moisture
Cooking time
(app. in min.)
Apple tart
Swiss roll
Small flaky pastry cakes
Bread (1 kg) **
Bread rolls **
Plaited buns **
Ring cake (yeast)
Fruit pie made of yeast dough
Biscuits
Quiche, fruit tarts
Sponge cake
Cream puffs
Onion pie
170 - 190 °C / 340 - 375 °F
190 - 210 °C / 375 - 410 °F
180 - 200 °C / 355 - 390 °F
200 /165 °C - 390/330 °F *
200 - 220 °C / 390 - 430 °F
165 - 170 °C / 330 - 375 °F
160 - 175 °C / 340 - 350 °F
160 - 175 °C / 340 - 350 °F
160 - 175 °C / 340 - 350 °F
180 - 210 °C / 355 - 410 °F
160 - 175 °C / 340 - 350 °F
200 - 210 °C / 390 - 410 °F
170 - 180 °C / 340 - 355 °F
30 %
0 - 30 %
80 - 100 %
80 - 100 %
80 - 100 %
30 - 60 %
30 - 60 %
0 - 30 %
0%
0 - 30 %
0 - 30 %
0 - 30 %
60 - 80 %
30 - 45
7-9
15 - 25
50 - 55
20 - 30
35 - 45
45 - 50
40 - 55
15 - 20
35 - 45
50 - 60
20 - 30
40 - 50
Special notes
see recipe book
see recipe book
see recipe book
see recipe book
see recipe book
Note: the cooking times and quantities given here are rough values for 4 people. Smaller quantities shorten cooking time. Always preheat the
steam oven. You can only bake on one level. Use the second level from bottom.
* Reduce to the second temperature value after15 min.
** Bread and bread rolls can be successfully baked as follows: Preheat at 220 °C / 430 °F and 30 % moisture. After placing them in the oven, steam
once or twice. After 5 minutes reduce to 0 % moisture and 190 °C / 375 °F .
32
8. Tips and tricks
General:
– The appliance does not need long to heat up.
It therefore operates in an extremely energy and
time-saving fashion.
– Cooking times depend on the quality, weight and
height of the food. This is why specified values
can only serve as recommendations.
– Food being cooked must not come into contact
with the oven compartment, the grease filter or
the air baffle.
– The steam oven door must seal well. So always
keep the door seal faces clean.
– Do not place too much on wire grill and in
receptacles. This will ensure optimum circulation
of the air.
What are all the things you can do better with
the steam oven?
– Cook potatoes in the perforated receptacle.
By doing so, you will ensure that the steam can
reach the potatoes from all sides. This will make
cooking more intensive.
– Use the perforated insert to boil large quantities
of eggs. Please note: Compared to an egg boiler,
the cooking time is extended by 2-3 minutes.
You will have to preheat the appliance if you want
to boil soft eggs.
– You can collect vegetable juices by placing the
unperforated insert in the bottom rack.
– For foods that are sensitive to pressure (such as
dumplings), you are best using two low cooking
receptacles rather than just one. By doing so, you
will ensure that items do not lie on one another
and cannot get crushed.
– Peel tomatoes: cut into the tomatoes and place
them in the steam for 1 to 2 minutes. Then dip the
tomatoes in ice water.
– You can even decrystallise honey with your steam
oven. To do this, set a temperature of 60 °C / 140 °F
and a moisture level of 100 % steam.
Tips on how to save energy and protect the
environment:
– Give good thought to what foods you can cook at
the same time. This will ensure an even load on
your appliance and will save you time and energy.
– Avoid opening the steam oven door frequently
and for prolonged periods. Otherwise, generated
steam and heat can escape unhindered and then
has to be generated again. This involves a loss
of large amounts of energy and prolongs the
cooking time.
– You can often use several levels at once (when
steaming with up to 100 °C / 210 °F , not when
baking).
Thawing tips:
– Only thaw the quantity you need.
– Please remember: once food has been thawed,
it may not be possible to keep it for as long as
intended and it will perish faster than fresh food.
– Thawing: thaw pieces of meat that you intend to
bread long enough to ensure that spices and the
bread crumbs will adhere to the meat.
– Thawing poultry: remove poultry from its
packaging before thawing. Important: pour away
the thawed water.
– You can store kitchen herbs frozen and you can
use them unthawed.
– Thawing and heating in steam is possible instead
of a bain-marie. Leave the meal in the bag or put
in directly on a plate.
Sterilising:
– If possible preserve foodstuffs immediately after
buying or harvesting them. Prolonged storage
reduces their vitamin content and leads easily to
fermentation.
– Only ever use fruit and vegetables that are in a
perfect state. Examine preserving jars and rubber
rings exactly. Check clips and springs. Sterilise
the jars and clean the rubber rings. Rinse them
with hot water.
33
9. Cleaning and care
9.1 Manual cleaning
You should thoroughly clean the appliance before
operating it for the first time and after every
use. By doing so, you avoid baking in of residues.
After residues have baked in several times, they
are then difficult to remove.
Caution: do not clean this appliance with a steam
cleaning unit or with water pressure - risk of shortcircuits!
Never use any abrasive or aggressive cleaning
agents such as abrasive agents, steel wool,
saponified steel wool, metal sponges, plastic
sponges or sponges with an abrasive surface.
Clean the grease filter at regular intervals.
Remove the support grills. Push up the grease filter
and then remove it.
After cleaning, remove all cleaning agent residues
without leaving any on the appliance.
When you wish to clean the appliance manually,
switch it off and allow it to cool down.
Clean accessory parts (cooking inserts etc.) in a
dishwasher or with hot water and rinsing detergent.
You can loosen food remainders that have burnt into
the cooking inserts by placing a little water and
rinsing detergent in the cooking insert. Soak these
in the steam oven at 70 °C / 160 °F and 100 %
moisture.
The outer surfaces must only be cleaned with a
soft cloth. Do not use any commercially available
stainless steel cleaners as these may be aggressive
to the printed markings.
Clean operator controls and glass surfaces with
a soft cloth and light rinsing detergent and wipe
them dry with a soft dry cloth. Do not use any
abrasive or nitro polishing agents for cleaning. Do
not use any abrasive sponges either. Do not spray
anything onto the switch panel.
Do not use strongly alkaline cleaning agents (such
as oven spray) because these are aggressive to the
aluminium surface.
Do not scrape off burnt-in food remainders.
Remove them by means of the cleaning aid function
instead (see Chapter 9.3).
34
Empty the drip channel and clean it.
Clean the strainer and the siphon at regular
intervals. To do this, unscrew the strainer from the
bottom plate.
9.2 Cleaning the side plate
– Allow the appliance to cool down completely
before cleaning it.
– Be careful that no small parts fall into the base
strainer.
– Pull out the left shelf after undoing the knurled nut
on the front side.
– The grease filter can be detached in the upward
direction.
Fig. 29
– To remove the side plate, undo the 4 nuts with a
socket spanner (8 mm). Be careful not to scratch
the inside of the cooker.
– Do not use any abrasive cleaning agents to clean
the side plate.
– Limescale deposits on the side panel and on the
fan are harmless and do not detrimentally
influence functioning of your appliance.
– The inlet pipe should be cleaned regularly.
See chapter 10.3 entitled Descaling.
– Re-insert the side plate. Re-attach the grease
filter and the shelves.
– Check that all parts are fitted securely before
commencing operation of the appliance.
35
9.3 Cleaning aid
Stubborn soiling can be loosened by means of
the cleaning aid and may then be removed more
easily.
You should not detach the grease filter. It protects
the fan against cleaning agent residues. You can
then clean the grease filter and shelves in a
dishwasher.
– Allow the appliance to cool down completely
before cleaning it.
– Remove the shelves by undoing the knurled nuts.
The appliance can be wiped out better later on.
Fig. 30
– Spray a household cleaning agent that is suitable
for stainless steel onto the cold appliance.
Note: be careful that no cleaner comes in contact
with the aluminium panel while cleaning.
– Close the appliance door.
– Leave the agent to act according to
manufacturer’s instructions.
– Starting in the initial position, turn the two control
knobs by one latching position to the left (Fig. 30).
– The (Cleaning aid) symbol lights up on the
display. The (Duration) and (Cooking time)
flash on the display (Fig. 31).
Fig. 31
– The cleaning time of 30 minutes is shown on the
display. For heavy soiling you can change the
cleaning time to 40, 50 minutes or 1 hour by
pressing the + key.
– Press the (Confirmation) key to start the
operation.
Note: the light in the oven compartment is off
during the cleaning process.
36
– By pressing the (Clock) key you can query the
remaining time. An audible signal sounds once
the cleaning aid has finished.
– Press the (Confirmation) key to switch off the
signal. Do not turn the control knobs.
– Immediately clean the inside of the oven with a
soft brush, and wipe with a soft cloth. By pressing
the (Steaming / condensing) key you can add
fresh water to aid cleaning (only when both
control knobs remain in the position cleaning aid).
Note: the (Steaming / condensing) key must
not be pressed when the side plate has been
removed. Risk of splashing!
– Should you leave the door open too long, that the
inside of the oven is too dry, repeat the process.
– To rinse the oven, close the door and heat the
oven for some minutes at 100 % moisture and
100 °C / 210 °F .
– Let the oven cool. You can now dry and polish the
inside of the oven and the glass panel with a soft
dry cloth.
– Turn the control knobs back to the starting
position. Reattach the grease filter and the
shelves. Check that all parts are fitted securely
before commencing operation of the appliance.
37
10. Maintenance
10.1 General
The appliance must always be disconnected
from the mains when being repaired.
If the appliance does not function correctly, check
the fuses and the water supply connection first.
If the power and water supply is functioning
correctly, but your appliance still does not work,
please contact your Gaggenau dealer who will
provide you with the address and telephone
number of your nearest manufacturer’s authorized
service agent or contact Gaggenau USA on (800)
828-9165. Specify the appliance type (see rating
plate located on the inner side of the door and also
included with these instructions).
Repairs may only be carried out by authorised
electricians, in order to guarantee the safety of the
appliance.
Unauthorised tampering with the appliance will
invalidate any warranty claims.
10.2 Lamp replacement
For technical reasons the lamp cover cannot be
removed. Lamp must only be replaced by
Gaggenau after-sales service.
Important: do not detach the lamp cover.
38
The water evaporates behind the side plate.
Scaling therefore drops out there and is washed
into the oven compartment. Scale can be wiped
away with a moist cloth.
10.3 Descaling
The inlet pipe must be descaled at regular intervals. The oven is equipped with a device which
counts the operational hours. Depending on the
hardness of the water entered, after a certain
number of hours the symbol
(Descale) will
constantly blink on the display. This shows that the
inlet pipe should be descaled (Fig. 32). This symbol
flashes even when the appliance is off.
Fig. 32
To descale the inlet pipe, proceed as follows:
– Remove the shelf and the side plate on the left.
(see Chapter 9.2).
– Dismantle the inlet pipe by first removing the nut
(8 mm) and by then pulling the inlet pipe out of
the mount (Fig. 33).
– Clean the inlet pipe by soaking it in vinegar
essence, citric acid or descaler.
– Reinstall the inlet pipe in the reverse order.
Note: the conical side of the nut must face the
appliance side.
Fig. 33
End
Options menu
Descaling
Temperature
display in
°C / °F
Start
Calibration
Time display
24h / 12h (AM/PM)
Fig. 34
Time display
ON/OFF
(only if appliance is switched off)
Important!
On assembly, pay attention to a good fit of the inlet
pipe. It should be exactly in the middle over the
distributor wheel and should not scrape on its
edges.
After descaling, the descaling display must be
turned off manually.
Proceed as follows:
– Turn the two control knobs to the topmost
position.
– Press the (Confirmation) key and keep it
pressed.
– Turn the “Moisture level” knob to the right.
– Release the (Confirmation) key.
– Turn the “Moisture level” control knob to the
“Descaling” position on the right (Fig. 34).
– Press the (Confirmation) key.
The
(Descaling) symbol goes off.
39
10.4 Disassembly of the front window
Proceed as follows:
– Remove the bottom screw from the door handle.
– Remove the top screw from the door handle and
detach the door handle.
– Hold the front window with one hand and lightly
shake the door to and fro. The glass window can
be removed towards you.
You can now clean the front window.
Install in the reverse order.
In doing so, make sure that you first insert the
window on the hinge side and that you hold it with
one hand to stop it from falling out.
Fig. 35
Fig. 36
40
10.5 Remedying small malfunctions yourself
If you cannot remedy a malfunction yourself with reference to the list below:
– Switch off the steam oven and isolate the appliance from the mains.
– Shut off the water supply.
– Do not open the housing of the appliance.
– Call Gaggenau after-sales service.
What to do if... ?
The cause
The solution!
... The display stays off?
No voltage on the appliance.
Insert the mains plug in the socket.
Check the household fuse.
Should you wish, switch the time display on using the options menu.
The time display has been switched off
on the options menu.
... “R” appears on the display?
Calibration has not been done or has
been ended prematurely.
Complete calibration.
... The
(Heating up) symbol does
not appear on the display?
Appliance door is not closed.
Close the appliance door.
... The
(Tap) symbol flashes on
the display?
No water in the appliance.
Check the water connection.
... Water drips down the door?
Condensation.
The window always steams up at temperatures up to 100 °C / 210 °F .
Condensation is normal with steam.
Wipe out the collecting channel.
Collecting channel on the appliance
door is full.
... Steam escapes from the appliance
despite condensation?
Not all the steam can be quenched
because the food itself steams as the
result of its own heat.
Caution when opening the door! Risk of scalding!
Wait until quenching has ended.
... You can hear a humming noise?
The drain pump is emptying the
drain tank.
This is normal.
... The
The child lock has been activated.
Switch off the child lock (see chapter 5.1).
... The
symbol lights on the display
and the appliance does not heat up?
symbol flashes on the display?
The appliance is set to show room mode
without heating function.
Disconnect appliance from power supply for a few seconds (switch
off fuse), then within 3 minutes press + key and keep pressed and
turn “Temperature” control knob to any temperature (not light!).
... The temperature display does
not indicate the set value?
The appliance is still heating up.
Small-scale periodic fluctuations of the cooking compartment
temperature are normal.
... The oven lighting goes off?
At low target temperatures, the light
is switched off automatically because
the lamp additionally heats up the
cooking compartment.
The light is activated for a few seconds every time a key
or control knob is operated.
... No steam is generated?
The inlet pipe is clogged with scale.
See Chapter entitled “Descaling”.
... The water in the cooking
compartment does not drain off?
The drain is clogged.
Clean the drain filter and siphon and rinse through the drain.
... The pump repeatedly
starts periodically?
The drain pipe is not laid in a gradient.
Refit the drain hose as described in the installation instructions.
... The inside walls are covered in scale?
Water is too hard.
Connect a water softener.
... Steam escapes during
boiling point adjustment?
More steam is needed for the
boiling point adjustment.
No longer occurs later on during normal operation.
... an error sign appears in the
display (e.g. F20, F23, etc.)?
The appliance has recognized an error.
Disconnect the appliance from the mains for about 10 minutes
(e.g. by switching off relevant fuse). If after renewed
switching on the error is still shown in the display, please
call the Gaggenau after-sales service.
41
GAGGENAU HAUSGERÄTE GMBH
P.O. BOX 10 02 50 · 80076 MÜNCHEN
GERMANY
Y (0 89) 45 90 - 03
FAX (0 89) 45 90 - 23 47
5551 McFADDEN AVENUE
HUNTINGTON BEACH, CA 92649
USA
Y (800) 828-9165 · FAX (714) 901-0979
www.gaggenau-usa.com