1
DRYER
Use & Care Guide
SECHEUSE
Guide de L’utilisateur
Table of Contents
Product registration ..................................... Cover
Important Safety Instructions.................................. 2
Drying Procedures ............................................... 3
Features .............................................................. 3
Common Drying Problems .................................. 4
Care and Cleaning.............................................. 4
Avoid Service Checklist ....................................... 5
Service information....................................................6
Français ...............................................................7-12
Consignes de sécurité importantes...........................7
Instructions de séchage ............................................8
Caractéristiques..........................................................9
Problèmes de séchage courants ...............................9
Entretien et nettoyage.............................................10
Guide de dépannage ..............................................11
Information sur le service après-vente....................12
Read all instructions before using this
appliance. This book contains valuable
information about
Operation
Care
Service
Keep it in a safe place.
Lisez ce manuel en entier avant de vous servir
de cet appareil.Ce manuel renferme de
précieuses informations sur
le fonctionnement
l’entretien
le service après-vente
Conservez-le en lieu sûr.
Read and Save These Instructions
Record Your Model and Serial Numbers
The model and serial numbers of your dryer are found on the dryer serial plate located of
the left side of the door opening. Record and retain these numbers.
Lisez et conservez ces instructions
Notez le numéro de modèle et le numéro de série
Les numéros de modèle et le numéro de série sécheuse se trouvent sur la plaque
signalétique située sure la gauche, dans l’ouverture de la porte. Notez et conservez ces
numéros.
Model Number:
N° de modèle:
Serial Number:
N° de série:
Purchase Date:
Date de l’achat:
P/N 131679000B (0504)
For your safety, the information in this manual must be followed to minimize the risk of fire or
explosion or to prevent property damage, personal injury or loss of life.
Do not store or use gasoline or other flammable vapors and liquids in the vicinity of this or any other appliance.
WHAT TO DO IF YOU SMELL GAS:
•
Do not try to light any appliance.
•
Do not touch any electrical switch; do not use any phone in your building.
•
Clear the room, building or area of all occupants.
•
Immediately call your gas supplier from a neighbor's phone. Follow the gas supplier's instructions.
•
If you cannot reach your gas supplier, call the fire department.
Installation and service must be performed by a qualified installer, service agency or the gas supplier.
Avoid fire hazard or electrical
shock. Do not use an adaptor plug or extension
cord or remove grounding prong from electrical
power cord. Failure to follow this warning can
cause serious injury, fire or death.
ELECTRIC DRYERS:
14-30R
DRYER
FUSED 30 AMP
120/240 V OR
120/208 V
WALL
DRYER
RECEPTACLE
SERVICE CORD
CORRECT
Use this way ONLY
GAS DRYERS:
Grounding type
wall receptacle
Do not under
any circumstances
cut, remove,
or bypass
the grounding prong
from this plug.
Power supply
cord with 3-prong
grounding plug
CORRECT
Use this way ONLY
Note: The instructions appearing in this
Owner's Guide are not meant to cover
every possible condition and situation that
may occur. Common sense and caution
must be practiced when installing,
operating and maintaining any appliance.
Important Safety Instructions
This Owner's Guide provides
general operating instructions
for your dryer. It also contains
information about features for
several other models. Your
dryer may not have every
feature included. Use the
dryer only as instructed in this
Owner's Guide and the
Operating Instructions card
included with your dryer.
SAVE THESE INSTRUCTIONS
Read all instructions before using this dryer.
To reduce the risk of fire, electrical shock, or injury to persons when using this dryer, comply
with the basic warnings listed below.
Failure to comply with these warnings could result in serious personal injuries.
Prevent Fire
Do not dry items that have been previously cleaned in, soaked in, or spotted with gasoline,
cleaning solvents, kerosene, waxes, etc. Do not store these items on or near the dryer. These substances
give off vapors or chemical reactions that could ignite or explode.
Do not place items exposed to cooking oils in your dryer. Items contaminated with cooking
oils may contribute to a chemical reaction that could cause a load to catch fire.
To prevent fire, do not use heat to dry items containing plastic, foam rubber or similarly
textured rubber-like materials, or items containing feathers or down. Use Air Fluff (No Heat) only.
Clean the lint screen before or after each load. The interior of the dryer, lint screen housing
and exhaust duct should be cleaned approximately every 18 months by qualified service personnel. An
excessive amount of lint build-up in these areas could result in inefficient drying and possible fire. See Care
and Cleaning, page 6.
Do not operate the dryer if the lint screen is blocked, damaged or missing. Fire hazard,
overheating and damage to fabrics can occur. If your dryer has a drying rack, always replace the lint screen
when finished using the drying rack.
Keep area around the exhaust opening and surrounding areas free from the accumulation
of lint, dust and dirt.
Do not obstruct the flow of ventilating air. Do not stack or place laundry or throw rugs
against the front or back of the dryer.
Do not spray any type of aerosol into, on or near dryer at any time.
Do not use fabric softeners or products to eliminate static unless recommended by the
manufacturer of the fabric softener or product.
Failure to comply with these warnings could result in fire, explosion, serious bodily injury and/or damage
to the rubber or plastic parts of the dryer.
Protect Children
Do not allow children to play on or in the dryer. Close supervision of children is necessary
when the dryer is used near children. As children grow, teach them the proper, safe use of all appliances.
Destroy the carton, plastic bag and other packing materials after the dryer is unpacked.
Children might use them for play. Cartons covered with rugs, bedspreads or plastic sheets can become
airtight chambers.
Keep laundry products out of children's reach. To prevent personal injury, observe all
warnings on product labels.
Before the dryer is removed from service or discarded, remove the dryer door to prevent
accidental entrapment.
Failure to comply with these warnings could result in serious personal injuries.
Prevent Injury
To prevent shock hazard and assure stability during operation, the dryer must be installed
and electrically grounded by a qualified service person in accordance with local codes. Installation
instructions are packed in the dryer for the installer's reference. Refer to INSTALLATION INSTRUCTIONS
for detailed grounding procedures. If the dryer is moved to a new location, have it checked and reinstalled
by a qualified service person.
To prevent personal injury or damage to the dryer, the electrical power cord must be plugged into a properly grounded system. The third
grounding prong must never be removed. Never ground the dryer to a gas pipe. Do not use an extension cord or an adaptor plug.
ALWAYS disconnect the dryer from the electrical supply before attempting any service or cleaning. Failure to do so can result in electrical
shock or injury.
Do not use any type spray cleanser when cleaning dryer interior. Hazardous fumes or electrical shock could occur.
To prevent injury, do not reach into the dryer if the drum is moving. Wait until the dryer has stopped completely before reaching into the
drum.
To prevent injury and damage to the dryer:
•
All repairs and servicing must be performed by an authorized servicer unless specifically recommended in this Owner's Guide. Use only authorized
factory parts.
•
Do not tamper with controls.
•
Do not install or store the dryer where it will be exposed to the weather.
A thermal limiter switch automatically turns off the motor in the unlikely event of an overheated situation (electric dryers only). A service technician must
replace the thermal limiter switch after correcting the fault.
Failure to comply with these warnings could result in serious personal injuries.
2
Printed in U.S.A.
Dr
ying Pr
ocedur
es
Drying
Procedur
ocedures
Follow fabric care label instructions.
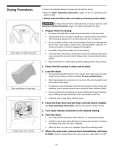
Place small items in a mesh bag.
Fill dryer drum 1/3 to 1/2 full.
Place the front bar under
the lip of the lint screen opening.
• Follow the guidelines below for preparing the load for drying.
• Read the Operating Instructions card for operating your specific model.
• Always read and follow fabric care labels and laundry product labels.
To reduce the risk of fire, electrical shock, or injury to persons, read Important
Safety Instructions, pages 2-3, before operating this dryer.
1. Prepare items for drying.
•
Dry items of similar fabric, weight and construction in the same load.
•
Separate dark items from light-colored items. Separate items that shed lint from
those that attract lint. If an item sheds lint, turn it inside out.
•
Be sure buckles, buttons and trim are heatproof and won't damage the drum finish.
Close zippers, fasten hooks and Velcro®-like fasteners. Tie strings and sashes to
prevent snagging and tangling.
•
If possible, turn pockets inside out for even drying.
•
Check for stains which may not have been removed in washing. Dryer heat may
permanently set some stains. Repeat stain removal process before drying.
•
Place small items in a mesh bag to prevent tangling and for easy removal.
2. Check that lint screen is clean and in place.
3. Load the dryer.
•
The average load will fill the drum 1/3 to 1/2 full. Items need room to tumble freely
for even drying and less wrinkling. Do not overload dryer.
• When drying large items, dry only 2 or 3 at a time. Fill out the load with small and
medium sized items.
• For delicate or very small loads, add 2 lint-free towels for better drying, less
wrinkling, and to prevent grease stains caused by fabric softener sheets.
• Do not overdry items. Overdrying can cause wrinkling, shrinkage, harshness, and
a build-up of static electricity, which can produce more lint.
•
If desired, add a dryer fabric softener sheet.
4. Close the dryer door and set dryer controls (some models).
See Operating Instructions card for your specific model controls.
5. Turn cycle selector clockwise to the desired setting.
6. Start the dryer.
•
Push Start button for 2 seconds.
• To add or remove items when the dryer is running, open the door. The dryer will
always stop when the door is opened. Allow the drum to come to a complete stop
before reaching inside.
• To restart dryer, close the door, then push the START button for 2 seconds.
• The dryer will not start if the cycle selector is in the OFF position.
7. When the cycle ends, remove items immediately and hang or fold. If load is
removed before the cycle ends, turn cycle selector to OFF.
Features
Cycle Signal Control (some models)
When the Cycle Signal Control is ON, a signal will sound at the end of each cycle and during
the Press Saver setting (some models). The volume is adjustable on some models.
Drum Light (some models)
A drum light will come on whenever the door is opened to illuminate the dryer drum during
loading and unloading. Closing the door turns off the light.
Reversible Dryer Door
Your dryer is equipped with a reversible door. The door can be hinged on the right or left
side. Refer to the INSTALLATION INSTRUCTIONS for directions on changing the door.
Drying Rack (some models)
Use the drying rack to dry items which should not be tumble dried.
1. Open the dryer door and remove the lint screen.
2. Insert drying rack into the dryer drum. Place the front bar under the lip of the lint screen
opening.
3. Place items to be dried on top of the rack. Weight should not exceed 10 lbs. Leave space
between items, but do not let items hang over the sides or through the grids. Do not
tumble other items when using the drying rack.
4. Select a timed dry setting best suited for items being dried. Use only the Air Fluff (no
heat) temperature setting for items containing plastic, foam rubber, rubber-like
materials, feathers or down.
5. When items are dry, remove the rack and replace the lint screen. If lint screen is not in
place, tumbling items could enter the exhaust system and cause damage to the dryer.
3
Care and Cleaning
To reduce risk of fire or serious injury to persons or property, comply
with the basic warnings listed in Important Safety Instructions, pages 2-3, and
those listed below.
•
•
Before cleaning the dryer interior, unplug the electrical power cord to avoid
electrical shock hazards.
Do not use any type spray cleanser when cleaning dryer interior. Hazardous
fumes or electrical shock could occur.
Inside
•
•
Clean lint screen after every load.
•
•
Clean the lint screen after every load. Lint build-up in the screen restricts air flow,
which causes longer drying times. The screen is located at the bottom of the door
opening. Remove by pulling straight up. Remove the lint and replace the screen.
Occasionally a waxy build-up may form on the lint screen from using dryer-added
fabric softener sheets. To remove this build-up, wash the lint screen in warm,
soapy water. Dry thoroughly and replace. Do not operate the dryer without the
lint screen in place.
If the dryer drum becomes stained from noncolorfast fabrics, clean the drum with
a damp cloth and a mild liquid household cleanser. Remove cleanser residue
before drying the next load.
Every 18 months an authorized servicer should clean the dryer cabinet interior
and exhaust duct. These areas can collect lint and dust over time. An excessive
amount of lint build-up could result in inefficient drying and possible fire hazard.
Outside
•
•
•
Do not store or place laundry products on top
of dryer at any time. They can damage the
finish or controls.
•
Clean the cabinet with mild soap and water. Never use harsh, gritty or
abrasive cleansers.
If the cabinet becomes stained, clean with diluted chlorine bleach [1/2 cup
(120 ml) in 1 quart (.95 liter) water]. Rinse several times with clear water.
Remove glue residue from tape or labels with a mixture of warm water and mild
detergent. Or, touch residue with the sticky side of the tape or label.
Before moving the dryer, place a strip of cardboard or thin fiberboard under
the front leveling legs to prevent damage to floor.
Common Drying Problems
Many drying problems involve poor cleaning results, poor soil and stain removal, residues of lint and scum, and fabric damage. For satisfactory drying results,
follow these suggestions provided by The Soap and Detergent Association.
PROBLEM
POSSIBLE CAUSES
SOLUTIONS
PREVENTIVE MEASURES
Greasy, oily
stains
• Fabric softener sheet.
• Rub fabric softener stains with bar soap.
Rinse and rewash.
• Add a few bath towels to small loads for
proper tumbling.
• Some "silk-like" fabrics should be air dried.
• Use proper drying temperature.
• Place fabric softener sheet on top of load
before starting the dryer.
Lint
• Overloading.
• Overdrying causes static
electricity.
• Lint screen not clean when
cycle began.
• Lint is attached to "pills."
• Reduce load size and rewash using liquid
fabric softener in the final rinse.
• Or, add a fabric softener sheet and tumble
without heat.
• Use lint brush or roller to remove lint.
• Do not overload dryer.
• Use fabric softener in washer or dryer to
reduce static electricity.
• Remove items when they are slightly damp to
avoid overdrying.
• Check that lint screen is clean and in place.
Pilling
•
(Fibers break off,
ball up and cling
to fabric.)
Pilling is normal with
synthetic and permanent
• Use a lint brush or shaver to remove pills.
press fabrics. This is due to
abrasion from normal wear.
Shrinking
• Overdrying.
Wrinkling
• Overloading.
• Reduce load size and tumble at medium or
• Leaving items in dryer after
low heat for 5-10 minutes.
cycle ends.
• Remove items immediately. Hang or fold.
• Irreversible condition.
4
• Use fabric softener to lubricate fibers.
• When ironing, use spray starch or fabric finish
on collars and cuffs.
• Turn items inside out to reduce abrasion.
• Follow fabric care label directions.
• If shrinking is a concern, check load often.
• Remove items while slightly damp and hang or
lay flat to complete drying.
• Block knits into shape.
• Do not overload dryer.
• Remove items as soon as cycle ends.
Avoid Ser
vice
Service
Checklist
Before calling for service, review this list. It may save both time and expense. The list includes
common occurrences that are not the result of defective workmanship or materials in this dryer.
OCCURRENCE
POSSIBLE CAUSE
SOLUTION
Dryer does not start.
Electrical power cord is not securely plugged
in or plug may be loose.
Make sure the plug fits tightly in wall outlet.
House fuse blown or circuit breaker tripped.
Reset circuit breaker or replace fuse.
Make sure electrical line is not overloaded and the dryer is on
a separate circuit.
Dryer runs but won't heat.
Drying cycle takes too long,
outside of the dryer feels too
hot or smells hot.
Thermal limiter tripped.
Call authorized service person for replacement.
There are 2 house fuses in the dryer circuit. If
1 of the 2 fuses is blown, the drum may turn
but the heater will not operate.
Replace fuse.
Gas supply valve is not open (gas models).
Check to make sure supply valve is open. See INSTALLATION
INSTRUCTIONS for procedure.
Dryer does not have enough air supply to
support the burner flame (gas models).
See INSTALLATION INSTRUCTIONS.
LP gas supply tank is empty or there has been
a utility interruption of natural gas (gas
models).
Refill or replace tank.
Lint screen is clogged with lint.
Make sure all lint has been removed from the dryer lint screen
before starting each cycle.
Exhaust duct requirements have not been
met.
Exhaust duct must be at least 4 inches in diameter and made
of rigid or flexible metal.
Dryer should heat when utility service is restored.
When in place, the duct must have no more than two 90°
bends and must not exceed length listed in INSTALLATION
INSTRUCTIONS.
Excessive wrinkling.
Scratching or chipping of the
drum finish.
Electric dryer is connected to a 208 volt circuit.
Drying time will be 20% longer than drying on a 240 volt
circuit.
Drying procedures have not been followed.
See Drying Procedures, page 4.
Outside exhaust hood or exhaust duct may
be clogged or restricted.
Clean out any obstruction.
High humidity.
Use a dehumidifier near the dryer.
Dryer is overloaded.
Do not overload. See Drying Procedures, page 4.
Items left in dryer too long.
Remove items as soon as cycle ends.
Insufficient sorting of items.
See Drying Procedures, page 4.
Drying temperature too high.
Follow fabric care label instructions.
Foreign objects such as coins, pins, clips or
buttons are inside the dryer.
Always remove foreign objects from pockets before
laundering. Remove objects from drum and restart dryer.
Permanently attached items such as belt
buckles, zippers and fasteners may be hitting
the inside of the drum.
It may be necessary to baste a scrap of material securely
around ornaments before drying to prevent scratching and
damage to the dryer.
Drum damage caused by foreign objects or permanently
attached items is not covered by the warranty.
5
Service Information
(Canada)
To avoid unnecessary cost and inconvenience, make a few simple checks before
calling for service. Common occurrences and their solutions can be found in the
Avoid Service Checklist. Be sure you have followed the instructions in this manual.
If you are unable to locate the cause of a problem, call for service. Insist on factory
service by an authorized ELECTROLUX PARTS AND SERVICE depot.
ELECTROLUX PARTS AND SERVICE
All Frigidaire appliances are backed by ELECTROLUX PARTS AND SERVICE, one of
Canada's largest parts and service networks.
The Frigidaire reputation means you can enjoy complete professional service from
one of our hundreds of trained technicians across the country. Ask your Frigidaire
dealer for details about the Extended Service Plan offered by ELECTROLUX PARTS
AND SERVICE to all purchasers of Frigidaire appliances in Canada.
PARTS AND SERVICE:
ELECTROLUX HOME PRODUCTS CANADA
6150 McLaughlin Road, Unit#1
Mississauga, Ontario
L5R 4C2
Tel.:
(905) 568-3433
Fax:
(905) 568-3542
Place the name, address and telephone number of your service depot in the
spaces below.
Product and feature specifications as described or illustrated are subject to
change without notice.
6