1
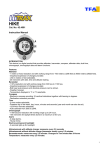
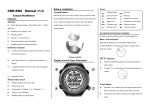
ENGLISH
NAVIGATOR 2.0
the range of 1 January 2008 to 31
December 2099.
S4
S1
NOTE: In FOREIGN TIME settings, only
the hour digits and minute digits are
open to setting. All other settings are
synchronized between HOME TIME and
FOREIGN TIME mode.
S2
TO USE THE COMPASS:
Press S3 button to select COMPASS
mode. The current time will be
displayed for around 0.5 second, then
the relative compass point and angular
bearing will be displayed.
S3
CONTROL BUTTONS
S1. Start/stop button
S2. Lap/reset button
S3. Mode button
S4. Light button
NOTE: This moving pointer represents
the direction of North (N).
DISPLAY MODES:
The watch has six display modes:
HOME TIME / FOREIGN TIME (TM2),
COMPASS (COMP), CHRONOGRAPH
(CHR), RECALL (RCL), TIMER (TMR)
and ALARM (ALM).
To change from one display mode to
another, press S3 button once. The
mode description will appear for
around 2 seconds before the selected
mode is activated.
NOTE: In any setting mode, if there is
no key manipulation for around 1-2
minutes, the watch will automatically
save the entered data and exit the
setting mode.
HOME AND FOREIGN TIME DISPLAY:
To display FOREIGN TIME mode, press
S1 button when HOME TIME mode is
displayed. The mode description (TM2)
will be displayed. To change back to
HOME TIME mode, press S1 button
again.
NOTE: If there is no key manipulation
for 20 seconds, the compass sensor
will be deactivated for power saving
and the watch will display only the
current HOME TIME or FOREIGN TIME
(depends on your selection in time
mode). Press S1 button to re-activate
the compass sensor.
NOTE: If the compass does not seem
to work well, for example: when it
displays the wrong compass direction
or it displays“DIST”(distort) on the
screen, then you have to calibrate the
compass. You should also calibrate
it after replacing the battery. If your
TO SET THE TIME AND CALENDAR:
watch has been exposed to strong
1. Press S3 button to select HOME electromagnetic fields, such as electric
TIME / FOREIGN TIME mode.
lines, magnets or loudspeakers, then
2. Press and hold S2 button for you have to calibrate it again. Please
around 2 seconds. The second also calibrate the compass before
digits will blink.
using it for the first time and before a
3. Press S1 button to reset the second long trip.
digits to zero.
4. Press S3 button, the minute digits NOTE: Because of the difference be will blink.
tween true North and magnetic North,
5. Press S1 button to set the minute you have to compensate it by adjusting
digits. Holding down the button will the compass declination. The declina speed up the process.
tion angle for your local area may be
6. Press S3 button, the hour digits will found below:
blink.
City Declination
7. Press S1 button to set the hour Angle
digits. Holding down the button will speed up the process.
Anchorage
22 E
8. Follow the same pattern to set the Atlanta
4W
hour format, date, month, year, Bombay
1W
Boston
16 W
hourly chime option and button Calgary
18 E
beep option.
Chicago
3W
9. To set the hour format, press S1 Denver
10 E
button to toggle between 12-hour Jerusalem
3E
and 24-hour format. The P.M. indi-
London
4W
Little Rock
3E
cator may be displayed to indicate Livingston, MT 14 E
the time period 12:00 A.M. – 11:59 Munich
1E
P.M. in 12-hour format.
New York City 14 W
10.To set the hourly chime option, Orlando
5W
press S1 button to turn it ON or Oslo
2W
Paris
2W
OFF.
Rio De Janeiro 21 W
11.To set the button beep option, press San
Francisco
15 E
S1 button to turn in ON or OFF.
Seattle
19 E
12.After finished making all the set-
Shanghai
5W
tings, press S2 button to confirm.
Toronto
11 W
NOTE: The day (of the week) is
automatically set in accordance with
the date. The date can be set within
Vancouver
20 E
Washington DC 10 W
Waterbury, CT 14 W
TO SET THE DECLINATION ANGLE:
In COMPASS mode,
1. Press and hold S2 button for
around 2 seconds
to enter into CAL mode.
2. Press S3 button, the declination angle will blink.
3. Press S1 or S3 button to set the declination angle. Holding down the button will speed up the process.
4. After finished making all settings, press S2 button to return to COM-
PASS mode.
TO CALIBRATE THE COMPASS:
In COMPASS mode,
1. Press and hold S2 button for
around 2 seconds
to enter into CAL (cali-
bration) mode.
2. Press S1 button, the pointers will begin to rotate clockwise.
3. Rotate the watch horizontally in clockwise direction slowly for at least 2 rotations, taking at least 15 seconds per rotation.
4. Press S1 button or leave the watch idle for 60 seconds to confirm the
calibration process, or press S2 button or S3 button to abort the calibration process.
TO USE THE CHRONOGRAPH:
1. Press S3 button to select CHRONO
GRAPH mode.
2. The chronograph will then be displayed in its current status – reset, running or stopped.
3. To resume a counting, press S1 button to resume from where it left off.
4. To start a new counting, reset the chronograph to zero first. Press S1
button to stop counting, then press and hold S2 button for around 2 seconds to reset.
For the measurement of elapsed time,
In CHRONOGPRAH mode,
1. Press S1 button to start counting.
2. To stop counting, press S1 button. Press S1 button to resume from where it left off.
3. To reset to zero, press S1 button to stop counting and then press and hold S2 button.
For the measurement of split time,
In CHRONOGRAPH mode,
1. Press S1 button to start counting.
2. While the chronograph is running, press S2 button once to register a lap. The lap number and lap time
of the registered lap will be displayed. The chronograph is still running in the background.
After around 10 seconds, the lap number and split time of the cur
rent lap will be displayed.
3. Repeat the last step until all the laps have been registered.
4. To stop counting, press S1 button. Press S1 button to resume from where it left off.
5. To reset to zero, press S1 button to stop counting, then press and hold S2 button for around 2 seconds.
NOTE: The watch can register and
record up to a maximum of 30 laps.
NOTE: The chronograph can count up
to a maximum of 99 hours, 59 minutes
and 59.99 seconds.
NOTE: You can leave the chronograph
running while switching over to other
operating modes.
ENGLISH
TO USE THE RECALL FUNCTION:
1. Press S3 button to select RECALL mode.
2. Press S1 button to scroll through the recorded individual lap time and total elapsed time.
2. Press S2 button to select among alarm entries 1, 2 and 3 to set.
3. Press and hold S2 button for around 2 seconds. The minute digits will blink.
4. Press S1 button to set the minute digits. Holding down the button will speed up the process.
NOTE: The recall function is available
5. Press S3 button, the hour digits will only when there is lap record. The
blink.
message “NO LAPS” will be displayed
6. Press S1 button to set the hour if there is no lap record.
digits. Holding down the button will speed up the process.
NOTE: The lap record will be cleared
7. Press S3 button the alarm fre
when the chronograph is reset.
quency will blink.
8. Press S1 button to select among TO SET THE TIMER:
daily (DL Y) and individual day (of 1. Press S3 button to select TIMER the week) only – Sunday (SUN), mode.
Monday (MON, Tuesday (TUE), 2. Press and hold S2 button for Wednesday (WED), Thursday (THU), around 2 seconds, the timer selec
Friday (FRI) and Saturday (SAT).
tion will blink.
3. Press S1 button to toggle between 9. After finished the settings, press S2 timer interval 1 and timer interval 2 button to confirm.
to set.
4. Press S3 button, the second digits NOTE: The alarm will automatically be
activated after being set.
will blink.
5. Press S1 button to set the second digits. Holding down the button will NOTE: The alarm will work according
to HOME TIME or FOREIGN TIME (de speed up the process.
6. Press S3 button, the minute digits pends on your selection in time mode).
will blink.
TO USE THE ALARM:
7. Press S1 button to set the minute digits. Holding down the button will In ALARM mode,
1. Press S2 button to select among speed up the process.
8. Press S3 button, the hour digits will alarm entries 1, 2 and 3 to set.
2. Press S1 button to activate the blink.
will alarm. The alarm indicator
9. Press S1 button to set the hour digits. Holding down the button will be displayed.
3. Press S1 button again to deactivate speed up the process.
10.Press S3 button, the action-at-end the alarm. The message “OFF” will be displayed.
selection will blink.
11.Press S1 button to select among CS WHEN AN ALARM GOES OFF:
(Count Stop), CR (Count Repeat) A 20-second alarm tune will be emitted
and CCU (Count Up).
at the designated time when the alarm
12.After finished making all the set-
is activated. To stop the tune, press
tings, press S2 button to confirm.
any button.
NOTE: Illustration of the action-at-end
TO USE THE BACKLIGHT:
selections:
Press S4 button to turn on the backa) CS (Count Stop) – the timer will stop when the countdown teaches light for around 3 seconds.
zero.
BEZEL-ACTIVATED BACKLIGHT
b) CR (Count Repeat) – the timer will repeat the countdown when the FUNCTION:
1. Press and hold S4 button for around countdown reaches zero.
3 seconds activated or deactivate c) CCU (Count Up) – the timer count the bezel-activated backlight func-
up to a maximum of 23 hours 59 minutes and 59 seconds when the tion.
2. When the function is activated, the countdown reaches zero.
light bulb icon will be displayed. You can then turn on the backlight NOTE: The timer cannot be activated
for around 3 seconds by touching if the value of timer interval 1 is set
the bezel of the watch.
as 0:0’00”.
NOTE: To use the bezel-activated
backlight function, the caseback of the
watch must be in direct contact with
your skin during wear.
LOW BATTERY DETECTION:
When the battery of the watch is close
to depletion, the battery low indicator
will be displayed.
NOTE: You can leave the timer running
while switching over to other operating
modes.
TO SET THE ALARM:
1. Press S3 button to select ALARM mode.
To reduce carbon foot print, these
Freestyle instructions are printed with
soy inks on recycled paper.
FS8127-NAVIGATOR 2.0-1067-MR01
TO USE THE TIMER:
1. Press S3 button to select TIMER mode.
2. The timer will be displayed in its current state – reset, running, or stopped.
3. To resume a counting, press S1 button to resume from where it left off.
4. To start a new counting, reload the timer first.
Press S1 button to stop counting and then press S2 button.
5. After reaching zero in a countdown, a tune will be emitted. To stop the tune, press any button.