1
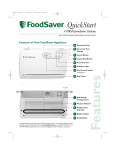
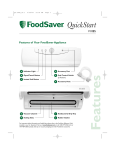
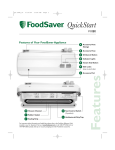
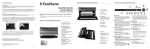
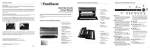
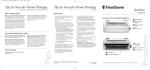
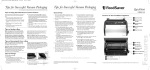
QS.825_845_GSS_v3.1
4/30/04
3:47 PM
Page 1
QuickStart
V825/V845/GameSaver Sport
Shown V845: V825 and GameSaver Sport operate in the same manner.
Features of Your FoodSaver Appliance
A Accessory Hose
B Accessory Hose
Storage
C Cancel Button
D Extended Vacuum
Button
E
Accessory Port
F
Indicator Light
H Bag Cutter
I
Roll Storage
Compartment
J
Vacuum Channel
K Antibacterial
Drip Tray
L
Sealing Strip
M Rubber Gasket
For important safety information and helpful tips, please refer to the FoodSaver Reference Guide
included in your kit. Questions? Visit us at www.foodsaver.com or call 1-800-777-5452 (U.S.) or
1-877-804-5383 (Canada), Mon-Fri 8am-8pm, Sat 9am-6pm EST. Get tips on vacuum packaging
and order FoodSaver accessories.
Features
G Seal Control Switch
(3-Position)
QS.825_845_GSS_v3.1
4/30/04
3:47 PM
Page 2
Getting Started
Registering your appliance is quick and easy at www.foodsaver.com.
How to Make a Bag from a FoodSaver Roll
Place Bag on Sealing Strip
1. Open appliance lid and place roll into Roll Storage
Compartment (I).
2. Pull out enough bag material to hold item to be
vacuum packaged, plus 3 inches. Close lid.
3. To cut bag material, set Seal Control Switch (G)
to Cut Only. Press down lightly on lid and slide
Bag Cutter (H) from one end of sliding channel
to other end.
4. Open appliance lid and tuck roll back into Roll
Storage Compartment.
Press and Release Lid
5. Place one end of bag material across Sealing Strip
(L), not over black rubber gasket, and close lid.
6. Turn Seal Control Switch to Vacuum and Seal.
7. Press down firmly on lid with both hands until
motor starts, wait 3-5 seconds, then release.
Motor will continue to run.
8. When motor and Indicator Light (F) turn off,
open lid and remove bag.
Now you are ready to vacuum package with your
new bag (see below).
How to Vacuum Package with FoodSaver Bags
Place Bag in Vacuum Channel
Bags & Rolls
Pull Out Bag Material
Set Seal Control Switch
Press and Release Lid
1. Place item(s) in bag, allowing at least 3 inches
5. To begin vacuum process, press down firmly on
of space between bag contents and top of bag.
2. Open appliance lid and place open end of bag
down into Vacuum Channel (J).
3. Close lid.
4. Turn Seal Control Switch (G) to Vacuum and Seal
or to Vacuum and Extended Seal (for moist or
juicy foods such as raw meat).
lid with both hands until motor starts, wait 3-5
seconds, then release. Motor will continue to run.
6. When motor turns off, open lid and remove bag.
Refrigerate or freeze if needed. (See FoodSaver
Reference Guide for food safety tips.)
Note: Let appliance cool down for 20 seconds
after each use.
QS.825_845_GSS_v3.1
4/30/04
3:47 PM
Page 3
FoodSaver Accessories
Accessories include FoodSaver Vacuum Packaging Canisters, Universal Lids, Jar Sealers and Bottle Stoppers.
FoodSaver Accessory Guidelines
1. Always leave at least one inch of space between
contents and rim.
2. Wipe rim of canister, container or bottle to ensure
it is clean and dry.
3. Place lid on canister or container, or place stopper
in bottle.
4. For accessories with a large knob on lid, turn knob
to Vacuum. Vacuum package using instructions
below. When vacuum process is complete, turn
knob to Closed before removing Accessory Hose.
5. For accessories without a large knob on lid,
vacuum package using instructions below.
Insert Accessory Hose
Set Seal Control Switch
1. Prepare container according to FoodSaver
Accessory Guidelines above.
2. Insert one end of Accessory Hose (A) into
Accessory Port (E) on appliance. Insert other
end into port on accessory. Twist gray tab while
inserting to ensure a tight fit.
3. Turn Seal Control Switch (G) to Vacuum and Seal.
4. To begin vacuum process, press down firmly on lid
until motor starts, wait 3-5 seconds, then release.
Motor will continue to run.
Press and Release Lid
Accessories
How to Vacuum Package with FoodSaver Accessories
5. When motor turns off, vacuum process is complete.
6. Gently twist and remove Accessory Hose from
accessory and appliance.
7. To test vacuum, simply tug on accessory lid.
It should not move.
Note: For important tips on using accessories
with different foods, please refer to the FoodSaver
Reference Guide.
g
How to Open FoodSaver Accessories after Vacuum Packaging
FoodSaver Vacuum Packaging Canisters
(without large knob on lid)
To release vacuum and open, push gray rubber
button on lid.
FoodSaver Bulk Canisters and Quick Marinators
(with large knob on lid) and Universal Lids
To release vacuum and open, turn knob on lid
to Open.
FoodSaver Jar Sealer with Mason Jars
For use with Ball® and Kerr ® brand Mason jars.
IMPORTANT: Do NOT use screw bands when
vacuum packaging jars. To open, wedge spoon
between Mason jar lid and highest part of threaded
rim. Twist spoon gently to release vacuum.
FoodSaver Bottle Stoppers
To release vacuum and open, twist and pull up on
Bottle Stopper.
QS.825_845_GSS_v3.1
4/30/04
3:47 PM
Page 4
Additional Features
Extended Vacuum Button
The Extended Vacuum Button (D) removes extra air
from large canisters and bags. Simply press button
during vacuum process, hold 10-15 seconds, then
release. If using a bag, bag will be sealed after button
is released.
If fragile foods start to crush, you can stop the
vacuum process without sealing the bag. Press
Cancel Button (C) and motor will stop.
Antibacterial Drip Tray
The Antibacterial Drip Tray (K) is made with an
FDA-approved antibacterial ingredient that helps
inhibit the growth of bacteria. The Drip Tray fits
inside the Vacuum Channel (J) and is removable,
making cleanup easy when small amounts of liquids
are inadvertently pulled into Vacuum Channel during
vacuum process (see FoodSaver Reference Guide for
tips on preventing this).
And More
Cancel Button
Place Drip Tray into Vacuum Channel. Two bag
guides in Drip Tray help correctly position FoodSaver
Bags when vacuum packaging. Slip open end of bag
into guides before closing lid and vacuum packaging.
After each use, empty Drip Tray and wash in warm
soapy water or place on top rack of dishwasher.
Appliance can be used without Drip Tray.
QS.825_845_GSS_v3.1
4/30/04
3:47 PM
Page 5
Tips for Successful Vacuum Packaging
For more usage tips and safety information, please refer to the FoodSaver Reference Guide or visit our website at www.foodsaver.com.
Sealing a Bag
Make sure you’ve placed the bag in the proper
place. When making a bag from a roll, make sure end
of cut piece is on Sealing Strip (L), not over rubber
gasket (M) or in Vacuum Channel (J).
Prevent moisture or liquid from being pulled into
the Vacuum Channel or trapped in the seal. Either
pre-freeze moist foods such as raw meat for 1-2
hours before vacuum packaging, or place a folded
paper towel between food and end of bag to absorb
excess liquids. Just be sure to leave at least 3 inches
between paper towel and end of bag so that bag
seals properly with paper towel inside.
Make sure the Seal Control Switch (G) is set to
Vacuum and Seal or to Vacuum and Extended Seal.
Make sure you give appliance time to cool down.
Wait at least 20 seconds between seals. Under very
heavy usage, appliance will shut off automatically to
prevent overheating. If it does, wait 20 minutes to
allow appliance to cool off.
Removing Air from a Bag
Check for wrinkles in the bag along the Sealing
Strip. Wrinkles in seal may cause leakage and allow
air to come back into bag. Check for wrinkles in bag
along Sealing Strip (L) before closing lid and vacuum
packaging. If you find wrinkles after sealing bag,
simply cut bag open and vacuum package again.
If motor runs for more than 30 seconds without
stopping, you may need to adjust bag and try again.
If you are making the initial seal on a piece of bag
material with two open ends, make sure bag is placed
on Sealing Strip, not on black rubber gasket. If you
are vacuum packaging with a bag, make sure open
end is placed down inside Vacuum Channel and make
sure Accessory Hose (A) is not attached. If you are
vacuum packaging with an accessory, check Accessory
Hose in appliance lid and in accessory to ensure a
tight fit. Also make sure Seal Control Switch (G) is set
to Vacuum and Seal or Vacuum and Extended Seal.
Tips
Make sure you’ve placed the bag in the proper
place. When vacuuming and sealing a bag, make
sure open end of bag is inside Vacuum Channel (J).
QS.825_845_GSS_v3.1
4/30/04
3:47 PM
Page 6
Tips for Successful Vacuum Packaging
(continued)
General Tips
1. Vacuum packaging is NOT a substitute for the
heat process of canning. Perishables still need to
be refrigerated or frozen.
2. For best results, use FoodSaver Bags, Canisters
and Accessories.
3. During the vacuum packaging process, small
amounts of liquids, crumbs or food particles can
be inadvertently pulled into Vacuum Channel,
clogging the pump and damaging your appliance.
To prevent this, follow these tips:
a. For moist and juicy foods such as raw meats:
Freeze first and avoid overfilling bags. You can
also place a folded paper towel inside top of bag,
but below seal area, before vacuum packaging.
b. For soups, sauces and liquids: Freeze first and
avoid overfilling bags. Or, use a canister in
refrigerator.
c. For powdery or fine-grained foods: Avoid
overfilling bags or use a canister. You can also
place a coffee filter or paper towel inside
before vacuum packaging.
d. If your appliance features a Drip Tray, empty it
after each use.
5. Do not create your own side seams for a
FoodSaver Bag. These bags are manufactured
with a special side seam, which is sealed all the
way to the outer edge.
6. To prevent wrinkles in seal when vacuum
packaging bulky items, gently stretch bag flat
along Sealing Strip before you close lid.
7. If you are unsure your bag was sealed properly,
simply reseal bag about 1⁄4 inch above first seal.
8. When you are vacuum packaging items with sharp
edges (dry spaghetti, silverware, etc.), protect
bag from punctures by wrapping item in soft
cushioning material, such as a paper towel. You
may want to use a canister or Mason jar instead
of a bag.
9. When using accessories, remember to leave one
inch of space at top of canister or container.
10. Pre-freeze fruits and blanch vegetables before
vacuum packaging for best results. See pages 2-3
of FoodSaver Reference Guide for more information.
4. To avoid overfilling, always leave at least 3 inches
p
of bag material between bag contents and top of
bag. Then leave at least one additional inch of bag
material for each time you plan to reuse bag.
Copyright © 2004 Tilia, Inc. All rights reserved. This material may not be reproduced or redistributed in any fashion without the express written consent of Tilia, Inc.
FoodSaver, GameSaver and the Freshness Shield logo are trademarks or registered trademarks of Tilia Int’l, Inc. in the United States and other countries. All other
trademarks are property of their respective owners. Tilia, Inc. and Tilia Int’l, Inc. are Jarden companies. This product is protected by one or more of the following
Patents: U.S. RE 34,929; 4,660,355; 4,941,310; 5,655,357; 6,058,998; 6,256,968; Canada 1,315,746; and their equivalent international patents.
First Printing: 5/2004
Item # T18-0110 (05/04)