1
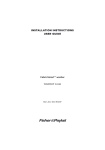
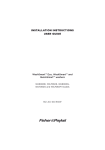
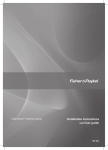
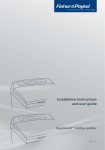
Clothes washer
WH60F60W*, WH70F60W*
& WH80F60W* models
Installation instructions
and User guide
NZ AU SG
Contents
Safety and warnings
Installation instructions
Initial preparations for washing
Selecting a programme and operating your machine
Care and cleaning
Troubleshooting
Specifications Manufacturer’s Warranty
Customer Care
Important! SAVE THESE INSTRUCTIONS
The models shown in this User Guide may not be available in all markets and are
subject to change at any time. For current details about model and specification
availability in your country, please visit our local website listed on the back cover
or contact your local Fisher & Paykel dealer.
1
2
4
8
10
17
20
21
22
24
2
Safety and warnings
General safety
■■
■■
■■
■■
■■
■■
■■
■■
■■
■■
Never place your machine on a carpet covered floor. A lack of airflow from beneath your
machine may cause electrical parts to overheat.
Secure the drain hose into the standpipe or tub to prevent any water leakage and to allow
machine to discharge water as required. Ensure that the inlet and drain hoses are not folded,
squashed, or broken when the appliance is pushed into place after it is installed or cleaned.
There may be some water in your machine when you receive it. This is from the quality control
process and is normal. It is not harmful to your machine.
Clean the outside of the appliance with a soft cloth. Do not use abrasive detergents.
Never force open the door or use it as a step.
Your clothes washer is designed to continue operation in the event of a power interruption.
The cycle will resume once the power is restored. To cancel a programme, refer to the ‘Cancelling
the programme’ section.
If damaged, the power cable should be replaced with an identical one obtained from a
Fisher & Paykel Authorised Repairer. The power cable may only be replaced by a qualified
technician, in order to avoid a hazard.
This appliance is not intended for use by persons (including children) with reduced physical,
sensory or mental capabilities, or lack of experience and knowledge, unless they have been
given supervision or instruction concerning use of the washer by a person responsible for
their safety.
Young children should be supervised to ensure that they do not play with the appliance or climb
inside the drum.
Keep the packaging materials out of reach of children.
First use
■■
■■
■■
Be sure to read the Safety Warnings and Installation Instructions in this guide before first use.
Ensure that the cold water inlet hose has been correctly connected when installing your machine.
To remove any residues from the manufacturing process, we recommend running the
machine through an initial Cottons 90º cycle with a half-load amount of detergent (without
adding laundry).
Intended use
■■
■■
This product has been designed for home use.
The appliance may only be used for the washing and rinsing of textiles that are marked
accordingly.
Safety and warnings
Safety instructions
You must remove the safety bolts (on the back panel) and the packing reinforcement
(underneath the machine) before use.
■■
This appliance must be connected to an earthed outlet protected by a fuse of suitable capacity.
■■
Never open the loading door or remove the filter while there is still water in the drum.
■■
Unplug the machine when it is not in use.
■■
Never touch the plug with wet hands.
■■
Do not operate the machine if the power cord or plug is damaged.
■■
For malfunctions that cannot be solved by information in the operating manual:
1 Turn off the machine.
2 Unplug the appliance at the wall socket.
3 Turn off the water taps.
4 Contact a Fisher & Paykel Authorised Repairer.
■■
If there are children in your house...
■■
■■
■■
Keep children away from the machine when it is operating.
Do not let children tamper with the machine.
Close the loading door when you leave the area where the machine is located.
3
4
Installation instructions
Remove the packaging
■■
Remove the packaging reinforcement underneath the product by tilting the machine and pulling
the extruding ribbon. Not doing so may cause damage to your floor during normal operation of
the machine.
Removing the transit safety bolts
■■
The clothes washer is fitted with transit safety bolts at the rear to avoid any possible damage to
the interior during transportation.
Important!
The transit bolts MUST be removed prior to operation of the machine. Failure to remove these will
result in damage to the machine.
■■
To remove the bolts:
1 Loosen all the bolts with a spanner until they rotate freely (“C”).
2 Remove the transit bolts by turning them gently.
3 Fit the bolthole covers (supplied in the bag with the operation manual) into the holes on the
rear panel (“P”).
Fig.1 Removing the transit safety bolts
■■
■■
Please keep these transit safety bolts in a safe place to reuse before transporting the machine in
the future.
Never transport the machine without the transportation safety bolts properly fixed in place.
Positioning the machine
■■
■■
Move the machine into position without lifting by the top panel.
Install the machine on a solid and level floor surface, preferably in a corner of the room.
Installation instructions
5
Adjusting the feet
In order for quiet and stable operation, the machine should be placed properly and levelled on
its feet.
■■
If the machine is unstable:
1 Loosen the plastic lock nut.
2 Screw or unscrew the adjustable foot until the machine stands firmly level.
3 Tighten the lock nut for stability.
■■
Lock nut
Adjustable foot
Fig.2 Levelling foot adjustment
Note: adjust lock nuts by hand. Do not use any tools to loosen or tighten the lock nuts, as they
can be damaged.
Connecting to the water supply
Important!
This washer connects to the cold water supply only.
Cold water should not exceed 35ºC.
■■
Exceeding this temperature may cause the machine to fault or result in damage to the machine.
Water supply requirements
Inlet water pressure: Max. 1Mpa (145 psi) Min. 0.1MPa (14.5 psi).
Inlet water flow rate: Max. 80 litres/min. Min. 10 litres/min.
6
Installation instructions
Inlet hoses
Important!
The appliance must be connected to the cold water mains using the new hose supplied. Old hoses
should not be reused.
■■
Connecting the hose:
1 Connect the straight end of the inlet hose to the tap. There are washers fitted to both ends.
2 Connect the elbow end of the inlet hose to the inlet valve on the back of the machine.
The cold inlet valve is marked in blue.
Fig.3 Connection of the inlet hose to the machine
Installation instructions
7
Connecting to the drain
■■
■■
■■
■■
The water drain hose should be placed either at the side of a basin or tub, or connected directly
to the wastewater standpipe.
The elbow/guide, supplied with the machine, should be fitted to the drain hose before being
connected directly into the tub or wastewater standpipe.
The drain hose should not be sharply bent.
The drain hose needs to be kept at an elevated height of at least 400 mm with a maximum
height of 1 m. If the hose is placed at the floor level, or close to the floor (less than 400 mm
above the ground), water discharge becomes more difficult and the laundry may come out wet.
max. 100
cm
min.
40 cm
Fig.4 Drain hose set up
■■
■■
■■
The drain hose should extend a maximum of 20 mm past the end of the elbow/guide.
The drain hose can be trimmed to length.
The maximum length of an extended drain hose is 3.2 m.
Electrical connection
■■
■■
■■
Connect the appliance to an earthed outlet protected by a fuse of suitable capacity.
Connection should comply with national regulations.
The voltage and the allowed fuse protection are stated in the ‘Specifications’ section.
Important!
■■
■■
■■
If you are using an extension cord or a portable electrical outlet device (eg multi-socket outlet
box), ensure that it is positioned so that it does not come into contact with water or moisture.
A damaged power cable must be replaced by the manufacturer, its service agent or similarly
qualified persons in order to avoid a hazard. The appliance must not be operated until it is
repaired, as there is risk of electric shock.
Do not operate this machine if it has been damaged in during transport. Contact your
Fisher & Paykel Dealer or Fisher & Paykel Authorised Repairer.
8
Initial preparations for washing
Preparing clothes for washing
■■
■■
■■
■■
■■
■■
■■
■■
■■
■■
■■
■■
Always follow the advice on the garment care label. It will tell you about the fabric of the
garment and how it should be washed.
Sort the laundry according to type of fabric, colour, degree of soiling, and allowable
water temperature.
Check and empty pockets. Coins, safety pins, etc can damage both your machine and
your clothes.
Remove any metal attachments, or place the items in a laundry bag, pillowcase, or something
similar (bras, or garments with metal buttons or belt buckles). The metal attachments may cause
damage to the machine.
Close zippers, hooks and eyes. This is to make sure that these items do not snag on other clothes.
Place small items like infants’ socks and nylon stockings, etc in a laundry bag, pillow case or
something similar. This will also save your laundry from getting lost.
Do not wash single items as they may cause out of balance. Add extra similar items to balance
the load.
Wash trousers, jeans and delicate clothes turned inside out.
Wash “machine washable” or “hand washable” labelled items with an appropriate programme only.
Do not wash colours and whites together. New, dark coloured items may release a lot of dye. It is
recommended to wash them separately.
Pre-treat heavily soiled areas with stain remover if necessary. Apply these away from the machine
as contents of the stain remover may damage plastic parts of the machine.
Use only dyes/colour changers and lime removers suitable for machine washing. Plastic and
rubber parts of the clothes washer can be stained by dyes. Always follow the instructions on
the packaging.
Initial preparations for washing
Detergents and softeners
Detergent drawer
The detergent drawer is composed of three main compartments:
– (I) for prewash
– (II) for main wash
– (III) siphon
– ( ) for softener
Fig.5 Detergent drawer compartments
Detergent, softener and other cleaning agents
Add detergent and softener before starting the wash programme.
Important!
■■
■■
Never open the detergent dispenser drawer while the washing programme is running!
When using a programme without pre-wash, no detergent should be put into the pre-wash
compartment (Compartment I).
Detergent quantity
■■
■■
The amount of washing detergent to be used depends on the amount of laundry, and the
degree of soiling.
Always follow the dosage recommendations on the detergent pack.
Important!
■■
■■
■■
■■
Insufficient detergent may result in grey laundry over time. Follow the detergent manufacturers
recommendations for the correct dosage.
Too much detergent can result in excess foam formation. If the clothes washer detects too much
foam the cycle may not progress to the spin phase of the programme.
Do not exceed the (> max <) level marking; excess softener will be wasted.
Do not use liquid detergent if you want to wash using the time delay feature.
9
10
Selecting a programme and operating your machine
Control panel
9
8
4
7
6
3
2
5
1
Fig.6 Control panel (same for 6 kg, 7 kg and 8 kg models)
1
2
3
4
5
Spin speed adjustment button
Time delay button
Additional function buttons
START/PAUSE and CANCEL button
Programme selection knob
6
7
8
9
Display screen
Child-proof lock indicator
Programme follow-up indicators
ON/OFF button
Using your machine
1
2
3
4
5
6
Ensure the machine is plugged in.
Turn the tap on completely.
Check that the hose is connected tightly.
Press the ON/OFF button.
Open the door.
Unfold the laundry and place it loosely in the drum. Refer to the recommended load capacity
shown in the Programme Selection Table.
Important!
Overloading the machine will result in unsatisfactory wash results and wrinkled laundry.
7 Close the door.
8 Add the detergent and softener to the appropriate compartments and close the detergent
dispenser drawer.
9 Using the programme selection knob, choose the appropriate cycle for your laundry according
to type, amount and degree of soiling.
10 Press the START/PAUSE button to start the programme.
Selecting a programme and operating your machine
11
Programme should be selected depending on the type of fabric, colour, degree of soiling and
permissible water temperature for the load. The following table serves as a guide for making
your decision.
Programme Fabric type
Description of programme
Cottons
A vigorous wash action
during a longer wash cycle.
Heavy
Allergy
Daily
Synthetics
Durable clothes
Durable clothes
not suitable for
Cottons 60
Baby clothes
and clothes
worn by people
with allergies
The same wash result as
Cottons 60, however, a lower
temperature and a longer
wash cycle provides an
increased energy saving.
A longer heating period and
an additional rinse cycle
provides increased hygiene.
Clothes worn
for a short time,
eg sportswear
A quicker wash for a small
number of cotton/synthetic
blended clothes.
Less durable
synthetic
clothes
eg shirts,
blouses and
synthetic/
cotton blended
garments
Compared to the Cottons
programmes, Synthetics
cycles use lighter wash
actions, shorter washing
cycles and reduced spin
speeds. For curtains and
lace, the Synthetics 40
programme with the
pre-wash function selected
is recommended.
Size
(kg)*
Max
load
(kg)
Temp
(ºC)
Prewash
Quick
wash
Rinse
plus
•
•
•
•
•
•
•
•
•
•
•
•
•
•
•
•
•
•
•
•
•
•
•
•
•
•
•
•
•
•
•
•
•
•
•
•
•
•
•
•
•
•
•
•
•
•
•
•
•
•
•
•
•
•
•
•
•
•
•
•
•
•
•
•
•
•
8
8
90
8
8
60
8
8
40
8
8
Cold
7
7
90
7
7
60
7
7
40
7
7
Cold
6
6
90
6
6
60
6
6
40
6
6
Cold
8
8
40
7
7
40
6
6
40
8
8
60
8
8
40
7
7
60
7
7
40
6
6
60
6
6
40
8
4
40
7
3.5
40
6
3
40
8
4
60
8
4
40
8
4
30
7
3
60
7
3
40
7
3
30
6
3
60
6
3
40
6
3
30
•
•
•
•
•
•
•
•
•
•
•
•
12
Selecting a programme and operating your machine
Max
load
(kg)
Programme Fabric type
Description of programme
Size
(kg)*
Shirts
Cotton and synthetic shirts
can be washed together
(no sorting is required).
8
7
6
3
40
8
3
30
7
2
30
6
2
30
8
2
40
8
2
30
8
2
Cold
7
1.5
40
7
1.5
30
7
1.5
Cold
6
1.5
40
6
1.5
30
6
1.5
Cold
Woollen/
Very gentle wash action and
delicate clothes a slow spin to care for your
that bear
special garments.
“not machine
washable” labels
8
1.5
30
7
1
30
6
1
30
A small number
of lightly soiled
garments
8
3
30
7
2.5
30
6
2.5
30
8
8
Cold
7
7
Cold
6
6
Cold
Delicate
Woollens
Hand wash
Quick wash
Cotton and
synthetic shirts
Delicate fabrics
Machinewashable
woollen
garments
Rinse
A sensitive wash action and
a slow spin provide extra
care for delicates.
It is important to select the
appropriate temperature as
per the care labels shown on
your garments. The use of
appropriate detergents for
woollens is recommended.
A quick wash (30 mins) to
save time.
A rinse only. For when you
want to rinse separately.
Drain & Spin See ‘Spin speed
selection’.
8
7
6
Rinse Hold
See ‘Spin speed
selection’.
8
7
6
No Spin
See ‘Spin speed
selection’.
8
7
6
*Corresponds to the capacity rating of your machine.
Temp
(ºC)
Prewash
Quick
wash
Rinse
plus
4
40
3
40
•
•
•
•
•
•
•
•
•
•
•
•
•
•
•
•
•
•
•
•
•
Selecting a programme and operating your machine
13
Spin speed selection
Whenever a new programme is selected, the maximum spin speed of the selected programme is
displayed on the spin speed indicator.
To decrease the spin speed, press the SPIN button. The spin speed decreases gradually, then the
RINSE HOLD and NO SPIN options are shown respectively.
Rinse hold is shown with “
” and no spin is shown with “
” symbols.
If you do not want to unload your clothes immediately after the programme, you may use the
RINSE HOLD function in order to prevent your clothes from becoming wrinkled in dry conditions.
If you only want to drain the water (without spinning), select DRAIN & SPIN and then select the
NO SPIN speed option using the spin speed adjustment button.
Additional function buttons
Select the required additional functions before starting the programme.
When selected, the button indicator light will be illuminated.
Note: some combinations cannot be selected together (eg Pre-wash and Quick Wash).
It is not possible to activate all the additional functions in all the wash programmes. For example,
if the cotton programme is selected, QUICK WASH and PRE-WASH functions can not be selected
at the same time. If PRE-WASH button is selected first and then QUICK WASH function next, the
LED of the PRE-WASH function will turn off, as it’s no longer an active selection.
An additional function that is not compatible with the programme cannot be selected (see
pages 11 and 12).
Pre-wash
A pre-wash is only worthwhile for heavily-soiled laundry. Without pre-wash you save energy,
water, detergent and time.
Pre-wash without detergent is recommended for lace and curtains.
Quick wash
This function can be used for the COTTONS and SYNTHETICS programmes. It decreases the
washing times for lightly soiled garments and also the number of rinsing steps in the programme.
Rinse plus
With this function, you can increase the number of current rinsing steps. This reduces the
amount of residual detergent left on the clothes, this is ideal for people with sensitive skin.
14
Selecting a programme and operating your machine
Time display
The display shows the time remaining for the programme to complete while a programme
is running.
Programme duration may differ from the values in the consumption table subject to the changes
in the water pressure, water hardness and temperature, ambient temperature, type and amount
of laundry, additional functions selected, and changes in the supply voltage.
Time delay
With the TIME DELAY function you can delay the programme start up to 24 hours.
Time delay can be set with steps of one hour for the first three hours and with steps of three
hours for the remainder (1, 2, 3, 6, 9, …24).
1 Press TIME DELAY button to select the length of delay.
2 Press the START/PAUSE button.
The time delay will start to count down.
Note: more laundry may be loaded during the time delay period.
Changing the delay time
If you want to change the time during the countdown:
1 Press the START/PAUSE button.
2 Press the TIME DELAY button to adjust the desired time delay.
3 Press the START/PAUSE button.
Cancelling the time delay
If you want to cancel the time delay countdown and start the programme:
1 Press the START/PAUSE button.
2 Press the TIME DELAY button to decrease the time delay.
3 Press the START/PAUSE button to start the programme.
Starting the programme
1 Press the START/PAUSE button to start the programme.
2 Programme follow-up lamp showing the startup of the programme will light up.
Progress of programme
Progress of a running programme is shown through the programme follow-up indicator.
At the beginning of every programme step, the relevant indicator lamp will light up, and the
light of the previous step will turn off. The symbol that is lit up at the far left of the series of
symbols indicates the step that is being carried out.
If the machine is not spinning, the programme may be in rinse hold mode or the automatic spin
correction system may have been activated, due to an excessive imbalance in the distribution of
laundry in the machine.
Selecting a programme and operating your machine
15
Changing the selections after the programme has started
■■
■■
Turning the programme knob while the programme is in operation will not change the
programme.
The programme needs to be paused or cancelled before changes can be made.
Door lock
■■
■■
The loading door cannot be opened whilst the READY lamp is flashing due to safety reasons.
Once the READY lamp lights continuously the door is able to be opened.
Adding additional laundry
■■
■■
Press the START/PAUSE button to pause the programme.
If the water level does not exceed the preset limits, in 1 to 2 minutes the door lock will be
deactivated. Laundry may be added / taken out by opening the door.
If, after 2 minutes, the door is unable to be opened, it means that the water level inside
the machine is too high for the door to be opened and laundry added (refer to ‘Cancelling
the programme’).
Pausing the programme
■■
■■
Press START/PAUSE button momentarily to switch your machine to the standby mode.
Additional functions can be cancelled or selected according to the stage of cycle the current
programme is at.
Cancelling the programme
If the programme has started and you want to cancel it:
1 Press and hold the START/PAUSE button for 3 seconds.
2 The programme will progress to the SPIN step.
3 The water will be drained, and after 1 –2 minutes the door can be opened.
Note: the READY warning lamp flashes during cancelling and then END will appear on the display.
16
Selecting a programme and operating your machine
Child-proof lock
■■
■■
You can protect the appliance from being tampered by activating the child-proof lock.
When activated, no change can be made to the programme running.
To activate the child-proof lock:
1 Press the 1st and 2nd additional function buttons for 3 seconds.
2 The “C ON” (child lock is activated) symbol appears on the screen.
Note: the child lock symbol will also be displayed whenever any button is pressed while the
machine is child-locked.
3 The child-proof lock lamp on the programme follow-up indicator will light up when the child-
proof lock is activated.
To deactivate the child-proof lock:
1 Press the 1st and 2nd additional function buttons for 3 seconds.
2 The “C OFF” (child-proof lock is deactivated) symbol appears on the screen.
3 The child-proof lock lamp on the programme follow-up indicator will go off when the child-proof
lock is deactivated.
Care and cleaning
17
Detergent drawer
Remove any powder residue buildup in the drawer.
Note: if more than a normal amount of water and softener mixture starts to gather in the
softener compartment, the siphon must be cleaned.
1
2
3
4
5
6
To remove and clean the detergent drawer and siphon:
Open the detergent drawer.
Press the dotted point on the siphon in the softener compartment.
Pull the compartment towards you until it is removed from the machine.
Wash the dispenser drawer and the siphon with plenty of lukewarm water.
Replace the drawer into its housing after cleaning.
Check that the siphon is back in its original location.
Fig.7 Removing the detergent drawer
Inlet water filters
■■
■■
■■
There is a filter at the end of the water inlet valve at the rear of the machine and also at the end
of the water inlet hose where it connects to the tap.
Filters prevent dirt and objects in the water from passing into the machine.
It is advisable that the filters should be cleaned every 30 – 40 washes.
Fig.8 Inlet water filter placement and connection of inlet hose to the tap
18
Care and cleaning
To clean the filter at the machine end:
1 Turn off the tap.
2 Disconnect the hose.
3 Clean the filter with a thin brush. If the filter is very dirty, you may clean it by pulling it out
with pliers (remember to refit the filter after cleaning).
4 Refit the hose and turn the tap back on.
1
2
3
4
5
To clean the filter at the tap end:
Turn off the tap.
Disconnect the hose.
Remove the filter by hand.
Clean the filter by rinsing under the tap.
Refit hose and turn tap back on.
Hose
To prevent any leakage, it is recommended a technician check the hoses every 2 years.
Drum
Do not leave any metal objects (pins, needles, etc) inside the drum. These objects may cause rust
on the inside drum surface.
Drum and door seals
■■
■■
■■
After use, wipe the drum seal (rubber seal surrounding the entrance to the drum, or “bellows”)
with a soft dry cloth.
Check the folds of the drum seal for foreign matter from time to time.
Clean the folds of the drum seal with a soft damp cloth 5-6 times per year.
Draining any remaining water and cleaning the pump filter
■■
■■
■■
Your product is equipped with a filter system. This helps extend the pump’s life by preventing
solid items such as buttons, coins and fabric fibres from clogging the pump propeller during
discharge of the washing water.
If your machine fails to drain the water, the pump filter may be clogged.
It is recommended that this is cleaned every 30 cycles.
Note: water must be drained off prior to cleaning the pump filter, or transporting the machine
(eg when moving house).
Important!
Depending on the programme used, there may be water at 90°C in the machine.
The filter must be cleaned only after the inside water is cooled down to avoid a hazard of scalding.
Care and cleaning
19
To clean the filter and discharge the water:
1 Unplug the machine to cut off the supply power.
2 To prevent water from leaking onto your floor pull the machine out from the wall, tip the
machine back and place solid 100mm tall objects under both feet of the machine to ensure that
the machine does not fall on to you. WARNING: Tipping the machine too far back may cause the
product to slip or fall backwards, or become a hazard.
3 Open the filter cover by pressing the tab on the cover downwards and pull it out towards yourself.
Fig.9 Opening the filter cover
4 Draining of water using the pump outlet hose (only available on selected models)
4a Pull out the pump outlet hose from its housing.
Fig.10 Draining of water using the pump outlet hose
4b Place a large container at the end of the hose.
4c Drain the water off into the container by pulling out the plug at the end of the hose.
Note: if the amount of water to be drained off is greater than the volume of the container,
replace the plug, pour the water out, then resume the draining process.
After the draining process is completed:
4d Replace the plug into the end of the hose.
4e Refit the hose back into the housing.
5 Remove the filter by turning counter-clockwise and wash with clean water.
6 Inspect the inside of the filter housing and remove any foreign objects.
7 Check the O-ring seal for cracks or breaks.
8 Replace the filter by turning clockwise. Firmly tighten by hand.
9 Close the filter cover by lifting it up and pressing on the tab.
10 Carefully lower the machine and push it back into position.
20
Troubleshooting
Suggestions for solving problems
Problem
Cause
Explanation / Suggestion
Programme is unable
to be started or
selected.
Machine may have switched to
self protection mode due to an
infrastructure problem (such as
line voltage, water pressure, etc).
Reset your machine by pressing START/PAUSE
button for 3 seconds (see ‘Cancelling the
programme’).
There is water
coming from the
bottom of the
machine.
There may be a problem with
the inlet hose, drain hose or the
pump filter.
Check the seals at both ends of the water inlet
hose. Ensure the filters are clear of debris and are
securely fitted.
Ensure the drain hose is securely and directly
fitted into the wastewater standpipe or tub.
Remove the service door and check that the
pump filter is completely closed.
Machine stopped
shortly after the
programme started.
Machine may stop temporarily
due to low voltage.
The programme will resume operating once the
voltage is back to the normal level.
The machine
continuously spins.
Remaining time does
not count down.
There may be an imbalance of
laundry in the machine.
The automatic spin correction system may have
been activated due to an unbalanced distribution
of laundry in the drum.
The laundry in the drum may be clustered
(bundled laundry in a bag). Items should be
rearranged and re-spun.
The load may be too small.
No spinning is performed when the laundry is
not evenly distributed in the drum to prevent any
damage to the machine and to its environment.
The machine
continuously washes.
Remaining time does
not count down.
In the case of a paused
countdown while taking in water:
The timer will not count down
until the machine is filled with the
correct amount of water.
The machine will wait until there is a sufficient
amount of water, at the correct temperature to
avoid poor wash results. The timer will then start
to count down.
In the case of a paused
countdown at the heating step:
The timer will not count down
until the selected temperature for
the programme is reached.
In the case of a paused
countdown at the spinning step:
There may be an imbalance of
laundry in the machine.
The automatic spin correction system might have
been activated due to an unbalanced distribution
of laundry in the drum.
The laundry in the drum may be clustered
(bundled laundry in a bag). It should be
rearranged then re-spun.
The load may be too small.
No spinning is performed when the laundry is
unevenly distributed in the drum. This is to prevent
any damage to the machine and to its environment.
Specifications
Models
WH60F60W*
WH70F60W*
WH80F60W*
Maximum dry laundry capacity (kg)
6
7
8
Height (cm)
84
84
84
Width (cm)
60
60
60
Depth (cm)
50
54
59
Net weight (kg)
21
65
73
75
Electricity (V/Hz.)
220-240V / 50Hz
220-240V / 50Hz
220-240V / 50Hz
Total current (A)
10
10
10
Total power (W)
2000-2350
2000-2350
2000-2350
1200
1200
1200
Spinning cycle (rpm max.)
Note: specifications of this appliance may change without notice to improve the quality of the
product. Figures in this manual are schematic and may not match your product exactly.
Values stated on the machine labels or in the documentation accompanying it are obtained
in laboratory in accordance with the relevant standards. Depending on operational and
environmental conditions of the appliance, values may vary.
22
Manufacturer’s Warranty
You automatically receive a 2 year Manufacturer’s Warranty with the purchase of this
Product covering parts and labour for servicing within the country of purchase.
Fisher & Paykel undertakes to
Repair or, at its option, replace without cost to the owner either for material or labour any part of
the Product, the serial number of which appears on the product, which is found to be defective
within TWO YEARS of the date of purchase.
Note
This Warranty is an extra benefit and does not affect your legal rights.
This warranty DOES NOT cover
A Service calls which are not related to any defect in the Product. The cost of a service call will be
charged if the problem is not found to be a Product fault. For example:
1.
Correcting the installation, eg removal of bottom packer and transit bolts (front loading
washers), levelling the machine, adjustment of the drain to correct siphoning, noises,
crossed, kinked or leaking inlet hose connections, turning on water, noises caused by the
waterhammer or power supplies.
2.
Providing instruction on use of the product or changing the set-up of the product,
eg instruction on correct use of detergents and fabric softeners.
3.
Replacing fuses in, or correcting house wiring or correcting house plumbing, eg unblocking drains.
4.
Correcting fault(s) caused by the user.
5. Noise or vibration that is considered normal, eg spin sounds, user warning beeps.
6.
Correcting damage caused by pests, eg rats, cockroaches, etc.
7.
Water on the floor due to incorrect loading or excessive suds.
8.
Blocked pumps, removal of foreign objects/substances from the machine, including the
pump and inlet hose filters, eg bra wires, bread tags, nails, grit, scrud, etc.
9.
Correcting corrosion or discolouration due to chemical attack.
B Defects caused by factors other than:
1. Normal domestic use or
2. Use in accordance with the Product’s User Guide.
C Defects to the Product caused by accident, neglect, misuse or ‘Act of God’.
D The cost of repairs carried out by non-authorised repairers or the cost of correcting such
unauthorised repairs.
E Normal recommended maintenance as set out in the Product’s User Guide.
F Repairs when the appliance has been dismantled, repaired or serviced by other than a
Fisher & Paykel Authorised Repairer or the selling dealer.
G Pick-up and delivery.
H Transportation or travelling costs involved in the repair when the Product is installed outside the
Fisher & Paykel Authorised Repairer’s normal service area.
Manufacturer’s Warranty
23
This Product has been designed for use in a normal domestic (residential) environment. This
Product is not designed for commercial use (whatsoever). Any commercial use by a Customer
will affect this Product’s Warranty.
Service under this Manufacturer’s Warranty must be provided by a Fisher & Paykel Authorised
Repairer (refer to the ‘Customer Care’ section at the back of this book). Such service shall be
provided during normal business hours. This Warranty certificate should be shown when making
any claim.
For Australian Customers
This Warranty is an extra benefit and does not affect your legal rights. Our goods come with
guarantees that cannot be excluded under the Australian Consumer Law. You are entitled to
a replacement or refund for a major failure and for compensation for any other reasonably
foreseeable loss or damage. You are also entitled to have the goods repaired or replaced if the
goods fail to be of acceptable quality and the failure does not amount to a major failure.
Please keep this User Guide in a safe place.
24
Customer Care
Before you call for service or assistance…
Check the things you can do yourself.
Refer to your User guide and check:
1 Your appliance is correctly installed.
2 You are familiar with its normal operation.
3 You have read the problem solving at the back of the book.
If after checking these points you still need assistance, please refer to your nearest Fisher & Paykel
Authorised Repairer, or contact us through our local website listed on the back cover.
In New Zealand if you need assistance...*
Call your Fisher & Paykel retailer who is trained to provide information on your appliance, or if we
can be of any further help, please contact our Customer Care Centre,
Toll Free: 0800 FP CARE or 0800 37 2273Fax: (09) 273 0656
Email: [email protected]
Postal address: PO Box 58732, Botany, Manukau 2163
If you need service...*
Fisher & Paykel has a network of independent Fisher & Paykel Authorised Repairers whose fully
trained technicians can carry out any service necessary on your appliance. Your dealer or our
Customer Care Centre can recommend a Fisher & Paykel Authorised Repairer in your area.
In Australia if you need assistance...*
Call the Fisher & Paykel Customer Care Centre and talk to one of our Customer Care Consultants.
Toll Free: 1 300 650 590Fax: (07) 3826 9298
Email: [email protected] Postal Address: P.O. Box 798, Cleveland, QLD 4163
If you need service...*
Fisher & Paykel has a network of qualified Fisher & Paykel Authorised Repairers responsible for
servicing only Fisher & Paykel branded appliances. Our Customer Care Centre can recommend a
qualified Fisher & Paykel Authorised Repairer in your area.
In Singapore if you need assistance...*
Please call our Fisher & Paykel Service line.
Phone: 6741 0777
Phone: 6547 0100
Email: [email protected]
Fax: 6547 0123
Postal address: 150 Ubi Avenue 4,
Sunlight Building #03-01A, Singapore 408825
*If you call, write or contact our website please provide: your name and address, model number,
serial number, date of purchase and a complete description of the problem. This information is
needed in order to better respond to your request for assistance.
Product details can be found on the top left hand side of the console or back panel of the
washer cabinet.
Customer Care
Product details
Fisher & Paykel Appliances, Ltd
Model/Serial No.
Date of Purchase Purchaser Dealer Suburb Town Country 25
www.fisherpaykel.co.nz
www.fisherpaykel.com.au
www.fisherpaykel.com.sg
Copyright © Fisher & Paykel 2011. All rights reserved.
The product specifications in this booklet apply to the specific products
and models described at the date of issue. Under our policy of continuous
product improvement, these specifications may change at any time. You
should therefore check with your Dealer to ensure this booklet correctly
describes the product currently available.
NZ AU SG
F&P PN - 790718 G
11.2011