1
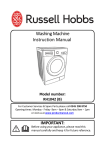
Installation instructions
and user guide
AquaSmart™ clothes washer
WL80T65D & WL70T60D
NZ AU
Contents
Installation instructions
Before you do your first wash
Checklist, Water consumption, Capacity
Getting started quickly
The unique AquaSmart™ wash
Sorting and loading
Detergent
Fabric softener
Changing the wash cycle options
Wash cycles explained
Wash cycle options explained
Auto drain
Lid lock
Customising the wash cycles
Changing pre-set options
Wash temperatures/Controlled cold
Aqua rinse/End of cycle beeps
Out-of-balance recovery routine/Reset back to factory settings
Control panel lighting
Caring for your AquaSmart™ washer
ABC washing guide
Before you call for service If your AquaSmart™ beeps for help
Solving operating problems
Solving wash problems
Manufacturer’s warranty
Customer care
2
5
5
6
8
9
11
12
13
13
16
18
18
19
20
21
22
23
24
25
27
31
31
33
35
36
37
Introduction
Welcome to AquaSmart™
Thank you for buying a Fisher & Paykel AquaSmart™ clothes washer. We are very proud of this
washer and trust it will serve you well for many years.
At Fisher & Paykel we aim to provide innovative products that are simple to use, ergonomic
and kind to the environment. Thousands of tonnes of washing and 70 years of laundry
experience have been programmed into your clothes washer to help give you the best possible
performance.
Your AquaSmart™ clothes washer works differently from a conventional washer. It is a “High
Efficiency” machine utilising innovative technology to wash in significantly less water and take
great care of your clothes.
The revolutionary, super water efficient wash action of your AquaSmart™ washer means that it
is no longer necessary to wash using a full bowl of water. This innovative wash action relies on
maintaining a small volume of water for the wash load to ensure the best wash results. Please be
aware that the water level for this washer is fully automatic, with the machine ‘smarts’ choosing
the appropriate water volume for you. This means that there is no option to select your
water level.
It is important that you take the time to read these instructions carefully before you begin using
your machine. Like all High Efficiency washers, a little extra care in how you sort your clothes and
choose your cycle and detergent will ensure that you get the best possible wash result.
We hope you enjoy your new washer, we have certainly enjoyed designing it for you.
Important!
SAVE THESE INSTRUCTIONS
The models shown in this user guide may not be available in all markets and are subject to
change at any time. For current details about model and specification availability in your country,
please go to our website www.fisherpaykel.com or contact your local Fisher & Paykel dealer.
Installation instructions
Unpacking
To ensure the best performance from your new AquaSmart™
clothes washer please follow the instructions below.
Removing the packaging
1 Remove the outer packaging.
2 Tilt the machine backwards and walk it off the bottom
packer one foot at a time.
3 Remove the bottom packer from under the machine by
pulling it out the front.
4 Lift the lid and remove the bowl packer from the bowl.
5 Remove the hoses and accessories.
6 Keep the bottom packer and bowl packer in case they are
Fig.1 Tilt washer backwards
to remove packer
required for future transit.
Important!
Ensure that the bottom packer has been removed before operating your machine.
Installation
In your clothes washer you will find:
4 rubber inserts for the levelling feet (joined
together).
1 hose guide.
2 white inlet hoses.
Pull hose
through guide
(20 mm)
maximum
Drain hose
1 Carefully pull the drain hose out from the back of
the machine by pulling the exposed part of the
hose downwards and outwards.
2 To guide the drain hose over the tub or standpipe
the hose guide MUST be fitted to the drain hose.
To prevent siphoning:
The drain hose should not extend more than
20 mm from the end of the guide. The height of the
standpipe or tub should be between 850 – 2400 mm.
The drain hose can be trimmed to length.
3 Place the drain hose in the tub or standpipe.
Flex hose
guide apart
Standpipe 850 – 2400 mm
Fig.2 Fitting the drain hose guide
Draining
Regularly check that your standpipe or tub is free from lint or other obstructions, which may
affect how your machine works or may cause flooding.
In multi-storey apartments or any upper floor, the machine should be installed on a drained floor.
Draining must comply with local by-laws.
Installation instructions
Water supply
This clothes washer should be plumbed into both a hot and cold water supply otherwise some
cycles may not function correctly.
For best operating conditions your hot water should be approximately 65˚C. Your hot water
should not exceed 75˚C or your cold water exceed 35˚C. Temperatures above these may cause a
fault or cause damage to the machine.
If you have an uncontrolled water-heating source (eg. a wet back or solar heating) you should
have a tempering device fitted. This will ensure the hot water temperature remains within
safe limits. For the most suitable type of tempering device we recommend you contact a local
plumber or plumbing supply merchant.
Inlet Water Static Pressure of between 3psi (20kPa) and 150psi (1MPa) is recommended.
(If using a header tank then the top of the header tank must be at least 2 metres above the top of
your clothes washer).
Minimum flow rate from the tap supplying the clothes washer should be greater than 6 litres/min
(assumes 12.7mm (1/2 inch) diameter pipes).
Minimum height of taps to clear the top of the machine is 1150 mm.
Inlet hoses
1 Connect the straight ends of the white inlet hoses to the
taps (there are washers fitted in both ends).
2 Connect the elbow ends of the white inlet hoses to the
machine inlet valves. Inlet valves are marked on the back
of the machine.
H=Hot C=Cold
Tap end
Machine end
Fig.3 Inlet hose ends
Electrical
This appliance must be supplied with a 230V - 240V, 50Hz, sinusoidal, 450W electrical supply.
Installation instructions
Levelling your machine
1
2
3
4
5
It is IMPORTANT to level the machine to ensure good spin
performance and effective detergent and fabric softener
dispensing.
Separate the 4 rubber foot inserts from the moulding and
fit into the feet on the base of the machine.
Move the machine to its final position. (We suggest a
minimum clearance of 20 mm each side).
Adjust the feet so the machine is level and cannot rock.
Turn on the water and check all hose connections for
leaks. Make sure there are no kinks in the hoses.
Uncoil power cord and plug into wall socket.
Incorrect
Rubber insert
Fig.4 Adjusting levelling feet
Lid
Wind left foot down
(out) to correct
Correct
Adjustable feet
Topdeck
Lid
Topdeck
Lid
Wind right foot down
(out) to correct
To check levelling look
down on the wash bowl
Topdeck
Fig.5 To assess levelling
check lid alignment
Clothes washer safety
This clothes washer is not intended for use by young children or infirm persons without
supervision.
Your AquaSmart™ can only be opened during the initial fill stage. Once the fill is complete, the lid
will be locked for safety reasons. Please supervise young children to ensure they do not play with
this clothes washer.
Important!
If you are using an extension cord or a portable electrical outlet device (eg. multi-socket outlet
box), ensure that it is positioned so that it does not come into contact with water or moisture.
Accessories and spare parts
Available from your Fisher & Paykel Dealer or Authorised Service Centre.
Hose Inlet Long (2 m) - Part No. 422680
Inlet Valve Cap - Part No. 388491,
Drain Hose Extension - Part No. 425627p
Hose Inlet Large Bore - Part No. 426123,
Power Cord - If the Power Cord of your clothes washer is damaged it must be replaced by a
Fisher & Paykel Authorised Service Centre, as it is not a standard power cord.
Before you do your first wash
You owe it to yourself and your AquaSmart™ to have it installed correctly by an authorised
service agent.
Before you start, it is a good idea to go through the following checklist:
1 Has the basepacker been removed?
2 Is the hot water hose connected to the hot valve marked ‘H’?
Is the cold water hose connected to the cold valve marked ‘C’?
3 Is the drain hose threaded through the ‘U bend’ hose guide (with no
more than 20 mm extended) and onto your standpipe?
4 Are the rubber inserts secured into the feet on the base of your
machine and is the machine levelled?
Refer to Installation instructions, pages 2 – 4.
AquaSmart™ water consumption
Model WL80T65D
Model WL70T60D
Regular High
Efficiency*
Regular
Conventional
Regular High
Efficiency*
Regular
Conventional
8 kg capacity
82 L
165 L
–
–
7 kg capacity
–
–
72 L
159 L
5 kg
69 L
147 L
66 L
141 L
3 kg
60 L
123 L
60 L
117 L
1 kg
54 L
88 L
52 L
77 L
Load Size
*Regular High Efficiency is the default wash cycle for AquaSmart™.
AquaSmart™ capacity
AquaSmart™ offers a generous 7 kg or 8 kg capacity. The list below outlines what is included in a
7 kg or 8 kg wash load (in accordance with AS/NZS 2040.1:2005).
7kg Load
8kg Load
2 Sheets (double)
4 Pillowcases
3 Sheets (double)
5 Pillowcases
6 Bath towels
7 Shorts
4 Bath towels
5 Shorts
2 Tablecloths
6 Wash cloths
3 Tablecloths
8 Wash cloths
3 Shirts
4 Handkerchiefs
5 Shirts
6 Handkerchiefs
4 T-shirts
5 T-shirts
We recommend for everyday use that you separate out your sheets and wash them on the
specially designed SHEETS cycle.
Getting started quickly
It is important to sort your clothes, particularly by colour, as well as separating out sheets and
washing them on the SHEETS cycle (refer to page 9 for more details on sorting and loading).
Close bra clasps, do up zippers and check pockets.
Place your clothes evenly around the wash bowl.
Detergent
Although your AquaSmart™ is a Top Loader, this High Efficiency washer has been designed for
use with Low Sudsing, ‘HE’ or ‘Front Loader’ type detergent. For example Fab® Front Loader
concentrate, or Persil®/Omo® low suds concentrate.
AquaSmart™ offers a detergent dispenser for your convenience, located on the front, left hand
side of the top deck.
For detergent dose, please follow the manufacturer’s directions, outlined on the detergent
package.
Pour the detergent down the detergent dispenser.
For more information on detergent and fabric softener please refer to pages 11 – 12.
1
2
Fig.6 AquaSmart™ control panel
4
5
Getting started quickly
1 PRESS POWER to activate your AquaSmart™ washer.
2 Select the desired WASH CYCLE that most closely matches your wash load.
3 HIGH EFFICIENCY – this light tells you when ‘High Efficiency’ mode is recommended, and the
button allows you to switch between High Efficiency and Conventional modes (refer to pages
8 – 9).
4 Select any additional WASH OPTIONS that you may require.
5 If you wish to use fabric softener, place into the softener dispenser and select SOFTENER to turn
the fabric softener option ON.
6 PRESS START – your AquaSmart™ will start to fill with water, and will automatically select the
correct water level and wash action for your load. To pause your AquaSmart™ at any time, simply
touch START/PAUSE.
For best fabric and colour care remove your clothes as soon as the cycle has finished.
3
6
The unique AquaSmart™ wash
The AquaSmart™ washer has two modes of washing, High Efficiency and Conventional.
Both modes start the same way, with a Detergent Activating wash.
Detergent Activating wash
AquaSmart™ fills the bowl at the selected water temperature,
with just enough water so the clothes are saturated. This small
amount of sudsy water flows through the clothes, up a specially
designed portal and back onto the clothes in a waterfall effect. This
thoroughly dissolves and activates the detergent.
Fig.7 Detergent Activating wash
High Efficiency mode
In the High Efficiency mode the AquaSmart™ then fills with just
enough cool water to lift the clothes off the low profile agitator so
when it rotates, the clothes gently roll over each other. This wash
uses similar quantities of water to most Front Loaders. Not only
do you get the benefits of water savings but the higher detergent
concentrations give you optimum soil removal.
Conventional mode
The Conventional mode is the immersion wash all Top Loader users
are familiar with. After the Detergent Activating wash the AquaSmart™
fills with cold water until the clothes are submerged, and gently turns
the clothes over. We recommend this mode when the dilution effect
of water can solve or prevent common wash problems. For example,
when dye or colour run can be a problem, or when washing sandy
towels. The SHEETS cycle uses the Conventional mode.
Fig.8 High Efficiency wash
Fig.9 Conventional wash
Some cycles can be used in both modes, whilst others work in only one.
High Efficiency
Conventional
Regular
Heavy
Delicate
Sheets
–
Colours
–
Bulky
–
Easy Iron
–
These two wash modes mean that your AquaSmart™ washer gives you the best of both worlds,
to suit any laundry situation.
Sorting and loading
Fully automatic water level
You may notice that your AquaSmart™ clothes washer behaves differently from your previous
washer.
Your AquaSmart™, like all High Efficiency washers, has a fully automatic water level. This means
that, like Front Loaders, the selection of the water level is left entirely up to the washer. This
ensures optimum wash performance and water savings.
Should you wish to use more water, simply select a Conventional cycle (refer to Conventional
mode page 8).
Sorting and loading
It is important to sort your wash load to ensure optimum wash performance.
SHEETS – Separate out sheets and duvet/doona covers and use the SHEETS cycle
which has been especially designed for these items. Ensure that duvet/doona covers
are buttoned or zipped up. To get the best possible wash for sheets, load these items
around the edge of the bowl rather than directly across the low profile agitator.
COLOURED ITEMS – Dye or colour run can be a problem with High Efficiency washers,
so separate highly coloured garments (especially when they are new) and choose the
COLOURS cycle. Most dye transfer occurs when clothes are left too long in the machine
at the completion of the cycle so try not to leave your coloured clothes lingering in the
machine.
BULKY ITEMS – Duvet/doona inners, sleeping bags, ski jackets , blankets and throws
are all items which tend to behave unusually in a clothes washer. The lighter ones tend
to float, while a large blanket can get very heavy and make spinning difficult. Your
AquaSmart™ offers a BULKY cycle designed to take care of these washing challenges.
CREASABLES – When you are concerned about creasing or wrinkling we recommend
you use the EASY IRON cycle. Alternatively, select one of the Conventional cycles. The
extra water used by these cycles will help to reduce creasing. Reducing the spin speed
of the wash may also help (refer to page 16).
JEANS – These items can quickly lose their colour. For best results we recommend that
you wash jeans using the COLOURS cycle to minimise any potential colour loss.
SOIL – Very dirty, sandy, or linty loads are best washed separately to prevent transfer
onto other garments. It may be that you have new towels that create lots of lint or very
sandy beach gear. We suggest using a Conventional cycle in this circumstance.
DELICATES – To take extra special care of delicate items, we suggest using the DELICATE
cycle.
For more information on washing tricky items washing please refer to page 27.
10
Sorting and loading
Sorting
Machine Washable
Warm 40°C max
Warm Rinse Well
Care labels
Care labels will tell you about the fabric of the
garment and how it should be washed.
Normal Spin
Do not bleach
Soil
Sort clothes according to the type and amount
of soil. Some soils suit warmer washes, eg. oily
soils, while others are best washed in cold water,
eg. mud, blood.
Do not tumble dry
Dry in shade
Warm iron
Colour
Sort white fabrics from coloured fabrics.
Lint
Wash lint givers and lint collectors separately.
Where possible, turn lint collectors inside out.
Dry Cleanable
Examples of care label symbols.
Loading
Check pockets
Loose items can damage both your AquaSmart™
and your clothes.
Close zippers, hooks and eyes
This is to make sure that these items do not snag
on other clothes.
Mend any torn garments or loose buttons
Tears or holes may become larger during
washing. Remove any loose bra wires as they can
damage your washing machine and/or dryer.
Pretreat any stains
For a balanced load
Place unfolded clothes firmly and evenly around
the low profile agitator.
Do not wrap large items, such as sheets, around
the low profile agitator.
A mixture of small and large items will wash
the best (remember to separate out sheets and
select the SHEETS cycle).
Lint Givers
Lint Collectors
Towels
Synthetics
Chenille
Corduroy
Nappies
Poly cotton
Socks
Detergent
11
Choosing the right detergent
Your AquaSmart™ is a High Efficiency clothes washer and needs Low Sudsing Detergent to
prevent oversudsing problems. This is the same type of detergent Front Loaders use and are
labelled, “Lows Suds”, “Matic” or “High Efficiency”.
We recommend the use of liquid detergents for best results. If you wish to use powdered
detergent, dissolve in water first before adding to the dispenser.
There are both liquid and powdered Low Sudsing detergents. Some examples are:
PERSIL® Low Suds
FAB® Front Loader concentrate
COLD POWER® ADVANCED Matic
OMO® Matic
When washing woollens use a wool detergent but use it sparingly as these are usually very high
foaming. Do not use soap flakes or soap powders.
How much detergent?
Use the instructions on the back of the detergent packet as a guide to the correct amount to use.
The correct amount of detergent will vary depending on the amount of soil in your clothes and
the size of your load. Jeans and work clothes may need more and towels less.
As a starting point:
Use one cap full for a large load and reduce or increase
the dosage as required.
For a small load (eg. 4 – 5 t-shirts) use ¼ cap.
If you have over-foaming problems reduce your dosage.
If your clothes are not clean enough, try using a bit more.
Where do I put my detergent?
Pour your detergent into the detergent dispenser, located
on the left side of the washer.
We recommend that you measure your detergent first.
If you use powdered detergent, we recommend that you
dissolve it in water before adding it to the dispenser.
Fig.10 Adding detergent to
the detergent dispenser
You will notice that most of the detergent placed in the dispenser will fall into the machine. It
will remain in an area separated from your clothes until the machine begins to fill. As the washer
fills, the dispenser will be flushed of any residue. The detergent is then mixed with water, and
specially designed ribs at the bottom of the bowl help to rapidly dissolve the detergent to
ensure optimum wash performance.
When washing in very cold water or on the quicker cycles (eg. DELICATE) dissolving the
detergent in warm water before pouring it down the dispenser will improve wash performance.
12
Fabric softener
Choosing the right cycle
If you wish to use fabric softener you will need to select the SOFTENER option which will give
you a deep rinse. If SOFTENER is not selected, the fabric softener will not be dispensed.
Adding the fabric softener
Measure softener out into the cap and pour into the fabric softener
dispenser. The softener will remain in the top of the dispenser until
the deep rinse, where water flushes it into the bowl.
Note: If you fill beyond the MAX mark, the overflow will pour fabric
softener into the bowl prematurely and contribute to Scrud
(refer below).
Fig.11 Adding softener into
the fabric softener dispenser
Cleaning the dispenser
The funnel of the fabric softener dispenser (the top) clicks off easily. Simply place a finger down
the centre and lift. The remaining siphon tube and fabric softener well is not removable and
needs to be wiped clean with hot water and an old toothbrush periodically. If the siphon tube
looks partially blocked use a cotton bud to clean.
Fig.12 Removing the fabric softener funnel
Scrud
Scrud is the name of the waxy build-up that can occur within any washer when fabric softener
comes into contact with detergent. This build-up is not brought about by a fault in the machine.
If scrud is allowed to build-up in the machine it can result in stains on the clothes or an
unpleasant smell in your washer.
If you wish to use fabric softener we recommend:
Use it sparingly.
Measure it carefully to ensure you do not fill above the MAX level.
Clean the dispenser as soon as the cycle has finished.
Clean your machine regularly using the AUTO CLEAN cycle (see page 25).
Cold water washing increases the chance of this build-up occurring. We recommend a warm or
hot wash at regular intervals, eg. every 5th wash.
Changing the wash cycle options
13
Wash cycles explained
Regular – High Efficiency Mode
For normally soiled everyday cotton loads, eg. towels, t-shirts, shorts,
shirts.
Regular
Regular – High Efficiency Mode Off
For everyday loads where extra water is an advantage. For example when
the load is linty, sandy, or dye run is possible.
High Efficiency Activated
(Default Mode)
High Efficiency OFF
Wash Time
12 – 15 mins
12 – 15 mins
Wash action
Regular High Efficiency
Regular Conventional
Wash temp
Warm/Cold
Warm/Cold
Rinse sequence
Aqua Rinse (shower)
Spray/Deep
Spin
Fast (1000 rpm)
Fast (1000 rpm)
Heavy – High Efficiency Mode
Recommended cycle for heavily soiled durable garments, eg. tea towels,
rugby shorts, children’s clothes.
Heavy
Heavy – High Efficiency Mode Off
For heavily soiled durable garments when you want to use more water.
High Efficiency Activated
(Default Mode)
High Efficiency OFF
Wash Time
15 mins
15 mins
Wash action
Heavy Duty High Efficiency
Heavy Duty Conventional
Wash temp
Warm
Warm
Rinse sequence
Aqua Rinse (shower)
Spray/Deep
Spin
Fast (1000 rpm)
Fast (1000 rpm)
Delicate – High Efficiency Mode
For delicate or valuable lightly soiled clothes.
Delicate
Delicate – High Efficiency Mode Off
For when you want to wash your delicates in more water.
High Efficiency Activated
High Efficiency OFF
(Default Mode)
Wash Time
6 mins
6 mins
Wash action
Delicate High Efficiency
Delicate Conventional
Wash temp
Warm/Cold
Warm/Cold
Rinse sequence
Aqua Rinse (shower)
Spray/Deep
Spin
Slow (300 rpm)
Slow (300 rpm)
14
Changing the wash cycle options
Wash cycles explained
Sheets – High Efficiency Mode
Unavailable.
Sheets
Wash Time
Sheets – High Efficiency Mode Off
Recommended cycle for sheets, tablecloths, doonas/duvet covers.
High Efficiency Activated
High Efficiency OFF
(Default Mode)
n/a
15 – 17 mins
Wash action
Sheets Conventional
Wash temp
Warm
Rinse sequence
Spray/Deep
Spin
Fast (1000 rpm)
Colours – High Efficiency Mode
Unavailable.
Colours
Wash Time
Colours – High Efficiency Mode Off
Recommended cycle for washing coloured items that may release dye
during the wash
High Efficiency Activated
High Efficiency OFF
(Default Mode)
n/a
12 – 15 mins
Wash action
Regular Conventional
Wash temp
Cold
Rinse sequence
Spray/Deep
Spin
Fast (1000 rpm)
Changing the wash cycle options
15
Wash cycles explained
Bulky – High Efficiency Mode
Unavailable.
Bulky
Bulky – High Efficiency Mode Off
Recommended cycle for washing bulky items.
High Efficiency Activated
Wash Time
n/a
Wash action
High Efficiency OFF
(Default Mode)
6 mins + soak
Bulky Conventional
Wash temp
Warm
Rinse sequence
Double Deep
Spin
Slow (300 rpm)
Washing bulky items
The BULKY cycle takes special care of bulky items. Bulky garments and bedding wash most
effectively when they can move freely. Ensure that there is sufficient room in the bowl for the
wash load to move during the wash.
Some bulky items may float during the wash (eg. duvet/doonas). If these items sit too high in
the washer they may touch stationary parts during agitate or spin. To minimise the chance of
this happening, ensure that bulky items are pushed as far down into the bowl as possible, prior
to spin. The washer will alert you when it is time to do this. To continue the cycle simply press
START/PAUSE.
When washing a single bulky item add a large beach towel to the wash, to ensure the load is
balanced for an effective spin.
Easy Iron – High Efficiency Mode
Unavailable.
Easy Iron
Wash Time
Easy Iron – High Efficiency Mode Off
Recommended cycle for minimising creasing.
High Efficiency Activated
High Efficiency OFF
(Default Mode)
n/a
12 mins
Wash action
Regular Conventional
Wash temp
Warm/Cold
Rinse sequence
Spray/Deep
Spin
Slow (300 rpm)
16
Changing the wash cycle options
Wash cycle options explained
Temperature
AquaSmart™ offers five wash temperatures.
Cold
Warm/Cold
Warm
Warm/Hot
Hot
Incoming water
from tap
35°C
40°C
50°C
60°C
Simply increase or decrease your wash temperature by pressing the
TEMPERATURE button to scroll through the options available.
Note: The temperature option selects the temperature of the first phase of the
two-part wash system, the Detergent Activating Wash.
Controlled Cold
The temperature of cold water varies widely, depending on your location
and the season. The lower the water temperature, the less effective the wash
becomes. To help with this issue we have developed Controlled Cold which adds
a small amount of warm water, when necessary, to raise your cold water wash to
20°C. To access this secondary option please refer to page 21.
Spin Speed
Your AquaSmart™ washer offers three spin speeds: Fast (1000rpm), Medium
(700rpm) and Slow (300rpm), plus an additional Spin Hold option.
Simply increase or decrease your spin speed by pressing the SPIN button to
scroll through the options available. When Spin Hold is selected the washer will
drain at the end of the rinse but stop the cycle before the spin. This option is
ideal for items that require drip drying.
Fabric Softener
If you wish to use fabric softener in your AquaSmart™ clothes washer, please
select the SOFTENER option. Press the SOFTENER button to turn this option
to ON. This will adjust the rinse to ensure that the fabric softener is dispensed
correctly.
Changing the wash cycle options
17
Wash cycle options explained
Delay Start
The Delay Start option allows you to delay the start of the wash cycle for 1, 3 or
9 hours. This can be useful to time your washing to finish when you arrive home
from work, or to start once you have finished in the shower.
Simply press the DELAY START button to scroll through the time options. When
no lights are shown, Delay Start is off. Once DELAY START has been selected the
START/PAUSE button will cease flashing and the Delay Start count down timer
will start automatically.
Note: We suggest that you avoid using Delay Start for damp, non-colourfast
items as this may cause dye to run.
Soak
The Soak option adds a 2 hour soak into the middle of the wash phase of the
cycle. During the soak, the washer will agitate for a few seconds every minute. At
the completion of the soak period the AquaSmart™ will then complete the rest
of the wash cycle. To select Soak, press the SOAK button once to select Soak ON.
Note: Once the Soak is under way you can exit out at any time by pressing the
SOAK button. This does not apply to BULKY cycle. For BULKY cycle to exit SOAK
press ADVANCE.
Wash Advance
There may be times when you wish to use the rinse and spin or spin only stages
of the wash cycle. The Advance option allows you to fast forward your cycle to
the desired location. Press the ADVANCE button repeatedly to advance the cycle
to the desired position, then press START.
18
Changing the wash cycle options
Note: If you wish to change any of the wash options while your AquaSmart™ is running please
press START/PAUSE then select the required option.
Auto drain
Unsupervised clothes washers filled with water can present a drowning hazard to small children.
In order to minimise any risk of this type of accident, your AquaSmart™ has been
pre-programmed to know when this hazard is created, and drain the wash water to a safe level.
If you pause your AquaSmart™ at any time during the wash cycle when there is water in the
bowl, the machine will activate the AUTO DRAIN function after 3 minutes. This will drain the
water in the wash bowl to an acceptable level, removing any potential hazard.
Your washer will beep to warn you prior to AUTO DRAIN being activated.
If you wish to soak clothing items during the wash process please select the SOAK option. This
will provide you with a two hour soak.
Lid lock
Your AquaSmart™ washer is able to lock its lid during hazardous parts of the wash cycle, to
provide extra safety for you and your family while it is operating.
The Lid Lock symbol (padlock) appears in the left hand side of the control panel, letting you
know at a glance if you can open the lid or not.
To unlock the lid at any time press START/PAUSE.
The lid will be unlocked during the initial phase of the wash. This will enable you to pre-dissolve
detergent and add or remove clothing before the wash begins.
If the lid is left open, your AquaSmart™ washer will be unable to lock the lid, and the cycle will
be halted. The machine will beep and the Lid Lock symbol will flash to alert you. If this occurs,
ensure that the lid is closed and press START/PAUSE.
Important!
Do not put anything down the Lid Lock slot in the top deck.
Do not try to disable the Lid Lock.
Ensure that children or infirmed persons are well supervised when around your AquaSmart™
washer, especially when you are using hot water, as the lid can be opened during the fill portion
of the cycle.
Customising the wash cycles
19
To customise a cycle
You can program your AquaSmart™ to remember the wash options you prefer for each wash
cycle. For instance, you may want to set the Regular cycle to a cold wash.
1
2
3
4
Press POWER.
Press the wash cycle button. Select your wash options, (eg. cold wash).
Press and hold down the wash cycle button for 2 seconds, until you hear a beep. This will store
your customised cycle for future washes.
To change your customised wash cycle simply repeat these steps.
Note: You will be unable to customise a wash cycle to start at the rinse or spin stage.
Fig.13 Customising the wash cycle
20
Changing pre-set options
Option Adjustment mode
After using your AquaSmart™ you may want to fine tune some of the options to suit your
wash needs.
There are a number of preset options, which can be altered.
The wash temperatures.
The rinse option.
Changing the cold wash to Controlled Cold.
The number of beeps at the end of the cycle.
The Out of Balance recovery routine.
Resetting the washer back to the settings it left the factory with.
To enter Option Adjustment mode
Turn the washer on at the wall but do not press POWER.
Press START/PAUSE and hold down, then press POWER.
You will hear two quick beeps and the machine will show an
unusual pattern of lights. Pages 21–24 explain the different
options in more detail.
2 Use the buttons on the panel to make your changes to the
pre-set options.
3 Press POWER to return to normal mode.
4 Your AquaSmart™ will automatically remember your changes.
1
Fig.14 Press START/PAUSE and
hold down, then press POWER
Changing pre-set options
21
Wash temperatures
All wash temperatures can be individually adjusted.
1 Enter Option Adjustment mode (refer to page 20).
2 Select the WASH TEMPERATURE you want to adjust.
3 The wash cycle buttons show the temperature adjustment possible for that temperature.
For example the Regular cycle button will be the coldest available setting for that temperature
and the Easy Iron button will be the warmest.
This means that by selecting a button to the left or the right of the button that is currently lit you
can increase or decrease the temperature. To increase the temperature setting, move to the right
and to decrease the temperature setting, move to the left. Each step in temperature equates to
approximately 1°C.
Fig.15 Adjusting Wash Temperatures
Controlled Cold
The temperature of cold water varies widely, depending on your location and the season. The
lower the water temperature, the less effective the wash becomes. To help with this issue we
have developed Controlled Cold. This adds a small amount of warm water, when necessary, to
raise your cold water wash to 20°C. This will ensure that you receive the most effective wash in
cold water.
1
2
3
4
5
Enter Option Adjustment mode (refer to page 20).
Select COLD wash temperature.
The Wash cycle buttons show the temperature adjustment possible.
When the REGULAR cycle light is on, the machine will fill with cold water only.
Press the SHEETS cycle button and your AquaSmart™ will control the temperature to
approximately 20˚C. Each following light to the right equals approximately a 1˚C temperature rise.
Note: If you always use cold or controlled cold water, we recommend that a warm or hot wash be
used regularly, eg. every 5th wash should be at least a warm one.
Fig.16 Select Cold Wash temperature
22
Changing pre-set options
Aqua Rinse
Rinse Options
On the High Efficiency cycles you can
change the pre-set rinse option.
Softener light on
Double Aqua Rinse
Softener light off
Aqua Rinse
The pre-set rinse option on these cycles
is a water efficient Aqua shower rinse.
This rinse can be altered to provide
a more intensive rinse for people with
sensitive skin.
1
2
3
Enter the Option Adjustment mode (refer to page 20).
Press SOFTENER to change to a double Aqua rinse.
Press POWER to save your selection.
End of Cycle beeps
The number of beeps that signal the
end of the cycle can be altered. Choose
between no beeps, five or fifteen beeps.
The DELAY START button adjusts the
cycle signal setting.
End of Cycle Beeps
1hr light
No beeps
3hr light
5 beeps
9hr light
15 beeps
1 Enter the Option Adjustment mode (refer to page 20).
2 Press the DELAY START button to adjust the cycle signal setting.
3 Press POWER to save your selection.
Changing pre-set options
23
Out-of-Balance recovery routine
When your AquaSmart™ is spinning it can sense if the
wash load is out-of-balance and will stop and re-try
spinning up to 3 times. If it still senses an unbalanced
load there are two options the machine can take.
Automatic Recovery option
Your AquaSmart™ will try to automatically correct the
out-of-balance load. It will fill with water and agitate to
redistribute the load before trying to spin up again.
Machine Stops option
Your AquaSmart™ will stop, give a short burst of beeps
every 5 seconds, and the spin speed lights will flash. You
must redistribute the load more evenly yourself. (Use
this option if you wish to conserve water).
SOAK
light on = automatic recovery
SOAK
light off = machine stops
Fig.17 Adjusting Out-of-Balance
recovery routine
Your washer arrived with the ‘Machine Stops’ option set.
1 Enter Options Adjustment mode (refer to page 20).
2 Select SOAK to program your AquaSmart™ to
automatically recover.
3 Press POWER to save your selection.
Reset Back to Factory Settings
If you would like to reset all settings back to those that
were set when your AquaSmart™ left the factory you have
the option of selecting RESET DEFAULTS.
1 Enter Option Adjust Mode (refer to page 20).
2 Press and hold the START /PAUSE button until you hear
one quick beep. This indicates that all settings have been
returned to the factory default settings.
Fig.18 Resetting factory defaults
24
Changing pre-set options
Control Panel Lighting
The panel lighting of your AquaSmart™ washer can be adjusted to suit the environment that it is
located in. For a low lighting situation you may need more lighting contrast and for installations
where there is a lot of ambient light, you may need less.
To adjust the control panel lighting:
1 Turn the washer on.
2 Press and hold the High Efficiency button for 2 seconds until you hear a quick beep. You will then
see a subtle change in the lighting contrast.
3 To change the setting again simply repeat the process.
Your AquaSmart™ washer leaves the factory set for low ambient light conditions.
Caring for your AquaSmart™ washer
When you have finished the cycle
Turn off the taps to prevent the chance of flooding should a
hose burst.
Unplug the machine from the wall socket.
Cleaning your AquaSmart™
Before you start cleaning your AquaSmart™ washer, ensure
that it is turned off at the wall.
Cleaning the soft touch buttons and topdeck
Use a soft damp cloth to wipe all surfaces, and wipe dry.
Avoid using chemical or scouring cleaners, as these will
damage the paint and plastic surfaces of your washer.
You can also remove the lid for cleaning. Open the lid fully,
grasp the lid on both sides. Lift in an upward motion, as
shown. To replace the lid, hold the lid vertically and align
both hinges before pushing downwards and slotting back
into place.
Fig.19 Removing the lid
Cleaning the detergent and fabric softener dispensers
Wipe out the detergent dispenser with a damp cloth.
The funnel of the fabric softener dispenser (the top) clicks
off easily. Simply place a finger down the centre and lift. The
fabric softener well is not removable and needs to be wiped
clean periodically. If the siphon tube looks partially blocked
use a cotton bud to clean.
Cleaning the inside of your washer
It is important that you occasionally clean the inside of your
AquaSmart™ washer. We recommend that you use the AUTO
CLEAN cycle 5 – 6 times a year and suggest that you do not
wash clothes during this cycle.
1 Add approximately 2 scoops of a powdered detergent that
contain phosphate directly into the detergent dispenser.
2 Turn your machine on and press and hold the HIGH
EFFICIENCY and START button.
3 Your AquaSmart™ will automatically start an AUTO CLEAN
cycle that incorporates a full bowl of hot water and a 2 hour
soak to ensure that your washer is thoroughly cleaned.
Fig.20 Removing the
fabric softener funnel
25
26
Caring for your AquaSmart™ washer
Cleaning your low profile agitator
If your low profile agitator becomes stained we recommend you use household bleach to clean
it. Ensure you wear gloves, tip a small amount of household bleach onto a soft cloth and apply
to the stain. Be careful to avoid metal surfaces of your machine. Leave it to soak in for 10 minutes
and repeat. Then put your AquaSmart™ washer through an AUTO CLEAN cycle to remove any
residual bleach (refer to page 25).
Automatic lint disposal system
With AquaSmart™ there is no need to remove messy lint filters. Your AquaSmart™ has a self
cleaning lint disposal system. It automatically separates the lint from the wash water as it
washes. The lint becomes trapped between the inner and outer bowls and is flushed out at the
end of the wash.
Nappy sanitisers/bleach
Nappy sanitisers and bleach are very corrosive to metal surfaces. DO NOT use your AquaSmart™
to soak items in bleach or sanitiser, or tip the contents of the nappy bucket into your machine.
Rinse and wring items out thoroughly before placing them in the machine. For cloth nappies,
wring out, place into the washer and select BULKY cycle. Using the ADVANCE button, advance
the cycle to RINSE and press START. After the cycle is complete, wash nappies as normal.
ABC washing guide
27
Unsure about what the best way is to wash your garment? Try these handy tips for some of those
tricky washing challenges:
A
Allergy
If you or someone in your household has allergies we would suggest using a
separate cycle to wash bedding and clothing. This will ensure that all dust mites
and their wastes as well as any residual detergent are removed. Choose the
SHEETS cycle, and select a HOT wash. This cycle is unsuitable for non-colourfast or
heat sensitive items.
B
Beach Gear
These items can be very grassy and sandy. Give them a good shake to remove
excess sand and grass, before placing them into the machine. Choose a
conventional cycle (HIGH EFFICIENCY OFF).
Brassiere
Do up the hooks and eyes and place in a lingerie wash bag. Choose DELICATE
cycle. Select the HIGH EFFICIENCY option if you wish to save water.
Blankets
These items can be difficult to wash as they become very heavy and cause the
machine to become unbalanced. If you are washing just one blanket add a large
beach towel to help keep the load balanced during spin. Remember to use a
wool detergent if it is a woollen blanket and check to make sure that it is machine
washable. Choose BULKY cycle.
Bulky Items
Ensure there is enough free space in the machine to allow bulky items such as ski
jackets and sleeping bags to move during the wash. Choose BULKY cycle.
Business
Shirts
Use at least a WARM/COLD wash temperature to ensure perspiration is removed.
We suggest selecting the EASY IRON cycle to minimise creasing.
C
Curtains
We do not recommend you wash curtains in your washer as the sun makes curtains
very brittle, and they can disintegrate when washed.
Creasables
For items that crease or wrinkle easily, choose the EASY IRON cycle.
Colours
Coloured items can transfer colour to other garments, so should be washed
separately. They can also lose dye if washed in water that is too hot. The COLOURS
cycle has been designed to care for coloured garments and help to maintain their
original colour. Choose COLOURS.
28
ABC washing guide
D
Damp Items
A simple spin only cycle is handy for spinning out damp items before
drying. Advance cycle to SPIN using the ADVANCE button.
Delicates
For clothing that requires a more gentle approach choose the
DELICATE cycle.
Dishcloths
To ensure that bacteria is removed from items such as dishcloths we
would recommend that you wash these items on the HOT, REGULAR,
HIGH EFFICIENCY cycle. Dry these items either in direct sunlight or on the
hottest setting in the dryer that the fabric will handle.
Duvet/Doona Inners
Its important to check the care labels on these items. Some feather
duvets are not machine washable. We do not recommend washing any
duvet/doonas labelled ‘Dry clean only’ in this machine. For those that are
machine washable choose BULKY cycle.
Duvet/Doona Covers
Choose the SHEETS cycle.
E
Electric Blanket
Please do not, under any circumstances, attempt to wash an electric
blanket in your AquaSmart™ washer.
F
Footy Gear
For muddy or grassy sports gear, select HEAVY cycle and turn High
Efficiency OFF to give a generous wash to dilute and remove mud.
These types of soils are most effectively removed with cold water, so adjust
the temperature to COLD. Remember warmer wash temperature can set
mud and grass stains, so if in doubt always start with a cold wash first.
For sweaty items, follow with a WARM/HOT wash.
Feather Duvet/
Doona
Ensure that your feather duvet/doona is machine washable. Choose
BULKY cycle.
H
Hand Washed Items
To finish off garments that have been hand washed in the sink or tub, try the
DELICATE cycle and advance to the Rinse and Spin stage of the cycle.
Hats
Check before washing to ensure that your hat is fabric only and does not
contain any other stiffening material that may not suit being immersed in
water. Choose a COLD, DELICATE cycle.
Hygiene
When someone in your home has a infection or illness. Choose a HOT,
REGULAR, HIGH EFFICIENCY cycle. This cycle is unsuitable for noncolourfast or heat sensitive items. For soiled sheets we recommend
selecting SHEETS and adjusting the wash temperature to Hot.
ABC washing guide
29
J
Jackets
To care for bulky jackets choose the BULKY cycle.
Jeans
These items can quickly lose their colour. For best results we recommend
that you wash jeans using the COLOURS cycle to minimise any potential
colour loss.
L
Lingerie
To take special care of your lingerie, do up any hooks and eyes and place
small delicate items in a lingerie wash bag. Choose DELICATE cycle.
N
Nappies
After soaking, wring out and place into the washer and select BULKY cycle.
Using the ADVANCE button, advance the cycle to RINSE and press START.
After the cycle is complete, wash nappies as normal.
S
Sensitive Skin
We would suggest using a detergent that is formulated for sensitive skin.
Sheets
To obtain an optimum result when washing sheets, always choose
SHEETS cycle.
Ski Gear
To wash bulky items like ski gear, choose BULKY cycle.
Sleeping Bags
To wash bulky items such as sleeping bags, choose BULKY cycle.
Soft Toys
We would recommend using the DELICATE cycle to bath these special
friends, along with a small amount of gentle detergent eg. wool wash, or
detergent for sensitive skin. Choose DELICATE cycle.
Sports Gear
For muddy or grassy sports gear, select HEAVY cycle and turn HIGH
EFFICIENCY OFF to give a generous wash to dilute and remove mud. These
types of soils are most effectively removed with cold water, so adjust the
temperature to COLD. Remember warmer wash temperatures can set
mud and grass stains, so if in doubt always start with a cold wash first.
For sweaty sports gear set the wash temperature to WARM/HOT, this will
ensure that all traces of perspiration are removed. Remember to check the
care label first to ensure garment is not heat sensitive.
Sports Shoes
To freshen up shoes, choose a WARM/COLD, DELICATE, conventional cycle
(High Efficiency OFF).
Stains
We recommend that you treat stains with cold water as soon as they occur.
To finish off removing stains choose a WARM, REGULAR, HIGH EFFICIENCY
OFF cycle for greasy stains, eg. chocolate, tomato and a COLD, REGULAR,
HIGH EFFICIENCY OFF wash for protein based stains eg. blood and grass.
Synthetic Duvets
Choose BULKY cycle.
30
ABC washing guide
T
Tablecloths
We recommend using the SHEETS cycle to properly care for large flat items
such as table cloths. Choose SHEETS cycle.
Tea Towels
To ensure that bacteria is removed from items such as tea towels we
recommend that you wash these items on the a HOT, REGULAR, HIGH
EFFICIENCY cycle. Dry these items either in direct sunlight or on the
hottest setting in the dryer that the fabric will handle.
Throws
Choose BULKY cycle.
Towels
Towels can be washed on REGULAR, HIGH EFFICIENCY mode. Choose
REGULAR cycle.
W
Waterproof Items
eg. baby bibs,
jackets
These items can float, and can be difficult to wash. We recommend wiping
as much dirt from the item with a damp cloth prior to placing in the
washer. Choose REGULAR cycle with HIGH EFFICIENCY OFF.
Whites
Whites can require some extra care to stay at their whitest. We recommend
washing your white garments separately, using the WARM/HOT, REGULAR,
HIGH EFFICIENCY OFF cycle.
Woollens
Woollen garments require extra care. Ensure that your wool items are
labelled ‘Machine Washable’. Use a small amount of gentle wool detergent,
together with a WARM/COLD, DELICATE cycle, with a MEDIUM spin
speed to keep your woollens looking great. Lay woollen items flat on an
absorbent surface, eg. a towel, to dry.
Wool Duvets
We do not recommend that you wash ‘dry clean only’ wool duvet inners in
your AquaSmart™ washer.
Wet Items
The Spin cycle is perfect for removing water from wet garments, eg. after
hand washing or when items have been left out on the washing line in the
rain. Choose REGULAR cycle and advance the cycle to SPIN.
Z
Zippers
Clothing items with multiple zippers can cause damage to other garments.
Wash these separately on a DELICATE, HIGH EFFICIENCY OFF cycle.
Before you call for service
31
Please read the following pages before you call for service.
You can correct many of your machine’s problems yourself, using the checklists on the
following pages.
Your AquaSmart™ is capable of diagnosing its own problems and if it has a problem it will beep
and display a message telling you what is wrong.
If your AquaSmart™ beeps for help
A musical series of beeps every 5 seconds and…
The musical series of beeps is the same sound that your washer makes when you turn it on at
the wall.
The SPIN SPEED and the RINSE or SPIN light is flashing.
Wash load is out of balance.
Ensure the machine is stationary and manually redistribute the load.
Check your machine is level (refer to Installation instructions pages 2 – 4).
The HOT and COLD water temperature lights are both flashing.
Check that the taps have been turned on.
Check that the inlet hose filters are not blocked.
Check that the inlet hoses are not kinked or squashed.
Check to see if the drain hose is too low or is pushed into the standpipe too far.
This will cause the water to siphon out of the machine (refer to Installation
instructions pages 2 – 4).
The HOT water temperature light is flashing.
Check that the hot water supply has been turned on.
Your hot water supply may not be hot enough to maintain the selected water
temperature.
Select a lower wash temperature.
Check that the inlet hose filter is not blocked.
Check that the inlet hose is not kinked or squashed.
Check that the inlet hoses have been connected to the correct taps.
The flow rate of the supply water may be too slow.
32
Before you call for service
The COLD water temperature light is flashing.
Check that the cold water supply has been turned on.
Your cold water temperature may exceed the recommended limits (refer to
Installation instructions pages 2 – 4).
Check that the inlet hose filter is not blocked.
Check that the inlet hose is not kinked or squashed.
Check that the inlet hoses have been connected to the correct taps.
The flow rate of the supply water may be too slow.
The WASH cycle light is flashing.
Your machine is overloaded and cannot continue the cycle.
Ensure the machine is stationary and remove items until the remaining ones can
move freely.
Check that the machine is not siphoning (refer to Installation instructions pages 2 – 4).
The RINSE and SPIN lights are flashing.
Your machine has a suds build-up. Too much detergent may have been used for the
amount of soil in the load.
Ensure that you are using a HE Low Sudsing, Matic or Front Loader type detergent.
Wait for suds to dissolve (about 20 minutes).
Rinse clothing using the RINSE and SPIN cycle, or run through another cycle.
For a bulky load, press down as far as possible and press START/PAUSE.
The LID LOCK light is flashing.
Check that the lid is closed.
Press START/PAUSE.
If the symptom persists, call your Fisher and Paykel Dealer or Authorised
Service Centre.
Single beep every second and …
The service light (spanner icon) is flashing.
1. Turn your machine off at the wall.
2. Wait 1 minute and turn it back on.
3. Check your machine is level (refer to installation instructions pages 2 – 4).
4. Remove load and retry.
5. Put through a RINSE and SPIN cycle.
6. If the fault re-occurs repeat steps 1 and 2.
If the machine still will not work, call your Fisher & Paykel Dealer or Authorised Service Agent to
arrange service (refer to page 37).
Solving operating problems
33
Pressing POWER does not turn on machine.
Is the power switched on at the wall?
Unplug from wall. Wait 60 seconds, plug back in, turn on and try again.
Could household power supply be at fault? Try plugging in another appliance.
Pressing START/PAUSE does not start the fill.
Are both hot and cold taps turned on?
Are the inlet hose filters blocked? Check ends of hose.
FILLING continuously.
Ensure drain hose is located in standpipe or tub.
Ensure standpipe or tub is at least 850 mm high and no more than 2400 mm high.
NOT SPINNING properly.
Ensure load is not out of balance.
Check machine is level and does not rock.
Ensure machine does not have suds buildup.
SPIN SPEED sounds slower than normal.
Clothes are unevenly distributed in wash bowl, your machine has slowed the spin to compensate.
WATER LEVEL low.
Your machine is designed to automatically sense load size and minimise water use, therefore
the water level may look different to your previous washer, this is normal.
WASH WATER temperature is not warm.
This unique wash system uses two wash phases. The second phase can be cooler than the first
to minimise energy use. This is normal and will not affect wash performance.
Too many SOAP SUDS.
Ensure than you are using a Low Suds, Matic or HE detergent.
Try using a little less detergent, especially if garments are only lightly soiled.
SMALL PUDDLE of water coming from under machine.
The detergent dispenser may be blocked.
Fabric softener dispenser may not be fitted correctly (refer to page 12).
Machine may have been overloaded, causing splash from clothes as machine filled.
Try reducing load size or select BULKY cycle for large, bulky items.
34
Solving operating problems
Wash CYCLE TIME longer than usual.
If water pressure is low, cycle time will increase due to longer fill times. Ensure that inlet hose
filters are not blocked.
Your machine may have initiated Wash Recovery Mode where it has sensed your load is
washing unevenly. Ensure your machine is loaded evenly. Wash very heavy or very large items
separately.
ADDING WATER in the middle of the wash/increased wash volume.
Your machine may have initiated Wash Recovery Mode where it has sensed your load is
washing unevenly. Ensure your machine is loaded evenly. Wash very heavy or very large
items separately.
Small amount of WATER IN BOWL AT END OF CYCLE.
It is normal for a small amount of water to discharge from the fill nozzle after a wash.
Liquid remaining in FABRIC SOFTENER DISPENSER at end of cycle.
A small amount of water remaining in the dispenser at the end of the cycle is normal.
Try cleaning your fabric softener dispenser to remove any blockages.
If the dispenser is at MAX level at the completion of the cycle, check for and remove any
blockages.
If problems persist, contact your Fisher & Paykel dealer or service agent.
Solving wash problems
CREASING.
Was the washer or dryer overloaded?
Selecting the EASY IRON cycle will minimise creasing.
Try not to leave wet clothes sitting in the washer or laundry basket.
LINTING.
Was the washer overloaded?
Wash lint givers, eg. towels, separately from lint receivers, eg. synthetics.
Have you used enough detergent?
Over drying clothes in the dryer can cause them to attract lint.
Try using a Conventional cycle (refer to page 8).
POOR SOIL REMOVAL.
Did you use enough detergent for the amount of dirt?
Are you using a good quality detergent?
Was the washer overloaded?
Separate heavily and lightly soiled garments.
Use a wash temperature suitable for soil type, eg. warm for greasy soils, cold for muddy soil.
DETERGENT RESIDUE.
Did you use too much detergent?
Was the washer overloaded?
Is your cold water less than 20°C? – select Controlled Cold temperature option.
Try using liquid detergent.
Try dissolving powdered detergent in warm water before adding to the dispenser.
DYE TRANSFER.
Remember to separate whites and colours.
Wash non-colourfast items separately and select COLOURS cycle.
Remember to remove items from washer as soon as the wash is finished.
BLACK or GRAY MARKS on Clothes.
Are you using enough detergent for the amount of dirt?
Empty machine and put through a AUTO CLEAN cycle.
TANGLING.
Have you separated out larger items from smaller items?
Try using a Conventional cycle.
Try using the EASY IRON cycle to wash Shirts.
Wash sheets on their own using the SHEETS cycle.
Try washing smaller load sizes.
If problems persist, please contact your Fisher & Paykel dealer or service agent.
35
36
Manufacturer’s warranty
When you purchase any new Fisher & Paykel whiteware Product you automatically receive a two
year Manufacturer’s warranty covering parts and labour for servicing.
Fisher & Paykel undertakes to
Repair or, at its option, replace without cost to the owner either for material or labour any
part of the Product, the serial number of which appears on the product, which is found to be
defective within TWO YEARS of the date of purchase.
This warranty DOES NOT cover
A Service calls which are not related to any defect in the Product. The cost of a service call will be
charged if the problem is not found to be a Product fault. For Example:
1. Correcting the installation, eg. removal of bottom packer, levelling the machine, adjustment of the drain to correct syphoning, noises, crossed, kinked or leaking inlet hose connections, turning on water, noises caused by the waterhammer or power supplies.
2. Noise or vibration that is considered normal, eg. spin sounds, user warning beeps.
3. Water on the floor due to incorrect loading or excessive suds.
4. Provide instruction on use of the product or change the set-up of the product, eg.
instruction on correct use of detergents and fabric softeners.
5. Blocked pumps, removal of foreign objects/substances from the machine, including the pump and inlet hose filters, eg. bra wires, bread tags, nails, grit, scrud etc.
6. Replace fuses in, or correct house wiring or correct house plumbing, eg. unblock drains.
7. Correct corrosion or discolouration due to chemical attack.
8. Correct damage caused by pests, eg. rats, cockroaches etc.
B Defects caused by factors other than:
1. Normal domestic use or
2. Use in accordance with the Product’s User Guide.
C Defects to the Product caused by accident, neglect, misuse or ‘Act of God’.
D The cost of repairs carried out by non-authorised repairers or the cost of correcting such
unauthorised repairs.
E
Normal recommended maintenance as set out in the Product’s User Guide.
Service under this manufacturer’s warranty must be provided by an Authorised Service Agent
(refer to the Customer care section for contact details). Such service shall be provided during
normal business hours. This warranty certificate should be shown when making any claim.
Note: This warranty is an extra benefit and does not affect your legal rights and applies only to
product purchased in New Zealand and Australia.
Please keep this User Guide in a safe place.
Do not return to Fisher & Paykel.
Customer care
37
First, check for the things you can do yourself.
Refer to your User Guide and check:
1 Your appliance is correctly installed.
2 You are familiar with its normal operation.
If after checking these points you still need assistance please refer to the following:
In New Zealand if you need assistance...*
Call your Fisher & Paykel retailer who is trained to provide information on your appliance, or if we
can be of any further help, please contact our Customer Care Centre,
Toll Free: 0800 FP CARE or 0800 37 2273 Fax: (09) 273 0656
Email: [email protected]
Postal address: P.O. Box 58732, Greenmount, Auckland
If you need service...*
Fisher & Paykel has a network of independent Fisher & Paykel Authorised Service Centres whose
fully trained technicians can carry out any service necessary on your appliance. Your dealer or
our Customer Care Centre can recommend an Authorised Service Centre in your area.
In Australia if you need assistance...*
Call the Fisher & Paykel Customer Care Centre and talk to one of our Customer Care Consultants.
Toll Free: 1300 650 590 Fax: (07) 3826 9298
Email: [email protected] Postal Address: PO Box 798, Cleveland QLD 4163
If you need service...*
Fisher & Paykel Australia Pty Ltd has a network of independent Fisher & Paykel Authorised
Service Centres whose fully trained technicians can carry out any service necessary on your
appliance. Our Customer Care Centre can recommend an Authorised Service Centre in your area.
*If you call or write, please provide: name, address, model number, serial number, date of
purchase and a description of the problem. This information is needed in order to better
respond to your request for assistance.
Product details can be found on the top left hand side of the console or back panel of the
washer cabinet.
Product details
Fisher & Paykel Appliances Ltd
Model/Serial No.
Date of Purchase Purchaser Dealer Suburb Town Country Copyright © Fisher & Paykel 2007. All rights reserved.
The product specifications in this booklet apply to
the specific products and models described at the
date of issue. Under our policy of continuous product
improvement, these specifications may change at any
time. You should therefore check with our Customer
Care Centre to ensure this booklet correctly describes
the product currently available.
www.fisherpaykel.com
NZ AU
AquaSmart™ clothes washer
Installation instructions and user guide
Published 07/2007
Part No. 421125B