1
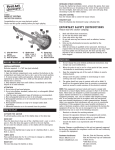
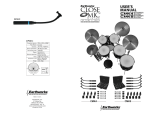
ASSEMBLY INSTRUCTIONS
FOR FIRST ACT MD700
SEVEN PIECE DRUM SET
HI-HAT
CLUTCH
DRUMSTICKS
CRASH
CYMBAL
10” TOM DRUM
12” SNARE
DRUM
TOM MOUNTING ARM
HI-HAT
CYMBALS
CRASH
CYMBAL
STAND
DRUM SEAT
HI-HAT
STAND
TENSION
ROD
SNARE
STAND
18” BASS DRUM
BASS DRUM
PEDAL WITH
FELT BEATER
© 2004 FIRST ACT INC. ALL RIGHTS RESERVED
13” FLOOR
TOM
MD700
7 PIECE DRUM SET
DRUMS
[A] 12” Snare Drum
[B] 10” Tom Drum
[C] 13” Floor Tom Drum
[D] 18” Bass Drum
CYMBALS
[E] 12” Hi-hat Cymbals (2)
[F] 14” Crash Cymbal
STANDS / HARDWARE / DRUM HEADS
[G] Snare Stand
[H] Hi-hat Stand
[I] Cymbal Stand
[J] Bass Drum Pedal w/ Felt Beater
[K] Tom Tom Mounting Arm w/ Memory Clamp
[L] Bass Drum Spurs (2)
[L.1] Retractable Rubber w/ Spiked Tip
[M] Floor Tom Legs (3)
[N] Bass Drum Tension Rods w/ Washers (12)
[O] Bass Drum Rim Claws (12)
[P] Bass Drum Hoops (2)
[Q] Long Tension Rods w/ Washers (10)
[R] Short Tension Rods w/ Washers (10)
[S] Drum Tuning Key
[T] 18” Ebony Resonant Front Drum Head
[U] 18” Clear Batter Side Back Drum Head
[V] 10”-5 hole, 13”-5-hole, Rims
[W] 10” Clear Drum Head (2)
[X] 13” Clear Drum Head (2)
ASSEMBLY INSTRUCTIONS
FOR FIRST ACT MD700
SEVEN PIECE DRUM SET
Thank you for purchasing the First Act MD700 seven piece drum set. By following these simple steps you’ll be set up and playing in no
time! Be sure to look over the Drum Contents page and identify the parts and hardware that you’ll be using to assemble the drum set.
You’ll need the drum tuning key to complete set up and tuning. After set up, use the Drum Tuning Diagrams and Instructions below on
how to tune your drums.
Assembly Instructions
Lay the 18” bass drum (D) flat on the floor with the side of the bass drum spur mounts and tom mounting bracket closest to the front
of drum facing up. Now insert the bass drum spurs (L) into the bass drum spur mounts. Spurs should extend out about four inches
from the bass drum. Just enough to raise the front of the bass drum slightly off the floor when in position. Note the spurs have a
retractable rubber tip that when turned expose the spurs spiked tip (L.1). Recommended to use this if drums are on a carpet to stop
bass drum from creeping. Use rubber tips only on floor surface or scratching of floor surface may occur.
Place the 18” ebony front side bass drum head (T) over the top of the 18” bass drum so it sits evenly on the drum. Be sure and line up
the First Act logo so it is aligned straight across the top of the drum face. Place the 18”metal hoop (P) on top so it rest on the head.
Thread the 6 bass drum tension rods with washers (N) through the 6 bass drum claws (O) and insert into the 6 lugs and finger tighten.
Turn the drum over and repeat same process to install 18” clear batter side head (U). This head is the playing side while the front ebony
head is the resonant side. The resonant side head is much thinner and not recommended for playing.
Place the 10” clear drumhead (W) over the top of the 10” tom (B) so it sits evenly on the drum. Place the 5-hole 10” metal rim (V) on
top so it rests on the drumhead. Line up the holes of the rim over the lug mounts and insert 5 tension rods with washers (R) through
the rim into the 5 lugs and finger tighten. Turn the drum over and repeat same process to install bottom head. Both heads are the same
thickness and weight.
Place the 13” clear drumhead (X) over the top of the 13” floor tom (C) so it sits evenly on the drum. Place the 5-hole 13” metal rim
(V) on top so it rests on the drumhead. Line up the holes of the rim over the lug mounts and insert 5 tension rods with washers (Q)
through the rim into the 5 lugs and finger tighten. Turn the drum over and repeat same process to install bottom head. Both heads are
the same thickness and weight.
Stand the bass drum upright and be sure that the bass drum spurs are secured and even. Attach the bass drum pedal (J) to the bottom
rim of the bass drum hoop. Tighten pedal clamp by the wing nut under the footboard so that it is firmly attached to the hoop. Insert
the felt bass drum beater and adjust so the beater strikes the middle of the bass drum head. Tighten with the drum key (S).
Insert the tom mount arm (K) into the tom holder mount on the bass drum and tighten. Stand behind the bass drum and place the 10”
tom on the tom arm. Height and angles may be adjusted and positioned at this time. Once you’ve got the drum position to your liking
simply tighten all wing nuts.
Insert the 3 floor tom legs (M) into the brackets on the 13” floor tom adjust height as necessary and tighten wing nuts. Stand the drum
on the floor to the right of the bass drum.
Insert the top snare basket into the tripod base of the snare drum stand (G). Extend the three arms of the basket to cradle the 12”
snare drum (A). Adjust height and angle accordingly. Place the stand with the snare drum to the left of the bass drum
Now that the drums are set up and positioned, lets’ set up the cymbal stands and cymbals!
Spread the legs at the base of the cymbal stand (I) and set evenly on the floor. Insert the top tube of the cymbal stand into the tripod
base. Adjust height as necessary and tighten. Spread tripod legs out evenly. The wider the legs are spread the more stable the stand
will be while playing.
Place the 14” crash cymbal (F) over the threaded top of the cymbal stand leaving one washer and one cymbal felt on the underside and
one cymbal felt and washer on top. Tighten wing nut leaving enough room for the cymbal to move during play.
Spread the legs at the base of the hi-hat stand (H) and set evenly on the floor. Insert the top tube of the hi-hat through the pull rod and
into the hi-hats tripod base and tighten main wing nut.
Place one 12” hi-hat cymbal (E) inverted to rest on the felt of the stand. Assemble the hi-hat clutch to the other 12” hi-hat cymbal by
making sure the cymbal is between the two felts on top and bottom of cymbal and tighten bottom nut. Place the top cymbal down over
the pull rod and tighten clutch wing nut leaving about 3/4” space between the two cymbals.
The seat or drum throne has a black seat cushion that is attached to the top of the seats tripod base. Tighten the wing nut. Extend the
tripods legs fully and adjust height that is comfortable for you by inserting the bolt with wing nut through one of the three height
settings. See next page for complete diagram instructions.
Once seated you can now fully adjust any angles and height of the drums, cymbals, and stands to your liking. Remember there is no
limit to your creativity, so feel free to experiment with your set up!
Drum Tuning Diagrams and Instructions
At this point you should have finger tightened the tension rods on all drum heads. Use the drum key (S) to tighten the tension rods and
fine-tune the drums. Use the order in the diagrams below. Apply an equal amount of tension to each lug. Turn each lug 1/4 turn until
pitch and tone of the drum begin to sound. The smaller drums can have a higher pitch and the bass drum would then have the lowest
pitch. Again, experiment to what sounds best for you.
1
1
6
3
4
5
4
3
2
5
Bass
2
Snare/ Tom Tom/ Floor Tom
Good luck and drum on!
First Act Inc.
P.O. Box 811
Needham, MA 02494 USA
Model #MD700
www.firstact.com
Made in China
[email protected]
CUSTOMER SERVICE 888-551-1115
© 2004 FIRST ACT INC. ALL RIGHTS RESERVED.