1
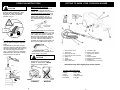
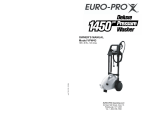
PRESSURE WASHER
OWNER'S MANUAL
Model VPW40
120V., 60 Hz., 12.5 Amps.
For information or assistance:
EURO-PRO Operating LLC
21 Lawrence Paquette Industrial Drive
Champlain, NY 12919
Tel.: 1-800-798-7398
www.euro-pro.com
Model VPW40
ONE (1) YEAR LIMITED WARRANTY
EURO-PRO Operating LLC warrants this product to be free from defects in
material and workmanship for a period of one (1) year from the date of the original
purchase, when utilized for normal household use, subject to the following
conditions, exclusions and exceptions.
If your appliance fails to operate properly while in use under normal household
conditions within the warranty period, return the complete appliance and
accessories, freight prepaid to EURO-PRO Operating LLC, 21 Lawrence
Paquette Industrial Drive, Champlain, NY 12919. If the appliance is found by
EURO-PRO Operating LLC to be defective in material or workmanship, EUROPRO Operating LLC will repair or replace it free of charge. Proof of purchase
date and $ 16.95 to cover the cost of return shipping and handling must be
included. *
Non-durable parts including, without limitation, hose, lance and electrical parts
which normally require replacement are specifically excluded from warranty.
The liability of EURO-PRO Operating LLC is limited solely to the cost of the
repair or replacement of the unit at our option. This warranty does not cover
normal wear of parts and does not apply to any unit that has been tampered with
or used for commercial purposes. This limited warranty does not cover damage
caused by misuse, abuse, negligent handling or damage due to faulty packaging
or mishandling in transit. This warranty does not cover damage or defects caused
by or resulting from damages from shipping or repairs, service or alterations to the
product or any of its parts, which have been performed by a repair person not
authorized by EURO-PRO Operating LLC.
This warranty is extended to the original purchaser of the unit and excludes all
other legal and/or conventional warranties. The responsibility of EURO-PRO
Operating LLC if any, is limited to the specific obligations expressly assumed by
it under the terms of the limited warranty. In no event is EURO-PRO Operating
LLC liable for incidental or consequential damages of any nature whatsoever.
Some states do not permit the exclusion or limitation of incidental or consequential
damages, so the above may not apply to you.
This warranty gives you specific legal rights, and you may also have other rights
which vary from state to state.
*Important: Carefully pack item to avoid damage in shipping. Be sure to
include proof of purchase date and to attach tag to item before packing with
your name, complete address and phone number with a note giving
purchase information, model number and what you believe is the problem
with item. We recommend you insure the package (as damage in shipping is
not covered by your warranty). Mark the outside of your package
“ATTENTION CUSTOMER SERVICE”. We are constantly striving to improve
our products, therefore the specifications contained herein are subject to
change without notice.
Printed in Italy
9
SAFETY & WARNING INSTRUCTIONS
TROUBLE SHOOTING
PROBLEM
POSSIBLE REASON
PRESSURE
WASHER WILL
NOT START WHEN
THE ON/OFF
SWITCH IS IN THE
"ON" POSITION
1.
PUMP DOESN'T
REACH
ADEQUATE
PRESSURE OR
CAVITATES
1.
2.
3.
2.
3.
4.
Electrical socket is faulty or
breaker has tripped.
Voltage is inadequate.
GFCI has tripped.
Power cord is not plugged in.
POSSIBLE SOLUTION
1.
2.
3.
4.
1.
PRESSURE
WASHER HAS OR
WILL NOT
MAINTAIN
PRESSURE
PRESSURE
WASHER MAKES
EXCESSIVE NOISE
MOTOR DOES
NOT RUN
CONTINUOUSLY
WHEN TRIGGER IS
SQUEEZED/
MOTOR BUZZES
WHEN TURNED
ON BUT DOES
NOT
START/MOTOR
STOPS RUNNING
WHILE UNIT IS IN
USE
4.
Water intake filter is clogged.
Pump is drawing air.
Diameter of garden hose is
too small.
Water supply is restricted.
2.
3.
4.
1.
1.
2.
1.
2.
Excessive air in waterline and
pump.
Water supply is restricted.
Air intake is blocked.
Water intake filter is dirty.
2.
1.
2.
Check plug, socket, fuses,
breaker.
Check that the voltage is
adequate.
Reset/Try another electrical
outlet.
Plug in power cord.
Remove and clean water
intake filter.
Tighten connections/bleed
system.
Replace with 3/4 inch
garden hose.
Check hose for kinks or
leaks, open tap fully.
Turn unit and water supply
off/Bleed system/Hold
trigger down. Allow water to
flow through the pump for
30 seconds.
Check hose for kinks or
leaks, open tap fully.
Clean the air intake vents.
Check & clean filter.
For safety reasons, it is recommended that you read this manual before
attempting to operate this appliance. Failure to follow these instructions can
result in personal injury or equipment problems. To help recognize note the
following symbols:
9. Keep operation area clear of all persons.
10. Do not overreach or stand on unstable
support. Keep good footing and balance
at all times.
11. Follow maintenance instructions
specified in this manual.
12. This product shall be connected to a
power supply receptacle protected by a
ground fault circuit interrupter (GFCI)
(electric power washers only).
13. If product is provided with a GFCI, be
sure to inspect the cord and GFCI prior
to use. Any repair or replacement of the
power cord must be performed by a
qualified (licensed or certified) electrical
technician.
DANGER
Danger indicates an imminently hazardous
situation, which, if not avoided, WILL result in
death or serious injury.
WARNING
Warning indicates a potentially hazardous
situation, which, if not avoided, COULD result in
death or serious injury.
CAUTION
WARNING
Caution indicates a potentially hazardous
situation, which, if not avoided, MAY result in
death or serious injury.
Risk of injection or severe injury. Keep clear
of nozzle. Do not discharge streams at
persons. This product is to be used only by
trained operators. Always remove lance
from gun before cleaning debris from tip.
• Keep clear of nozzle. NEVER direct high
pressure spray at any person, animal or
self.
• Always wear safety goggles or glasses
and protective clothing when operating,
performing maintenance or changing
accessories.
• Never put hands or fingers over the spray
tip while operating the unit.
• Never try to stop or deflect leaks with any
body part.
• Always engage the trigger safety latch in
the safe position when spraying is
stopped even if only for a few minutes.
• Always follow detergent manufacturer's
label recommendations for proper use of
detergents. Always protect eyes, skin and
respiratory system from detergent use.
NOTE: Information that requires special
attention.
Important Safety Instructions SAVE THESE
INSTRUCITONS
When using this product, basic precautions
should always be followed, including the
following:
DANGER
1.
Net voltage is lower than
suggested.
8
1.
Check that the voltage is
adequate.
1. Read all instructions before using the
product.
2. To reduce the risk of injury, close
supervision is necessary when this
product is used near children.
3. Always disconnect power (electric units)
before disassembling, repairing or
changing attachments on the unit.
4. Follow all safety codes as well as the
Occupational Safety and Health Act
(OSHA).
5. Ensure safety devices are operating
properly before each use. DO NOT
remove or modify any part of the gun or
unit.
6. Know how to stop this unit and relieve
pressure quickly. Be thoroughly familiar
with the controls.
7. Stay alert - Watch what you are doing.
8. Do not operate this unit when fatigued or
under the influence of alcohol or drugs.
Rev. 11/03
WARNING
1
SERVICING OF A DOUBLE-INSULATED
APPLIANCE.
In a double-insulated product, two systems
of insulation are provided instead of
grounding. No grounding means are
provided for a double-insulated product, nor
should grounding means be added to the
product. Servicing a double-insulated
product requires extreme care and
knowledge of the system and should be
done only by qualified service personnel.
Replacement parts for a double-insulated
product must be identical to the
original parts. A double-insulated
product is marked with the words
" double Insulation" or "Double
Insulated". Product may also be
marked with symbol shown.
SAFETY & WARNING INSTRUCTIONS
continued
• Always hold gun and lance firmly when
starting and operating the machine.
• NEVER allow the unit to run with the
trigger released (OFF) for more than one
minute. Resulting heat buildup will
damage pump.
• NEVER store the pressure washer outdoors
or where it could freeze. The pump will be
seriously damaged.
• Release trigger when changing from high to
low pressure modes. Failure to do so could
result to damage to the nozzle.
• This unit must always be used in the
horizontal position.
WARNING
Do not use pressure that exceeds the
operating pressure of any of the parts
(hoses, fittings, etc.) in the pressurized
system. Ensure that all equipment and
accessories are rated to withstand the
maximum working pressure of the unit.
WARNING
Explosion hazard.
• NEVER spray flammable liquids of use
pressure washer in areas containing
combustible dust, liquids or vapors.
• NEVER operate this machine in a closed
building or in or near an explosive
environment.
CAUTION
Keep hose away from sharp objects. Bursting
hose may cause injury. Examine hoses
regularly and replace if damaged. Do not
attempt to mend a damaged hose.
WARNING
EXTENSION CORDS
Do not spray electrical apparatus or wiring.
• NEVER disconnect the high pressure
discharge hose from the machine while
the system is pressurized. To
depressurize the machine, turn the power
and water supply off, then press the gun
trigger 2-3 times.
• NEVER permanently engage the trigger
mechanism on the gun.
• NEVER operate the machine without all
the components properly connected to
the unit (handle, gun/lance assembly,
nozzle, etc.).
DANGER
If using an extension cord, use only grounded,
three wire extension cords that are in good
condition. Use only extension cords that are
intended for outdoor use. These extension
cords are identified by a marking "Acceptable
for use with outdoor appliances; store indoors
while not in use." use only extension cords
having an electrical rating not less than the
product. Do not use damages extension
cords. Examine extension cord before using
and replace if damaged. Do not abuse
extension cord and do not pull on the cord to
disconnect. Keep cord away from heat and
sharp edges. Always disconnect from the
receptacle before disconnecting the product
from the extension cord.
Note: Do not use 16 or 18 AWG extension
cords on this product.
WARNING
Equipment damage.
• ALWAYS turn water supply "ON" before
turning the pressure washer "ON".
Running pump dry causes serious
damage.
• Do not operate the pressure washer with
the inlet water screen removed. Keep
screen clear of debris and sediment.
• NEVER operate pressure washer with
broken or missing parts. Check
equipment regularly and repair or replace
worn or damaged parts immediately.
• Use only the nozzle supplied with this
machine.
• Never leave the lance unattended while
the machine is running.
• Never attempt to alter factory settings.
Altering factory settings could damage the
unit and will void the warranty.
DANGER
Failure to follow these instructions can result
in serious injury, including death.
WARNING
OPERATING INSTRUCTIONS
Storing Your Pressure Washer
Ground Fault Circuit
Interrupter (GFCI)
When you have finished using your
pressure washer, follow these steps for
safe storage:
1. Turn the pressure washer to the
"Off" position.
2. Turn off the water supply.
3. Before disconnecting the high
pressure hose connection, point the
trigger gun in a safe direction away
from you and discharge the high
pressure water. Disconnect the high
pressure hose from the pressure
washer.
4. Disconnect garden hose from
pressure washer.
5. Remove excess water from the
pump by tipping the unit on both
sides to drain any remaining water
from the water intake and outlet
fittings.
6. Drain detergent applicator bottle and
flush with clean water.
7. Wipe away any remaining water on
all parts and fittings.
8. Engage the trigger gun safety lock.
9. Store the unit and accessories in a
room above 32°F.
This unit is equipped with a Ground
Fault Circuit Interrupter (GFCI) built into
the plug. This device provides additional
protection from the risk of electrical
shock. When connecting the GFCI to the
electrical outlet, the indicator should
appear red. If the indicator is not red,
depress the RESET button on the GFCI
until the indicator appears red.
Cleaning Tips
Wood Decks: Rinse deck and
surrounding area with fresh water. If
using detergent, fill the detergent
applicator bottle and apply to the area
being cleaned. For optimal results,
reduce your work area to small sections
and clean each section one at a time.
Allow the detergent to rest on the surface
for a few minutes and then rinse at high
pressure. Do not let the detergent dry on
the deck. Always clean from left to right
and top to bottom for best results. Rinse
at high pressure using the lance keeping
the tip of the spray nozzle 8-12 inches
from the surface. Caution: For soft
woods, increase the distance from the
cleaning surface.
Winterizing & Long Term Storage
1. Disconnect all water connections.
2. Turn the pressure washer on for a
few seconds, until any remaining
water in the pump exits.
3. Turn the unit off immediately.
4. Store the pressure washer, parts
and accessories in an area with a
temperature above 32°F.
Cars, Boats, & Motorcycles: Wet down
area to be cleaned before applying
detergent with clean water. Fill the
detergent applicator bottle and apply to
the area being cleaned. To achieve best
results, clean one side at a time. Allow
the detergent to rest on the surface for a
few minutes but do not let it dry. Rinse at
high pressure using the fan jet in a
sweeping motion keeping the tip of the
spray nozzle at least 8-10 inches away
from the surface. Maintain a further
distance when using a direct spray. Wipe
surface for a polished finish.
Motor Thermostat
Important: This pressure washer is
equipped with a motor thermostat. The
motor will stop if it is overheating. Wait
10-20 minutes before starting the unit
again. If it stops again, please call
customer service at 1-800-798-7398.
To reduce the risk of electrocution, keep all
connections dry and off the ground. Do not
touch the plug with wet hands.
Extension Cord
2
Allowable Length
25'
50'
14 AWG
YES
NO
12 AWG
YES
YES
7
OPERATING
OPERATINGINSTRUCTIONS
INSTRUCTIONS
GETTING TO KNOW YOUR PRESSURE WASHER
Maintenance & Cleaning
CAUTION
Lubrication: The pressure washer is
supplied with a closed lubrication
system, so no addition of oil is needed.
Checking the Water Intake Filter: The
water intake filter is located inside the
water intake connector. (Fig. 9).
Remove periodically and inspect for
any deposits that might accumulate
there.
When you wish to stop using the
pressure washer temporarily, make
sure that the safety lock has been
engaged to avoid any accidental
operation. (Fig. 6)
Hose Connector
Water Intake
Fig. 9
Safety
Lock
Cleaning the Nozzles: If you notice that
the output pressure fluctuates, you may
have to clean the nozzles. Turn the unit
"Off". Unplug from electric outlet and
disconnect the water supply. Remove
the lance and hose with the trigger gun
from unit. Take the small metal pin
provided and insert into the nozzle end
to remove any obstructions. (Fig. 10)
Fig. 6
Using the High Pressure lance
The high pressure lance may be used
alone or with the detergent applicator
bottle.
Add detergent to the bottle and then
attach the detergent applicator bottle to
the high pressure lance, just push it on
the end of the high pressure lance.
(Fig. 7 & 8) To remove the detergent
applicator bottle, lift the tab on the top
of the connector and pull off.
Fig. 10
This will occur more frequently if your
water supply is very hard.
CAUTION
When using your pressure washer,
always have it in the horizontal
position as shown below. NEVER
have it in the upright position.
Fig. 7
1.
2.
3.
4.
5.
6.
7.
8.
High Pressure Lance
Trigger Gun
High Pressure Hose
High Pressure Hose Connector
Safety Lock
Trigger
On/Off Switch
Water Intake Valve
9. Inlet Water Filter
10. Garden Hose Coupling
11. High Pressure Output
12. Handle
13. Pressure Washer
14. Detergent Applicator Bottle
15. Wheels (x2)
16. Handle Screw (x1 not shown)
Illustrations may differ slightly from actual product.
Technical Specifications
Voltage:
Power:
Pressure:
Flow Rate:
CORRECT
120V., 60Hz.
12.5 Amps.
1300 psi. (max)
1.45 gpm
WRONG
Fig. 8
6
3
OPERATING INSTRUCTIONS
Suitable Use of Your Pressure
Washer
Correct Use of the Pressure
Washer
This high pressure washer is suitable for
non-professional use. The working
temperature must range between 40°F
and 120 °F. The machine is supplied with
a trigger gun, equipped with a trigger
handle to offer a comfortable working
position.
The high pressure washer is suitable for
washing with cold water only. The water
that you use for the pressure washer
must not be dirty, sandy or contain any
corrosive chemical products.
The pressure washer may be used to
wash shutters, doors, tiles, cars, decks,
campers, etc., where high water pressure
is necessary to remove dirt.
With the detergent applicator bottle, the
pressure washer can be used to apply a
thick coating of aerated detergent to the
areas being cleaned .
When using the pressure washer we
recommend the use of personal safety
items to reduce the risk of accidental
injury.
• Place the pressure washer in a safe
area and on a horizontal surface.
• When using the pressure washer,
hold the trigger gun firmly with one
hand on the handle and the other on
the lance. (Fig. 1)
OPERATING INSTRUCTIONS
attributable to air bubbles in the water
or other similar phenomena which do
not imply the existence of any defects
in the machine. Do NOT leave the
appliance unattended during the
standby for more than 5 minutes.
Contrarily, for the safety of the
appliance it is necessary to re-turn the
On/Off switch to the “Off” position.
Please check that the coupling of the
high pressure hose with the appliance
and the trigger gun supplied as
standard equipment is made correctly,
that is to say without any water leak.
Garden Hose Connection
Once the high pressure hose is
attached to the pressure washer, you
can connect the garden hose to the
unit. Before attaching the garden hose
coupling to the unit, make sure that the
water intake filter is inside the water
intake connector on the unit.
1. Attach the male adapter (supplied) to
the water intake connector on the left
hand side of the unit. (Fig. 5)
2. Attach the female hose coupling to
the garden hose. (Fig. 5)
3. Connect the female hose coupling to
the male adapter making sure that it
is tightly secured in place. (Fig. 5)
Attaching High Pressure Hose to
Pressure Washer
Fig. 1
• NEVER point the water jet at electric
wiring, at the pump unit, or at any
person or animal.
Assembling the Pressure Washer
1. Carefully take the pressure washer
and all accessories out of the
packaging.
2. Snap wheels onto the unit. (Fig. 2)
3. Attach the handle to the unit with the
screw supplied using a Phillips
screwdriver. (Fig. 2)
Once the pressure washer is
assembled, you are ready to use the
unit.
1. While facing the front side of the unit
attach the high pressure hose to the
high pressure output connector on
the right side of the unit. Twist on
tight to avoid leakage. (Fig. 3)
Fig. 5
4. After all the connections have been
made and BEFORE you plug the
pressure washer into an electrical
outlet, open the water supply and
press on the trigger switch in order to
remove any air which may be in the
hose or pump. Continue to press on
the trigger switch until you get a
constant flow of water coming out of
the trigger gun. Allow water to flow
for 30 seconds.
5. Once this is accomplished, stop
pressing the trigger switch. Engage
the safety lock on the trigger
6. Ensure that the "On/Off" switch, at
the rear of the unit, is on the "Off"
position, then plug the unit into an
electrical outlet and turn the unit to
the "On" position.
7. Now you are ready to use the
pressure washer. Disengage the
safety lock and depress the trigger on
the trigger gun.
Fig. 3
Fig. 2
3. Once the high pressure hose is
connected to the unit, you can
attach the lance to the end of the
trigger gun. (Fig. 4)
AUTOMATIC STOP SYSTEM
Unpacking Your Pressure Washer
PLEASE NOTE: This pressure
washer is equipped with the
Automatic Stop System, which stops
the unit during the bypass stage. To
start the pressure washer, it is
therefore necessary to set the On/Off
switch to the “On” position; after that
press the trigger: the Automatic Stop
System will start the machine and will
stop it automatically when the trigger
is released. It is advisable to put on
the safety lock of the trigger
whenever the machine is stopped in
order to avoid unintentional starting.
Any automatic start of the machine
without pressing the trigger is
After you open the package, check to
make sure that all the parts are in the box
as per parts that illustrated on page 3 of
this guide. Due to transport and packing
restraints, some accessories may be
supplied unassembled; in this case follow
the assembly instructions in this manual.
If you have any questions, call Customer
Service at 1-800-798-7398. Keep all
small and potentially harmful parts of the
package (plastic bags, foamed
polystyrene, nails, etc.) out of the reach
of children.
4
Fig. 4
To attach the lance to the trigger gun,
hold the trigger gun in your left hand
insert the lance and push it in all the
way into the connector on the trigger
gun and turn it clockwise 60° until it
locks in place. To remove the lance,
push down on the attachment and
turn counter-clockwise 60° and then
pull out. Make sure that the lance is
securely locked in place before use.
5