1
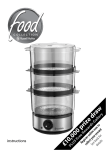
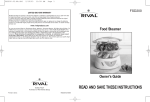
THREE-TIER FOOD STEAMER
OWNER'S MANUAL
Model KS315
120V., 60Hz., 1000 W.
EURO-PRO Operating LLC
Boston, MA 02465
Tel.: 1 (800) 798-7398
www.euro-pro.com
IMPORTANT SAFETY INSTRUCTIONS
When using your EURO-PRO Three-Tier Food Steamer, basic safety
precautions should always be observed, including the following:
1. Read all instructions before using your
Food Steamer.
2. To protect against electrical shock, do
not submerge the base of the food
steamer or allow the power cord to
come into contact with water or any
other liquid.
3. Close supervision is necessary when
any appliance is used by or near
children. Never leave an appliance
unattended when in use.
4. Always remove the power cord from the
electrical outlet when not in use, before
assembling or disassembling parts and
before cleaning. To unplug, grasp the
plug and pull from the electrical outlet.
Never pull from the power cord
5. Always allow the appliance to cool
before taking off parts and before
cleaning.
6. Do not operate the appliance with a
damaged power cord or plug. Do not
use appliance if it has been dropped,
damaged, left outdoors or dropped in
water. Return appliance to EURO-PRO
for examination, repair or adjustment.
7. Do not use outdoors.
8. Do not let the power cord hang over
the edge of table or counter or touch
hot surfaces such as the stove.
9. Do not operate this appliance on or
near any hot surfaces (such as gas or
electric burner or in a heated oven).
10. The use of attachments or accessories
not recommended by the
manufacturer may result in fire,
electric shock or personal injury.
11. Extreme caution must be used when
moving an appliance containing hot
food, water or other hot liquids.
12 Do not overfill.
13. Use extreme caution when lifting or
opening the steamer lid to avoid
scalding and allow water to drip into
steamer.
14. Do not place the appliance directly
under cabinets when operating as this
appliance produces large amounts of
steam.
15. Do not steam food in the water
reservoir.
16. It is normal for some water to remain
in the water reservoir after the steamer
has shut off.
17. Do not abuse the power cord. Never
carry the appliance by the power cord
or yank it to disconnect from electrical
outlet; instead grasp the plug and pull
to disconnect.
18. Do not use this appliance for other
than its intended use.
19. THIS PRODUCT IS INTENDED FOR
HOUSEHOLD USE ONLY.
This unit has a short power supply cord to
Reduce the risk resulting from becoming
entangled in or tripping over a long cord. An
extension cord may be used if you are
careful in its use:
1. The electrical rating of the extension
cord should be at least as great as the
electrical rating of the appliance.
2. An extension cord with the power cord
must be arranged so that it will not drape
over the countertop or tabletop where
they can be pulled on by children or
tripped over accidentally.
SAFETY PRECAUTIONS
WARNING:
•
•
•
•
•
To prevent injuries always follow basic safety precautions when
using the food steamer.
•
To prevent burns form escaping hot
steam, always use oven mitts or
potholders when removing the
steamer lid or steaming baskets
from the appliance.
Always remove the steamer lid
slowly with the inside of the steamer
lid facing away from you and let the
steam escape gradually. Hold the
steamer lid over the appliance to
allow the condensation to drain into
the steamer.
Do not reach into the appliance
when the appliance is steaming. To
check the cooking progress or to stir
ingredients, use a long wooden or
plastic utensil.
Do not use metal utensils, as they
may scratch or damage surfaces.
Use ONLY plastic or wooden
utensils.
Do not touch hot surfaces with bare
hands.
•
•
•
•
•
SAVE THESE INSTRUCTIONS
For Household Use Only
WARNING: To reduce the risk of electric shock, this appliance has a polarized plug
(one blade is wider than the other). This plug will fit in a polarized outlet only one way.
If the plug does not fit fully in the outlet, reverse the plug. If it still does not fit, contact a
qualified electrician to install the proper outlet. Do not modify the plug in any way.
1
Rev. 08/04A
2
A small amount of water will remain
in the water reservoir after the
steamer has stopped; this is normal
and helps extend the life of the
appliance. NEVER run the
appliance without first adding water
into the water reservoir.
Do not use any liquid other than
water in the water reservoir .
Do not add any seasonings, herbs,
spices or anything else into the
steaming liquid.
Use this appliance only on a heatresistant surface such as tile,
formica or any other surface
protected with a heat-resistant finish.
Fill the water reservoir with water
before plugging the appliance in an
electrical outlet otherwise the
appliance may be damaged.
Do not place any parts in a
microwave.
OPERATING INSTRUCTIONS
GETTING TO KNOW YOUR THREE-TIER FOOD STEAMER
Warning: The steamer base should
never be immersed in water.
Caution: Make sure that the steamer
base is unplugged from power source
before attaching or removing any
accessory.
Important: Do NOT operate the appliance
with the water reservoir empty as it could
damage the appliance.
Before Using the Food Steamer
• Remove the appliance from its packaging
and unpack all the accessories.
• Wash the steamer lid, rice bowl, steaming
baskets and the drip pan with warm,
soapy water. You can wash these parts is
a dishwasher but ONLY on the top rack.
Rinse and dry well. all parts should be dry
before mounting on the steamer base.
• Wipe the steamer base with a damp cloth.
Do NOT immerse in water.
Assembling the Food Steamer
• Place the steamer base on a flat, stable
heat resistant surface, away from any
objects or cabinets that could be
damaged by steam. Do not place on a
dining room table or table cloth as the
heat might damage the surface.
• Pour 6 cups (1.5 L.) of cold water into the
water reservoir. Do NOT overfill. (Fig. 1)
• Place the drip pan on the steamer base
and ensure that it is level. (Fig. 2)
1.
2.
3.
4.
5.
6.
7. 60-Minute Timer
8. Power "On" Light
9. Water Level Indicator
10. Water Reservoir
11. Easy Fill Spout
Steamer Lid
Rice Bowl
Steaming Baskets (x3)
Stacking Rings (x2)
Drip Pan
Steamer Base
Using the Food Steamer
Your food steamer comes equipped with
three steamer baskets. You may use just
one at a time or all three together.
• The steamer baskets can be assembled
in any order on the steamer base.
• After filling the water reservoir with water
and placing the drip pan on the steamer
base, place the first steamer basket on
the drip pan. Place the food that you wish
to be steamed in the steamer basket. We
recommend that you place the largest
pieces of food that take the longest to
cook on the lower basket. Also, the food
will steam more evenly if there is only one
layer of food.
• If you wish to use more than one steamer
basket, attach one of the stacking rings
on the bottom of the second steamer
basket making sure that it snaps in place.
• If you wish to use the third steaming
basket also, attach the second stacking
ring on the bottom of the third steaming
basket on place over the second steaming
basket.
• If you do not wish to use more than one
steaming basket, place the steamer lid on
the steaming basket.
• Plug the appliance into an electrical outlet.
• Turn the timer to the desired cooking time.
The maximum cooking time on the timer
is 60 minutes. The unit will start steaming
after approximately 6 minutes.
Condensation during steaming is normal.
• The Power ON Light will come when the
timer is set.
• When the cooking time is up, the timer
will ring and the light will go off.
• Use ONLY steaming accessories supplied
with this unit.
Using the Rice Bowl
Fig. 1
•
Technical Specifications
•
Voltage:
Power:
•
120V., 60Hz.
1000 Watts
•
Caution: Always lift steamer lid away
from you to prevent scalding. Always
use oven mitts or potholders when
removing the steamer lid or steaming
baskets from the appliance.
Fig. 2
Illustrations may differ from actual product.
3
Place one of the steamer baskets on
the steamer base.
Place 1 cup (250 ml) of rice and 10 oz
(300 ml) of water in the rice bowl.
Place the rice bowl on the steamer
basket and cover the steamer.
Set timer for approximately 32 minutes,
depending on your taste.
Caution: Never put any seasonings or
liquids other than water into the water
reservoir.
4
OPERATING INSTRUCTIONS
Using the Food Steamer (cont.)
Cleaning Your Food Steamer (cont.)
Important: If steaming food for a long
period of time, check the that there is
water in the water reservoir though the
water level indicator. If the water level is
low, add water through the easy fill
spout in the rear of the appliance.
•
•
Warning: To prevent scalds or burns,
use oven mitts or potholders when
removing the lid or the steaming
baskets as hot steam will escape.
Remove the lid slowly with the inside
of the lid pointing away from you and
let the steam escape slowly. Hold the
lid over the appliance to allow the
condensation to drain into the
steamer.
Do not reach into the food steamer
while the appliance is still steaming. If
you need to check on the cooking
progress or to stir, use a wooden or
plastic utensil with a long handle.
• To avoid food from becoming
overcooked, remove the steaming
basket immediately using pot holders
or oven mitts and place on a plate. If
you used the rice bowl, remove this
carefully holding it by the sides or if
necessary, use a kitchen utensil with
long handles.
• After you have finished using the
appliance, unplug it from the electrical
outlet and allow it to cool completely
before cleaning.
Warning: Be careful when removing the
drip pan because it will have hot water in
it.
•
•
Descaling the Water Reservoir
After using the appliance several times in
hard water areas, scale deposits may build
up on the heating element and the inside
surface of the water reservoir. This is a
normal occurrence and the degree of
buildup will depend on the hardness of the
water in your area. It is essential that the
food steamer is descaled regularly to
maintain good steam production and to
prolong the life of the appliance.
• Fill the water reservoir with 6.5 oz
(200 ml) vinegar to 27.5 oz. (800 ml)
water. Do not use other chemical or
descaling products. Do not overfill the
water reservoir.
• Do not place the drip pan or any other
accessory on top of the steamer base
during this procedure.
• Let the unit stand with the vinegar and
water solution overnight. Then empty.
• Rinse several times with cold water
and dry thoroughly before storing.
Cleaning Your Food Steamer
•
•
•
•
•
These parts may also be washed on
the top rack of the dishwasher in a
light cycle. Please note though that
continual use of a dishwasher may
result in a slight loss of exterior gloss
and dulling of the steaming baskets.
Empty and clean the water reservoir
after each use.
Do not immerse the steamer base in
water. Fill the water reservoir with
warm, soapy water and wipe with a
cloth. Rinse thoroughly.
Wipe the steamer base with a damp
cloth.
Storing Your Food Steamer
NEVER IMMERSE THE STEAMER
BASE, POWER CORD OR PLUG IN
WATER OR ANY OTHER LIQUID.
Unplug appliance from electrical
outlet and let cool completely before
cleaning.
Do not use abrasive cleansers when
cleaning this appliance.
Do not clean the steamer baskets rice
bowl or steamer lid with the abrasive
side of a sponge or pad.
Wash all parts except the steamer
base in warm liquid with a
dishwashing liquid. Rinse and dry
thoroughly.
Before storing your food steamer, allow
the unit to cool completely and clean the
water reservoir and steaming baskets. All
parts must be thoroughly dry before
storing. Store the food steamer in a dry
location with the electrical cord wound
into a coil and secured with a twist tie.
5
OPERATING INSTRUCTIONS
Useful Hints & Tips
Adding More Water During Cooking
• You can reduce cooking times by
filling the water reservoir with warm
water.
• Do not pack the steaming baskets too
tightly with food. Leave some space
for the steam to circulate as much as
possible.
• The time required to steam may vary
depending on the size of the pieces of
food, the space left between items, the
quality of the food used and individual
tastes. For best results, use pieces of
food of approximately the same size. If
the pieces are of different sizes, layer
the pieces putting the smallest pieces
on top.
• If you are steaming large quantities of
food, remove the steamer lid halfway
through the steaming process, stir the
food and then replace the steamer lid.
• You can use the water collected in the
drip pan to make soups, sauces, etc.
• Do not add salt or any other
seasonings to the food until after the
steaming process is completed.
Seasoning the food before steaming
may cause damage to the appliance.
• Never steam frozen meat, poultry or
seafood. Always allow to thaw first.
• The rice bowl is ideal for steaming
other foods such as fruit, puddings,
quick breads, etc.
Using Two or More Steaming Baskets
• Always place the largest pieces or
food that takes longer to cook on the
lowest steaming basket.
• You may place different foods in the
steamer baskets, but as condensation
will drip from the upper steaming
basket to the lower ones, be sure that
the flavors complement each other.
• If steaming meat or poultry, always
place these in the lower steaming
basket so that the juices from the
meat or seafood does not drip onto
other foods.
•
•
•
•
For recipes with long cooking times,
set the timer and add more water as
needed through the filling spout in the
rear of the unit. See illustration below.
When refilling, always turn the timer to
the OFF position and unplug the
appliance first.
Add sufficient warm water, making sure
that you do not overfill past the MAX
level on the water level indicator.
Turn the timer back on to the desired
amount of time and continue steaming
your food.
Thermostat
This appliance is equipped with a
protective thermostat. If the water
reservoir runs out of water during
steaming, the appliance will automatically
turn OFF. To turn the unit back on, unplug
from electrical outlet. Refill the water
reservoir with cold water and let the unit
cool down for approximately 8-10 minutes.
Once the unit is cool, re-plug in the
appliance and set the timer to the desired
amount of cooking time.
6
STEAMING CHARTS
STEAMING CHARTS
Note: All of the cooking times listed below in the steaming chart are ONLY suggestions.
The time required to steam various foods may vary depending on the size of the
pieces of food, the space left between items, the quality of the food used and
individual tastes. Watch food to avoid overcooking.
Note: All of the cooking times listed below in the steaming chart are ONLY suggestions.
The time required to steam various foods may vary depending on the size of the
pieces of food, the space left between items, the quality of the food used and
individual tastes. Watch food to avoid overcooking.
Cook rice and required quantity of liquid together in the rice bowl.
Fish is done when it is opaque and flakes easily with a fork.
VEGETABLE STEAMING CHART
FOOD
Artichokes, Whole
Asparagus
STEAMING
TIMES
(minutes)
QTY
4 med
1 lb.
RICE STEAMING CHART
NOTES
40-45
Cut off base
13-15
Lie flat in
steaming basket
30-35
Stir halfway
through cooking
time
35
Stir halfway
through cooking
time
Rice
QTY
Liquid
STEAMING
TIMES
(minutes)
Parboiled Long
Grain Rice
1 cup
1 1/4 cups
water
30 min.
NOTES
Stir halfway
through cooking
time
spinach
Baby Sweet Corn
Beans
Green/Yellow
8 oz.
1 lb.
Broccoli, pieces
1 lb.
10-12
Use only the
florets
Brussel Sprouts
1 lb.
25-30
Stir halfway
through cooking
time
Carrots
Cauliflower, pieces
1 lb.
12-15
1 lb.
FISH & SEAFOOD STEAMING CHART
FOOD
QTY
STEAMING
TIMES
(minutes)
NOTES
Fish, fillets
1/2 lb.
9-13
Fish is cooked
when it is opaque
and flakes easily
with a fork.
20-22
Lobster meat will
be opaque when
done. Cook
longer if
necessary.
10-12
Stir halfway
through cooking
time. Meat will be
opaque and flaky
when done.
10-15
Shrimp will be
opaque when
done. Cook
longer if
necessary.
15-18
Fish is cooked
when it is opaque
and flakes easily
with a fork.
Lobster Tails
2 tails
Stir halfway
through cooking
time
10-14
Stir halfway
through cooking
time
Corn on the Cob
2-3 ears
20-25
Turn each ear
over halfway
through cooking
time
Potatoes
Small or cut in
pieces
1 lb.
13-15
Turn halfway
through cooking
time
Spinach
1/2 lb.
6-8
Squash, pieces
1 lb.
10-13
Stir halfway
through cooking
time
Zucchini, pieces
1 lb.
10-13
Stir halfway
through cooking
time
Scallops
Shrimp
Salmon Steak
1/2 lb.
1/2 lb
1/2 - 1 lb
spinach
spinach
7
8
Model KS315
ONE (1) YEAR LIMITED WARRANTY
EURO-PRO Operating LLC warrants this product to be free from defects in material and
workmanship for a period of one (1) year from the date of purchase when utilized for normal
household use.
If your appliance fails to operate properly while in use under normal household conditions within the
warranty period, return the complete appliance and accessories, freight prepaid Fot customer
service, call 1 (800) 798-7398 or visit our website www.euro-pro.com. If the appliance is found by
EURO-PRO Operating LLC to be defective in material or workmanship, EURO-PRO Operating LLC
will repair or replace it free of charge. Proof of purchase date and $12.95 to cover shipping and
handling must be included.*
The liability of EURO-PRO Operating LLC is limited solely to the cost of the repair or replacement of
the unit at our option. This warranty does not cover normal wear of parts and does not apply to any
unit that has been tampered with or used for commercial purposes. This limited warranty does not
cover damage caused by misuse, abuse, negligent handling or damage due to faulty packaging or
mishandling in transit.
This warranty is extended to the original purchaser of the unit and excludes all other legal and/or
conventional warranties. The responsibility of EURO-PRO Operating LLC if any, is limited to the
specific obligations expressly assumed by it under the terms of the limited warranty. In no event is
EURO-PRO Operating LLC liable for incidental or consequential damages of any nature
whatsoever. Some states do not permit the exclusion or limitation of incidental or consequential
damages, so the above may not apply to you.
This warranty gives you specific legal rights, and you may also have other rights which vary from
state to state.
*Important: Carefully pack item to avoid damage in shipping. Be sure to include proof of
purchase date and to attach tag to item before packing with your name, complete address
and phone number with a note giving purchase information, model number and what you
believe is the problem with item. We recommend you insure the package (as damage in
shipping is not covered by your warranty). Mark the outside of your package “ATTENTION
CUSTOMER SERVICE”. We are constant;y striving to improve our products, therefore the
specifications contained herein are subject to change without notice.
OWNERSHIP REGISTRATION CARD
Please fill out and mail the product registration card within ten (10) days of purchase. The
registration will enable us to contact you in the unlikely event of a product safety notification. By
returning this card you acknowledge to have read and understood the instructions for use, and
warnings set forth in the accompanying instructions.
RETURN TO EURO-PRO Operating LLC, Boston, MA 02465
Model KS315
_______________________________________________________________________
Appliance model
_______________________________________________________________________
Date purchased
Name of store
_______________________________________________________________________
Owner’s name
_______________________________________________________________________
Address
Printed in China
City
State
Zip code