1
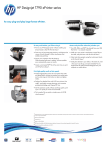
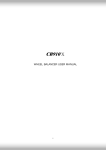
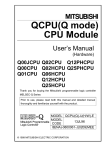
®
Auto Take-up
Reel Unit User’s Guide
English . . . . . .
XXXXXXX-XX
XXX-00
All rights reserved. No part of this publication may be reproduced, stored in a retrieval system, or transmitted
in any form or by any means, electronic, mechanical, photocopying, recording, or otherwise, without the prior
written permission of SEIKO EPSON CORPORATION. The information contained herein is designed only
for use with this EPSON product. EPSON is not responsible for any use of this information as applied to other
products.
Neither SEIKO EPSON CORPORATION nor its affiliates shall be liable to the purchaser of this product or
third parties for damages, losses, costs, or expenses incurred by purchaser or third parties as a result of:
accident, misuse, or abuse of this purduct or unauthorized modifications, repairs, or alterations to this
product, or (excluding the U.S.) failure to strictly comply with SEIKO EPSON CORPORATION’s operating
and maintenance instructions.
SEIKO EPSON CORPORATION shall not be liable against any damages or problems arising from the use of
any options or any consumable products other than those designated as Original EPSON Products or EPSON
Approved Products by SEIKO EPSON CORPORATION.
General Notice: Other product names used herein are for identification purposes only and may be trademarks
of their respective owners. EPSON disclaims any and all rights in those marks.
Copyright © 2001 by SEIKO EPSON CORPORATION, Nagano, Japan.
For European Users
This product conforms to CE marking requirements in accordance with EC Directive 89/336/EEC.
Dieses Produkt entspricht den ßedingungen zur CE-Kennzeichnung in Übereinstimmung mit der EGRichtlinie 89/336/EWG.
Ce produit est estampillé CE et conforme aux directives européennes 89/336/EEC.
Este producto cumple los requisitos de señalización de la CE, según lo dispuesto en las directivas 89/336/EEC
de la CE.
Il prodotto è conforme ai requisiti CE ed alle direttive EC 89/336/EEC.
Este produto está em conformidade com os requisitos de etiquetagem CE nos termos da Directiva
89/336/EEC.
English
Safety Instructions
For United Kingdom users
Use of options
Important safety instructions
Read all of these instructions and save them for
later reference. Follow all warnings and
instructions marked on the unit.
❏ Do not place the unit near a radiator or heat
source.
❏ Unplug the printer before cleaning. Clean
with a damp cloth only. Do not spill liquid on
the unit.
❏ Except as specifically explained in this guide,
do not attempt to service the unit yourself.
❏ Unplug the unit and refer servicing to
qualified service personnel under the
following conditions:
Epson (UK) Limited shall not be liable against any
damages or problems arising from the use of any
options or consumable products other than those
designated as Original EPSON products or
EPSON Approved products by Epson (UK)
Limited.
Warnings, cautions, and notes
w
c
Warnings must be followed carefully to avoid
bodily injury.
Cautions must be observed to avoid damage to
your equipment.
Notes contain important information and useful tips
on the operation of the product.
if liquid has entered the unit;
if the unit has been dropped or the cabinet
damaged;
if the unit does not operate normally or
exhibits a distinct change in performance.
Note:
Adjust only those controls that are covered by the
operating instructions.
A few precautions
❏ Always turn the printer off before changing
the roll paper. Accidental operation of the
take-up motor can cause injury.
❏ Make sure that the take-up reel unit is securely
locked into place. Incorrect installation can
cause the roll to fall and cause injury.
❏ Do not touch the auto take-up reel unit while
it is operating. Hair or clothing can become
caught in the unit and cause injury.
❏ Do not look directly at the sensor beam. Doing
so may cause permanent eye damage.
1
Checking the Package Contents
Make sure that all the items shown below are
included and not damaged. Remove all protective
materials packed with this unit before you set it
up and turn on the power. Save all packaging and
protective materials in case you need to transport
the printer later.
Drive unit (with control box)
Movable unit
Installing the Auto Take-Up Reel
Unit
c
Caution:
Use only the provided screws when installing
the auto take-up reel unit. Use of non-issue
screws can leave components insecurely
fastened, increasing the risk of injury and
printer damage.
Before starting:
❏ Make sure that the printer is turned off.
❏ Remove the paper basket or push the front
part of the paper basket to the rear to keep it
out of the way.
Take-up reel core (3 inch)
Sensor unit
Screws (Large 2, small 4)
Cable clamps
Drafting tape
Movable unit stopper
Cable connector
2
Installing the drive unit
Installing the movable unit
1. Attach the drive unit on the horizontal strut as
shown below.
1. Turn the lock lever to the left to release it.
2. Tighten the two screws to attach the drive unit
to the printer securely.
2. While holding the movable unit, attach the
movable unit stopper on the bottom of the
movable unit. Snap the two protrusions of the
stopper into the movable unit, so the stopper
does not fall off.
3. Plug the cable connector into the connector on
top of the control box of the drive unit, then
tighten the screws on both sides of the connector.
3. Tighten the two screws to attach the movable
unit to the horizontal strut.
4. Plug the other end of the cable connector into
the connector on the back of the printer as
shown below, then tighten the screws on both
sides of the connector.
3
Installing the sensor unit
The sensor components are shown below.
Light detector
Connector
Light emitter
1. Set the sensor unit’s light emitter in the bottom
of the drive unit, and then secure it with a
screw.
2. Set the sensor unit’s light detector in the base
unit’s bottom left side, and then secure it with
a screw.
4
3. Plug the connector of the sensor unit cable into
the socket located at the top rear of the control
box on the drive unit.
4. Fasten the cable using the cable clamps
provided. Use as many of the clamps as
necessary to secure the cable.You may need to
do this from the back of the printer.
Installing the 3-inch take-up reel
core
4. Turn the lock lever to the front to lock the
movable unit.
Note:
If you want to install a 2-inch take-up reel core instead,
see the next section for instructions. Also you can reuse the core from a used paper roll. See your Online
Guide.
1. Make sure that the lock lever is released
(turned to the left). Slide the movable unit to
the left end of the horizontal strut.
The installation of the 3-inch auto take-up reel
unit is complete.
Installing a 2-inch take-up reel core
If you want to use the 2-inch take-up reel core, you
need to reverse the flanges on the drive unit and
movable unit first. Follow the steps below.
2. Slip one end of the take-up reel core over the
flanged knob on the drive unit.
1. Make sure that your printer is turned off.
2. Remove the cap and fastener from the drive
unit.
3. Insert the flanged knob on the movable unit
into the other end of the take-up reel core.
5
3. Remove the flange.
6. Remove the fastener from the movable unit.
Next, remove the flange.
4. Reverse the flange so that the smaller knob is
positioned on the outside, then replace it on
the drive unit.
7. Reverse the flange so that the smaller knob is
positioned on the outside, then replace it on
the movable unit.
5. Replace the cap and fastener, which you
removed in step 2, on the drive unit.
8. Replace the fastener, which you removed in
step 6, back on the movable unit.
9. Install the 2-inch take-up reel core in the auto
take-up reel unit in the same manner as
described in “Installing the 3-inch take-up reel
core” on page 5.
6
Using the core from a used paper roll
as a take-up reel core
The installation of the Auto Take-up Reel Unit is
complete. When you use the unit, see the Reference
Guide.
Before you install a used paper roll as the take-up
reel core, note and check the following:
❏ If the paper roll core is deformed or damaged,
it cannot be used as a take-up reel core.
Specifications
❏ Make sure that there is no looseness between
the core and the flanges on the drive unit and
movable unit.
Note:
❏ This product is designed for use with printer
models P260 (A, B or C)
❏ To wind up 36-inch wide roll paper, use a 44inch wide take-up reel core. To wind up 44inch wide roll paper, use a 46-inch paper roll
core. (The optional Take-Up Reel Core
[C815091] for 44-inch wide roll paper is
available for purchase. Contact your dealer.)
❏ This product conforms to CE marking
requirements in accordance with EC Directive
898/336/EEC.
Usable paper width
Max. 1118 mm, min. 210 mm
Paper length
No greater than a 10 cm roll
diameter on a 2-inch core,
or a 15 cm roll diameter on a
3-inch core.
Max. sheet diameter
after take-up
180 mm (paper must not
come in contact with the top
horizontal strut between the
uprights of the base unit)
Flange rotation speed
63 rpm
Power supply
AC 5 V/28 V
Rated current
2 A/2 A
Operating noise
50 dB
Unit weight
4.25 kg
Operating environment
(without condensation)
Temperature: 10 to 35°C
Humidity: 20 to 80% (without
condensation)
Diameters of the knobs on the flange are shown
below.
76.2mm (3")
50.8mm (2")
Length of the take-up reel core as related to the
width of the roll paper is shown below. Keep a gap
of at least 20 mm between the flanges and the right
and left edges of the roll paper, otherwise the roll
paper cannot be wound up with the auto take-up
reel unit properly.
Roll paper
20mm gap (at least)
20mm gap (at least)
7
8
Printed in Japan 00.xx-xx