1
WorkForce 435
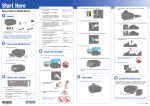
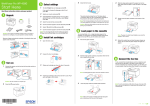
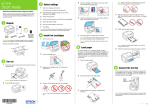
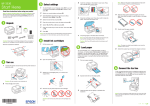
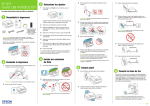
4 Remove only the yellow tape from each cartridge.
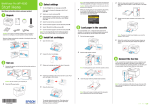
3 Select settings
®
Start Here
3Squeeze the edge guide as you slide it all the way to the
left.
1To select English as your language, press OK.
Read these instructions before using your product.
Caution: Don’t remove any other seals or the cartridges may
leak.
1 Unpack
5 Insert the cartridges in the holder for each color.
4Load letter- or A4-size paper against the right edge and
behind the tab, with the printable side face up.
(If you want to change the language, press
select it, then press OK.)
or
to
2Select your Country/Region and press OK.
3Select the current Daylight Saving Time setting (Winter
or Summer) and press OK.
French control panel stickers
(included for Canada only)
Caution: Do not open ink cartridge packages until you are ready to
install the ink. Cartridges are vacuum packed to maintain reliability.
Remove all protective materials.
4Select the Date format and press OK.
6 Press each cartridge down until it clicks.
5Slide the edge guide over.
5 Press the number keys to enter the Date and press OK.
6 Select the Time format (12h or 24h) and press OK.
7Press the number keys to enter the Time. Then press
or
to select AM or PM, if necessary.
8 Press OK.
7 Close the cartridge cover. Press down until it clicks.
4 Install ink cartridges
6 Connect the phone cord
Note: Do not load paper yet.
1Lift up the scanner.
2 Turn on
8 Lower the scanner.
9Press the OK button to prime the printer.
1 Connect the power cable.
To fax, connect a phone cord to a telephone wall jack and
to the LINE port on your product. To connect a telephone or
answering machine, use the EXT. port on your product. See
the Quick Guide for more details.
Priming takes about 3 minutes.
Note: Your printer ships with full cartridges and part of the ink
from the first cartridges is used for priming the printer.
Caution: Don’t turn off the printer while it is priming or you’ll
waste ink.
2 Open the cartridge cover.
5 Load paper
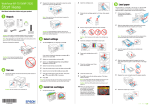
1Open the paper support and pull up the extensions.
Caution: Do not connect to your computer yet.
2 Press the
Note: If you’re connecting to a DSL phone line, you must use a DSL
filter or you won’t be able to fax. Contact your DSL provider for the
necessary filter.
On button.
3Shake the ink cartridges gently 4 or 5 times, then unpack
them.
2Pull out the output tray extensions and raise the stopper.
*412081000*
*412081000*
WorkForce 435
4 Remove only the yellow tape from each cartridge.
3 Select settings
®
Start Here
3Squeeze the edge guide as you slide it all the way to the
left.
1To select English as your language, press OK.
Read these instructions before using your product.
Caution: Don’t remove any other seals or the cartridges may
leak.
1 Unpack
5 Insert the cartridges in the holder for each color.
4Load letter- or A4-size paper against the right edge and
behind the tab, with the printable side face up.
(If you want to change the language, press
select it, then press OK.)
or
to
2Select your Country/Region and press OK.
3Select the current Daylight Saving Time setting (Winter
or Summer) and press OK.
French control panel stickers
(included for Canada only)
Caution: Do not open ink cartridge packages until you are ready to
install the ink. Cartridges are vacuum packed to maintain reliability.
Remove all protective materials.
4Select the Date format and press OK.
6 Press each cartridge down until it clicks.
5Slide the edge guide over.
5 Press the number keys to enter the Date and press OK.
6 Select the Time format (12h or 24h) and press OK.
7Press the number keys to enter the Time. Then press
or
to select AM or PM, if necessary.
8 Press OK.
7 Close the cartridge cover. Press down until it clicks.
4 Install ink cartridges
6 Connect the phone cord
Note: Do not load paper yet.
1Lift up the scanner.
2 Turn on
8 Lower the scanner.
9Press the OK button to prime the printer.
1 Connect the power cable.
To fax, connect a phone cord to a telephone wall jack and
to the LINE port on your product. To connect a telephone or
answering machine, use the EXT. port on your product. See
the Quick Guide for more details.
Priming takes about 3 minutes.
Note: Your printer ships with full cartridges and part of the ink
from the first cartridges is used for priming the printer.
Caution: Don’t turn off the printer while it is priming or you’ll
waste ink.
2 Open the cartridge cover.
5 Load paper
1Open the paper support and pull up the extensions.
Caution: Do not connect to your computer yet.
2 Press the
Note: If you’re connecting to a DSL phone line, you must use a DSL
filter or you won’t be able to fax. Contact your DSL provider for the
necessary filter.
On button.
3Shake the ink cartridges gently 4 or 5 times, then unpack
them.
2Pull out the output tray extensions and raise the stopper.
*412081000*
*412081000*
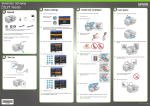
7 Choose your connection
You can connect your printer to your existing wireless network
or directly to your computer using a USB cable (not included).
See below for details on each connection method.
Note: Do not connect the printer to your computer until you’re
instructed to do so.
3Windows: If you see the AutoPlay window, click
Run Setup.exe. If you see the User Account Control
screen, click Yes or Continue.
Mac OS® X: Double-click the
Epson icon.
Any questions?
Quick Guide
Basic instructions for copying, printing, faxing, and scanning.
4Click Install (Windows) or Continue (Mac OS X) and
follow the on-screen instructions.
Need paper and ink?
Try Epson paper with DURABrite® Ultra Ink for professional
results. For the right supplies at the right time, you can
purchase them at Epson Supplies Central at
www.epson.com/ink3 (U.S. sales) or www.epson.ca
(Canadian sales). You can also purchase supplies from an
Epson authorized reseller. To find the nearest one,
call 800-GO-EPSON (800-463-7766).
Wireless connection
You must install the software on every computer from which
you want to print. For the first installation, we recommend
using a temporary USB connection to simplify wireless setup.
After the printer is connected to the network, you will be
prompted to remove the cable.
If you’re using Mac OS® X 10.6 or don’t have a USB cable,
you need to use the buttons on the printer to select wireless
settings.
Any problems?
ake sure you know your network name (SSID) and network
M
password:
If you experience problems during setup, see below:
• Network name
• Make sure you select the right network name.
• Network password
• If your network has security enabled, make sure you enter
your network password (WEP key or WPA passphrase)
correctly. If it has uppercase (ABC) or lowercase (abc)
letters, make sure you enter them correctly.
If you don’t have this information, contact the person who set
up your network.
User’s Guide
Genuine Epson paper
Click the icon on your desktop (or in the Applications/Epson
Software/Guide folder on Mac OS X) to access the online
User’s Guide, software downloads, Epson Supplies Central®,
and more (requires an Internet connection). If you don’t have
a User’s Guide icon, you can install it from the CD or go to the
Epson website, as described below.
Epson offers a wide variety of papers to meet your needs;
visit Epson Supplies Central for more information.
Network setup was unsuccessful.
Presentation Paper Matte
Smooth, non-glare, instant-drying
paper for scrapbooks, newsletters, and
graphical presentations.
Genuine Epson inks
ook for the numbers
L
below to find your
cartridges. It’s as easy as
remembering your number!
Direct USB connection
On-screen help with your software
Make sure you have a USB cable (not included).
Select Help or ? when you’re using your software.
8 Install software
Note: If your computer does not have a CD drive, you can download
the software from the Epson website, as described under “Epson
Technical Support”.
1Make sure the printer is NOT CONNECTED to your
computer.
Epson technical support
Repeatedly press the numeric keypad buttons as necessary
to select uppercase letters (ABC), lowercase letters (abc),
or numbers and symbols (123).
Press
to move to the next character.
Press
to delete.
Press the OK button when you’re finished entering your
password.
• If you see a firewall alert message, click Unblock or Allow
to let setup continue.
Windows®: If you see a Found New Hardware screen, click
Cancel and disconnect the USB cable. You can’t install your
software that way.
You see error messages on the printer’s LCD screen.
See your Quick Guide for troubleshooting information.
Setup is unable to find my printer after connecting it
with a USB cable.
Make sure it is securely connected as shown:
Visit epson.com/support (U.S.) or epson.ca/support
(Canada) where you can download drivers, view manuals, get
FAQs, or e-mail Epson.
WorkForce 435 ink cartridges
Moderate-capacity
(For lighter use)
High-capacity
Black
124
126
You may also speak with a support specialist by calling:
Cyan
124
126
• U.S.: (562) 276-4382, 6 AM to 8 PM, Pacific Time, Monday
through Friday, and 7 AM to 4 PM Saturday.
Magenta
124
126
Yellow
124
126
• Canada: (905) 709-3839, 6 AM to 8 PM, Pacific Time,
Monday through Friday.
Color
Days and hours of support are subject to change without
notice. Toll or long distance charges may apply.
Software technical support
ABBYY® FineReader®
(408) 457-9777
www.abbyyusa.com
[email protected]
Recycling
Epson offers a recycling program for end of life products.
Please go to www.epson.com/recycle for information on
how to return your products for proper disposal.
2 Insert your product CD.
Epson and Supplies Central are registered trademarks, and Epson Exceed Your Vision is a
registered logomark of Seiko Epson Corporation. WorkForce and DURABrite are registered
trademarks, and Designed for Excellence is a trademark of Epson America, Inc.
General Notice: Other product names used herein are for identification purposes only and
may be trademarks of their respective owners. Epson disclaims any and all rights in those
marks.
This information is subject to change without notice.
© 2011 Epson America, Inc. 5/11
Printed in XXXXXX
CPD-34237
7 Choose your connection
You can connect your printer to your existing wireless network
or directly to your computer using a USB cable (not included).
See below for details on each connection method.
Note: Do not connect the printer to your computer until you’re
instructed to do so.
3Windows: If you see the AutoPlay window, click
Run Setup.exe. If you see the User Account Control
screen, click Yes or Continue.
Mac OS® X: Double-click the
Epson icon.
Any questions?
Quick Guide
Basic instructions for copying, printing, faxing, and scanning.
4Click Install (Windows) or Continue (Mac OS X) and
follow the on-screen instructions.
Need paper and ink?
Try Epson paper with DURABrite® Ultra Ink for professional
results. For the right supplies at the right time, you can
purchase them at Epson Supplies Central at
www.epson.com/ink3 (U.S. sales) or www.epson.ca
(Canadian sales). You can also purchase supplies from an
Epson authorized reseller. To find the nearest one,
call 800-GO-EPSON (800-463-7766).
Wireless connection
You must install the software on every computer from which
you want to print. For the first installation, we recommend
using a temporary USB connection to simplify wireless setup.
After the printer is connected to the network, you will be
prompted to remove the cable.
If you’re using Mac OS® X 10.6 or don’t have a USB cable,
you need to use the buttons on the printer to select wireless
settings.
Any problems?
ake sure you know your network name (SSID) and network
M
password:
If you experience problems during setup, see below:
• Network name
• Make sure you select the right network name.
• Network password
• If your network has security enabled, make sure you enter
your network password (WEP key or WPA passphrase)
correctly. If it has uppercase (ABC) or lowercase (abc)
letters, make sure you enter them correctly.
If you don’t have this information, contact the person who set
up your network.
User’s Guide
Genuine Epson paper
Click the icon on your desktop (or in the Applications/Epson
Software/Guide folder on Mac OS X) to access the online
User’s Guide, software downloads, Epson Supplies Central®,
and more (requires an Internet connection). If you don’t have
a User’s Guide icon, you can install it from the CD or go to the
Epson website, as described below.
Epson offers a wide variety of papers to meet your needs;
visit Epson Supplies Central for more information.
Network setup was unsuccessful.
Presentation Paper Matte
Smooth, non-glare, instant-drying
paper for scrapbooks, newsletters, and
graphical presentations.
Genuine Epson inks
ook for the numbers
L
below to find your
cartridges. It’s as easy as
remembering your number!
Direct USB connection
On-screen help with your software
Make sure you have a USB cable (not included).
Select Help or ? when you’re using your software.
8 Install software
Note: If your computer does not have a CD drive, you can download
the software from the Epson website, as described under “Epson
Technical Support”.
1Make sure the printer is NOT CONNECTED to your
computer.
Epson technical support
Repeatedly press the numeric keypad buttons as necessary
to select uppercase letters (ABC), lowercase letters (abc),
or numbers and symbols (123).
Press
to move to the next character.
Press
to delete.
Press the OK button when you’re finished entering your
password.
• If you see a firewall alert message, click Unblock or Allow
to let setup continue.
Windows®: If you see a Found New Hardware screen, click
Cancel and disconnect the USB cable. You can’t install your
software that way.
You see error messages on the printer’s LCD screen.
See your Quick Guide for troubleshooting information.
Setup is unable to find my printer after connecting it
with a USB cable.
Make sure it is securely connected as shown:
Visit epson.com/support (U.S.) or epson.ca/support
(Canada) where you can download drivers, view manuals, get
FAQs, or e-mail Epson.
WorkForce 435 ink cartridges
Moderate-capacity
(For lighter use)
High-capacity
Black
124
126
You may also speak with a support specialist by calling:
Cyan
124
126
• U.S.: (562) 276-4382, 6 AM to 8 PM, Pacific Time, Monday
through Friday, and 7 AM to 4 PM Saturday.
Magenta
124
126
Yellow
124
126
• Canada: (905) 709-3839, 6 AM to 8 PM, Pacific Time,
Monday through Friday.
Color
Days and hours of support are subject to change without
notice. Toll or long distance charges may apply.
Software technical support
ABBYY® FineReader®
(408) 457-9777
www.abbyyusa.com
[email protected]
Recycling
Epson offers a recycling program for end of life products.
Please go to www.epson.com/recycle for information on
how to return your products for proper disposal.
2 Insert your product CD.
Epson and Supplies Central are registered trademarks, and Epson Exceed Your Vision is a
registered logomark of Seiko Epson Corporation. WorkForce and DURABrite are registered
trademarks, and Designed for Excellence is a trademark of Epson America, Inc.
General Notice: Other product names used herein are for identification purposes only and
may be trademarks of their respective owners. Epson disclaims any and all rights in those
marks.
This information is subject to change without notice.
© 2011 Epson America, Inc. 5/11
Printed in XXXXXX
CPD-34237