1
Checking Ink Levels and Replacing Ink Cartridges
Before you begin a large print job, you should check your
ink levels. If one of your cartridges is low, you can replace
it before you start. Or you can wait until the ink runs
out, replace the cartridge, and then continue the job.
When one of the icons has an X and REPLACE INK
CARTRIDGE is displayed, the cartridge is expended. To
replace the cartridge, first make sure the printer is on.
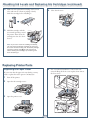
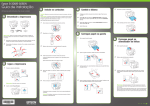
1
Press the ink compartment cover to open it.
2
Push in the low or expended cartridge to release it.
3
Remove the expended ink cartridge from the printer.
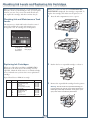
Checking Ink and Maintenance Tank
Levels
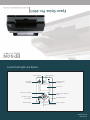
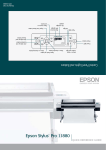
The easiest way to check ink levels is from the control
panel. The numbers above the ink cartridge icons
correspond to the 11 cartridge slots in the printer.
Ink gauges for
11 cartridges
listed below
Maintenance
tank gauges
Replacing Ink Cartridges
When one of the ink icons flashes, and INK LOW is
displayed on the LCD screen, the cartridge is nearly
expended. Check the LCD screen to see which cartridge
is low, and make sure you have the correct replacement
cartridge.
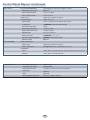
Epson UltraChrome® HDR ink cartridges
Ink Bay
Slot no.
Cartridge
Part no.
Left
1
2
3
4
5
6
7
8
9
10
11
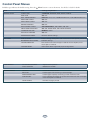
Green (GR)
Light Light Black (LLK)
Yellow (Y)
Light Cyan (LC)
Vivid Light Magenta (VLM)
Orange (OR)
Matte Black (MK)
Vivid Magenta (VM)
Light Black (LK)
Cyan (C)
Photo Black (PK)
T653B00
T653900
T653400
T653500
T653600
T653A00
T653800
T653300
T653700
T653200
T653100
Right
Warning: Do not shake the expended cartridge, or
ink may leak. If ink gets on your hands, wash them
thoroughly with soap and water. If ink gets in your
eyes, flush them immediately with water.
6