1
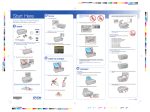
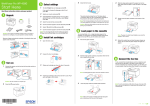
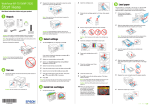
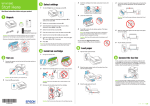
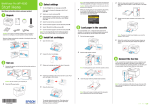
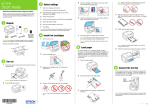
Start Here
2
1
Turn on
4
Insert the cartridges in the holder for each color.
5
Press the cartridges down until they click.
3
Load paper against the right edge and behind the tab. Then squeeze
the edge guide and slide it to the edge of the paper.
Connect the power cable.
®
Epson Stylus Photo R2000 Series
Read these instructions before using your product.
1
Unpack
Note: Don’t load the paper sideways. Always load
it short edge first.
Caution: Do not connect to your computer yet.
2
Press the
power button.
Rear manual feed slot
You can print on these paper types using the single
sheet guide and the rear manual feed slot:
• Epson Hot Press Bright
• Epson Hot Press Natural
• Epson Cold Press Bright
6
• Epson Cold Press Natural
Close the cartridge cover, then close the printer cover.
• Epson Velvet Fine Art Paper
Caution: Do not open ink cartridge packages until you are ready to install
the ink. Cartridges are vacuum packed to maintain reliability.
1
• Epson Matte Scrapbook Photo Paper
Remove all protective materials.
3
1
Remove any paper from the sheet feeder and close the paper
support.
2
Make sure the output tray is open and the extensions are pulled out.
3
Slide the roll paper edge guide on the back of the printer all the way
to the right
4
Attach the single sheet guide by aligning the notches on its base with
the slots on the back of the printer. Then hook the tabs over the top of
the slot (marked with orange triangles).
Install ink cartridges
Open the printer cover, then open the ink cartridge cover.
7
2
1
Open the top cover and remove any tape inside.
Press the ink button to begin priming the ink delivery system. This
takes about 4 minutes. Do not turn off the printer, load paper, or open
any covers until the process is complete.
Caution: Don’t turn off the printer while it is priming or you’ll
waste ink.
2
Shake the ink cartridges gently 4 or 5 times, then unpack them.
4
Load paper
Sheet feeder
You can load plain paper, and most glossy and matte papers, in the
sheet feeder.
1
3
Open the paper support and pull up the extensions.
Remove only the yellow tape from each cartridge.
2
Open the output tray and pull out the extensions.
Caution: Don’t remove any
other seals or the cartridges
may leak.
*412146800*
*412146800*
4121468
1-F
Rev.0
C
4121468
1-F
Rev.0
M
4121468
1-F
Rev.0
Y
4121468
1-F
Rev.0
K
5
6
Turn on the printer so it can load the paper correctly.
Insert one sheet of paper against the right edge, then slide the edge
guide over.
6
1
Install software
Make sure the printer is NOT CONNECTED
to your computer.
Need paper and ink?
Epson Technical Support
Visit epson.com/support/r2000 (U.S.) or epson.ca/support/r2000 (Canada)
where you can download drivers, view manuals, get FAQs, or e-mail Epson.
Try Epson paper with Epson UltraChrome Hi-Gloss® 2 ink for professional
results. For the right supplies at the right time, you can purchase them at
Epson Supplies Central at www.epson.com/ink3 (U.S. sales) or
www.epson.ca (Canadian sales). You can also purchase supplies from an
Epson authorized reseller. To find the nearest one, call 800-GO-EPSON
(800-463-7766).
You may also speak with a support specialist by calling:
• U.S.: (562) 276-7272, 6 AM to 8 PM, Pacific Time, Monday through
Friday, and 7 AM to 4 PM Saturday
• Canada: (905) 709-2567, 6 AM to 8 PM, Pacific Time, Monday through
Friday
Windows®: If you see a Found New
Hardware screen, click Cancel and
disconnect the USB cable. You can’t
install your software that way.
7
Days and hours of support are subject to change without notice. Toll or long
distance charges may apply.
Any problems?
Genuine Epson Paper
Epson offers a wide variety of papers to meet your needs; visit Epson Supplies
Central for more information.
Note: Don’t load paper sideways. Always load it short edge first.
If you experience problems during setup, see below:
Push the paper into the printer until it meets resistance and hold
it there until the printer pulls it in slightly. When the printer begins
feeding the paper, let go of it.
Network setup was unsuccessful.
• Make sure you select the right network name.
Premium Photo Paper Glossy
2
Insert your product CD.
Windows: If you see the AutoPlay window,
click Run Setup.exe. If you see the User
Account Control screen, click Yes or Continue.
Macintosh®: Double-click the
3
Epson icon.
Windows: Click Install and follow the on-screen instructions.
High gloss, instant-drying paper for beautiful, durable photos
made to share or display in an album.
• If you see a firewall alert message, click Unblock or Allow to let setup
continue.
• If your network has security enabled, make sure you enter your
network password (WEP key or WPA passphrase) correctly. If it has
uppercase (ABC) or lowercase (abc) letters, make sure you enter them
correctly.
Genuine Epson Inks
Look for the numbers below to find your
cartridges. It’s as easy as remembering
your number!
• Try moving the product to a different location. Avoid placing it next to
a microwave oven, 2.4 GHz cordless phone, or large metal object such
as a filing cabinet.
Note: For instructions on loading roll paper, a CD or DVD, or thick
media, see the User’s Guide.
Macintosh: Select the items you want to install, then click Install.
• If your wireless router doesn’t broadcast its network name (SSID),
manually enter your wireless network name. Make sure there aren’t
any access restrictions (such as MAC address filtering) set on the
wireless router. If access restrictions are set, register the product’s
MAC address on the router. Print a Network Status Sheet (see
below) to obtain the MAC address. Then see your router’s manual for
instructions.
Epson Stylus Photo R2000 Series Ink Cartridges
Color
• Print a Network Status Sheet to see what network settings are
currently enabled in the printer. Press the Network Information
button to print a network status sheet.
Part number
Photo Black
159
Cyan
159
Magenta
159
Yellow
159
Red
159
Orange
159
Matte Black
159
Gloss Optimizer
159
• Remove and reinsert the CD to reinstall your product software.
5
• If you’re using the
Wi-Fi button to connect to your
WPS-compatible wireless router, make sure you press the
Wi-Fi
button on your printer and the
WPS button on your router within
2 minutes of each other.
Choose your connection
You can connect your printer to your existing network (wireless or wired) or
directly to your computer using a USB cable (not included). See below for
details on each connection method.
Tip: Be sure to install the professional print sample. When you’re
done with the installation, you can test your printer’s output.
Wireless Connection (802.11n)
You must install the software on every computer from which you want
to print. For the first installation, we recommend using a USB cable (not
included) to simplify wireless setup. After the printer is connected to the
network, you will be prompted to remove the cable.
Make sure you know your network name (SSID) and network password:
• Network name
• Network password
If you don’t have this information, contact the person who set up your
network.
Setup is unable to find my printer after connecting it with a USB
cable.
Make sure it is securely connected as shown:
Any questions?
Network Setup
Follow the on-screen instructions when you insert your product CD. You
can also watch a video tutorial at: epson.com/support/wireless.
Basics Guide
Basic instructions for loading paper, printing, and maintenance.
Note: For optimal print speed, your wireless router and/or computer must
conform to the 802.11n standard. Earlier standards (802.11a/b/g) are not
supported.
Printing Problems
• Make sure the size of paper you loaded matches the paper size
selected in your printer software.
Direct USB Connection
Make sure you have a USB cable (not included). Do not connect the printer
to your computer until you’re instructed to do so.
Wired Ethernet® Connection
Make sure you have an Ethernet network cable (not included). You must
install the software on every computer from which you want to print.
The product’s WiFi light is on but you cannot print.
Your router might not be assigning IP addresses automatically using DHCP.
If it isn’t, you will need to set the product’s IP address manually. Make sure
it is set correctly for your network.
• Printing stops when an ink cartridge is expended. If a cartridge is
expended, you must replace it to continue printing.
On-screen help with your software
Select Help or ? when you’re using your software.
User’s Guide
Click the shortcut on your desktop (or in the Applications/Epson Software/
Guide folder on Macintosh) to access the online User’s Guide, software
downloads, Epson Supplies Central , and more (requires an Internet
connection).
®
Paper Feeding Problems
If paper doesn’t feed correctly, remove the paper and fan the sheets, then
reload them. Don’t load paper above the tabs on the edge guides.
Print Quality Problems
• Make sure your paper is loaded printable side up (usually the whiter,
brighter, or glossy side).
• For the best print quality, use Epson papers and genuine Epson ink
cartridges.
• Make sure the type of paper you loaded matches the paper type
setting in your printer software. See the online User’s Guide for more
information.
• If you notice light or dark bands across your printouts or they are too
faint, run a nozzle check to see if the print head needs cleaning. See
the online User’s Guide for more information.
• If you notice jagged vertical lines, you may need to align the print
head. See the printed Basics guide for instructions.
Epson, Epson Stylus, Epson UltraChrome Hi-Gloss, and Epson Supplies Central are registered trademarks, and Epson Exceed Your
Vision is a registered logomark of Seiko Epson Corporation.
UltraSmooth is a registered trademark and Designed for Excellence is a trademark of Epson America, Inc.
• The ink cartridges may be low on ink. Check your cartridge levels and
replace cartridges, if necessary. See the online User’s Guide for more
information.
General Notice: Other product names used herein are for identification purposes only and may be trademarks of their respective
owners. Epson disclaims any and all rights in those marks.
This information is subject to change without notice.
© 2011 Epson America, Inc. 6/11
Printed in XXXXXX
4121468
1-B
Rev.0
C
4121468
1-B
Rev.0
M
4121468
1-B
Rev.0
Y
CPD-33733R1
4121468
1-B
Rev.0
K