1
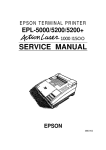
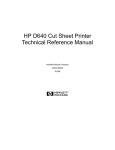
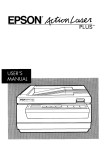
ActionLaser II
Internal modes:
Cl HP LaserJet series II emulation
0 ESC/P 24-pin printer emulation
(LQ-2500)
0 ESC/P 9-pin printer emulation
IC card slot:
1 slot for identity cards
Cartridge slot:
1 slot for font cartridges
Residentfonts:
HP LaserJet series IIP mode
Courier 10 cpi
Courier 12 cpi
Courier 10 cpi Bold
Courier 12 cpi Bold
Line printer 16.66 cpi
Paper cassette
Upright/Italic
Upright/Italic
upright
upright
Upright
P/L
P/L
P/L
P/L
P/L
P: Portrait, L: Landscape
Photoconductor unit
The Italic, Bold, and Landscape effects are
created internally.
FX and LQ modes
Courier 10 cpi Upright/Italic* M/B
Courier 12 cpi Upright/Italic* M/B
Line printer
Upright
M/B*
16.66 cpi
M/B*
Prestige 12 cpi Upright
M/B*
Prestige 20 cpi Upright
P/L
P/L
P/L
P/L*
P/L*
M: Medium, B: Bold, I’: Portrait,
L: Landscape
Panel
* The Italic, Bold, and Landscape effects are
created internally.
, Paper guide
External fonts:
Optional fonts provided with font cartridges.
Download fonts
Paper and paper delivery
Paper specifications
Types:
Plain paper
Special papers:
Fan cover
‘0 Labels
0 Envelopes
Socket
Cl Transparencies
0 Colored paper
0 Cardstock
Printer Specifications
Epson does not recommend or guarantee the
use of any particular brand of paper. Because
paper characteristics are subject to change by
individual manufacturers, it is your
responsibility to ensure the quality of paper
used with the printer.
Printing
Printing method:
Laser beam scanning and dry
electrophotographic process
Resolution:
300 x 300 dpi
Printing speed:
Up to 6 pages per minute for letter-size
(depending on the font and quantity of data)
First print:
Less than 20 seconds with letter
(except when the STANDBY mode is on)
Warm-up time:
45 seconds or less at normal temperature
Laser Printers
Paper weight:
Plain paper: 60-90 g/m*, 16-24 lb
Card stock: 90-157 g/ml, 24-42 lb
9/17/91
ALII-1
ActionLaser II
Paper size:
Paper sizes using SelecType
Consumable products
Paper:
Toner cartridge (5050002):
Type
A4
A5
B5
F4
Letter
Legal
Half-Letter
Executive
Government Legal
Government Letter
Size
210 x 297 mm
148 x 210 mm
182 x 257 mm
210 x 330 mm
8.5 x 11 inches
8.5 x 14 inches
5.5 x 8.5 inches
7.25 x 10.5 inches
8.5 x 13 inches
8.0 x 10.5 inches
Storage temperature: 0 to 30°C (32 to 80°F)
For less than 20 days -20 to 43°C (-4 to 110°F)
Storage humidity: 20% to 80% RH
For less than 20 days 5% to 95%
Shelf life: 18 months after production
Typical life is up to 5000 pages under the
following conditions: Letter-size paper,
continuous printing, and 5% print ratio.
Atmospheric pressure: No less than 740
millibar (about the same as 2500 m
or 8200 ft altitude).
Envelope:
Monarch
Commercial-10
DL
C5
3% x i”/i inches
4% x 9M inches
11ox22omm
162 x 229 mm
The number of pages you can print with a
toner cartridge varies depending on the type
of printing. If you print dense text exceeding
the 5% print ratio, your cartridge may print
fewer pages.
Paper size range using software commands
Width 98-216 mm (3.86-8.5 inches)
Photoconductor unit (S051005):
Length 148-356 mm (5.83-14 inches)
Storage temperature: 0 to 30°C (32 to 80°F)
For less than 20 days -20 to 43°C
(-4 to 110°F)
Printable area:
Storage humidity: 20% to 80% RH
For less than 20 days 5% to 95%
Shelf life: 18 months after production
Life:
Photoconductor unit life is up to 30,000
pages. Atmospheric pressure: No less than
740 millibar (about the same as atmospheric
pressure at 2500 m or 8200 ft altitude).
Paper feeding direction
Special sizes:
Basically, the paper area within a 1/4 inch
(6.4 mm) border is the printable area for any
paper size. Details for paper sizes using
SelecType are shown below.
Ozone filter (packaged with toner cartridge):
Replace at the same time as the toner
cartridge.
Mechanical
Dimensions and weight:
Height: 177 mm (7.0 inches)
356 mm (14.0 inches)*
Width: 479 mm (18.9 inches)
479 mm (18.9 inches)*
Depth: 362 mm (14.3 inches)
700 mm (27.6 inches)*
Weight: Approx. 13 kg (29 lb.)*
Paper feed alignment and direction:
Center alignment for all sizes
Paper feed:
Automatic or manual feed
Input paper supply (75 g/m’ or 20 lb paper):
100 sheets
150 sheets (optional multi-media feeder)
15 envelopes (optional multi-media feeder)
Paper eject:
Face-down only
Paper eject capacity (75 g/m’or 20 lb paper):
50 sheets
* Including paper cassette, photoconductor
unit, output tray, and toner cartridge.
MPBF (Mean Prints Between Failures):
24,000 sheets (2,400 per month x 10 months)
MTBF (Mean Time Between Failures):
5,760 hours
Durability:
ALll-2
9/17/91
5 years or 180,000 sheets (3,000 per month x
60 months); whichever comes first.
Laser Printers
ActionLaser II
Serial interface (RS-232C)
Electrical
Rated voltage:
120 VAC
Rated current:
7A
Data format
Word length: 7 or 8 bits
Parity: none, odd or even
Stop bits: 1 or 2
Printer ready protocol: enabled (DTR and
XON/XOFF protocol set to ON.)
Rated frequency range:
50 Hz to 60 Hz
Power consumption:
Less than 600 W
The data format can be set using options and
menu items in SelecType.
Dielectric strength (between AC line and chassis):
Can withstand 1250 VAC rms for 1 minute.
Controller hardware
Baud rate
300, 600, 1200, 2400, 4800, 9600, 19200 bits per
second.
CPU:
68000, 16.66 MHz (CPU clock 14.1312 MHz)
Signal level
RS-232C: Conforms to ELA
RAM:
Standard 0.5 MB (expandable up to 5.5MB)
Connector
D-sub 25pin connector
Environmental
Handshaking
Temperature:
0 to 30°C (32 to 80°F)
Humidity:
20% to 80% RH
The printer’s serial interface can use DTR (Data Terminal Ready)
signal levels and XON/XOFF communication protocols either
separately or in combination.
XON/XOFF protocol
80%
54%
Print assured area
20%
I
10-C 27-C 3 2 ° C
(5o’F) wFl (SOT)
Atmosphericpressure: No less than 740 millibar (about the same as
atmospheric pressure at a 2500 m or 8200 ft
altitude)
Operating Angle:
Should be kept level.
Interface Specifications
Interface timing
The figure below shows the timing for the parallel interface.
0.5~s min. 0.5~s min.
yr
When the vacant area for data in the input buffer drops to 128 bytes,
the printer outputs an XOFF code, indicating that the printer cannot
receive more data. Once the vacant area for data in the buffer
recovers to 256 bytes, the printer outputs an XON code, indicating
that the printer is again ready to receive data.
XON/XOFF protocol can be enabled using SelecType. The factory
setting is “ENABLE.”
DTR/DSR protocol
When the printer can receive the data, the printer sets the DTR signal
level to high (SPACE). When the printer cannot receive data, the
printer sets the DTR signal level to low (MARK). If the DTR menu in
SelecType is set to off, the DTR signal is always treated as high
(SPACE.) The printer sends the TXD (transmitted data) only when
the DSR signal level is set to high (SPACE) except the DSR menu in
SelecType is set to off. If the DSR menu in SelecType is set to off, the
DSR signal is always treated as high (SPACE)
DTR/DSR protocol can be enabled using SelecType. The factory
settings are DTR “ON” and DSR “OFF.”
Error handling
A * character is printed if a parity error, framing error, or over-run
error is detected.
Options
ACKNLG
Multi-media feeder
Varies depending on the SelecType setting.
OJJS t y p , 5JJs t y p , lops t y p , o r A C K N L G
Signal is not changed.
Electrical
AC power supply:
DC 24 V supplied by the printer
Insulation resistance: 10 Mohm minimum
Note that it is possible to change the timing between ACKNLG and
BUSY.
Signal level:
Laser Printers
Dielectric strength (between AC line and chassis):
Can withstand 1250 VAC rms for one minute.
TTL compatible
9/17/91
ALll-3
ActionLaser II
Paper and paper delivery
In FX mode, choose one of the following:
98-216 mm (3.86-8.50 inches)
148-356 mm
(5.83-14.0 inches)
Size:
Paper Width:
Paper Length:
Weight:
Plain paper:
60-157 g/m2 (l6-42 lb) Manual feed
60-90 g/m2 (16-24 lb) Auto feed
Envelope:
60-90 g/m2 (16-24 lb)
Paper feed:
Automatic feed delivery system
Tray capacity up to 150 sheets (75 g/m2 or
20 lb-paper)
Tray capacity up to 15 envelopes
(60-90 g/m2 or 16-24 lb paper)
Feeding speed:
FX-850/1050
FX- (286e/86e)
FX-85
FX-80
If none of the above printers is listed among your program’s options,
choose the first available of the following: Epson printer, Standard
printer, Draft printer.
Font Cartridges
Manual Feed
This printer can use any of the font cartridges listed below when the
HP LaserJet IIP emulation mode is selected. By using font cartridges,
you can select many different styles of type in addition to the
resident fonts in your printer.
60-157 g/m2 (16-42 lb) plain paper or
60-90 g/m2 (16-24 lb) envelope
Note: Some of the fonts contained on these font cartridges are
duplicated by the resident fonts in the printer.
Up to 6 pages per minute (letter-size paper).
Supplier
HP
Mechanical
Dimensions and weight:
Without the printer:
Height:
Width:
Depth:
Weight:
175 mm
326 mm
384 mm
Approx.
(6.9 inches)
(12.8 inches)
(15.1 inches)
13 kg (27 pounds)
Application Software
HP LaserJet IIP emulation mode
When your printer is in HP LaserJet IIP (LJ-2P) mode, the factory
setting, select one of the following drivers from your program’s
printer selection menu. (They are listed in order of preference.)
HP LaserJet IIP
HP LaserJet series II™
HP LaserJet Plus™
HP LaserJet 500™
HP LaserJet™
Anacom
If none of the above printers is listed among your program’s options,
select any printer model that uses the HP Printer Command
Language (PCL.). Do not select PCL-5.
Peripherals
Epson LQ and FX emulation modes
Everex
Enter your program’s printer selection menu and choose the first
printer available from the list of printers below. (They are listed in
order of preference.)
When your printer is in LQ mode, select one of the following from
your program’s printer selection menu:
92286A
92286B
92286C
92286D
92286E
92286F
92286G
92286H
92286J
92286K
92286L
922B6M
92286N
92286P
92286Q
92286R
92286T
92286U
92286V
92286W
92286X
92286Y
92286Z
92290S1
92290S2
92286PC
C2055A
C2053A
C2053A
C2053A
C2053A
C2053A
C2053A
C2053A
C2053A
Cartridge
Courier 1
Tms Proportional 1
International 1
Prestige Elite
Letter Gothic
Tms Proportional 2
Legal Elite
Legal Courier
Math Elite
Math TmsRmn
Courier P&L
Prestige Elite P&L
Letter Gothic P&L
TmsRmn P&L
Memo 1
Presentations 1
Tax1
Forms Portrait
Forms Landscape
Bar Code 3-of-9/OCR-A
EAN/UPC/OCR-B
PC Courier 1
Mlcrosolt. 1 A
Courier Document 1
TrnsRmn/Helv Report 1
ProCollection
#CO1 Great Start
#C01 WordPerfect
#C02 Microsott
#C03 Polished Worksheets.
#C04 Persuasive Presentations
#C05 Forms Etc.
#C06 Bar Codes & More
#C07 Text Equations
#C08 Global Text
Alfajet MX-1 Maxi-One Cartridge
Alfajet PC Maxi-Pro Cartridae
JetFont SuperSet
JetFont 12/30
JetFont 4-in-1
JetFont SuperSet International
HardFont Cartridge B
HardFont Cartridge F
HardFont Cartridge T
HardFont Cartridge Z
HardFont Cartridge LGL
HardFont Carlridge SST
HardFont Cartridge BST
HardFont Carlridge All-in-1
HardFont Cartridge A-TO-Z
Super
Super
Super
Super
Super
LQ-2500
LQ-1050/850
LQ-510
LQ-1000/800 (expanded ESC/P)
L Q - 5 0 0
LQ-1500 (with version 2 ROM)
LQ printer
ALII-4
Cartridge number
9/17/91
Cartridge 1
Cartridge 2
Cartridge 2L
Cartridge LC
Cartridge 2WP
Laser Printers
ActionLaser II
Supplier
Pacific
Cartridge number
UDP
lntercon
Cartridge
25 Cartridges in One (Original Version)
25 Cartridges in One (172)
Headlines in a Cartridge
DT1 -TMS RMN
DT2-HELV
65-in-One
PHONT+
PROIIP
5. Press firmly until the cartridge locks into place.
Caution: Use only the font cartridges listed above in your printer.
Do not use other cartridges with this printer or you may damage
your printer.
Inserting a font cartridge
You insert a font cartridge into the slot on the front of the printer.
CAUTION:
0 Never insert or remove a cartridge while the printer is on line, in
SelecType mode, or while the printer is resetting (after you press
RESET).
CAUTION: If the message REMOVE CARD appears on the display,
you inserted the cartridge when the printer was on line or when the
printer’s memory contained data. If you see this message, remove the
cartridge, press CONTINUE; then return to step 1.
6. If the power is on, press ON LINE to set the printer on line. If the
power is off, turn on the printer.
0 Be careful when you insert or remove a font cartridge. You can
damage the cartridge by trying to insert it the wrong way or by
using too much force.
The Memory Expansion Board
0 Do not touch the connector on the bottom of the cartridge or the
connector in the printer’s cartridge slots. You could damage the
cartridge or printer.
1. Make sure that the printer is not in one of the following
conditions:
The FEED light is flashing fast (the printer is receiving data
You probably need to add memory if you have trouble printing
complex or graphics-intensive pages, or if any of the following
messages appear often: INSUFF MEMORY, PAGE BUFFER FULL, or
ADD MEMORY. Using the INDIVIDUAL setting in the CH mode in
SelecType also requires additional memory.
through the currently selected interface).
There are two types of chips you can buy:
You are setting parameters using SelecType.
0 256K x 4 80 ns DRAM 20-pin DIP (Four of these constitute a
0.5MB chip set.)
The display shows the RESET message.
2. If the FEED light is on, press ON LINE to take the printer off line;
then press FEED to print any data remaining in the buffer.
3. Make sure the printer is off line (the ON LINE light is off) or turn
off the printer.
4. Hold the cartridge so that the label on the cartridge faces left as
shown below.
0 1Mbit x 4 80 ns DRAM 20-pin DIP (Four of these constitute a
2.0MB chip set.)
The printer’s built-in memory is 0.5MB. By installing the RAM chips
as described in this section you can increase the printer’s memory up
to 5.5 MB.
Note:
0 Although the memory board can hold up to 8.0MB of RAM chips,
the printer can access only 5.5MB of additional memory.
0 Memory chips can be purchased from Epson Accessories.
First you install the RAM chips on the memory board. Then you
install the memory board in the printer. If you have questions about
this process, see your dealer or a qualified service person.
Installing RAM chips on the memory board C822061
There are four sectors on the memory board, each with four chip
sockets, as shown below.
Laser Printers
9/17/91
ALll-5
ActionLaser II
Remove the two brasscolored retaining screws and the memory
board cover located on the right side of the printer.
A
There are three ways to install chip sets on this board.
Cl 0.5MB chip sets in blocks A, B, C, and D
Cl A 2.0MB chip set in block A, and 0.5MB chip sets in blocks B, C,
and D
0 2.0MB chip sets in blocks A and B, and 0.5MB chips sets in blocks
C and D
After you have bought the chip sets and decided where to install
them, follow the steps below
1. Locate the DIP switches on the memory board and make sure that
switches 1 and 2 are off, as shown below.
Insert the optional memory board (with memory chips installed)
into the printer. Make sure the connectors fit together securely.
2. Set the remaining DIP switches on the memory board according
to the following table:
I
DIP Switch
1 Block
ON
OFF
1
Secure the board using the four screws attached to the memory
board.
rs)
5
c
2.0MB
0.5MB
6
ID
2.0MB
0.5MB
Installing the board
To install the memory expansion board, you need a cross-head
screwdriver.
WARNING: Do not remove any screws other than the brass-colored
screws specified in the following steps. High voltages are present
inside the printer when the power is on. Do not attempt to install the
memory board unless the printer is turned off and the power cord is
unplugged. Also, try not to touch any contacts on the circuit board of
the printer because many of the components can be destroyed by the
static electricity in your body.
Place the memory board cover over the memory board as shown
below. Then, secure the cover using the brass-colored screws.
1. Unplug the power cable from the printer,
2. Disconnect all interface cables from the rear of printer.
ALII-6
9/17/91
Laser Printers
ActionLaser II
Note: In some cases, the red CONTINUE light flashes when an error is
detected. This requires you to correct the problem and then press
CONTINUE to clear the error. However, if the AUTO CONT option in
SelecType is set to on, some errors may clear automatically even
though the problem remains. In most instances, you should leave
AUTO CONT set to off.
Paper Handling Options
The Multi-Media Feeder
The optional multi-media feeder handles automatic feeding of many
types of paper. It holds up to 150 sheets of paper, and it can feed
paper from 98 to 216 mm (3.86 to 8.50 inches) wide and from 148 to
356 mm (5.83 to 14.0 inches) long. You can load two different sizes of
paper in your printer at once (one size in the multi-media feeder and
the other in your standard paper cassette). You can also set SelecType
Level 1 INPUT to AUTO and use both the multi-media feeder and
the standard paper cassette for continuous printing of up to 250
sheets of the same size paper.
The messages
In this section, status messages are preceded by [S], error messages
are preceded by [E] and warning messages are preceded by [W]. In
some cases the message you see on your display also shows the
printer mode.
[E] ADD MEMORY FOR U-I-X
This indicates that there is not enough memory in Channel X. See
Chapter 4 for instructions on changing the RX-BUFFER SIZE or
adjusting the memory distribution in the INDIVIDUAL setting or
see Appendix A for adding memory.
Installing the multi-media feeder
1. Remove the manual feed paper guide.
[E] CANCEL MANUAL FEED
This message indicates that there is no paper in the manual feed
slot when you are using manual feed. See Chapter 5.
[E] CHANGE PCU XXXXX
Replace the photoconductor unit as described in Chapter 6.
The PCU counter tells you the number of pages that have been
printed.
[S] CHAR CREATING
Characters are being created.
[S] COPY END
Multiple-copy printing is cancelled. (You pressed the COPY END
button when the printer was off line.)
2. Attach the multi-media feeder as shown below. Then, mount the
multi-media feeder safely on the printer.
[E] COVER OPEN
The printer or fan cover is open or the toner cartridge or
photoconductor unit is not installed. Close the printer or fan
cover or install the toner cartridge and photoconductor units.
[S] DATA
The printer has received data but is not yet printing or the printer
has received data and is off line. If the printer is off line, press
FEED to print the data.
[E] FEED JAM
Paper is not feeding into the printer from the specified cassette or
has jammed on its way into the printer. See the FEED JAM section
in this chapter for information.
[S] FONT CREATING
A font is being created.
[S] GRAPHIC DRAWING
Graphics are being drawn.
Status and Error Messages
If an error occurs, your best source of information is the display on
the control panel. The messages displayed there tell you what may be
wrong and, in some cases, indicate the actions you should take to
correct the problem. Status messages appear on the display during
normal operation. They indicate the printer’s current status.
[E] ILLEGAL CARD
A card in the card slot or a cartridge in the cartridge slot cannot
be read. To correct this error, take the printer off line and then
press CONTINUE. If the error message remains, make sure the
printer is off line and remove the card or the cartridge. If the red
CONTINUE light still flashes, press CONTINUE.
[S] INITIALIZE
The printer is being initialized to the factory or optional settings.
This section contains an alphabetical list of status and error messages
you may encounter while printing and includes steps you can take to
correct any problems.
Laser Printers
9/17/91
ALll-7
ActionLaser II
[E] RESELECT TRAY
The optional multi-media feeder is not installed and the INPUT
option is set to OPT or AUTO. Install the optional multi-media
feeder and then press CONTINUE. However, if you decide not to
use the optional multi-media feeder, simply press CONTINUE and
paper is automatically selected from the standard paper cassette.
[E] INSUFF MEMORY
The printer has insufficient memory available for the task you
have given it. To correct the error, press CONTINUE. If the message
remains, press RESET or perform INITIALIZE. This error can also
be cleared by turning the printer off and back on again. However,
it may be necessary to simplify the page you are trying to print or
add more memory to the printer.
[S] RESET
The printer has been reset to previous settings to the macro
number specified with the LOAD MACRO setting in the SYSTEM
CONFIG option of SelecType Level 1.
[E] PAGE BUFFER FULL
Text or graphics data has filled the printer’s buffer and an
incomplete page is ejected. Press CONTINUE to clear the error. You
may need to add more memory to the printer.
[S] ROM Check
The printer is checking ROM.
[S] PAPER FEEDING
The printer is feeding paper.
[E] SAVE MEMORY OVERFLOW
This message may appear when you are trying to save a macro
with the SYSTEM CONFIG option SAVE MACRO setting in
SelecType Level 1. The printer does not have enough memory to
save any additional macros. To correct this error, delete unused
macros using the DELETE MACRO setting, and then repeat
SAVE MACRO.
[E] PAPER JAM
Paper is not being fed into the printer or paper is jammed inside
the paper path. See the PAPER JAM section later in this chapter.
[E] PAPER OUT
There is no paper in the standard paper cassette or the optional
multi-media feeder (if installed). Insert more paper into the
selected paper cassette or manually feed a sheet of paper into the
printer.
[E] PAPER OUT [paper source][paper size]
There is no paper in the paper source from which the printer
expects to feed paper. The right column of the display prompts
you to load the correct paper size into the paper source.
[E] PAPER SIZE ERROR
The paper size you selected with SelecType (or the default size if
you have not selected a size) does not match the paper loaded in
the selected paper source. Press CONTINUE to clear the error. Insert
the correct paper or change the P-SIZE setting with your
application software or with SelecType.
[S] PRINTING
The printer has received data and is printing.
[S] RAM Check X.X MB
The printer is checking RAM (X.X = capacity).
IS] READY
The printer is ready to print.
[E] REINSERT CARD
If this message appears on the display, you may have removed an
identity card or a font cartridge while the FEED light was still lit or
while the printer was on line. To correct the error, make sure the
printer is off line. Next, reinsert the card or cartridge and press
[E] REMOVE CARD
You may have inserted an identity card or a font cartridge while
the printer was on line or while the FEED light was on. To correct
this error, take the printer off line, then remove the card or
cartridge and press CONTINUE. Before reinserting the card or
cartridge, make sure that all data in the buffer has been printed
and that the printer is off line. If the FEED light is on, press FEED to
print out the remaining data.
[E] SET [paper size] MANUAL
This message requires that you set the paper size for manual
feeding.
[E] STARTUP ERROR
Press a to continue.
[E] SET FULL PRINT
This message may appear when you are trying to print graphics
or a mix of text and graphics. Press CONTINUE and then change the
FULL PRINT setting in SelecType Level 1. See Chapter 4 for more
information about this setting.
[S] PRINT STOP
The printer stops printing during a multi-copy print operation.
CONTINUE.
[E] SERVICE REQ. CXXX
[E] SERVICE REQ. E00XX
A controller or print engine error has been detected. Write down
the error number that appears in the right column of the display
and turn off the printer. Turn the printer back on after a few
seconds to see if the error message still appears. If it does, turn off
the printer, unplug the power cord from the electrical outlet, and
contact a qualified service person.
[S] STANDBY MODE
If the standby mode is enabled, the printer enters this mode when
it is not used for about thirty minutes. This message appears.
Press any control panel button or send data to the printer to
warm it up. It will also enter this mode after 8 hours even if the
mode is disabled.
[W] TONER LOW
The printer is almost out of toner. When you see this message,
you can still print up to 20 more pages. Then you must replace the
toner cartridge.
[E] TONER OUT
The toner cartridge must be replaced.
[E] TRAY SET XXX
The paper-size setting does not match the paper loaded in the
specified paper cassette. The right column of the display indicates
the currently selected cassette and the expected paper size. You
can either change the paper-size setting or load the correct paper
size. After you correct the paper mismatch, press CONTINUE.
[S] WARMING UP
The printer is warming up.
ALll-8
9/17/91
Laser Printers
ActionLaser II
SelecType
The SelecType function on the printer control panel allows you to
print test pages, display memory size, select paper sizes, and change
your printer’s configuration without using DIP switches or software
commands. However, use SelecType only when you are unable to
use your application software to control settings required for your
print job.
Note: New SelecType settings are in effect only until you turn off the
printer unless you save them with the Level 1 SYSTEM CONFIG
option or the Level 2 P-CONFlG SAVE option described later in this
chapter.
SelecType is divided into two levels as shown below. A brief
description of each main menu option follows.
Level 1
Level 2
CH SELECT
INPUT
P-SIZE
COPIES
ORIENT
FONT
STATUS SHEET
FONT SAMPLE
SUB CONFIG
SYSTEM CONFIG
TEST PRINT
MODE ASSIGN
I/F CONFIG
RX-BUFFER SIZE
CH
CH TIMEOUT
AUTO CONT
P-CONFIG SAVE
FACTORY RESET
VERSION
PAGE COUNTER
STANDBY
SelecType Level 1 functions
I/F CONFIG
Configures the parallel and serial interfaces.
RX-BUFFER SIZE
Chooses the size of the receive buffer.
Channel mode. Sets the interface channels to
CH
auto-sense or individual.
CH TIMEOUT
Channel time out. If no data is sent during
the specified time period, the printer switches
from one channel to the other.
AUTO CONT
Automatic continue. Permits the printer to
continue printing instead of stopping under
certain error conditions.
P-CONFIG SAVE
Printer configuration save. Saves all Level 2
settings.
FACTORY RESET
Returns all Level 1 and Level 2 settings to
their factory settings.
VERSION
Displays the version numbers of the printer’s
controller and font.
PAGE COUNTER
Displays the total number of sheets printed
by the printer and the number by the current
photoconductor unit.
STANDBY
Conserves power by reducing power to the
fixing heater when the printer is not used for
30 minutes.
This section lists all the options available when you use SelecType.
Most options are the same whether you’re working in LJ-2P, LQ, or
FX emulation mode. Some of the options in Level 1, however, have a
different function for each mode.
INPUT
Selects the standard cassette or the optional
multi-media feeder or both.
P-SIZE
Specifies the size of paper.
COPIES
Selects the number of copies to be printed.
Selecting and printing a status sheet
ORIENT
Orientation. Selects portrait (vertical) or
landscape (horizontal) printing orientation.
A status sheet lists the current printer settings.
FONT
Selects one of the available fonts.
STATUS SHEET
Prints a report listing the current printer
settings.
FONT SAMPLE
Prints all font samples (bit-map and scalable
fonts) in the printer.
SUB CONFIG
Subconfiguration. Depending on the printer
mode, controls such features as symbol set
and number of text lines.
SYSTEM CONFIG
System configuration. Saves Level 1 settings
in macros for one or more printer modes,
displays the amount of memory remaining,
changes top and left offsets, and controls
printing of complex pages.
Printing a Status Sheet
1. Make sure that your printer is turned on.
2. Press the
SelecType button until SelecType LEVEL1 appears.
Note:
If you have used SelecType before, and if the printer is set up to
use more than one channel, the following option appears on the
display at step 2:
Press A, V, or D to choose your channel. Then go on to
step 3.
Press V until STATUS SHEET appears on the display.
SelecType Level 2 functions
TEST PRINT
Prints two test patterns.
MODE ASSIGN
Chooses one of the emulation modes:
HP LaserJet IIP, Epson LQ, Epson FX, or
(with the optional identity card installed)
Epson GL.
Laser Printers
9/17/91
ALll-9
ActionLaser II
4. Press D twice to print the status sheet. A sample printout is
shown below.
Choosing a Paper Size
The factory paper-size setting is set to letter. Whenever possible, use
your application software settings to choose the paper size you
require for your print job. If you cannot select the paper size with
your application program, you can use the SelecType Level 1 P-SIZE
option.
You need to choose the paper size (preferably with your software) if
you use a paper other than letter size and:
0 you use manual feeding
0 you install the multi-media feeder
Cl you return to letter-size printing after using another paper size.
The table below lists all the paper sizes on the SelecType menu.
Dimension:
Paper:
A4
A5
B5
LETTER
HALF LT (Half letter)
LEGAL
GLT (Government letter)
GLG (Government legal)
EXE (Executive)
F4
Other
Note: The status sheet prints the printer’s current settings, including
any new macro settings.
Data Dump Mode
Data dump mode is a special feature that makes it easy for
experienced users to find the cause of communication problems
between the printer and computer. The data dump mode produces
an exact printout of the codes reaching the printer.
8 x 10.5 inches
8.5 x 13 Inches
7.25 x 10.5 inches
210 x 330 mm
I
/ Envelopes:
3 ‘/ax 7’h inches
MONARCH
1 4 ‘18 x 9 % inches
110 x 220 mm
162 x 229 mm
C10 (CommercIal- 10)
DL
C5
Make sure that the printer is loaded with paper and turned off.
Hold down the SelecType button while you turn on the printer.
Make sure you hold the button down until the message HEX
DUMP appears on the display.
210 x 297 mm
148 x 210 mm
182 x 257 mm
8.5 x 11 inches
5.5 x 8.5 inches
8.5 x 14 inches
The following table lists recommended paper-feed methods for
different print media. (If you want to try other methods, be sure to
test-print a few sheets before beginning regular use.)
Run any program that causes the printer to print (either an
application program or a program written in any programming
language). Your printer prints out all of the codes sent to it in
hexadecimal format as shown in the sample below.
c
Heavy Paper
(90-157 g/m’
24-42 lb)
Envelopes
Transparencies
Labels
Manual or optional MMF
I
I
Manual or optional MMF
Manual or optional MMF
Manual or optional MMF
Note:
Cl Paper feeding and print quality are usually best with regular
paper.
0 Paper feeding is possible, although print quality cannot be
guaranteed, with other types of media.
0 To print on letterhead paper, load the paper face down with the
top of the paper entering the printer first.
0 To automatically load various types of media into the printer,
use the optional multi-media feeder. See Appendix A.
ALII-10
9/17/91
Laser Printers
ActionLaser II
Installation/Support Tips
Set Up
1. Install a font cartridge or an HPGL card only when the power is
off.
2. Do not use the individual feature unless you have installed
optional memory. If you set this option before adding memory,
you could damage the printer.
Software
1. When using software packages with the ActionLaser II, select
HP LaserJet series IIP as the printer. If this is not available, select
HP LaserJet series II. If neither is available, select HP LaserJet+.
2. If you are using a font cartridge, ensure that the software is set up
to support it.
Information Reference List
Engineering Change Notices
None.
Product Support Bulletins
None.
Technical Information Bulletins
None.
Related Documentation
TM-ACTLASII
ActionLaser II Service Manual
PL-ACTLASII
ActionLaser II Parts Price List
SPKACTLASII
ActionLaser II Self Paced Kit
4000468
ActionLaser II User’s Guide
4000577
ActionLaser II Your First Laser Printer
4000478
ActionLaser II Quick Setup & Maintenance
Guide
Laser Printers
9/17/91
ALII-11