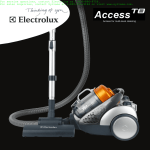
1
Access for multi-level cleaning
ENGLISH
FRANÇAIS
ESPAÑOL
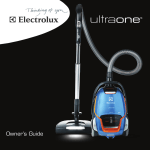
Thank you for having chosen an Electrolux T8
Merci d’avoir choisi un aspirateur Electrolux T8. Ces
Gracias por elegir una aspiradora Electrolux
vacuum cleaner. These Operating Instructions
instructions d’utilisation portent sur l’ensemble des
T8. En este manual de instrucciones se incluyen
cover all T8 models. This means that with your
!
-
&
tains accessoires ou fonctions ne soient pas fournis
no incluya algunos accesorios o funciones. Para
"
"
"#"
%
'
always use original Electrolux accessories. They
$!
%
&
(
have been designed especially for your vacuum
utiliser des accessoires originaux Electrolux. Ils ont
)
*
cleaner.
été spécialement conçus pour votre aspirateur.
2
ENGLISH
IMPORTANT SAFEGUARDS
+
,
,
,/
READ ALL INSTRUCTIONS BEFORE USING THIS VACUUM CLEANER.
WARNING
To reduce the risk of fire, electric shock, or injury:
0
0
0
0
0
0
0
0
0
0
0
0
0
0
0
0
0
0
0
0
0
0
0
0
0
0
1
,
1
"",
,
,
"
1
,
,
4
4
!
1
,
"
,
5
,
a service center before using.
1
1
"
"
6
cord away from heated surfaces.
1
(
,
1
1
",,
1
%
1
,
575
,
"
"
"
6
,
"
1
5
5
1
,
9:
;
""
,""$
,
4(,
1
5
,
<
6
,
5,
4
"
$,
,
#
##
=
,,
1
,
,,,
,1
,
$"
5
%
;
4
"
4
!
1
,
575
,
SAVE THESE INSTRUCTIONS
FOR HOUSEHOLD USE ONLY
To reduce the risk of electric shock, #9
,
:,
#
,
"
1
,
Thermal Cut Off
"
"
,
9>:
5
"
5
(,?>
$?>
5
,
9:
5
&
($
#<"
3
FRANÇAIS
CONSIGNES DE SÉCURITÉ IMPORTANTES
AVERTISSEMENT
Pour réduire le risque de feu, de choc électrique ou de blessure :
0 @!#J!(K
K
0 @#%!KQ#!W9XYZZ[:K#!
"
!#
"
tout travail de nettoyage ou d’entretien.
0 @#!
K
%
4
K
!K
!
0 <"#
!
4#
K
0 @!#!
K<!
"!KKKK!
K!
KKKJ!(K
KK!
#\J""!
0 @#
#!
@!#
K@#
#
@#
"!#
J
0 @!#
!
K
0 Q#!W9XYZZ[:"K
0 @K#!
]
K#
0 @#
!"
K
0 @!K#
"@!#!"
"
K^
"
"WKK
"(
K!
0 K!
#"(
"!
0 @#
%_
0 @!#!J
9:9:
0 ^
""!
]
K"_K"#
travaux d’entretien de la courroie.
0 ]
#
"
#
0 @!#!
!@!#!
`
WK
0 &
#"
J!K
0 Q#
KJ!
`"
"#
0 1K#K"
"!
0 @#
!
0 1K#K"
"!
0 @#
!
CONSERVER CES INSTRUCTIONS
UTILISER L’ASPIRATEUR UNIQUEMENT DANS UN ENVIRONNEMENT DOMESTIQUE
Pour réduire le risque de choc électrique Coupure thermique
4
ESPAÑOL
IMPORTANTE MEDIDAS DE PROTECCIÓN
K
z/
LEA TODAS LAS INSTRUCCIONES ANTES DE UTILIZAR ESTE ASPIRADOR
ADVERTENCIA
Para reducir el riesgo de incendio, descarga eléctrica o lesiones:
0
0
0
0
0
0
0
0
0
0
0
0
0
0
0
0
0
0
0
0
0
0
0
@
%
@
%
K$
|K
K
@
%
%]|
)
)
z
}|
}|
@
|
<
z)%
%
"K"
"
"
"
@
%"
|
|
|%
|
$
|&"
(
|
@
K
(
$
@
%
|]
|
@
'
@
'
%
@
z
7K
"
&
|
Q
%
y partes movibles.
@
K
|
9
:
#
@
"
9:
^
]"
|
@
*
z
~
%
Qz%
1
K
<%
K
|@
%
z
|
4
@
*7
K"
"
%
GUARDE ESTAS INSTRUCCIONES
SÓLO PARA USO DOMÉSTICO
Para reducir el riesgo de una descarga eléctrica, #
9
z
:&
#
<
"<
"*
@
Apagado térmico
&
<
'
|9>:
"
#|
"
<
K
?>
1K
?>
""
|9:<
"*
K"
#
"
&
(
5
1
2
3
4
6
5
6
7
ENGLISH
FRANÇAIS
ESPAÑOL
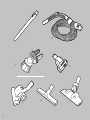
ACCESSORIES
ACCESSOIRES
ACCESORIOS
1* Telescopic tube
K
|
2
Hose handle + hose
2
Poignée pour tuyau et tuyau
Q%
3
Combination brush
3
Brosse combinée
3
Cepillo multiuso
4
Hand Turbo
4
Turbo manuel
4
Turbo de mano
##
5* Embout du turbo
;
6
6
6
Bare floor brush
Brosse pour plancher sans aucun recouvrement
Cepillo para pisos sin alfombra
^
,
##
&
J
;
%
* Depending on the model
* Selon le modèle
* Depende del modelo
7
1
2
3
4
!
5
6
8
ENGLISH
FRANÇAIS
ESPAÑOL
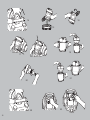
BEFORE STARTING
AVANT LA MISE EN MARCHE
ANTES DE COMENZAR
1
Check the dust container is in place.
2
Insert the hose until the release button clicks to
9
:
3
4
Attach the telescopic tube to the hose handle
##,
9,
:
Extend the electric cord and connect it to the
electrical outlet. The vacuum cleaner is fitted
with a cord winder. Once the electric cable has
(
,
,
pedal. The cord will then rewind.
5
The dust container must be emptied when
debris in container reaches “max fill” line or
when the dust container indicator changes
to red while the cleaner is operating and the
##
6
Start the vacuum cleaner by pressing the power
button. Stop the vacuum cleaner by pressing
once again.
$#\"
J
bien en place.
K
de polvo.
K#%!J
K!9#
K
K:
(|
||9
|:
? Z(#K
J
K
J!
"
9&#
"
K#\
K
:
? |
%
|
"#9~(
:
#
K#\
une prise murale. L’aspirateur est muni d’un
4
KKK
position.
4
Extienda el cable eléctrico y conéctelo a la
^
z
4"#
K
z(
|
]
|
&
z
"#
5
El contenedor de polvo se debe vaciar si
la suciedad en el contenedor llega al nivel
z(
"
%
z
"
]
#K
!
7
!
!\W
^
J
W"K
KXQ([9
(:
!
J
!
!
"K
Q#!
$W#!
J
"
marche.
&
|
encendido. Apague la aspiradora oprimiendo
"
|
9
7
8
9
>
12
11
>
ENGLISH
FRANÇAIS
ESPAÑOL
USING THE CLEANER
UTILISATION DE L’ASPIRATEUR
CÓMO USAR LA ASPIRADORA
Using the turbo nozzle
Utilisation de l’embout turbo
Para utilizar la boquilla turbo
7
K
7J
déloger la peluche et les poils d’animaux.
7
&
J
/#\
"J
;
%
/<#
alfombra o alfombras de pelo corto y tapetes.
Ideal for carpets and wall-to-wall carpeting to
remove stubborn fluff and pet hairs.
^
,
##/4
,
pile carpets and area rugs.
4
##
,/
Ideal para aspirar pelusas persistentes y pelos
de mascotas en alfombras de pared a pared.
4
/
4#!
/
+
/4
##9:
4
/
9>:
9:
,
,
5"
"
/4"
##9:
@
/1
##
5
rugs or carpet fringes. To avoid damaging the
5
##
,
1
##
,
vacuum cleaner immediately after use.
]
/#!
\
"W9:
Q
K
"/
9>:"WK
les sofas et tous autres tissus robustes. La brosse
K9:K
(
K
K
Z
/#9:
@
/!#!
!(
J]
K"
!
#!
@
!
K
#\"
!K!"
"#K!
]
/4
9:
Q#
/&
9>:
#
&
9:#
"
"
/4
9:
@
/@
]
)
K
@
K
|
inmediatamente después de usarla.
11
14
16
15
19
17
18
21
>
22
12
23
ENGLISH
FRANÇAIS
ESPAÑOL
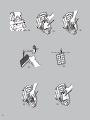
REMOVING THE CONTENTS OF THE DUST
CONTAINER.
VIDER LE CONTENU DU CONTENANT À
POUSSIÈRE.
PARA VACIAR EL CONTENIDO DEL
CONTENEDOR DE POLVO
Always operate the cleaner with the dust container
installed.
^
J
%
W
"
!
Siempre opere la aspiradora con el contenedor de
polvo instalado.
14 Remove the dust container by pressing in the
two gray buttons on the dust container lid.
#
J
les deux boutons gris situés sur le couvercle du
J
14 Quite el contenedor de polvo oprimiendo los
dos botones de color gris ubicados en la tapa
del contenedor de polvo.
#
J
en appuyant sur le bouton gris situé au bas du
contenant.
15 Vacíe el contenido del contenedor de polvo
|
parte inferior del contenedor.
Z#
"
J
%!J\
complètement.
16 Cierre la tapa de contenedor de polvo hasta
escuchar un clic.
15 Remove the contents of the dust container by
pressing the gray button on the bottom of the
container.
16 Close the dust container trapdoor lid until it clicks
shut.
17 Replace the dust container by placing it base first
into the cleaner. Press down until it clicks into
place.
18 Lock the dust container in place by pushing
down on the handle until it clicks into place.
DISMANTLING THE DUST CONTAINER.
To ensure there is no restriction of airflow and
,
5
dust container for blockages.
19 There are 2 clips on the top part of the dust
"
one on the back. Release these clips and lift the
top part of the dust container assembly from the
clear dust bin.
> filtration assembly. Be sure to remove any
obstructions that may be stuck in or on the
assembly.
21 Re-assemble the dust container by placing the
central filtration assembly back into the dust
container bin and securing the front and rear
clips.
CLEANING AND REPLACING THE MOTOR
PROTECTION FILTER.
22 Remove the dust container as previously
described.
23 Refer to the image for where to find the motor
protection filter. Lift the top plastic cover from
its position and pull the filter from its position.
To clean the filter rinse under cold water and
be sure to air dry for at least 24 hours before
placing it back in the vacuum cleaner.
K#
J
K
!$#%!J
\!
#
J
K"%!J"
#
17 Instale el contenedor de polvo colocando
&%
%
18 Asegure en contendor de polvo en su lugar
%
%%
trabe en su lugar.
DÉMONTAGE DU CONTENANT À POUSSIÈRE.
PARA DESMONTAR EL CONTENEDOR DE
POLVO.
]
"
!
K!
!K!
J
(
!
J
!
K
]
%
||
inspeccionar el contenedor de polvo en busca de
19 2 fermoirs sont présents sur la partie supérieure
J
7K
\
KJ!"!J
!^K#
"#
K
J
"
J
19 Hay 2 broches en la parte superior del
"
%
situada al frente y otro en el dorso. Libere estos
"
%
"
z
trasnparente para polvo.
> K#!K
!
$#\"
"W
K
> %
|
|
%
K#
J
déposant l’assemblage de filtration central dans le
J
"
et arrière.
NETTOYER ET REPLACER LE FILTRE DE
PROTECTION DU MOTEUR.
21 Vuelva a armar el contenedor de polvo
%
z
"
abrochando los broches ubicados al frente y
z
#
J
K
précédemment.
PARA LIMPIAR Y CAMBIAR EL FILTRO
PROTECTOR DEL MOTOR.
?
#\"
J!
l’emplacement du filtre de protection du moteur.
<
"#
"K
#]
J!
froide et le faire sécher pendant 24 heures avant
de le replacer dans l’aspirateur.
22 Quite el contenedor de polvo tal como se ha
descrito anteriormente.
? K||
ubica el filtro protector del motor. Levante la
z
(
]
%z
*|
al menos 24 horas antes de volverlo a instalar
en la aspiradora.
13
24
26
25
28
27
29
14
?>
ENGLISH
FRANÇAIS
ESPAÑOL
CLEANING AND REPLACING THE MAIN
FILTER.
NETTOYER ET REPLACER LE FILTRE
PRINCIPAL.
PARA LIMPIAR Y CAMBIAR EL FILTRO
PRINCIPAL.
24
Remove the dust container as previously
described.
#
J
K
précédemment.
24
25
Refer to the image to locate the filter cover
]
,
"
the latch and lift it from the vacuum cleaner.
26
Tilt the filter on a diagonal angle and lift it from
the vacuum cleaner. Tap the filter face down
on a flat surface covered with a sheet of paper.
This will help dislodge excessive residue from
the filter.
#\"
J!
!
"
$#
"K#
"#\!
K|
]
%
(z
aspiradora.
26
Faites basculer le filtre en un angle diagonal et
#\!<
#
"
"
!"
J
déloger les résidus excessifs du filtre.
z
(z
~
"
%
%&
z
a desprender el exceso de residuos del filtro.
<KWK
!
$#\"
%
"
J
!
nettoyage sur le filtre.
1
"
agua corriente fría. Lave siempre el filtro desde
#
en el filtro.
ZKJ!
"
!
sec avant de le réutiliser.
1%
#K
"
"#
#!K
l’aspirateur.
29
?> #
"K
en premier les 2 languettes inférieures et en
"%!J
"
!#!
?> "
%
%
trabarla en su lugar.
27
28
29
If necessary the filter can be washed under a
tap with cold water. Always wash the filter from
filter.
Air dry the filter for 24 hours to ensure it is
completely dry before re-using it.
Re-fit the filter by inserting it on a slight
diagonal angle into the vacuum cleaner.
?>
"
"
,
until it clicks into place.
Quite el contenedor de polvo tal como se ha
descrito anteriormente.
Reinstale el filtro filter introduciéndolo en un
z
15
32
31
33
35
34
16
ENGLISH
FRANÇAIS
ESPAÑOL
CLEANING THE HOSE AND NOZZLE
NETTOYER LE TUYAU ET L’EMBOUT
The vacuum cleaner stops automatically if the
##
5
,
disconnect from electrical outlet and allow to cool
>\?>
5
^!!W
!K"K
`!
K
J
K#!
#\
>J?>
1K
#
#"#
J
#!
marche.
PARA LIMPIAR LA MANGUERA Y LA
BOQUILLA
Tubes and hoses
31 Use a cleaning strip or similar to clear the
tubes and hose.
32 It may also be possible to remove the
#
=
,"
caused by glass or needles caught inside the
hose.
@
/,
"
to the hose while cleaning it.
Cleaning the turbo nozzle*
? 1
##
"
"
etc. by snipping them away with scissors. Use
##
?
##
,
5
the cleaning lid by pressing the button and
"
%
to rotate freely.
TROUBLESHOOTING
The vacuum cleaner does not start
0 5
electrical outlet.
0 5
.
0 5
,
The vacuum cleaner stops
0 5,
0 ##
5
0 $
5
Water has entered the vacuum cleaner
It will be necessary to replace the motor at an
authorised Electrolux service centre. Damage
to the motor caused by the penetration of water
is not covered by the warranty.
Tubes et tuyaux
?4#
%
similaire pour nettoyer les tubes et le tuyau.
?
"#K!
Z
!
WK
du verre ou des aiguilles.
@
/
"
causés au tuyau pendant le nettoyage.
Nettoyer l’embout turbo*
? 1K#!
!
#WK
J
!(4#
K
pour nettoyer l’embout.
?
1!K"K
`!
"#
"
#
%
"W
librement.
DÉPANNAGE
L’aspirateur ne démarre pas
0 $#\"
KJ
K
0 #\"
endommagés.
0 $#\"
!!
L’aspirateur cesse de fonctionner
0 K#
J
<!"#\
0 ^!
\
K
0 ^
\
K
De l’eau s’est infiltrée dans l’aspirateur
Il sera nécessaire de faire remplacer le moteur par un
centre de service autorisé Électrolux. Les dommages
J
K!
!
couverts par la garantie.
^
K%J
z
obstrucciones y cuando el contenedor de polvo
&
*"
>?>
|
vacíe el contenedor de polvo y luego vuelva a poner
en funcionamiento la aspiradora.
Tubos y boquillas
? 4#
para limpiar los tubos y la manguera.
32 Probablemente sea posible eliminar la
|
<
|#
"
%
dentro de la manguera.
@
/^*
)
manguera al tratar de limpiarla.
Para limpiar la boquilla turbo*
? 1
z
%4
el mango de la manguera para limpiar la
?
&
%
#
|
%
SOLUCIÓN DE PROBLEMAS
La aspiradora no encienda
0 K
toma de corriente.
0 hayan dañado.
0 La aspiradora deja de funcionar
0 "
<
"*
0 &z
0 &z
Penetró agua en la aspiradora
"
#
&
(&
daño al motor ocasionado por la entrada de agua
no esta cubierto por la garantía.
17
ENGLISH
THE ELECTROLUX LIMITED WARRANTY
Your Electrolux cleaner is warranted to be free from all defects in material and workmanship in normal household use for a period of five years. The warranty is granted only to the
,%
,
"
,
"
"
$
,Y,!~
",^5,
#"
~&
(
"
&
(,
"
",$
,
&
(,
consumer’s purchase price.
To register your product visit www.electroluxvacuums.com and click on the Product Registration link on the top of the page.
,"
"
,
&
($
#+<
Z
&
($
#+<
"
4<
/
1-800-896-9756
You may also visit us online at
www.electroluxusa.com (USA) or www.electrolux.ca (Canada)
FUTHER LIMITATIONS AND EXCLUSIONS ARE AS FOLLOWS:
$,
,
,
Q
,
ZZ
$]
]
,<
,
,
,
"
,
(
"
"
"&
(
,
<
,(
"
limitation or exclusion may not apply to you.
This warranty gives you specific legal rights. You may also have other rights which vary by state.
REGISTRATION
To register your product visit www.electroluxvacuums.com and click on the Product Registration link on the top of the page. Registering your new Electrolux product entitles you to
the most up-to-date Electrolux product warranty and promotion information.
FRANÇAIS
LA GARANTIE LIMITFE ELECTROLUX
&
((
"
!
K
^
KJ!(K
^
(
"
"!"WK
J
"
K
K
!K!"
!
"
K
"1W
K
KK
K
!
&
(
"
&
(K
J
K
!K(
"K&"
&
(
(!
]
"
"#
,,,
(
!\%
]
"\"
!
!
K(
"!J!
"\"KK&
(]
"\"KK&
(
#"
"\"
#/
1-800-896-9756
Vous pouvez aussi nous consulter sur : www.electrolux.ca
D’AUTRES RESTRIC TIONS ET EXCLUSIONS:
W"J!
J!
K
!J
KJKK
"
JK!
\
"!
\KJ
K\&
(W
K!
!
K
"!(
\"!
J
K(KK!
!
"!K!
"J!
ENREGISTRANT
<!"
"
"
&
(=
K
",,,
(
94<$:
,,,
(9:
!
\%
^!"
"
&
("
!
&
(
K
18
ESPAÑOL
LA GARANTÍA LIMITADA DE ELECTROLUX
<
&
(z#
|
*
)
^*
^*z%
&*
#
#%
"
"
"
#&*
')
K
Q4
$
'
)
#
repuestos Electrolux auténticos.
&
(
|z
#z
#
K%
*&
**&
(
z
]*
"
",,,
(
""%
*%
]
"
%
*"
"
#
%
~*$
#
&
(
|
"
&
4
z
"
/
1-800-896-9756
También puede visitar nuestro sitio web en www.electroluxusa.com
LAS SIG UIENTES SON OTRAS L IMITACION ES Y EXCLUSIO NES ADICIONALES:
**
*
*
|
|*&
|**
anteriores pueden no aplicarse en su caso.
<
|
*
|
;%
&
(z
'
)
&
(|
|)
|
(|
&*
*
4z
"*
REGISTRANDO
]
"
"
&
(=
|"
,,,
(
94<$:
,,,
(9z:
#%
|%&"
&
(
|z#
*
&
(
For service information in the United States
/
1-800-896-9756
Centre de service après-vente agréé de
&
(
#
vous ou des renseignements sur le service
\"
#/
You may also visit us online at
1-800-896-9756
www.electroluxusa.com (USA) or
www.electrolux.ca (Canada)
"#
1-800-896-9756
También puede visitar nuestro sitio web en
www.electroluxusa.com (USA) ou
www.electrolux.ca (Canada)
Part No. 86586
>&
(=
]
Printed in China
www.electroluxusa.com
]
|
"
&
4
z
"
/
www.electroluxusa.com (USA) o
www.electrolux.ca (Canadá)
19
The Electrolux Story
For more than 90 years, Electrolux
has been designing products with real
people in mind. We call it “thoughtful
design” - which means that our
products are not only made to last,
but are also made for ease-of-use and
peace-of-mind.
The “Thinking of you” promise from
Electrolux goes beyond meeting the
needs of today’s consumers. It also
means we’re committed to making
appliances safe for the environment now and for future generations.
At Electrolux, we’re thinking of you.
PN 86586
©>&
(=
]
^
Printed in Hungary
www.electroluxusa.com