1
fety
Table of Contents
Safety ................................................................................iii
Introduction .......................................................................1
Monitor Description ..........................................................3
Monitor Display and Media Box ....................................................3
Media Box Front Panel .................................................................4
Media Box Back Panel .................................................................5
Using the Monitor’s Inputs ............................................................7
Using the Remote Control ............................................................8
Using the Monitor’s Features.........................................13
One-Button Features ..................................................................13
Remote Control Buttons .............................................................15
Menu System ..............................................................................16
Picture Menu ..............................................................................16
Sound Menu ...............................................................................17
Settings Menu .............................................................................18
Options Menu .............................................................................20
Window Menu .............................................................................24
Layout Menu ...............................................................................25
Installation and Setup.....................................................27
Installation Considerations .........................................................27
Connecting Your HDTV Monitor .................................................28
Installing the Media Box Stand ...................................................30
Removing the Speakers .............................................................31
Restoring Your Remote Control’s
Factory Settings for Monitor Control ...........................................31
Page i
Contents
Troubleshooting ............................................................. 33
Appendix ......................................................................... 37
Limited Warranty......................................................................... 37
FCC Compliance ........................................................................ 39
Index ................................................................................ 41
Page ii
Safety Instructions
1.
2.
3.
4.
5.
6.
7.
8.
9.
10.
11.
12.
13.
14.
Read these instructions.
Keep these instructions.
Heed all warnings.
Follow all instructions.
Do not use this apparatus near water.
Clean only with a dry cloth.
Do not block any ventilation openings. Install in accordance with the
manufacturer’s instructions.
Do not install near any heat sources such as radiators, heat registers, stoves, or
other apparatus (including amplifiers) that produce heat.
Do not defeat the safety purpose of the polarized or grounding-type plug. A
polarized plug has two blades with one wider than the other. A grounding-type
plug has two blades and a third grounding prong. The wide blade or the third
prong are provided for your safety. If the provided plug does not fit into your
outlet, consult an electrician for replacement of the obsolete outlet.
Protect the power cord from being walked on or pinched, particularly at plugs,
convenience receptacles, and the point where they exit from the apparatus.
Use only attachments/accessories specified by the manufacturer.
Use only with the cart, stand, tripod, bracket, or table specified by
the manufacturer, or sold with the apparatus. When a cart is used,
use caution when moving the cart/apparatus combination to avoid
injury from tip-over.
Unplug this apparatus during lightning storms or when unused for
long periods of time.
Refer all servicing to qualified service personnel. Servicing is required when the
apparatus has been damaged in any way, such as the power supply cord or plug
is damaged, liquid has been spilled or objects have fallen into the apparatus, the
apparatus has been exposed to rain or moisture, does not operate normally, or
has been dropped.
Apparatus shall not be exposed to dripping or splashing and no
objects filled with liquids, such as vases, shall be placed on the
apparatus.
Page iii
Safety Instructions
Note to installer: This reminder is provided to call the satellite TV system
installer’s attention to Article 820-40 of the National Electrical Code (NEC) that
provides guidelines for proper grounding and, in particular, specifies that the
cable ground shall be connected to the grounding system of the building as close
to the point of cable entry as practical.
Safety Tips
•
•
•
•
•
•
•
•
•
•
•
•
Page iv
Unplug the monitor from the AC power outlet before cleaning.
The use of accessories or attachments not recommended by the monitor
manufacturer will void the Limited Warranty.
Do not place the monitor in an enclosure such as a cabinet without proper
ventilation.
Do not stack the monitor on top of or below other electronic devices.
Do not drop or impact the monitor. The LCD monitor is fragile and may break.
Operate the monitor using only the type of power source indicated on the
marking label. Unplug the monitor power cord by gripping the power plug, not
the cord.
Do not overload wall outlets or extension cords, as this can result in a risk of
fire or electrical shock.
Never insert objects of any kind into the monitor through openings, as the
objects may touch dangerous voltage points or short out parts. This could cause
fire or electrical shock.
Make sure that the outdoor parts of the antenna system are grounded in
accordance with local, state, federal, and National Electrical Code (NEC)
requirements.
Do not locate the antenna near overhead light or power circuits, or where it can
fall into such power lines or circuits. When installing the antenna, take extreme
care to avoid touching such power lines or circuits, as contact with them can be
fatal.
Do not attempt to service the monitor yourself, as opening or removing covers
may expose you to dangerous voltage, and will void the Limited Warranty.
Refer all servicing to authorized service personnel.
Use an electrical outlet that contains surge suppression or ground fault
protection. During a lightning storm, or if the monitor is to be left unattended
and unused for a long period of time, unplug the power cord from the electrical
outlet and disconnect the cable between the monitor and an off-air antenna, if
applicable. This will provide some protection against damage caused by
lightning or power line surges.
Chapter 1
Introduction
Welcome to DISH Network HDTV. This High Definition TV (HDTV) monitor will
bring you the sharpest picture format available. Along with HDTV programming
delivered by DISH Network, you will also be able to enhance your home
entertainment system with this versatile monitor.
Key Features
Your monitor is equipped with features that will add to your TV-viewing
experience. These features include the following:
DISH Digital Visual Interface (DISH DVI)
Use the DISH DVI input to connect a DISH DVI-equipped DISH Network
HDTV satellite receiver. This connection provides the highest quality digital
signal available for HD programming.
Tip: Save your
purchase receipt for
the monitor. See the
Limited Warranty on
page 37 for details.
Unified Remote Control
The remote control provided with your DISH DVI-equipped DISH Network
receiver seamlessly controls both your DISH Network HDTV monitor and
satellite receiver. To program the remote to control other devices, see the
satellite TV receiver User’s Guide.
How to Use This Guide
Tips
In the margins of pages throughout this guide are tips and other information to
make using your HDTV monitor easier.
Conventions
To make it easy for you to use this guide, we use the following conventions.
• The names of remote control buttons and modes are in all capital letters.
Example: Press the SAT button.
• Menus and options that appear on the monitor’s screen are in bold type.
Example: Open the Main Menu.
• Connections on the back of the monitor and receiver are in small capital
letters.
Example: VIDEO.
If You Run Into Problems
There are problems you might run into that are easy to solve. Before you call the
Customer Service Center, be sure to refer to Chapter 5, Troubleshooting. If
problems remain call the Customer Service Center at 1-800-333-DISH (3474).
Page 1
Chapter 1
Introduction
Notes
Page 2
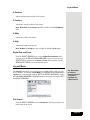
Chapter 2
Monitor Description
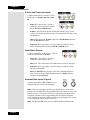
Monitor Display and Media Box
There are three main components of the LCD monitor - the monitor display, the
Media Box, and the power supply.
The monitor display is a flat, thin
screen that shows the video. The
display includes speakers attached
to both sides to play audio and
includes an integral stand for
table-top mounting.
Note: Remove the film
covering the monitor’s screen.
The Media Box includes the
monitor controls and provides the
audio/video input connections for
your DISH Network satellite
receiver and other devices. It
connects to the monitor display
using a system cable. The Media
Box can either be mounted on the
back of the monitor display or
mounted separately whichever
makes getting to the controls or
connections easier.
Note: To mount the Media
Box to the display, insert four
mounting posts on the Media
Box into the matching keyshaped holes on the display
back panel and push down to
lock in place. To remove the
Media Box, press down and
hold the locking clip at the
bottom of the Media Box
while gently pulling the Media
Box up and then away from
the monitor.
The power supply provides power
from a wall outlet to the monitor
through a connection on the
display back panel.
Monitor - Front View
Monitor - Back View
with Media Box Attached
Monitor - Back View
with Media Box Mounted Separately
See Chapter 4 for installation
instructions.
Page 3
Chapter 2
Monitor Description
Media Box Front Panel
The front panel buttons may be used to operate many of the monitor’s
features.
Menu
Displays the Main Menu. Use the MENU button to go back one level in the
menus.
Channel Controls
Changes channels on the monitor’s TV input. While in the menus, use the
CHANNEL +/- to move vertically through the menus.
Note: Normally, you would want to change programming channels using the
DISH Network satellite receiver and its Electronic Program Guide.
Volume Controls
Turns the volume up or down. While in the menus, use the VOL +/- to move
horizontally through the menus and adjust menu settings. In the Source
Select menu, use the VOL +/- to move the highlight to a different input.
Power
Turns the monitor on and off.
Source
Displays the Source menu. In the Source menu, once the desired input is
highlighted using the VOL +/- buttons, use the SOURCE button to switch
to the highlighted input.
Page 4
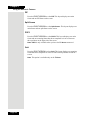
Media Box Back Panel
Media Box Back Panel
DISH DVI Input
Connect a DISH DVI-equipped DISH
Network HD receiver to watch high
definition programming.
•
DISH DVI - Provides a high-quality
digital video interface.
•
L-AUDIO-R (RCA-type audio) - Provides left (white) and right (red)
audio connections when using the DISH DVI video input.
Tip: Remember to
connect the left
and right audio
cables because
the DISH DVI cable
carries the video
signal, not the
sound.
Component Inputs
Connect a component video
source, such as an HD device or a
DVD player, to HDTV1 IN or
HDTV2 IN.
•
Y-PB-PR / Y-CB-CR (Component Video) - Provides optimum picture
quality because the video is separated into three components: Y (green),
PB/CB (blue), and PR/CR (red).
•
L-AUDIO-R (RCA-type audio) - Provides left (white) and right (red)
audio connections when using the COMPONENT INPUTS.
VGA Input
Connect a VGA video source, such as a
computer, to VGA IN.
•
VGA - Provides optimum picture quality because the video is separated
into its individual pieces and travels along the connector’s pins.
•
AUDIO (3.5 mm mini-jack) - Provides stereo (left and right) audio when
using the VGA IN video input.
Note: There is also a VGA input on the monitor itself. This input can only
be used when the Media Box’ system cable is disconnected from the
monitor. Make sure that the monitor is powered off before disconnecting
the system cable.
Page 5
Chapter 2
Monitor Description
S-Video and Composite Inputs
Connect another device, such as a VCR or
DVD player, to S-VIDEO, AV1 IN, or AV2
IN.
•
VIDEO (RCA-type Video) - Provides
composite video connections (yellow)
for the AV1 IN and AV2 IN inputs.
•
S-VIDEO - Provides better picture quality than the RCA-Type Video
(yellow) connections because the video is separated into two parts: color
and brightness.
Note: When connected, S-VIDEO replaces the AV1 IN VIDEO input and
uses the AV1 IN audio inputs.
•
R-AUDIO-L (RCA-type audio) - Provides right (red) and left (white)
audio connections when using the AV1 IN or AV2 IN inputs.
Audio/Video Outputs
Connect an amplifier, audio receiver, VCR, or
external video monitor to AV OUT.
•
VIDEO (RCA-type Video) - Provides a
composite video output (yellow).
Note: This video output does not include menu overlays or messages.
•
R-AUDIO-L (RCA-type audio) - Provides right (red) and left (white)
variable audio outputs.
Note: The AV OUT only provides video from a standard-definition
input. If you are using a high-definition input, the AV OUT displays
content from the TV1 INPUT.
Antenna/Cable Inputs (Capped)
Connect an antenna to TV1 or TV2 to receive
analog broadcasts from an off-air antenna.
Note: For the best viewing experience, you should use the off-air tuner
provided in your DISH DVI-equipped DISH Network satellite receiver. The
satellite receiver’s off-air tuner can receive both analog and digital off-air
broadcasts, integrates off-air programming into its Electronic Program
Guide, and allows all of the satellite and off-air programming to be viewed
over a single high-quality digital connection.
Note: The TV1 and TV2 inputs are for standard definition channels only.
Page 6
Using the Monitor’s Inputs
Headphone Jack
HEADPHONE - Provides a stereo 3.5 mm mini-jack audio
output. To control the volume for this input, see page 17.
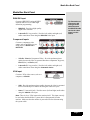
Using the Monitor’s Inputs
To view the programming provided through the audio/video connections on
the Media Box, the DISH LCD monitor must be switched to the correct
input. To switch to the desired input, find its source name on the example
screen below, and then either:
•
Press the INPUT button on the remote control to switch inputs
until the input name is highlighted on the Source Select bar,
or
•
Press the GUIDE button on the remote control, then use the
LEFT and RIGHT ARROWS to highlight the input name on
the Source bar, then press SELECT.
Tip: Remember to
keep the remote
control in TV mode
for these buttons to
work as described.
Note: The H1 and C1 inputs share the same physical connection on the
Media Box (HDTV1 IN), but need to be selected separately depending on
what device is connected. For example, H1 is for high definition sources
(720p or 1080i), which include DISH HD receivers and HD gaming
consoles, while C1 is for enhanced definition sources (480p) which include
DVD Players and non-HD gaming consoles.
Note: In the Source bar, the AV input becomes the SV input when an SVideo cable is connected from a device to the Media Box.
Page 7
Chapter 2
Monitor Description
Using the Remote Control
The remote control gives you easy access to the features of your monitor.
This remote control is provided with your DISH DVI-equipped DISH
Network satellite receiver.
Note: Your remote control may look slightly different than that shown.
Page 8
Using the Remote Control
Remote Control Buttons
The following section describes how to use the remote control with your
monitor.
Mode Buttons
The mode buttons on your remote control allow you to control your
monitor, DISH Network satellite receiver, and other devices.
•
Press the SAT mode button to turn on the monitor and DISH Network
satellite receiver, and change the monitor to the DISH DVI input so you
can watch satellite programming.
Note: You may need to press the SAT button a second time to switch
the input to DISH DVI.
Tip: Normally, you
would want to use
the remote control
in SAT mode to
watch DISH Network
programming
and to use the
extensive features
of your DISH
Network satellite
receiver.
This action also puts the remote control into the SAT mode, enabling it
to control the satellite receiver. Refer to your satellite receiver User’s
Guide instructions to control your satellite receiver.
•
Press the TV mode button to control the DISH Network LCD monitor.
See the section below for details on monitor controls.
•
Press the VCR and AUX mode buttons to control other devices.
See the User’s Guide that came with your DISH Network satellite
receiver for instructions on using the VCR and AUX mode buttons to
program the remote to control other devices.
TV Mode Button
Pressing the TV mode button puts the remote control in the TV
mode. When in the TV mode, the other remote control buttons work
as described below to control monitor features.
Note: Your remote control provided with your DISH DVI-equipped DISH
Network satellite receiver comes from the factory ready to work with your
DISH Network LCD monitor. However, the TV mode button can be
programmed to operate other TVs. If the remote control has been
programmed to operate a different TV and you wish to restore the remote
control factory settings to control your DISH Network LCD monitor, see
Restoring Your Remote Control’s Factory Settings for Monitor Control on
page 31.
Power Buttons
Press the POWER or TV POWER button to turn the monitor on
or off. The TV POWER button will also turn the monitor on or
off in other remote control modes.
Page 9
Chapter 2
Monitor Description
Tip: Remember
to keep the
remote control in
TV mode for
these buttons to
function as
described.
SD/HD Input Button
Press the SD/HD INPUT button to switch to the next input on the
monitor.
Menu Button
Press the MENU button to open the Main Menu. Use the MENU
button to step back out of the menus.
Mute Button
Press the MUTE button to turn off the monitor sound. Press it again
to restore the monitor sound. The MUTE button will mute and
restore the monitor volume in other remote control modes.
Volume Button
Press the minus (-) side of the VOLUME button to
lower the monitor volume. Press the plus (+) side of the
VOLUME button to raise the monitor volume. The
VOLUME button will change the monitor volume in other
remote control modes.
Guide Button
Press the GUIDE button to display the Source Select menu. When
displayed, use the LEFT and RIGHT ARROWS to highlight an
input, and then select the input. While in the TV menus, press the GUIDE
button to bring up the current input and channel information on the right side
of the screen.
Up and Down Arrow Buttons
Press the UP and DOWN ARROW buttons to:
Page 10
•
Move up and down in a menu.
•
Move the picture up and down on the screen when in
Pan mode (described on page 25).
•
Zoom the picture in and out when in Zoom mode
(described on page 25).
•
In Picture-in-Picture (PIP) mode, the UP ARROW will select a picture
window for channel changes and audio control, while the DOWN
ARROW will move the PIP window around the screen. See page 14 for
information about PIP.
Using the Remote Control
Left and Right Arrow Buttons
Press the LEFT and RIGHT ARROW buttons to:
•
Move left and right in a menu
•
Adjust menu settings.
•
Move the picture left and right on the screen when in Pan mode
(described on page 25).
In Picture-in-Picture (PIP) mode, after selecting a window using the UP
ARROW, the LEFT ARROW will allow the monitor to play the selected
picture window’s sound through the monitor’s speakers, while the RIGHT
ARROW will allow the monitor to play the selected picture window’s
sound through the headphone output. See page 14 for information about
PIP.
Page Up and Page Down Buttons
Press the PAGE UP and PAGE DOWN buttons to change
the channel up or down on the monitor’s internal off-air
tuner (TV input).
Note: For the best viewing experience, you should use the off-air tuner
provided in your DISH DVI-equipped DISH Network satellite receiver. The
satellite receiver’s off-air tuner can receive both analog and digital off-air
broadcasts, integrates off-air programming into its Electronic Program
Guide, and allows all of the satellite and off-air programming to be viewed
over a single high-quality digital connection.
Note: The TV input is for standard definition channels only.
Recall Button
Press the RECALL button to go back to the last channel or input
you watched. Press it again to switch between the last two
channels or inputs you watched.
Select/OK Button
Press the SELECT/OK button to:
•
Select menu items.
•
Tune to a channel once entered in using the NUMBER PAD.
•
Tune to an input once highlighted in the Source Select menu.
Info Button
Tip: Remember
to keep the
remote control in
TV mode for
these buttons to
function as
described.
Press the INFO button to activate the Pan and Zoom feature.
The Pan and Zoom feature is described on page 25.
Cancel Button
Press the CANCEL button to remove any menu or display from
the screen and return to normal viewing. While in PIP or POP,
press the CANCEL button to return to Full Screen viewing.
Page 11
Chapter 2
Monitor Description
Pound (#) Button
Press the POUND (#) button to open the Picture Mode menu.
The Picture Mode menu is described on page 13.
Star / Format (*) Button
Press the STAR (*) button to set the Sleep Timer to turn off the
TV after a given amount of time. The Sleep Timer is described
on page 13.
Tip: PIP lets
you watch two
channels at
the same time one channel on
the main screen
and the other in
a smaller window. POP also
lets you watch
two channels at
the same time one channel on
the left side of
the screen
(main picture)
and the other
on the right.
PIP Button
Press this button to open the PIP window. Press the button a
second time to open the Picture-Outside-Picture (POP) window.
When you press the PIP button a third time, the POP window
will close. See page 14 for more details on PIP and POP.
Note: Not all inputs may be available for PIP/POP windows.
Swap Button
Press this button to swap the video in the main display with the
video in the PIP or POP window.
Note: The SWAP button may not work with all inputs.
Position Button
Press this button to move the PIP window to different positions
on the monitor screen.
Number Pad Buttons
Use the NUMBER PAD buttons to enter a channel
number to change the channel. Once entered in,
press the SELECT/OK button to tune to the
channel.
Note: For the best off-air viewing experience, you
should use the off-air tuner provided in your DISH
DVI-equipped DISH Network satellite receiver.
The satellite receiver’s off-air tuner can receive
both analog and digital off-air broadcasts, integrates
off-air programming into its Electronic Program Guide, and allows all of the
satellite and off-air programming to be viewed over a single high-quality
digital connection.
Note: The TV input is for standard definition channels only.
Page 12
Chapter 3
Using the Monitor’s Features
One-Button Features
Satellite System Power-Up
Once your HDTV monitor and DISH Network satellite TV receiver are
connected with a DISH DVI cable, press the SAT button to power on both the
monitor and satellite receiver. After the monitor is on, pressing the SAT button
will always switch the display to satellite programming.
Picture Mode
Press the POUND (#) button on the remote to display the Picture Mode
setting. Then, use the LEFT and RIGHT ARROWS to scroll through available
video modes that enhance your viewing experience by modifying your
Brightness and Contrast settings. The four options available are Normal, Soft,
Bright, and a User definable setting.
Sleep Timer
Press the STAR (*) button on the remote to display the Sleep Timer setting.
Then, use the LEFT and RIGHT ARROWS to specify how long until the
monitor turns itself off. The amounts of time range from 0 to 120 minutes, in 15
minute increments.
Digital Pan and Zoom
Press the INFO button to activate the Digital Pan and Zoom feature. Then
press the UP and DOWN ARROWS to zoom in and out. Press SELECT to
switch between Zoom and Pan. When panning, use the ARROW BUTTONS
to move around the screen.
Page 13
Chapter 3
Using the Monitor’s Features
PIP and POP
The PIP feature lets you display a second, smaller picture on top of the main
picture. The POP feature lets you display two windows side by side. The
main picture is on the left and the POP window is on the right.
PIP Example
Tip: Remember
to keep the
remote control in
TV mode to use
these buttons.
POP Example
There are several remote buttons that control the way the PIP window
works:
•
PIP - Press this button to open the PIP window. Press the
button a second time to open the POP window. When you
press the PIP button a third time, the POP window will
close.
Note: When in POP, the picture on the left is the one that remains
when you close the POP window.
Note: In either PIP or POP, you can choose where each window’s
audio is played. Press the UP ARROW until the desired window is
highlighted. Then, either press the LEFT ARROW to play that
window’s audio through the monitor’s speakers or press the RIGHT
ARROW play the audio through the HEADPHONE output on the
Media Box.
•
POSITION - Press this button to move the PIP window to
different positions on the monitor screen.
Note: The DOWN ARROW button also moves the PIP
window.
•
SWAP - Press this button to swap the video in the main
display with the video in the PIP window.
Note: The SWAP button will only work in PIP while
displaying two standard definition inputs.
Page 14
Remote Control Buttons
Remote Control Buttons
Page 15
Chapter 3
Using the Monitor’s Features
Menu System
When you press the MENU button on the remote control, the main menu is
displayed with six different sub-menus. Use the menus described below to
customize settings on your monitor.
Picture Menu
Tip: Remember
to keep the
remote control in
TV mode to
highlight and
adjust options.
The Picture menu options apply to the video for the main TV and video
input selections. To open the Picture Menu, press MENU and then highlight
the Picture icon on the far left using the LEFT and RIGHT ARROWS. Use
the UP and DOWN ARROWS to highlight an option, and adjust it using the
LEFT and RIGHT ARROWS.
The ways that you can adjust the picture will vary depending on which video
input is being viewed. For example, the AV input offers Sharpness, Color,
and Tint options; the H1 input instead offers Phase and Frequency options.
Brightness
Adjusts the brightness of the picture.
Contrast
Adjusts the difference between the light and dark areas of the picture.
Tip: You can
adjust
sharpness for
each channel.
This is useful if
the video
appears fuzzy.
Sharpness
Adjusts the crispness of the edges in the picture.
Color
Adjusts the richness of the color.
Tint
Adjusts the balance between the red and green levels.
Phase
Adjusts the clarity of the image.
Frequency
Adjusts the monitor to minimize any shimmering or rainbow-like noise
displayed.
Page 16
Sound Menu
Color Temperature
Adjusts the color to be warmer or cooler. The five options available are
Warmest, Warm, Normal, Cool, and Coolest.
Sound Menu
The Sound menu allows you to customize the sound settings on your
HDTV monitor. To open the Sound Menu, press MENU and then highlight
the Audio icon (second from the left) using the LEFT and RIGHT
ARROWS. Use the UP and DOWN ARROWS to highlight an option, and
adjust it using the LEFT and RIGHT ARROWS.
Tip: Remember
to keep the
remote control in
TV mode to
highlight and
adjust options.
Audio Mode
Scroll through available sound modes to enhance your audio experience.
The four options available are Cinema, Music, News, and a User definable
setting.
Treble
Adjusts the treble.
Bass
Adjusts the bass.
Note: The Audio Mode must be set to User to be able to adjust Treble and
Bass.
Balance
Adjusts the sound more to the right or left.
Headphone
Adjusts the volume of the headphone output.
Page 17
Chapter 3
Using the Monitor’s Features
MTS
Scrolls through the available audio types to control the way the sound comes
through your speakers.
•
Stereo - Splits the incoming stereo audio signal into left and right
•
SAP - Plays any Secondary Audio Programming that may be carried
with the program, such as a Spanish audio track or Descriptive
Video for the hearing impaired.
•
Mono - Plays the sound in mono only. Use this setting when
channels. Most TV programs and recorded materials have stereo
audio. The word Stereo appears in the channel banner when you
tune to a program that is broadcast in stereo.
receiving broadcasts with mono or weak stereo audio signals.
Note: The MTS option only appears on the TV input.
Auto Volume
Enable Auto Volume to lower the sound level when a program’s audio is
loud, and to raise the sound level when a program’s audio is quiet.
SRS Effect
Enable SRS Effect (Sound Retrieval System) to make a stereo audio signal
sound more natural and three-dimensional.
Settings Menu
Tip: Remember
to keep the
remote control in
TV mode to
highlight and
adjust options.
The Settings menu allows you to customize the menus and closed
captioning on your HDTV monitor. To open the Settings Menu, press
MENU and then highlight the Settings icon (third from the left) using the
LEFT and RIGHT ARROWS. Use the UP and DOWN ARROWS to
highlight an option, and adjust it using the LEFT and RIGHT ARROWS.
Menu Background
Change the background of the menu system to either Opaque or
Translucent.
Page 18
Settings Menu
Language
Select the language in which the menus will appear: English, Espanol
(Spanish), or Francais (French).
Closed Caption Mode
Select a closed caption setting from the following list: cc1, cc2, t1, t2, cc3,
cc4, t3, or t4. These settings represent one of four different closed
captioning channels in either Caption (cc) or Text (t) mode. In Caption
mode, the dialog or commentary shows up as text while not blocking the
picture. In Text mode, information independent of the program is shown
over the picture, such as a weather forecast or a TV program schedule.
Closed Caption
Change closed caption settings.
•
Off - Turns off closed captioning
•
On - Turns on closed captioning.
•
On Mute - Turns on closed captioning only when the TV is muted.
Closed Caption Background
Select either an Opaque or Transparent background for closed caption
displays.
Note: Closed Caption Mode and Closed Caption Background options
are only available when Closed Caption is set to On, or set to On Mute
when the TV is muted.
Factory Reset
Press SELECT to bring up a confirmation screen asking if you want to reset
all settings back to factory defaults. Use the RIGHT and LEFT ARROWS
to highlight Yes, then press SELECT to perform the reset.
Sat Source
Select the input that the monitor will switch to when the SAT button is
pressed.
Note: If you want to disable this feature, select the Disable option.
Menu Time Out
Select how long the menus stay on the screen before returning to
programming: 5s, 15s, 60s, or 5 min.
Page 19
Chapter 3
Using the Monitor’s Features
Options Menu
Tip: Remember
to keep the
remote control in
TV mode to
highlight and
adjust options.
The Options Menu, only available on the TV, AV/SV, and V2 inputs (see
page 6 for descriptions), allows you to set up and customize your TV
channels and set up locks based on programming content. To open the
Options Menu, press MENU and then highlight the Options icon (third
from the right) using the LEFT and RIGHT ARROWS. Use the UP and
DOWN ARROWS to highlight an option, and adjust it using the LEFT and
RIGHT ARROWS.
TV Tuner Menus
The TV Tuner Menu, only available for the TV input, allows you to set up
and customize your TV channels. To open the TV Tuner Menu, select TV
Tuner from the Options Menu. To return from the TV Tuner menus, press
the MENU button.
Search Menu
To open the Search Menu, highlight the Search icon (on the left) from
the TV Tuner Menu using the LEFT and RIGHT ARROWS. Use the
UP and DOWN ARROWS to highlight an option, and adjust it using
the LEFT and RIGHT ARROWS.
Source
Set the TV input for either an Antenna or Cable TV source.
Page 20
Options Menu
Autoset
Select Autoset to automatically scan through channels and add
them to the TV’s memory. To stop a scan in progress, press the
MENU button.
Auto Fine Tune
Enable Auto Fine Tune to automatically tune a channel’s frequency
to obtain the best picture and sound.
Fine Tune
Manually tune a channel’s frequency to obtain the best picture and
sound.
Channel Skip
Add or remove a channel from the TV’s memory.
• Off - Turning Channel Skip Off adds the channel to the TV’s
memory.
• On - Turning Channel Skip On removes the channel from the
TV’s memory. The channel may only be accessed by direct
entry on the NUMBER PAD.
Channel Menu
To open the Channel Menu, highlight the Channel icon (on the right)
from the TV Tuner Menu using the LEFT and RIGHT ARROWS.
Edit Labels
Select Edit Labels to allow channel labels to be changed. Use the
PAGE UP and DOWN buttons to select a channel, then use the
ARROW BUTTONS to edit that channel’s label. The INPUT button
will clear the current entry, and the MENU button will return you to the
menus.
Content Blocking Menu
Note: Your DISH Network satellite receiver has parental locks that can lock
out DISH Network programming based on ratings, content, or by channel.
The Content Blocking Menu allows you to block TV (non-satellite)
programs and movies containing violence, sex, or other content that may
not be appropriate for some viewers (e.g. children). After you block
programs, you can unblock programs by entering a password. By default,
the software inside your TV is turned off. To open the Content Blocking
Menu, select Content Blocking from the Options Menu. To return from
the Content Blocking menus, press the MENU button.
Note: Content Blocking may only be accessed on the AV/SV, V2, and TV
inputs.
Page 21
Chapter 3
Using the Monitor’s Features
Password Menu
The Password Menu is where you must enter and can change the
password for the content blocks. To open the Password Menu, highlight
the Password icon (on the left) from the Content Blocking Menu using
the LEFT and RIGHT ARROWS.
Enter
To enter the user-defined six-digit password, use the UP and
DOWN ARROWS to change each digit one at a time, and use the
LEFT and RIGHT ARROWS to move to the next digit and then
select OK.
Note: The initial password is 000000. After you have set up locks,
you may change the password.
Change
After the correct password has been entered, the Change option will
appear. If you want to change the password, use the UP and DOWN
ARROWS to change each digit one at a time, and use the LEFT and
RIGHT ARROWS to move to the next digit, and then select OK.
Movie Blocking
The Movie Blocking Menu is where you can set locks based on nonsatellite movie ratings. To open the Movie Blocking Menu after entering
the password, highlight the Movie Blocking icon (in the middle) from
the Content Blocking Menu using the LEFT and RIGHT ARROWS.
In this menu, you will see the ratings below. To lock a rating, highlight it
using the ARROW BUTTONS and press SELECT. Locking a rating
also locks all ratings below it. For example, locking R also locks NC-17,
X, and NR.
Rating
G
Description and Content Themes for Age-Based Ratings
General Audiences - All ages admitted.
PG
Parental Guidance Suggested - Some material may not be suitable
for children.
PG-13
Parents Strongly Cautioned - Some material may be inappropriate
for children under 13.
R
NC-17
X
NR
Restricted - Under 17 requires accompanying parent or adult
guardian.
No One 17 and Under Admitted.
X Rated - An older rating unified with NC-17 but may be used in older
movies.
Not Rated
TV Blocking
Page 22
Options Menu
The TV Blocking Menu is where you can set blocks based on nonsatellite TV ratings. To open the TV Blocking Menu after entering the
password, highlight the TV Blocking icon (on the right) from the
Content Blocking Menu using the LEFT and RIGHT ARROWS.
In this menu, you will see both age and content ratings below. To lock a
rating, highlight it using the ARROW BUTTONS and press SELECT.
Locking a rating also locks all ratings below it. For example, locking
TV-PG also locks TV-14 and TV-MA. To lock a content theme within a
rating, highlight it using the ARROW BUTTONS and press SELECT.
For example, locking TV-14 V (violence) also locks TV-MA V
(violence).
Note: Broadcasters are not required to provide content themes or age-
based ratings.
Rating
Description and Content Themes for Age-Based Ratings
TV-Y
All Children - Themes and elements in this program are designed for a
young audience, including children from ages 2-6. It is not expected to
frighten younger children.
TV-Y7
Directed to Children 7 Years and Older - Designed for children ages
7 and above. It may be more appropriate for children who have
acquired the developmental skills needed to distinguish between makebelieve and reality. Themes and elements in this program may include
mild fantasy violence (FV) or comedic violence, or may frighten
children under the age of 7.
TV-G
General Audience - Most parents would find this program suitable for
all ages. It contains little or no sexual dialogue (D) or situations (S), no
strong language (L), and little or no violence (V).
TV-PG
Parental Guidance Suggested - Contains material that parents may
find unsuitable for younger children. Many parents may want to watch
it with their younger children. The program contains one or more of the
following content themes: some suggestive dialogue (D), infrequent
coarse language (L), some sexual situations (S), or moderate violence
(V).
TV-14
Parents Strongly Cautioned - Contains some material that many
parents would find unsuitable for children under 14. Parents are
strongly urged to exercise greater care in monitoring this program and
are cautioned against letting children under the age of 14 watch
unattended. This program contains one or more of the following
content themes: intensely suggestive dialogue (D), strong coarse
language (L), intense sexual situations (S), or intense violence (V).
TV-MA
Mature Audience Only - Specifically designed to be viewed by adults
and may be unsuitable for children under 17. It contains one or more of
the following content themes: crude indecent language (L), explicit
sexual activity (S), or graphic violence (V).
Page 23
Chapter 3
Using the Monitor’s Features
Content Themes
D
Sexually explicit dialogue
L
Adult language
S
Sexual situations
V
Violence
FV
Fantasy Violence
Window Menu
Tip: Remember
to keep the
remote control in
TV mode to
highlight and
adjust options.
The Window menu allows you to customize how images appear on your HDTV
monitor. To open the Window Menu, press MENU and then highlight the
Window icon (second from the right) using the LEFT and RIGHT ARROWS.
Use the UP and DOWN ARROWS to highlight an option, and adjust it using
the LEFT and RIGHT ARROWS.
Image Size
Scroll through the available Image Size options, which adjust how the
image is displayed on the screen.
• Normal - The picture is displayed without modification, in its native
resolution and aspect ratio.
• Fill All - The picture is stretched vertically and horizontally to fill
the display from edge to edge.
• Wide - A 4:3 image is stretched to fill a 16:9 display with as little
distortion of the image as possible. The stretching only occurs on the
sides of the image, with the extreme edges of the picture showing
the most stretching. Additionally, the top and bottom 5% of the
picture are cropped.
• Zoom - A 16:9 image has its top and bottom cropped by 10%, then
fills the screen horizontally. A 4:3 image has all sides cropped
16.5%, then fills the screen.
Note: Wide and Zoom image sizes are only available on AV/SV, V2,
and TV inputs.
Page 24
Layout Menu
H Position
Adjusts the horizontal position of the picture.
V Position
Adjusts the vertical position of the picture.
Note: H Position and V Position are NOT available on the D (DISH DVI)
input.
H Wide
Adjusts the width of the picture.
V High
Adjusts the height of the picture.
Note: H Wide and V High are only available on the H1 and H2 inputs.
Digital Pan and Zoom
Press the RIGHT ARROW once to select Digital Pan and Zoom. Once
selected, press the UP and DOWN ARROWS to zoom in and out. Press
SELECT/OK to switch between Zoom and Pan. When panning, use the
ARROW BUTTONS to move around the screen.
Layout Menu
The Layout menu allows you to alter Picture-in-Picture (PIP) settings on your
HDTV monitor. To open the Layout Menu, press MENU and then highlight the
Layout icon on the far right using the LEFT and RIGHT ARROWS. Use the
UP and DOWN ARROWS to highlight an option, and adjust it using the LEFT
and RIGHT ARROWS.
Tip: Remember
to keep the
remote control in
TV mode to
highlight and
adjust options.
Full Screen
Press the RIGHT ARROW to select Full Screen. This layout displays one
main frame on the screen.
Page 25
Chapter 3
Using the Monitor’s Features
PIP
Press the RIGHT ARROW to select PIP. This layout displays one main
frame and one PIP frame on the screen.
Split Screen
Press the RIGHT ARROW to select Split Screen. This layout displays one
main frame and one split frame on the screen.
POP3
Press the RIGHT ARROW to select POP3. This layout displays one main
frame and one scanning frame that shows snapshots as it moves between
three positions on the right side of the screen.
Note: POP3 is only available when you have the TV INPUTS connected.
Grid
Press the RIGHT ARROW to select Grid. This layout displays one scanning
frame that shows snapshots as it moves between nine positions around the
screen.
Note: This option is available only on the TV INPUT.
Page 26
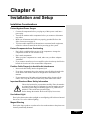
Chapter 4
Installation and Setup
Installation Considerations
Protect Against Power Surges
•
•
•
•
Connect all components before you plug any of their power cords into a
power strip.
Turn off the monitor and/or component before you connect or disconnect
any cables.
Make sure all antennas and cables are properly grounded. Refer to the
Safety Instructions on page iii.
To protect audio amplifiers of the monitor or connected audio equipment,
ensure the volume is turned down before powering up the system.
Protect Components from Overheating
•
•
•
•
Don’t block ventilation holes on any of the components. Arrange the
components so that air can circulate freely.
Don’t stack components.
When you place components in a stand, make sure you allow adequate
ventilation.
If you connect an audio receiver or amplifier, place it on the top shelf so the
heated air from it won’t flow around other components.
Position Cable Properly to Avoid Audio Interference
•
•
•
Insert each cable firmly into the designated jack.
If you place components above the monitor, route all cables down the side
of the back of the monitor instead of straight down the middle of the
monitor.
If your antenna uses 300-ohm twin lead antenna cables, do not coil the
cables. Also, keep the twin lead cables away from audio/video cables.
Important Stand and Base Safety Information
Choose the location for your monitor carefully. Place the monitor
on a stand or base that is of adequate size and strength to prevent
the monitor from being accidentally tipped over, pushed off, or
pulled off. This could cause personal injury
and/or damage the monitor. Refer to the Safety Instructions.
Use Indirect Light
Don’t place the monitor where sunlight or room lighting will be directed toward
the screen. Use soft or indirect lighting.
Magnet Warning
Don’t place large speakers or a subwoofer close to the monitor or the picture can
become permanently distorted.
Page 27
Chapter 4
Installation and Setup
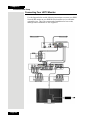
Connecting Your HDTV Monitor
Use the diagram below and the following instructions to connect your DISH
Network HD monitor to your DISH Network satellite receiver and other
optional devices. This is the recommended installation for best results,
although other installations are also supported.
Page 28
Connecting Your HDTV Monitor
Connect Your DISH Network Satellite Receiver
1. Connect a DVI cable between the Media Box and DISH Network
satellite receiver DISH DVI connectors.
2. Connect red and white RCA-type cables between the matching color
RCA-type plugs on the Media Box audio inputs and DISH Network
satellite receiver audio outputs.
Connect a VCR (Optional)
Follow these instructions to connect the monitor to a VCR. See your VCR
User’s Guide for VCR setup instructions.
1. Connect yellow, white, and red RCA-type cables between the matching
color RCA-type plugs at AV1 IN or AV2 IN inputs on the Media Box and
the VCR outputs.
2. Connect yellow, white, and red RCA-type cables between the matching
color RCA-type plugs at the inputs on the VCR and the satellite TV
receiver outputs.
Note: Optionally, instead of connecting video using yellow RCA-type
connections, connect an S-Video cable at the input on the VCR and
satellite TV receiver output.
Connect a DVD Player and/or Game Console
(Optional)
Follow these instructions to connect the monitor to a DVD player or other
device. See your DVD player or other device User’s Guide for setup
instructions.
1. Connect green, blue, and red component cables between the matching
color connections at the HDTV1 or HDTV2 inputs on the Media Box and
outputs on a DVD player or other device.
2. Connect white and red RCA-type cables between the matching color
RCA-type plugs at the HDTV1 or HDTV2 inputs on the Media Box and
the outputs on a DVD player or other device.
Connect the System Cable
Connect the system cable to the Media Box and to the monitor’s SYSTEM
CABLE connections.
Note: Before disconnecting the system cable, first make sure that the
monitor is powered off.
Page 29
Chapter 4
Installation and Setup
F
Connect the Speaker Cables
Connect the speaker cables from the monitor to the speakers. Make sure
that the black cylinders on the cables are closer to the monitor connection
than the speaker connection as shown on page 28. Make sure each speaker
wire is connected to the same color on both ends - red to red, black to black.
Note: If speaker wire clips are included on the back of the monitor, you may
place the speaker wires through the clips for a cleaner looking installation.
G
Plug In Your Monitor to a Power Outlet
Connect the power supply’s DC power cable to the monitor by plugging the
special round connector to the Media Box’s POWER IN connector on the back.
The notch on the round connector when properly positioned will face you.
Plug the other provided power cable into the power supply, and connect the
power supply plug to a power strip.
Installing the Media Box Stand
The DISH Network LCD monitor is shipped with a stand to hold the Media
Box upright. Complete the following instructions to mount the Media Box
on the stand.
1. Turn off and unplug the monitor.
2. Disconnect all of the cables from the Media Box.
3. Remove the Media Box by pressing down and holding the locking clip
at the bottom of the Media Box while gently pulling the Media Box up
and then away from the monitor.
4. Turn the Media Box so that the DISH Network logo is right side up.
5. Place the stand on the right side of the Media Box.
6. Align the holes on the stand with the holes on the Media Box.
7. Insert and tighten the two screws included with the monitor.
8. Reconnect all of the cables as described in Connecting Your HDTV
Monitor starting on page 28.
Page 30
Removing the Speakers
Removing the Speakers
The DISH Network LCD monitor is shipped with its speakers attached. If
you want to detach the speakers, follow these instructions.
Note: Make sure the monitor’s power is disconnected before attaching or
detaching speaker connections.
1. Turn off the monitor, and unplug it from power.
2. Detach both speaker cables from both the speaker and the monitor.
3. On each speaker, there are two plastic covers. Squeeze them on the top
and bottom and carefully pull them off.
4. Behind each cover are four Phillips-head screws. Unscrew them.
Note: As you unscrew the speakers, make sure to hold the speaker to
prevent it from being damaged in a fall.
5. Store the screws, covers, and speakers.
Restoring Your Remote Control’s Factory Settings
for Monitor Control
Your remote control provided with your DISH DVI-equipped DISH
Network satellite receiver comes from the factory ready to work with your
DISH Network HDTV monitor. However, the TV mode button can be
programmed to operate other TVs (refer to your DISH Network satellite
receiver User’s Guide for more details). If the remote control has been
programmed to operate a different TV, you can restore the remote control
factory settings to control your DISH Network HDTV monitor by
performing the following:
1. Press and hold the TV button until all four mode buttons light.
Release the button.
2. Use the NUMBER PAD buttons to enter 7-4-2.
3. Press the POUND (#) button. If you entered the
code correctly, the TV mode button will flash three times.
4. Press the SAT button and the monitor should turn on. If it doesn’t
turn on, repeat steps 1 through 4.
Page 31
Chapter 4
Installation and Setup
Notes
Page 32
Chapter 5
Troubleshooting
Use these tables if you have problems using the system before calling the
Customer Service Center. Many problems arise from misunderstandings of how
the system works, especially when you are just becoming familiar with it. These
tables cover many problems, usually with a simple solution for each one. To
solve a particular problem, do the following:
1. Review the section in this Guide that relates to the problem.
2. If you cannot find a solution, then find the section in the following tables
that relates to the problem.
•
•
Read the What’s Happening column until you find the problem.
Try each of the suggested solutions in the What to Do column.
3. If the problem cannot be solved using the above steps, call the Customer
Service Center at 1-800-333-DISH (3474).
Page 33
Chapter 5
Troubleshooting
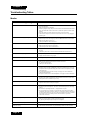
Troubleshooting Tables
Monitor
What is Happening
What to Do
Monitor won’t turn on.
•
•
•
•
Can’t see DISH Network programming.
•
•
•
•
Remote won’t control the monitor.
• Remote control may need to be reprogrammed. See the instructions on page 31.
• Make sure the remote control is in TV mode.
• Check and replace the remote control batteries.
Front panel buttons don’t work.
• Unplug the monitor for two minutes and then plug it back in. Turn the monitor on and
try again.
• Check the System Cable’s connection between the Media Box and the monitor.
Monitor turns off while playing.
• Sleep timer may have been activated. Go to page 13 for instructions.
• Unplug. Wait two minutes. Plug in again.
Monitor turns on unexpectedly.
• You might have pressed a button on the remote control accidentally.
Blank screen.
•
•
•
•
No sound, picture OK.
• Maybe the sound is muted. Try pressing the volume up button to restore sound.
• If using S-Video, Y-PB-PR, or DISH DVI connections, remember to also connect the
component’s left and right audio output jacks to the monitor’s corresponding L and R
Audio input jacks.
• The sound settings may not be set correctly. Go to page 16 for more information.
• Check the cable connectors.
• The picture window’s audio is set to Headphone. Go to page 16 for more information.
Can’t select certain channels or inputs.
• Channel may be blocked or not approved in the Parental Controls menu.
• If using a VCR, check to make sure the TV/VCR button on the VCR is in the correct
mode (press the TV/VCR button on your VCR).
Noisy stereo reception.
• May be a weak station. Use Audio menu to choose mono sound.
• Adjust the off-air antenna to improve reception.
No picture, no sound, but monitor is on.
• Make sure the component connected to the monitor is turned on.
• The Source option in the Options - TV Tuner - Search menu may be set to the wrong
position.
• The channel or input might be blank — change channels or inputs.
• If you’re watching your VCR and it’s connected with coaxial cable to the CABLE/
ANTENNA jack, tune the monitor to channel 3 or 4 (whichever channel is selected on
the 3/4 switch on the back of your VCR). Also check to make sure the TV/VCR button
on the VCR is in the correct mode (press the TV/VCR button on your VCR).
• Check cable connections.
Sound OK, but the picture is poor.
• Check antenna connections.
• Make sure all of the cables are firmly connected to the jacks.
• Try adjusting the Sharpness option to improve weak signals.
Volume buttons not adjusting volume louder.
• Check to make sure volume isn’t limited by the Auto Volume feature (see page 17).
Picture not moving.
• Check whether the Pause feature on your DISH Player-DVR or VCR is activated.
Page 34
Press the TV power button.
Press the SAT button.
Make sure the monitor is plugged in.
Something might be wrong with your remote control. Press the POWER button on the
front of the Media Box. If the monitor turns on, check and replace the remote control
batteries.
• If the wall outlet is switched, make sure the switch is in the ON position.
• Check the wall receptacle (or extension cord) to make sure it is “live” by plugging in
something else.
Make sure your monitor is on.
Monitor may be set for the wrong input. Press the SAT button on the remote control.
Make sure the satellite receiver is on.
Check your DISH DVI cable connections.
Make sure the monitor is turned on.
Make sure the component connected to the monitor is turned on.
Try another channel or input.
Check your cable connections.
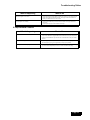
Troubleshooting Tables
What is Happening
What to Do
Black box appears on the screen.
• Closed-captioning might be enabled on either your monitor or your satellite receiver.
Check Closed Caption in the Settings menu. Go to page 18 for more instructions.
Check your satellite receiver’s User’s Guide.
Closed caption is not working
• Closed Caption Mode may be set to the incorrect mode. Go to page 18 for more
information.
• Closed Captioning may not be available on this input.
V-Chip/Parental Controls
What is Happening
What to Do
Ratings limits don’t work.
• The V-Chip Parental Control is not available for DISH DVI, HDTV1, or HDTV2
inputs. Your DISH DVI-equipped DISH Network satellite receiver provides parental
controls for the DISH DVI input. See the User’s Guide that came with your satellite
receiver.
Password lost or forgotten.
• If you forget your password, enter 666888 as the password. The Change option will
then be displayed, giving you an opportunity to change your password.
V-Chip blocks non-violent programs.
• Maybe the movie was given an NR (Not Rated) status. After you block movie ratings,
you must unlock NR separately in order to view movies with an NR rating.
Page 35
Chapter 5
Troubleshooting
Notes
Page 36
Appendix
Limited Warranty
This Limited Warranty is a legal document. Keep it in a safe place. Remember to
retain your original purchase receipt for warranty service! Any items returned
without a copy of the original purchase receipt will be considered out of warranty.
What the Warranty Covers
This warranty extends only to the original user of this DISH Network Monitor.
EchoStar Technologies Corporation ("EchoStar") warrants this DISH Network
Monitor against defects in materials or workmanship as follows:
LABOR: For a period of one (1) year from the original date of purchase, if
EchoStar determines in its sole judgment that the DISH Network Monitor is
defective subject to the limitations of this warranty, EchoStar will arrange to pay an
Authorized Service Center for DISH Network Monitors for the labor charges to
repair your DISH Network Monitor. EchoStar warrants any such work done against
defects in materials or workmanship for the remaining portion of the original
warranty period.
PARTS: For a period of one (1) year from the original date of purchase, if EchoStar
determines in its sole judgment that any part of a DISH Network Monitor is
defective subject to the limitations of this warranty, EchoStar will arrange to pay an
Authorized Service Center for DISH Network Monitors to supply new or remanufactured parts in exchange for parts determined by EchoStar in its sole
judgment to be defective subject to the limitations of this warranty. EchoStar
warrants any such replacement parts against defects in materials or workmanship
for the remaining part of the original warranty period. Note: “parts” means items
included in this package. It does not include other parts purchased separately.
For Service
• Call 1-800-333-DISH (3474) and have your unit's date of purchase and model
number ready.
• A Customer Service Representative will assist you.
• If the Representative determines that the monitor needs service, they will provide
you with contact information in order to have your DISH Network Monitor
serviced.
• The original purchase receipt which is evidence that the product is within the
warranty period must be presented to obtain warranty service.
• If the monitor is wall mounted you will need to remove it from the wall in order
for it to be serviced. Unless it was professionally installed by DISH Network in
which case you will need to provide the work order document provided at the
time of install showing that the unit was professionally installed.
What the Warranty Does Not Cover
• This warranty does not cover customer instruction. (Your Owner's Manual
describes how to install, adjust, and operate your unit. Any additional
information should be obtained from your retailer.)
• This warranty does not cover installation and related adjustments. If applicable,
such installation will be warranted under a separately purchased installation
agreement.
Page 37
Appendix
• This warranty does not cover physical setup or adjustment of any consumer
electronic devices, remote control batteries, loss of use of the DISH Network
Monitor, or unused programming charges due to malfunction.
• This warranty does not cover signal reception problems.
• This warranty does not cover cosmetic damage, damage due to lightning,
electrical or telephone line surges, fire, flood, or other acts of Nature,
accident, misuse, abuse, repair or alteration by other than an Authorized
Service Center for DISH Network Monitors, use of accessories not included
in this package, negligence, commercial or institutional use, or improper or
neglected maintenance.
• This warranty does not cover batteries.
• This warranty does not cover damage from images burnt onto the screen.
• This warranty does not cover a unit that has been modified or incorporated
into other products.
• This warranty does not cover a unit purchased, serviced or operated outside
the continental United States of America.
• This warranty does not cover problems which do not involve defective
materials or workmanship. Costs of such service calls are the sole
responsibility of the user.
• This warranty does not cover equipment sold AS IS or WITH ALL
FAULTS.
• This warranty does not cover shipping damage.
• This warranty does not cover a limited number of nonconforming pixels.
Legal Limitations
REPLACEMENT AND/OR REPAIR AS PROVIDED UNDER THIS
WARRANTY IS YOUR EXCLUSIVE REMEDY. ECHOSTAR SHALL NOT
BE HELD LIABLE FOR ANY INCIDENTAL OR CONSEQUENTIAL
DAMAGES FOR BREACH OF ANY EXPRESSED OR IMPLIED
WARRANTY ON THIS DISH NETWORK MONITOR, NOR FOR ANY
INCIDENTAL OR CONSEQUENTIAL DAMAGES RESULTING FROM
THE USE OF, OR INABILITY TO USE, THIS DISH NETWORK
MONITOR. UNDER NO CIRCUMSTANCES SHALL ECHOSTAR'S
LIABILITY, IF ANY, EXCEED THE PURCHASE PRICE PAID FOR THIS
DISH NETWORK MONITOR. EXCEPT TO THE EXTENT PROHIBITED
BY APPLICABLE LAW, ANY IMPLIED WARRANTY OF
MERCHANTABILITY OR FITNESS FOR A PARTICULAR PURPOSE ON
THIS SYSTEM IS LIMITED IN DURATION TO THE PERIOD OF THIS
WARRANTY. ECHOSTAR RESERVES THE RIGHT TO REFUSE TO
HONOR THIS WARRANTY IF ECHOSTAR DETERMINES ANY OF THE
ABOVE EXCEPTIONS HAVE CAUSED THIS DISH NETWORK
MONITOR NOT TO HAVE PERFORMED PROPERLY. THIS WARRANTY
SHALL BE VOID IF ANY FACTORY-APPLIED IDENTIFICATION
MARK, INCLUDING BUT NOT LIMITED TO SERIAL NUMBERS, HAS
BEEN ALTERED OR REMOVED. THIS WARRANTY SHALL ALSO BE
VOID IF THIS DISH NETWORK MONITOR HAS BEEN OPENED BY AN
UNAUTHORIZED PERSON.
How State Law Relates to this Warranty
Some states do not allow the exclusion nor limitation of incidental or
consequential damages, or limitations on how long an implied warranty lasts,
so the above limitations or exclusions may not apply to you. This warranty
gives you specific legal rights, and you also may have other rights that vary
from state to state.
Page 38
FCC Compliance
Equipment Modifications
There are no customer repairable parts inside. Any attempts to open
or repair the Monitor will void your warranty. There is risk of
electrical shock, which may result in damage to the equipment, or
personal injury or death.
FCC Compliance
The following text is extracted from Federal Communications
Commission (FCC) regulations, as of the publication date of this
Guide. Contact the FCC (see following) or your library for the
complete text of the regulations.
Radio Interference
This device complies with Part 15 of the FCC Rules. Operation is subject to the
following two conditions:
• This device may not cause harmful interference, and
• This device must accept any interference received, including interference
that may cause undesired operation.
This equipment has been tested and found to comply with the limits for a Class
B digital device, pursuant to Part 15 of the FCC Rules. These limits are
designed to provide reasonable protection against harmful interference in a
residential installation. This equipment generates, uses, and can radiate radio
frequency energy and, if not installed and used in accordance with the
instructions, may cause harmful interference to radio communications.
However, there is no guarantee that interference will not occur in a particular
installation. If this equipment does cause harmful interference to radio or
television reception, which can be determined by turning the equipment off and
on, the user is encouraged to try to correct the interference by one or more of
the following measures:
• Reorient or relocate the receiving antenna.
• Increase the separation between the equipment and receiver.
• Connect the equipment into an outlet on a circuit different from that to which
the receiver is connected.
• Consult the dealer or an experienced radio/TV technician for help.
• If none of the above remedies stops the radio interference, you should
contact a licensed radio/television technician, your satellite dealer, or call the
Customer Service Center at 1-800-333-3474, for assistance.
Page 39
Appendix
Notes
Page 40
Index
A
K
Antenna/Cable Inputs 6
Audio/Video Outputs 6
Key Features 1
DISH DVI 1
Unified Remote Control 1
B
Back Panel 5
C
Cancel Button 11
Channel Controls 4
Component Inputs 5
D
Digital Pan and Zoom 13
DISH DVI 1
DISH DVI Input 5
Display 3
F
Factory Settings 31
Front Panel 4
G
Guide Button 10
H
Headphone Jack 7
I
Inputs 7
Antenna/Cable Inputs 6
VGA Input 5
Installation Considerations 27
L
Layout Menu 25
Left and Right Arrow Buttons 11
M
Media Box 3
Antenna/Cable Inputs 6
Audio/Video Outputs 6
Back Panel 5
Channel Controls 4
Component Inputs 5
DISH DVI Input 5
Front Panel 4
Headphone Jack 7
Menu 4
Power 4
Source 4
S-Video and Composite Inputs 6
VGA Input 5
Volume Controls 4
Menu 4, 16
Menu Button 10
Menu System
Layout 25
Picture 16
Settings 18
Sound 17
Window 24
Monitor Connections 28
Movie Blocking 22
Mute Button 10
Page 41
Index
N
Number Pad Buttons 12
O
One-Button Features 13
Digital Pan and Zoom 13
Picture Mode 13
PIP and POP 14
Satellite System Power-Up 13
Sleep Timer 13
Options Menu
Menu System
Options 20
Outputs
Headphone Jack 7
P
Page Up and Page Down Buttons 11
Picture Menu 16
Picture Mode 13
PIP and POP 14
PIP Button 12
Position Button 12
Pound (#) Button 12
Power 4
Power Buttons 9
Page 42
Position Button 12
Pound (#) Button 12
Power Buttons 9
Recall Button 11
SD/HD Input Button 10
Select/OK Button 11
Star / Format (*) Button 12
Swap Button 12
TV 9
Up and Down Arrow Buttons 10
Restore Factory Settings 31
S
Satellite System Power-Up 13
SD/HD Input Button 10
Select/OK Button 11
Settings Menu 18
Sleep Timer 13
Sound Menu 17
Source 4
Star / Format (*) Button 12
S-Video and Composite Inputs 6
Swap Button 12
T
TV Blocking 22
TV Mode 9
R
U
Rating
TV Blocking 22
Ratings
Movie Blocking 22
Recall Button 11
Remote Control 8
Buttons 9
Cancel Button 11
Guide Button 10
Left and Right Arrow Buttons 11
Menu Button 10
Mode 9
Mute Button 10
Number Pad Buttons 12
Page Up and Page Down Buttons 11
PIP Button 12
Unified Remote Control 1
Up and Down Arrow Buttons 10
V
VGA Input 5
Volume Controls 4
W
Window Menu 24
Index
Notes
Page 43
Index
Notes
Page 44
Write the following information in the spaces provided below. You may need to provide this information if you call
the Customer Service Center.
Purchase Location Name:
Purchase Location Telephone Number:
Monitor Serial Number:
134536