1
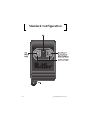
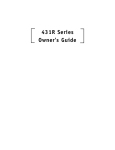
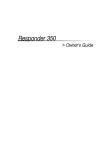
Model 250
Owner's Guide
Downloaded from: http://www.guardianalarms.net
Limited Lifetime
Consumer Warranty
For a period of one calendar year from the date of purchase of this auto-security
device, Directed Electronics, Inc. promises to the ORIGINAL PURCHASER to repair or
replace (with a comparable reconditioned model), free of cost, any electronic control
module which proves to be defective in workmanship or material under normal use,
SO LONG AS THE SYSTEM WAS SOLD, INSTALLED, AND SERVICED BY A PROFESSIONAL
AUTO INSTALLER, AND REMAINS IN THE CAR IN WHICH THE SYSTEM WAS ORIGINALLY
INSTALLED. If warranty service is necessary you must have a clear copy of your sales
receipt containing all of the information shown on the following page.
After the first calendar year, from the date of purchase of this auto-security device,
Directed Electronics, Inc., promises to the ORIGINAL PURCHASER to repair or replace
(with a comparable reconditioned model) any electronic control module which proves
to be defective in workmanship or material under normal use FOR A CHARGE OF
$45.00, SO LONG AS THE SYSTEM WAS SOLD, INSTALLED, AND SERVICED BY A PROFESSIONAL AUTO INSTALLER, AND REMAINS IN THE CAR IN WHICH THE SYSTEM WAS
ORIGINALLY INSTALLED. If warranty service is necessary you must have a clear copy
of your sales receipt containing all of the information shown on the following page.
This warranty contains the entire agreement relating to warranty and supersedes all
previous and contemporaneous representations or understandings, whether written or
oral. IN ANY EVENT, DEI IS NOT LIABLE FOR THE THEFT OF THE VEHICLE AND/OR ITS
CONTENTS.
This warranty is void if the product has been damaged by accident, unreasonable use,
neglect, improper service or other causes not arising out of defects in materials or
construction. This warranty is nontransferable and does not apply to any unit that
has been modified or used in a manner contrary to its intended purpose and does not
cover batteries. The unit in question must be returned to the manufacturer, postage
prepaid. This warranty does not cover labor costs for the removal, diagnosis, troubleshooting or reinstallation of the unit. For service on an out-of-warranty product a
flat rate fee by model is charged. Contact your authorized dealer to obtain the service charge for your unit.
These systems are a deterrent against possible theft. Directed Electronics, Inc. is not
offering a guarantee or insuring against the theft of the automobile or its contents
and disclaims any liability for the theft of the vehicle and/or its contents. Directed
Electronics does not authorize any person to create for it any other obligation or liability in connection with this security system.
© 2001 Directed Electronics, Inc.
i
TO THE MAXIMUM EXTENT ALLOWED BY LAW, ANY AND ALL WARRANTIES ARE EXCLUDED BY THE MANUFACTURER AND EACH ENTITY PARTICIPATING IN THE STREAM OF COMMERCE THEREWITH. THIS EXCLUSION INCLUDES BUT IS NOT LIMITED TO THE EXCLUSION OF ANY AND ALL WARRANTY OF MERCHANTABILITY AND/OR ANY AND ALL WARRANTY OF FITNESS FOR A PARTICULAR PURPOSE AND/OR ANY AND ALL WARRANTY OF
NON-INFRINGEMENT OF PATENTS, IN THE UNITED STATES OF AMERICA AND/OR
ABROAD. NEITHER THE MANUFACTURER OR ANY ENTITIES CONNECTED THEREWITH
SHALL BE RESPONSIBLE OR LIABLE FOR ANY DAMAGES WHATSOEVER, INCLUDING BUT
NOT LIMITED TO ANY CONSEQUENTIAL DAMAGES, INCIDENTAL DAMAGES, TOWING,
REPAIR, REPLACEMENT, DAMAGES FOR LOSS OF TIME, LOSS OF EARNINGS, COMMERCIAL
LOSS, LOSS OF ECONOMIC OPPORTUNITY AND THE LIKE. NOTWITHSTANDING THE
ABOVE, MANUFACTURER DOES OFFER A LIMITED WARRANTY TO REPLACE OR REPAIR
THE CONTROL MODULE AS DESCRIBED ABOVE. Some states do not allow limitations on
how long an implied warranty will last or the exclusion or limitation of incidental or
consequential damages. This warranty gives you specific legal rights, and you may
also have other rights which vary from state to state.
IMPORTANT NOTE:
This product warranty is automatically void if its date code or serial number is
defaced, missing, or altered. This warranty will not be valid unless you have completed the warranty card and mailed it to Directed Electronics, Inc. within 10 days
after purchase to the address listed on the warranty registration card.
Make sure you have all of the following information from your dealer:
A clear copy of the sales receipt, showing the following:
■
■
■
■
■
■
■
■
■
ii
Date of purchase
Your full name and address
Authorized dealer's company name and address
Type of alarm installed
Year, make, model and color of the automobile
Automobile license number
Vehicle identification number
All security options installed on automobile
Installation receipts
© 2001 Directed Electronics, Inc.
Table of Contents
Limited Lifetime Consumer Warranty . . . . . . . . . . . . . . . . . . . . . . . . . . . . . . i
What Is Included . . . . . . . . . . . . . . . . . . . . . . . . . . . . . . . . . . . . . . . . . . . . 3
Important Information . . . . . . . . . . . . . . . . . . . . . . . . . . . . . . . . . . . . . . . . 3
System Maintenance . . . . . . . . . . . . . . . . . . . . . . . . . . . . . . . . . . . . . . . . 3
Your Warranty . . . . . . . . . . . . . . . . . . . . . . . . . . . . . . . . . . . . . . . . . . . . . 4
FCC/ID Notice . . . . . . . . . . . . . . . . . . . . . . . . . . . . . . . . . . . . . . . . . . . . . 4
Transmitter Functions . . . . . . . . . . . . . . . . . . . . . . . . . . . . . . . . . . . . . . . . . 5
Standard Configuration . . . . . . . . . . . . . . . . . . . . . . . . . . . . . . . . . . . . . . . 5
Using Your System . . . . . . . . . . . . . . . . . . . . . . . . . . . . . . . . . . . . . . . . . . . 6
Arming . . . . . . . . . . . . . . . . .
Disarming . . . . . . . . . . . . . . .
Disarming Without a Transmitter
Panic Mode . . . . . . . . . . . . . .
Silent Mode . . . . . . . . . . . . . .
Valet Mode . . . . . . . . . . . . . .
Remote Valet . . . . . . . . . . . . .
Nuisance Prevention Circuitry . .
.
.
.
.
.
.
.
.
.
.
.
.
.
.
.
.
.
.
.
.
.
.
.
.
.
.
.
.
.
.
.
.
.
.
.
.
.
.
.
.
.
.
.
.
.
.
.
.
.
.
.
.
.
.
.
.
.
.
.
.
.
.
.
.
.
.
.
.
.
.
.
.
.
.
.
.
.
.
.
.
.
.
.
.
.
.
.
.
.
.
.
.
.
.
.
.
.
.
.
.
.
.
.
.
.
.
.
.
.
.
.
.
.
.
.
.
.
.
.
.
.
.
.
.
.
.
.
.
.
.
.
.
.
.
.
.
.
.
.
.
.
.
.
.
.
.
.
.
.
.
.
.
.
.
.
.
.
.
.
.
.
.
.
.
.
.
.
.
.
.
.
.
.
.
.
.
.
.
.
.
.
.
.
.
.
.
.
.
.
.
.
.
.
.
.
.
.
.
.
.
.
.
.
.
.
.
.
.
.
.
.
.
.
.
.
.
.
.
.
.
.
.
.
.
.
.
.
.
.
.
.
.
.
.
.
.
.
.
.
.
.
.
.
.
.
.
.
.
.
.
.
.
.
.
.
.
6
7
7
8
8
9
9
10
Diagnostics . . . . . . . . . . . . . . . . . . . . . . . . . . . . . . . . . . . . . . . . . . . . . . . . 11
Arming Diagnostics . . . . . . . . . . . . . . . . . . . . . . . . . . . . . . . . . . . . . . . . . 11
Disarming Diagnostics . . . . . . . . . . . . . . . . . . . . . . . . . . . . . . . . . . . . . . . 11
Table of Zones . . . . . . . . . . . . . . . . . . . . . . . . . . . . . . . . . . . . . . . . . . . . 12
Code-Hopping™ . . . . . . . . . . . . . . . .
High Frequency . . . . . . . . . . . . . . .
Programming Options . . . . . . . . . . .
Security & Convenience Expansions .
Glossary Of Terms . . . . . . . . . . . . . .
Quick Reference Guide (Removable)
© 2001 Directed Electronics, Inc.
. . . . . . . . . . . . . . . . . . . . . . . . . . . . . . 13
. . . . . . . . . . . . . . . . . . . . . . . . . . . . . . 13
. . . . . . . . . . . . . . . . . . . . . . . . . . . . . . 14
. . . . . . . . . . . . . . . . . . . . . . . . . . . . . . 14
. . . . . . . . . . . . . . . . . . . . . . . . . . . . . . 16
. . . . . . . . . . . . . . . . . . . . . . . . . . . . . . 18
1
Standard Configuration
2
© 2001 Directed Electronics, Inc.
What is Included
■
A control module
■
Two 2-button remote transmitters
■
Stinger® DoubleGuard® dual-stage shock sensor on-board the
control module
■
A Revenger® Soft-Chirp® six-tone siren
■
A Failsafe® starter kill relay on-board the control module
■
A red status LED indicator light
■
A push-button Valet® switch
Important Information
Congratulations on the purchase of your state-of-the-art vehicle
security system. This system has been designed to provide years of
trouble-free operation. By carefully reading this guide prior to
using your system, you will maximize the use of this product and
its features. Additional or replacement copies of this manual may
be obtained by logging on to DEI’s website at www.directed.com.
System Maintenance
Your vehicle security system has no specific maintenance requirements. The remote transmitter is powered by a miniature 12V
battery, type GP23A, which has an approximate lifetime of one year
© 2001 Directed Electronics, Inc.
3
under normal use. When the battery begins to weaken, the LED on
the remote transmitter will light dimly and you will notice reduced
operating range when using the remote transmitter.
Your Warranty
Your warranty card must be returned and the barcode serial number
must not be removed. If the warranty card is not returned, no
warranty will be honored on your unit. It is also necessary to keep
your proof of purchase, which reflects that the product was
installed by an authorized dealer. Make sure you receive the
warranty card from your dealer.
FCC/ID Notice
This device complies with Part 15 of FCC rules. Operation is subject
to the following two conditions: (1) This device may not cause
harmful interference, and (2) This device must accept any interference received, including interference that may cause undesired
operation.
Caution: Changes or modifications not expressly approved by the
party responsible for compliance could void the user's authority to
operate this device.
4
© 2001 Directed Electronics, Inc.
Transmitter Functions
This system is programmable, making it possible to assign any transmitter button to any specific receiver function. The remote initially
comes programmed with Standard Configuration, but may also be
customized by an authorized dealer. The buttons in all of the instructions in this manual correspond to a Standard Configuration remote.
Standard Configuration
Button I
The arm/disarm/panic functions are usually controlled by
.
Button II
Silent Mode™, Remote Valet®, and an optional auxiliary function
(such as trunk release) are usually controlled by
and Remote Valet work by pressing
. (Silent Mode
for less than one second.
An optional auxiliary output is controlled by pressing and holding
for 1.5 seconds.)
This auxiliary output controls ____________________________.
Buttons I and II
A user-assigned convenience or expansion option that you have
added to your system can be activated by pressing
and
simultaneously.
This auxiliary output controls_____________________________.
NOTE: If using an optional four-button remote, the Standard
Configuration may be assigned to buttons III and IV of the transmitter.
© 2001 Directed Electronics, Inc.
5
Using Your System
The buttons described in all instructions in this manual correspond
to a standard configuration transmitter, unless otherwise specified.
Arming
You can arm the security system by pressing
for one second.
When the system arms, you will hear a short siren sound (chirp)
and the parking lights will flash once. Once armed, the status LED
will flash once per second to indicate that the system is actively
protecting your vehicle. If you hear a second chirp after arming
and notice that the status LED is flashing in a grouped pattern,
this signals Bypass Notification. Bypass Notification is described in
detail in the Diagnostics section of this manual.
Your security system can also be programmed for Passive Arming.
With Passive Arming, the system automatically arms itself 30 seconds
after the ignition has been turned off and the last door has been
closed. During the 30-second Passive Arming countdown, the status
LED will flash twice as fast as it does when the system is armed.
NOTE: If any protected entry point, such as a door or switch-protected
trunk or hood, is open, Passive Arming will not engage. Additionally, each
time a sensor is triggered during the Passive Arming countdown, the
countdown starts over.
Arming your system protects your vehicle in the following ways:
■
Light impacts trigger a Warn Away® response, causing the siren
to chirp and the parking lights to flash for a few seconds.
6
© 2001 Directed Electronics, Inc.
■
Heavy impacts trip a trigger sequence, which consists of the
siren sounding continuously and the parking lights flashing
for 30 seconds.
■
If a door is opened, the siren immediately starts chirping and
the parking lights start flashing to provide an instant
response. Three seconds later, the siren output changes to a
continuous blast. This two-stage progressive response allows
you time to disarm the security system with your remote
transmitter, in case the door is inadvertently opened while
the system is armed.
■
Turning on the ignition key triggers the same two-stage progressive response as opening a door.
■
The starter kill prevents the vehicle’s starter from cranking.
Disarming
Press
to disarm the system when it is already armed. Disarming
is confirmed when the parking lights flash twice and the siren
emits two chirps. The status LED will also stop flashing. The siren
chirping either four or five times when disarming indicates Tamper
Alert, which is described in the Diagnostics section of this guide.
Disarming Without a Transmitter
If your remote transmitter is lost or damaged, you can manually
disarm your vehicle security system. To disarm the system without
a transmitter, you must have the vehicle's ignition key and know
where the Valet switch is located. Be sure to check with your installer
at the time of installation for the location of the Valet switch.
© 2001 Directed Electronics, Inc.
7
To disarm the security system,
turn the ignition key on and
press and release the Valet
switch within 15 seconds. The
DRW-35
system should now disarm. If the system does not disarm, you may
have waited too long to press the Valet switch; turn the ignition
off and repeat the process.
Panic Mode
If you are threatened in or near your vehicle, you can press and
hold
for 1.5 seconds to trigger Panic Mode on your security
system and attract attention. The siren will sound and the parking
lights will flash for 30 seconds. To stop the Panic Mode at any
time, press
again.
Silent Mode
Use Silent Mode to temporarily turn off the arm or disarm chirps by
briefly pressing
before either arming or disarming. The confir-
mation chirp(s) will then be eliminated for that one operation
only. To permanently turn off the arm and disarm chirps, contact
your installation dealer.
NOTE: The Warn Away Response to lighter impacts is bypassed if the
system is armed using the Silent Mode. This ensures that the siren does
not chirp in an environment where you do not want chirps to be emitted.
The system is still capable of being triggered by heavier impacts; only the
Warn Away Response generated by light impacts is bypassed.
8
© 2001 Directed Electronics, Inc.
Valet Mode
Valet Mode prevents your security system from arming and triggering either automatically or with the remote transmitter. In Valet
Mode, the system will not arm, but all convenience functions
remain operational. This feature is useful when washing or
servicing your vehicle. You can access Valet Mode either manually
or from the remote transmitter.
To enter or exit Valet Mode with the Valet switch:
1. Turn the ignition on.
2. Turn the ignition off.
3. Press and release the Valet
switch within 10 seconds.
DRW-35
The status LED will light solidly if you are entering Valet Mode and
will turn off if you are exiting Valet Mode.
Remote Valet®
You can also enter or exit Valet Mode by using the remote
transmitter:
1. Open any vehicle door.
2. Press
.
3. Press
.
4. Press
again.
The status LED will light solidly if you have entered Valet Mode and
will turn off if you have exited Valet Mode.
© 2001 Directed Electronics, Inc.
9
Nuisance Prevention® Circuitry
Your security system has Nuisance Prevention Circuitry™ (NPC™) to
prevent annoying false alarms. This circuitry is designed to prevent
repetitive trigger sequences due to faulty door pinswitches or environmental conditions such as thunder, jackhammers, airport
noise, etc.
Here's how it works: If the alarm is triggered by the same sensor
or switch three times within a 60 minute period, your system interprets this pattern of triggers as false alarms. After the third trigger,
the NPC™ ignores, or bypasses, that sensor or switch (along with
any other sensors or switches sharing the same zone) for 60
minutes. If the bypassed sensor is triggered again while it is
already being bypassed, the 60-minute bypass period will start
over. This ensures that a sensor that is continually being triggered
will remain bypassed.
The vehicle doors are protected differently by NPC™. If your security
system is triggered by an open door for three, full 30-second cycles
(one and one half minutes), the system will bypass the doors until
the trigger ceases.
NOTE: Arming and disarming the system does not reset the NPC™. The
only ways to reset a bypassed zone are for that zone not to be triggered
for 60 minutes or to turn the ignition key on. When testing your system,
it is important to remember that NPC™ can cause zones to be bypassed
and appear to not work. If five chirps are heard when disarming the
system, NPC™ has been engaged. To clear the NPC™ memory, simply turn
the ignition key on.
10
© 2001 Directed Electronics, Inc.
Diagnostics
The microprocessor at the heart of your system has the ability to
constantly monitor all of the switches and sensors connected to it.
It can detect any faulty switches or sensors and prevent them from
disabling the entire system. It can also record and report any
triggers that occur when you are away from your vehicle.
Arming Diagnostics
If the system is armed at the same time that an input is active
(door opening, sensor triggering, etc.), you will hear one chirp to
indicate arming and a second chirp a few seconds later to indicate
Bypass Notification. A Bypass Notification chirp means that the
system ignores the input that was active when the system was
armed, until that input ceases. Three seconds after that input
ceases, the system will resume normal monitoring. For example, if
your vehicle has an interior light exit delay and you arm the system
before the light turns off, you may hear a Bypass Notification chirp.
Three seconds after the light turns off, normal monitoring resumes.
NOTE: Bypass Notification does not occur when the system is in Silent
Mode™ or if the chirps have been programmed not to sound.
Disarming Diagnostics
Your system has a Tamper Alert feature that notifies you of system
triggers that occur while you are away from your vehicle. If you
hear four chirps when you disarm, this indicates that the system
© 2001 Directed Electronics, Inc.
11
was triggered in your absence. If you hear five chirps when you
disarm, this indicates that a specific zone was triggered so many
times that the NPC™ has bypassed that zone. In both cases, the
pattern of the flashing status LED indicates which zone was
triggered (see Table of Zones). The LED does not, however, report
when Warn Away Responses have activated; it only reports
Triggered Sequences. The system retains this information in its
memory and will continue to chirp four or five times each time the
system is disarmed, until the next time the ignition is turned on.
Table of Zones
A zone is represented by the number of LED flashes used by the
system to identify a particular type of input. Standard input assignments are listed in the following table, along with spaces to write
in any optional sensors or switches that you have had installed.
ZONE
(Number of
LED Flashes)
DESCRIPTION
1
Instant trigger for optional
hood or trunk pins
2
A heavier impact detected by
the Shock Sensor
3
Door switch trigger
5
Ignition trigger
DEALER-INSTALLED
OPTIONS
NOTE: The LED does not report when the Warn Away® response has been
activated; it only reports Triggered Sequences.
12
© 2001 Directed Electronics, Inc.
Code Hopping ™
The receiver and transmitter use mathematical formulas called
algorithms to change their codes each time the transmitter is used.
This Code Hopping technology has been developed to increase the
security of the unit. By following this set code sequence, the
receiver and transmitter stay synchronized, even if the transmitter
is used out of range of the vehicle. If, however, the transmitter is
pressed many times out of range, or the battery is removed, the
transmitter may get temporarily out of sync and fail to operate the
system. To resynchronize the transmitter, simply press
several
times within range of the vehicle. The system will automatically
resynchronize and the transmitter will respond normally.
High Frequency
Your system transmits and receives at 434 MHz. This provides a
cleaner spectrum with less interference and a more stable signal.
Enjoy a phenomenal increase in range, even in areas with high
radio interference.
© 2001 Directed Electronics, Inc.
13
Programming Options
Programming options control your system's normal, operational
set-up. Most options do not require additional parts, but some may
require installation labor.
This system's programming options are listed below, with the
factory default settings in bold:
■
Active arming (only with the remote) or passive arming (automatic arming 30 seconds after the last vehicle door is closed).
■
Arming and disarming confirmation siren chirps can be programmed on or off.
■
Siren tones and chirp volume: The output of the Revenger™
Soft Chirp™ siren consists of six different tones in sequence.
The arming and disarming confirmation chirps can be programmed for full volume or six decibels quieter than full
alarm blast.
Security & Convenience
Expansions
Listed in this section are some of the many expansion options
available for use with your system. Please consult your dealer for
a detailed explanation of all the available options.
14
© 2001 Directed Electronics, Inc.
Audio Sensor: Metal on glass, glass cracking, and breaking glass
each produce distinctive acoustic signatures. The 506T audio
sensor uses a microphone to detect these sounds, and then
analyzes them with proprietary acoustic software to determine if
the glass has been tampered with or broken.
Backup Battery: The 520T Backup Battery ensures that the system
stays armed, triggers the alarm and keeps the optional starter kill
active if main battery power is disconnected.
Field Disturbance Sensor: An invisible dome of coverage is established by the 508D "radar" sensor. Your security system will respond
to any intrusions into this field by initiating the triggered sequence.
Power Trunk Release: The
output of the system can operate
a factory power release for the vehicle's trunk or hatch. An optional
relay is required. If the factory release is not power-activated, then
DEI's 522T trunk release solenoid can be added in most cases.
Power Window Control: Automatic power window control is
provided with the 529T and 530T systems. These options operate
power windows, by rolling them up, down, or both up and down.
The 530T also offers one-touch switch operation.
Valet™ Start System: For the ultimate in convenience, the Valet
Start System can start your vehicle, monitor engine functions and
activate your climate control system with a push of a button! Overrev protection, open-hood lockout, brake pedal shutoff and
automatic timer shutoff are included. (This option is available only
for fuel-injected, automatic-transmission vehicles.)
© 2001 Directed Electronics, Inc.
15
Glossary of Terms
Control Module: The "brain" of your security system. Usually
hidden underneath the dash area of the vehicle. It houses the
microprocessor that monitors your vehicle and controls all of the
security system’s functions.
Failsafe® Starter Kill Relay: Located on-board the control module,
this is an automatic switch controlled by the security system that
prevents the vehicle's starter from cranking whenever the system is
armed. The vehicle is never prevented from cranking when the
system is disarmed, in Valet Mode, or if the starter kill fails.
Input: Any physical connection to the security system. An input
can be provided through a sensor, pinswitch or by existing systems
in the vehicle, such as ignition or courtesy lights.
LED: A red light mounted inside the vehicle, at a location determined by the installer. The LED indicates the status of your system
and also reports triggers and faults in the system or sensors.
Shock Sensor: A dual-stage shock sensor, located on-board the
control module, that detects impacts to the vehicle.
Siren: A noise generating device, usually installed in the engine
compartment of the vehicle. The siren generates the chirps and
tones heard when the system is triggered.
Transmitter: A hand-held, remote control that operates the various
functions of the security system.
16
© 2001 Directed Electronics, Inc.
Trigger or Triggered Sequence: The "setting off" or "tripping" of
the alarm. A Triggered Sequence consists of the siren sounding and
the parking lights flashing for 30 seconds.
Valet Switch: A small, push-button switch mounted inside the
vehicle, at a location determined by the installer. This switch is
used to override the alarm when a transmitter is lost or damaged,
or can be used to put the system into Valet Mode.
Warn Away Response: Light impacts to the vehicle generate the
Warn Away Response, which consists of several seconds of siren
chirps and flashing parking lights.
Zone: A zone is a separate input that the alarm recognizes as
unique. Each input to the system is connected to a particular zone.
Two or more inputs may share the same zone.
© 2001 Directed Electronics, Inc.
17
✂
QUICK REFERENCE GUIDE
Arming the system with your remote:
Cut along dotted line and fold for a quick and easy reference to keep in your purse or wallet.
■ Press
of your transmitter for one second. When the system arms,
you will hear a short siren sound, or chirp, and see the parking lights
flash once.
Disarming the system with your remote:
■ Press
again. You will hear two chirps, and the parking lights will
flash twice.
Disarming the system without your remote:
■ Turn on the ignition. Press the Valet switch within 15 seconds. The
system should now disarm. If it does not disarm, you may have waited
too long to press the Valet switch; turn the ignition off and on and try
again.
Silent Mode™:
■ Press
briefly before arming or disarming, and the confirmation
chirp(s) will be eliminated for that one operation only.
Panic Mode:
■ Press
for 1.5 seconds, and you will enter Panic Mode. The siren will
sound and the parking lights will flash for 30 seconds. To stop Panic
Mode at any time, press
on the transmitter again.
To enter or exit Valet Mode with the Valet switch:
■ Turn the ignition to the ON position, then turn to the OFF position.
Press and release the Valet switch within 10 seconds.
Remote Valet:
✂
■ You can also enter or exit Valet Mode by using the remote transmitter.
First, open any vehicle door. Then press
. Press
. Press
again. The status LED will light solidly if you have entered Valet Mode
and will turn off if you have exited Valet Mode.
18
© 2001 Directed Electronics, Inc.
The company behind this system is Directed Electronics, Inc.
Since its inception, DEI® has had one purpose, to provide consumers with the finest
vehicle security and car stereo products and accessories available. The recipient of
nearly 100 patents and Innovations Awards in the field of advanced electronic
technology, DEI is ISO 9001 registered.
Quality Directed Electronics products are sold and serviced throughout North America
and around the world.
Call (800) 274-0200 for more information about our products and services.
DEI is committed to delivering world class quality products and services
that excite and delight our customers.
®
Vista, CA 92083
www.directed.com
© 2001 Directed Electronics, Inc. - All rights reserved
G425R 4/01
Rev. A 1.0