1
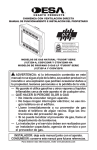
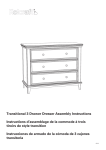
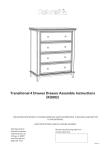
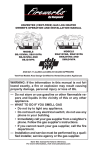
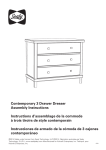
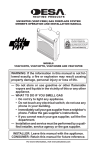
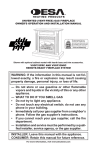
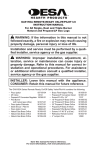
WIRELESS HAND-HELD REMOTE CONTROL MODELS HRC100,
HRC101, HRC200 AND HRC201 OPERATING INSTRUCTIONS
For Use With DESA Heating Products Remote Ready Log Sets
and Fireplace Systems
Installing Remote Receiver
1. Disconnect switch wires from the control valve.
Some units will have an on/off switch with
switch plate that is connected to the control
valve. Other units will have a jumper wire that
will need to be removed from the control valve
(see Figure 1).
2. Remove screws and switch plate as shown in
Figure 1. Discard after removing.
3. Install remote receiver unit onto gas log heater
base using clips (2) and insulating washers
provided.
4. Push clips firmly into place (see Figure 2).
5. Connect wires as shown in Figure 3.
Note: On yellow flame models, reuse provided
phillips head screws and reinstall heat shield over
receiving unit.
INSTALLING WIRELESS REMOTE
control ACCESSORY
Two 9-volt alkaline batteries (not included) are
required to operate this wireless hand held remote
control set. One battery must be installed in the
receiver and one in the hand-held remote control
unit. Note: Only use alkaline batteries.
Installing 9-Volt Battery (Not Included) in
Receiver
1. Locate the battery clip mounted on the back
of the receiver.
2. Slide a 9-volt battery through the clip.
3. Attach the terminal wires to the battery.
Mounting
Clips
Front
Front
Screw
Back
Remote
Receiver
Back
Wires to
Control Valve
Insulating
Washers
Battery Clip
Figure 2 - Installing Remote Receiver
ON/OFF Switch with
Switch Plate
Red Wire
From
Receiver
Jumper Wire
Control Valve
Figure 1 - Disconnecting Wires from
Control Valve
White
Wire From
Receiver
Valve
Figure 3 - Connecting Wires
Save for future reference.
For more information, visit www.desatech.com
Sensor
Tag
Terminal
Wires
Battery
Housing
9-Volt Battery
Figure 4 - Installing Battery in Hand-Held
Remote Control Unit
REMOTE OPERATION
NOTICE: You must light the pilot before using the hand-held
remote control unit. See Lighting Instructions in your owner’s
manual.
T
LO
ON
FF PI
Remote Control Unit
REMOTE
OFF
ON
Control Knob
O
Battery
Cover
Selector Switch in
REMOTE Position
(Optional Hand-Held
Remote Control)
LO
Installing 9-Volt Battery (Not Included) in
Hand-Held Remote Control Unit
1. Remove battery cover on back of remote
control unit.
2. Remove and discard sensor tag inside battery
housing.
3. Attach terminal wires to the battery. Place
battery into the battery housing.
4. Replace battery cover onto remote control
unit.
HI
Flame Adjustment Knob
(Available on Some Models)
Figure 5 - Setting the Selector Switch,
Control Knob and Flame Adjustment
Knob (Available on Some Models) for
Hand-Held Remote Operation
ON/OFF Series
(Models HRC100 and HRC101)
Hold the control button on the hand-held remote
until burner turns on. Hold the control button again
until burner turns off (see Figure 6).
To Lock press both buttons on hand-held remote
control until light stops flashing. Hand-held
remote control is now locked. If the fire is on it
will be turned off automatically. In the locked
state, the light will not light up when any button
is pressed.
To Unlock press both buttons together on handheld remote control until the light stops flashing.
The hand-held remote is now unlocked.
Indicator Light
1. After lighting, let pilot flame burn for about
one minute. Turn control knob to ON position. Adjust flame adjustment knob anywhere
between HI and LO. Slide the selector switch
to the REMOTE position (see Figure 5).
Note: The burner may light if hand-held
remote was on when selector switch was last
turned off. You can now turn the burner on and
off with the hand-held remote control unit.
IMPORTANT: Do not leave the selector switch
in the REMOTE or ON position when the pilot
is not lit. This will drain the battery.
Control
Button
Figure 6 - ON/OFF Hand-Held Remote
Control Unit
www.desatech.com
116710-01C
Thermostat Series
(Models HRC200 and HRC201)
The hand-held remote can be operated using
either the manual mode (MANU) or thermostatic
mode (AUTO) (see Figure 7). To select Fahrenheit/Centigrade mode display, carefully press the
˚C/˚F mode button with the end of a paper clip or
similar blunt object.
Manual Mode
1. Press the POWER and LOCK buttons together
to turn on the hand-held remote control.
2. Press the MANU button to turn on the fireplace.
3. Press the POWER and LOCK buttons together
to turn off the fireplace.
Auto (Thermostatic) Mode
1. Press the POWER and LOCK buttons together
to turn on the hand-held remote control.
2. Press AUTO button to select this mode.
3. Set the desired room temperature by pressing the TEMP + or - buttons.
4. Press the POWER and LOCK buttons together
to turn off the fireplace.
Note: Do not leave the hand-held remote in the
AUTO mode close to the fireplace. The radiant
heat from the fireplace will turn off the fireplace.
Ideally, place the hand-held remote in the center
of the room facing towards the fireplace.
Note: Do not hold the hand-held remote for a long
time. Body temperature will affect its operation in
the AUTO mode.
Safety Features
When away from home for an extended period
of time or as a child safety feature to prevent
accidental ignition of the fireplace, the receiver
ON/OFF/REMOTE switch should be in the OFF
position.
Auto Shutoff Feature
1. If the average room temperature reaches a
range of 82° F (28° C) to 92° F (33° C), the
hand-held remote control will perform a safety
override and shut the fireplace off. This feature
is not available in the MANU mode.
2. The receiver continuously receives signals
from the hand-held remote to control the
room temperature. If the hand-held remote is
misplaced, obstructed or for any reason cannot transmit to the receiver, the receiver will
shut off the fireplace. This will occur in eight
or more minutes depending upon location of
remote transmitter and strength of batteries.
Key Pad Lock Feature
This feature allows the user to lock/unlock the
keypad on the hand-held remote in the MANU or
AUTO mode to prevent inadvertent operation (i.e.
children operating the hand-held remote control,
etc.). The keypad is locked in either on or off. Press
the POWER and LOCK buttons together to turn
the unit on or off.
Digital Display Shows
Temperature and Settings
Locks System to
Prevent Accidental
Ignition
ROOM
TEMP
LOCK
AUTO
SET
TEMP
TEMP
POWER
Turns Burners
On or Off
Turns Hand-Held Remote
On or Off and Allows You
to Choose the Manual
Setting
Selects AUTO Mode
MANU
ºC/ºF
AUTO
°C/°F Mode Button
Increases or Decreases
Room Temperature in
AUTO Mode
Figure 7 - Thermostat Hand-Held Remote Control Unit
116710-01C
www.desatech.com
Docking station
The wall docking station offers a convenient location to store your hand-held remote control when
the fireplace is not in use. The fireplace will not
operate properly when remote control is stored in
the wall docking station.
Note: For customer service contact DESA Heating
Products at 1-866-672-6040 or visit our web site
at www.desatech.com.
Figure 8 - Remote Docking Station
2701 Industrial Drive
P.O. Box 90004
Bowling Green, KY 42102-9004
www.desatech.com
®
INSTRUCCIONES DE OPERACIÓN PARA LOS MODELOS
HRC100, HRC101, HRC200 Y HRC201 CON CONTROL REMOTO
INALÁMBRICO
Para uso con sistemas para chimenea y juegos de leños de
encendido remoto de DESA Heating Products.
Instalación del receptor
remoto
1. Desconecte los cables del interruptor de la
válvula de control. Algunas unidades tienen
un interruptor de alimentación con placa, el
cual está conectado a la válvula de control.
Otras tienen un cable de puente que deberá
extraer de la válvula de control (consulte la
figura 1).
2. Quite los tornillos y la placa del interruptor
como se muestra en la figura 1. Deséchelos.
3. Instale la unidad del receptor remoto en la base
del calefactor de leños a gas sujetándolo con
los clips (2) y arandelas aislantes incluidas.
4.Fije con firmeza los clips en su sitio (consulte
la figura 2).
5. Conecte los cables como se muestra en la
figura 3.
Nota: En los modelos con llama color amarillo,
vuelva a utilizar los tornillos de cruz (phillips)
provistos para instalar el protector de calor en la
unidad receptora.
INSTALACIÓN DEL ACCESORIO
PARA CONTROL REMOTO
INALÁMBRICO
Este control remoto requiere dos baterías alcalinas
de 9 voltios (no incluidas). Una batería se coloca en
el receptor y la otra en la unidad de control remoto.
Nota: Utilice sólo baterías alcalinas.
Colocación de la batería de 9 voltios (no
incluida) en el receptor
1. Encuentre el sujetador de batería montado en
la parte posterior del receptor.
2. Introduzca una batería de 9 voltios en el sujetador.
3. Conecte los cables de terminal a la batería.
Sujetadors
de montaje
Frente
Front
Atrás
Back
Receptor
remoto
Frente
Front
Tornillo
Arandelas
aislantes
Atrás
Back
Cables hacia
la válvula de
Interruptor de alimentación control
con placa
Cable de
puente
Sujetador de batería
Figura 2 - Instalación del receptor
remoto
Cable rojo
del receptor
Cable
blanco del
receptor
Válvula
Válvula de control
Figura 1 - Desconexión de los cables de
la válvula de control
Figura 3 - Conexión de los cables
Conserve este instructivo para referencia futura.
Para obtener más información, visite www.desatech.com
Batería de 9 voltios
Figura 4 - Instalación de la batería en la
unidad de control remoto
OPERACIÓN REMOTA
AVISO: antes de utilizar la unidad
de control remoto debe encender
el piloto. Consulte las Instrucciones de encendido en el manual
del propietario.
1. Una vez que el piloto enciende deje que
la llama permanezca encendida durante
un minuto. Gire la perilla de control hasta
la posición de “ON” (encendido). Gire la
perilla de ajuste de llama hasta cualquier
posición entre “HI” (alto) y “LO” (bajo).
Ponga el interruptor del selector en la posición
“REMOTE” (remoto) (consulte la figura 5).
Nota: Es posible que el quemador encienda si
el control remoto estaba encendido la última
vez que se apagó el interruptor del selector.
Ahora ya puede encender y apagar el quemador con la unidad de control remoto.
IMPORTANTE: no deje el interruptor del selector en la posición “REMOTE” (remoto) o “ON”
(encendido) cuando el piloto no esté encendido.
De lo contrario la batería se descargará.
T
LO
ON
FF PI
Compartimento
de batería
REMOTE
OFF
ON
Perilla de control
O
Cables de
terminal
Interruptor del selector
en posición REMOTO
(remote) (el control
remoto es opcional)
LO
Instalación de la batería de 9 voltios (no
incluida) en el control remoto
1. Retire la tapa de la batería ubicada en la parte
posterior de la unidad de control remoto.
2. Retire y deseche la etiqueta del sensor que
se encuentra dentro del compartimiento de la
batería.
3. Conecte los cables de terminal a la batería.
Introduzca la batería en el compartimento.
4. Coloque la tapa de la batería en el control
remoto.
Unidad de
Cubierta de
control remoto
la batería Etiqueta
del sensor
HI
Perilla de ajuste de llama
(disponible en algunos modelos)
Figura 5 - Ajuste del interruptor del
selector, de la perilla de control y de la
perilla de ajuste de llama (disponibles
en algunos modelos) para su
funcionamiento con control remoto
Serie con interruptor de alimentación
(modelos HRC100 y HRC101)
Mantenga presionado el botón de control del
control remoto hasta que el quemador se encienda.
Mantenga nuevamente presionado el botón del
control hasta que el quemador se apague (consulte
la figura 6).
Para bloquearlo presione los dos botones del
control remoto hasta que la luz deje de parpadear.
En ese momento la unidad de control remoto
queda bloqueada. Si la llama está encendida el
calentador se apagará automáticamente. Cuando
está bloqueado, la luz no se encenderá al presionar
alguno de los botones.
Para desbloquearlo presione los dos botones
del control remoto al mismo tiempo hasta que la
luz deje de parpadear. La unidad de control remoto
queda desbloqueada.
Luz indicadora
Botón de
control
Figura 6 - Unidad de control remoto con
interruptor de alimentación
www.desatech.com
116710-01C
Nota: No sujete la unidad de control remoto en su
mano por mucho tiempo. La temperatura corporal
afecta el funcionamiento del control remoto cuando ésta en modo AUTO (automático).
Serie con termostato
(Modelos HRC200 y HRC201)
El control remoto puede utilizarse ya sea en
modo manual (MANU) o en modo termoestático
(AUTO) (consulte la figura 7). Para seleccionar
el modo de mostrar la temperatura en fahrenheit
o centígrados, presione cuidadosamente el botón
del modo ˚C/˚F con la punta de un clip o de algún
otro objeto puntiagudo.
Aspectos de seguridad
Cuando vaya a estar fuera de su domicilio durante
un largo tiempo o como medida de seguridad
para niños y para prevenir que la chimenea se
encienda accidentalmente, ponga el interruptor de
ON/OFF/REMOTE (encendido/apagado/remoto)
del receptor en la posición OFF (apagado).
Apagado automático
1. Cuando la temperatura promedio de la habitación alcance un rango de 28° C (82° F) a 33° C
(92° F), el control remoto efectuará una acción
de control maestro de seguridad y apagará la
chimenea. Esta función no está disponible en el
modo MANU (manual).
2. El receptor continuamente recibe señales del
control remoto para controlar la temperatura
de la habitación. Cuando el control remoto
esté extraviado o algo obstruya la señal o
bien cuando por algún otro motivo no pueda
transmitir la señal al receptor, éste último
apagará la chimenea. Esto ocurrirá en ocho o
más minutos dependiendo de la ubicación del
control remoto y de la carga de las baterías.
Modo manual
1. Presione al mismo tiempo los botones de
POWER (encendido) y LOCK (bloqueo) para
encender la unidad de control remoto.
2. Presione el botón MANU (manual) para
encender la chimenea.
3. Presione al mismo tiempo los botones de
POWER (encendido) y LOCK (bloqueo) para
apagar la chimenea.
Modo automático (termoestático)
1. Presione al mismo tiempo los botones de
POWER (encendido) y BLOCK (bloqueo)
para encender la unidad de control remoto.
2. Presione el botón AUTO (automático) para
elegir este modo.
3. Para ajustar la temperatura deseada de la
habitación presione los botones TEMP + o -.
4. Presione al mismo tiempo los botones de
POWER (encendido) y BLOCK (bloqueo)
para apagar la chimenea.
Nota: Cuando el control remoto esté en modo
AUTO (automático) no lo deje cerca de la chimenea. La chimenea se apagará por el calor que
irradia de ella. Lo más recomendable es que ponga
la unidad de control remoto en el centro de la
habitación y dirigido hacia la chimenea.
ROOM
TEMP
Bloquea el sistema para
prevenir que se encienda
accidentalmente
LOCK
MANU
Bloqueo del teclado
Está función permite al usuario bloquear o desbloquear el teclado del control remoto en el modo
MANU (manual) o AUTO (automático) para
prevenir que éste opere de manera inadvertida (por
ejemplo, que niños pequeños lo estén manejando,
etc.). El teclado se puede bloquear en encendido
o apagado. Presione al mismo tiempo los botones
de POWER (encendido) y LOCK (bloqueo) para
encender o apagar la unidad.
AUTO
SET
TEMP
TEMP
ºC/ºF
POWER
AUTO
Enciende o apaga
los quemadores
La pantalla digital
muestra la temperatura y
configuración
Enciende o apaga la
unidad de control remoto
y permite elegir el ajuste
manual
Elige el modo
AUTOMÁTICO
Botón de
modo °C/°F
Sube o baja la temperatura
de la habitación en modo
AUTOMÁTICO
Figura 7 - Unidad de control remoto con termostato
116710-01C
www.desatech.com
Base para el control remoto
La base de pared es un sitio conveniente para
colocar la unidad de control remoto cuando la
chimenea no esté en uso. La chimenea no funcionará correctamente cuando el control remoto esté
en la base de pared.
Nota: Para servicio al cliente llame a DESA Heating Products al teléfono 1-866-672-6040 o visite
nuestro sitio web en www.desatech.com.
Figura 8 - Base para el control remoto
2701 Industrial Drive
P.O. Box 90004
Bowling Green, KY 42102-9004, EE.UU.
www.desatech.com
116710 01
NOT A UPC
116710-01
Rev. C
08/06