1
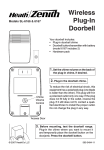
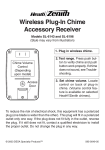
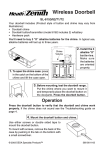
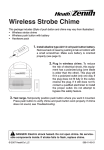
Your doorbell system includes:
• Two plug-in doorbell chimes
• Two doorbell buttons/transmitters
with batteries
• Two hardware packs
Wireless
Plug-In
Doorbell
System
As shipped from the factory:
• Both chimes will sound when either button is pushed. The system can be
changed so that one chime responds to the factory set door button, while
the other chime responds to a new customer setting.
• See pages 2 and 3 to change codes and sounds.
1. Plug-in the doorbell chime.
To reduce the risk of electrical shock, this
equipment has a polarized plug (one blade is
wider than the other). This plug will fit in a polarized outlet only one way. If the plug does
not fit fully in the outlet, reverse the plug. If it
still does not fit, contact a qualified electrician
to install the proper outlet. Do not change the
plug in any way.
2.
Before mounting, test the doorbell range.
Plug-in the chime where you want to mount it
and temporarily place the doorbell button on the
doorjamb. Press the doorbell button.
Operation
Push
Button
Press the doorbell button to verify that the
doorbell and chime work properly. If the chime
does not sound see the Troubleshooting guide
on page 4.
Doorbell Button
© 2003 DESA Specialty Products™
598-1034-02
3. Mount the doorbell button.
Use either screws or double sided tape to mount
the doorbell button.
To mount with screws, remove the back of the case by pushing in the tab on
the bottom with a small screwdriver and rotating the blade.
Attach the back of the case to the door jamb or wall. Snap the front of the
button back on.
When attaching the doorbell button using the double sided tape, make sure
the surface of the door jamb or wall is clean.
Code and Tune Settings
Code Settings
Note: Most installations will not require you to change any of the jumpers on your doorbell.
WARNING: Disconnect chime unit from power source before opening
code access door. Close door and replace screw before reconnecting
to power.
The doorbell button and chime communicate by using a code that can be
changed by removing and/or adding jumpers on both the doorbell button and
chime. The code is factory set; however, there are 128 selectable codes that
allow you to expand your system and prevent outside interference. Another
wireless doorbell system or other wireless products may cause interference
and the system may not function properly. Follow the instructions below for
setting a new code.
-2-
598-1034-02
1. Disconnect the power to the doorbell button and chime.
2. Open the cases and locate the jumpers on both the doorbell button and
chime (See illustration).
3. The doorbell button and chime both have eight different jumper locations.
The jumper positions 1 through 7 are used for setting the code.
4. To change the code, add and/or remove jumpers as needed. There are
128 different combinations. It is recommended to only change one jumper
at a time and then check to see if system is functioning properly. Note:
Jumpers in positions 1 through 7 must be exactly the same for both the
doorbell button and chime for this system to function.
Tune Settings
Your Heath®/Zenith wireless doorbell has 2 different selectable tunes: Ding
(one note) or Ding-Dong (two note). The factory setting is for the Ding-Dong;
however, this can be changed by following the instructions below.
• Ding (one note tune)
Doorbell button: Add a jumper to location 8.
• Ding-Dong (two note tune)
Doorbell button: Remove jumper from location 8.
Doorbell Button Battery Replacement
Install an alkaline type A23 12 Volt battery. The positive terminal should be positioned as shown.
Remove screw to
open access door
Back of
Chime
598-1034-02
12345678
12345678
Not
Used
Tune
Setting
-3-
Inside
Doorbell
Button
* Code Settings 1-7
Must Match Both
Doorbell Button
and Chime
Troubleshooting
Chime does not sound:
• Make sure the doorbell button and the chime codes are the same (See
pages 2 and 3).
• Check orientation of doorbell button battery (See page 3).
• Check the doorbell button battery, replace if necessary.
Batteries seem OK, but the chime does not work when installed:
• Do not mount the chime or doorbell button on metal or near metal studs.
This reduces the transmitter range. Use 1/4" to 1/2" (6 to 13 mm) wood
shims to move the chime or doorbell button off the metal surface.
• Do not mount the chime too close to ground level concrete slabs. This
may also reduce the range. Mount the chime away from the floor.
• Try different locations for the chime closer to the doorbell button. Also try
to orient the chime at a different angle to increase the range.
The range of the doorbell depends on location, temperature and battery condition.
Regulatory Information
This device (SL-6151-RX-A, WB-94A-TX) complies with Part 15 of the FCC
Rules and RSS-210 of Industry Canada. Operation is subject to the following two conditions: (1) this device may not cause harmful interference, and
(2) this device must accept any interference received, including interference
that may cause undesired operation.
The user is cautioned that changes or modifications not expressly approved
by the party responsible for regulatory compliance could void the user’s authority to operate the equipment.
Technical Service
(Do Not Send Products)
If you experience a problem, follow this guide. You may also want to visit our Web
site at: www.desatech.com. If the problem persists, call* for assistance at 1800-858-8501, 7:30 AM to 4:30 PM CST (M-F). You may also write* to:
DESA Specialty Products™
P.O. Box 90004, Bowling Green, KY 42102-9004
ATTN: Technical Service Specialty Products
* If contacting Technical Service, please have the following information available: Model Number, Date of Purchase, and Place of Purchase.
No Service Parts Available for this Product
-4-
598-1034-02
ONE YEAR LIMITED WARRANTY
This is a “Limited Warranty” which gives you specific legal rights. You may
also have other rights which vary from state to state or province to
province.
For a period of one year from the date of purchase, any malfunction
caused by factory defective parts or workmanship will be corrected at no
charge to you. Batteries are not covered. To obtain a refund or a
replacement, return the product to the place of purchase.
Not Covered - Repair service, adjustment and calibration due to misuse,
abuse or negligence, light bulbs and other expendable items are not
covered by this warranty. Unauthorized service or modification of the
product or of any furnished component will void this warranty in its entirety.
This warranty does not include reimbursement for inconvenience, installation, setup time, loss of use, or unauthorized service.
This warranty covers only DESA Specialty Products™ assembled products and is not extended to other equipment and components that a
customer uses in conjunction with our products.
THIS WARRANTY IS EXPRESSLY IN LIEU OF ALL OTHER WARRANTIES, EXPRESS OR IMPLIED, INCLUDING ANY WARRANTY,
REPRESENTATION OR CONDITION OF MERCHANT ABILITY OR
THAT THE PRODUCTS ARE FIT FOR ANY PARTICULAR PURPOSE
OR USE, AND SPECIFICALLY IN LIEU OF ALL SPECIAL, INDIRECT,
INCIDENTAL, OR CONSEQUENTIAL DAMAGES.
REPAIR OR REPLACEMENT SHALL BE THE SOLE REMEDY OF THE
CUSTOMER AND THERE SHALL BE NO LIABILITY ON THE PART OF
DESA SPECIALTY PRODUCTS™ FOR ANY SPECIAL, INDIRECT,
INCIDENTAL, OR CONSEQUENTIAL DAMAGES, INCLUDING BUT
NOT LIMITED TO ANY LOSS OF BUSINESS OR PROFITS, WHETHER
OR NOT FORESEEABLE. Some states or provinces do not allow the
exclusion or limitation of incidental or consequential damages, so the
above limitation or exclusion may not apply to you. Retain receipt for
warranty claims.
DESA Specialty Products™ reserves the right to discontinue and to change
specifications at any time without notice without incurring any obligation to
incorporate new features in previously sold products.
598-1034-02
-5-
Su sistema de timbre de puerta incluye:
• Dos campanas enchufables.
• Dos botones timbre y transmisores
con pilas.
• Dos paquetes de ferretería
Timbre
Inalámbrico
enchufable
de timbre
de puerta
Así viene de la fábrica:
• Las dos campanas sonarán cuando se pulse cualquiera de los botones.
Se puede cambiar el sistema de manera que una campana responda al
timbre de puerta programado en fábrica, mientras que la otra campana
responda a la nueva programación hecha por el cliente.
• Vea las páginas 7 y 8 cambiar códigos y sonidos.
1.
Enchufe la campana en un
tomacorriente de pared.
Para reducir el riesgo de choque eléctrico, este
equipo tiene un enchufe polarizado (una patilla es
más ancha que la otra). Este enchufe podrá
insertarse en un tomacorriente polarizado
solamente de una manera. Si el mismo no entra
completamente en el tomacorriente, invierta el
enchufe. Si aún no encaja completamente,
póngase en contacto con un electrista competente
para qua éste instale el tomacorriente correcto. No
cambie el enchufe de modo alguno.
2. Antes de la instalación, pruebe el alcance del
timbre. Enchufe la campana en un tomacorriente
de pared donde desea instalarla y coloque
temporalmente el botón del timbre en el quicio
de la puerta. Presione el botón del timbre.
Funcionamento
Presione
el Botón
Presione el botón del timbre para verificar
que el timbre y la campana funcionen
correctamente. Si la campana no suena, ve
la guía de análisis de averías en la página 9.
Botón del Timbre
© 2003 DESA Specialty Products™
-6-
598-1034-02
598-1034-02
S
3. Monte el botón del timbre.
Para montar el botón del timbre use una cinta
adhesiva de doble lado o tornillos.
Para montar con tornillos,
quite la parte de atrás de la
caja empujando hacia
adentro la lengüeta de abajo
con un destornillador
pequeño y girando la
cuchilla.
Coloque la parte de atrás de la caja contra la jamba o la pared. Asiente el
frente del botón en su lugar.
Cuando coloque el botón del timbre, usando la cinta engomada en los dos
lados, asegúrese que la superficie de la jamba o de la pared esté limpia.
Programaciones del código y del tono
Programaciones del código
Nota: La mayoría de las instalaciones no requerirán que usted cambie
ninguno de los puentes de su timbre de puerta.
ADVERTENCIA: Desconecte la unidad de la campana de la fuente de
alimentación antes de abrir la puerta de acceso de códigos. Cierre la
puerta y ponga los tornillos antes de reconectar la alimentación.
El botón y la campana del timbre de la puerta se comunican usando un
código que puede ser cambiado quitando y/o añadiendo puentes tanto en el
botón como en la campana del timbre de puerta. El código ha sido programado
en fábrica; sin embargo, hay 128 códigos elegibles que le permiten expandir
su sistema y evitar interferencia externa. Otro sistema inalámbrico de timbre
de puerta u otros productos inalámbricos pueden causar interferencia y pueda
ser que el sistema no funcione correctamente. Para programar un nuevo
código siga las siguientes indicaciones:
598-1034-02
-7-
1. Desconecte la alimentación que va al botón del timbre de puerta y a la campana.
2. Abra las cajas y ubique los puentes en el botón del timbre de puerta y en
la campana (vea la ilustración).
3. El botón del timbre de puerta y la campana tendrán ocho lugares diferentes
para los puentes. Las posiciones de puente del 1 al 7 se usan para
programar el código.
4. Para cambiar el código añade y/o quite los puentes, como sea necesario.
Existen 128 combinaciones diferentes. Se recomienda cambiar tan sólo
un puente por vez y luego comprobar si el sistema funciona correctamente.
Nota: Los puentes en las posiciones del 1 al 7 deben ser idénticos tanto
para el botón del timbre de puerta como para la campana para que este
sistema funcione.
Programación del tono
Su timbre de puerta inalámbrico Heath®/Zenith tiene 2 diferentes tonos
elegibles: Tilín (una nota) o Tilín-Talán (dos notas). La programación de
fábrica es la de Tilín-Talán; sin embargo, esto se puede cambiar de acuerdo
a las siguientes indicaciones:
• Tilín (tono de una nota)
Botón del timbre de puerta: aumente un puente al sitio 8.
• Tilín-talán (tono de dos notas)
Botón del timbre de puerta: Quite el puente del sitio 8.
Quite el tornillo para abrir
la puerta de acceso
Parte de
atrás de la
campana
Cambio de pila
Cámbiela con una pila alcalina tipo A23
de 12 V. El terminal positivo debe mirar
hacia la parte de arriba de la caja.
12345678
12345678
No se
usa
Botón
Programación
Interno del
del tono
Timbre
-8-
* Las
programaciones de
código del 1 al 7
deben ser iguales
al botón del timbre
de puerta y al de la
campana
598-1034-02
Análisis de Averías
La campana no suena:
• Asegúrese que los código del timbre de puerta y de la campana sean los
mismos (Vea las páginaciones 7 y 8).
• Verifique la orientación de la pila del botón del timbre de puerta (Ver página 8).
• Revise la pila del botón del timbre de puerta y cámbiela si es necesario.
La pilas parecen estar buenas pero la campana no funciona una vez instalada:
• No monte el botón de la campana y del timbre de puerta sobre metal o
cerca de montantes de metal. Esto reduce el alcance del transmisor. Use
una cuña de madera de 6 mm ó 13 mm para apartar el botón de la campana
y del timbre de puerta de la superficie de metal.
• No monte la campana demasiado cerca de las losas de concreto al nivel
del piso. Esto puede reducir el alcance. Monte la campana lejos del piso.
• Pruebe diferentes lugares para la campana, más cerca al botón del timbre. Trate también de orientar la campana en un ángulo diferente para
aumentar el alcance.
El alcance del timbre depende del lugar, de la temperatura y de la condición
de la pila.
Información Regulatoria
Este aparato (SL-6151-RX-A, WB-94A-TX) cumple con la Parte 15 de las
Reglas de la FCC (Comisión Federal de Comunicaciones) y con la RSS-210
de las Industrias del Canadá. El funcionamiento está sujeto a las dos
siguientes condiciones: (1) este aparato no puede causar interferencias
dañinas, y (2) este aparato debe aceptar cualquier interferencia recibida,
incluyendo una interferencia que pueda causar un funcionamiento indeseable.
Se advierte al usuario que cambios o modificaciones no aprobadas
expresamente por la parte responsable de cumplir con los reglamentos podría
invalidar la autoridad del usuario para el uso de este equipo.
Servicio Técnico
(No enviar los productos)
Si tiene algún problema por favor siga esta guía. Lo sentimos, pero no
podemos contestar preguntas en español por teléfono. Usted puede también
escribir* a:
DESA Specialty Products™
P.O. Box 90004, Bowling Green, KY 42102-9004
* Si se llama al Servicio Técnico, por favor tener lista la siguiente información:
Número de Modelo, Fecha de compra y Lugar de compra.
No hay piezas de servicio disponibles para este producto
598-1034-02
-9-
GARANTÍA LIMITADA A 1 AÑO
Esta es una “Garantía Limitada” que le da a Ud. derechos legales
específicos. Usted puede también tener otros derechos que varían de
estado a estado o de provincia a provincia.
Por un período de 1 año desde la fecha de compra, cualquier mal
funcionamiento ocasionado por partes defectuosas de fábrica o mano
de obra será corregido sin cargo para Ud. Las pilas no están cubiertos
banjo de esta garantia. Para obtener el reembolso o reemplazo,
devuelva el producto al lugar de compra.
No cubierto - Los servicios de reparación, regulación y calibración
debidos al mal uso, abuso o negligencia, las bombillas y otras partes
fungibles no se cubren con esta garantía. Los Servicios no autorizados
o modificaciones del producto o de cualquier componente que se
provee invalidarán esta garantía en su totalidad. Esta garantía no
incluye reembolso por inconveniencia, instalación, tiempo de montaje,
pérdida por uso, o servicio no autorizado.
Esta garantía cubre solamente los productos ensamblados por DESA
Specialty Products™ y no se extiende a otros equipos o componentes
que el consumidor usa junto con nuestros productos.
ESTA GARANTÍA ESTÁ EXPRESAMENTE EN LUGAR DE OTRAS
GARANTÍAS, EXPRESADAS O SOBREENTENDIDAS, INCLUYENDO
CUALQUIER GARANTÍA, REPRESENTACIÓN O CONDICIÓN DE
COMERCIABILIDAD O QUE LOS PRODUCTOS SE ADAPTEN PARA
CUALQUIER PROPÓSITO O USO EN PARTICULAR, Y
ESPECIFICAMENTE EN LUGAR DE TODOS LOS DAÑOS
ESPECIALES, INDIRECTOS, INCIDENTALES Y CONSECUENTES.
LA REPARACIÓN O EL REEMPLAZO DEBERÍA SER LA ÚNICA
SOLUCIÓN DEL CLIENTE Y NO HABRÁ RESPONSABILIDAD POR
PARTE DE DESA SPECIALTY PRODUCTS™ POR CUALQUIER DAÑO
ESPECIAL, INDIRECTO, INCIDENTAL O CONSECUENTE, INCLUIDOS
PERO NO LIMITADOS A CUALQUIER PÉRDIDA DE NEGOCIO O
GANACIAS SEAN O NO PREVISIBLES. Algunos estados o provincias
no permiten la exclusión o limitación de daños incidentales o consecuentes,
de modo que la limitación o exclusión arriba indicada puede que no se
aplique a Ud. Guarde el recibo para reclamos de garantía.
DESA Specialty Products™ se reserva el derecho de descontinuar y de
cambiar las especificaciones a cualquier momento, sin previo aviso, sin
incurrir en ninguna obligación de tener que incorporar nuevas características
en los productos vendidos anteriormente.
-10-
598-1034-02
NOTES/NOTAS _____________________________
_____________________________
_____________________________
_____________________________
_____________________________
_____________________________
_____________________________
_____________________________
_____________________________
_____________________________
_____________________________
_____________________________
_____________________________
_____________________________
_____________________________
_____________________________
_____________________________
_____________________________
_____________________________
598-1034-02
-11-
NOTES/NOTAS _____________________________
_____________________________
_____________________________
_____________________________
_____________________________
_____________________________
_____________________________
_____________________________
_____________________________
_____________________________
_____________________________
_____________________________
_____________________________
_____________________________
_____________________________
_____________________________
_____________________________
_____________________________
_____________________________
-12-
598-1034-02