1
F6585am0.fm Page 1 Friday, July 9, 2004 11:08 AM
About Cautions
Attaching Casters to Your System
CAUTION: Only trained service technicians are authorized to remove the system cover and access any
of the components inside the system. See your Product Information Guide for complete information
about safety precautions, working inside the computer, and protecting against electrostatic discharge.
To attach the caster bracket assemblies to your system, perform the following steps:
1
Disconnect the system and any attached peripherals from their electrical outlets,
and then disconnect the peripherals from the system.
CAUTION: To avoid injury, two people should perform step 2.
2
Gently turn the system upside down.
3
Remove the four feet from the bottom of the chassis. Each foot is attached to the bottom
of the chassis by a screw. See Figure 1.
NOTE: Retain these screws for use in step 5.
4
Slide one caster into the tabs on each foot so that the hole in the caster lines up with the hole
in the foot. See Figure 1.
5
Attach each caster assembly to the bottom of the chassis, using the screws you removed
in step 3. See Figure 1.
July 2004
www.dell.com | support.dell.com
CAUTION: A CAUTION indicates a potential for property damage, personal injury, or death.
www.dell.com | support.dell.com
F6585am0.fm Page 2 Friday, July 9, 2004 11:08 AM
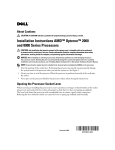
Figure 1. Attaching Casters to Your System
feet (4)
tabs
casters (4)
screws (4)
CAUTION: To avoid injury, two people should perform step 6.
6
Carefully turn the system right-side up.
___________
Information in this document is subject to change without notice.
© 2004 Dell Inc. All rights reserved. Printed in the U.S.A.
Reproduction in any manner whatsoever without the written permission of Dell Inc. is strictly forbidden.
Trademarks used in this text: Dell and the DELL logo are trademarks of Dell Inc. Other trademarks and trade names may be
used in this document to refer to either the entities claiming the marks and names or their products. Dell Inc. disclaims any
proprietary interest in trademarks and trade names other than its own.
)FDPIP3DJH7KXUVGD\-XO\30
ਈ᎖வস
Ᏼᇹᄻڔᓤ୭ൔ
வসǖᒑᎌளਭኵࡼᆒኀଆၣཽᏋݣᎌཚቘሆᓍ૦ঙ݀ގᓤᇹᄻดྀࡼݝੜᔝୈăᎌਈڔཝ
ᎾऴࡅဗĂގᓤଐႯ૦ดݝᔝୈጲૺऴᒏஸ࢟ႼࡼᅲᑳቧᇦLj༿ݬᏞĖޘອቧᇦᒎฉėă
㽕ᇚ㛮䕂ᬃᶊ䚼ӊᅝ㺙ࠄ㋏㒳Ϟˈ䇋ᠻ㸠ҹϟℹ偸˖
1
ᮁᓔ㋏㒳䖲ⱘӏԩೈ䆒Ϣ⬉⑤ᦦᑻⱘ䖲ˈ✊ৢᮁᓔೈ䆒Ϣ㋏㒳ⱘ䖲DŽ
வসǖᆐ೫ܜᐆ߅Lj።কᎅೝৈཽᒊቲݛᒾ 2ă
2
䕏䕏ഄ㗏㋏צ㒳DŽ
3
Ңᴎㆅⱘᑩ䚼ौϟಯϾᬃ㛮DŽ↣Ͼᬃ㛮ᰃ⫼㶎䩝ᅝ㺙ᴎㆅⱘᑩ䚼DŽ䇋খ䯙 1DŽ
ᓖǖֱ⬭䖭ѯ㶎䩝ˈҹկℹ偸 5 ЁՓ⫼DŽ
4
↣Ͼᬃ㛮ϞᇚϔϾ㛮䕂⒥ࡼࠄव㟠ЁˈᑊՓ㛮䕂Ϟⱘᄨᇍޚᬃ㛮ϞⱘᄨDŽ䇋খ䯙 1DŽ
5
Փ⫼ℹ偸 3 Ёᢻϟⱘ㶎䩝ˈᇚ↣Ͼ㛮䕂䚼ӊᅝ㺙ࠄᴎㆅⱘᑩ䚼DŽ䇋খ䯙 1DŽ
2004 ᑈ 7 ᳜
www.dell.com | support.dell.com
வসǖவসܭာࡀᏴభถࡴᒘޘݤႼပĂཽႌᅾࡼ༅Ᏼᆉሙă
www.dell.com | support.dell.com
)FDPIP3DJH7KXUVGD\-XO\30
ᅄ 1.
Ᏼᇹᄻڔᓤ୭ൔ
ᬃ㛮 (4 Ͼ˅
व㟠
㛮䕂˄4 Ͼ˅
㶎䩝˄4 Ͼ˅
வসǖᆐ೫ܜᐆ߅Lj።কᎅೝৈཽᒊቲݛᒾ 6ă
6
ᇣᖗഄ㗏䍋䅵ㅫᴎՓ݊ℷ䴶ᳱϞDŽ
___________
ᴀ᭛Ёⱘֵᙃབ᳝ᬍˈᘩϡ㸠䗮ⶹDŽ
© 2004 Dell Inc. ⠜ᴗ᠔᳝DŽ㕢ॄࠊDŽ
㒣 Dell Inc. к䴶䆌ৃˈϡޚҹӏԩᔶᓣ䖯㸠ࠊDŽ
ᴀ᭛ӊЁՓ⫼ⱘଚᷛ˖Dell DELL ᖑᷛᰃ Dell Inc. ⱘଚᷛDŽᴀ᭛ӊЁ䗄ঞⱘ݊ᅗଚᷛѻકৡ⿄ᰃᣛᢹ᳝Ⳍᑨ
ଚᷛѻકৡ⿄ⱘ݀ৌ݊ࠊ䗴ⱘѻકDŽ Dell Inc. ᇍᴀ݀ৌⱘଚᷛѻકৡ⿄Пⱘ݊ᅗଚᷛѻકৡ⿄ϡᢹ᳝
ӏԩϧ᳝ᴗDŽ
F6585fam0.fm Page 1 Friday, July 9, 2004 11:13 AM
À propos des avertissements
Fixation de roulettes sur le système
AVERTISSEMENT : seuls les techniciens de maintenance qualifiés sont habilités à retirer le capot du
système et à accéder aux composants du système. Consultez le Guide d'information sur le produit pour
obtenir des informations détaillées sur les consignes de sécurité, les interventions dans l'ordinateur et
la protection contre les décharges électrostatiques.
Pour fixer les kits de roulettes sur votre système, procédez comme suit :
1
Débranchez le système et les périphériques de leurs prises électriques, puis débranchez
les câbles reliant le système aux périphériques.
AVERTISSEMENT : pour éviter tout risque de blessure, l'étape 2 doit de préférence être effectuée
par 2 personnes.
2
Retournez le système, en procédant avec précaution.
3
Retirez les quatre pieds de la partie inférieure du châssis. Chaque pied est fixé par une vis.
Voir la figure 1.
REMARQUE : conservez ces vis pour l'étape 5.
4
Glissez une roulette dans les pattes situées sur chaque pied, en veillant à aligner les trous
appropriés. Voir la figure 1.
5
Fixez chaque kit de roulette au châssis, à l'aide des vis que vous avez retirées à l'étape 3.
Voir la figure 1.
Juillet 2004
www.dell.com | support.dell.com
AVERTISSEMENT : un AVERTISSEMENT vous avertit d'une situation qui, si elle n'est pas évitée,
peut provoquer la mort ou des blessures sérieuses.
www.dell.com | support.dell.com
F6585fam0.fm Page 2 Friday, July 9, 2004 11:13 AM
Figure 1. Fixation de roulettes sur le système
Pieds (4)
Pattes
Roulettes (4)
Vis (4)
AVERTISSEMENT : pour éviter tout risque de blessure, l'étape 6 doit de préférence être effectuée
par 2 personnes.
6
Remettez le système à l'endroit, en procédant avec précaution.
___________
Les informations contenues dans ce document peuvent être modifiées sans préavis.
© 2004 Dell Inc. Tous droits réservés. Imprimé aux États-Unis.
La reproduction de ce document de quelque manière que ce soit sans l'autorisation écrite de Dell Inc. est strictement interdite.
Marques utilisées dans ce document : Dell et le logo DELL sont des marques de Dell Inc. Toutes les autres marques déposées
et noms de marques utilisés dans ce document se rapportent aux sociétés propriétaires des marques et des noms de ces produits.
Dell Inc. décline tout intérêt dans l'utilisation des marques déposées et des noms de marques ne lui appartenant pas.
F6585gam0.fm Page 1 Friday, July 9, 2004 11:18 AM
Warnhinweise
Gleitrollen an das System montieren
VORSICHT: Nur ausgebildete Servicetechniker sind befugt, die Systemabdeckung zu entfernen
und Komponenten im Innern des Systems zu handhaben. Ausführliche Informationen zu den
Sicherheitsvorkehrungen beim Arbeiten im Innern des Computers und zum Schutz vor elektrischer
Entladung finden Sie im Produktinformationshandbuch.
Zum Montieren des Rollenhalterungs-Montagesatzes an Ihr System gehen Sie wie folgt vor:
1
Trennen Sie das System sowie sämtliche angeschlossenen Peripheriegeräte vom Netz,
und trennen Sie dann alle Peripheriegeräte vom System.
VORSICHT: Zur Vermeidung von Verletzungen sollten Sie Schritt 2 nur mit Unterstützung
einer zweiten Person ausführen.
2
Drehen Sie das System vorsichtig auf den Kopf.
3
Entfernen Sie die vier Füße von der Unterseite des Gehäuses. Die Füße sind mit je
einer Schraube an der Gehäuseunterseite befestigt. Siehe Abbildung 1.
ANMERKUNG: Bewahren Sie die Schrauben auf, da Sie sie in Schritt 5 wieder benötigen.
4
Schieben Sie je eine Gleitrolle in die Halterungen jedes Fußes. Achten Sie darauf, dass
die Öffnung in der Rollenhalterung sich mit der Öffnung im Fuß deckt. Siehe Abbildung 1.
5
Befestigen Sie die Rollenhalterungen mit den in Schritt 3 entfernten Schrauben am
Gehäuseboden. Siehe Abbildung 1.
Juli 2004
www.dell.com | support.dell.com
VORSICHT: VORSICHT zeigt eine mögliche gefährliche Situation an, die bei Nichtbeachtung
zu Sachschäden, Körperverletzungen oder zum Tod führen könnte.
www.dell.com | support.dell.com
F6585gam0.fm Page 2 Friday, July 9, 2004 11:18 AM
Abbildung 1.
Montieren von Gleitrollen an das System
Füße (4)
Zungen
Gleitrollen (4)
Schrauben (4)
VORSICHT: Zur Vermeidung von Verletzungen sollten Sie Schritt 6 nur mit Unterstützung
einer zweiten Person ausführen.
6
Drehen Sie das System vorsichtig wieder um (auf die Rollen).
___________
Irrtümer und technische Änderungen vorbehalten.
© 2004 Dell Inc. Alle Rechte vorbehalten. Gedruckt in den USA.
Eine Reproduktion dieses Dokuments in jeglicher Form ohne schriftliche Genehmigung von Dell Inc. ist streng verboten.
Marken in diesem Text: Dell und das DELL -Logo sind Warenzeichen von Dell Inc. Andere in diesem Dokument
möglicherweise verwendete Warenzeichen und Handelsbezeichnungen sind unter Umständen Marken und Namen der
entsprechenden Firmen oder ihrer Produkte. Dell Inc. erhebt keinen Anspruch auf Marken und Handelsbezeichnungen
mit Ausnahme der eigenen.
(LCOHO2CIG9GFPGUFC[,WN[2/
̞࠙࣬̾̀ͅ
ΏΑΞθ͈͒΅λΑΗȜ͈৾ͤັ̫
࠙࣬ȇΏΑΞθ͈ΨȜ̱ͬ৾ͤ̀ٸȂΏΑΞθඤ໐ͬͦͥͅैު͉ȂΠτȜΣϋΈͬ
̫̹ȜΫΑܿ৪͈༷̺̫̦࣐̩̺̯̞̽̀ȃհષ͈ಕփȂϋάνȜΗඤ໐͈ैުȂ
̤͍͢ഩܨવ͈͒ٺచੜ͈મळ̞͉̾̀ͅȂȸୋૂ༭΄ͼΡȹͬ४ચ̱̩̺̯̞̀ȃ
ȵɫɁɇʀɞɱȹɋɐȪɃɻɞɲȡȿɁɎɨǺۄș͛ǠȚǺǾƸͨˁǽཆⱽȡી⒅ǦǵǞǯ
ǤǓƹ
1
ȿɁɎɨǷǨȈǵǽܦ⡙ᑿࠔǽ⯍ᛠȹʀɞɳȡȻɻɃɻɐǚȘོǓǵƸȿɁɎɨǚȘ
ܦ⡙ᑿࠔȡۄșঋǦȍǨƹ
࠙࣬ȇ̫̦ͬཡগ̳̹ͥ͛Ȃਜ਼ 2 ͉ 2 ૽࣐̩̺̯̞́̈́̽̀ȃ
2
ȿɁɎɨȡᗨ ǞЬǦƸˀˁ⢑ǺΈǜȍǨƹ
3
ȿɫʀȿˁ⤴ǚȘ 4 dzǽ⃐⤴ȡۄșঋǦȍǨƹ⃐⤴Ǿȿɫʀȿˁ⤴ǺɕɀǶࡘǤț
ǵǓȍǨƹࡖ 1 ȡڹᡄǦǵǞǯǤǓƹ
ικȇ̹̱৾ͤٸΥΐ͉Ȃਜ਼ 5 ́ঀဥ̳͈ͥ́Ȃ༗̞̯̺̩̞̤̱̀̀ۯȃ
4
Ǭțǭțǽ⃐⤴ǽɇɞǺȵɫɁɇʀȡ 1 ХǩdzǾȐ⡛ȢǶƸȵɫɁɇʀǽ᳡Ƿ⃐⤴ǽ
᳡ǽΡΈȡ۰ȞǪȍǨƹࡖ 1 ȡڹᡄǦǵǞǯǤǓƹ
5
ཆⱽ 3 ǶۄșঋǦǮɕɀȡπDzǵƸ۬ȵɫɁɇȪɃɻɞɲȡȿɫʀȿ
ಃ⤴ǺࡘǦȍǨƹࡖ 1 ȡڹᡄǦǵǞǯǤǓƹ
2004 ා 7
www.dell.com | support.dell.com
࠙࣬ȇ͉࠙࣬ȂഎఅٺȂ̫̦Ȃ̹͉͘ঘཌ͈ࡔ֦͂̈́ͥخෝ̦̜̭ͥ͂ͬা̱̳͘ȃ
www.dell.com | support.dell.com
(LCOHO2CIG9GFPGUFC[,WN[2/
1. ΏΑΞθ͈͒΅λΑΗȜ͈৾ͤັ̫
ݗ໐Ȫ4ȫ
Ηή
΅λΑΗȜ
Ȫ4ȫ
ΥΐȪ4ȫ
࠙࣬ȇ̫̦ͬཡগ̳̹ͥ͛Ȃਜ਼ 6 ͉ 2 ૽࣐̩̺̯̞́̈́̽̀ȃ
6
ȿɁɎɨȡᗨ Ǟ❙ǢǦƸ⢡ǽᣞຎǺ༻ǦȍǨƹ
___________
ǢǢǺ▉⠅ǤțǵǓȚԑǾ̔ܝǹǞংሠǤțȚǢǷǛǑșȍǨƹ
© 2004 ǨȈǵǽ⊣ΰᑤǾ Dell Inc. ǺǑșȍǨƹPrinted in the U.S.A.
Dell Inc. ǽሤⰢǺȗȚ▞ǽǹǓ⓹⓯ǾƸǓǚǹȚബຎǺǙǓǵȑ⦔ڴǺᱞǧȘțǵǓȍǨƹ
ቊሤǶπ᧸ǤțǵǓȚަᑙǺdzǓǵ⿉Dell ǙȗȂ DELL ɵȼǾ Dell Inc. ǽަᑙǶǨƹቊሤǶǾƸർ┶Ǻඅǧǵ
ˀ▉ͨঋǽަᑙǙȗȂΉ᰷۵Ǜπ᧸ǤțǵǓȚई۰ǛǑșȍǨǛƸǢțȘǽަᑙȓΉ᰷۵ǾƸʶչ Dell Inc. Ǻ
ཀୡǨȚȑǽǶǾǑșȍǪȢƹ
m]\_\WUGGwGXGG{ SGq G_SGYWW[GGXWaZ\Ght
주의에 대하여
캐스터를 시스템에 연결
주의 : 숙련된 서비스 기술자만 시스템 덮개를 분리하고 시스템 내부의 구성요소에 액세스해야
합니다 . 안전 지침 , 컴퓨터 내부 작업 및 정전기 방전 보호에 대한 자세한 내용은 시스템 정보 설
명서를 참조하십시오 .
캐스터 브래킷 부속품을 시스템에 연결하려면 다음 단계를 수행하십시오:
1
시스템과 시스템에 연결된 모든 주변 장치의 전원을 끄고, 시스템에서 주변 장치를 분리
하십시오.
주의 : 부상을 방지하기 위해 2 명의 사용자가 2 단계를 수행해야 합니다 .
2
시스템을 천천히 거꾸로 뒤집으십시오.
3
섀시 하단에서 4개의 다리를 분리하십시오. 다리는 섀시 하단에 나사로 연결되어 있습니
다. 그림 1을 참조하십시오.
참고: 5단계에서 사용한 나사를 보관하십시오.
4
캐스터의 구멍이 다리 구멍과 맞도록 캐스터를 각 다리의 탭에 밀어 넣으십시오.
그림 1을 참조하십시오.
5
3단계에서 분리했던 나사를 사용하여 캐스터 부속품을 섀시 하단에 연결하십시오.
그림 1을 참조하십시오.
2004 년 7 월
www.dell.com | support.dell.com
주의 : 주의는 위험한 상황 , 심각한 부상 또는 사망할 우려가 있음을 알려줍니다 .
www.dell.com | support.dell.com
m]\_\WUGGwGYGG{ SGq G_SGYWW[GGXWaZ\Ght
그림 1.
캐스터를 시스템에 연결
다리 (4)
탭
캐스터 (4)
나사 (4)
주의 : 부상을 방지하기 2 명의 사용자가 6 단계를 수행해야 합니다 .
6
시스템을 조심해서 오른쪽으로 뒤집으십시오.
___________
본 설명서에 수록된 정보는 사전 통보 없이 변경될 수 있습니다.
© 2004 Dell Inc. All rights reserved. 미국에서 인쇄됨.
Dell Inc.의 사전 승인 없이 어떠한 경우에도 무단 복제하는 것을 엄격히 금합니다.
본 설명서에 사용된 상표: Dell, DELL 로고는 Dell Inc.의 등록 상표입니다. 특정 회사의 표시나 회사명 또는 제품을
지칭하기 위해 다른 상표나 상호를 본 설명서에서 사용할 수도 있습니다. Dell Inc.은 자사가 소유하고 있는 것 이외
에 기타 모든 등록 상표 및 상표 이름에 대한 어떠한 소유권도 없습니다.
F6585sam0.fm Page 1 Friday, July 9, 2004 11:20 AM
Información sobre los avisos de precaución
Fijación de las ruedas al sistema
PRECAUCIÓN: los técnicos de servicio especializados son las únicas personas autorizadas
para retirar las cubiertas y acceder a los componentes internos del sistema. Consulte la Guía de
información del producto para obtener información completa sobre las precauciones de seguridad,
la manipulación de las piezas internas del ordenador y la protección contra descargas electrostáticas.
Para fijar los soportes con ruedas al sistema, efectúe los pasos siguientes:
1
Desconecte el sistema y todos los periféricos de las tomas de corriente y, a continuación,
desconecte todos los periféricos del sistema.
PRECAUCIÓN: para evitar daños, el paso 2 lo deben llevar a cabo dos personas.
2
Apoye el sistema sobre uno de sus laterales.
3
Extraiga los cuatro pies de la parte inferior del chasis. Cada pie está unido a la parte inferior
del chasis mediante un tornillo. Consulte la figura 1.
NOTA: conserve los tornillos para el paso 5.
4
Deslice una rueda en las lengüetas de cada uno de los pies, de modo que el orificio
de la rueda quede alineado con el orificio del pie. Consulte la figura 1.
5
Fije cada rueda a la parte inferior del chasis con los tornillos extraídos en el paso 3.
Consulte la figura 1.
Julio de 2004
www.dell.com | support.dell.com
PRECAUCIÓN: un mensaje de PRECAUCIÓN indica el riesgo de daños materiales, lesiones corporales
o incluso la muerte.
www.dell.com | support.dell.com
F6585sam0.fm Page 2 Friday, July 9, 2004 11:20 AM
Figura 1. Fijación de las ruedas al sistema
Pies (4)
Lengüetas
Ruedas (4)
Tornillos (4)
PRECAUCIÓN: para evitar daños, el paso 6 lo deben llevar a cabo dos personas.
6
Vuelva a colocar el sistema en su posición inicial.
___________
La información contenida en este documento puede modificarse sin notificación previa.
© 2004 Dell Inc. Reservados todos los derechos. Impreso en EE. UU.
Queda estrictamente prohibida la reproducción de este documento de cualquier forma sin la autorización por escrito de Dell Inc.
Marcas comerciales que aparecen en el texto: Dell y el logotipo de DELL son marcas registradas de Dell Inc. Otras marcas y
otros nombres comerciales pueden utilizarse en este documento para hacer referencia a las entidades que los poseen o a sus
productos. Dell Inc. renuncia a cualquier interés en la titularidad de derechos sobre marcas comerciales y nombres comerciales
que no sean los suyos.