1
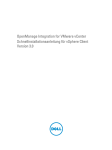
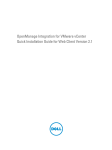
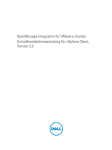
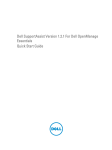
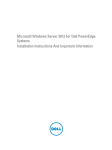
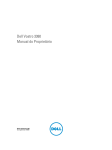
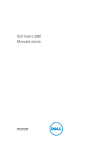
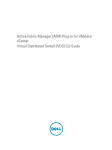
Dell Management Plug-In for VMware vCenter
Quick Install Guide Version 1.7
Notes, Cautions, and Warnings
NOTE: A NOTE indicates important information that helps you make better use of your computer.
CAUTION: A CAUTION indicates either potential damage to hardware or loss of data and tells you how to avoid the
problem.
WARNING: A WARNING indicates a potential for property damage, personal injury, or death.
© 2013 Dell Inc.
Trademarks used in this text: Dell™, the Dell logo, Dell Boomi™, Dell Precision™ , OptiPlex™, Latitude™, PowerEdge™, PowerVault™,
PowerConnect™, OpenManage™, EqualLogic™, Compellent™, KACE™, FlexAddress™, Force10™ and Vostro™ are trademarks of Dell
Inc. Intel®, Pentium®, Xeon®, Core® and Celeron® are registered trademarks of Intel Corporation in the U.S. and other countries. AMD®
is a registered trademark and AMD Opteron™, AMD Phenom™ and AMD Sempron™ are trademarks of Advanced Micro Devices, Inc.
Microsoft®, Windows®, Windows Server®, Internet Explorer®, MS-DOS®, Windows Vista® and Active Directory® are either trademarks
or registered trademarks of Microsoft Corporation in the United States and/or other countries. Red Hat® and Red Hat®
Enterprise Linux® are registered trademarks of Red Hat, Inc. in the United States and/or other countries. Novell® and SUSE® are
registered trademarks of Novell Inc. in the United States and other countries. Oracle® is a registered trademark of Oracle Corporation
and/or its affiliates. Citrix®, Xen®, XenServer® and XenMotion® are either registered trademarks or trademarks of Citrix Systems, Inc. in
the United States and/or other countries. VMware®, Virtual SMP®, vMotion®, vCenter® and vSphere® are registered trademarks or
trademarks of VMware, Inc. in the United States or other countries. IBM® is a registered trademark of International Business Machines
Corporation.
2013 - 5
Rev. A05
Contents
Notes, Cautions, and Warnings...................................................................................................2
1 Quick Start Installation...............................................................................................................5
Installation Introduction............................................................................................................................................5
Prerequisites.............................................................................................................................................................5
Product Hardware Requirements......................................................................................................................6
Software Requirements.....................................................................................................................................6
Installation and Configuration Overview..................................................................................................................6
Deploying the Dell Management Plug-in OVF Using the vSphere Client...........................................................7
Registering Dell Management Plug-in within vCenter And Importing The License File....................................8
Installation Verification....................................................................................................................................11
2 Understanding How To Configure the Dell Management Plug-in Using the Wizard.....13
Configuration Wizard Welcome Page....................................................................................................................13
Creating A New Connection Profile [Wizard].........................................................................................................13
Configuring Events And Alarms [Wizard]...............................................................................................................15
Setting Up A Proxy Server [Wizard]........................................................................................................................16
Scheduling Inventory Jobs [Wizard]......................................................................................................................16
Running A Warranty Retrieval Job [Wizard]..........................................................................................................17
Configuring the Deployment Credentials [Wizard].................................................................................................17
Setting The Default Firmware Update Repository [Wizard]...................................................................................17
Enabling The OMSA Link [Wizard]..........................................................................................................................18
Configuring Dell iDRAC Auto-Discovery And Initial Start-up.................................................................................18
Configuring OMSA Agents To Send Traps.............................................................................................................18
Configuring NFS Shares..........................................................................................................................................19
For More Configuration Information.......................................................................................................................19
4
Quick Start Installation
1
Installation Introduction
This guide provides step-by-step instructions for the installation and configuration of the Dell Management Plug-in
installation on Dell servers. Once the installation is complete, refer to the Dell Management Plug-in User's Guide for
information about all aspects of administration including: inventory management, monitoring and alerting, firmware
updates, deployments and provisioning, and warranty management.
NOTE: With installations on hosts that are on PowerEdge 12th generation servers, OMSA agent installation is not
required. For installations on PowerEdge 11th generation servers OMSA agent is now automatically installed
during the deployment process. For more information about OMSA, please see the section “Understanding OMSA
For 11G Hosts” in the Dell Management Plug-in User's Guide. To more clearly understand PowerEdge 12th
generation servers and hosts prior to the 12th generation, see the Release Notes for this release.
Prerequisites
The following information is needed prior to the start of Dell Management Plug-in installation.
•
TCP/IP address information to assign to the Dell Management Plug-in virtual appliance.
•
A user name and password for the Dell Management Plug-in to access the vCenter server. This should be an
administrator role that has all needed permissions. For additional information on the available Dell Management
Plug-in roles within vCenter, see the Dell Management Plug-in Configuration chapter of the User’s Guide.
•
Root password for ESX/ESXi host systems or Active Directory account that has administrative rights on the ESX/
ESXi host system.
•
User name and password associated with iDRAC Express or Enterprise (only for host systems that include an
iDRAC).
•
If you want to use an Active Directory account to access iDRAC or the host using OMSA or the hypervisor, make
sure that the Active Directory user account already exists in Active Directory and that the host / iDRAC are
configured to support Active Directory.
NOTE:
To learn more about integrating your iDRAC into Active Directory, see the
Integrated Dell Remote Access Controller User's Guide that’s appropriate for your version.
•
Make sure the vCenter server and vSphere client are currently running.
•
Know the location of the Dell Management Plug-in OVF and license files.
•
Install the Dell Management Plug-in (virtual appliance) on any ESX/ESXi host managed by a vCenter instance
that will be registered with the virtual appliance.
•
Your VMware vSphere environment must meet virtual appliance, port access, and listening port requirements. In
addition, install Adobe Flash player 10.0 or higher on the vSphere client system.
5
NOTE: The virtual appliance functions as a regular virtual machine; any interruptions or shut downs impacts overall
functionality of the virtual appliance.
Product Hardware Requirements
The Dell Management Plug-in for VMware vCenter provides full support for 11th and 12th generation Dell servers with
iDRAC and limited support for 9th and 10th generation Dell servers. To determine what generation of Dell Servers you
have, refer to the tables in the Release Notes. See the Dell Management Plug-in for VMware vCenter Release Notes for
specific hardware support information.
Software Requirements
The vSphere environment must meet virtual appliance, port access, and listening port requirements. In addition, install
Adobe Flash player 10.0 or higher on the vSphere client system.
VMware vSphere has both a desktop client and Web client. The Dell Management Plug-in is only available in the
desktop client.
NOTE: It is recommended that the Dell Management Plug-in and vCenter server are located on the same network.
For specific software requirements, refer to the Dell Management Plug-in for VMware vCenter Release Notes.
Dell Management Plug-in Port Requirements
•
443 (https) and 80 (http) - Administration Console
•
4433 (https) - For auto discovery and handshake
•
162 and 11620 - For SNMP trap listener
•
2049, 4001, 4002, 4003, 4004 - NFS share
Installation and Configuration Overview
The following high-level steps outline the overall installation procedure for the Dell Management Plug-in. These
procedures assume that the required hardware is in place and running the required VMware vCenter software. With
installations on PowerEdge 12th Generation servers, OMSA agent installation is not required. For installations on
PowerEdge 11th Generation servers, the OMSA agent is now automatically installed during the deployment process. For
more information about OMSA, please see the Dell Management Plug-in User's Guide.
The following information is an outline of the installation process. To begin the actual installation, see Deploy Plug-In
OVF Using the vSphere Client.
Installation Overview
1. Install the Dell Management Plug-in.
a. Be sure systems are connected, and vCenter server and vSphere client are running.
b. Deploy the Open Virtualization Format (OVF) file that contains the Dell Management Plug-in using the vSphere
client.
c. Upload the license file.
d. Register the Dell Management Plug-in with vCenter server using the Administration Console.
2. Complete Configuration Wizard.
3. Enable Dell events.
a. Set up event filter options on the Settings page.
6
4. Enable firmware updates.
a. Download firmware updates, and make them available to applicable systems.
5. Configure the Dell iDRAC user name and password.
Deploying the Dell Management Plug-in OVF Using the vSphere Client
This procedure assumes that you have downloaded and extracted the product zip file (Dell_Management_Plugin_<version>.<buildnumber>.ZIP) from the Dell website.
NOTE: Thick Provision Eager Zeroed is the disk format recommended during this installation.
To deploy the Dell Management Plug-in OVF using the vSphere Client:
1.
Locate the Dell Management Plug-in virtual disk that you downloaded and extracted and run
Dell_Management_Plug-in_<version number>.<build number>.exe.
2.
Agree to the EULA, extract the user guides and obtain the OVF file.
3.
Copy/move the OVF file to a location accessible to the VMware vSphere host to which you will upload the
appliance.
4.
Start the VMware vSphere client.
5.
From the VMware vSphere client, select File → Deploy OVF Template.
Figure 1. Deploying the OVF Template from vSphere
6.
In the Source window, use the Browse button to locate the OVF package. The location can be a local drive,
network drive, CD/DVD, or from the internet. The Dell Management Plug-in file size is approximately 1.8GB.
NOTE: The install can take between 10 to 30 minutes if the OVF package resides on a network share. For the
quickest installation, it is recommended that you host the OVF on a local drive.
7.
Click Next.
8.
In the OVF Template Details window, review the information presented.
9.
Click Next.
10. In the Name and Location window, do the following:
a. In the Name text box, enter the name of the template. This name can contain up to 80 characters.
b. In the Inventory Location list, select a location to store the template.
11. Click Next.
7
12. Depending on the vCenter configuration, one of the following options displays:
–
If resource pools are configured — On the Resource Pool page, select the pool of virtual servers to which
the Dell Management Plug-in will be deployed.
If resource pools are not configured — On the Hosts/Clusters page, select the host or cluster to which the
Dell Management Plug-in will be deployed.
13. If there is more than one datastore available on the host, the Datastore page displays. Select the location for
storing Dell Management Plug-in files, and click Next.
–
14. In the Disk Format window, select the format in which you want to store the virtual disks:
a. Thick Provision Lazy Zeroed
A lazy-zeroed thick disk has all the disk space allocated at the time of creation, but each block is zeroed only
on first write. This results in a shorter creation time, but reduced performance the first time a block is written
to. Subsequent writes have the same performance as eager-zeroed thick disks.
b. Thick Provision Eager Zeroed [Recommended]
An eager-zeroed thick disk has all the space allocated and zeroed out at the time of creation. This type of disk
increases the time it takes to create the disk, but results in the best performance, even on the first write to
each block.
c. Thin Provision [Not Recommended]
Space required for a thin-provisioned virtual disk is allocated and zeroed upon first write, as opposed to upon
creation. There is a higher I/O cost (similar to that of lazy-zeroed thick disks) during the first write to an
unwritten file block, but on subsequent writes thin-provisioned disks have the same performance as eagerzeroed thick disks.
15. Click Next.
16. In the Ready to Complete window, review the selected options for the OVF deployment task and click Finish. The
deployment job runs and provides a completion status window where you can track job progress.
Registering Dell Management Plug-in within vCenter And Importing The License File
This procedure assumes that you have downloaded the product license zip file (Dell_Management_Plug-in_<# of
hosts>_license.zip) from the Dell website and run Dell_Management_Plug-in_<# of hosts>_license.exe to get the license
XML file. The license XML file is used in this procedure.
1.
From vSphere client, select Home → Hosts and Clusters, then in the left panel, locate the Dell Management Plug-in
just deployed, and then click Power on the virtual machine.
2.
Click the Console tab in the main VMware vCenter window to initiate the Administration Console.
3.
Allow the Dell Management Plug-in to finish booting up and then enter the user name for the administrator (the
default is Admin), and set a password.
4.
Configure the Dell Management Plug-in network and time zone information.
8
Figure 2. Console tab
5.
Open a Web browser and type the appliance's IP address or hostname.
For example: https://10.210.126.120 or https://myesxihost. The URL is not case sensitive.
Figure 3. Administration Console
6.
In the Administration Console login window, enter the password, and then click Login.
9
Figure 4. vCenter Registration Window from within the Administration Console
7.
In the vCenter Registration window, click Register a new vCenter Server.
8.
On the Register a New vCenter window, do the following:
a) Under vCenter Name, in the vCenter Server IP or Hostname text box, enter the server IP or hostname and then
in the Description text box, enter the optional description.
b) Under Admin User Account, in the Admin User Name text box, enter the Admin user name. Enter the username
as domain\user or domain/user or user@domain. The Admin user account is used by the Dell Management
Plug-in for vCenter administration.
c) In the Password text box, enter the password.
d) In the Verify Password text box, enter the password again.
9.
Click Register.
10. Do one of the following:
–
If you are using the Dell Management Plug-in trial version, skip to step 12.
–
If you are using the full product version, there is a license.xml file that you downloaded and extracted
before you started this install. This file contains your product license, and you must import this license to
your virtual appliance. To import the license file, click Upload License.
11. On the Upload License window, click the Browse button to navigate to the license file. Click Upload to import the
license file.
NOTE: If the license file is modified or edited in any way, the license file will not work.
12. Once the Dell Management Plug-in is registered, the Dell Management Plug-in icon displays under the
Management category of the vCenter home page.
10
Figure 5. The Dell Managment Plug-in Successfully Added to vCenter
Installation Verification
The following steps verify that the Dell Management Plug-in installation was successful:
1.
Confirm that the Dell Management Plug-in icon appears inside of vSphere Client. If it does not, restart the vSphere
Client and check again.
2.
Check that vCenter can communicate with the Dell Management Plug-in by attempting a ping command from the
vCenter server to the virtual appliance IP address or hostname.
3.
In vSphere Client, click Plug-ins → Managed Plug-ins. In the Plug-in Manager window verify the Dell Management
Plug-in is installed and enabled.
11
12
Understanding How To Configure the Dell
Management Plug-in Using the Wizard
2
After you do the basic installation of the Dell Management Plug-in, it needs to be configured. This is typically done using
the Configuration Wizard, but you can also do it using the Settings page options in the Dell Management Center Setting's
options.
The user interface in both areas is similar except in the wizard you Save and Continue, whereas in the Settings options
you click Apply.
This section tells you how to configure using the wizard. For information about using the Dell Management Center's
Settings options for configuring the Dell Management Plug-in, see The Dell Management Plug-in User's Guide.
Configuration Tasks Using the Configuration Wizard
Use these tasks when configuring the Dell Management Plug-in using the Configuration Wizard:
1. Configuration Wizard Welcome Page
2. Creating A New Connection Profile
3. Configuring Events And Alarms
4. Setting Up A Proxy Server
5. Scheduling Inventory Jobs
6. Running A Warranty Retrieval Job
7. Configuring The Deployment Credentials
8. Setting The Default Firmware Update Repository
9. Enabling The OMSA Link
Configuration Wizard Welcome Page
After you install the Dell Management Plug-in, it must be configured.
1.
In the vSphere Client, under Management, click the Dell Management Center icon.
2.
The first time you click on the Dell Management Center icon, it opens the Configuration Wizard. You can also
access this wizard on the Dell Management Center → Settings page.
3.
In the Welcome tab, review the steps you will step through, and then click Next.
Creating A New Connection Profile [Wizard]
A connection profile stores the credentials that the virtual appliance uses to communicate with Dell servers. Each Dell
server must be associated with a connection profile to be managed by the Dell Management Plug-in. You may assign
multiple servers to a single connection profile. Creating the Connection Profile is similar between the Configuration
Wizard and from the Dell Management Center, Settings option.
NOTE: With installations on hosts that are using Dell PowerEdge 12th generation servers, the OMSA agent
installation is not required. For installations on 11th generation servers, OMSA agent is now automatically installed
during the deployment process.
13
Prior to using the Active Directory credentials with a connection profile, the Active Directory user account must exist in
Active Directory and this account must already be enable in iDRAC. This wizard is not for creating Active Directory
accounts or enabling Active Directory on iDRAC.
To create a new connection profile using the wizard:
1.
From the Connection Profiles tab, click Create New.
2.
In the Profile Name and Description page, enter the Connection Profile Name and an optional Connection Profile
Description that are used to help manage custom connection profiles.
3.
In the Associated Hosts page, select the hosts for the connection profile and click Next.
4.
In the Credentials page, read the information and click Next.
5.
In the iDRAC page, under Credentials, do one of the following:
NOTE: The iDRAC account requires administrative privileges for updating firmware, applying hardware
profiles, and deploying hypervisor.
–
–
For iDRACs already configured and enabled for Active Directory on which you want to use Active Directory,
select the Use Active Directory check box; otherwise skip down to configure the iDRAC credentials.
*
In the Active Directory User Name text box, type the user name. Type the username in one of these
formats: domain\username or domain/username or username@domain. The user name is limited to
256 characters. Refer to Microsoft Active Directory documentation for user name restrictions.
*
In the Active Directory Password text box, type the password. The password is limited to 127
characters.
*
In the Verify Password text box, type the password again.
*
In the Certificate Check drop-down list, select one of the following:
•
To download and store the iDRAC certificate and validate it during all future connections,
select Enable .
•
To perform no check and not store the certificate, select Disabled.
To configure iDRAC credentials without Active Directory, do the following:
*
In the User Name text box, type the user name. The user name is limited to 16 characters. Refer to
the iDRAC documentation for information about user name restrictions for your version of iDRAC.
NOTE: The local iDRAC account requires administrative privileges for updating firmware,
applying hardware profiles, and deploying hypervisor.
*
In the Password text box type the password. The password is limited to 20 characters.
*
In the Verify Password text box, type the password again.
*
In the Certificate Check drop-down list, select one of the following:
•
To download and store the iDRAC certificate and validate it during all future connections,
select Enable.
•
To perform no check and not store the iDRAC certificate, select Disabled.
6.
Click Next.
7.
In the Host Credentials page, under Credentials, do one of the following:
14
–
–
For hosts already configured and enabled for Active Directory on which you want to use Active Directory,
select the Use Active Directory check box; otherwise skip down to configure your Host Credentials.
*
In the Active Directory User Name text box, type the user name. Type the username in one of these
formats: domain\username or domain/username or username@domain. The user name is limited to
256 characters. Refer to Microsoft Active Directory documentation for user name restrictions.
*
In the Active Directory Password text box, type the password. The password is limited to 127
characters.
*
In the Verify Password text box, type the password again.
*
In the Certificate Check drop-down list, select one of the following:
•
To download and store the Host certificate and validate it during all future connections,
select Enable .
•
To perform no check and not store the Host certificate, select Disabled.
To configure Host Credentials without Active Directory, do the following:
*
In the User Name text box, type the user name. The user name must be root.
*
In the Password text box type the password. The password is limited to 127 characters.
NOTE: For servers that do not have either an iDRAC Express or Enterprise card, the iDRAC test
connection result states Not Applicable for this system.
NOTE: The OMSA credentials are the same credentials used for ESX and ESXi hosts.
*
In the Verify Password text box, type the password again.
*
In the Certificate Check drop-down list, select one of the following:
•
To download and store the Host certificate and validate it during all future connections,
select Enable .
•
To perform no check and not store the Host certificate, select Disabled.
8.
Click Next.
9.
In the Test Connection Profile page, do one of the following:
–
To begin the test, click Test Selected. The other options are inactive.
–
To stop the test, click Abort All Tests.
10. To complete the profile, click Save.
11. To continue on to configure Events and Alarms, click Save and Continue.
Configuring Events And Alarms [Wizard]
Configure events and alarms using the Configuration Wizard or from the Dell Management Center, Settings option for
Events and Alarms.
NOTE: On hosts prior to 12G, this feature requires that the virtual appliance is configured as a trap destination in
OMSA to display host events in vCenter.
To configure events and alarms:
1.
In the Configuration Wizard, under Event Posting Levels, select one of the following:
–
Do not post any events - Block hardware events.
–
Post All Events - Post all hardware events.
15
2.
–
Post only Critical and Warning Events - Post only critical or warning level hardware events.
–
Post only Virtualization-Related Critical and Warning Events - Post only virtualization-related critical and
warning events; this is the default event posting level.
To enable all hardware alarms and events, select the Enable Alarms for Dell Hosts check box.
NOTE: Dell hosts that have alarms enabled respond to critical events by entering maintenance mode.
3.
In the dialog box that displays, click Continue to accept this change, or click Cancel.
NOTE: This step is only seen if Enable Alarms For Dell Hosts is selected.
4.
To restore the default vCenter alarm settings for all managed Dell servers, click Restore Default Alarms.
It may take up to a minute before the change takes effect.
5.
To continue the wizard, click Save and Continue.
Setting Up A Proxy Server [Wizard]
Set the proxy server in the Configuration Wizard or later using the Dell Management Center Settings → Proxy page.
To set up a proxy server:
1.
In the Configure HTTP Proxy window, do one of the following:
–
To not use a proxy server, click Save and Continue.
–
To use a proxy server, under Settings enter a Proxy Server Address.
2.
Enter the Proxy Port number.
3.
Select the Credentials Required check box, if needed.
4.
If you selected Credentials Required, do the following:
a) In the Proxy User Name text box, type the proxy user name.
b) In the Proxy Password text box, type the proxy password.
c) In the Proxy Verify Password text box, re-type the proxy password.
5.
Under Proxy, select the Use Proxy check box.
6.
To save these options and continue, click Save and Continue.
Scheduling Inventory Jobs [Wizard]
The inventory schedule configuration is similar between the Configuration Wizard and from the Dell Management
Center, Settings option. The only difference is that the wizard supplies an option to select if you want to run the inventory
immediately.
NOTE: To make sure that the Dell Management Plug-in continues to display updated information, it is
recommended that you schedule a periodic inventory job. The inventory job consumes minimal resources and will
not degrade host performance.
To schedule an inventory job:
1.
2.
In the Configuration Wizard, in the Inventory Schedule window, do one of the following:
–
To run inventory schedules, click On Selected Days.
–
To not run inventory schedules, select Do not run inventory on Dell hosts.
If you selected On Selected Days, then do the following:
a) Select the check box next to each day of the week that you want to run the inventory.
b) In the text box, enter the time in HH:MM format.
16
The time you enter is your local time. Calculate the time difference you need to run the inventory collection at
the proper time.
c) To automatically run the inventory task once the wizard is complete, select the Run inventory at the end of the
wizard [Recommended] check box.
This check box only appears when the On Selected Days check box is selected.
3.
To apply the changes and continue, click Save and Continue.
Running A Warranty Retrieval Job [Wizard]
The warranty retrieval job configuration is similar between the wizard and from the Dell Management Center, Settings
option. The only difference is that the wizard supplies an option to run the warranty retrieval job immediately. In addition,
you can run the Warranty Retrieval Job now, from Job Queue.
To run a warranty retrieval job:
1.
2.
In the Configuration Wizard, on the Warranty Schedule window, do one of the following:
–
To run warranty schedules, click On Selected Days.
–
To not run warranty schedules, select Do not retrieve Warranty Data.
If you selected On Selected Days, then do the following:
a) Select the text box next to each day of the week that you want to run the warranty jobs.
b) In the text box, enter the time in HH:MM format.
The time you enter is your local time. Calculate the time difference you need to run the warranty jobs at the
proper time.
3.
To apply the changes and continue, click Save and Continue.
Configuring the Deployment Credentials [Wizard]
Deployment credentials are used to securely communicate with a bare-metal system, using the iDRAC from initial
discovery until the end of the deployment process. Once deployment completes, the credentials are changed to those in
the connection profile matched to the bare-metal system from the Deployment wizard. If the deployment credentials are
changed, all newly discovered systems from that point on are provisioned with the new credentials; however, the
credentials on servers discovered prior to the change are not affected.
To configure the deployment credentials:
1.
In the Deployment Credential window you can view or change the credentials. The bare— metal server switches
from these credentials to those specified in the Connection Profile.
2.
To change these credentials, under Credentials for Bare Metal Server Deployment, do the following:
a) In the User name text box, edit the user name.
b) In the Password text box, edit the password.
c) In the Verify Password, text box, confirm the password.
3.
To save the specified credentials and continue with the Configuration Wizard, click Save and Continue.
Setting The Default Firmware Update Repository [Wizard]
Firmware repository settings contain the firmware catalog location used to update deployed servers. You can set up
firmware initially here in the wizard or later from the Dell Management Center Settings option. In addition, you can run
the firmware update later from the Dell Server Management tab.
To set the default firmware update repository:
17
1.
In the Configuration Wizard, on the Firmware Repository page, to choose the default repository for firmware
updates, select one of the following:
–
Dell Online
Default firmware repository (ftp.dell.com) with a staging folder. The Dell Management Plug-in downloads
selected firmware updates and stores them in the staging folder, and then they are applied as necessary.
–
Local/shared repository
These are created with the Dell Repository Manager application. These local repositories should be
located on Windows-based file shares.
2.
If you selected Local/shared repository, do the following:
a) Enter the Catalog File Location using the following format:
*
NFS share for xml file: host:/share/filename.xml
*
NFS share for gz file: host/share/filename.gz
*
CIFS share for xml file: \\host\share\filename.xml
* CIFS share for gz file: \\host\share\filename.gz
b) If using a CIFS share, enter the User Name, Password, and Verify Password; the passwords must match. These
fields are only active when entering a CIFS share.
NOTE: The @ character is not supported for use in shared network folder user names/passwords.
c) To validate your entries click Begin Test.
3.
To save this selection and continue the Configuration Wizard, click Save and Continue.
Enabling The OMSA Link [Wizard]
To launch OMSA within the Dell Management Plug-in virtual appliance, the OMSA Web Server must be installed and
configured. See the Dell OpenManage Server Administrator Installation Guide for instructions on how to install and
configure the Web Server.
NOTE: OMSA is only required on Dell servers prior to version 12G.
You can use OMSA to:
•
Manage vCenter elements (detailed sensor/component-level health information).
•
Clear command logs and system event logs (SELs).
•
Obtain NIC statistics.
•
Make sure that the Dell Management Plug-in captures events from a selected host.
1.
In the Configuration Wizard, on the OpenManage Server Admin page, use the OMSA Web Server URL text box to
enter the OMSA URL. You must include the full URL including the HTTPS.
2.
To save this URL and finish the Configuration Wizard, click Finish.
Configuring Dell iDRAC Auto-Discovery And Initial Start-up
If you did not order your appliance with Auto-Discovery enabled from the factory, you can do it manually by reading
Appendix A, in the Dell Management Plug-in User’s Guide.
Configuring OMSA Agents To Send Traps
The Install and Configure OMSA agent on the ESX Web site contains detailed instructions, as well as sample scripts, to
the OMSA agent to send traps to the Dell Management Plug-in virtual appliance. It is located at the following URL:
18
http://www.delltechcenter.com/page/Install+and+Configure+OMSA+on+ESX
Configuring NFS Shares
To use NFS shares with the Dell Management Plug-in for backup and restore operations, firmware updates, and as a
staging folder, there are certain configuration items that you must complete. CIFS shares do not require additional
configuration.
To configure NFS shares:
1.
On the machine hosting the NFS shares, edit /etc/exports to add: /share/path <appliance IP> (rw) *(ro).
This allows the virtual appliance full read and write access to the share, but limits all other users to read only.
2.
Start nfs services:
service portmap start
service nfs start
service nfslock status
NOTE: The steps above may vary depending on the Linux distribution in use.
3.
If any of the services were already running:
exportfs -ra
For More Configuration Information
For a complete guide on Dell Management Plug-in configuration, management, and deployment options, see the Dell
Management Plug-in for VMware vCenter User's Guide.
19