1
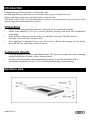
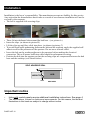
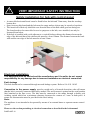
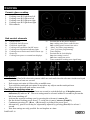
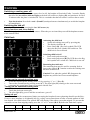
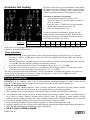
OWNER’S
MANUAL
You can rely on Defy. To simplify
TOUCH CONTROL
CERAN HOB
DHD 395
“770 TC”
2
2
2
2
3
4
4
5
7
Introduction.
Unpacking.
Cupboard design.
Aperture size
Installation.
Safety installation.
Electrical installation.
The controls.
Automatic fast heating & Timer, Ceran
smooth top.
8 Recommendations & Error codes.
9 Technical specifications.
9 Safety advice.
9 Problem check.
9 Owner’s responsibility.
10 Defy Service Centres.
11 Warranty.
12 Purchase details to be filled in.
Part Number 068020
PAGE 1 OF 12
Please register your product at
www.defy.co.za
Introduction
Congratulations on the purchase of this quality hob.
We, the manufacturer, trust that you will enjoy many years of trouble free use.
Please read these instructions carefully before using the hob.
This book will provide you with information on how to operate and care for your hob in order
that you gain the maximum benefit from it.
Unpacking
•
•
•
•
Please ensure that packaging material is disposed of in a responsible manner.
Plastic bags should be cut up to prevent children playing with them and accidentally
suffocating.
Some models feature a protective film over stainless steel trim. This film must be
carefully removed before using the hob.
If the appliance is damaged in any way, do not use it. Report the damage to your dealer,
who will take the necessary corrective action.
Cupboard design
•
•
Cooking appliances generate considerable heat. The layout and materials of the mounting
cabinet should take account of these characteristics.
Surfaces and surrounding edges immediately adjacent to the hob should be able to
withstand temperatures of up to 100°C without delaminating or discolouring.
Aperture size
PAGE 2 OF 12
Installation
Installation is the buyer’s responsibility. The manufacturer accepts no liability for this service.
Any action that the manufacturer has to take as a result of an erroneous installation will not be
covered by the warranty.
• The hob is supplied with securing clips.
A
•
•
•
•
•
•
B
C
These fit into dedicated slots around the hob base . (see picture A)
Insert the clips. (as shown in picture B)
Lift the clips up until they click into place. (as shown in picture C)
To avoid liquid spills penetrating between the hob and the worktop, apply the supplied selfadhesive seal to the perimeter of the aperture. Do not use a silicone sealer.
Invert the hob on the worktop adjacent to the aperture before making the electrical
connection. This will ensure sufficient cable length for subsequent servicing.
Position the hob into the aperture so that the securing clips are compressed between the hob
base and the worktop. (see Sketch below)
SELF ADHESIVE SEAL
WORKTOP
HOB
CLIP
SIDE VIEW
Important notice
•
Hobs with control panels require additional installation instructions. See page 4.
•
The Manufacturer strives for continuous improvements. For this reason, the text and
illustrations in this book are subject to change without notice.
PAGE 3 OF 12
!
VERY IMPORTANT SAFETY INSTRUCTION
Safety installation for hob with control panel
•
•
•
•
A removable horizontal board must be fitted below the hob and 75mm away from the worktop
bottom face.
Space between this board and the hob must be empty and no objects may be stored or kept there.
This board will effectively shield the user from the base of the hob which gets hot during use.
The board needs to be removable for service purposes as the hob, once installed, can only be
loosened from below.
If the hob is installed with a side adjacent to a vertical kitchen cabinet, the distance between the
edge of the hob and that of the cabinet side must be a least 150mm. The distance between the back
wall and the rear edge of the hob must be at least 55mm.
Electrical installation
This appliance must be earthed and the manufacturer and the seller do not accept
responsibility for any damage due to incorrect installation or electrical connection.
Earth leakage
This hob should not be connected through an earth leakage system. Refer to S.A.N.S. 10142
Connection to the power supply must be carried out by a licensed electrician, who will ensure
that the hob is correctly connected and safely earthed. The rated current is printed on the serial number
label attached to the base cover. The hob must be connected to the mains through a double pole
isolating switch which has a minimum clearance between the contacts of 3 mm. in both poles. A
means for disconnection must be provided in the fixed wiring.
Note:
The appliance is not intended to be operated by means of an external timer or separate remote-control
system.
Please see the section pertaining to electrical connection as described in the hob manual.
PAGE 4 OF 12
Controls
Ceramic glass cooktop
1.
2.
3.
4.
5.
Cooking zone Hi Light front left.
Cooking zone Hi Light rear left.
Cooking zone Hi Light rear right.
Cooking zone Hi Light front right.
Hob controls.
Hob control elements
A.
B.
B1.
C.
C1.
D.
E.
F.
On/Off sensor.
Child lock On/Off sensor.
Child lock signal light .
Cooking zone expansion On/Off sensor.
Cooking zone Expansion indicator light.
Cooking zone selection and On/Off sensor (+).
Sensor (-).
Cooking zone power or remain heat displays.
F1.
G.
H.
I.
I1.
L.
Decimal dot on the power displays:
On: cooking zone power control active.
Off: cooking power control not active.
“More” key timer programming.
“Less” key timer programming.
Timer Display.
Decimal dot on clock display:
On: time setting is active.
Off: time setting not active.
Timer controller cooking zone signal lamp.
Hob control
•
•
•
•
The hob is fitted with electronic sensors which are activated when the relevant circular touch pad
is pressed for at least one second.
Each sensor activation is followed by an audible tone.
To avoid false touch pad activations do not place any objects on the touch pad area.
Always keep the touch pad surface area clean.
Switching a cooking zone on
•
•
•
•
•
•
Press the on/off sensor (A) for at least one second to switch the hob on, all hotplate power
indicators (F) indicate ‘0’. The next setting must be selected within 20 seconds to prevent the
hob from switching off.
Activate the required cooking zone by pressing the relevant (+) sensor (D)
Set the desired cooking power from 1- 9, using the (+) or (-) sensors (D and E )
Continuous pressing of + (D) or - (E) increases or reduces the power level.
Alternatively, power levels may be sequentially adjusted by pressing (D or E) for at least 1
second.
Note that settings are only possible for one hotplate at a time.
PAGE 5 OF 12
Controls
Switching a cooking zone off
•
Press the (-) sensor (E) and set the power level to ‘0’, the hotplate will switch off after 3 seconds. Shortly
thereafter the hot surface indicator light on the hob will switch on, display (H) and remain on for 20 to
30 minutes after the plate is switched off. This is a reminder that the hob surface is still too hot to touch.
•
Fast deactivation. Press both + and - (D and E) touchpad sensors simultaneously to switch the hotplate
off immediately.
Switching the hob off
Switch the hob off by pressing the On / Off sensor (A).
Safety functions and error display
The hob is equipped with overheat safety sensors. When they are activated they turn off the hotplates nearest
to the control board.
•
Child lock
Activating the child lock
•
Switch all cooking zones off by pressing (A)
•
The displays indicate ‘0’
•
Press sensor (B). (Key lock symbol) The LED
above the Key lock symbol will switch on. The
child lock is now activated.
Switching child lock off
•
Press touch pad sensor (A).
•
Press touch pad sensor (B) The LED above the Key
lock symbol will switch off. Child lock is now off.
Remaining heat indicator
The remaining heat may be used for warming food as
long as the symbol ‘H’ remains on after the cooking zone
has been switched off.
Caution! Even when the symbol ‘H’ disappears the
hotplate may still be hot. Do not touch hotplates.
Turning on the extended cooking zone
•
Select the required power setting (from 1-9) by pressing “+” or “-” (D or E).
•
Turn on the second zone by pressing sensor (C). The pilot light (C1) relating to the zone concerned
comes on; the second zone comes on together with the first.
Turning off the extended cooking zone
•
The dual zone burner must be on
•
Touch the dual zone sensor (C)
•
The pilot light (C1) goes off and the second zone goes off
Safety cut out
Your hob is fitted with a temperature limiter preventing the hotplate from overheating should a pot boil dry .
If one or more hotplates is accidentally left on, a safety cut out turns them off after a certain amount of time
has elapsed. (See table below) The symbol “H” will display if the safety cut out has tripped. To prevent the
automatic cut out from tripping simply press the “+” or “-” sensor (D or E) before the limit time expires.
Level
1
2
3
4
5
6
7
8
9
Limit time (h)
10
5
5
4
3
2
2
2
1
PAGE 6 OF 12
The hob is fitted with a special mechanism which makes
the hotplates operate at full power at the start of cooking
regardless of the selected setting. After a certain amount
of time the hotplate returns to the originally set value.
Automatic fast heating
Activation of automatic fast heating
•
Selected hotplate must be set to level “0”
•
Touch the sensor “E” and the display switches to
the power setting 9.
•
Press the sensor “+” (D) of the relevant hotplate
and the display indicates the letter “A”
•
Select the desired power level.
The power indicator intermittently displays the “A”
symbol and the selected power setting. When the fast
heating period expires, the hotplate switches to the pre
selected power setting. See table A:
Table A:
Level
Limit time (S)
1
2
3
4
5
6
7
8
1’11’’ 2’44’’ 4’47’’ 5’28’’ 6’29’’ 1’11’’ 2’44’’ 2’44’’
9
...
If the power level is changed during the automatic fast heating on a particular cooking zone, the power boost
function is immediately deactivated.
Timer operation
The control device has an incorporated timer, which when activated may be assigned to one of four areas.
•
Press the “+” (G) or “-” (H) sensors of the timer. The timer display (I) will show “00”, the other (F)
displays “t”
•
After setting the timer, a hotplate must be selected within 10 seconds. Selecting a cooking zone with the
“+” key (D). The pilot light (L) relating to the hotplate comes on
•
Select the required time from between 1-99 minutes with the keys “+” e “-” (G/H).
•
If the timer is selected by pressing the “-” key (H), the starting time would be “99” (Maximum value)
•
Select the required power setting (1-9) with the keys “+” e “-” (G/H).
The timer is assigned to the selected hotplate. Once the countdown is complete, the hotplate will switch off
automatically accompanied by an acoustic signal. Pressing the “+” and “-” keys (G/H) of the timer
simultaneously turns off the timer immediately.
Ceran® smooth top
WARNING: In the unlikely event of the Ceran sustaining accidental damage or cracks, switch off the
appliance at the mains to avoid electric shock and have the panel replaced before further use.
Caring for the Ceran hob
• Ceran is a tough, durable material, which provides a beautiful, functional and long lasting cooking
surface. To keep it looking good, it needs to be treated with care and cleaned regularly.
• Wipe spillage off as soon as possible with a damp cloth, preferably while the hob is still warm.
• Clean the hob with a nylon pad and a suitable smooth top cleaning solution, which is available from all
Defy Service Centres. Remove calcium stains (yellow stains) by applying a small amount of lime
remover such as vinegar or lemon juice. Other suitable commercially available products can also be used.
• If necessary stubborn spills may be removed using the blade scraper provided.
• Do not use metal scourers or coarse abrasive powders as these could scratch the Ceran.
• Regular cleaning after use will prevent dirt build up and ensure that the hob remains bright and attractive.
• Wipe the hob surround with a damp hot soapy cloth and dry.
• DO NOT USE A STEAM CLEANER.
PAGE 7 OF 12
Recommendations
Recommendations (see also the enclosed ‘CERAN’ leaflet)
• Use only pots with a solid level base. An uneven base will prolong cooking time and waste energy.
• Use pots with a base diameter slightly larger than that of the thermal area. This will ensure even
heat distribution and prevent spillage from dripping onto and staining the hot zone.
• Always cover the pot with a lid. This will conserve energy and minimize spillage.
• Save energy by switching the plate off 5 to 10 minutes before the end of a lengthy cooking period.
The Ceran hob will retain sufficient residual heat to complete the cooking process.
• A pot with rough edges could scratch the Ceran if it were dragged across the surface of the hob.
• Any spillage of sugar solution such as jam, must be removed immediately. If allowed to cool on the
Ceran it could pit and damage the surface.
• Do not cover the Ceran with aluminium foil and do not use poor quality aluminium pots. These
will leave unsightly deposits which in time, could adhere to the Ceran.
Error codes
ERROR CODE
ERROR DESCRIPTION
WHAT TO DO
FA
ON/OFF button: emitter’s anomaly. All cook- CONTACT YOUR DEFY SERVICE CENTRE AND SPECIFY THE ERROR CODE
ing zones are disabled.
FC
ON/OFF button: receiver’s anomaly. All
cooking zones are disabled.
CONTACT YOUR DEFY SERVICE CENTRE AND SPECIFY THE ERROR CODE
FE
Touch control’s temperature sensor: sensor
NTC’s short circuit. All cooking zones are
disabled.
CONTACT YOUR DEFY SERVICE CENTRE AND SPECIFY THE ERROR CODE
Ft
Touch control’s temperature sensor: sensor
NTC’s opening. All cooking zones are disabled.
CONTACT YOUR DEFY SERVICE CENTRE AND SPECIFY THE ERROR CODE
Fc
Touch controls temperature sensor: sensor
NTC’s overheating. All cooking zones are
disabled.
CONTACT YOUR DEFY SERVICE CENTRE AND SPECIFY THE ERROR CODE
Fr
Relay: relay’s anomaly. All cooking zones
are disabled.
CONTACT YOUR DEFY SERVICE CENTRE AND SPECIFY THE ERROR CODE
FH
Touch control's EEPROM (memory):
Eeprom’s anomaly. All cooking zones are
disabled.
CONTACT YOUR DEFY SERVICE CENTRE AND SPECIFY THE ERROR CODE
FJ
Touch control’s ADC: Anomaly of touch con- CONTACT YOUR DEFY SERVICE CENTRE AND SPECIFY THE ERROR CODE
trol’s ADC. All cooking zones are disabled.
FO
Touch control’s software: Software anomaly. If it persists with domestic use: CONTACT
YOUR DEFY SERVICE CENTRE AND
All cooking zones are disabled
SPECIFY THE ERROR CODE
FL
Touch control’s brightness: Excessive exter- CONTACT YOUR DEFY SERVICE CENTRE AND SPECIFY THE ERROR CODE
nal brightness that prevents calibration of
touch sensors. All cooking zones are disabled
FU
Touch control’s divider: Divider anomaly. All
cooking zones are disabled.
PAGE 8 OF 12
CONTACT YOUR DEFY SERVICE CENTRE AND SPECIFY THE ERROR CODE
Technical Specifications
Model
DHD 395 “770 TC”
Volts
220V –240V 50/60Hz~
Amperes
33
Plate power rating (ø, mm/ W)
Front cooking zone left
210/120, 2200/750
Front cooking zone right
180, 1800
Rear cooking zone right
170 x265, 2400/1500
Rear cooking zone left
140, 1200
Total power ( W)
7600
Type of switch
Electronic sensors
Width
Depth
770 mm
510 mm
Safety advice
•
•
•
•
•
This hob is not intended for use by persons (including children) with reduced physical, sensory
or mental capabilities, or lack of experience and knowledge, unless they have been given
supervision or instruction concerning use of the hob by a person responsible for their safety.
Children should be supervised to ensure that they do not play with the hob.
Only use the hob for preparing food.
Do not leave hot fat or oil unattended. If overheating occurs, these could catch fire.
Switch off the power at the mains in the event of a fault or when cleaning the hob.
Problem check
Before calling a service technician to assist with a problem:
PROBLEM
SOLUTION
The plates do not work
Check there is power to the wall switch.
Remember that you may be charged for a service call even during the warranty period if the fault is
due to or caused by the above.
Owner’s responsibility
Since the following are not factory faults, they are the owner’s responsibility.
•
•
•
•
Damage to exterior finish.
Breakage of glass and other components.
Damage through improper use or installation of the appliance.
Damage caused by moving the appliance.
Did you remember to fill in the purchase details on page 12 of this manual?
PAGE 9 OF 12
Defy Service Centres
If you have followed the instructions and still have a problem, contact the
nearest Defy Technical Support Centre. They will be able to advise you on any
aspect of the product or send a qualified technician to repair it.
BLOEMFONTEIN
CAPE TOWN
DURBAN
EAST LONDON
JOHANNESBURG
Commercial Head Office,
Administration, Distribution, National Groups,
Tel. Sales, Contracts and Credit.
POLOKWANE
PORT ELIZABETH
PRETORIA.
160 Long Street, Hilton,
Bloemfontein 9301.
Tel. 051 400 3900
[email protected]
5A Marconi Rd.
Montague Gardens, 7441.
Tel. 021 526 3000
[email protected]
35 Intersite Avenue,
Umgeni Business Park, Durban 4051.
Tel. 031 268 3300
[email protected]
16 Bowls Rd. Arcadia,
East London 5201.
Tel. 043 743 7100
[email protected]
Cnr. Mimetes & Kruger Sts. Denver ext.12
Johannesburg. 2094.
Tel. 011 621 0200 or 011 621 0300
[email protected]
87 Nelson Mandela Drive.
Superbia 0699.
Tel. 0152 92 1166 / 7 / 8 / 9.
[email protected]
112 Patterson Road,
North End, Port Elizabeth 6001.
Tel. 041 401 6400
[email protected]
Block A1 Old Mutual Industrial Park.
Cnr. D.F.Malan Drive & Moot Str.
Hermanstad. 0082.
Tel. 012 377 8300
OTHER AREAS ARE SERVICED BY OVER 200 AUTHORISED AGENTS.
CONSULT THE NEAREST REGIONAL SERVICE CENTRE FOR DETAILS.
PAGE 10 OF 12
Warranty
This certificate is issued by DEFY APPLIANCES (PTY) LTD manufacturers of Defy and Ocean products,
hereinafter the Company, to the original purchaser only, of the appliance described on the certificate and
shall constitute the only warranty given in respect of this appliance.
The Company warrants to the original purchaser that for a period of TWO YEARS from date of purchase the
appliance is free from defect under normal domestic use, both in workmanship and material, subject to the
following conditions.
1. Repair or replacement of any part of this appliance, found by the Company to be defective, shall be at the
election of the Company. The Company reserves the right to effect such service through any of its Service
Divisions or Authorised Service Dealers. The cost of such service shall be borne by the Company in full,
provided that the appliance is located no further than 50 km from a Company Service Centre or an
Authorised Service Dealer. Where the appliance is located beyond the 50 km radius, the purchaser shall
be liable for the standard travelling charges, as determined by the Company.
CARRY IN SERVICE Microwave ovens, Compact cookers and small appliances are repaired in our
service centres and are not collected from the customers home. Faulty units should be delivered to the
purchasing dealer or to the nearest Company Service Centre for warranty repairs.
2. Rusted or corroded plates, vitreous enamelware, fuses and lamps are specifically excluded from these
warranties. It is an express condition of these warranties that the purchaser takes due care and attention in
the use and maintenance of the appliance. Abuse, misuse in conflict with operating instructions, connection
to incorrect voltages and subjection to commercial use shall release the Company from its obligations.
3. This warranty shall become void and cease to operate if the appliance is dismantled by, or any repairs to
the appliance are effected by any persons not duly authorised by the Company, or if substitute parts not
approved by the Company are used in the appliance, or if the serial number of the appliance is removed.
4. The Company shall not be responsible for damages resulting from fire, flood, civil disturbances or any
Act of God. The Company shall not, in terms of these warranties be responsible nor held liable for any
consequential loss or damage of any kind caused by or due to the failure or malfunction of the appliance.
5. The Company shall not be responsible for transportation or other costs other than those incurred within
the provisions of Point 1 of this Certificate.
6. These warranties shall not apply to the appliance if it is purchased or used beyond the borders of the
Republic of South Africa, Namibia, Botswana, Swaziland and Lesotho.
7. Where service is requested under warranty and no fault or defect can be found by the Company, all costs
incurred will be for the purchaser's account.
8. This Certificate as well as your invoice will serve as proof of purchase. For the purpose of warranty, it
will be essential to produce this Certificate and invoice. Failure to do so, will render the purchaser liable for
service costs.
KEEP THIS CERTIFICATE AND SALES INVOICE AS PROOF OF PURCHASE FOR
WARRANTY PURPOSES.
PAGE 11 OF 12
You can rely on Defy. To simplify
For future reference, record the listed information in the space below.
The Serial number may be found on the label attached to the hob base.
Serial No:
Date of purchase:
Purchased from:
PAGE 12 OF 12

![8KG HEAT PUMP DRYER [Met DTD 315]](http://vs1.manualzilla.com/store/data/005851733_1-4b2b64d3b006b4e2563952fefa7cfd52-150x150.png)
![AUTODRY PREMIUM PLUS [Met DTD298]](http://vs1.manualzilla.com/store/data/006012284_1-1524e0bc7da7bc268800a5fd91963b06-150x150.png)