1
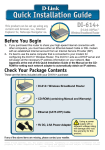
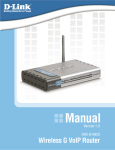
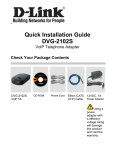
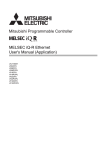
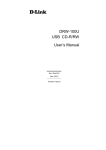
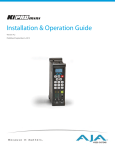
This product can be set up using
any current web browser, i.e.,
Internet Explorer 6 or Netscape
Navigator 6.2.3.
DVG-G1402S
Wireless VoIP Router
Before You Begin
1.
2.
If you purchased this Router to share your high-speed Internet connection with other
computers, you must have an established Internet account from an Internet Service
Provider (ISP).
It’s best to use the same computer that is connected to your router for configuring the
DVG-G1402S Wireless VoIP Router. The DVG-G1402S acts as a DHCP server and
will assign all the necessary IP address information on your network. See the Quick
Installation Guide or the Manual on the CD-ROM for setting each network adapter to
automatically obtain an IP address.
Check Your Package Contents
•
DVG-G1402S
shown with antenna
•
CD-ROM
containing Manual and Warranty
•
Ethernet Cable
(CAT5 UTP Straight-Through)
•
12V, 1.2A
Power Adapter
Using a power adapter with
a different voltage rating will
damage and void the
warranty for this product.
If any of the above items is missing, please contact your reseller.
©2005 D-Link Systems, Inc. All rights reserved. Trademarks or registered trademarks are the property of
their respective holders. Software and specifications subject to change without notice. DVG-G1402S
Wireless VoIP Router
Connecting the Router to your Computer
Antenna
Phone Connections
Connect to your phones
using standard phone
cabling
Ensures good
wireless reception
LAN Ports
Reset
Connect to the
LAN and other
computers
Push to return to
factory settings
Power Input
Connect to AC
Adapter
WAN Port
Connect to the
WAN (Internet)
A. First, connect the power adapter to the power input at the back
panel of the DVG-G1402S and then plug the other end of the
power adapter to a wall outlet or power strip. On the front of the
device, the Power LED will turn ON to indicate proper operation.
B. Insert one end of the Ethernet cable into an Ethernet (LAN) port
on the back panel of the DVG-G1402S and the other end of the
cable to an Ethernet Adapter or available Ethernet port on your
computer.
C. Insert one end of the Ethernet Cable (blue) to the LAN or
Ethernet port on your Cable or DSL modem, and then connect
the other end of the cable to the WAN port of the DVG-G1402S.
D. Check the LED display on the front of the Router to confirm that
the connections have been made.
Configure IP Settings
To connect to the network, make sure the network adapter in
your computer is configured properly. Here’s how to configure
the network adapter to obtain an IP address automatically for
the DVG-G1402S Wireless VoIP Router.
2
For Microsoft Windows XP
Go to Start > select
Settings > click
Control Panel >
Double-click on the
Network
Connections icon
Double-click on
Network Connections
Right-click the
Local Area
Connection icon,
and then select
Properties.
Select Properties
3
The dialog box displays a list
of currently installed network
items.
Click Internet Protocol
(TCP/IP)
Click Properties
Make the choice to get the IP
settings assigned automatically.
Select Obtain an IP address
automatically
Click OK
4
Connecting Additional Computers
to the DVG-G1402S
Wireless VoIP Router
Using additional Ethernet (CAT5 UTP) cables, connect your Ethernetequipped computers to the LAN ports on the back panel of the DVGG1402S.
When you have completed the steps in this Quick Installation Guide,
your connected network should look similar to this:
5
Initial Web Configuration
Open your Web browser and
type http://192.168.15.1 into
the URL address box. Press
Enter or Return.
The login dialog box
appears:
When you first log in, the
User name is admin and
the Password is also
admin. These may be
changed later.
Click OK.
6
The Home window appears:
Click Run Wizard.
Clicking a hyperlink on the menu on the upper left side of the window
brings up a detailed configuration window (see the next section for a brief
description of three typical WAN connection examples).
7
Configuring the Router using
the Setup Wizard
The following screens are displayed when you click Run Wizard from the
Web configuration Home page, as shown above. Included are typical
WAN (Internet) connection examples for Dynamic IP Address (DHCP),
Static IP Address, or PPPoE connections. Click Run Wizard on the
menu above to view the following Wizard window:
Click the Next button.
8
Click the Next button.
Enter the Time Zone that corresponds to your location on the
planet.
Click Next to continue.
9
Click the Next button.
Enter the WLAN channel and SSID you want to use for your
WLAN network. Initially, you can accept the default values
and change the router’s configuration later.
Click Next to continue.
10
Click the Next button.
Enter the Authorization Settings you want to use for your
WLAN network. Initially, you can accept the default value
(No Auth) and change the router’s configuration later. If you
choose use Wireless encryption, click the WEP or WPA-PSK
radio button to open the following screen.
No Auth disables Wireless LAN authentication.
Remember that each PC on your Wireless network will have
to have identical Authorization Settings as the router to
connect.
Click Next to continue.
11
Click the Next button.
WEP is for general use and utilizes a Shared Key between
cooperating Wireless devices. WEP encrypts the data
portion of each frame transmitted from the wireless adapter
using one of the predefined keys. Decryption of the data
contained in each packet can only be done if the both the
receiver and transmitter have the same shared key.
Remember that each PC on your Wireless network will have
to have identical Authorization Settings as the router to
connect.
Click Next to continue.
12
Click the Next button.
WPA-PSK (Pre-Shared Key) uses the same encryption as
WPA but is implemented differently. All devices on the
wireless network share the same key (a Passphrase). Enter
the Passphrase in the field above.
Remember that each PC on your Wireless network will have
to have identical Authorization Settings as the router to
connect.
Click Next to continue.
13
Click the Next button.
Enter a new password for the DVG-G1402S in the
Password field.
Confirm the new password by entering it again into the
Verify Password field.
Click the Next button to continue.
14
Click the Next button.
The window above allows you to select between the three
most common ways to connect to your ISP’s WAN (Internet).
Select Dynamic IP Address if your ISP automatically
assigns you an IP address. This is the most common way of
connecting the DVG-G1402S to another modem, such as a
Cable modem.
Select Static IP Address if your ISP provided you with IP
address information that will not change.
Select PPPoE if your ISP uses the Point-to-Point over
Ethernet (PPPoE) protocol to make the connection. This is
the most common connection type for DSL users.
Click the Next button to continue.
15
Dynamic IP Address
Select Dynamic IP Address if your ISP automatically
assigns you an IP address. This is the most common way of
connecting the DVG-G1402S to another modem, such as a
Cable modem.
Click the Next button.
Enter the host name, if required, in the Host Name field.
If you are using a Cable modem to make the connection to
your ISP’s WAN (Internet), click the Clone MAC Address
button. This will copy the MAC address of your PC’s network
adapter to the DVG-G1402S. The Cable modem will then
recognize the DVG-G1402S and make a valid connection.
Click the Next button to continue.
16
Click the Restart button.
Click the Restart button to save the settings and restart the
router.
17
Static IP Address
Select Static IP Address if your ISP provided you with IP
address information that will not change.
Click the Next button.
Click the Next button to continue.
18
Click the Next button.
You will need your ISP to provide you with the IP address
information about your Internet account, if your ISP statically
assigns an IP address to you.
Enter the provided IP address in the WAN IP Address field.
Enter the corresponding subnet mask in the WAN Subnet
Mask field.
Enter the IP address of your ISP’s gateway in the WAN
Gateway Address field.
Enter the IP address of a Domain Name Server (DNS) in the
Primary DNS Address field.
Click the Next button to continue.
19
Click the Restart button.
Click the Restart button to save the settings and restart the
router.
20
PPPoE
Select PPPoE if your ISP uses the Point-to-Point over
Ethernet (PPPoE) protocol to make the connection. This is
the most common connection type for DSL users.
Click the Next button.
Click the Next button to continue.
21
Click the Next button.
Enter the User Name for your account in the User Name
field.
Enter the Password for your account in the Password field.
Confirm the Password by entering it again in the Retype
Password field.
Click the Next button to continue.
22
Click the Restart button.
Click the Restart button to save the settings and restart the
router.
23
Technical Support
You can find software updates and user documentation on the D-Link
website.
Tech Support for customers within the Europe
D-Link Europe (United Kingdom) Ltd
4th Floor, Merit House, Edgware Road, Colindale, London
NW9 5AB United Kingdom
TEL: 44-020-8731-5555 SALES: 44-020-8731-5550
FAX: 44-020-8731-5511 SALES: 44-020-8731-5551
BBS: 44 (0) 181-235-5511
URL: www.dlink.co.uk E-MAIL: [email protected]
http://support.dlink.co.uk
email:[email protected]
ISL2G620BLB1
Ver:1.00
24