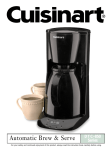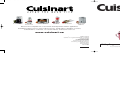
1
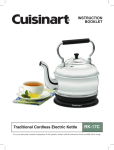
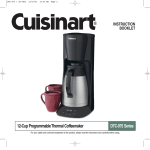
DTC-975C IB-4830-CAN-B
4/20/05
5:40 PM
Page 1
INSTRUCTION
BOOKLET
Coffeemakers
Food
Processors
Toaster Ovens
Cookware
Blenders
Ice Cream
Makers
Discover the complete line of Cuisinart® brand premier kitchen appliances
including food processors, mini food processors, hand mixers, blenders, toasters,
coffeemakers, cookware, ice cream makers and toaster ovens at
www.cuisinart.ca
©2005 Cuisinart
Cuisinart® is a registered trademark of Cuisinart
Cuisinart Canada
156 Parkshore Drive
Brampton, Ont. L6T 5M1
Consumer Call Centre E-mail:
[email protected]
Printed in China
www.cuisinart.ca
03CC18099
IB-4830-CAN-B
12-Cup Programmable Thermal Coffeemaker
DTC-975BKC Series
For your safety and continued enjoyment of this product, always read the instruction book carefully before using.
DTC-975C IB-4830-CAN-B
4/20/05
5:40 PM
Page 3
IMPORTANT SAFEGUARDS
When using electrical appliances, basic safety precautions should
always be followed to reduce the risk of fire, electric shock and/or
injury to persons, including the following:
1. Read all instructions before operating or using the appliance.
2. Do not touch hot surfaces. Use handles and knobs.
3. To protect against electrical shock, do not place cord, plugs or
appliance in water or other liquid.
4. Close supervision is necessary when any appliance is used by or
near children.
5. Unplug from outlet when not in use and before cleaning. Allow to
cool before putting on or taking off parts and before cleaning
the appliance.
6. Do not operate any appliance with damaged cord or plug, or after
the appliance malfunctions or has been damaged in any manner.
Return appliance to authorized service facility for examination,
repair or adjustment.
7. The use of an accessory not evaluated for use with the appliance
may cause injuries.
8. Do not use outdoors.
9. Do not let cord hang over edge of table or counter, or touch
hot surface.
10. Do not place on or near a hot gas or electric burner or in a
heated oven.
11. Do not move entire unit when appliance is on or when thermal
carafe contains hot liquids.
12. Prior to connecting or disconnecting plug from wall outlet, turn all
controls to “OFF”.
13. Do not use appliance for other than intended purpose. Appliance is
for household use only.
14. WARNING: To reduce risk of fire or electrical shock, do not remove
bottom cover. No user-serviceable parts are inside. Repair should
be done by authorized personnel only.
15. Special instructions for the thermal carafe:
A. The thermal carafe is designed for use with this appliance only.
It must never be used with any other drip-type coffeemaker, or
on a range top or in a microwave oven.
1
B. Do not set a hot thermal carafe on a wet or cold surface. Do not
put thermal carafe in water. Do not place on hot surface.
C. Do not use a cracked thermal carafe or a thermal carafe that
has a loose or weakened handle.
D. Do not clean thermal carafe with cleaners, steel wool pads or
abrasive material. Do not place sharp or hard objects in the
thermal carafe.
16. Do not place a cloth or otherwise restrict airflow beneath coffeemaker.
SAVE THESE INSTRUCTIONS
HOUSEHOLD USE ONLY
This appliance has a polarized plug (one blade is wider than the other).
To reduce the risk of electric shock, this plug is intended to fit into a
polarized outlet only one way. If the plug does not fit fully into the outlet,
reverse the plug. If it still does not fit, contact a qualified electrician.
Do not attempt to modify the plug in any way.
SPECIAL CORD SET INSTRUCTIONS
A short power-supply cord is provided to reduce the risk of becoming
entangled in or tripping over a longer cord. Extension cords are available and may be used if care is exercised in their use. If an extension
cord is used, the marked electrical rating of the extension cord should
be at least as great as the electrical rating of the appliance, and the
cord should be arranged so it will not drape over the countertop or
tabletop where it can be tripped over or pulled on by children.
WARNING
RISK OF FIRE OR ELECTRIC SHOCK
DO NOT OPEN
WARNING: TO REDUCE THE RISK OF FIRE OR ELECTRIC SHOCK,
DO NOT REMOVE COVER (OR BACK)
OPERATING NOTICE
INTRODUCTION
Clogging and backing up of water and/or coffee in the filter basket can
occur under any or a combination of any of the following conditions:
The use of too finely ground coffee, using two or more paper filters,
using the gold tone filter in conjunction with a paper filter or not properly
cleaning coffee grounds from the gold tone filter, or allowing coffee
grounds to spill over the filter.
The Cuisinart® Thermal Carafe Coffeemaker is a coffee lover’s dream.
It delivers the freshest coffee in the world. The secret? The patented lid.
Coffee brews and pours through and you never have to open or turn the
lid. Flavour and heat are sealed in. Now, you can program your
coffeemaker to start brewing when you want. Simply set the desired
brew time, fill the reservoir with water, put in your filter, add ground
coffee and press the “ON” button. In minutes, you’ll have a wonderfully
fresh pot of coffee.
Caution: Never open the top cover during the brewing cycle, even if no
water is draining from the filter basket, since extremely hot water/coffee
can spill out from the filter basket and cause injury. If water/coffee is not
draining from the filter basket during the brewing cycle, unplug the unit
and wait 10 minutes before opening the top cover and checking the filter basket.
We know the Cuisinart® Thermal Carafe Coffeemaker will bring you
years of pleasure. Nothing is more satisfying than a rich cup of
your favourite brew.
PREPARATION FOR USE
IMPORTANT UNPACKING
INSTRUCTIONS
Before first use, clean the thermal carafe coffeemaker by completing a
brew cycle as described below, without using coffee or coffee filter.
Place the box on a large, sturdy, flat surface. Lay the box on its side.
Slide the packaged unit out of the box. Remove the foam insert and
the cardboard insert. Now remove the carafe from the coffeemaker.
Remove the carafe from its cardboard packaging. Carefully lift the
coffeemaker from the remaining inserts. Remove the plastic bag from
the coffeemaker. We suggest you save all packing materials in the
event that future shipping of the machine is needed. Keep all plastic
bags away from children.
To Set The Clock
TABLE OF CONTENTS
Press the “minute” button to advance the minutes to the desired time.
Minutes move in one second increments.
Important Safeguards . . . . . . . . . . . . . . . . . . . . . . . . . . . Page 1
When complete, press the hour button again, or wait for 15 seconds
and your time change will be accepted.
Unpacking Instructions . . . . . . . . . . . . . . . . . . . . . . . . . . Page 2
Introduction . . . . . . . . . . . . . . . . . . . . . . . . . . . . . . . . . . . Page 2
Using the Programming Feature . . . . . . . . . . . . . . . . . . . Page 2
Making Coffee . . . . . . . . . . . . . . . . . . . . . . . . . . . . . . . . . Page 3
Cleaning and Maintenance . . . . . . . . . . . . . . . . . . . . . . . Page 4
NO USER-SERVICEABLE PARTS INSIDE
Features and Benefits . . . . . . . . . . . . . . . . . . . . . . . . . . . Page 5
REPAIR SHOULD BE DONE BY AUTHORIZED SERVICE PERSONNEL ONLY
Warranty . . . . . . . . . . . . . . . . . . . . . . . . . . . . . . . . . . . . . . Page 6
USING THE PROGRAMMING FEATURE
To set the time, press and hold the hour or minute button for two
seconds. “Time set” starts flashing in the upper left hand corner of the
LCD screen.
Press the hour button to advance the clock to the desired time.
The hour numeral moves in one hour increments. When numeral passes
12 am, the “PM” indicator will illuminate in the lower left hand corner of
the LCD screen.
To Program the Brew Time
To program the brew time, press and hold the program button for two
seconds. The “prog” symbol starts flashing in the lower right corner
of the LCD screen.
Press the hour button to advance the clock to the desired time. The
hour numeral moves in one hour increments. When numeral passes
12 am, the “PM” indicator will illuminate in the lower left hand corner of
the LCD screen.
2
DTC-975C IB-4830-CAN-B
4/20/05
5:40 PM
Page 5
Press the “minute” button to advance the minutes to the desired time.
Minutes move in one second increments.
When complete, press the “prog” button, or wait for 15 seconds and
your set time will be accepted.
To Activate the Auto Brew Cycle
To activate the auto brew mode, depress the “auto on” button.
The “auto” symbol will illuminate in the upper right hand corner of the
LCD screen.
The unit will now begin the brewing cycle at the programmed time.
When the programmed time initiates the cycle, the red “ON” indicator
light will show that the brewing cycle has started.
NOTE: The unit will continue to attempt to brew at the programmed
time, each day, until the Off button is pressed. The red “ON” indicator light will illuminate each time the attempt to brew is made.
If there is no water in the reservoir, the unit will automatically shut off
one minute later.
MAKING COFFEE
1. Place coffeemaker on a solid flat surface.
Plug into 120V outlet.
2. Open thermal carafe lid in direction of “OPEN” arrow. Fill thermal
carafe with cold, fresh water. Open hinged water reservoir cover;
pour water into reservoir opening. Markings on water level indicator show amount of water needed to make desired number of cups
of coffee. TO AVOID OVERFLOW, DO NOT FILL ABOVE 12 CUP
MARK. Close reservoir cover.
3. Before thermal carafe is returned to platform, prewarm carafe by
running warm water through it. Prewarming carafe will help keep
coffee warmer.
4. Return carafe lid to thermal carafe. To close lid, turn it in direction of
“CLOSE” arrow until it fits tightly on carafe, and “POUR” arrow is
aligned with spout. Return empty thermal carafe to platform.
Be certain thermal carafe lid is in “CLOSED” position and is
securely in place during brew cycle.
5. Open filter basket by grasping basket handle and swinging
outward. Insert a filter into filter basket; make sure filter fits snugly
in basket. Use a fresh filter for each carafe of coffee.
3
6. After placing 1 level tablespoon (15 ml) of ground coffee per cup
(148 ml) of water into the cone filter, return the brew basket to the
closed position. To ensure safe operation, make sure basket is
closed securely.
7. With thermal carafe and basket securely in place, press “ON”
button; LED will light. CAUTION: Coffeemaker becomes very hot
during brew cycle; handle with extreme care, as hot parts and
escaping steam may cause burns.
8. The Brew-Through lid allows coffee to drip from coffeemaker
through closed lid. When coffee has completely stopped dripping
into thermal carafe and water level indicator is empty, brew cycle is
complete. When dripping stops, Brew-Through lid will seal so coffee
freshness and temperature are preserved.
PRECAUTIONS
1. Do not place a cloth or otherwise restrict airflow beneath coffeemaker.
2. To avoid accidents, make sure thermal carafe lid is in “CLOSED”
position during brewing and while pouring; do not pour in the
direction of people.
3. When pouring, use thermal carafe handle only. Bottom of Thermal
Carafe is hot to touch for several minutes after brewing.
4. CAUTION: Burns may result from spilled hot liquid and/or contact
with hot parts.
CLEANING AND MAINTENANCE
9. An audible “beep” tone will signal when brew cycle is complete. The
coffeemaker will switch off automatically.
Bottom of Thermal Carafe is hot to touch for several minutes
after brewing. Use caution.
10. After coffee grounds have cooled, carefully open filter basket and
discard used coffee filter and grounds. To remove filter basket from
coffeemaker (A) grasp basket handle and swing basket outward,
and (B) with basket in far right position, lift up and pull
basket hinge.
Daily
Always unplug coffeemaker and allow to cool before cleaning. Wash
filter basket in hot, soapy water. The carafe and lid can be washed in
warm soapy water and rinsed thoroughly. Not recommended for use
in dishwasher.
Do not use scouring agents or harsh cleansers on any part of
the coffeemaker.
11. Brew-Through lid allows coffee to be poured with lid in “CLOSED”
position, so coffee freshness and temperature can be preserved.
NEVER POUR LIQUID FROM THERMAL CARAFE UNLESS LID IS
IN “CLOSED” POSITION.
Never immerse base unit in water or other liquid. To clean base, simply
wipe with a clean, damp cloth and dry before storing. Wipe resting
plate with a clean, damp cloth. Never use rough, abrasive materials or
cleansers to clean the resting plate. Do not dry the inside of the water
reservoir with a cloth, as lint may remain.
BREW PAUSE™
Monthly
This feature allows a cup of coffee to be poured before the brew cycle
has finished. Carefully remove thermal carafe, and the Brew Pause™
feature will automatically activate, temporarily stopping flow of coffee
into thermal carafe. Return thermal carafe to platform immediately after
pouring coffee, and the brewing process will resume.
IMPORTANT: Carafe must be returned to its position within 30 seconds to
prevent filter basket from overflowing.
NOTE: Strength of coffee poured mid-cycle may vary in strength from
finished brew.
CAUTION: During brew cycle, basket must be closed securely since
basket in improper position may cause hot water or coffee to overflow.
Minerals found in water can clog coffeemaker or reduce its efficiency.
To prevent this, fill thermal carafe with 2 cups (500 ml) vinegar. Add
cold water to top. Pour water/vinegar mixture into reservoir opening.
Place empty thermal carafe (with lid securely closed) on platform and
press “ON” button. After water/vinegar mixture has been cycled
through, press “OFF” button. Rinse by cycling through 2 or 3 more
carafes of plain cold tap water. Do not pour any liquid other than cold
tap water or water/vinegar mixture into reservoir opening when
cleaning.
4
DTC-975C IB-4830-CAN-B
4/20/05
5:40 PM
Page 7
WARRANTY
FEATURES AND BENEFITS
LIMITED THREE-YEAR WARRANTY
2
This warranty supersedes all previous warranties on the
Cuisinart® Thermal Carafe Coffeemaker. This warranty is available
to consumers only. You are a consumer if you own a Cuisinart®
Thermal Carafe Coffeemaker that was purchased at retail for personal, family or household use. This warranty is not available to
retailers or other commercial purchasers or owners.
1. Patented Lid
Allows coffee to brew in and pour out of carafe without
opening or adjusting. Keeps coffee hot and flavourful for hours.
2. Reservoir Cover
Simply lift to fill with water. Close cover once water has been added.
We warrant that your Cuisinart® Thermal Carafe Coffeemaker will be
free of defects in material or workmanship under normal home
use for three years from the date of original purchase.
3
3. Filter Basket
Swings open for easy insertion of coffee filter.
4. Water Window
Magnified markings indicate water needed to make corresponding
cups of coffee.
6
1
4
5. Stainless Double-wall Thermal Insulated Carafe
These warranties expressly exclude any defects or damages
caused by accessories, replacement parts or repair service
other than those that have been authorized by Cuisinart. These
warranties exclude all incidental or consequential damages.
BEFORE RETURNING YOUR CUISINART® PRODUCT
* Important: If the nonconforming product is to be serviced by
someone other than Cuisinart’s Authorized Service Centre,
please remind the servicer to call our Consumer Service Centre
to ensure that the problem is properly diagnosed, the product
serviced with the correct parts, and to ensure that the product is
still under warranty.
When calling our Authorized Service Centre for in warranty service please make reference to your model number and the manufacturing date code. This information can be found in the rating
area on the body or underneath the base of your unit. The model
number will follow the word Model: DTC-975BKC. The manufacturing date code is a 4 or 5 digit number. Example, 40630 would
designate year, month & day (2004, June 30th).
6. Brew Pause™
Stops flow of water from basket when carafe is removed from heater
plate, so a cup can be poured during brewing cycle.
5
7. Auto-Brew Cycle
Program time to brew.
If your coffeemaker should prove to be defective within the warranty period, we will repair it or, if we think it necessary, replace
it. To obtain warranty service, please call our Consumer Service
Centre toll-free at 1-800-472-7606 or write to:
8. “ON” Indicator Light
Illuminates when power is on.
Cuisinart Canada
156 Parkshore Drive
Brampton, Ont. L6T 5M1
9. LCD Readout
8
7
9
5
For warranty purposes, we would like to suggest that you register your product on-line at www.cuisinart.ca to facilitate verification of the date of original purchase. However, should you not
wish to register on-line we recommend the consumer to maintain
original receipt indicating proof of purchase. In the event that
you do not have proof of purchase date, the purchase date for
purposes of this warranty will be the date of manufacture.
Your Cuisinart® coffeemaker has been manufactured to strict
specifications and has been designed for use with the Cuisinart®
coffeemaker authorized accessories and replacement parts for
your model.
To facilitate the speed and accuracy of your return, please also
enclose $10.00 for shipping and handling of the product. Please
also be sure to include a return address, description of the product defect, product serial number, and any other information pertinent to the product’s return. Please pay by cheque or money
order.
NOTE: For added protection and secure handling of any
Cuisinart® product that is being returned, we recommend you
use a traceable, insured delivery service.
Cuisinart cannot be held responsible for in transit damage or for
packages that are not delivered to us. Lost and/or damaged
products are not covered under warranty.
6