1
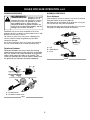
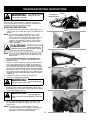
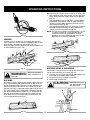
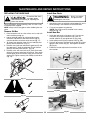
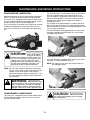
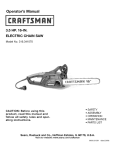
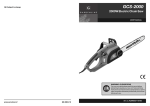
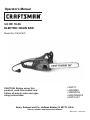
Operator’s Manual
3.5 HP. 16-IN.
ELECTRIC CHAIN SAW
Model No. 316.341070
CAUTION: Before using this
product, read this manual and
follow all safety rules and operating instructions.
•
•
•
•
•
SAFETY
ASSEMBLY
OPERATION
MAINTENANCE
PARTS LIST
Sears, Roebuck and Co., Hoffman Estates, IL 60179, U.S.A.
Visit our website: www.sears.com/craftsman
6096-211301 date(12/04)
TABLE OF CONTENTS
Warranty
Page
2
Safety Rules
Pages 3 - 9
Starting/Stopping Instructions
Page
Operation
Pages 11 - 12
Maintenance
Page
Troubleshooting
Page 20
Repair Parts
Page 21
10
13 - 19
WARRANTY STATEMENT
TWO YEARS LIMITED WARRANTY ON CRAFTSMAN ELECTRIC CHAIN SAW
For two years from the date of purchase, when this Chain Saw is used and maintained according to
the operator’s manual, Sears will repair any defect in material or workmanship free of charge.
This warranty excludes the bar and chain, which are expendable parts that can wear out from normal
use in less than two years.
If this Chain Saw is used for commercial or rental purposes, this warranty applies for only 30 days
from the date of purchase.
WARRANTY SERVICE IS AVAILABLE BY RETURNING THIS CHAIN SAW TO THE NEAREST
SEARS STORE OR SEARS PARTS & REPAIR CENTER IN THE UNITED STATES.
This warranty gives you specific legal rights, and you may also have other rights which vary from
state to state.
Sears, Roebuck and Co., Dept. 817WA, Hoffman Estates, IL 60179
2
RULES FOR SAFE OPERATION
SYMBOL
The purpose of safety symbols is to attract your attention to possible dangers. The safety symbols, and their
explanations, deserve your careful attention and understanding. The safety warnings do not by themselves
eliminate any danger. The instructions or warnings they
give are not substitutes for proper accident prevention
measures.
SYMBOL
MEANING
DANGER:
Failure to obey a safety
warning will result in
serious injury to yourself or to others. Always
follow the safety precautions to reduce the
risk of fire, electric shock and personal injury.
MEANING
SAFETY ALERT:
Indicates
danger,
warning or caution. Attention is required in
order to avoid serious personal injury. May
be used in conjunction with other symbols
or pictographs.
WARNING:
Failure to obey a
safety warning can
result in injury to yourself and others. Always
follow the safety precautions to reduce the
risk of fire, electric shock and personal
injury.
NOTE: Advises you of information or instructions vital to
the operation or maintenance of the equipment.
CAUTION:
Failure to obey a safety warning may result
in property damage or personal injury to
yourself or to others. Always follow the safety precautions to reduce the risk of fire,
electric shock and personal injury.
Read the Operator’s Manual(s) and follow all warnings
and safety instructions.
Failure to do so can result in serious injury to the
operator and/or bystanders.
• IMPORTANT SAFETY INSTRUCTIONS •
READ ALL INSTRUCTIONS
PLAN AHEAD
• Wear protective gear. Always use steel-toed safety
footwear with non-slip soles; snug-fitting clothing;
heavy-duty non-slip gloves; eye protection such as
non-fogging, vented goggles or face screen; an
approved safety hard hat; and hearing protection.
Regular users should have hearing checked regularly as
chain saw noise can damage hearing.
WARNING:
If correctly used, the
chain saw is a
quick, easy to handle and efficient tool; if used improperly or
without the due precautions it could become
a dangerous tool. For pleasant and safe
work,always strictly comply with the safety
rules that are contained in this manual.
OPERATE YOUR SAW SAFELY
• Do not operate a chain saw that is damaged, not calibrated properly or not fully assembled. Always replace
chain, bar, chain brake, and other parts immediately if
damage occurs.
• Read the instructions carefully. Be familiar with the controls and proper use of the unit.
• Do not apply excess force to the chain saw at the end
of the cut. You may lose control of the unit when the
cut has been completed.
• Do not operate this unit when tired, ill or under the
influence of alcohol, drugs or medication.
• Keep all parts of your body away from the chain when
the engine is running.
• Keep Children away.
• Secure hair above shoulder length. Do not wear loose
clothing or jewelry; they can get caught in moving
parts.
• Use the unit only in daylight or good artificial light.
• Inspect the unit before use. Replace all damaged parts
prior to starting. Make sure the unit is in original operating condition before starting.
• Know the controls and know how to stop the chain saw
quickly.
• Carry the chain saw with the motor stopped, the guide
bar and saw chain to the rear.
3
RULES FOR SAFE OPERATION
• Do not operate a chain saw that is damaged, improperly
adjusted, or not completely and securely assembled. Be
sure that the saw’s chain stops moving when the trigger
is released.
WARNING:
KICKBACK may
occur when the nose
or tip of the guide bar touches an object, or
when the wood closes in and pinches the saw
chain in the cut. Tip contact in some cases
may cause a lightning-fast reverse reaction,
kicking the guide bar up and back towards
the operator. Pinching the saw chain along the
top of the guide bar may push the guide bar
rapidly back toward the operator. Either of
these reactions may cause you to lose control
of the saw, which could result in serious personal injury.
Do not rely exclusively upon the safety
devices built into your saw. As a chain saw
user, you should take several steps to keep
your cutting jobs free from accident or injury.
• Use extreme caution when cutting small-sized brush
and saplings because slender material may catch the
chain saw and whip towards you or cause you to lose
control.
• When cutting a limb that is under tension, be alert for
springback so that you will not be struck when the tension in the wood fibers is released
• Do not cut through nails, rods in the tree, railroad ties or
pallets. Inspect a tree that you are going to cut for foreign objects that could cause injury or damage to your
chain saw.
• After striking a foreign object, stop the motor and thoroughly inspect for damage. Repair as necessary.
KICKBACK SAFETY PRECAUTIONS
• We do not recommend using the chain saw in a tree or
on a ladder.
• With a basic understanding of kickback, you can reduce
or eliminate the element of surprise. Sudden surprise
contributes to accidents. Be alert to the potential for
kickback at all times.
MAINTAIN YOUR SAW IN GOOD
WORKING ORDER
• All chain saw service, other than the items listed in this
instruction manual maintenance instructions, should be
performed by a Sears or other qualified service dealer.
• Keep a good firm grip on the saw with both hands, the
right hand on the rear handle and the left hand on the
front handle, when the motor is running. Use a firm grip
with thumbs and fingers encircling the chain saw handles. A firm grip will help you reduce kickback and maintain control of the saw. Don’t let go.
• Make sure all fasteners are in place and secure.
• Unauthorized replacement parts or the removal of safety
devices may cause damage to the unit and possible
injury to the operator or bystanders. Use only Craftsman
accessories and replacement parts as recommended.
Never modify your saw.
• Make sure that the area in which you are cutting is free
from obstructions. Do not let the nose of the guide bar
contact a log, branch, fence, or any other obstruction
that could be hit while you are operating the saw.
• When not in use, saw should be stored in a dry, highly
secure location away from children.
• Always cut with the motor running at full speed. Fully
squeeze the trigger and maintain a steady cutting
speed.
• All chain saw service, other that the items listed in this
instruction manual maintenance instructions, should be
performed by a Sears or other qualified service dealer.
• Do not overreach. Always keep proper footing and balance.
• Use only the correct original equipment manufacturer
replacement bars, chains and other parts and accessories. These are available from a Sears or other qualified service dealer. Use of any unauthorized parts or
accessories could lead to serious injury to the user, or
damage to the unit, and will void your warranty.
• Always hold the unit with both hands when operating.
Keep a firm grip on all handles or grips.
• Follow the manufacturer’s sharpening and maintenance
instructions for the saw chain.
• Apply chain brake prior to any repositioning of the operator in the cutting area. As an additional safety precaution, apply the chain brake prior to setting down the
saw.
• Use only the replacement guide bars and low kickback
chains specified for your saw to avoid injury.
• Never touch the chain or attempt to service the saw
while the motor is running. Make sure all moving parts
have stopped. Allow the chain saw to cool, as the chain
can be hot.
• Always have saw at full speed when entering a previous
cut. Always use caution when entering a previous cut.
• Use the right tool. Only use this chain saw for its intended purpose, to cut wood.
• Watch for shifting logs or other forces that could pinch
or fall into chain.
• Do not start a cut using the tip of the saw.
• Check the bar and chain at frequent intervals for proper
adjustment. Make sure the bar and chain are properly
tightened and sharpened. Visually inspect for damage.
Repair any damage before restarting or operating the
chain saw.
4
RULES FOR SAFE OPERATION
OTHER SAFETY PRECAUTIONS
ELECTRICAL SAFETY WARNINGS
• Do not operate a chain saw with one hand! Serious
injury to the operator, helpers, bystanders, or any combination of these persons may result from one-handed
operation. A chain saw is intended for two-handed use.
• Since the tool is double-insulated, a 2-wire extension
cord (an extension cord without a ground) may be used.
A 3-wire extension cord (an extension cord with a
ground) that uses a NEMA type connector (parallel
blade, U ground) is recommended. Extension cords are
available at Sears or other retailers. Use only roundjacketed extension cords approved for outdoor use.
• Do not operate a chain saw if you are fatigued.
• Use safety footwear; snug-fitting clothing; protective
gloves; and eye, hearing, and head protection devices.
• This tool is double-insulated. Repair or replace damaged cords.
• Do not allow other persons to be near the chain saw
when starting or cutting with the chain saw. Keep
bystanders and animals out of the work area.
• To reduce the risk of electrical shock, this unit has a
polarized plug (one blade is wider than the other). This
unit will fit with a polarized plug in one way only. If the
plug does not fit fully into the unit, reverse the plug. If it
still does not fit, use a cord with the correct connection.
Do not modify the unit in any way.
• Do not remove, damage or de-activate any of the safety
devices. Never use a damaged, modified, or improperly
repaired or assembled chain saw. Check their proper
operation regularly. See chain replacement under
Maintenance and Repair Instructions.
WARNING:
To reduce the risk of
electrical shock, use
only SW-A, SOW-A, STW-A, STOW-A, SJW-A,
SJOW-A, SJTW-W or SJTOW-A cord types.
• Never carry out operations or repairs on your own that
are other than routine maintenance as listed in this
manual.
• Use caution when felling a tree. Make sure you have
planned an escape path when felling, and keep all
bystanders away.
• Be alert; stop the machine if anyone enters the cutting
area, which is usually 3 to 4 feet around the operator.
• Use caution when working in a crew to avoid injury to a
fellow worker who may enter the cutting area.
• Keep these instructions. Refer to them often and use
them to instruct other users. If you loan this unit to others, also loan these instructions to them.
• Store the unit in a dry place, secured, or at a height to
prevent unauthorized use or damage. Keep out of reach
of children.
• Never douse or squirt the unit with water or any other
liquid. Keep handles dry, clean and free from debris.
Clean after each use.
• Do not use the unit in the rain, in a storm or in
inclement weather.
5
RULES FOR SAFE OPERATION
ELECTRICAL SAFETY WARNINGS (CONT’D)
• Examine the electrical switches. Do not use the chain
saw if the switches do not properly turn on and off. Do
not attempt to make any repairs to the electric switches.
Take your saw to a Sears or other qualified service dealer.
• CORD SETS: Make sure your cord set is in good condition, with a cord that is heavy enough to carry the current that your unit will draw. An undersized cord set will
cause a drop in line voltage resulting in a loss of power,
as well as overheating. The table shown below illustrates the correct size to use depending on the cord
length and nameplate amperage rating. If in doubt, use
the next heavier size line gauge. The smaller the gauge
number, the heavier the cord. To prevent the cord from
disconnecting from the unit, use the cord hook shown in
the Starting/Stopping Instructions.
• Keep the cord away from the cutting area and to position cord so that it will not be caught on branches, and
the like, during cutting.
• This electric powered saw is classified accroding to
CAN/CSA Z62.1-03 as a Class 2C saw. It is intended for
infrequent use by homeowner’s, cottagers and campers,
and for such general applications such as clearing,
pruning, cutting firewood, etc. It is not intended for prolonged use. If the intended use involves prolonged periods of operation, this may cause circulatory problems in
the user’s hands due to vibration. It may be appropriate
to use a saw having an anti-vibration feature.
• Ground Fault Circuit Interrupter (GFCI) protection should
be provided on the circuit(s) or outlet(s) that will be used
for the unit. Use receptacles with built-in GFCI protection for an extra measure of safety.
• Avoid dangerous environments. Never operate your unit
in damp or wet conditions. Moisture is a shock hazard.
• Inspect all extension cords and the unit power connection
periodically. Look closely for deterioration, cuts or cracks
in the insulation. Also inspect the connections for damage. Repair or replace the cords if any defects appear.
• Do not handle the plug or the unit with wet hands.
Minimum Gauge Wire
Saw Model
Ampere
Rating
Volts AC
34107
13.5
110 / 120
Length of Power Cord
25 ft. / 7.5m
50 ft. / 15m
100 ft. / 30m
16 Gauge
16 Gauge
SAVE THESE INSTRUCTIONS
6
14 Gauge
RULES FOR SAFE OPERATION
SAFETY AND INTERNATIONAL SYMBOLS
This operator's manual describes safety and international symbols and pictographs that may appear on this product.
Read the operator's manual for complete safety, assembly, operating and maintenance and repair information.
SYMBOL
SYMBOL
MEANING
MEANING
• GUIDE BAR
• SAFETY ALERT SYMBOL
WARNING:
Indicates danger, warning, or caution.
May be used in conjunction with
other symbols or pictographs.
Contact of the
guide bar tip with any object should
be avoided. Tip contact may cause
the guide bar to move suddenly
upward and backward, which may
cause serious injury. Avoid bar nose
contact.
• READ OPERATOR'S MANUAL
WARNING:
Read the
Operator’s Manual(s) and follow all
warnings and safety instructions.
Failure to do so can result in serious
injury to the operator and/or
bystanders.
• USE BOTH HANDS
Always use both hands while operating the chain saw. Never use only one
hand to operate the saw.
• WEAR EYE, HEARING AND HARDHAT PROTECTION
WARNING: Thrown
objects and loud noise can cause
severe eye injury and hearing loss.
Wear eye protection meeting ANSI
Z87.1-1989 standards and ear protection when
operating this unit. Wear a hard hat.
Use a full face shield when needed.
• DOUBLE INSULATED
Two systems of insulation are provided instead of grounding. There is
no grounding provided and no
means of grounding should be
added to this unit.
• DO NOT USE IN THE RAIN
WARNING:
Avoid dangerous environments. Never operate
your unit in the rain, or in damp or
wet conditions. Moisture is a shock
hazard.
7
RULES FOR SAFE OPERATION
KNOW YOUR SAW
9
11
16
10
1
8
15
14
3
7
2
5
18
17
19
4
12
13
6
CHAIN SAW COMPONENTS
SAFETY FEATURES
1. REAR HANDLE
2. OIL RESERVOIR CAP
3. TRIGGER START/STOP SWITCH
4. SPROCKET COVER
5. BAR BOLT KNOB
6. CHAIN TENSION RING
7. ELECTRIC MOTOR
8. ELECTRIC CORD
9. CHAIN BRAKE® LEVER / HAND GUARD
10. LOCK / OFF BUTTON
11. FRONT HANDLE
12. GUIDE BAR
13. SAW CHAIN
14. BUCKING SPIKES
15. CORD RETAINER HOLE
16. SPROCKET TIP
17. OIL RESERVOIR WINDOW
18. CORD RETAINER
19. CHAIN CATCHER
Numbers preceding the descriptions correspond with the
numbers above to help you locate the safety feature.
3. TRIGGER START / STOP SWITCH stops saw motor
when released.
7. ELECTRIC MOTOR is double insulated for added safety.
9. CHAIN BRAKE® LEVER / HAND GUARD protects the
operator’s left hand in the event it slips off the front
handle while saw is running.
10. LOCK / OFF BUTTON prevents accidental acceleration of the saw motor. The trigger cannot be
squeezed unless lock/off button is depressed.
13. LOW KICKBACK SAW CHAIN helps significantly
reduce kickback, or the intensity of kickback, due to
specially designed depth gauges and guard links.
19. CHAIN CATCHER reduces the danger of injury in the
event saw chain breaks or derails during operation.
The chain catcher is designed to intercept a whipping
chain.
8
RULES FOR SAFE OPERATION cont.
KICKBACK SPECIFICS
KICKBACK SPECIFICS
Pinch Kickback
WARNING:
Kickback can lead to
dangerous loss of
control of the chain saw and result in serious
or fatal injury to the saw operator or to anyone standing close by. Always be alert.
Rotational kickback and pinch-kickback are
major chain saw operational dangers and the
leading cause of most accidents.
Pinch kickback can occur when the saw chain is pinched
along the bottom or top of the guide bar.
When pinched on the bottom of the guide bar, it may pull
the saw forward, away from the operator.
When pinched along the top of the guide bar, it may push
the guide bar rapidly back toward the operator.
KICKBACK may occur when the NOSE or TIP of the
guide bar touches an object, or when wood closes in and
pinches the saw chain in the cut.
Tip contact in some cases may cause a lightning-fast
reverse reaction, kicking the guide bar up and back
toward the operator.
Any of these reactions may cause you to lose control of
the saw, which could result in serious personal injury.
A
A = Pull
B = Solid objects
C = Push
Rotational Kickback
Rotational Kickback can occur when the moving
chain contacts an object at the upper tip of the guide
bar. This contact can cause the chain to dig into the
object, which stops the chain for an instant. The
result is a lightning fast, reverse reaction which kicks
the guide bar up and back toward the operator.
A
Fig. 2
B
A
A
B B
A = Kickback path
B = Kickback reaction zone
Fig. 1
9
C
STARTING/STOPPING INSTRUCTIONS
WARNING:
Never operate the saw
without the bar and
Oil Reservoir
Inspection Spot
chain properly installed.
Oil Cap
STOPPING INSTRUCTIONS
The saw motor will automatically stop when the trigger is
released. To restart the motor, you will have to depress the
LOCK/OFF button and squeeze the trigger.
STARTING INSTRUCTIONS
1.
Fill the oil reservoir with correct chain and bar oil (Fig. 3). Use
a funnel, wipe up any spills and make sure no dirt gets into
the tank.
NOTE: The saw chain requires lubrication when in use to
minimize friction with the guide bar. The oil tank
holds 4.5 ozs of oil, enough to lubricate the chain for
12-15 minutes of sawing. We recommend using
Craftsman Bar and Chain Lubricant, which contains
additives to reduce friction wear and reduce resin
residue formations.
Fig. 3
CAUTION:
The oil reservoir level
should be frequently
checked during operation to avoid starving
the bar and chain of lubrication.
Fig. 4
NOTE: Your chain saw is equipped with an Automatic Oiler
system and is the ONLY source of lubrication for the
bar and chain.
2. Be certain the Chain Brake® is disengaged before
starting unit (Fig. 4). Disengage it by pulling backward
toward the motor.
3. Hook the extension cord to the extension cord retainer (A)
(Fig. 5) that is built into the rear handle. This will prevent
the cord from pulling out of the handle. Double the extension cord, about a foot from the end, and insert it through
the hole at the end of the handle. Hook the loop formed by
doubling the cord over the tab. Gently tug on the cord to
ensure that it is firmly retained in the saws handle. Plug the
receptacle end of the extension cord into the tool’s power
supply cord.
4. Perform Chain Brake Test which is located in the
Maintenance and Repair Instructions.
A
Fig. 5
WARNING:
Ensure the extension
cord is of the proper
size and type for your saw.
5. Grip the saw with both hands, left hand holding the front
handle (DO NOT HOLD CHAIN BRAKE®) and the right
hand holding the rear handle. Thumbs and fingers should
encircle both handles (Fig. 6).
Fig. 6
WARNING:
C
Make sure the extension cord does not
come in contact with the guide bar and saw
chain.
6. With your right thumb, push forward the LOCK/OFF button (C) on the top of the rear handle, and at the same
time squeeze the trigger. To stop the saw, release the
trigger (Fig. 7).
NOTE: It is not necessary to maintain pressure on the
LOCK/OFF button once the trigger is squeezed and
the motor is running. The LOCK/OFF button is a
safety device to avoid accidental starting.
10
Fig. 7
OPERATING INSTRUCTIONS
FELLING
WARNING:
Felling is the term for cutting down a tree. Small trees up
to 6-7 inches (15-18cm) in diameter are usually cut in a
single cut. Larger trees require notch cuts. Notch cuts
determine the direction the tree will fall.
Never walk in front of
a tree that has been
notched.
Make the felling cut (D) from the other side of the tree and
1.5 - 2.0 inches (3-5 cm) above the edge of the notch (C)
(Fig. 9).
WARNING:
A retreat path (A)
should be planned
and cleared as necessary before cuts are
started. The retreat path should extend back
and diagonally to the rear of the expected
line of fall, as illustrated in Fig. 8.
CAUTION:
If felling a tree on
sloping ground, the
chain saw operator should keep on the
uphill side of the terrain, as the tree is likely
to roll or slide downhill after it is felled.
Hinge
NOTE: Direction of fall (B) is controlled by the notching
cut. Before any cuts are made, consider the location of larger branches and natural lean of the tree
to determine the way the tree will fall.
Fig. 9
Never saw completely through the trunk. Always leave a
hinge. The hinge guides the tree. If the trunk is completely
cut through, control over the felling direction is lost.
WARNING:
Before making the
final cut, always recheck
the area for bystanders, animals or obstacles.
B
Insert a wedge or felling lever in the cut well before the
tree becomes unstable and starts to move. This will prevent the guidebar from binding in the felling cut if you
have misjudged the falling direction. Make sure no
bystanders have entered the range of the falling tree
before you push it over.
A
Felling Cut:
1. Use wooden or plastic wedges (G) to prevent binding
the bar or chain (H) in the cut. Wedges also control
felling (Fig. 10).
2. When diameter of wood being cut is greater than the
bar length, make 2 cuts as shown (Fig. 11).
Fig. 8
WARNING:
WARNING:
Do not cut down a
tree during high or
changing winds or if there is a danger to
property. Consult a tree professional.Do not
cut down a tree if there is a danger of striking utility wires; notify the utility company
before making any cuts.
Normally felling consists of 2 main cutting operations,
notching (C) and making the felling cut (D) (Fig. 9).
Start making the upper notch cut (C) on the side of the
tree facing the felling direction (E). Be sure you don t make
the lower cut too deep into the trunk(Fig. 9).
The notch (C) should be deep enough to create a hinge (F)
of sufficient width and strength. The notch should be wide
enough to direct the fall of the tree for as long as possible
(Fig. 9).
As the felling cut
gets close to the
hinge, the tree should begin to fall. When
tree begins to fall, remove saw from cut,
stop motor, put chain saw down, and leave
area along retreat path (Fig. 8).
G
11
H
Fig. 10
OPERATING INSTRUCTIONS
When bucking on a slope, always stand on the uphill side.
1. Log supported along entire length: Cut from top (overbuck), being careful to avoid cutting into the ground
(Fig. 13).
2. Log supported on one (1) end: First, cut from bottom
(underbuck) 1/3 diameter of log to avoid splintering.
Second, cut from above (overbuck) to meet first cut
and avoid pinching (Fig. 14).
3. Log supported on both ends: First, overbuck 1/3 diameter of log to avoid splintering. Second, underbuck to
meet first cut and avoid pinching (Fig. 15).
NOTE: The best way to hold a log while bucking is to use
a sawhorse. When this is not possible, the log
should be raised and supported by the limb
stumps or by using supporting logs. Be sure the
log being cut is securely supported.
Fig. 11
LIMBING
Limbing a tree is the process of removing the branches
from a fallen tree. Do not remove supporting limbs (A) until
after the log is bucked (cut) into lengths (Fig. 12).
Branches under tension should be cut from the bottom up
to avoid binding the chain saw.
Fig. 14
Fig. 15
A
BUCKING USING A SAWHORSE
Fig. 12
WARNING:
For personal safety and ease of cutting, the correct position for vertical bucking is essential (Fig. 16).
A. Hold the saw firmly with both hands and keep the saw
to the right of your body while cutting.
B. Keep the left arm as straight as possible.
C. Keep weight on both feet.
Never cut tree limbs
while standing on a
tree trunk.
BUCKING
CAUTION:
Bucking is cutting a fallen log into lengths. Make sure you
have a good footing and stand uphill of the log when cutting on sloping ground. If possible, the log should be supported so that the end to be cut off is not resting on the
ground. If the log is supported at both ends and you must
cut in the middle, make a downward cut halfway through
the log and then make the undercut. This will prevent the
log from pinching the bar and chain. Be careful that the
chain does not cut into the ground when bucking as this
causes rapid dulling of the chain.
While the saw is cutting, be sure the chain
and bar are being properly lubricated.
A
B
C
Fig. 13
12
Fig. 16
MAINTENANCE AND REPAIR INSTRUCTIONS
MAINTENANCE SCHEDULE
WARNING:
To prevent serious
injury, never perform
maintenance or repairs with unit running.
Always service and repair a cool unit.
Perform these required maintenance procedures at the frequency stated in the table. These procedures should also
be a part of any seasonal tune-up.
A good preventive maintenance program of regular inspection and care will increase life and improve performance of your
chain saw. This maintenance checklist is a guide for such a program.
Cleaning, adjustment, and part replacement may be required, under certain conditions, at more frequent intervals than
those indicated.
CUSTOMER RESPONSIBILITY
AFTER
EACH USE
MAINTENANCE CHECKLIST
ITEM
BEFORE EACH USE
CHECK FOR LOOSE SCREWS/
NUTS/BOLTS
CHECK GUIDE BAR AND CHAIN OIL
CLEAN UNIT AND INSPECT DECALS
CHECK CHAIN BRAKE® COMPONENTS
CHECK GUIDE BAR GROOVE
CHECK CHAIN TENSION
CHECK CHAIN SHARPNESS
LUBRICATE SPROCKET TIP
CHECK FOR DAMAGED / WORN PARTS
13
HOURS OF OPERATION
10
20
MAINTENANCE AND REPAIR INSTRUCTIONS
Install Saw Chain
REPLACING THE GUIDE BAR
WARNING:
CAUTION:
Disconnect the chain
saw from power
source before checking or adjusting the
chain saw tension.
Always use protective gloves when
handling the saw chain.
1. Spread the chain out with the cutting edges (H) of the
chain pointing in the DIRECTION OF ROTATION.
2. Fit chain into groove of guide bar.
NOTE: The chain must be installed in the correct
direction (Fig. 20).
These instructions are for replacing a bar. The unit is fully
assembled when shipped.
NOTE: Always wear heavy gloves when handling the saw
chain.
Remove Old Bar
Install New Bar
1. Place the power unit on a flat surface, on its side with
chain tensioner facing up.
2. Loosen knob (B) slightly by turning knob counterclockwise and then turn the chain tension ring (C)
counter-clockwise to relieve chain tension (Fig. 17).
3. To remove the sprocket cover (A), turn knob (B) completely counter-clockwise. (Fig. 17)
4. Remove saw chain from around the guide bar (E) and
the sprocket (F). Slide the guide bar (E) with tension
plate (D) attached, from the unit. (Fig. 18)
5. Remove screw with lock washer (G) from the tension
plate (D) to remove plate from the old bar. Then attach
tension plate (D) to the new bar using screw with lock
washer (G). Tighten securely with Phillips screw driver
(Fig. 19).
1. Install bar and chain on to power unit. Turn the tension plate (D) counter-clockwise until chain fits
around sprocket (F) and guide bar (E) (Fig. 20A).
2. Install sproket cover (A) on to power unit (Fig. 20B)
3. For final adjustment, hold the tip of the bar (E) up and
tighten chain tension ring (C). Then tighten the knob
(B) (Fig.21).
4. Follow the tension adjustment instructions in the
next section.
H
C
Fig. 20
B
E
D
C
A
Fig. 17
F
A
F
Fig. 20B
Fig. 20A
E
D
C
Fig. 18
E
G
D
B
Fig. 19
14
Fig. 21
D
MAINTENANCE AND REPAIR INSTRUCTIONS
SAW CHAIN TENSION ADJUSTMENT
WARNING:
Always use protective gloves when
D
handling the saw chain.
Proper tension of saw chain is extremely important and
must be checked before starting, as well as during any
cutting operation.
Taking the time to make needed adjustments to the saw
chain will result in improved cutting performance and prolonged chain life.
NOTE: A new chain and bar will need readjustment after
as few as 5 cuts. This is normal during the breakin period, and the interval between future adjustments will lengthen quickly (Fig. 22).
Fig. 23
CAUTION:
If saw chain is TOO
LOOSE or TOO
TIGHT, the sprocket, bar, chain, and crankshaft bearings will wear more rapidly. Study
Fig. 22 for information concerning correct
cold tension (A), correct warm tension (B),
and as a guide for when saw chain needs
adjustment (C).
E
F
Fig. 24
NOTE: Make sure the Chain Brake® is disengaged.
Disengage the Chain Brake® (D) by pulling it backward
(Fig. 23).
1. Tensioning the chain can be accomplished with relative ease. Turn knob (E) counter clockwise. Then turn
ring (F) counter-clockwise to loosen chain or clockwise
to tighten chain (Fig. 24).
2. After adjustment and while wearing heavy duty work
gloves, move the saw chain back and forth on the
guide bar to be sure the chain moves freely and is in
proper mesh with sprocket.
NOTE: If the chain is difficult to rotate or if it binds on the
guide bar, too much tension has been applied and
must be adjusted as described in step 1.
3. While applying tension to the chain, hold the tip of the
bar up and then tighten the knob (E).
A
B
C
Fig. 22
15
MAINTENANCE AND REPAIR INSTRUCTIONS
CHAIN AND BAR LUBRICATION
The Chain Brake® is a safety feature which is activated if
pressure is applied against the guard or when, in the
event of kickback, the operator’s hand strikes the lever.
When the Chain Brake® is activated, chain movement
abruptly stops and the power supply to the motor is
immediately cut off.
The purpose of the Chain Brake® is to reduce the possibility of injury due to kickback. The Chain Brake® cannot,
however, provide the measure of intended protection if the
saw is carelessly operated.
The Chain Brake® is disengaged (chain can move) when
the brake is pulled back and locked. This is the normal
running position (Fig. 26).
Adequate lubrication of the saw chain during cutting operations is essential to minimize friction with the guide bar.
Your chain saw is equipped with an automatic oiler system.
The oiler automatically delivers the proper amount of oil to
the bar and chain. There is no flow adjustment.
You can check the oil reservoir level using the oil reservoir
window (D) provided on the right side of the saw. The
reservoir is full when oil is at the top of the window (Fig.
25).
D
Fig. 25
CAUTION:
Never starve the bar
and chain of lubrication oil. Running the saw DRY or with TOO
LITTLE OIL will decrease cutting efficiency,
shorten chain saw life, and cause rapid
dulling of the chain and excessive wear of
the bar from overheating. Too little is evidenced by smoke or bar discoloration.
Fig. 26
The Chain Brake® is engaged (chain cannot move) when
the brake is in forward position (Fig. 27).
NOTE: The motor will not start if the Chain Brake® is in
the engaged position.
NOTE: The saw chain stretches during use, particularly
when it is new, and occasional adjustment will be
needed. A new chain requires more frequent
adjustment during the break-in period. This is normal. See Section Saw Chain Tension Adjustment
for instructions.
loose chain can
WARNING: Ajump
off the bar while
you are cutting, as well as wear the bar and
chain. A chain that is too tight can damage
the saw. Either situation, chain too loose or
too tight, could cause serious personal injury.
Fig. 27
CAUTION:
CHAIN BRAKE® / HAND GUARD
The Chain Brake®
should not be used
for starting and stopping the saw during
normal operation
This chain saw is equipped with chain brake/hand guard.
The Hand Guard protects your left hand in the event it
slips off the front handle.
16
MAINTENANCE AND REPAIR INSTRUCTIONS
CHAIN BRAKE® TEST
DOUBLE INSULATION
Before cutting with your saw, the Chain Brake® should be
tested as follows:
A. Make sure the Chain Brake® is disengaged (Fig. 26).
B. Place the saw on a firm, flat, dry surface that is clear
of any debris. Do not let the saw come in contact with
any objects.
C. Plug the unit into the power source.
D. Grasp the front handle (not the Chain Brake®/Hand
Guard Lever) with your left hand. Thumb and fingers
should encircle the handle.
E. Grasp the rear handle with your right hand. Thumb
and fingers should encircle the handle.
F. Slide the LOCK/OFF button with your right thumb.
Squeeze the trigger with your index finger (Fig. 7).
G. While the motor is running, activate the Chain Brake®
by rolling your left hand forward against the lever.
H. Chain and motor should stop abruptly.
WHEN SERVICING, USE ONLY IDENTICAL REPLACEMENT PARTS.
Information
Do not use if the cord or plug is damaged. Your appliance
is double insulated to help protect against electric shock.
Double insulation construction consists of 2 separate “layers” of electrical insulation.
Appliances built with this insulation system are not intended to be grounded. As a result, the extension cord used
with your appliance can be plugged into any conventional
120 volt electrical outlet.
Normal safety precautions must be observed when operating an electrical appliance. The double insulation system is
only for added protection against injury resulting from a
possible internal electrical insulation failure.
WARNING:
Your double insulated appliance has no
serviceable parts inside. Do not attempt to
repair it yourself. For service information,
take the saw to a Sears or other qualified
service dealer.
WARNING:
If the chain and
motor fail to stop
when the Chain Brake® is engaged, take
the saw to a Sears or other qualified service
dealer. Do not use the saw if the Chain
Brake® is not in proper working order.
In this double insulated appliance, 2 systems of insulation,
instead of grounding, are provided. No grounding means is
provided on a double insulated appliance, nor should a
means for grounding be added to the appliance. No serviceable parts are inside. A double insulated appliance is
marked with the words, “DOUBLE INSULATION” or “DOUBLE INSULATED.” The symbol (square within a square)
may also be marked on the appliance.
EXTENSION CORDS
When using an electric chain saw, plug it into the extension cord only when you are ready to cut wood. Connect
the extension cord to a 110/120 voltage outlet. Refer to
the Electrical Safety Warnings section.
CAUTION:
Maintenance
1. Place switch in OFF position and unplug the power
supply before the appliance is serviced, cleaned, or
maintenance is performed.
2. Keep the air intake clean and air vents free of debris to
avoid overheating the motor.
3. Clean with a damp sponge and mild soap. Do not
squirt with a water hose or douse with water or other
liquids.
4. Inspect the saw chain for proper tension before each
use and frequently during cutting. Sharpen as required.
Refer to the Chain Sharpening in Maintenance and
Repair Instructions.
5. Clean the guide bar and bar pad to ensure free path
for oil.
6. No motor lubrication is necessary. The motor is
equipped with lifetime lubricated bearings.
7. If the saw does not operate, turn switch to OFF position and disconnect the extension cord, first from the
power supply, then from the saw. Check the power
supply for blown fuses or tripped circuit breakers. If it
still does not operate, take the saw to a Sears or
A cord that is hot to
the touch is over-
loaded.
WARNING:
Do not operate your
chain saw in a wet or
damp environment. Do not expose the saw to
rain, snow or sleet. Moisture will cause short
circuits. Replace or repair any damaged or
frayed extension cords before using your saw.
Keep the cord away from the cutting area and
position the cord so that it will not be caught
on branches or other objects during cutting.
other qualified service dealer.
NOTE: Do not attempt to repair saw yourself. No
serviceable parts are inside.
17
MAINTENANCE AND REPAIR INSTRUCTIONS
GUIDE BAR MAINTENANCE
Maintenance Procedures
Frequent lubrication of the guide bar is required. Proper
maintenance of the guide bar, as explained in this section,
is essential to keep your saw in good working condition.
Most guide bar problems can be prevented merely by
keeping the chain saw well maintained. Incorrect filing and
non-uniform cutter and depth gauge settings cause most
guide bar problems, primarily resulting in uneven bar wear.
As the bar wears unevenly, the rails widen, which may
cause chain clatter and difficulty in making straight cuts.
Insufficient guide bar lubrication and operating the saw with
chain that is too tight will contribute to rapid bar wear.
To help minimize bar wear, the following guide bar maintenance procedures are recommended:
WARNING:
Ensure that the
power cord is disconnected before performing any maintenance on your saw.
Sprocket Tip Lubrication
BAR WEAR - Turn guide bar frequently at regular intervals
(for example, after 5 hours of use), to ensure even wear on
top and bottom of bar.
BAR GROOVES (B) (Fig. 29)- Bar grooves (or rails which
support and carry the chain) should be cleaned if saw has
been used heavily or if saw chain appears dirty. Rails
should always be cleaned every time saw chain is
removed.
OIL PASSAGES (A) (Fig. 29)- Oil passages on the bar
should be cleaned to ensure proper lubrication of the bar
and chain during operation. This can be done using a soft
wire small enough to insert into the oil discharge hole.
NOTE: The condition of the oil passages can be easily
checked. If the passages are clear, the chain will
automatically give off a spray of oil within seconds
of starting the saw. Your saw is equipped with an
automatic oiler system.
CAUTION:
The sprocket tip on
your new saw has
been pre-lubricated at the factory. Failure to
lubricate the guide bar sprocket tip as
explained below will result in poor performance and seizure, voiding the manufacturer’s
warranty.
Lubrication of the sprocket tip is recommended after each saw use. Always thoroughly clean guide bar sprocket tip before
lubrication.
The Lube Gun (not included) is recommended for applying
grease to the guide bar sprocket tip. The Lube Gun is
equipped with a needle nose tip which is necessary for
the efficient application of grease to the sprocket tip.
Cleaning Bar Rails
1. Remove sprocket cover, bar and chain. Refer to the
Install the Guide Bar/Saw Chain section.
2. Using a screwdriver, putty knife, wire brush or other similar instrument, clear residue from the rails on the guide
bar. This will keep the oil passages open to provide
proper lubrication to the bar and chain (Fig. 29).
3. Reinstall the bar, chain, sprocket cover, tighten knob,
and chain tension ring. See Section Install the Guide
Bar / Saw Chain for more information.
Fig. 28
To lubricate the sprocket tip:
1. Unplug the chain saw from the power source.
NOTE: It is not necessary to remove the saw chain to
lubricate the guide bar sprocket tip. Lubrication
can be done on the job.
WARNING:
A
Always use protective
gloves when handling
the saw chain.
B
2. Clean the guide bar sprocket tip.
3. Using the Lube Gun (optional), insert tip of lube gun
into the lubrication hole and inject grease until it
appears at outside edge of sprocket tip (Fig. 28).
4. Make sure that the Chain Brake® is deactivated.
Rotate saw chain by hand. Repeat lubrication procedure until the entire sprocket tip has been greased.
Fig. 29
18
MAINTENANCE AND REPAIR INSTRUCTIONS
CHAIN MAINTENANCE
WARNING:
Never have more
than 3 links
removed from a loop of chain. This could
cause damage to the sprocket.
WARNING:
Unless you have
experience and specialized training for dealing with kickback
(see Safety Precautions), always use a lowkickback saw chain, which significantly
reduces the danger of kickback. Low-kickback saw chain does not completely eliminate kickback. A low-kickback or “safety
chain”, should never be regarded as total
protection against injury.
Chain Lubrication
Always make sure the automatic oiler system is working
properly. Keep the oil reservoir filled with a high quality
Chain, Bar and Sprocket Oil.
Adequate lubrication of the bar and chain during cutting operations is essential to minimize friction with the guide bar.
Never starve the bar and chain of lubricating oil. Running
the saw dry or with too little oil will decrease cutting efficiency, shorten saw chain life, cause rapid dulling of
chain, and lead to excessive wear of bar from overheating.
Too little oil is evidenced by smoke or bar discoloration.
A low-kickback saw chain should always be used in conjunction with other kickback protection devices such as the
Chain Brake®/Hand Guard furnished with your unit.
Always use a replacement saw chain designed as “lowkickback” or a saw chain which meets the low-kickback
performance requirements of ANSI (American National
Standards Institute).
A standard saw chain (a chain which does not have the
kickback reducing guard links) should only be used by an
experienced professional chain saw operator.
Chain Sharpening
Chain sharpening requires special tools to ensure that cutters are sharpened at the correct angle and depth. For the
inexperienced chain saw user, we recommend that the
saw chain be professionally sharpened by the nearest
Authorized Service Center. If you feel comfortable sharpening your own saw chain, special tools are available from
your Authorized Service Center.
What is a Low-Kickback Saw Chain?
A low-kickback saw chain is a chain which has met the
kickback performance requirements of ANSI B175.1.
By keeping the Chain Brake® and saw chain in good
working condition and correctly serviced as recommended
in this manual, you will be able to maintain the safety system of your chain saw over the life of the product.
WARNING:
Never remove, modify or make inoperative any safety device furnished with your
unit. The Chain Brake® / Hand Guard and
low-kickback saw chain are major safety
features provided for your protection.
Chain Tension
Check the chain tension frequently and adjust as often as
necessary to keep the chain snug on the bar, but loose
enough to be pulled around by hand.
CHAIN REPLACEMENT INFORMATION
Breaking in a New Saw Chain
Bar Length
16”
A new chain and bar will need chain readjustment after as
few as 5 cuts. This is normal during the break-in period,
and the interval between future adjustments will begin to
lengthen quickly.
Over a period of time, however, the moving parts of the
saw chain will become worn, resulting in what is called
CHAIN STRETCH. This is normal. When it is no longer
possible to obtain correct chain tension adjustment, a link
will have to be removed to shorten the chain. Take the
saw to a Sears or other qualified service dealer.
19
Drive Links
55 DL
Sears Part #
36121
TROUBLESHOOTING
UNIT WILL NOT START
CAUSE
ACTION
1. Unit is unplugged
1. Check cord to make sure it is plugged into an electrical
outlet
2. GFCI in outlet has tripped (if used)
2. Reset GFCI
NOTE: For repairs beyond the minor adjusments listed above, contact your nearest Sears Parts & Repair center (1800-4-MY-HOME®) or other qualified service dealer for an adjustment.
SPECIFICATIONS / FEATURES
Peak H.P.......................................................................................................................................................................... 3.5
Approximate Weight (with bar and chain) ..................................................................................................11.3 lbs. (5.1 kg)
Features:
Chain Brake/Hand Guard
Double Insulated
TUV Rheinland of North America, Inc. (TUV) Listed
Trigger Lock/Off
Chain Catcher
20
PARTS LIST
Item Parts No.
Description
Item Parts No.
Description
Item Parts No.
Description
1
6228-211404
SPROCKET COVER ASS'Y
25
66CG-9.5
C RING
49
6086-211501
FRONT HANDLE COVER
2
6228-211504
SPROCKET ASS'Y
26
6014-210502
WASHER
50
6228-211301
MOTOR GEAR BOX ASS'Y
3
6012-210501
WASHER
27
6228-210104
GEAR BEARING ASS'Y
51
6022-211501
SWITCH
4
6017-210103
OIL CAP
28
6077-211501
COVER
52
6SDABB04-10
SCREW
5
6SDABB04-18
SCREW
29
6057-210102
WASHER
53
6011-211502
POWER CORD
6
6043-211302
ADJUSTMENT PLATE
30
6CC-10
C RING
54
6043-840001
STRAIN RELIEF
7
6050-211301
GASKET
31
6SDABB03-18
SCREW
55
6059-855001
CORD GUARD
8
6220-210201
CHAIN
32
6228-210105
OIL PUMP ASS'Y
56
6012-211501
RUBBER STOP
9
6038-211507
HOUSING (R)
33
6188-211501
PULL BAR
57
6024-211506
SPRING
10
9040-310194
BAR
34
6114-211501
PULL PLATE
58
6PC05-14.7
PIN
11
6SDABB04-14
SCREW
35
6024-211507
SPRING
59
6PC4.4-35
PIN
12
6228-211506
OIL PIPE ASS'Y
36
6SQABB04-20
SCREW
60
6SQAB-04-06
SCREW
13
6076-210503
WASHER
37
6181-211501
CLUTCH
61
6WFB-03-12
WASHER
14
6056-211503
SWITCH BUTTON
38
6181-211502
CLUTCH
62
6SDABB03-15
SCREW
15
6066-211501
OIL TANK
39
6024-211503
SPRING
63
6158-211502
PLATE
16
6028-211503
TRIGGER
40
6014-211501
WASHER
64
6SLABB03-06
SCREW
17
6022-211502
SWITCH
41
6154-211301
CONNECTING BAR
65
6010-211301
WIRE
18
6024-211301
SPRING
42
6SDABB4.5-30
SCREW
19
6CY-08
RING
43
6154-211504
CONNECTOR
20
6079-211501
SPRING, BRAKE
44
6017-211503
FRONT-HAND GUARD
21
6073-211501
GEAR
45
6228-211303
FIXED ASS'Y
22
6059-210201
ADJUSTMENT COVER
46
6SDABB04-16
SCREW
23
6115-211502
PIN
47
6079-211503
SPRING
24
6154-211502
CONNECTION
48
6038-211508
HOUSING (L)
21
22