1
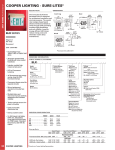
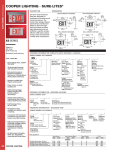
SURE-LITES
Installation Instructions For AC EAX/EAC Exit Signs
IMPORTANT SAFEGUARDS
WHEN USING ELECTRICAL EQUIPMENT, BASIC SAFETY PRECAUTIONS SHOULD ALWAYS
BE OBSERVED INCLUDING THE FOLLOWING:
READ AND FOLLOW ALL SAFETY INSTRUCTIONS
1.
2. Do not use outdoors.
3. Do not mount near gas or electric heaters.
4. Equipment should be mounted in locations and at heights where it will not readily be subjected to tampering by unauthorized
personnel.
5. The use of accessory equipment not recommended by Sure-Lites may cause an unsafe condition.
6. Do not use this equipment for other than its intended purpose.
7. Some equipment covered by these instructions are approved for remote fixtures. This equipment does not require a load fuse
because its sophisticated solid-state transfer switch is current limited. Check load rating of equipment to calculate remote capability.
DO NOT exceed TOTAL OUTPUT RATING of equipment. TRANSFER CIRCUIT will automatically shut down if overloaded.
8.
SAVE THESE INSTRUCTIONS
WALL MOUNTING INSTALLATION
Step 1. Extend AC power supply of rated voltage to junction box (by others). Leave adequate slack. Circuit should not be energized at this time.
JUNCTION BOX (BY OTHERS)
NOTE: When using non-metallic
boxes, be sure to use the proper
bracket for orientation of the
mounting screws similar to a
54151 box.
Step 2. Remove screw and end cap. Slide exit face from exit housing for mounting
access.
Step 3. Assemble mounting strap to junction box through proper slots using screws supplied with junction box. Install 2-mounting screws partially into correct threaded
hole.
MFG. PLATE
Step 4. Remove round and 2-keyhole knockouts from back exit door. Insert plastic bushing with flanged end outside into round hole. Feed wires through bushing and
connect power supply in accordance with fixture type and appropriate wiring
diagram. Note: Connections must be in junction box.
CANOPY MTG.
SCREW (2)
Step 5. Hang fixtures using 2-keyhole slots, tighten screws.
NUT
MOUNTING
STRAP
CEILING OR END MOUNT INSTALLATION
Step 1.
Extend AC power supply of rated voltage to junction box (by others). Leave
adequate inches of slack. Circuit should not be energized at this time.
Step 2.
Remove screw and end cap. Slide exit face from exit housing for mounting
access.
Step 3.
Back off canopy mounting screws to remove mounting plate. Fasten to junction box with short legs against mounting surface through proper slots using
screws supplied with junction box.
Remove knockout from top or end to accommodate canopy kit (QE 1030)
supplied.
Step 4.
Step 5.
Fasten canopy to exit frame using threaded bushing and nut.
Step 6.
Feed wires through exit and canopy. Make connections in accordance with
fixture type and appropriate wiring diagram. Re-install canopy with exit to
mounting plate by tightening mounting screws.
For top mount loosen small socket plate screw and drop socket plate for
mounting of canopy and feeding of wires. Note: Connections must be in
canopy or junction box.
NOTE: For exit with top enclosure (277V), remove 2-screws from access
panel. Remove panel for mounting of canopy and feeding wires.
SURE-LITES
CANOPY
TOP ENCLOSURE
277V ONLY
PLASTIC
BUSHING
SCREWS (2)
ACCESS PANEL
THREADED
BUSHING
SOCKET PLATE
SCREW
EXIT HOUSING
BACK MTG.
SCREW (2)
400 BUSSE ROAD ELK GROVE VILLAGE, IL 60007
7/98
694827C
SURE-LITES
WIRING DIAGRAMS
For connection to a single source of supply such
that all lamps are simultaneously illuminated
Wiring Diagrams are for fixtures with PL lamps. For fixtures with incandescent
lamps, omit ballasts. Black leads connect directly to lamps.
SURE-LITES
400 BUSSE ROAD ELK GROVE VILLAGE, IL 60007
7/98
694827C