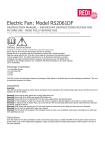
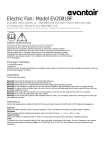
1
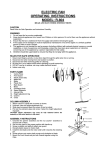
OPERATING INSTRUCTIONS
1. Set the fan on a dry, level and sturdy surface.
2. Plug the fan into the mains.
ON/OFF, Speed selection
1. The fan is controlled by the buttons on the speed switch box.
2. To turn the fan on press either “1”, “2” or “3” button.
3. To change the speed of the fan by selects another speed
control button. i.e. “1” is lowest, “2” is middle & “3” is highest.
4. The fan can be turned off by pressing “0” button.
INSTRUCTION MANUAL
How To Adjust Tilt
1. Insert knob to tilt nut.
2. Use knob to loose tilt nut by turning counter clockwise.
3. Adjust fan head to tilt you want.
4. Tightened the tilt nut by turning clockwise.
5. Keep Knob for future use.
KNOB
TILT NUT
18” HIGH VELOCITY FLOOR FAN
MODEL:
CP49518
PLEASE READ AND SAVE THESE
IMPORTANT INSTRUCTIONS
18” High VELOCITY FLOOR FAN
OPERATING INSTRUCTIONS
READ AND SAVE THESE INSTRUCTIONS
CAUTION: Read and follow all instructions before Operating Fan. Do not use fan
if any part is damaged or missing.
WARNING: To reduce the risk of fire or electrical shock, do not expose to water
or rain.
To reduce the risk of fire or electrical shock, do not use this fan with any solid state
speed control device.
Take all the parts out of the plastic bag and separate them into their groups.
To avoid scratching it is recommended that you assemble the fan light on a soft
level surface.
STAND ASSEMBLY
Connect stand B to stand A by tightening fixing screw.
Connect the other end of stand B to stand C by tightening fixing screw.
Align the hole of stand A (left hand side) to the shock resistant block and tighten
the flat washer and nut by using the knob nut. Do the same procedure on the right
hand side.
PARTS NAME AND LOCATION
RULES FOR SAFE OPERATION:
1. Never insert fingers or any other objects through the grille guard when fan is
operation.
2. Disconnect the fan when moving from one location to another.
3. Disconnect the fan when removing guards for cleaning.
4. Be sure fan is on a stable, flat surface when in operation.
5. DO NOT use fan in windows. Rain and moisture may create electrical hazard.
6. If the supply cord is damaged, it must be replaced by the manufacturer, its
service agent or similarly qualified persons in order to avoid a hazard.
7. This appliance is not intended for use by persons (including children) with
reduced physical, sensory or mental capabilities, or lack of experience and
knowledge, unless they have been given supervision or instruction concerning use
of the appliance by a person responsible for their safety.
8. Children should be supervised to ensure that they do not play with the
appliance.
CLEANING
WARNING: Unplug from electrical supply source before cleaning.
- Use soft damp cloth to clean. Then wipe with dry cloth.
- Do not use a cleaning solution that is harmful to paints or plastics.
- Do not bend the blades.
- The motor bearings are permanently sealed and do not require additional
lubrication.
ASSEMBLY THE FAN
BEFORE ASSEMBLING UNIT:
Read these instructions carefully and familiarize your self with the procedure before
assembling the unit.
Check that you have all the component parts following the content list and familiarize
yourself with each part before proceeding.
Ensure you have enough space to lay out all the parts before assembly.
KNOWING YOUR MACHINE
1. Floor Guard
2. Blade
3. Speed Switch
4. Foot
5. Stand
2
5
3
4
1
OPERATING INSTRUCTIONS
1. Set the fan on a dry, level and sturdy surface.
2. Plug the fan into the mains.
ON/OFF, Speed selection
1. The fan is controlled by the buttons on the speed switch box.
2. To turn the fan on press either “1”, “2” or “3” button.
3. To change the speed of the fan by selects another speed
control button. i.e. “1” is lowest, “2” is middle & “3” is highest.
4. The fan can be turned off by pressing “0” button.
INSTRUCTION MANUAL
How To Adjust Tilt
1. Insert knob to tilt nut.
2. Use knob to loose tilt nut by turning counter clockwise.
3. Adjust fan head to tilt you want.
4. Tightened the tilt nut by turning clockwise.
5. Keep Knob for future use.
KNOB
TILT NUT
18” HIGH VELOCITY FLOOR FAN
MODEL:
CP49518