1
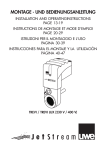
D E 11/26/07 3:59:01 PM F Cleaning and Care Thoroughly rinse reservoir with clean water after each use with dental rinse or mouthwash, and whenever the Dental Water Jet has not been used for an extended period of time. Allow full reservoir of lukewarm water to pass through power unit and cleaning tip before first use. To purchase replacement tips, please contact our customer service. These are sold by pack of 2 tips under the reference WJT2RT. 14. Turn Dental Water Jet to direct the jet of water toward tooth surfaces and between teeth to rinse away trapped plaque and particles. The pushing action of the water massages gums as it cleans the entire mouth. Note: To prevent damage to delicate gum areas, do not point water jet directly at gums. 15.Turn the unit off. IMPORTANT SAFEGUARDS READ ALL INSTRUCTIONS BEFORE USING • DO NOT use the unit while bathing. •ALWAYS unplug this product immediately after using. •DO NOT place or store the unit where it can fall or be pulled into a tub, sink, or toilet. DANGER •DO NOT reach for a unit that has fallen into water. To reduce the Unplug immediately. Do not reach into the water under risk of any circumstances. Have the unit checked by an electrocution: authorized service center afterward. •The transformer is designed for use in a 120 volt AC, 60 Hz outlet. Never force the plug into the outlet. •DO NOT submerge the unit in water or any other liquid. Instructions for Use 1. Detach reservoir from power unit (see A). 2.Open the jack cover on the power unit (see B). 3.Plug the jack into the power unit and the transformer into a live outlet (see C) (make sure the power unit is turned off). 4.Fully charge the unit for at least 16 hours (Note: If the outlet is controlled by a wall switch, be sure the switch is always on for continuous charge). 5.Unplug the transformer from both the outlet and the power unit. 6.Close the jack cover. 7. Fit the water cleaning tip firmly into the power unit. 8.Release and pull out the tube located at the base of the power unit (see D). 9.Fill the reservoir with lukewarm water. 10.Attach the reservoir to the bottom of the power unit, inserting the tube of the power unit into the reservoir, and aligning both arrows on the reservoir and the main unit (see E). 11. Lock the reservoir into position, as indicated, by turning the reservoir until its arrow faces the locking position (see F). 12.Turn the unit on by pressing the on/off switch. 13.Hold mouth slightly open and elbow at mouth level to let water run back into the sink. • Never operate the unit if it has a damaged plug, if it is not working properly, if it has been dropped or WARNING damaged, or if it is immersed in water. Refer to an Authorized Service Center for repair service. To reduce the •DO NOT excessively bend or pull the cord. Unplug risk of burns, the cord by grasping the plug – NOT THE CORD. electrocution, •Keep the cord away from heated surfaces. fire, or injury: •Close supervision is necessary when this product is used by, on, or near children or disabled persons. •Use this product only for its intended use as described in this manual. Do not use attachments unless recommended by the manufacturer. • Never use while drowsy. 1-4 B A C 13.Turn the power unit on by pressing the on/off switch. 14.Allow full reservoir of lukewarm water to pass through power unit and cleaning tip. 15.Turn the unit off. Removable Reservoir Remove reservoir On/Off Switch Before using your Dental Water Jet for the first time : 1. Carefully unpack the Dental Water Jet. 2.Detach reservoir from power unit (see A). 3.Open the jack cover on the power unit (see B). 4.Plug the jack into the power unit (see C) and the transformer into a live outlet (make sure the power unit is turned off). 5.Fully charge for at least 16 hours. (Note: If the outlet is controlled by a wall switch, be sure the switch is always on for continuous charge.) 6.Unplug the transformer from both the outlet and the power unit. 7. Close the jack cover. 8.Fit the cleaning tip firmly into the power unit. 9.Release and pull out the tube located at the base of the power unit (see D). 10.Fill the reservoir with lukewarm water. 11. Attach the reservoir to the bottom of the power unit, inserting the tube of the power unit into the reservoir, and aligning both arrows on the reservoir and the power unit (see E). 12.Lock the reservoir into position, as indicated, by turning the reservoir until its arrow faces the locking position (see F). Initial Preparation SAVE THESE INSTRUCTIONS 07IN7027 WJ2CS_WJ2B IB eng_span.1-4 Remember: Oral irrigation is a supplement to, not a substitute for, your oral hygiene routine. Ask your dental health care provider to advise you on how the Water Jet can most effectively meet your specific oral needs. The Interplak® Water Jet enhances oral hygiene and significantly contributes to healthy gums when used as part of a responsible oral health management program. It is particularly effective at cleaning around orthodontic appliances, fixed and removable bridge work, implants and splints, and it provides valuable gum massage with every use. Welcome to a New Level of At-Home Dental Care Cleaning Tip Limited 1-Year Warranty •Contact your dentist prior to MEDICAL WARNING use if you have had oral or For your safety: periodontal surgery in the previous twelve months. •When you start any new oral hygiene program, your gums may initially bleed slightly. Contact your dentist if excessive bleeding occurs or if bleeding continues after two weeks of use. •Be sure that only the water jet nozzle touches your teeth and gums. Damage to teeth and gums may occur if any other part of the unit touches them. •This product is designed for oral cleaning only. DO NOT use the unit for any other purpose. •As with any other new oral hygiene program, individuals with heart problems should check with their physician prior to using the Interplak® Dental Water Jet, and should always exercise particular care with any oral hygiene device. •The Interplak® Dental Water Jet is a personal care unit and is intended for household use only. Conair will repair or replace (at our option) your unit free of charge for 12 months from the date of purchase if the appliance is defective in workmanship or materials. To obtain service under this warranty, return the defective product to the service center listed below that is nearest you, together with your purchase receipt and $3.00 for postage and handling. California residents need only provide proof of purchase and should call 1-800-334-4031 for shipping instructions. In the absence of a purchase receipt, the warranty period shall be 12 months from the date of manufacture. ANY IMPLIED WARRANTIES, OBLIGATIONS, OR LIABILITIES, INCLUDING BUT NOT LIMITED TO THE IMPLIED WARRANTY OF MERCHANTABILITY AND FITNESS FOR A PARTICULAR PURPOSE, SHALL BE LIMITED IN DURATION TO THE 12 MONTH DURATION OF THIS WRITTEN, LIMITED WARRANTY. Some states do not allow limitations on how long an implied warranty lasts, so the above limitation may not apply to you. IN NO EVENT SHALL CONAIR BE LIABLE FOR ANY SPECIAL, INCIDENTAL, OR CONSEQUENTIAL DAMAGES FOR BREACH OF THIS OR ANY OTHER WARRANTY, EXPRESS OR IMPLIED, WHATSOEVER. Some states do not allow the exclusion or limitation of special, incidental, or consequential damages, so the above limitation may not apply to you. This warranty gives you specific legal rights, and you may also have other rights, which vary from state to state. For Battery Disposal This product is powered by rechargeable nickel-cadmium batteries. Under various state and local laws, it is illegal to dispose of these batteries in our municipal waste stream. “The EPA certified RBRC® Battery Recycling Seal on the nickel-cadmium (NiCd) battery indicates Conair is voluntarily participating in an industry program to collect and recycle these batteries at the end of their useful life, when taken out of service in the United States or Canada. The RBRC® program provides a convenient alternative to placing used Ni-Cd batteries in the trash or the municipal waste stream, which may be illegal in your area. Please call 1-800-9-BATTERY™ for information on Ni-Cd battery recycling and disposal bans/restrictions in your area. Conair’s involvement in this program is part of our commitment to preserving our environment and conserving our natural resources.” *RBRC™ is a trademark of the Rechargeable Battery Recycling Corporation. Service Centers: Conair Corporation Service Department 150 Milford Road East Windsor, NJ 08520 D E N TA L W AT E R J E T Instruction Manual • Model WJ2B/WJ2CS For your safety and continued enjoyment of this product, always read the instruction book carefully before using. Conair Corporation Service Department 7475 N. Glen Harbor Blvd. Glendale, AZ 85307 ©2008 Conair Corporation, 150 Milford Road, East Windsor, NJ 08520 For more information regarding this and other Interplak® products, visit www.interplak.com SAVE THESE INSTRUCTIONS 07IN7027 IB-8131 Questions or Comments? 1-800-334-4031 Visit us at our website: www.interplak.com Preparación Cabezal de inyección I R R I G A D O R D E N TA L Manual de Instrucciones • Modelo WJ2B/WJ2CS Para su seguridad y para disfrutar plenamente de su aparato, siempre lea las instrucciones adjuntas cuidadosamente antes de usarlo. Higiene bucal profesional en la comodidad de su hogar Botón de encendido/ apagado El Irrigador Dental Interplak® le ayudará a mejorar la salud de sus encías y conseguir una sonrisa más sana. Es muy efectivo para limpiar alrededor de los aparatos ortodóncicos (frenos), puentes fijos y amovibles, férulas e implantes. Además, masajea las encías cada vez que lo use. ¿Preguntas o comentarios? 1-800-334-4031 Recuerda: La irrigación dental debe complementar, no reemplazar su rutina de higiene dental. Pida a su dentista como el Irrigador Dental puede satisfacer sus necesidades de higiene bucal. Saque el depósito Depósito amovible Visítenos en www.interplak.com Limpieza y Mantenimiento Si usa enjuague bucal, enjuague el depósito con agua después de cada uso. Antes del primer uso, o si no ha usado el aparato durante mucho tiempo, enjuague la unidad y el cabezal, dejando que un depósito completo de agua pase por ellos. Para ordenar cabezales de repuesto, llame a nuestro servicio post-venta al 1-800-334-4031. Los cabezales (parte WJT2RT) vienen en paquetes de dos. F MEDIDAS DE SEGURIDAD IMPORTANTES LEA TODAS LAS INSTRUCCIONES ANTES DE USARLO • NO use el aparato en el baño o la ducha. •SIEMPRE desconecte el aparato después de usarlo. PELIGRO •NO coloque ni guarde el aparato donde pueda caer o Para reducir ser empujado a una bañera, un lavabo o un inodoro. el riesgo de •NO trate de alcanzar el aparato si cae al agua. electrocución: Desconéctelo inmediatamente. Si el aparato hubiese caído al agua, regréselo a un centro de servicio autorizado para que lo examinen. •NO sumerja la unidad en agua u otro líquido. • N unca utilice el aparato si el cable o la clavija están dañados, si no funciona correctamente, si ha ADVERTENCIA caído, si está dañado o si la unidad de carga ha caído al agua. Llévelo a un centro de servicio Para reducir el riesgo autorizado para que lo examinen y lo reparen. de quemaduras, •NO doble mucho o jale fuertemente el cable. electrocución, Para desconectar el aparato, coja el cable por incendio o heridas: la clavija. NO JALE EL CABLE. •Mantenga el cable alejado de las superficies calientes. •Se debe supervisar cuidadosamente el uso de este aparato cuando esté usado por, sobre o cerca de niños o personas con alguna discapacidad. •Use este aparato únicamente con el propósito para el cual fue diseñado y tal como se describe en este manual. Sólo use accesorios recomendados por el fabricante. • Nunca utilice el aparato mientras usted está adormilado. GUARDE ESTAS INSTRUCCIONES 07IN7027 WJ2CS_WJ2B IB eng_span.5-8 5-8 Antes de usar su Irrigador Dental por primera vez: 1. Saque cuidadosamente todas las partes de la caja. 2.Separe el depósito de la unidad de carga (A). 3.Exponga el enchufe en la unidad de carga (B). 4.Asegúrese que el aparato esté apagado. Conecte el adaptador a la unidad de carga (C), luego enchúfelo en un tomacorriente. 5.Cargue la unidad durante 16 horas. Nota: Si el tomacorriente está controlado por un interruptor de luz, asegúrese que el interruptor esté en la posición de encendido. 6.Desconecte el adaptador de la unidad de carga y del tomacorriente. 7. Cierre el enchufe de la unidad de carga. 8.Instale el cabezal sobre la unidad. 9.Afloje y jale el tubo que se encuentra el la unidad de carga (D). 10.Llene el depósito con agua tibia. 11. Conecte el depósito a la unidad de carga, insertando el tubo que se encuentra en la unidad en el depósito y haciendo coincidir las flechas en la unidad y el depósito (E). 12.Gire el depósito en el sentido antihorario para sujetarlo (F). B A C 13.Oprima el botón de encendido/apagado para encender la unidad. 14.Permita que toda el agua del depósito pase por la unidad y el cabezal. 15.Apague la unidad. • Pida consejo a su dentista antes ADVERTENCIA MÉDICA de usar este aparato si usted Para su seguridad: ha tenido cirugía oral o periodontal en los 12 últimos meses. •Puede que sus encías sangren ligeramente al comenzar su nuevo programa de higiene dental. Consulte a su dentista si se produce un sangrado excesivo o si el sangrado persiste después de 2 semanas de uso. •Asegúrese que sólo la punta del cabezal de inyección toque sus dientes y sus encías. El contacto con las partes de plástico del aparato podría lastimar sus dientes y encías. •Este aparato ha sido diseñado para irrigación bucal. NO lo use para ningún otro fin. •Si usted padece de problemas cardiacos, pida consejo a su doctor antes de usarlo y úselo con mucho cuidado. • El Irrigador Dental Interplak® es para uso doméstico solamente. Información de Reciclado de las Baterías Este aparato contiene baterías recargables de Níquel-Cadmio (Ni-Cd). Según algunas leyes locales y estatales en los Estados Unidos y Canadá, podría ser ilegal desechar la batería con su basura casera. El sello RBRC® en el paquete de la batería Ni-Cd indica que Conair participa de manera voluntaria en un programa de la industria para recolectar y reciclar estas baterías cuando ya no funcionen. Este programa sólo está disponible dentro de los Estados Unidos y Canadá. El programa RBRC® proporciona una alternativa conveniente a poner los paquetes usados de batería Ni-Cd en la basura o desecharlos a través del sistema de limpia municipal, lo que en algunas partes es ilegal. Por favor llame al 1-800-9-BATTERY para más información sobre las opciones de reciclado y disposición de baterías en su área. La participación de Conair en este programa es parte de su compromiso para proteger nuestro medio ambiente y conservar los recursos naturales. *RBRC® es una marca registrada por Rechargeable Battery Recycling Corporation. GUARDE ESTAS INSTRUCCIONES Instrucciones de Uso 1. Separe el depósito de la unidad de carga (A). 2. Exponga el enchufe en la unidad de carga (B). 3. Asegúrese que el aparato esté apagado. Conecte el adaptador a la unidad de carga (C), luego enchúfelo en un tomacorriente. 4. Cargue el aparato durante 16 horas. Nota: Si el tomacorriente está controlado por un interruptor de luz, asegúrese que el interruptor esté en la posición de encendido. 5. Desconecte el adaptador de la unidad de carga y del tomacorriente. 6. Cierre el enchufe en la unidad de carga. 7. Instale el cabezal sobre la unidad. 8. Afloje y jale el tubo que se encuentra el la unidad de carga (D). 9. Llene el depósito con agua tibia o enjuague bucal. 10.Conecte el depósito a la unidad de carga, insertando el tubo que se encuentra en la unidad en el depósito y haciendo coincidir las flechas en la unidad y el depósito (E). 11. Gire el depósito en el sentido antihorario para sujetarlo (F). 12.Introduzca el cabezal en su boca e inclínese encima del lavabo. Cierre levemente los labios para evitar salpicarse, pero permita que el agua fluya con libertad de la boca al lavabo. 13.Oprima el botón de encendido/apagado para encender la unidad. 14. Dirija la corriente del irrigador hacia sus dientes y el espacio entre ellos para eliminar los residuos de comida atrapados entre ellos. La presión del agua masajeará las encías al mismo tiempo que limpiará la boca. IMPORTANTE: Para no lastimar las partes sensibles de las encías no dirija la corriente del irrigador directamente hacia ellas. 15.Apague la unidad. D E Garantía Limitada por Un Año Conair reparará o remplazará (a su opción) su aparato sin cargo por un período de 12 meses a partir de la fecha de compra si presenta defectos de mano de obra o en los materiales. Para obtener servicio técnico bajo esta garantía, lleve o mande su aparato al Centro de Servicio indicado a continuación, junto con su recibo de compra y un cheque de $3,00US para gastos de envío y manejo. Los residentes de California sólo necesitan dar una prueba de compra y deben llamar al 1-800-326-6247 para recibir instrucciones de envío. En ausencia del recibo de compra, el período de garantía será de 12 meses a partir de la fecha de fabricación. CUALQUIERA GARANTÍA, OBLIGACIÓN O RESPONSABILIDAD IMPLÍCITAS, INCLUYENDO PERO NO LIMITADAS A LA GARANTÍA IMPLÍCITA DE COMERCIABILIDAD Y APTITUD PARA UN PROPÓSITO ESPECÍFICO, ESTARÁN LIMITADAS POR LOS 12 MESES DE LA PRESENTE GARANTÍA ESCRITA. Algunos Estados no permiten limitaciones sobre la duración de una garantía implícita, de modo que las limitaciones mencionadas pueden no regir para usted. CONAIR NO SERÁ RESPONSABLE EN NINGÚN CASO POR ALGÚN DAÑO ESPECIAL, INCIDENTAL O CONSECUENTE DEBIDO AL INCUMPLIMIENTO DE ESTA O DE CUALQUIER OTRA GARANTÍA, EXPRESA O IMPLÍCITA. Algunos Estados no permiten la exclusión o limitación de daños especiales, incidentales o consecuentes, de modo que las limitaciones mencionadas pueden no regir para usted. Esta garantía le otorga derechos legales específicos y usted puede tener otros derechos que varían de un Estado a otro. Centros de Servicio: Conair Corporation Service Department 150 Milford Road East Windsor, NJ 08520 Conair Corporation Service Department 7475 N. Glen Harbor Blvd. Glendale, AZ 85307 ©2008 Conair Corporation, 150 Milford Road, East Windsor, NJ 08520 Para más información sobre los productos de Conair, visite www.interplak.com 07IN7027 IB-8131 11/26/07 3:59:03 PM


![Irrigador bucal Interplak® [WJ3CSR]](http://vs1.manualzilla.com/store/data/006249164_1-6578002c751a1b4da9994f53046ac9e4-150x150.png)