1
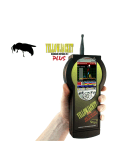
WOLF
manual version 1.2
Contents
INTRODUCTION.................................................................................................
STARTING UP...................................................................................................
Wolf ACCESSORIES............................................................................................
STARTUP SCREEN.............................................................................................
FREQUENCY STEPS............................................................................................
MAIN MENU.....................................................................................................
SINGLE CHANNEL ANALYSIS.................................................................................
CHANNEL TABLE...............................................................................................
SPECTRUM ANALYSIS.........................................................................................
BEST SERVER LIST............................................................................................
REALTIME CLOCK AND MARKERS...........................................................................
DATA RECORDING..............................................................................................
SNAPSHOTS....................................................................................................
DATA CONVERSION USING CHAMELEON CW..............................................................
BATTERY CHARGING SYSTEM...............................................................................
TROUBLESHOOTING...........................................................................................
BATTERY TIPS..................................................................................................
CHAMELEON SOFTWARE (WOLF EDITION)................................................................
BVS CHANNEL TABLE EDITOR SOFTWARE.................................................................
GLOSSARY OF ACRONYMS
GENERAL SAFETY
Wolf DATA SHEET
Page 1
2
2
2
4
4
4
5
5
6
7
7
7
8
8
9
9
10
11
12
INTRODUCTION
Wolf™ is a wireless multi-band signal meter system that
works with the iPAQ® PocketPC® in sweeping, analyzing and
optimizing indoor and outdoor wireless networks. The receiver
measures both Cellular 868-896 MHz and PCS 1930-1995 MHz
demodulating both bands and delivering vital wireless data.
Measurements include full spectrum sweep, channel comparisons, best servers, adjacent channels and more. Wolf™ allows
those familiar with the iPAQ’s PocketPC® interface a unique
advantage over “software only” products currently available
because Wolf™ functions as a complete indoor analysis system combining the ubiquitous PocketPC® environment along
with Berkeley’s precision receiver technology.
Wolf receiver (top view) has an SMA male connector for the
supplied antenna. Wolf receiver may be powered here for
desktop use using the supplied transformer. This manual
contains operational procedures to get the user up-and-going
right out of the box. For any details regarding the iPAQ, users
should read all materials from Compaq and contact them.
STARTING UP Wolf
Power up your Wolf by pushing power button in upper right
corner of unit. This power will automatically power up the
Wolf receiver also. When you power down the iPAQ, (push
the power button on the upper right quickly-holding this button
will also toggle the backlight on and off) your Wolf receiver
will also shut down. Connect the included antenna to the
SMA connector and remove the stylus by pushing down on it.
Use your stylus to tap onto the Windows® icon in the upper
left corner. Choose Wolf in the pulldown menu. Data may be
transferred to a PC via the IrDA window or USB or serial connection. Install Wolf software by connecting your iPAQ to your
PC and inserting included BVS software CD-ROM into PC to
begin installation. You may also use the provided Compact
Flash Installer card.
Wolf ACCESSORIES
Your Wolf includes the following accessories: antenna, 2 sets
of AA (Ni-MH) removable batteries (8 total), Simply insert
depleted batteries into charger and plug charger into AC
outlet. See top of charger for LED status indicator lights (see
end of manual for charger specs). Approximate charging time
for 4 Ni-MH batteries is just over one hour. Run time is just
over two hours. Wolf uses common AA battery cells found in
Page 2
any convienence store. Ni-Cad, Alkalines, Ni-MH and Li-Ion
cells may all be used. Wolf does require 4 AA cells with at
least 1500 mAh per cell. BVS supplies 2 battery sets (8 Ni-MH
battery cells total) to get users working right out of the box.
Ni-MH cells are recommended for best performance from your
Wolf. Batteries that are warm or hot to the touch (from constant usage or warm ambient temperatures) will take longer
to charge than batteries of a normal temperature. Contact
BVS for new Ni-MH battery packs. Expect over 500 cycles
from each Ni-MH pack.
iPAQ model 3955
(optional) inside
iPAQ cradle.
The included Compact Flash Backup Installer
card can be used to install the Wolf Data
Logger application when the iPAQ’s internal
battery has completely drained and a PC is
not handy. Simply insert this card into the
iPAQ sleeve that attaches to the Wolf receiver
and install the software using your iPAQ from
there. Always make sure batteries are fully
charged when doing any software installs.
See TROUBLESHOOTING section at the end of
this manual for battery charging and removal
procedures.
iPAQ / Wolf charger
Wolf calibrated
receiver
eight AA NiMH batteries
Wolf Compact
Flash Backup
Installer
antenna
iPAQ charging
cradle.
Direction Finding
Antenna (optional)
Rayovac® Ni-MH fast
charger with AC adapter
and auto adapter
Page 3
Startup Screen
The Wolf software can be started by:
1. Pressing the Start button on the Ipaq.
2. Pressing the “BVS Wolf” program option from the main
drop-down list.
3. Tapping anywhere on the screen when the splash
screen appears as shown below.
Frequency Steps
After you tap on the startup screen, you will see this frequency
step menu screen. You must choose your frequency kHz steps
in either 30kHz, 50kHz or 200kHz increments. Choose your
frequency steps to proceed to the main menu.
Main Menu
The main menu of the Wolf software contains option buttons
in the main viewing area and a series of toolbar options. The
main viewing area is shown below. There are four choices in
the main viewing area. You may choose single channel analysis, which allows selection of a single channel on either or
both bands. There is the channel table selection, which allows
up to 30 channels to be selected for analysis. These channels
can be in either band. There is the spectrum analyzer-type
screen which will show all RF being received within the range
of the receiver, the range being decided upon by the user.
The final option is the best server screen. This option shows
the frequencies with the strongest received signal strength in
a particular band.
Page 4
The toolbar (shown below) gives the user more options on
every screen. The first icon has five interconnected colored
circles. Using this option will always return the user to the
main menu.
The second and third icons are arrows pointing upward and
downward. These options have different uses depending on
the currently active screen. For instance, on the access point
screen, the arrows are used to flip the current page of access
points.
The fourth icon represents a camera. This option takes snapshots of the current screen for later viewing. The pictures are
stored in JPEG format.
The “record” button is for logging a data file. The “stop” button is for terminating the logging of data. The “play” button
will be implemented in a later version of the software.
The icon with the letters “ABCD” enters the system options
screen.
The question mark icon reveals the application about box.
Single Channel Analysis
The “Single Channel” option allows users to choose a single
channel from either/both bands to view over a period of time.
When pressing the “Single Channel” button, an option screen
will appear. Place a checkmark by each band you wish to
examine. Then choose the frequency or channel in each band
selected .
After then pressing OK, a bar graph and an “over time” graph
will appear for each of the channels selected.
Page 5
Channel Table
The channel table screen allows a user to select up to 30 channels in either band for closer inspection. These channel ‘lists’
are created with the separate channel table editor which runs
on the PC.
After pressing the channel table button on the main menu,
select a file on the iPAQ containing the desired channel table
for this scan. After the table has been selected, the channel
table display screen will appear and begin scanning.
Spectrum Analysis
The spectrum analysis feature of the Wolf allows a user to
view any RF signals that is received by the receiver. It uses
frequency for the X-axis and RSSI (received signal strength
indicator) in dBm on the Y-axis.
When pressing the spectrum analysis button on the main
menu, an option screen appears. Here is where the band,
center frequency, and span (in MHz or channels) are set. Be
aware not to choose a span that is wider than the width of
the band. For example, the cellular band is 869.01-893.97,
therefore the maximum width is 24.96 MHz, using 881.52 as
an approximate center frequency.
After these options have been set, the ‘OK’ button will bring
the user into the spectrum screen itself. The white bar moving
horizontal across the screen is there to show that the unit is
indeed scanning. Similar to the radar sweep indicator which
is found on radar.
There are three available traces. They are red, blue, and yellow traces. Only one trace can be active at any one time.
Each of the three traces can be made visible by pressing their
respective “visible” buttons. The active trace can be peak
held by pressing it’s “hold trace” button.
Page 6
Use the “marker to peak” button to move the diamond marker
to the current highest dBm valued point. Use the “marker to
center” button to move the diamond marker to the center of
the currently displayed section.
There are also buttons for moving the diamond peak mark to
the left or right in the currently displayed screen.
Each spectrum screen displays information regarding the center frequency of the screen as well as the span in MHz. The
current marker position and value is also displayed.
Best Server List
The best server point list screen provides the user with a list of
top frequencies from a particular band as seen by the receiver.
The user is prompted to choose which band is to be used for
the search.
Then, after pressing OK to the particular band, the hardware
will search through all channels on that band. After completing
a sweep of all channels, the top 10 channels will be shown.
The frequency, channel number, and RSSI will be shown for
each entry. The list is updated after every sweep.
Real-Time Clock and Markers
It is noted that the blue bar on some screens show the iPAQ
date and time as provided by the operating system. This date
and time is used for marking logged records with a reference
point in time.
There is also a marker number. When the INC button is
pressed on this bar, the marker number will increment. This
is also used in log files for a reference point to interesting data
collection anomalies.
Data Recording
When the “record” button icon is pressed from the toolbar at
the bottom of the screen, the user will be prompted for a filename. This filename will be used to store collected data for
later conversion by Chameleon CW.
Page 7
The data is stored in a compact proprietary binary format. The
Wolf will store data as it received from the hardware, depending on the currently active screen. If the spectrum screen is
currently active, spectrum data will be stored. If the access
point screen is currently active, access point information will
be stored.
To save the collected data, press the “stop” button icon. To
view the size of the log file while still logging, simply return
to the main menu screen.
WARNING! : Make sure that the “stop” button is pressed to
avoid the loss of data saved.
Snapshots
When the camera icon is pressed from the toolbar at the
bottom of the screen, a snapshot of the currently viewable
display is taken. The snapshot can be saved as a JPEG format
picture (just like a digital camera) for viewing at a later time
or for importing into documents and reports. As an example,
the images of the Wolf screens shown in this section of the
manual were saved using this option.
Data Conversion (using Chameleon (Wolf Edition))
Data that has been logged by the Wolf is stored in a proprietary
binary format. It can be transferred to a PC or laptop. Once on
the PC or laptop, the Chameleon utility application can be
used to convert the binary data into an ASCII-readable format
that can be imported into spreadsheet applications such as MS
Excel or other applications that accept ASCII-delimited data.
Page 8
Charging System
The Wolf has 2 different battery sources that need charging power.
There is an internal battery for the Pocket PC and removable batteries
for the receiver module. The 4 AA Ni-MH receiver batteries may only
be charged using the supplied fast charger or another comparable
Ni-MH charger. The Compaq iPAQ internal battery may be charged
by either plugging in the supplied power transformer or by inserting
the iPAQ PDA into the supplied charging / data transfer cradle. The
BVS supplied charger will power the Wolf receiver AND power and
charge the iPAQ PDA. Batteries for the Wolf receiver (4 AA cells) must
be charged in the provided charger. See Compaq’s documentation for
complete charging instructions.
Troubleshooting
If your Wolf is not responding, be sure to check all battery and cable
connections. Check Compact Flash end of connector that slides into
top of iPAQ and other end of cable that connects to Wolf receiver
To access batteries under iPAQ:
1. Slide iPAQ back and away from antenna end of receiver. Be sure
not to pull too hard or crimp the cable in any way. NEVER remove the
Compact Flash connector from the iPAQ sled unless troubleshooting
for connectivity issues.
2. Flip over iPAQ exposing the battery compartment on the top of the
Wolf receiver.
3. Pull up tab on battery cover to expose 4 Ni-MH AA batteries. Change
these batteries for fresh Ni-MH batteries and repeat steps above in
reverse order.
• Cannot Open Com Port or System Not Responding – Try restarting
the application. If the system locks up completely, press the small
reset button located at the bottom of your iPAQ. See Compaq’s usage
instructions for more info on performing a hard reset.
• Wolf software is missing or corrupted You can find the Wolf application in the BVS Software CD (red writing)
included with your Wolf. Re-install your Wolf software.
Users may experience COM PORT communication problems when
moving from Bird’s Eye Site Surveyor to Wolf Data Logger in Pocket
PC 2002. This may be remedied by simply pushing the reset switch on
the bottom of the iPAQ.
BATTERY TIPS
Page 9
Use this included power adapter for
3800 or 3900 series iPAQs with no
separate power input.
The Grasshopper™, Locust™, Yellow Jacket™ and Yellow Jacket Plus
(fomally called Scorpion), Beetle™, Cricket™, and Cicada W-LAN receivers use 4 or 5 Ni-MH long-lasting “AA Cells”.
1. Ni-MH batteries do not charge to full capacity the first time they are
charged.
2. Ni-MH batteries do not charge to full capacity the first time they are
charged after a long period of inactivity. or after a long period of non-use.
Cause:
When charging Ni-MH batteries for the first time after long-term storage, deactivation of reactants may lead to increased battery voltage and
decreased capacity, (which causes premature termination of charging).
Because batteries are chemical products involving internal chemical reactions, performance deteriorates with prolonged storage. This is normal in
Ni-MH batteries.
Resolution:
Ni-MH batteries may not charge to full capacity the first time they are
charged, or after a long period of inactivity.
The first-time charge of the Ni-MH Rechargeable Battery Pack should take
approximately 2 hours. If the Receiver Dock light turns green, indicating a
full charge, in less than 2 hours, repeat the charge cycle as follows:
First-time Charge:
1. To begin charging, place the instrument on the Charge Dock. Refer to
your instrument’s User Guide for details.
2. When the charge light turns green, remove the W-LAN Receiver from
the dock and place back on the dock after several seconds.
3. Repeat steps 1 and 2 three or four times or until the combined charge
time is 2 hours.
Subsequent charges of the W-LAN Ni-MH Battery Pack will not require
multiple charging cycles unless left uncharged for a long period of time
(greater than 2 months).
Chameleon (Wolf Edition)
NOTE: In order to prevent the Ipaq from freezing when running Wolf software (therefore rendering the power button useless), make sure to:
1. ALWAYS leave the checkboxes in the SETTINGS/SYSTEM/POWER
screen unchecked. Power-save mode will lock up the application due
to the fact that the application is stopped while communicating with
the hardware..
2. Make sure that the battery level on the Ipaq remains above 40%.
The serial card interface may cease to operate when the battery level
is under 40%.
To resolve the freeze, simply press the soft reset button on the bottom
of the Ipaq with the stylus.
NEVER LEAVE THE IPAQ ON FOR EXTENDED TIMES (10 HOURS OR GREATER)
WITHOUT EXTERNAL POWER. ALWAYS SAVE ANY DATA AND THEN TURN OFF
IPAQ (TOP RIGHT POWER BUTTON) WHEN NOT IN USE. NOT DOING SO WILL
RESULT IN DAMAGE TO THE IPAQ’S INTERNAL BATTERY.
Page 10
In the PocketPC’s OS, choose Settings and then
choose System settings at the bottom. Select the
battery icon for Power Settings to access this
screen. These power settings come unchecked
from the BVS factory to ensure Wolf software runs
optimally. Power must remain on during logging
or else data might be corrupted.
PC Application
The Chameleon application converts data logged by the Wolf into an ASCII delimited file for use in postprocessing. The data converted is based on correlation records collected in the measurement mode of
the iPAQ Wolf Receiver Interface.
To convert a file, use the following steps:
1.
2.
3.
4.
5.
6.
7.
8.
Copy the log file off of the iPAQ and onto your desktop or laptop.
Run the Chameleon application.
Click BROWSE on the Input File line to choose a file to convert.
A default output filename will be created. Change if needed.
Choose which fields you wish to have in the output file.
Choose the delimiter to place between fields.
Choose whether or not you would like a header record with titles for each column.
Press the CONVERT button.
The progress bar will monitor the progress of the conversion.
Page 11
BVS Channel Table Editor
The BVS Channel Table Editor is a utility program that runs on your PC. It is used to create channel tables
that can then be used for Wolfpack scanning or as a channel table on the base Wolf software.
You can enter up to 30 different channels or frequencies. You can modify an existing table or create a new
table by pressing the associated buttons.
When entering data into the table, you must:
1. Select the band (0 is the Cellular Band, 1 is the PCS band).
2. Choose either a channel number or a frequency.
If you choose a channel number, the associated frequency will adjust when leaving the edit field. If you
choose a frequency, the associated channel number will change when you leave the edit field.
When you are done, save the file (will be a .BCT file). Then you move the table over to the iPAQ through
ActiveSync. Place the file into the “My Documents” folder on the iPAQ. Then you can import the table into
the appropriate software (Wolf or Wolfpack).
Page 12
Glossary of Acronyms
AC
A/D
AGC
AP
Applet
BER
BPSK
BSS
BW
CDMA
DC
D/A
dB
dBm
DOS
DSP
DSSS
ESS
FHSS
FIR
GHz
IF
I and Q
IBBS
IrDA
kHz
LCD
LO
MAC
Mbits
MHz
NIC
OFDM
PC
PCS
PER
PN
QPSK
RF
RSSI
SSID
STA
UCT
VAC
VGA
WEP
WLAN
Alternating Current
Analog to Digital converter
Automatic Gain Control
Access Point
a small Application
Bit Error Rate
Binary Phase Shift Keying
Basic Service Set
Band Width
Code Division Multiple Access (spread spectrum modulation)
Direct Current
Digital to Analog
decibel
decibels referenced to 1 milliwatt
Digital Operating System
Digital Signal Processing
Direct Sequence Spread Spectrum
Extended Service Set
Frequency-Hopping Spread Spectrum
Finite Impulse Response
GigaHertz
Intermediate Frequency
In phase and Quadrature
Independent Basic Service Set
Infrared Data Association
kiloHertz
Liquid Crystal Display
Local Oscillator
Medium Access Control
Megabits
MegaHertz
Network Interface Card
Orthogonal Frequency Domain Multiplexing (802.11a)
Personal Computer
Personal Communications Service (1.8 to 2.1 GHz frequency band)
Packet Error Rate
Pseudo Noise
Quaternary Phase Shift Keying, 4-level PSK
Radio Frequency
Receiver Signal Strength Indicator
Service Set IDentification
STAtion (generally a laptop WLAN card)
Universal Coordinated Time
Volts Alternating Current
Video graphic
Wired Equivalent Protocol
Wireless Local Area Network
Page 13
IMPORTANT SAFETY INSTRUCTIONS
When using your telephone equipment, basic safety precautions should always be followed to reduce the risk of fire, electric
shock and injury to persons, including the following:
1)Read and understand all instructions.
2)Follow all warnings and instructions marked on the product.
3)Unplug this product from the wall outlet before cleaning. Do not use liquid cleaners or aerosol cleaners. Use a damp cloth
for cleaning.
4)Do not use this product near water, for example, near a bath tub, wash bowl, kitchen sink, or laundry tub, in a wet basement,
or near a swimming pool.
5)Do not place this product on an unstable cart, stand, or table. The product may fall, causing serious damage to the product.
6)Slots and openings in the cabinet and the back or bottom are provided for ventilation, to protect it from overheating these
openings must not be blocked or covered The openings should never be blocked by placing the product on the bed, sofa, rug or
other similar surface. This product should never be placed near or over a radiator or heat register. This product should not be
placed in a built-in installation unless proper ventilation is provided.
7) This product should be operated only from the type of power source indicated on the appliance. If you are not sure of the type
of power supply to your home, consult your dealer or local power company.
8)Do not allow anything to rest on the power cord. Do not locate this product where the cord will be abused by persons walking
on it.
9)Do not overload wall outlets and extension cords as this can result in the risk of fire or electric shock.
10)Never push objects of any kind into this product through cabinet slots as they may touch dangerous voltage points or short
out parts that could result in a risk of fire or electric shock. Never spill liquid of any kind on the product.
11) To reduce the risk of electric shock, do not disassemble this product, but take it to a qualified service faciI4 when some
service or repair work is required. Opening or removing covers may expose you to dangerous voltages or other risks. Incorrect
reassembly can cause electric shock when the appliance is subsequently used.
12)Unplug this product from the wall outlet and refer servicing to qualified service personnel under the following conditions:
A) When the power supply cord or plug is damaged or frayed. B) If liquid has been spilled into the product.
C)If the product has been exposed to rain or water.
D)
If the product does not operate normally by following the operating instructions. Adjust only those controls, that are
covered by the operating instructions because improper adjustment of other controls may result in damage and will often require
extensive work by a qualified technician to restore the product to normal operation.
E) If the product has been dropped or the cabinet has been damaged. F) If the product exhibits a distinct change in performance.
13)Avoid using the product during an electrical storm. There may be a remote risk of electric shock from lightning.
14)Do not use the telephone to report a gas leak in the vicinity of the leak.
INSTALLATION INSTRUCTIONS
1. Never install telephone wiring during a lightning storm.
2. Never install telephone jacks in wet locations unless the jack is specifically designed for wet locations.
3. Never touch uninsulated telephone wires or terminals unless the telephone line has been disconnected at the network interface.
4. Use caution when installing or modifying telephone lines.
INSTRUCTION FOR BATTERIES
CAUTION: To Reduce the Risk of Fire or Injury to Persons, Read and Follow these Instructions:
1.
Use only the type and size of batteries mentioned in owner’s manual.
2.
Do not dispose of the batteries in a fire. The cells may explode. Check with local codes for possible special disposal
instructions.
3.
Do not open or mutilate the batteries. Released electrolyte is corrosive and may cause damage to the eyes or skin. It
may be toxic if swallowed.
4.
Exercise care in handling batteries in order not to short the battery with conducting materials such as rings, bracelets,
and keys. The battery or conductor may overheat and cause burns.
5.
Do not attempt to recharge the batteries provided with or identified for use with this product. The batteries may leak
corrosive electrolyte or explode.
6.
Do not attempt to rejuvenate the batteries provided with or identified for use with this product by heating them. Sudden
release of the battery electrolyte may occur causing burns or irritation to eyes or skin.
7.
When replacing batteries, all batteries should be replaced at the same time. Mixing fresh and discharged batteries
could increase internal cell pressure and rupture the discharged batteries. (Applies to products employing more than one separately replaceable primary battery.)
8.
When inserting batteries into this product, the proper polarity or direction must be observed. Reverse insertion of batteries can cause charging, and that may result in leakage or explosion. (Applies to product employing more than one separately
replaceable primary battery.)
9.
Remove the batteries from this product if the product will not be used for a long period of time (several months or more)
since during this time the battery could leak in the product.
10.
Discard “dead” batteries as soon as possible since “dead” batteries are more likely to leak in a product.
11.
Do not store this product, or the batteries provided with or identified for use with this product, in high-temperature
areas. Batteries that are stored in a freezer or refrigerator for the purpose of extending shelf life should be protected from condensation during storage and defrosting. Batteries should be stabilized at room temperature prior to use after cold storage.
Wolfpack
TM
Indoor CW Mapping Coverage Software
1
Create your floorplan:
Site Creator:
Create floorplan layouts using bitmaps on any PC
Add rooms, floors, walls, and other clutter
Import existing floorplans for modification and surveys
Survey floorplans on
a PocketPC. Create
and organize survey
maps on a PC.
Wolfpack™ is a powerful mapping tool that works with
Berkeley’s Wolf Dual Band CW receiver system. Wolfpack™
runs on any 2000, 3000 or 5000 series iPAQ® Pocket PC®
device allowing site surveys to be performed completely
INDOORS and outdoors using real-time mapping coverage technology. No GPS reception needed. Simply walk
through an office space, warehouse or multi-floor building
- any interior space that needs to be surveyed - and take
microcell measurements. Next, place those measurements
on top of any structural floorplan to get a comprehensive
view of any PCS and Cellular base station based upon RSSI.
Export AutoCAD files into Wolfpack™ powerful floorplan Site
Creator and scale your rooms and walls for measurement
overlays. All measurements can be transferred, stored, displayed and printed using any PC running Windows 98, 2000,
ME or XP OS.
3
Organize and plot your coverage:
Site Analysis:
Plot coverage by RSSI or RSSI groups
Save and print color plots of survey layout and collected data
Propagation data can be studied after or during any CW survey
2
Take your AP measurements:
Site Survey:
Touch-screen measurement points using PocketPC®
Customizable surveys based on RSSI parameters
Export floorplans from AutoCAD® or any bitmap
Wolfpack is just one of many exceptional
software solutions from Berkeley Varitronics.
Call us today for more information:
(732) 548-3737 / Fax: (732) 548-3404
Internet: www.bvsystems.com
E-mail: [email protected]
Windows CE, PocketPC and HP iPAQ are registered ® trademarks of the Microsoft Corporation and Compaq Corporation respectively.
wireless products
BERKELEY
VARITRONICS
SYSTEMS
WOLF
NEW
TM
Multi-Band Signal Meter
Wolf™ is a wireless multi-band signal meter system that
works with the iPAQ® PocketPC® in sweeping, analyzing and optimizing indoor and outdoor wireless networks.
The receiver measures both Cellular 868-896
MHz and PCS 1930-1990 MHz demodulating
both bands and delivering vital wireless
data. Measurements include full spectrum
sweep, channel comparisons, best servers, adjacent channels and more. Wolf™
allows those familiar with the iPAQ’s
PocketPC® interface a unique advantage
over “software only” products currently
available because Wolf™ functions as
a complete indoor analysis system
combining the ubiquitous PocketPC®
environment along with Berkeley’s
precision receiver technology.
5
21
Q2
iPA
Berkeley’s custom, calibrated
receiver demodulates and displays
both PCS and Cellular frequency
bands in true dBm
FEATURES:
• Display and log data from 2 frequency bands
• Multi-band switchable CW receiver (Cellular and PCS)
(custom frequencies also available)
• Measures RSSI in true dBm with a calibrated receiver
• Single channel analysis with instant zoom in/out capability
• Spectrum features include Peak Search and Peak Hold with 3 traces
• Replay, marker and snapshot feature
Wolf Measurements:
✔Full Spectrum Sweep
✔Scan Table
✔Channel/Compare
✔Adjacent Channel
• Removable HP IPAQ® PocketPC® PDA interface
✔Best Servers
• Connection (Hot Sync) to a PC via IRDA or USB
✔Set RSSI Thresholds
• Removable battery power (4 AA Ni-MH cells)
• Wolf-Pack™ Indoor/Outdoor Mapping Software included
✔Single-Channel
The Wolf is just one of many exceptional
design solutions from Berkeley Varitronics.
Call us today for more information:
(732) 548-3737 / Fax: (732) 548-3404
Internet: www.bvsystems.com
E-mail: [email protected]
PocketPC and Hewlett Packard iPAQ are registered ® trademarks of the Microsoft Corporation and Hewlett Packard Corporation respectively.
Wolf Receiver System includes a carrying case, stylus, ac adaptor, 8 AA Ni-MH
batteries, fast-charger, USB cradle and
iPAQ PDA with expansion pack sled.
wireless products
BERKELEY
VARITRONICS
SYSTEMS
WOLF
TM
Multi-Band Signal Meter
BANDS SUPPORTED
Cellular:
PCS:
SENSITIVITY
-118 to -30 dB + 1 dB
>45 dB @ 30 kHz
Adj. Chan. Rejection:
RECEIVER MODES
868-896 MHz
Downlink (Blocks A through F) 1930-1990 MHz
Single Channel
Multiple Channel (user selectable or sweep)
GENERAL SPECIFICATIONS
Dual Conversion:
IF Bandwidth:
Stability:
Phase Noise:
Antenna:
Controls:
Warm Up Time:
Power:
Weight:
Dimensions:
83 MHz first IF, 455 kHz second IF
30 kHz (Cellular) 50 kHz (PCS)
+ 2.5 PPM Temp range 32° to 120 F°
> 80 DBC @ 1 kHz
SMA Female 50 ohm
iPAQ PocketPC
< 3 minutes
Internal battery power (4 AA Ni-MH batteries in receiver)
3 lbs.
2” H x 4” W x 6” L (water resistant, high impact ABS plastic case)
Wolf™ Receiver System
includes all of the following:
Wolf calibrated receiver
Wolf Software
Wolf-Pack Mapping Software
HP iPAQ PDA PocketPC
iPAQ charger/cradle
Wolf/iPAQ expansion pack
3 dBi small SMA antenna
8 Ni-MH batteries
Ni-MH fast charger
Backup CF Installer
Wolf™ output data supports
Microsoft Excel spreadsheets as
well as the included Wolf-Pack™
Real-time
Indoor/Outdoor
Mapping solution on iPAQ
PocketPC®. No GPS required.
Optional:
Direction Finding Antenna
Berkeley Varitronics Systems, Liberty Corporate Park, 255 Liberty Street, Metuchen, NJ 08840
Phone 732-548-3737 • Fax 732-548-3404 • www.bvsystems.com • E-mail: [email protected]