1
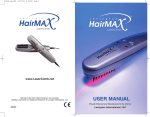
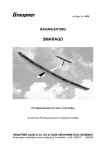
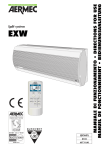
284-9796-00 (1/2)
Installation and Wire connection manual
Manuel d’installation et de connexion
Installation- und Kabelanschluß-Anleitung
Manuale per installazione e collegamenti
ZCP104
1.
Deutsch
WANING
• THIS ANTENNA IS FOR VEHICLES WITH A 12-V DC POWER SUPPLY ONLY.
• THIS ANTENNA IS TO BE ATTACHED ON THE UPPER PART OF THE WINDSHIELD TO SECURE THE
DRIVER’S VIEW.
CAUTION
Thank you for purchasing this Clarion product.
Nous vous remercions d’avoir acheté ce produit Clarion.
Wir danken Ihnen für den Kauf dieses Clarion-Produkts.
Grazie per avere acquistato questo prodotto Clarion.
Français
English
• INSTALL IT IN THE DAYLIGHT ON A CLEAR DAY
TV DIVER CITY ANTENNA FOR AUTOMOBILE USE
(WITH AN AMPLIFIER TO BE ATTACHED INSIDE THE CAR)
ANTENNE DE TÉLÉVISION À RÉCEPTION
SIMULTANÉE POUR AUTOMOBILE
(AVEC AMPLIFICATEUR À FIXER À L’INTÉRIEUR DE LA VOITURE)
FERNSEH-DIVERSITY-ANTENNE FÜR
ANWENDUNG IN FAHRZEUGEN
(MIT EINEM IM INNERN DES FAHRZEUGS
ANZUBRINGENDEN VERSTÄRKER)
ANTENNA TV A DIVERSITÀ PER L’USO SU AUTOMOBILI
(CON AMPLIFICATORE DA APPLICARE
ALL’INTERNO DELL’AUTOMOBILE)
English
■ CAUTIONS ON INSTALLATION
• MAKE SURE TO KEEP IT AWAY FROM HUMIDITY (WATER, RAIN, FOG, SNOW, ETC.), AND AVOID
INFLICTING FORCE ON IT WITHIN 24 HOURS OF THE ATTACHMENT.
• WHEN TEMPERATURE IS LOW (20°C OR LESS), WARM UP THE ADHESIVE SURFACE OF TWO-SIDED
TAPE OF THE BRACKET AND THE INSTALLATION SURFACE WITH A HAIR DRYER OR BY SWITCHING
ON THE REAR DEFOGGER IN ORDER TO HAVE A CERTAIN ADHESIVE POWER.
• BE CAREFUL NOT TO TOUCH THE ADHESIVE SURFACE OF TWO-SIDED TAPE WITH FINGERS OR
REATTACH THE TAPE IN ORDER TO SECURE THE ADHESIVE POWER.
■ PRÉCAUTIONS RELATIVES À L'INSTALLATION
AVERTISSEMENT
• CETTE ANTENNE EST CONÇUE SEULEMENT POUR LES VÉHICULES À ALIMENTATION CC DE 12 V.
• FIXEZ CETTE ANTENNE SUR LA PARTIE SUPÉRIEURE DU PARE-BRISE POUR NE PAS GÊNER LA VUE
DU CONDUCTEUR.
PRECAUTION
• INSTALLEZ L’ANTENNE PENDANT LA JOURNÉE UN JOUR DE BEAU TEMPS.
• VEILLEZ À L’ÉLOIGNER DE L’HUMIDITÉ (EAU, PLUIE, BROUILLARD, NEIGE, ETC.), ET À ÉVITER
D’APPUYER FORTEMENT DESSUS DANS LES 24 HEURES QUI SUIVENT SON INSTALLATION.
• SI LA TEMPÉRATURE EST BASSE (20°C OU MOINS), CHAUFFEZ LA SURFACE ADHÉSIVE DU RUBAN À
DOUBLE FACE DE L’ÉTRIER ET LA SURFACE D’INSTALLATION AVEC UN SÈCHE-CHEVEUX OU EN
ALLUMANT LE DÉGIVREUR ARRIÈRE, DE FAÇON À OBTENIR UN POUVOIR D’ADHÉRENCE
SUFFISANT.
• FAITES ATTENTION DE NE PAS TOUCHER LA SURFACE ADHÉSIVE DU RUBAN À DOUBLE FACE AVEC
LES DOIGTS ET À NE PAS RÉUTILISER LE RUBAN AFIN DE PRÉSERVER SON POUVOIR
D’ADHÉRENCE.
Italiano
BEFORE STARTING / AVANT DE DEMARRER /
EHE SIE MIT DEM EINBAU BEGINNEN / PRIMA DI COMINCIARE
■ WAARSCHUWINGEN VOOR DE INSTALLATIE
WARNUNG
■ 1. Read these instructions carefully.
2. Be sure to disconnect the battery “-” terminal before starting. This is to prevent short circuits during
installation. (Figure 1)
■ 1. Lire ces instructions attentivement.
2. S’assurer de débrancher la borne “-” de la batterie avant de commencer. Cela évitera les court-circuits
pendant l’installation. (Figure 1)
■ 1. Lesen Sie sich diese Bedienungsanleitung sorgfältig durch.
2. Zur Verhütung von Kurzschlüssen muß das “-” Batteriekabel vor dem Einbau abgetrennt werden. (Abbildung 1)
■ 1. Leggete queste istruzioni attentamente.
2. Assicuratevi di scollegare il terminale “-” della batteria prima di cominciare. Questo serve per prevenire la
messa a corto circuito durante l’installazione. (Figura 1)
• DEZE ANTENNE IS ALLEEN VOOR VOERTUIGEN MET EEN 12 V GELIJKSTROOMVOORZIENING.
• DIESE ANTENNE WIRD BEIM OBEREN TEIL DER FRONTSCHEIBE INSTALLIERT, DAMIT DIE SICHT DES
FAHRERS NICHT BEHINDERT WIRD.
VORSICHT
• DIE INSTALLIERUNG BEI TAGESLICHT AN AN EINEM KLAREN TAG VORNEHMEN.
• DIE ANTENNE SOLLTE NICHT FEUCHTIGKEIT (WASSER, REGEN, NEBEL, SCHNEE, USW.) AUSGESETZT WERDEN UND VERMEIDEN, DASS SIE INNERHALB 24 STUNDEN NACH ANBRINGUNG GEWALTEINWIRKUNGEN AUSGESETZT WIRD.
• BEI NIEDRIGEN TEMPERATUREN (20°C ODER NIEDRIGER) DIE KLEBEFLÄCHE DES ZWEISEITIGEN
KLEBEBANDS DER BEFESTIGUNG SOWIE DIE MONTAGEFLÄCHE MIT EINEM FÖN ERWÄRMEN ODER
DEN HINTEREN KONDENSSCHUTZ EINSCHALTEN, DAMIT DAS ERFORDERLICHE HAFTVERMÖGEN
GEWÄHRLEISTET IST.
• VERMEIDEN, DASS DIE KLEBEFLÄCHE DES BEIDSEITIGEN KLEBEBANDS MIT DEN FINGERN
BERÜHRT WIRD ODER DAS KLEBEBAND FÜR BESSERE HAFTUNG ERNEUT ANBRINGEN.
■ PRECAUZIONI PER L’INSTALLAZIONE
Français
Deutsch
PLACE AND CAUTIONS / EMPLACEMENT D’INSTALLATION ET PRÉCAUTIONS /
ANBRINGUNGSTELLE UND VORSICHTSMASSNAHMEN / LUOGO DI INSTALLAZIONE E PRECAUZIONI
4. INSTALLATION
■ There are adhesive side and non-adhesive side on the film antenna.
The silver lined side is adhesive (the side to be attached on the windshield) (see Figure 2)
■ Cette antenne doit être utilisée à l’intérieur de la voiture. Ne l’installez pas ailleurs qu’à l’intérieur du
pare-brise ou de la lunette arrière.
Si vous installez l’antenne dans un break, vous ne pourrez pas la fixer sur la lunette arrière. Mais vous pourrez
la fixer sur la fenêtre latérale fixe.
Remarques :
• Lors d’une installation sur le pare-brise, fixez l’antenne sur la partie supérieure de la vitre pour ne pas gêner la
vue du conducteur.
• Lors d’une installation sur la lunette arrière, fixez l’antenne sur la partie supérieure de la vitre pour ne pas gêner
la vue du conducteur, tout en évitant les fils du chauffage.
• Si vous installez l’antenne sur un pare-brise avec revêtement de vitre de type miroir, cela réduira la sensibilité de l’antenne.
■ L’antenne-film comprend un côté adhésif et un côté non adhésif.
Le côté à revêtement argenté est le côté adhésif (le côté à fixer sur le pare-brise) (voyez la Figure 2).
■ Diese Antenne wird im Innern des Fahrzeugs benutzt. Sie sollte nur innen bei der Front- oder Heckscheibe angebracht werden.
Bei einem Hecktürmodell kann die Antenne nicht bei der Heckscheibe angebracht werden. Sie kann jedoch
beim hinteren Seitenfenster angebracht weeden.
Hinweise:
• Bei Anbringung an der Frontscheibe, die Antenne beim oberen Teil der Scheibe anbringen, damit die Sicht des
Fahrers nicht behindert wird. Darüber hinaus sollte es nicht über Aufklebern, usw. angebracht werden.
• Bei Anbringung an der Heckscheibe, die Antenne beim oberen Teil der Scheibe anbringen, damit die Sicht des
Fahrers nicht behindert wird und ebenfalls nicht die Heizdrähte überdecken.
• Bei Anbringung auf einer Frontscheibe mit einer spiegelähnlichen Glasfolie wird die Empfindlichkeit der Antenne verringert.
■ Die Folienantenne besitzt eine klebende und nicht-klebende Seite.
Die silberkschierte Seite ist die Klebeseite (diese Seite wird an der Frontscheibe angebracht) (siehe Abbildung 2).
■ Questa antenna deve essere usata all’interno del veicolo. Non installarla in alcun altro luogo diverso
dall’interno del vetro anteriore o posteriore.
Nel caso di una vettura con portellone posteriore, l’antenna non può essere applicata al vetro posteriore. È però
possibile applicarla al finestrino laterale posteriore fisso.
Note:
• Quando si installa sul vetro anteriore, applicare l’antenna alla parte superiore del vetro per lasciare libera la
visione del conducente. Inoltre non applicarla sopra autodesivi o simili.
• Quando si installa sul vetro posteriore, applicare l’antenna alla parte superiore del vetro per lasciare libera la
visione del conducente, facendo attenzione a che non tocchi i fili di riscaldamento.
• Quando si installa su un vetro coperto da pellicola a specchio, la sensibilità dell’antenna sarà minore.
■ L’antenna a pellicola ha un lato adesivo e uno non adesivo.
Il lato argentato è adesivo (lato da attaccare al vetro) (vedere la Figura 2).
Transparent sheets
Feuilles transparentes
Klarsichtfolien
Fogli trasparenti
AVVERTIMENTO
• QUESTA ANTENNA DEVE ESSERE APPLICATA ALLA PARTE SUPERIORE DEL PARABREZZA PER NON
OSTACOLARE LA VISIONE DEL CONDUCENTE.
PRECAUZIONE
• ASSICURARSI DI PROTEGGERE DALL’UMIDITÀ (ACQUA, PIOGGIA, NEBBIA, NEVE, ECC.) E EVITARE DI
APPLICARE FORZA NELLE PRIME 24 ORE DOPO L’APPLICAZIONE.
• SE LA TEMPERATURA È BASSA (20°C O MENO), RISCALDARE LA SUPERFICIE ADESIVA DEL NASTRO
BIADESIVO SULLA STAFFA E LA SUPERFICIE DI INSTALLAZIONE CON UN ASCIUGACAPELLI O
ACCENDENDO IL DISPOSITIVO ANTIAPPANNANTE DEL VETRO POSTERIORE PER OTTENERE UNA
FORZA ADESIVA SUFFICIENTE.
• FARE ATTENZIONE A NON TOCCARE LA SUPERFICIE ADESIVA DEL NASTRO BIADESIVO CON LE DITA
E NON STACCARE E RIAPPLICARE IL NASTRO PER EVITARE DI PERDERE FOZA ADESIVA.
English
2.
Français
Deutsch
Italiano
PACKAGE CONTENTS / CONTENU DE L’EMBALLAGE
VERPACKUNGSINHALT / CONTENUTO DELL’IMBALLO
1 Film antennas (for the right one/the left one)
......................................................... complete set
2 Antenna cable with amplifier
(The length of the cable 5m, with power cord) ... 2
3 Amplifier cover (bottom) ........................................ 2
4 Power box ............................................................. 1
5 Fixing sheet .......................................................... 1
6 Cable clamps ........................................................ 6
7 Cleaner ................................................................. 1
English
3.
Français
Deutsch
1 Antennes-film (pour celle de droite/de gauche)
........................................................... jeu complet
2 Câbles d’antenne avec amplificateur
(Longueur du câble 5 m, avec cordon d’alimentation)
........................................................................... 2
3 Caches d’amplificateur (fond) ............................... 2
4 Boîtier d’alimentation ............................................ 1
5 Feuille de fixation .................................................. 1
6 Colliers de serrage ............................................... 6
7 Nettoyeur .............................................................. 1
1 Antenne a pellicola (sinistra/destra)
................................................. corredo completo
2 Cavo antenna con amplificatore
(lunghezza cavo 5 m, con cavo di alimentazione)
........................................................................... 2
3 Coperchio amplificatore (inferiore) ....................... 2
4 Scatola di alimentazione ....................................... 1
5 Foglio di fissaggio ................................................. 1
6 Fermacavo ............................................................ 6
7 Detergente ............................................................ 1
SPECIFICATIONS / CARACTERISTIQUES TECHNIQUES /
TECHNISCHE DATEN / SPECIFICHE
■ Section amplificateur
■ Verstärkerteil
■ Sezione amplificatore
Voltage
Power consumption
Gain
Frequency range
Tension
Consommation
Gain
Plage de fréquence
Spannung
Leistungsaufnahme
Verstärkung
Frequenzbereich
Tensione
: 12 V CC
Consumo di corrente : 180 mA o meno
Guadagno
: 11 dB (VHF)/9 dB (UHF)
Campo di frequenza : 42-890 MHz
: Gleichstrom 12 V
: 180 mA oder weniger
: 11 dB (VHF)/9 dB /UHF)
: 42 - 890 MHz
■ Antenna section
■ Section antenne
■ Antennenteil
■ Sezione antenna
: 75 ohm ✕ 4 (3.5mm diameter L
type with mini-plug)
Installation place
: front windshield (inside the
vehicle)/rear windshield (inside
the vehicle)
The whole length of the body : 400 mm (including the amplifier
section)
Cable length
: about 5 m
Mass
: about 175 g ✕ 2 (including the
amplifier section)
Impédance de sortie : 75 ohms ✕ 4 (type L, 3,5 mm
de diamètre, avec mini-fiche)
Emplacement d’installation : Pare-brise (intérieur du
véhicule)/lunette arrière
(intérieur du véhicule)
Longueur totale du boîtier : 400 mm (avec la section
amplificateur)
Longueur de câble : Environ 5 m
Poids
: Environ 175 g ✕ 2 (avec la
section amplificateur)
Ausgangsimpedanz : 75 Ohm ✕ 4 (L-Typ mit 3,5 mm
Durchmesser mit Ministecker)
Anbringungsort
: Frontscheibe (im Innern des
Fahrzeugs)/Heckscheibe (im
Innern des Fahrzeugs)
Gesamtlänge
: 400 mm (einschließlich
Verstärkerteil)
Kabellänge
: Ca. 5 m
Gewicht
: Ca. 175 g ✕ 2 (einschließlich
Verstärkerteil)
Impedenza in uscita : 75 ohm ✕ 4 (con minispina a
forma di L da 3,5 mm di diametro)
Luogo di installazione: vetro anteriore (all’interno del
veicolo)/vetro posteriore
(all’interno del veicolo)
Lunghezza totale del corpo : 400 mm (inclusa la sezione
amplificatore)
Lunghezza del cavo : circa 5 m
Massa
: circa 175 g ✕ 2 (inclusa la
sezione amplificatore)
■ Power box section
■ Section boîtier d’alimentation
■ Stromboxteil
■ Sezione scatola di alimentazione
Fuse
External dimensions
Cord length
Mass
Fusible
Encombrement
Longueur de cordon
Poid
Sicherung
:3A
Außenabmessungen : 60,3 (B) ✕ 25,6 (H) ✕ 43,2 (T) mm
Kabellänge
: Ca. 50 cm
Gewicht
: Ca. 120 g
Fusibile
Dimensioni esterne
Lunghezza del cavo
Massa
Output impedance
:3A
: 60.3 (W) ✕ 25.6 (H) ✕ 43.2 (D) mm
: about 50 cm
: about 120 g
:3A
: 60,3 (L) ✕ 25,6 (H) ✕ 43,2 (P) mm
: Environ 50 cm
: Environ 120 g
:3A
: 60,3 (L) ✕ 25,6 (A) ✕ 43,2 (P) mm
: circa 50 cm
: circa 120 g
Figure 3 / Figure 3 /
Abbildung 3 / Figura 3
Inside windshield
Intérieur du pare-brise
In Innern an der Frontscheibe
All’interno del vetro
■ Instructions for use
● Do not fold or scar the film antennas.
If inside wires are cut, the receiving sensibility will decrease.
● Do not put together the adhesive sides of the film antennas.
If so, it will be difficult to separate them, and after separating them, the adhesive agent will wear off, making
them difficult to attach.
● After pealing off the backing paper, do not touch the adhesive side.
After pealing off the transparent sheets of the film antennas, backing papers of the power box fixing sheet and
cable clamps, do not touch the adhesive sides. Also, do not leave them for long hours.
● After taking the amplifier out of its case, do not touch the circuit board inside or antenna terminals.
It can cause failures by static electricity, or poor connection by hand’s sweat or dirt.
● When the image is affected by noise from the motor of the electric radiator fan etc., use the noise suppressor
(sold separately).
● Where to receive frequency may affect the clearness of the image (inside a tunnel, the place blocked by
mountains, between buildings etc.).
● Lightly wipe out dirt with soft cloth such as flannel. When the dirt is hard to remove, tightly wring a cloth that is
soaked in mild detergent diluted with water, wipe out the dirt with the cloth, and then wipe it again with a dry
cloth. Do not use a hard cloth, alcohol, benzine, wax, thinner, gasoline, etc.
● Please consult your store of purchase for questions such as installation, after service, etc.
■ Instructions d’utilisation
● Ne pliez pas et ne rayez pas les antennes-film.
Si les fils internes sont coupés, cela réduira la sensibilité de réception.
● Ne mettez pas l’une sur l’autre les surfaces adhésives des antennes-film.
Vous auriez du mal à les séparer, et après la séparation, l’agent adhésif aura perdu de son pouvoir d’adhérence, ce qui rendra la fixation difficile.
● Après avoir décollé le papier de support, ne touchez pas la surface adhésive.
Après avoir décollé les feuilles transparentes des antennes-film, les papiers de support des feuilles de fixation
du boîtier d’alimentation et des colliers de serrage, ne touchez pas les surfaces adhésives. Par ailleurs, ne les
laissez pas découvertes pendant longtemps.
● Après avoir sorti l’amplificateur de son carton, ne touchez pas la carte de circuits à l’intérieur ni les
bornes d’antenne.
L’électricité statique ou un mauvais contact résultant de la transpiration ou de la saleté sur les mains pourraient
provoquer des anomalies.
● Si l’image est affectée par des parasites résultant du moteur du ventilateur de radiateur électrique, utilisez un
atténuateur de parasites (vendu séparément).
● L’endroit où vous recevez la fréquence peut affecter la netteté de l’image (intérieur d’un tunnel, lieu obstrué par
des montagnes, entre des immeubles, etc.).
● Essuyez légèrement la saleté avec un chiffon doux, par exemple de la flanelle. Si la saleté a du mal à partir,
humectez un chiffon avec du détergent doux dilué dans de l’eau, puis tordez-le bien et essuyez la saleté avec le
chiffon, puis essuyez à nouveau avec un chiffon sec. N’utilisez pas de chiffon dur, d’alcool, de benzine, de cire,
de diluant, d’essence, etc.
● Pour toute question relative à l’installation, le service après-vente, etc., consultez votre magasin d’achat.
■ Before installation
■ Handhabungshinwiese
● There are two different film antennas:
one for right side, and another for left side. Attach them horizontally on the upper part of inside the front or rear windshield.
● When the surface temperature of the glass is low (when outside temperature is 20°C or less), warm it up.
Warm up the glass by turning on the air conditioner below the front windshield, or by switching on the electric
rear window defogger for about five minutes, before attaching it.
● Die Folienantennen niemals falten oder zerkratzen.
Wenn innere Drähte beschädigt werden, wird die Empfangsempfindlichkeit der Antenne verringert.
● Die Klebeseiten der Folienantennen niemals aufeinander legen.
Sollte dies geschehen, könnten sie nur sehr schwer getrennt werden und nach Trennung könnte sich das
Klebemittel ablösen und dadurch deren Anbringung erschweren.
● Completely wipe out dust, grease, wax etc. on the place where the antenna is to be attached.
Also, wipe cable clamps and the attaching side of the power box. (See Figure 3)
● Nach Abziehung des Trägerpapiers, niemals die Klebeseite berühren.
Nach Abziehung der Klarsichtfolien von den Folienantennen sowie dem Trägerpapier des StromboxBefestigungsblechs und der Kabelklammen, niemals die Klebeseiten berühren.Ebenfalls sollte diese Seiten
danach nicht für längere Zeit freiliegen.
■ Avant l’installation
● Il y a deux antennes-film différentes :
L’une est pour le côté droit, et l’autre pour le côté gauche. Fixez-les à l’horizontale sur la partie supérieure à
l’intérieur du pare-brise ou de la lunette arrière.
● Nach Entnahme des Verstärkers aus dessen Hülle, niemals die innere Leiterplatte oder Antennenanschlüsse berühren.
Durch Schweiß oder Schmutz an den Händen können Störungen durch elektrische Aufladung entstehen oder
der Anschluß beeinträchtigt werden.
● Lorsque la température de la surface de la vitre est basse (lorsque la température extérieure est de 20°C ou
moins), chauffez-la.
Chauffez la vitre en allumant le climatiseur sous le pare-brise, ou en allumant le dégivreur de vitre arrière
électrique pendant environ cinq minutes, avant de fixer l’antenne.
● Wenn das Bild durch Rauschen vom Motor des elektrischen Kühlerventilators,usw. beeinträchtigt wird,den
Rauschfilter (getrennt erhältlich) verwenden.
● Die Bildklarheit könnte durch den Ort, wo die Frequenz empfangen wird, beeinträchtigt werden (in einem
Tunnel,in Gebirgen, zwischen Gebäuden, usw.).
● Essuyez bien toute la poussière, graisse, cire, etc. à l’endroit où vous allez fixer l’antenne.
Par ailleurs, essuyez les colliers de serrage et le côté de fixation du boîtier d’alimentation. (Voyez la Figure 3.)
● Vous pouvez effectuer l’installation vous-même. Toutefois, nous vous recommandons de consulter votre
magasin d’achat. (Vous devrez acquitter des frais d’installation.)
● Schmutz mit einem weichen Tuch, wie z, B, Flanell, abwischen. Bei hartnäckiger Verschmutzung, ein Tuch, das
in ein mildes mit Wasser gelöstes Reinigungsmittel getaucht wurde, auswringen und damit den Schmutz
entfernen und dachnach mit einem trockenen Tuch nachwischen. Niemals ein grobes Tuch, Alkohol, Wachsbenzin, Wachs, Verdünner, Benzin, usw. verwenden.
■ Vor Anbringung
■ Amplifier section
: CC 12 V
: 180 mA ou moins
: 11 dB (VHF)/9 dB (UHF)
: 42-890 MHz
Figure 2 / Figure 2 /
Abbildung 2 / Figura 2
Semi-transparent protection film
Pellicule de protection semi-transparente
Halbdurchsichtige Schutzfolie
Pellicola protettiva opac
● Self-installation is possible. But we recommend you consult your store of purchase. (Installation fee will be charged).
1 Folienantennen (links und rechts)
.................................................... kompletter Satz
2 Antennenkabel mit Verstärker
(Kabellänge 5 m, mit Netzkabel) ........................ 2
3 Verstärkerabdeckung (unten) ............................... 2
4 Strombox .............................................................. 1
5 Befestigungsblech ................................................ 1
6 Kabelklemmen ...................................................... 6
7 Reiniger ................................................................ 1
Italiano
: DC 12V
: 180 mA or less
: 11 dB(VHF)/9 dB(UHF)
: 42-890 MHz
Silver lined side
(to be attached on the windshield)
Côté à revêtement argenté
(côté à fixer sur le pare-brise)
Silberkaschierte Seite
(wird an der Frontscheibe angebracht)
Lato argentato
(da attaccare al vetro)
Black lined side
Côté à revêtement noir
Schwarzkaschierte Seite
Lato nero
• ESEGUIRE L’INSTALLAZIONE DI GIORNO CON TEMPO SERENO
Figure 1 / Figure 1 /
Abbildung 1 / Figura 1
Installation place
Emplacement d’installation
Anbringungsort
Luogo di installazione
■ This antenna is to be used inside the vehicle. Do not install it other than either inside the front or rear windshield.
In case of a hatchback car, the antenna cannot be attached on the rear windshield. But it can be attached on the
fixed rear side window.
Notes:
• When installed on the front windshield, attach the antenna on the upper part of the glass to secure the driver’s
view. In addition, do not attach it over stickers, etc.
• When installed on the rear windshield, attach the antenna on the upper part of the glass to secure the driver’s
view, while keeping clear of heat wires.
• When installed on the windshield with mirror-like glass film, the antenna sensibility will decrease.
• QUESTA ANTENNA È SOLO PER VEICOLI CON ALIMENTAZIONE A 12 VCC
Car battery /
Batterie de voiture /
Kfz-Batterie /
Batteria dell'automobile
Italiano
● Es gibt zwei verschiedene Folienantennen:
Eine für die rechte und eine für die linke Seite. Beide waagrecht oben bei der Front- oder Heckscheibe im
Innern des Fahrzeugs anbringen.
● Wenn die Oberflächentemperatur der Scheibe zu niedrig ist (wenn die Außentemperatur 20 °C oder weniger
beträgt), diese erwärmen.
Die Scheibe erwärmen, indem die Klimaanlage unter der Frontscheibe oder der elektrische Kondensschutz der
Heckscheibe vor Anbringung für ca. fünf Minuten eingeschalten werden.
● Bei der Anbringungsstelle für die Antenne vollständig Staub, Fett, Wachs, usw. entfernen.
Ebenfalls die Kabelklemmen sowie die Anbringungsseite bei der Strombox abwischen. (Siehe Abbildung 3.)
● Sie können die Anbringung selbst vornehmen. Aber wird empfehlen Ihnen, sich an Ihren Händler zu wenden.
(Für die Anbringung wird eine Gebühr verlangt.)
■ Prima dell’installazione
● Sono fornite due diverse antenne a pellicola:
una per il lato destro e una per il lato sinistro. Applicarle orizzontalmente alla parte superiore dell’interno del
vetro anteriore o posteriore.
● Se la temperatura del vetro è bassa (quando la temperatura esterna è 20°C o meno), riscaldarlo.
Riscaldare il vetro accendendo il climatizzatore sotto il vetro anteriore o accendendo il dispositivo
antiappannamento del vetro posteriore per circa cinque minuti prima di procedere con l’applicazione.
● Rimuovere accuratamente polvere, grasso, cera, ecc dal punto di installazione dell’antenna. Inoltre pulire i
fermacavo e il lato di applicazione della scatola di alimentazione. (Vedere la Figura 3.)
● È possibile eseguire personalmente l’installazione. Si consiglia però di consultare il negozio di acquisto.
(L’installazione è a carico dell’acquirente.)
● Wenn Sie Fragen zur Anbringung, Kundendienst, usw. haben, wenden Sie sich bitte an Ihren Händler.
■ Istruzioni per l’uso
● Non piegare o graffiare le antenne a pellicola.
Se i fili interni sono tagliati, la sensibilità di ricezione diminuisce.
● Non unire i lati adesivi delle antenne a pellicola.
Se fossero unite, risulterà difficile staccarle e dopo la separazione la forza adesiva sarà minore, rendendone
difficile l’applicazione.
● Dopo aver rimosso la carta protettiva non toccare il lato adesivo.
Dopo aver rimosso i fogli trasparenti dalle antenne a pellicola, la carta protettiva del foglio di fissaggio della
scatola di alimentazione e dei fermacavo, non toccare il lato adesivo. Inoltre non lasciarlo esposto per molte ore.
● Dopo aver estratto l’amplificatore dalla sua custodia, non toccare il circuito stampato all’interno o i
terminali antenna.
Questo può causare guasti dovuti ad elettricità statica o un collegamento scadente a causa della presenza di
oleosità della pelle o sporco.
● Se l’immagine è influenzata da disturbi del motore del radiatore elettrico, ecc. usare il dispositivo antidisturbi
(venduto separatamente).
● Il luogo di ricezione della frequenza può influire sulla chiarezza delle immagini (in gallerie, in montagna, tra
edifici, ecc.).
● Togliere lo sporco delicatamente con un panno morbido, come un pezzo di flanella. Se lo sporco è resistente,
strizzare bene un panno bagnato con detergente delicato diluito con acqua, togliere lo sporco con il panno e
quindi asciugare bene con un panno asciutto. Non usare panni ruvidi, alcool, benzene, cera, acquaragia,
benzina, ecc.
● Si prega di consultare il negozio di acquisto per interrogativi riguardanti l’installazione, l’assistenza tecnica, ecc.
English
5.
Français
Deutsch
English
Italiano
INSTALLATION OF THE FILM ANTENNA / INSTALLATION DE L’ANTENNE-FILM /
ANBRINGUNG DER FOLIENANTENNE / ISTALLAZIONE DELLE ANTENNE A PELLICOLA
● Confirmation of the installation place and preparations
Before installation, well confirm where to attach the film antennas and amplifier covers.
1. Thoroughly wipe out dirt and dust on the installation surface with the cleaner. (Included in the package).
2. Mist the place with water by using a sprayer, etc.
● Attachment of film antennas (the procedure is the same for both sides).
1. Remove the half of the transparent sheet from the silver lined side, and attach the antenna on the windshield.
(Figure 4)
∗ When the transparent sheet is hard to remove, do it slowly with adhesive cellophane tape.
2. Remove the rest of the transparent sheet slowly while holding the film antenna with a hand to keep it in place.
3. Scrape out water and air inside between the film antenna and glass with a rubber scraper to make the
adhesion tight.
∗ Scrape it outward from the center part.
∗ When a rubber scraper is not available, use a plastic board or hard board wounded around with cloth for
substitution.
4. Wipe out excess water on and around the film antenna by pressing the antenna lightly with dry cloth.
5. Attach another film antenna in the same manner.
Note:
• Make sure to remove the transparent sheet.
6.
Français
Deutsch
English
Italiano
INSTALLATION OF THE AMPLIFIER / INSTALLATION DE L’AMPLIFICATEUR /
ANBRINGUNG DES VERSTÄRKERS / INSTALLAZIONE DELL’AMPLIFICATORE
● Fix the amplifier cover (bottom) on the windshield.
1. Remove the backing paper of the two-sided tape on the bottom of the amplifier cover (bottom) (Figure 5)
2. Place the holes of the film antenna into the bosses of the amplifier cover (bottom), and then well press the
cover (bottom) onto the windshield to fix it. (Figure 6)
3. Slowly remove the protection film (semi-transparent) on the black lined side.
Note:
• Make sure to remove the protection film (semi-transparent), or the antenna will not work properly.
● Installation of the amplifier cover (top)
Put the (top) cover lightly onto the (bottom) cover until clicking sound is heard. (Figure 7)
● Fixez le cache de l’amplificateur (inférieur) sur le pare-brise.
1. Retirez le papier de support du ruban à double face sur le dessous du cache de l’amplificateur (inférieur). (Figure 5).
2. Placez les orifices de l’antenne-film sur les bossages du cache de l’amplificateur (inférieur), puis appuyez bien
le cache (inférieur) sur le pare-brise pour le fixer. (Figure 6)
3. Retirez lentement la pellicule de protection (semi-transparente) du côté à revêtement noir.
Remarque :
• N’oubliez pas de retirer la pellicule de protection (semi-transparente), sinon l’antenne ne fonctionnera pas correctement.
● Installation du cache de l’amplificateur (supérieur)
Posez légèrement le cache (supérieur) sur le cache (inférieur) jusqu’à ce que vous entendiez un déclic. (Figure 7)
■ In case of reattaching,
Remove the film antenna slowly from the end.
● Confirmation de l’emplacement d’installation et préparatifs
Avant d’installer les antennes-film, vérifiez bien l’endroit où vous allez installer les antennes et les caches
d’amplificateur.
1. Enlevez bien toute la saleté et la poussière de la surface d’installation avec le nettoyeur. (Inclus dans
l’emballage)
2. Humectez l’emplacement avec de l’eau au moyen d’un vaporisateur, etc.
● Fixation des antennes-film (La procédure est la même pour les deux côtés.)
1. Retirez la moitié de la feuille transparente du côté à revêtement argenté, et fixez l’antenne sur le pare-brise.
(Figure 4)
∗ Si vous avez du mal à retirer la feuille transparente, procédez lentement avec le ruban de cellophane
adhésif.
2. Retirez le reste de la feuille transparente lentement tout en tenant l’antenne-film d’une main pour la maintenir
en place.
3. Enlevez l’eau et nettoyez l’espace entre l’antenne-film et la vitre avec une raclette en caoutchouc pour que
l’adhérence soit bien solide.
∗ Raclez du centre vers l’extérieur.
● Die Verstärkerabdeckung (unten) an der Frontscheibe anbringen.
1. Das Trägerpapier beim beidseitigen Klebeband an der Unterseite der Verstärkerabdeckung (unten) entfernen. (Abbildung 5)
2. Die Löcher der Folienantenne in die Naben der Verstärkerabdeckung (unten) einpassen und dann die
Abdeckung (unten) für Anbringung fest an die Frontscheibe drücken. (Abbildung 6)
3. Langsam die Schutzfolie (halbdurchsichtig) bei der schwarzkaschierten Seite entfernen.
7.
Français
Deutsch
Italiano
HOW TO ROUTE THE CABLE / ACHEMINEMENT DU CÂBLE /
KABELVERLEGUNG / DISPOSIZIONE DEL CAVO
● When the antenna is installed on the front windshield,
Notes:
• When routing the cable under the passenger seat, place it under the carpet to keep it out of view.
• Avoid routing the cable onto the following area if possible.
Around the rails of sliding seats; around movable parts such as the door; around the driving motor; and the
place where temperature can rise markedly higher.
● Si vous installez l’antenne sur le pare-brise
Remarques :
• Si vous faites passer le câble sous le siège du passager, mettez-le sous le tapis pour le dissimuler.
• Si possible, évitez de faire passer le câble dans les endroits suivants :
Autour des rails de glissement des sièges ; autour des éléments mobiles comme la portière ; autour du moteur
d’entraînement ; et là où la température peut augmenter considérablement.
● Bei Anbringung der Antenne an der Frontscheib
Hinweise:
• Bei Verlegung des Kabels unter dem Beifahrersitz, das Kabel unter dem Bodenbelag verlegen, damit es
verdeckt ist.
• Wenn möglich, das Kabel nicht über die folgenden Stellen verlegen.
Über die Schienen von Gleitsitzen, bewegliche Teile, wie z.B. Türen, den Antriebsmotor und an Stellen, wo die
Temperatur stark ansteigen kann.
● Quando l’antenna è installata sul vetro anteriore,
Note:
• Quando si fa passare il cavo sotto il sedile del passeggero, farlo passare sotto il tappetino per tenerlo nascosto.
• Evitare di far passare il cavo nei seguenti punti se possibile.
Lungo i binari di scorrimento sedili; presso parti mobili come la portiera; intorno al motore; e in luoghi soggetti
ad alte temperature.
Hinweis:
• Unbedingt die Schutzfolie (halbdurchsichtig) entfernen, sonst funktioniert die Antenne nicht einwandfrei.
● Anbringung der Verstärkerabdeckung (oben)
Die obere Abdeckung leicht auf der unteren Abdeckung aufsetzen, bis ein Klickgeräusch gehört wird. (Abbildung7)
Fix it with cable clamps
(Included in the package)
Fixez-le avec les colliers de serrage
(inclus dans l’emballage)
Mit den Kabelklemmen befestigen
(enthalten in der Verpackung).
Fissare con i fermacavo
(inclusi nella confezione)
● Fissare il coperchio dell’amplificatore (inferiore) al vetro.
1. Rimuovere la carta protettiva del nastro biadesivo sul fondo del coperchio dell’amplificatore. (Figura 5)
2. Inserire i fori dell’antenna a pellicola sulle sporgenze del coperchio dell’amplificatore (inferiore) e quindi
premere il coperchio (inferiore) contro il vetro per fissarlo. (Figura 6)
3. Rimuovere lentamente la pellicola protettiva (opaca) sul lato nero.
Nota:
• Assicurarsi di rimuovere la pellicola protettiva (opaca) o l’antenna non può funzionare correttamente.
● When the antenna is installed on the rear windshield.
● Si vous installez l’antenne sur la lunette arrière
● Bei Anbringung der Antenne an der Heckscheibe.
● Quando l’antenna è installata sul vetro posteriore,
Power box / Boîtier d’alimentation /
Strombox / Scatola di alimentazione
Route the cable under the kick plate
Acheminez le câble sous le pied de caisse.
Das Kabel unter der Fußleiste verlegen.
Far passare il cavo sotto il battipiedi
■Cable routing around the rear windshield area, seen from inside the vehicle
■Acheminement du câble autour de la zone du pare-brise arrière, vue de l’intérieur du véhicule
■Kabelverlegung in Nähe der Heckscheibe innen im Fahrzeug
■Disposizione del cavo intorno all’area del vetro posteriore, visto dall’interno del veicolo
Rear windshield
Lunette arrière
Heckscheibe
Vetro posteriore
Film antenna
Antenne-film
Folienantenne
Antenna a pellicola
Rear seat cushion
Coussin de siège arrière
Rücksitzpolster
Cuscino del sedile posterior
Fix the cable with cable clamps (Included in the package)
Fixez le câble avec des colliers de serrage (inclus dans l’emballage).
Das Kabel mit den Kabelklemmen (enthalten in der Verpackung) befestigen
Fissare il cavo con i fermacavo (inclusi nella confezione)
Power box / Boîtier d’alimentation /
Strombox / Scatola di alimentazione
● Installazione del coperchio dell’amplificatore (superiore)
Premere leggermente il coperchio (superiore) sul coperchio (inferiore) fino a sentire uno scatto. (Figura 7)
Tuner amplifier
Amplificateur de tuner
Tunerverstärker
Sintoamplificatore
∗ Si vous n’avez pas de raclette en caoutchouc, utilisez une planche en plastique ou une planche de bois dur
enveloppée d’un chiffon à la place.
Tuner unit / Tuner /
Tuner / Unità sintonizzatore
Figure 8 / Figure 8 /
Abbildung 8 / Figura 8
English
Français
Deutsch
Italiano
4. Essuyez l’excès d’eau sur et autour de l’antenne-film en appuyant légèrement sur l’antenne avec un chiffon sec.
5. Pour fixer l’autre antenne-film, procédez de la même manière.
Remarque :
• N’oubliez pas de retirer la feuille transparente.
9.
Backing paper
Papier de support
Trägerpapier
Carta protettiva
■ En cas de remontage,
Retirez l’antenne-film lentement en procédant par l’extrémité.
● Prüfung des Anbringungsorts und Vorbereitungen
Vor Anbringung prüfen, wo die Folienantennen sowie die Verstärkerabdeckungen angebracht werden sollen.
1. Bei der Anbringungsfläche mit einem Reiniger (enthalten in der Verpackung) sorgfältig Schmutz und Staub
entfernen.
English
Figure 5 / Figure 5 /
Abbildung 5 / Figura 5
2. Die Anbringungsstelle mittels eines Sprühers, usw. mit Wasser besprühen.
Amplifier cover (top)
Cache de l’amplificateur (supérieur)
Verstärkerabdeckung (oben)
Coperchio dell’amplificatore (superiore)
● Anbringung der Folienantennen (des Verfahren ist für beide Seiten gleich)
1. Die Hälfte der Klarsichtfolie von der silberkaschierten Seite entfernen und die Antenne an der Frontscheibe
anbringen. (Abbildung 4)
Protection film
(semi-transparent)
Pellicule de protection
(semi-transparente)
Schutzfolie
(halbdurchsichtig)
Pellicola protettiva
(opaca)
8.
Italiano
INSTALLATION OF THE POWER BOX / INSTALLATION DU BOÎTIER D’ALIMENTATION /
EINBAU DER STROMBOX / INSTALLAZIONE DELLA SCATOLA DI ALIMENTAZIONE
2. Remove the backing paper of the fixing sheet and place the sheet onto the power box. Then well press it
downward to fix it. (Figure 9)
● Fixing the power box
1. Wipe out dust, dirt, etc. on the side of the power box to be installed.
∗ Sollte sich die Klarsichtfolie schwer entfernen lassen, die Folie langsam mit Zellophanklebeband entfernen.
3. Mit einem Gummischaber Wasser sowie Luft zwischen der Folienantenne und der Scheibe für eine gute
Haftung entfernen.
∗ Den Schaber von der Mitte nach außen ziehen.
Bosses
Bossages
Naben
Sporgenze
∗ Wenn kein Gummischaber verfügbar ist, ein Kunststoffbrett oder hartes Brett, umwickelt mit einem Tuch, verwenden.
4. Wasser auf und in Nähe der Folienantenne entfernen,indem die Antenne leicht mit einem trockenen Tuch
angedrückt wird.
Figure 7 / Figure 7 /
Abbildung 7 / Figura 7
■ Bei Neuanbringung
Deutsch
Install the power box on the place where driving operation will not be disturbed.
● Attachment of the fixing sheet
1. Wipe out dust, dirt etc. on the side of the box on which the fixing sheet is to be attached.
2. Den Rest der Klarsichtfolie lamgsam entfernen, indem die Folienantenne mit der Hand festgehalten wird.
5. Die andere Folienantenne auf die gleiche Weise anbringen.
Hinweis:
• Unbedingt die Klarsichtfolie entfernen.
Français
Film antenna
Antenne-film
Folienantenne
Antenna a pellicola
Figure 6 / Figure 6 /
Abbildung 6 / Figura 6
2. Remove the backing paper of the fixing sheet and attach the box on the place where the power lead wire can be connected.
Then well press it onto the installation place to fix it. (The length of the power lead wire is about 50 cm) (Figure 10)
HOW TO CONNECT / MÉTHODE DE RACCORDEMENT /
ANSCHLUß / COME COLLEGARE
To the power source of a TV, etc.
Vers la source d’alimentation d’un
téléviseur, etc.
Zur Stromquelle eines Fernsehers, usw.
Alla fonte di alimentazione di un
televisore, ecc.
2. Retirez le papier de support de la feuille de fixation et mettez la feuille sur le boîtier d’alimentation. Ensuite,
appuyez bien dessus pour la fixer. (Figure 9)
When changing a fuse, make sure to replace the fuse
of the same capacity to avoid a failure. Check the
amperage before changing.
PRECAUTION
Lorsque vous remplacez un fusible, veillez bien à
utiliser un fusible de la même capacité pour éviter les
pannes. Vérifiez l’intensité en ampères avant de
remplacer le fusible.
Connect to the power source that can be
turned on/off with an ignition key (ACC line)
Raccordez à une source d’alimentation
qui puisse être activée/désactivée avec
la clé de contact (ligne ACC).
An die Stromquelle anschließen, die mittels
einem Zündschlüssel ein/ausgeschaltet
werden kann (ACC-Leitung)
Collegare alla fonte di alimentazione che
può essere attivata/disattivata con la
chiavetta di ignizione (linea ACC).
VORSICHT
Bei Austausch der Sicherung sollte zur Vermeidung
einer Störung eine Sicherung mit der gleichen
Leistung verwendet werden. Vor Austausch die
Stromstärke prüfen.
PRECAUZIONE
Fuse box
Boîte à fusibles
Sicherungskasten
Scatola fusibili
Installez le boîtier d’alimentation dans un endroit où il ne gênera pas la conduite.
● Fixation de la feuille de fixation
1. Enlevez la saleté, la poussière, etc. sur le côté du boîtier où vous allez coller la feuille de fixation.
CAUTION
Ground (black)
Masse (noir)
Erde (schwarz)
Massa (nero)
● Fixation du boîtier d’alimentation
1. Enlevez la saleté, la poussière, etc. sur le côté du boîtier d’alimentation qui va être fixé.
Fuse (3A) / Fusible (3A) /
Sicherung (3A) / Fusibile (3A)
2. Retirez le papier de support de la feuille de fixation et fixez le boîtier à l’endroit où vous allez raccorder le fil
d’alimentation. Ensuite, appuyez bien dessus à l’emplacement d’installation pour le fixer. (La longueur du fil
d’alimentation est d’environ 50 cm.) (Figure 10)
Die Folienantenne langsam von deren Ende her entfernen.
● Verifica del luogo di installazione e preparativi
Prima di installare, verificare dove installare le antenne a pellicola e i coperchi amplificatore.
1. Rimuovere accuratamente sporco e polvere dalla superficie di installazione con il detergente. (Incluso nella confezione)
2. Spruzzare acqua sulla superficie con un atomizzatore, ecc.
● Applicazione delle antenne a filo
1. Rimuovere metà del foglio trasparente dal lato argentato e applicare l’antenna al vetro. (Figura 4)
∗ Se è difficile staccare il foglio trasparente, procedere lentamente usando del nastro adesivo comune.
2. Rimuovere lentamente il resto del foglio trasparente trattenendo l’antenna in posizione con una mano.
3. Spingere fuori acqua e bolle d’aria rimaste tra l’antenna a pellicola e il vetro con un raschiatore di gomma per
far aderire saldamente.
∗ Spingere dal centro verso l’esterno.
∗ Se non si dispone di un raschiatore di gomma, usare una tavola di plastica o una tavola rigida coperta di panno.
4. Asciugare l’acqua in eccesso sopra e intorno all’antenna a pellicola premendo leggermente l’antenna con un
panno asciutto.
5. Applicare l’altra antenna a pellicola nello stesso modo.
Nota:
• Assicurarsi di rimuovere il foglio trasparente.
Die Strombox an einer Stelle einbauen,die das Fahren nicht behindert.
● Anbringung des Befestigungsblechs
1. Staub, Schmutz, usw. an der Seite der Box entfernen, an der das Befestigungsblech angebracht werden soll.
2. Das Trägerpapier des Befestigungsblech entfernen und das Blech bei der Strombox ansetzen. Dann für
Anbringung fest andrücken. (Abbildung 9)
● Befestigung der Strombox
1. Staub, Schmutz, usw. an der Seite der Strombox entfernen, die eingebaut werden soll.
2. Das Trägerpapier des Befestigungsblechs entfernen und die Box an der Stelle anbringen, wo der Leitungsdraht angeschlosen werden kann. Dann das Blech für Anbringung fest andrücken. (Die Länge des Leitungsdrahts beträgt ca. 50 cm .) (Abbildung 10)
Installare la scatola di alimentazione in una posizione dove non interferisca con le operazioni di guida.
● Applicazione del foglio di fissaggio
1. Eliminare polvere, sporco, ecc. dal lato della scatola cui sarà applicato il foglio di fissaggio.
2. Rimuovere la carta protettiva del foglio di fissaggio e applicare il foglio alla scatola di alimentazione. Poi
premere in basso per fissare. (Figura 9)
● Fissaggio della scatola di alimentazione
1. Eliminare polvere, sporco, ecc. dal lato della scatola di alimentazione da installare.
■ Per riapplicare:
2. Rimuovere la carta protettiva del foglio di fissaggio e applicare la scatola ad un punto dove il cavo di alimentazione può essere collegato. Poi premere contro il luogo di installazione per fissare. (La lunghezza del cavo di
alimentazione è di circa 50 cm.) (Figura 10)
Rimuovere lentamente l’antenna a pellicola da una estremità.
Quando si sostituisce un fusibile, assicurarsi di
sostituire con un fusibile della stessa capacità per
evitare guasti. Controllare l’amperaggio prima di
sostituire.
Connect to the metal part of the
vehicle (area such as part of the
chassis that is conducted to the
negative terminal of the battery).
Raccordez à une pièce métallique du
véhicule (par exemple une pièce du
châssis raccordée à la borne négative
de la batterie).
An einem Metallteil des Fahrzeugs
anschließen (z.B. an einem Teil des
Chassis, das leitend zum negativen
Batterieanschluß ist).
Collegare ad un punto metallico del
veicolo (punto come una parte del
telaio che è condotta al terminale
negativo della batteria).
Power box / Boîtier d’alimentation /
Strombox / Scatola di alimentazione
These connectors can be connected to either side of the terminals.
Ces connecteurs se raccordent sur n’importe quel côté des bornes.
Diese Anschlüsse können an einer der Seiten der Anschlüsse
angeschlossen werden
Questi connettori possono essere collegati ad un lato
qualsiasi dei terminali.
These plugs can be connected to any
terminals.
Ces connecteurs se raccordent à
n’importe quelle borne.
Dieser Stecker können an beliebigen
Anschlüssen angeschlossen werden.
Queste spine possono essere collegate
a qualsiasi terminale.
TV tuner / Tuner TV /
Fernseh-Tuner / Sintonizzatore TV
Inside the vehicle
Intérieur du véhicule
Im Fahrzeug
Interno del veicolo
Transparent sheets
Feuilles transparentes
Klarsichtfolien
Fogli trasparenti
Windshield side
Côté pare-brise
Frontscheibenseite
Lato vetro
Silver lined side
Côté à revêtement argenté
Silberkaschierte Seite
Lato argentato
Figure 4 / Figure 4 /
Abbildung 4 / Figura 4
Fixing sheet
Feuille de fixation
Befestigungsblech
Foglio di fissaggio
Figure 9 / Figure 9 /
Power box
Abbildung 9 / Figura 9
Boîtier d’alimentation
Strombox
Scatola di alimentazione
Backing paper
Papier de support
Trägerpapier
Carta protettiva
Figure 12 / Figure 12 /
Abbildung 12 / Figura 12
Antenna input
Entrée d'antenne
Antenneneingang
Ingresso antenna
Clarion Co., Ltd.
Figure 10 / Figure 10 /
Abbildung 10 / Figura 10
2003/3 (D.KY)
All Rights Reserved. Copyright © 2003: Clarion Co., Ltd.
Printed in Japan / Imprimé au Japon / Gedruckt in Japan / Stampato in Giappone