1
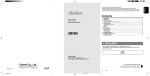
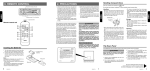
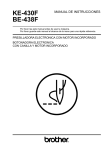
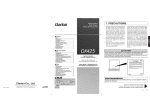
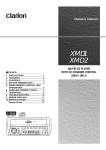
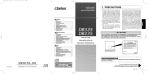
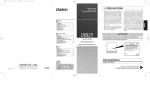
Owner’s manual
Mode d’emploi
Manual de instrucciones
■ Contents
English
■ Table des matières
Français
1. PRÉCAUTIONS.........................................................17
2. COMMANDES.............................................................3
3. NOMENCLATURE DES TOUCHES .........................18
4. CARACTÉRISTIQUES..............................................19
5. MANIPULATION DES DISQUES COMPACTS ........20
6. CLAVIER DE COMMANDE AMOVIBLE (DCP) .......21
7. TÉLÉCOMMANDE....................................................22
8. FONCTIONNEMENT.................................................24
9. DÉPISTAGE DES PANNES ......................................29
10.AFFICHAGE DES ERREURS...................................30
11.SPÉCIFICATIONS.....................................................31
1. When the inside of the car is very cold and
the player is used soon after switching on
the heater, moisture may form on the disc
or the optical parts of the player and proper
playback may not be possible. If moisture
forms on the disc, wipe it off with a soft
cloth. If moisture forms on the optical parts
of the player, do not use the player for about
one hour and the condensation will disappear naturally to allow normal operation.
2. Driving on extremely bumpy roads which
cause severe vibration may cause the
sound to skip.
3. This unit uses a precision mechanism.
Even in the event that trouble arises, never
open the case, disassemble the unit, or
lubricate the rotating parts.
DB415
AM/FM CD PLAYER
•
RADIO AM/FM-LECTEUR CD
•
RADIO AM/FM Y REPRODUCTOR CD
CAUTION
USE OF CONTROLS, ADJUSTMENTS, OR PERFORMANCE OF PROCEDURES OTHER THAN
THOSE SPECIFIED HEREIN, MAY RESULT IN HAZARDOUS RADIATION EXPOSURE.
THE COMPACT DISC PLAYER SHOULD NOT BE ADJUSTED OR REPAIRED BY ANYONE
EXCEPT PROPERLY QUALIFIED SERVICE PERSONNEL.
MODEL
DRX5675
12V
GROUND
AM 530-1710kHz/FM 87.9-107.9MHz
THIS DEVICE COMPLIES WITH PART 15 OF THE FCC RULES.
OPERATION IS SUBJECT TO THE FOLLOWING TWO CONDITIONS:
(1) THIS DEVICE MAY NOT CAUSE HARMFUL INTERFERENCE, AND
(2) THIS DEVICE MUST ACCEPT ANY INTERFERENCE RECEIVED,
INCLUDING INTERFERENCE THAT MAY CAUSE UNDESIRED
OPERATION.
■ Índice
Español
1. PRECAUCIONES......................................................33
2. CONTROLES ..............................................................3
3. NOMENCLATURA DE LOS BOTONES ...................34
4. CARACTERÍSTICAS ................................................35
5. MANEJO DE LOS DISCOS COMPACTOS ..............36
6. PANEL DE CONTROL DESMONTABLE (DCP) ......37
7. CONTROLADOR REMOTO......................................38
8. OPERACIÓN .............................................................40
9. SOLUCIÓN DE PROBLEMAS..................................45
10.INDICACIONES DE ERROR ....................................46
11.ESPECIFICACIONES ...............................................47
This equipment has been tested and found to
comply with the limits for a Class B digital
device, pursuant to Part 15 of the FCC Rules.
These limits are designed to provide reasonable protection against harmful interference in
a residential installation. This equipment generates, uses, and can radiate radio frequency
energy and, if not installed and used in accordance with the instructions, may cause harmful
interference to radio communications.
However, there is no guarantee that interference will not occur in a particular installation. If
this equipment does cause harmful interference to radio or television reception, which can
be determined by turning the equipment off
and on, the user is encouraged to consult the
dealer or an experienced radio/TV technician
for help.
THIS PRODUCTION COMPLIES WITH DHHS RULES 21 CFR
SUBCHAPTER J APPLICABLE AT DATE OF MANUFACTURE.
CLARION CO.,LTD.
50 KAMITODA,TODA-SHI,SAITAMA-KEN,JAPAN
051 722 877
Bottom View of Source Unit
MANUFACTURED:
SERIAL No.
PE-2310B
286- 324-00
Clarion Co.,Ltd.
MADE IN CHINA
INFORMATION FOR USERS:
CHANGES OR MODIFICATIONS TO THIS PRODUCT WILL VOID THE WARRANTY AND WILL
VIOLATE FCC APPROVAL.
Clarion Co., Ltd.
2001/1 (D• C)
All Rights Reserved. Copyright © 2001: Clarion Co., Ltd.
Printed in China / Imprimé en Chine / Impreso en China
PE-2389B
280-7597-00
Be sure to unfold and read the next page.
Veuillez déployer et vous référer à la page suivante.
Cerciórese de desplegar y de leer la página siguiente.
DB415
2
English
1. PRECAUTIONS...........................................................2
2. CONTROLS.................................................................3
3. BUTTON TERMINOLOGY ..........................................4
4. FEATURES..................................................................5
5. HANDLING COMPACT DISCS...................................6
6. DCP .............................................................................7
7. REMOTE CONTROLL ................................................8
8. OPERATION..............................................................10
9. TROUBLESHOOTING ..............................................14
10.ERROR DISPLAYS ...................................................15
11.SPECIFICATIONS.....................................................16
1. PRECAUTIONS
2. CONTROLS / LES COMMANDES / CONTROLES
3. BUTTON TERMINOLOGY
Note:
• Be sure to read this chapter referring to the front diagrams of chapter 2. CONTROLS on page 3 (unfold).
Main unit / Appareil principal / Unidad principal
12
1 Open Button
4
3
2 A-M (Audio Mode) Button
LD (Loudness) Button
3 POWER Button
FNC (Function) Button
English
English
4 ISR (Instant Station Recall) Button
5 DISP (Display) Button
6 RDM (Random) Button
$#
@
! 0
9
87 6
7 RPT (Repeat) Button
8 SCN (Scan) Button
Français
With the FLIP DOWN PANEL opened /
Ouvrez le PANNEAU RABATTABLE /
Apertura del PANEL ABATIBLE
%
5
PS/AS (Preset Scan/Auto Store) Button
9 Preset Buttons (1 to 6)
¥
Direct Buttons (1 to 6)
0 Z-EHCR (Z-enhancer) Button
! BND (Band) Button
TOP (Top Play) Button
@ SRCH (Search) Left and Right (
and
) Buttons
# Rotary Knob
Español
$ Play/Pause (
) Button
MUTE Button
Display / Afficheur / Visualizador
% Eject (
) Button
¥ CD insertion slot
Note: Be sure to unfold this page and refer to the front diagrams as you read each chapter.
Remarque: Veuillez déplier cette page et vous référer aux schémas quand vous lisez chaque chapitre.
Nota: Cuando lea los capítulos, despliegue esta página y consulte los diagramas.
3
DB415
280-7597-00
4
DB415
DB415
49
4. FEATURES
■ Rotary Encoder Volume Control
■ DIN Chassis with Detachable Control Panel
■ Z-Enhancer with 3 Mode Sound Selector
■
®
FM Reception System
■ AM/FM Bands-1 AM, 3 FM/18 FM/6 AM Touchbutton Memory
■ 8-Times Oversampling Digital Filter and Dual 1-Bit D/A Converters
■ Zero-Bit Detector Mute Circuit
■ Repeat/Random Play/Intro Music Scan
E glis
■ Multi-Color LC Display
■ 4-Channel RCA Line Level Output with Fader Control
■ 180 W (45 W × 4) Maximum Power Output
■ IR-Remote Control Capability
Flip Down Panel
This unit uses a flip-down structure that makes possible large-size displays.
CAUTION
When opening and closing the FLIP DOWN PANEL,
be careful not to catch your fingers. They could be
injured.
1. Always use this unit with the FLIP DOWN
PANEL closed.
2. Do not force operations or use this device
abnormally when opening or closing the
FLIP DOWN PANEL.
3. Do not use the FLIP DOWN PANEL as a tray
to place objects on when it is open.
4. When closing the FLIP DOWN PANEL, do
not press the Open button 1.
5. Strong impacts to the operating or display
section can cause damage or deformation.
6. If the flip down panel does not open fully,
gently open it with your hand.
DB415
5
5. HANDLING COMPACT DISCS
This unit has been designed specifically for playback of compact discs bearing the
mark.
No other discs can be played.
Note on Compact Discs
Never stick labels on the surface of the compact
disc or mark the surface with a pencil or pen.
To remove the compact disc from its storage
case, press down on the center of the case and
lift the disc out, holding it carefully by the edges.
Removing the disc
No
Proper way to hold
the compact disc
English
Always handle the compact disc by the edges.
Never touch the surface.
Do not use any solvents such as commercially
available cleaners, anti-static spray, or thinner to
clean compact discs.
No
To remove fingermarks and dust, use a soft
cloth, and wipe in a straight line from the center
of the compact disc to the circumference.
No
Do not use compact discs that have large
scratches, are misshapen, or cracked, etc. Use
of such discs will cause misoperation or damage.
No
New discs may have some roughness around
the edges. The unit may not work or the sound
may skip if such discs are used. Use a ball-point
pen, etc. to remove roughness from the edge of
the disc.
Ball-point pen
Roughness
Do not expose compact discs to direct sunlight
or any heat source.
No
Note:
• Do not use commercially available CD protection sheets or discs equipped with stabilizers, etc. These
may get caught in the internal mechanism and damage the disc.
6
DB415
6. DCP
The control panel can be detached to prevent theft. When detaching the control panel, store it in the
DCP (DETACHABLE CONTROL PANEL) case to prevent scratches.
We recommend taking the DCP with you when leaving the car.
Removing the DCP
Attaching the DCP
1. Hold down POWER button 3 for 1 second or
longer to switch off the power.
1. Insert the right side of the DCP into the main
unit.
2. Insert the left side of the DCP into the main
unit.
E glis
2.
DCP
2. Deeply push in Open button 1 to unlock the
FLIP DOWN PANEL.
1.
∗ If the FLIP DOWN PANEL does not open fully,
gently open it with your hand.
DCP Release button 1
3. Pull the DCP toward you and remove it.
DCP
CAUTION
• The DCP can easily be damaged by shocks. After
removing it, be careful not to drop it or subject it
to strong shocks.
• If the FLIP DOWN PANEL is kept open, the DCP
may drop due to vibration of the car.
This results in damage to the DCP. So close the
FLIP DOWN PANEL or remove the DCP to store
into the case.
• The connector connecting the unit and the DCP is
an extremely important part. Be careful not to
damage it by pressing on it with fingernails,
screwdrivers, etc.
Note:
• If the DCP is dirty, wipe off the dirt with a soft, dry
cloth only.
4. Close the HOLD FLAP.
HOLD FLAP
CAUTION
Be sure to close the HOLD FLAP for safety
when removing the DCP.
DB415
7
7. REMOTE CONTROL
If you buy the RCB-130, sold separately, you can enjoy the use of the remote control function.
Receiver for remote control unit
Operating range: 30° in all directions
English
Remote Control Unit
Signal transmitter
&
(
¡
)
*
£
™
¢
∞
¶
§
Inserting the Batteries
1. Turn the remote control unit over, then slide
the rear cover in the direction of the arrow.
2. Insert the AA (SUM-3, IECR-6/1.5V) batteries that came with the remote control unit facing in the directions shown in the figure, then
close the rear cover.
AA (SUM-3, IECR-6/1.5V)
Batteries
Notes:
Using batteries improperly can cause them to explode.
Take note of the following points:
• When replacing batteries, replace both batteries with
new ones.
• Do not short-circuit, disassemble or heat batteries.
• Do not dispose of batteries into fire or flames.
• Dispose of spent batteries properly.
8
DB415
Rear cover
Rear side
Functions of Remote Control Unit Buttons
Mode
Radio
Button
CD
& FUNC
Turns power on and off. When pressed and held for 1 second: Turns power off.
Switches between radio and CD.
* BAND
DISC UP
PROG
TOP
Switches reception band.
( VOLUME
Increases and decreases volume (in all modes).
) SEARCH
Moves preset channels up and down.
Moves tracks up and down.
When pressed and held for 1 second:
Fast-forward/
fast-backward.
¡ PLAY/PAUSE
Turns mute on and off.
Switches between playback and pause.
™ MUTE
Turns mute on and off.
Switches between playback and pause.
£ ISR
Recalls ISR radio station in memory.
Press and hold for more than 2 seconds: Stores current station into ISR memory
(radio mode only).
¢ DISP
Switches among main display, sub display and clock display.
∞ SCAN
PS/AS
Preset scan.
When pressed and held for 2 seconds:
Auto store.
Scan play.
§ RPT
BLS
No function.
Repeat play.
¶ RDM
MONI
No function.
Random play.
Plays the first track.
Top play.
E glis
* Some of the corresponding buttons on the source unit and remote control unit have different functions.
DB415
9
8. OPERATION
Note:
• Be sure to read this chapter referring to the front diagrams of chapter 2. CONTROLS on page 3 (unfold).
Basic Operations
CAUTION
When this unit is turned on, starting and stopping the engine of a car with its volume raised
to the maximum level may harm your hearing.
Be careful about adjusting the volume.
English
Turning ON the Power and Adjusting
the Volume
Adjusting the Treble
1) Press A-M button 2 and select “TREB”.
2) Turning the Rotary knob # clockwise emphasizes the treble; turning it counterclockwise
attenuates the treble.
* The
factory default setting is “0”. (Adjustment
range: –6 to +6)
3) When the adjustment is complete, press A-M
button 2 several times until the function
mode is reached.
1) Press the POWER button 3.
* To
turn off the power, press the POWER button
3 for 1 second or longer.
2) Press the FNC button 3 and select another
operation mode. Every time the FNC button
3 is pressed, the display changes the operation mode as:
Radio ➜ CD ➜ Radio
1) Press A-M button 2 and select “BAL”.
2) Turning the Rotary knob # clockwise emphasizes the sound from the right speaker; turning it counterclockwise emphasizes the sound
from the left speaker.
* The
factory default setting is “0”. (Adjustment
range: L9 to R9)
Notes:
• The operation mode not connected to the unit will not
•
Adjusting the Balance
be selected.
If the CD mode is selected when no disc is inserted,
the display shows “ NO DISC”.
3) Turning the Rotary knob # clockwise
increases the volume; turning it counterclockwise decreases the volume.
* The volume level is from 0 (minimum) to 33 (maximum).
Audio Mode Adjustments
3) When the adjustment is complete, press A-M
button 2 several times until the function
mode is reached.
Adjusting the Fader
1) Press A-M button 2 and select “FAD”.
2) Turning the Rotary knob # clockwise emphasizes the sound from the front speakers; turning it counterclockwise emphasizes the sound
from the rear speakers.
Press the A-M button 2 to select the adjustment
mode. The mode switches as follows each time
the A-M button is pressed:
BASS ➜ TREB ➜ BAL ➜ FAD ➜ Previous
mode
3) When the adjustment is complete, press A-M
button 2 several times until the function
mode is reached.
Adjusting the Bass
Setting the Z-enhancer
1) Press A-M button 2 and select “BASS”.
2) Turning the Rotary knob # clockwise emphasizes the bass; turning it counterclockwise
attenuates the bass.
This unit comes with three types of sound tone
effects stored in memory. Select the one you prefer.
* The
factory default setting is “0”. (Adjustment
range: –6 to +6)
3) When the adjustment is complete, press A-M
button 2 several times until the function
mode is reached.
10
DB415
* The
factory default setting is “0”. (Adjustment
range: F9 to R9)
* The factory default setting is “Z-EHCR OFF”.
Each time you press Z-EHCR button 0, the
tone effect changes in the following order.
“Z-ENHANCER 1” ➜ “Z-ENHANCER 2” ➜
“Z-ENHANCER 3” ➜ “Z-EHCR OFF” ➜
“Z-ENHANCER 1”...
• Z-ENHANCER 1: bass emphasized
• Z-ENHANCER 2: treble emphasized
• Z-ENHANCER 3: bass and treble emphasized
• Z-EHCR OFF: no sound effect
Loudness Effect
In order to turn on/off the loudness effect, use
the LD button 2 for 1 second or longer. Every
time the LD button 2 is pressed and held for 1
second or longer, the loudness effect switches
on and off.
* When the loudness effect is on, the display will show
Switching the Display
Every time the DISP button 5 is pressed, the
display will change between the main display
and the clock display.
Main display
FM Reception
®
For enhanced FM performance the
tuner includes signal actuated stereo control and
Multipath noise reduction circuits.
Listening to the Radio
1) Press the FNC button 3 to select the radio
mode, then the radio will be on.
2) To select a preset band, press the BND button !, then select one of the preset bands
such as FM1, FM2, FM3, or AM. Every time
the BND button ! is pressed, the display will
change as:
FM1 ➜ FM2 ➜ FM3 ➜ AM ➜ FM1
3) Press the SRCH Left/Right button @, then
the station at which there is a broadcast will
be selected (Seek selection).
Mute
Clock display
Use this function to turn off the sound immediately.
Press the MUTE button $. The sound turns off
and “MUTE” appears on the display. Press the
MUTE button again to cancel the mute mode.
Main display ...
Manual Tuning
Setting the Clock
1) Press the DISP button 5 to display the clock
display.
2) Press and hold the DISP button 5 for 1 second or longer.
3) Press the SRCH Left button @, then set the
current hour.
4) Press the SRCH Right button @, then set the
current minute.
5) Press the DISP button 5, then the clock is
set.
Notes:
• If
•
you select another operation mode while you are
setting the clock, the clock setting operation will be
canceled.
If you remove the vehicle’s battery for a check or
repair, the clock will be reset, so you must set it again.
1) Press the BND button !, then select FM1,
FM2, FM3 or AM.
2) Press and hold the BND button ! for 1 second or longer, then the display will show
“MANU”, which means that a manual selection function is on.
3) Press the SRCH Left/Right button @ and
select the right station.
Seek Tuning
1) Press the BND button !, then select FM1,
FM2, FM3 or AM.
2) If the “MANU” on the display is on, press and
hold the BND button ! for 1 second or
longer. When the “MANU” display is off, the
Seek Selection function is on.
3) Press the SRCH Left/Right button @, then
when it selects the station in which there is a
broadcast, it automatically stops.
DB415
11
E glis
“LD”.
Radio Mode Operations
Preset Memory Function
Preset Memory Function can store up to 24 stations: six stations for each of FM1, FM2, FM3
and AM.
Note:
• When
the present memory function is used, all the
content of the memory will be erased.
English
Manual memory function
1) Press the BND button !, and select the
band you want to store in the memory.
2) Press the SRCH Left/Right button @ then
select the station you want to store in the
memory.
3) Press and hold the Preset button 9 for 2
seconds or longer, then the station will be
stored in the memory.
Auto store function (Automatic Station Store)
1) Press the BND button !, then select the
band you want to store in the memory.
2) Press and hold the AS button 8 for 2 seconds or longer, then the station at which the
reception is the strongest will be automatically stored in the memory.
3) Press and hold the ISR button 4 for 2 seconds or longer.
Recalling ISR
Press the ISR button 4 then the display will
show “ISR”, then the radio station previously
memorized will be selected. Press the ISR button 4 again to disengage the unit from the
Recalling ISR function.
Area Change
Use this function when you are using the car
stereo anywhere outside the U.S.
Switchable frequency spacing
This car stereo is initially set to tune in frequency intervals of 10 kHz for AM and 200 kHz for
FM, the standard calibrations in the U.S. When
using the unit outside the U.S., use the following
procedure to switch the frequency range.
The table below lists the frequency specifications for the U.S. and other countries.
Initial Setting New Setting
(U.S. standard) (outside U.S.)
10 kHz
9 kHz
Frequency
range
530 to
1,710 kHz
531 to
1,629 kHz
Frequency
spacing
200 kHz
50 kHz
Frequency
range
87.9 to
107.9 MHz
87.5 to
108 MHz
AM
Note:
• When the number of stations stored is less than six,
the previous content of the memory for each direct
button will be retained.
Preset Scanning (Preset Station Scan)
When the PS button 8 is pressed, the preset
memory numbers flash and the stations are
tuned in for 7 seconds each in the order in which
they were stored. Press the PS button again to
cancel the preset scanning mode.
Instant Station Recall (ISR)
With this function, a specific radio station can be
recalled from any mode.
ISR memory
1) Press the FNC button 3, then select the
radio mode.
2) Select the radio station which you want to
store in the memory.
12
Frequency
spacing
DB415
FM
Switching the area change
Outside U.S. (New Setting)
While pressing the BND button !, press the
SRCH Left button @, then “outside U.S.” will be
selected.
Inside U.S. standard (Initial Setting)
While pressing the BND button !, press the
SRCH Right button @, then the “U.S. standard”
will be selected.
CD Mode Operations
Loading a Disc
1. Press Open button 1 to access the CD
insertion slot behind the FLIP DOWN.
2. Insert the disc into the CD insertion slot with
its label side up, then the CD will start playing.
For 5-inch (12 cm) CD
For 3-inch (8 cm) single CD
the center of the slot.
* When inserting a single CD (3”(8 cm)), do not connect an adapter.
Notes:
• Some
•
CDs recorded in CD-R mode may not be
usable.
Even when recorded in CD-R/W mode, some CDs
may not be usable.
3. Close the FLIP DOWN PANEL.
CAUTION
Be careful not to catch your hand or fingers
while closing the FLIP DOWN PANEL.
Note:
1. Press Open button 1 to open the FLIP
DOWN PANEL.
2. Press Eject button % to eject the CD. Take it
out from the ejected position.
3. Close the FLIP DOWN PANEL.
CAUTION
Be careful not to catch your hand or fingers
while closing the FLIP DOWN PANEL.
Notes:
• If the FLIP DOWN PANEL does not open fully, gently
open with your hand.
• After taking out the CD, be sure to close the FLIP
DOWN PANEL.
∗ If a CD (12 cm) is left in the ejected position for 15
seconds, the CD is automatically reloaded (Auto
reload).
∗ 8 cm CDs are not auto reloaded. Be sure to remove
it when ejected.
Note:
• If you force a CD into before auto reloading, this can
damage the CD.
Top Function
Press the TOP button !, then the CD will start
playing from the first song (track number 1).
Selecting Tracks (songs)
• If the FLIP DOWN PANE, does not open fully, gently
open with your hand.
• After loading a CD, always close the FLIP DOWN
PANEL.
Press the SRCH Left/Right button @.
: Playback will start from the next track.
: Playback will start from the beginning of
the track currently playing. When this
button is pressed again, the CD will play
from the previous track.
Listening to the Disc already Inserted
Fast-Forward and Fast-Backward
Press the FNC button 3 to select the CD mode,
the CD will start playing.
Press and hold the SRCH Left/Right button @.
: To fast-forward
: To fast-backward
Stopping (pausing) Playback
* Pressing the SRCH Left/Right button for 1 second or
Press the Play/Pause button $. “PAUS”
appears on the display.
Press the Play/Pause button $ again to resume
playback.
longer will move forward or backward 5 times faster
than normal play, and pressing it for 3 seconds or
longer will do the operation 30 times faster.
DB415
13
E glis
* When inserting a single CD (3”(8 cm)), insert it from
Ejecting the CD
Scan Play (Intro Music Scan)
Repeat Play
Press the SCN button 8, then the display
shows “SCN”, then the CD will play the first 10
seconds of each track of the whole disc. Press
the SCN button 8 again to disengage the unit
from scan play.
Press the RPT button 7, then the display shows
“RPT”, then the track currently playing will be
played repeatedly. Press the RPT button 7
again to disengage the unit from repeat play.
* A scan play will start from the track following the one
Random Play
currently playing.
Press the RDM button 6, then the display will
show “RDM”, then the entire tracks on the disc
will be played at random. Press the RDM button
6 again to disengage the unit from random play.
General
Problem
Cause
Measure
Power does not
turn on.
(No sound is
produced.)
Fuse is blown.
Replace with a fuse of the same amperage. If the
fuse blows again, consult your store of purchase.
Incorrect wiring.
Consult your store of purchase.
No sound output
when operating
the unit with
amplifiers or
power antenna
attached.
1. Turn the unit off.
Power antenna lead is
2. Remove all wires attached to the power antenna
shorted to ground or
lead. Check each wire for a possible short to
excessive current is required
ground using an ohm meter.
for remote-on the amplifiers
3. Turn the unit back on.
or power antenna.
4. Reconnect each amplifier remote wire to the
power antenna lead one by one. If the amplifiers
turn off before all wires are attached, use an
external relay to provide remote-on voltage
(excessive current required).
Nothing happens
when buttons are
pressed.
The microprocessor has
malfunctioned due to noise,
etc.
Turn off the power, then press the Open button 1
and remove the DCP.
Press the reset button for about 2 seconds with a
thin rod.
Display is not
accurate.
Reset button
DCP or main unit connectors Wipe the dirt off with a soft cloth moistened with
cleaning alcohol.
are dirty.
CD
English
9. TROUBLESHOOTING
Compact disc
cannot be
loaded.
Another compact disc is
already loaded.
Eject the compact disc before loading the new one.
Sound skips or is
noisy.
Compact disc is dirty.
Clean the compact disc with a soft cloth.
Compact disc is heavily
scratched or warped.
Replace with a compact disc with no scratches.
Water droplets may form on
the internal lens when the
car is parked in a humid
place.
Let dry for about 1 hour with the power on.
Sound is bad
directly after
power is turned
on.
14
DB415
10. ERROR DISPLAYS
If an error occurs, one of the following displays is displayed.
Take the measures described below to eliminate the problem.
CD
Error Display
Measure
CD ER2
A CD is caught inside the CD deck
and is not ejected.
This is a failure of CD deck’s
mechanism and consult your store
of purchase.
CD ER3
A CD cannot be played due to
scratches, etc.
Replace with a non-scratched,
non-warped disc.
CD ER6
A CD is loaded upside-down inside Eject the disc then reload it
the CD deck and does not play.
properly.
E glis
Cause
If an error display other than the ones described above appears, press the reset button. If the problem
persists, turn off the power and consult your store of purchase.
DB415
15
11. SPECIFICATIONS
FM Tuner
General
Frequency Range: 87.9 MHz to 107.9 MHz
Usable Sensitivity: 11 dBf
50 dB Quieting Sensitivity: 17 dBf
Alternate Channel Selectivity: 75 dB
Stereo Separation (1 kHz): 35 dB
Frequency Response (±3 dB): 30 Hz to 15 kHz
Power Supply Voltage: 14.4 V DC (10.8 V to 15.6
V allowable), negative ground
Current Consumption: Less than 15 A
Speaker Impedance: 4 Ω (4 Ω to 8 Ω allowable)
Weight: 3.97 lb. (1.8 kg)
Dimensions:
7” (178 mm) Width × 2” (50 mm) Height ×
6-1/8” (155 mm) Depth
AM Tuner
CD Player
7”
(178 mm)
2”
(50 mm)
7-3/8”
(188 mm)
2-1/4”
(58 mm)
6-1/8”
(155 mm)
English
Frequency Range: 530 kHz to 1,710 kHz
Usable Sensitivity: 25 µV
System: Compact disc audio system
Usable Discs: Compact disc
Frequency Response: 10 Hz to 20 kHz (±1 dB)
Signal-to-Noise Ratio: 100 dB (1 kHz) IHF-A
Dynamic Range: 95 dB (1 kHz)
Harmonic Distortion: 0.01%
Notes:
Audio
• Specifications comply with EIA Standards.
• Specifications and design are subject to change with-
Maximum Power Output:
180 W (45 W × 4 ch)
Continuous Average Power Output:
17 W × 4, into 4 Ω, 20 Hz to 20 kHz,1%THD
Bass Control Action (30 Hz): ±13 dB
Treble Control Action (10 kHz): ±10 dB
Line Output (with CD 1 kHz, 10 kΩ): 1.8 V
16
DB415
out notice for further improvement.