1
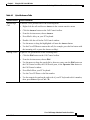
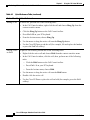
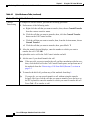
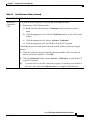
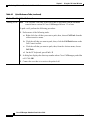
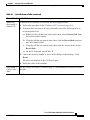
C H A P T E R
4
Using the Call Control Window
When you place or answer a call, the call state, the directory number of the
incoming call, the name of the person, if available, the operator directory number,
and the elapsed time display in the Call Details pane of the Call Control window.
This section describes the following topics:
•
Placing Calls from the Call Control Window, page 4-2
•
Performing Call-Control Tasks in the Call Control Window, page 4-2
Cisco CallManager Attendant Console User Guide
OL-3053-01
4-1
Chapter 4
Using the Call Control Window
Placing Calls from the Call Control Window
Placing Calls from the Call Control Window
To place a call from the Call Control window, perform the following procedure:
Procedure
Step 1
Click the Operator Line button in the upper, right corner that indicates the
directory number of the Cisco IP Phone that controls the Cisco CallManager
Attendant Console.
Step 2
In the dialog box, enter the number that you want to dial.
Step 3
Click OK or Cancel.
Tip
To place a call to a speed-dial or directory entry, drag the speed-dial or directory
entry onto the Operator Line button in the upper, right corner of the Call Control
window.
Performing Call-Control Tasks in the Call Control
Window
Table 4-1 describes the call-control tasks that affect calls in the Call Control
window. For additional information on performing call-control tasks in the Call
Control window, see the “Handling Calls” section on page 2-1.
Cisco CallManager Attendant Console User Guide
4-2
OL-3053-01
Chapter 4
Using the Call Control Window
Performing Call-Control Tasks in the Call Control Window
Table 4-1
Quick Reference Table
Desired Result
Action Performed
Answering a
Call
To answer a call, perform one of the following tasks:
Placing a Call
•
Right-click the call and choose Answer in the context-sensitive menu.
•
Click the Answer button on the Call Control toolbar.
•
From the Actions menu, choose Answer.
•
Press Ctrl + A key on your PC keyboard.
•
Double-click the call in the Call Control window.
•
Use the mouse to drag the highlighted call onto the Answer button.
•
Use the Cisco IP Phone to answer the call (for example, press the line button with
the incoming call, or press the Answer softkey).
To place a call, perform one of the following tasks:
•
Click the Dial button on the Call Control toolbar.
•
From the Actions menu, choose Dial.
•
Use the mouse to drag the speed-dial or directory entry onto the Dial button on
the Call Control toolbar, the Call Details pane, or the Operator Line button in
the Call Control window.
•
Press Ctrl + D on your PC keyboard.
•
Use the Cisco IP Phone to dial the number.
•
Use the numeric keypad on the right side of your PC keyboard to dial a number;
then, press Enter or press Ctrl + D.
Cisco CallManager Attendant Console User Guide
OL-3053-01
4-3
Chapter 4
Using the Call Control Window
Performing Call-Control Tasks in the Call Control Window
Table 4-1
Quick Reference Table (continued)
Desired Result
Action Performed
Ending a Call
To end a call, perform one of the following tasks:
Placing a Call
on Hold
•
In the Call Control window, right-click the call and choose Hang Up from the
context-sensitive menu.
•
Click the Hang Up button on the Call Control toolbar.
•
Press Ctrl + H on your PC keyboard.
•
From the Actions menu, choose Hang Up.
•
Use the mouse to drag the active call onto the Hang Up button.
•
Use the Cisco IP Phone to end the call (for example, lift and replace the handset
or press the EndCall softkey).
To place a call on hold, perform one of the following tasks:
•
Right-click the active call and choose Hold from the context-sensitive menu.
•
In the Call Control window, click the call; then, perform one of the following
tasks:
– Click the Hold button on the Call Control toolbar.
– Press Ctrl + L on your PC keyboard.
– From the Actions menu, choose Hold.
•
Use the mouse to drag the active call onto the Hold button.
•
Double-click the active call.
•
Use the Cisco IP Phone to place the call on hold (for example, press the Hold
softkey).
Cisco CallManager Attendant Console User Guide
4-4
OL-3053-01
Chapter 4
Using the Call Control Window
Performing Call-Control Tasks in the Call Control Window
Table 4-1
Quick Reference Table (continued)
Desired Result
Action Performed
Retrieving a
To retrieve a call from hold, perform one of the following tasks:
Call from Hold
• Right-click the call that is on hold; choose Resume from the context-sensitive
(Resume)
menu.
•
Click the call that is on hold and then perform one of the following tasks:
– Click the Resume button on the Call Control toolbar.
– Press Ctrl + L on your PC keyboard.
– From the Actions menu, choose Resume.
Transferring a
Call
•
Using the mouse, drag the call that is on hold onto the Resume button on the Call
Control toolbar.
•
Double-click the call that you placed on hold.
•
Use the Cisco IP Phone to retrieve the call from hold.
To complete a transfer, perform the following procedure:
1.
Perform one of the following tasks:
a. Right-click the call that you want to transfer; then, choose Transfer from the
context-sensitive menu.
b. Click the call that you want to transfer; then, click the Transfer button on
the Call Control toolbar.
c. Click the call that you want to transfer; then, from the Actions menu, choose
Transfer.
d. Click the call that you want to transfer; then, press Ctrl + X.
2.
After the transfer keypad opens, enter the number to which you want to transfer
the call. Click OK.
Tip
If you prefer, you can perform a transfer by dragging the call onto a speed-dial
or directory entry. You can also right-click the entry and choose Transfer
from the context-sensitive menu.
Tip
If you prefer, you can transfer a call without using the transfer keypad. After
you click the call that you want to transfer, press the keys on the PC keyboard
to enter the number to which you want to transfer the call. Press Ctrl + X to
transfer to call.
Cisco CallManager Attendant Console User Guide
OL-3053-01
4-5
Chapter 4
Using the Call Control Window
Performing Call-Control Tasks in the Call Control Window
Table 4-1
Quick Reference Table (continued)
Desired Result
Action Performed
Consult
Transferring
To complete a consult transfer, perform the following procedure:
1.
Perform one of the following tasks:
a. Right-click the call that you want to transfer; then, choose Consult Transfer
from the context-sensitive menu.
b. Click the call that you want to transfer; then, click the Consult Transfer
button on the Call Control toolbar.
c. Click the call that you want to transfer; then, from the Actions menu, choose
Consult Transfer.
d. Click the call that you want to transfer; then, press Ctrl + T.
2.
After the transfer keypad displays, enter the number to which you want to
transfer the call. Click OK.
You placed the active call in the Call Control window on hold.
3.
Note
4.
Tip
Ask the user if you should transfer the call.
If the user tells you not to transfer the call, end the consultation with the user;
then, click the held call in the Call Control Details pane, and perform one of
the methods from the “Retrieving a Call from Hold (Resume)” section on
page 2-5.
To transfer the held call, perform any of the methods from Step 1.
If you prefer, you can consult transfer a call without using the transfer
keypad. After you click the call that you want to transfer, press the keys on
the PC keyboard to enter the number to which you want to transfer the call.
Press Ctrl + T to transfer to call.
Cisco CallManager Attendant Console User Guide
4-6
OL-3053-01
Chapter 4
Using the Call Control Window
Performing Call-Control Tasks in the Call Control Window
Table 4-1
Quick Reference Table (continued)
Desired Result
Action Performed
Initiating a
Conference
Call
To initiate an ad hoc conference, perform the following procedure:
1.
Perform one of the following tasks:
a. Right-click the call and choose Conference from the context-sensitive
menu.
b. Click the appropriate call; click the Conference button on the Call Control
toolbar.
c. Click the appropriate call; choose Actions > Conference.
d. Click the appropriate call; press Ctrl + C on the PC keyboard.
Performing the previous tasks places the call on hold, and the conference keypad
displays.
2.
Using the conference keypad, enter the directory number of the user that you
want to add to the conference. Click OK.
3.
Click the Conference button, choose Actions > Conference, or press Ctrl + C
on the PC keyboard.
Tip
If you prefer not to use the conference keypad, you can drag a speed-dial or
directory entry onto the Conference button to complete the transaction.
Cisco CallManager Attendant Console User Guide
OL-3053-01
4-7
Chapter 4
Using the Call Control Window
Performing Call-Control Tasks in the Call Control Window
Table 4-1
Quick Reference Table (continued)
Desired Result
Action Performed
Parking a Call
Note
You can park a call only if the server that is associated with the attendant
console runs a version of Cisco CallManager Release 3.3 or later.
To park a call, perform the following procedure:
1.
Perform one of the following tasks:
a. Right-click the call that you want to park; then, choose Call Park from the
context-sensitive menu.
b. Click the call that you want to park; then, click the Call Park button on the
Call Control toolbar.
c. Click the call that you want to park; then, from the Actions menu, choose
Call Park.
d. On the PC keyboard, press Ctrl + P.
2.
A dialog box displays the directory number where Cisco CallManager parked the
call. Click OK.
3.
Contact the user that is to retrieve the parked call.
Cisco CallManager Attendant Console User Guide
4-8
OL-3053-01
Chapter 4
Using the Call Control Window
Performing Call-Control Tasks in the Call Control Window
Table 4-1
Quick Reference Table (continued)
Desired Result
Action Performed
Retrieving
(Reverting) a
Parked Call
To retrieve/revert a parked call, perform the following procedure:
1.
Perform the procedure in the “Parking a Call” section on page 2-10.
2.
If the user does not answer the call, perform the one of the following tasks to
revert the parked call:
a. Right-click the call that you want to park; then, choose Revert Park from
the context-sensitive menu.
b. Click the call that you want to park; then, click the Revert Park button on
the Call Control toolbar.
c. Click the call that you want to park; then, from the Actions menu, choose
Revert Park.
d. On the PC keyboard, press Ctrl + P.
3.
Choose the directory number to revert in the dialog box that displays. Click
Revert.
The active call displays in the Call Details pane.
4.
Forwarding a
Call to Voice
Mail
Notify the caller of the situation.
See the “Using Dial Digits” section on page 3-8 for information on how to perform
this task.
Cisco CallManager Attendant Console User Guide
OL-3053-01
4-9
Chapter 4
Using the Call Control Window
Performing Call-Control Tasks in the Call Control Window
Cisco CallManager Attendant Console User Guide
4-10
OL-3053-01