1
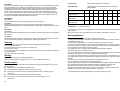
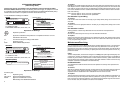
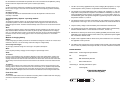
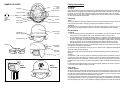
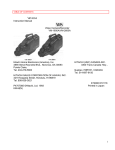
Martindale Centurion Safety Products Ltd 21 Howlett Way, Thetford, Norfolk, IP24 lHZ, UK Tel: +44(0)1842 754266 Fax: +44(0)1842 765590 USER INFORMATION AND INSTRUCTIONS FOR USE & MAINTENANCE EC type examination by: BSI Product Services, Maylands Avenue, Hemel Hempstead, Herts. HP2 4SQ, UK. 0086 (Notified body No. 0086) All Centurion products are approved. 002-001-111 (01/07) We have made every effort to ensure that the information given in this catalogue is accurate, but our policy of continuous product development means specifications are likely to change and such information is for guidance only. Martindale will not accept liability for any loss, damage or consequential loss arising from information contained herein. Your statutory rights will not be affected. Before using your Max helmet it is essential that you study the following instructions. Special attention must always be given to the warnings, capabilities and maintenance requirements stated herein, and to any labelling specific to your model. Martindale will accept no liability for damage occurring: 5 in connection with unprofessional use and/or maintenance of the product, including use for the purposes other than those for which it is intended 5 due to failure to observe the instructions given in this manual 5 in connection with repairs to the safety product that were not carried out by or on behalf of our company Technical Specification Flow rate testing of your Max helmet Products fitted with grey strongrings are Intrinsically safe (please see instructions specific to hazardous installations). Products fitted with black strongrings are only intended for use in working areas where there is no possibility of explosive concentration of gasses or vapours building up. Prior to each use of your helmet, please check the manufacturers minimum design flow rate using the Max test flow indicator which is provided with your Max helmet. The indicator can also be purchased separately (part number E305). Full instructions are provided within the test device package. Miner P1 1100g Integra P2 1250g Integra Intrinsically Safe P2 1400g Battery Mounting external waist mounted within helmet within helmet Battery Type Lead acid Certified to: EN50033 NiMH NiMH Battery Duration (hours) 12 10 8 It is important that the correct flow rate is achieved when using your Max respiratory unit. Intrinsically Safe Yes ATEX Certified to: EN50033 EN50014 EN50303 EN50020 EEx ia I M1 No Yes ATEX Certified to: EN50014 EN50284 EN50020 EEx ia IIBT3 1G Non-Mining EEx ia I M1 Mining Note: Ensure the helmet is free from visible damage e.g. holes and cracks, etc. Use only Martindale replacement parts. Mining Environments Dust Environments requiring an integrated unit Helmet weight (approximate) Usage areas Dust Environments requiring an integrated unit + for use in potentially explosive atmospheres If the flow rate is not sufficient ensure that you: ● Check the filter by replacing it with a fresh one ● Check the battery is fully charged ● If the flow rate is still insufficient, return your helmet to your nearest agent or to the manufacturer Martindale Certified Accessories and Replacement Parts List Part No. Description Part No. Description E200 Filter standard P2 particulate (Suitable for Miner P1, Integra P2 & Integra IS P2) E201 Filter odour P2 particulate and nuisance odours (Suitability as per E200) E210 P1 Visor anti-scratch E225 Headband cradle & pad kit E210L P1 Long Visor anti-scratch E230 Hygiene kit for Ear Defenders E211 P1 Visor anti-mist E235 Pair of Ear Defenders E211L P1 Long Visor anti-mist E240 Chinstrap - nylon Size All helmets fit head sizes from 51 - 62 cm Respiratory Protection (EN146) THP1 THP2 THP2 Nominal Protection Factor 10 20 20 Part No’s E100 E145 E140IS E212 P2 Visor anti-scratch E241 Chinstrap - leather Product Options Variations of the basic model are also available. Helmets are available with ear defenders but also with ear defenders and Centurion Connect Clips fitted to the side of the shell to enable the user to fit Centurion carriers, face screens and welding shields for various applications. E213 P2 Visor anti-mist E245 Plug cover E220 P1 Head Seal Kit E246 Reflective kit E221 P2 Head and Face Seal Kit E300 Miner Helmet Airflow Test Kit With Ear Defenders E305 Integra Helmet Airflow Indicator Integra P2 P2 Intrinsically Safe Face Protection Head Protection 2 E140 E140ISE With Ear Defenders and Connect Clips E140C E140ISEC Withstand impact - Class B EN166 Polycarbonate screens will withstand temperatures of up to +190°C E310 Oldham cap lamp & battery (certified to EN50033) - UK Mining only E345 Charger for all Integra models (10 hour Battery) E350 Oldham charger E360 Fuse pack (10 of) E370 Fuse resistor link for cap lamp used on Miner helmet EN397 11 Face Seal Ear Protection Meets acoustic performance of EN352-3 If the visor face seal becomes torn or damaged in any way you must immediately replace the face seal assembly. To fit, follow the instructions given for the P1 visor. For P2 face seal replacement, remove the black stud on either side by griping the face seal behind the stud and pulling away to de-snap. Carefully peel away the face seal from the visor to detach Velcro. Fit your new face seal by placing evenly onto visor Velcro and pressing down to ensure a seal is obtained on the visor. Attach each side of the face seal to the ear defender surround by inserting the black stud through the face seal hole and snapping the stud into the hole provided (either side) below the top white stud. Attenuation data Mean attenuation and standard deviation as measured in BS EN 24869-1: Sweatband To remove Lift the sweatband off the retaining pips by stretching until it becomes free. To replace Gently stretch the sweatband over the retaining pips, locating the pips through holes in the sweatband and taking care not to damage the material. Ensure that the new sweatband is securely in place. Chinstrap To remove With the ear defenders retracted gently pull one end of the chinstrap until it becomes free. Repeat for the other end. To replace With the ear defenders retracted, holding bracket on end of chinstrap push retainer pip through hole underneath face seal on strongring, snap into place. Repeat for the other end. Cleaning The helmet and all it’s parts should only be cleaned with warm water and a soft cloth. Do not use organic solvents. Do not attempt to clean the filter, replace on a weekly basis. Do not immerse in water. Do not apply paints, solvents, adhesives or self adhesive labels to the helmet except those approved by the manufacturer. Only clean the product in safe areas. Storage Store in a clean dry place at an ambient temperature. Maximum limits of storage (including filters) –5°C to +55°C. Relative humidity <90%. Fault Location In the event of a reduction of airflow, leave the polluted environment immediately and carry out the following checks: ● The filter is clean, undamaged and fitted correctly ● The face seals are undamaged, fitted and are sealing correctly ● The battery is connected and is fully charged (substitution with a new battery may be necessary) ● Any helmet which exhibits visible damage should be replaced ● If the motors are not running send helmet back to your nearest agent or to the manufacturer 10 FREQUENCY 63 125 250 500 1K 2K 4K 8K MEAN ATTENUATION 9.9 9.9 13.9 18.1 24.0 25.2 39.7 27.4 STANDARD DEVIATION 3.6 3.7 2.9 4.8 2.8 3.7 3.6 6.9 ASSUMED PROTECTION 6.4 6.2 11.1 13.3 21.2 21.4 36.1 20.5 H = 26dB Complete Unit M = 19dB L =14dB SNR = 22dB Conforms to PAS 016 Flow rates of 160-180 litres a minute (depends on battery and filter status) minimum designed flow rate of 130l/min. Motors are extremely quiet - generating a maximum of 65dB. Guaranteed for two years. Warning/Attention Examination and function test of the helmet should be made weekly. A thorough visual examination of all parts of the helmet should be made. Any defects should be remedied before further use. Any helmet with visible damage e.g. a cracked or pierced shell should be replaced. This helmet is made to absorb the energy of a blow by partial destruction or damage to the shell and the harness or protective padding, and even though such damage may not be readily apparent, any helmet subjected to severe impact should be replaced. Any helmet which is two years beyond its manufacturing date should be replaced. This helmet should not be modified in any way. In the power off state this helmet will offer no respiratory protection and there may be an immediate build up of carbon dioxide - this is to be considered an abnormal situation. At very high work rates the pressure in the device may become negative at peak inhalation flow. At very high wind velocities it is possible that the respiratory protection may not be at its optimum potential. This device is only to be used in atmospheres with normal oxygen content. Only use intrinsically safe products in explosive atmospheres. The Max helmets must not be used in areas with concentrations of gases and vapours above the OEL (Occupational Exposure Limit) as defined in National Standards or areas with dust concentrations requiring a protection factor of more than that detailed on page 1. Manufacturer’s minimum design duration is 8 hours. Typical battery duration exceeds this and depends on model used. See technical specification on pages 2-3. It is possible that visors may transmit impacts to eye-wear enclosed by the visor. 3 STRONGRING MARKINGS (Intrinsically Safe) Instructions specific to hazardous area installations (reference European ATEX Directive 94/9/EC Annex II 1.0.6). The following instructions apply to equipment covered by certificate numbers SIRA 02ATEX2019X (INTEGRA) and SIRA 02ATEX2020X (EH1). These instructions relate to compliance with the above Directive only. 1. The certification marking is as follows MINER Ear Defender Cup and Ring Helmet Label CENTURION TYPE MINER SIRA 02ATEX2020X EEX ia yy yy 0086 0518 Manufactured in the EEC by M yy yy PAS 016 -20/+50 deg.C RL 51-62cm 3 / 2003 Respiratory Protection Type THP1 PAS016:1995 CENTURION SAFETY PRODUCTS LTD 21 HOWLETT WAY THETFORD, NORFOLK, IP24 1HZ, U.K. POSSIBLE ELECTROSTATIC HAZARD DO NOT CLEAN IN HAZARDOUS ATMOSPHERE A Division of Centurion Safety Products Ltd. Symbol to indicate that the product is in compliance with one or more standards in this series To replace Remove the protective backing paper from the replacement cushion and carefully locate onto the ear defender cup, making sure that the thickest corner of the cushion will sit behind your ear lobe when in use, then press firmly into place. For intrinsic safety according to EN 50020 Explosion group 0518 SIRA Notified Body Number INTEGRA Maintenance/Servicing Helmet Label M CENTURION TYPE E140IS* EEx ia B T3 INTEGRA SIRA 02ATEX2019X EEX ia yy yy 0086 0518 yy yy PAS 016 CENTURION SAFETY PRODUCTS LTD 21 HOWLETT WAY THETFORD, NORFOLK, IP24 1HZ, U.K. Manufactured in the EEC by -20/+50 deg.C RL 51-62cm 3 / 2003 Respiratory Protection Type THP2 PAS016:1995 POSSIBLE ELECTROSTATIC HAZARD DO NOT CHARGE OR CLEAN IN HAZARDOUS AREA A DIVISION OF CENTURION SAFETY PRODUCTS LTD HOWLETT WAY, THETFORD, NORFOLK, UK, IP24 1HZ CENTURION SAFETY PRODUCTS INTEGRA (MSHA) Mine Safety and Health Administration CENTURION TYPE E140ISEWUSA INTEGRA APPROVAL No 2G-4106-0 E130ISEWUSA MODEL E130ISEWUSA PERMISSIBLE MAX MINER POWERED RESPIRATOR M INERS HELMET United States Department of Labor -3(! APPROVAL No. 2G-4106-0 Mine Safety and Health Administration TESTED FOR INTRINSIC SAFETY IN METHANE AIR MIXTURES ONLY WARNINGS: Charge battery pack assembly in fresh air only Explanation of Markings As above plus: IIB Explosion group 2G-4106-0 MSHA Approved Certificate Number Approval & Certification Center Mine Safety and Health Administration 4 Ear Defender Cushion To remove Peel the old cushion away from the cup of the ear defender and discard. I -3(! To replace Locate the wires in the appropriate holes on the body of your safety helmet, taking care to fit the front wires first. Explosion protection Ia United States Department of Labor To remove Free the wires from their location on the body of your safety helmet, taking care to remove the front wires last. Hearing protector cushions may deteriorate with use and will then need replacement. Explanation of Markings EEx To replace Reposition two cradle brackets through the two slots within the forehead section of the face seal. Replace the two cradle brackets into the strongring slots at the front of the shell. Relocate both sides of the face seal onto the ear defender surrounding with the white studs. Locate the front of the headband onto the cradle brackets. Make sure that an efficient seal is formed with both visor and ring. Note: The face seals on the P1 visor are not replaceable. Note: The face seals on the P2 visor are replaceable. Only purchase/use Centurion Martindale Protection certified replacement parts - see replacement parts list at back of manual. It is likely that certain items may deteriorate in use and may need replacement in the course of a twelve month period (or except where stated). The helmet has been designed so that tools are not necessary to replace parts. Do not use sharp tools to remove any parts of the helmet. Filter The filter is disposable, and should be changed on a weekly basis (after approximately fifty hours of constant use). The filter is intended for use in environments containing nuisance or respirable dust hazards only and is limited to solid aerosols or water based aerosols only. (Water based aerosols are those produced from solutions and/or suspicious particulate materials in water such that the only workplace contaminant is attributed to this solid material). Headband/Cradle The headband and cradle should be removed and replaced in its entirety when replacement is necessary. To remove With the ear defender assembly retracted, carefully slide the six white plastic retainers from their slots in the body of the helmet (see drawing on page 6). The two front retainers need to be separated from the headband and then released from the front of the face seal. To replace Take the replacement assembly, ensuring that the ‘open’ side of the headband is towards the rear of the helmet, and push the white plastic retainers (marked R1, R2) firmly into the empty slots. The back of the two front retainers (marked F1, F2) need to be first inserted through the two holes in the front of the face seal, then attached to the slots on the headband. 9 be cut/modified to accommodate the spectacle arms. This can best be accomplished by cutting the face seal at the required level with a pair of scissors (see below). To fit Cut away the surplus material until a suitable fit is achieved with scissors. Carefully remove only a little at a time, as a gap of more than 2mm will seriously reduce the respiratory protection offered by the helmet. P2 Integra System P2 Systems are fitted with an elasticated fabric face seal. No adjustment of this face seal is necessary or desirable. Visor/Respiratory System - operating method Integra To operate the respiratory system, grip the tag at the bottom of the face seal and pull down in a one-handed operation. The visor in the down position will then trigger the motor and start the air flowing through the helmet. The airflow will automatically cease if the visor is not secured in the down position. Miner To operate the respiratory system, attach the Oldhams cap lamp and battery to the helmet. The cap lamp should be fitted to the helmet in the same way as the cap lamp is positioned on the charging rack, i.e. a push twist and turn motion. The air flow will commence as soon as the lamp is attached to the helmet. To lower the visor, simply grip the visor in the centre and pull down in a one handed operation. Method of charging battery Integra Locate charger plug into battery socket at rear of helmet and charge for a minimum of 12 hours and a maximum of 16 hours - do not overcharge. Use E345 charger for Integra battery. 1. The EH1 is for mining applications only and is Category M1 equipment, i.e. may be used irrespective of the presence of explosible concentrations of firedamp. 2. The integra is for mining applications and is category M1 equipment, i.e. may be used irrespective of the presence of explosive concentrations of firedamp. It is also for nonmining applications and is category 1G equipment, i.e. may be used in zones 0, 1 and 2 with flammable gases and vapours assigned to apparatus groups IIA & IIB and with temperature classes T1, T2 & T3. 3. The electrical circuits of the EH1 and Integra are only certified for use in ambient temperatures in the range -20°C to +40°C and should not be used outside this range. 4. Only the battery charger recommended by the manufacturer shall be used. 5. The equipment has not been assessed as a safety-related device (as defined by Directive 94/9/EC Article 1.2 and referred to in Annex )) , clause 1.5). 6. Maintenance shall only be carried out by suitably-qualified personnel and, where applicable to due electrical aspects of the helmet, only replacement parts supplied by the manufacturer shall be used. 7. Repair of this equipment shall be carried out by the manufacturer or in accordance with the applicable code of practice. Intrinsically Safe Integra As per Integra, use E345 charger. Do not charge in an explosive atmosphere. 8. The battery pack charger must not be supplied (under normal or abnormal conditions), from a source of potential, with respect to earth, in excess of 250Vrms or 250Vdc. Miner Locate cap lamp in battery charging rack and charge for required length of time. OTHER MARKING Visor PAS016:1995 Product Approval Specification CE CE Approval 0086 BSI Notified Body Number yy Date of Manufacture To remove For the P1 Visor adjust the visor until mid-way between the open and closed position. Pull the visor off each orange pin located underneath the ear defenders, away from the pivot arm (de-snap) and carefully remove the visor from the shell of the helmet. For the P2 Visor remove the visor in the same way but firstly remove the black stud from each side of the ear defender surround to release the face seal. To replace For the P1 Visor snap the visor onto the pivot arms by pushing it over the orange pins when at the mid-way position. Check to ensure that the new visor moves freely. If not, repeat the steps described above. For the P2 visor replace the visor in the same way but then secure the material of the face seal to the side face seal flaps found on the side of the ear defender surround using the black studs. -20/+50 deg.C Claimed performance option RL Lateral rigidity STRONGRING MARKINGS (Non Intrinsically Safe) Foam face seals To remove Pull out white studs located on the ear defender surrounding. Remove cradle bracket from strongring and remove complete face seal from cradle and disregard. 8 0086 00 02 01 03 PAS 016 5 NAMES OF PARTS Sweatband Fitting Instructions Foam Face Seals (P1 version) Cradle Assembly Ear Defender Ring Ear Defender Cushion Helmet Adjustment Pad Headband Filter Housing Filter To adjust Adjust the headband by pressing the edge of the headband buckle and opening the headband to its fullest position. Then slightly pull the strap through the buckle and place the helmet on your head to test the fit. Continue with this by pulling the strap through the buckle further each time until the helmet fits firmly on your head. To achieve adequate protection this helmet must fit or be adjusted to the size of the individual wearers head. Chinstrap Chinstrap Buckle Headband To fit With the ear defenders retracted, holding the bracket on end of chinstrap push retainer pip through hole underneath face seal on strongring, snap into place. Repeat for the other end. To adjust Place the helmet on your head and connect the male and female connectors under your chin. Pull the loose end of the strap through the fastener until a firm, comfortable fit has been achieved. Adjustable Ear Defender Support Motor Housing Assembly Ear Defender Cup Chinstrap Lamp Bracket (for Miner) Lamp (for Miner) Visor MAX MINER 6 MAX INTEGRA Ear Defenders To adjust 1. The ear defenders have been supplied in the inward position, push out to the external position. Fit the helmet on your head and push the ear defenders inward to cover your ears. 2. The ear defender has three width adjustment positions - provided by the ear defender support at the back of the helmet - the position on receipt will be the outside slot. If the ear defenders are too loose, simply adjust the ear defender supports to the middle or inside position, whichever gives you the best fit. To achieve adequate protection this helmet must have the hearing defender adjusted to achieve the same spacing all around between the ear and the seal. Should further adjustment be required, the ear defender cushion can be re-positioned on the ear defender ring in any direction (see below). If you find that the ear defender is too low on your ear, raise the level by fitting the helmet adjustment pad to the cradle (see main drawing). When correctly adjusted, the ear defenders will fit small/medium/large size range as defined in EN352-3. To seal It is important in order to achieve proper ear defender protection that the ear defender cushion sits securely around your ears. When you receive your helmet, the cushion will be located centrally around the hollow in the ear defender. You may need to move the cushion around the cup to affect the best seal around your ear. If so, peel off and reposition until a comfortable and effective seal is made. Ear defenders are supplied in pairs; each cushion is designed specifically for the left or right ear lobe - ensure the correct cushion is used on each side. Face seals P1 Miner System To ensure respiratory effectiveness it is important to form a seal between the visor and your face with the face and visor seals. The seal has been manufactured to accommodate the dimensions of an average face. It is important that the seal fits as closely as possible to your face. Ideally it should be just touching the skin and should be checked prior to each use. This device has been designed for use by wearer’s with or without spectacles. If spectacles are worn beneath the visor, in some circumstances impacts may be transmitted through the eye wear enclosed by the visor. For the ultimate in respiratory protection, the side face seals should 7