1
30
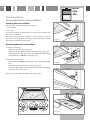
Replacing the Halogen Oven Lights
WARNING: Ensure the appliance is switched off before replacing the lamp to avoid the
possibility of electric shock.
– Let the oven cavity and the heating elements to cool down;
– Switch off the electrical supply;
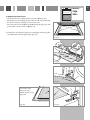
Top Right Lamp (Top & Lower Ovens):
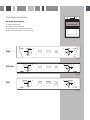
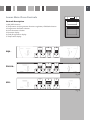
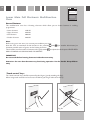
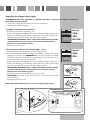
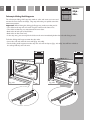
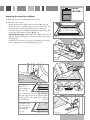
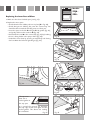
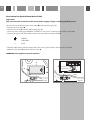
– Remove the protective cover C (fig. 11);
– Replace the halogen lamp B with a new one suitable for high temperatures
having the following specifications: 230V and same power (check watt
power as stamped in the lamp itself) of the replaced lamp.
IMPORTANT WARNING: Never replace the bulb with bare hands;
contamination from your fingers can cause premature failure.
Always use a clean cloth or gloves.
– Refit the protective cover;
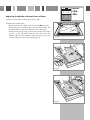
Left Lamp (Lower Oven only of models 9Q6.. - 9Z6..):
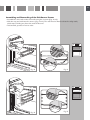
– Remove the left wire rack by unscrewing the fixing screws.
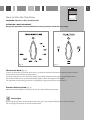
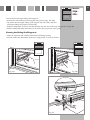
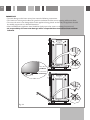
– Press down from the top the protective cover A (fig. 11) and remove it by
rotating on the lower side. IMPORTANT: never use screwdrivers or other
utensils to remove the cover A. This could damage the enamel of the oven
or the lampholder. Operate only by hands.
– Replace the halogen lamp B with a new one suitable for high temperatures
having the following specifications: 230V and same power (check watt
power as stamped in the lamp itself) of the replaced lamp.
IMPORTANT WARNING: Never replace the bulb with bare hands;
contamination from your fingers can cause premature failure.
Always use a clean cloth or gloves.
– Refit the protective cover A operating in reverse order.
ATTENTION: the notch in the inner edge of the cover must be oriented
toward the lamp.
– Assemble the left wire rack.
Models:
9Q6..
9Z6..
DV 990..
Models:
9Q6..
9Z6..
WRONG
Note: Oven bulb replacement is not covered by your guarantee.
CORRECT
1
A
Fig. 11
2
A
B
A
B
C